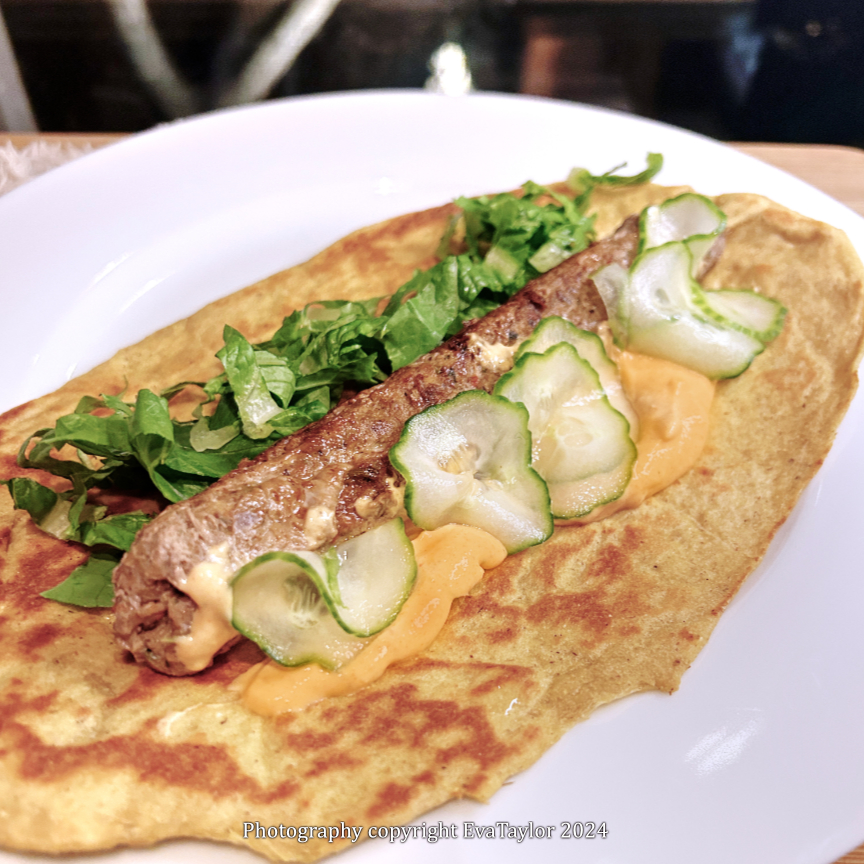
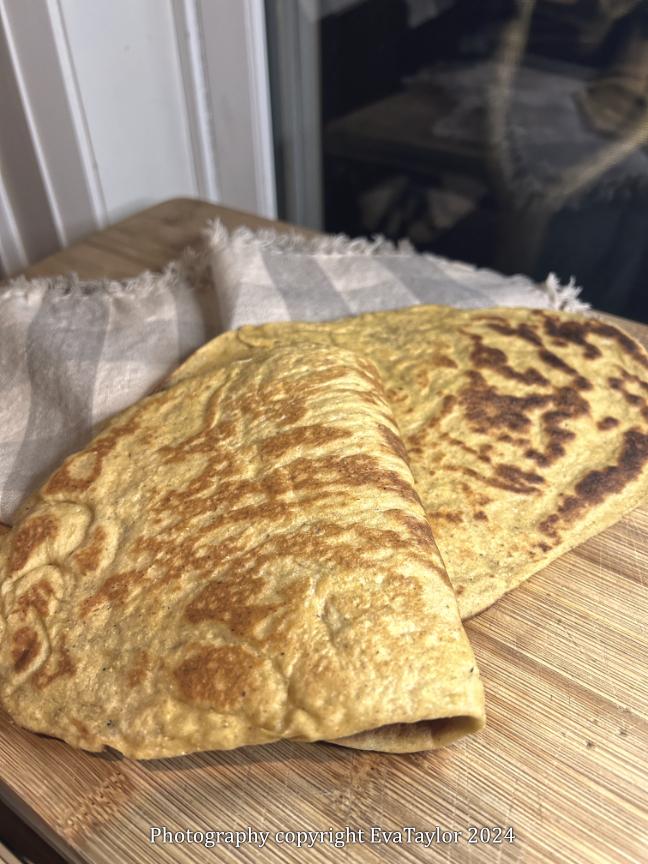
Stop right now! You have to make this if you are doing a low-carb diet. This is literally the best low-carb flatbread I have ever created. They’re fabulously chewy and springy. They fold perfectly to cradle the kebab and resist cracking or breaking apart.
This flatbread has been a long and difficult journey. JT has had to endure some pretty bad flat bread samples. True, it’s pretty easy to make a flatbread that is thin and holds your kebab, but the difficulty lies in the chewy and springy texture that the original flatbread has. It’s mandatory for flatbread. This recipe has it all.
Low-Carb Flatbread
A Kitcheninspirations original recipe
Makes 8 flatbreads
Ingredients:
320 g water, about 60° F
2 g sugar
8 g instant yeast
80 g Lupin Flour
170 g Vital Wheat Gluten
38 g Oat Fibre
30 g psyllium husk, ground
48 g Erythritol
8 g Sea Salt
20 g baking powder
Directions:
Combine the water, and yeast and set aside to allow the yeast to bloom.
In the large bowl of your stand mixer, combine the erythritol with vital wheat gluten, oat fibre, lupin flour, psyllium husk, and salt, and stir to mix well.
Once the yeast has become foamy, add it to the flour mixture and knead with the cookie dough paddle until the dough has come together. Allow to rest for 5 minutes. Sprinkle the salt and baking powder onto the dough and continue to knead for 15 minutes. Form the dough into a ball with your hands and cover to rest for 30 minutes.
Once rested, divide the dough into 8 equal portions, roll out each piece into an oval, rub with EVOO and allow to rest for 10 minutes covered with a clean kitchen towel.
Preheat a cast iron pan on medium heat. Cook each flatbread until golden, flip and continue until all have been cooked. Freeze in an airtight container/bag. Defrost in the refrigerator and reheat, slightly dampened with water on each side.
The kebabs fit into this flatbread perfectly.
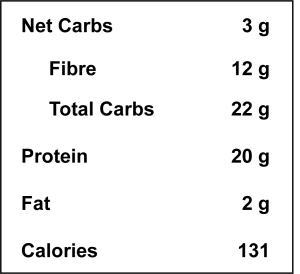
Low-Carb Flat Bread Nutrition for 1 flatbread
Notes:
The sugar gets completely eaten by the yeast, although I have included it in the nutitional ingredients.
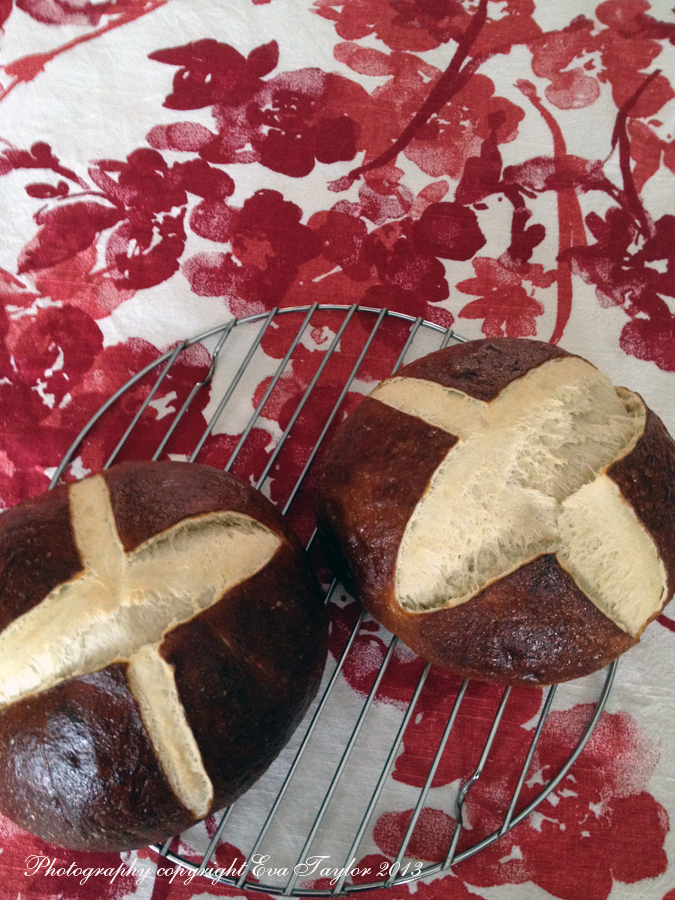
I’ve noticed lately that most of our grocery stores are now carrying a variety of extraordinary breads, from focaccia made from an authentic Italian recipe that uses an enormous volume of olive oil to various egg, grain and nut breads; recently I’ve also noticed something I hadn’t seen before, a very beautiful Pretzel Bread! Now pretzel bread has a chewy texture and a salty finish on its chewy crust. It’s a lovely dense bread (if you love egg bread than you will love pretzel bread) that works well as hamburger buns and sandwiches! We’re going to use it for a cheese fondu! I’ve also seen this type of boule used as a soup bowl…perhaps another time!
I scanned the internet for a recipe and came across one from Fleischmann’s yeast that I rather liked, so I made it the first time verbatim and then the second time I made a few adjustments because I wasn’t entirely happy with the first result. There just wasn’t enough liquid to soak up the flour they claimed to need no matter how much I kneaded! My first dough was a little stiff. With some minor adjustments I present to you the slightly modified recipe but please pop on over to the original recipe here.
This is the first batch I made, the bread was not soft enough to open too much. The finished texture was OK though.
Originally, pretzel bread is boiled in a water and Food Grade Lye solution, but that just seemed a little too dangerous for my taste so I opted to use baking soda instead. Many recipes range for a few tablespoons to 3/4 cup of baking soda which is the most I’ve seen on-line. I’ve even seen some recipes bake the baking soda, but that seemed like too much work! The baking soda or lye creates Maillard reaction which causes the proteins and the sugars react in a certain way that allows the bread to brown at high temperatures much more easily than by just baking; boiling it first gives this bread its signature chewy crust. This bread turned a most beautiful reddish brown colour that normal baking would not have resulted! I was very pleased indeed! The dough comes together very easily and doesn’t take an exorbitant amount of time. Proofing is just 1 hour! Baking is even less! The results are worth the effort. I must warn you though, it’s a good workout if you don’t have a stand mixer, the recipe says to knead for 8-10 minutes and they are not kidding!
Second attempt: The boules are not huge, so plan on having two on hand for a dinner party.
Prep Time: 20 minutes
Proofing Time: 60 minutes
Boiling Time: per loaf, 2 minutes
Baking Time: 25 to 27 minutes
Makes: 2 (18 cm or 7-inch) loaves or 8 rolls (I will make the rolls for soup bowls another time). For slider buns, form 50 g balls of dough to make 19 buns.
Ingredients for Dough:
1 1/2 to 1 3/4 cups milk (I increased the milk because the original dough was too tough and not soft as indicated in the instructions, but it will change depending on how humid the day is)
2 tablespoons unsalted butter
2 tablespoons brown sugar
1 tbsp bread machine yeast (I prefer to use this because it dissolves faster)
2 teaspoons salt
3 to 3 1/2 cups all-purpose flour (I found 3 cups in the winter months was enough to produce a soft, sticky dough)
Ingredients for the Boiling Solution:
2.8 L or 3 quarts water
3/4 cup baking soda
Ingredients for the Egg Wash:
1 egg
1 teaspoon water
Directions:
Warm the milk and butter to 37.7°C – 43°C (100°F-110°F); the butter will not completely melt.
In the large mixing bowl of your stand mixer, combine the warm milk with room temperature yeast and brown sugar. Stir in the salt and 2 cups flour and beat for 3 minutes (I used my cookie dough blade on my stand mixer, the first time I tried the whisk attachment and it was too sticky).
Gradually add enough of the remaining flour to make a soft dough (I added 1 additional cup, 3 cups in total).
Knead for 8-10 minutes in your stand mixer using the dough hook until smooth and elastic.
Place the dough in a greased bowl, cover and let rise for 1 hour or until doubled in size.
Preheat oven to 204°C (400°F)
Combine boiling solution and bring to a boil.
Punch the dough down and divide into 2 equal portions.
Form each portion into a tight, smooth ball (this will be the shape of your final bread, so if you want more of an oval roll, shape accordingly).
Boil each portion in the solution for a total of 2 minutes; start with the top side down and then flipping it over after 1 minute, top side up.
Remove the dough portions from the pot using a slotted spoon and place on a greased baking sheet (I lined my sheet with parchment). Allow to dry off for a bit (a minute or so).
Brush with the egg wash and cut a cross in the top, make sure you insert blade about 2 mm (1/8″) into the dough.
Bake for 15 minutes at 204°C (400°F), then reduce the temperature to 177°C (350°F) and bake an additional 8-10 minutes until the loaves are evenly browned, you want a nice dark reddish-brown colour and the bread sounds hollow when tapped.
Remove from pan and cool on a wire rack.
May I cut you a slice or two? A delightful chewy texture.
I posted this in January’s Growing Edge group post. Please check it out here.
I thought I had my workout in the gym today. That’s what I thought when I got home and prepared to go for a walk around the hood and admire the changing leaves before they are all on the ground. I was wrong. As I went into the kitchen for a glass of water (the wine would come after the walk) I noticed the hardwood in front of our wine fridge was buckling a bit. No problem, I’ll just pull out the fridge and see what’s going on. I should have waited for JT to get home because clearly I was in the ‘blue job’ territory. But I just couldn’t help myself, I’m like that. I discovered that the fridge didn’t budge; oh no, it must be buckling under it and catching the little feet. Oh no. Now THIS is a challenge. Some brains and some brawn (and some good old fashioned Eastern European sweat) I managed to get the fridge out and the boards cut out (with my handy Dremel tool, which I use about once every four years). BRING ON THE DYI, I’m freakin’ READY! Tomorrow I’m ripping out tiles from the stairs and I’m cladding them in wood!
Fortunately, there was no water or even wetness below, so there is relief because if you’ve ever had a water leak, it’s almost impossible to figure out where it’s coming from. But now the question is, why did the boards buckle? Any suggestions would be greatly appreciated.
Doing manual labour like that inspires me to bake. Fortunately, my friend’s (boss, neighbour) daughter’s after school program is having a bake sale and since my friend (Kim) doesn’t bake much, I told her I would bake some cookies for the sale. I ended up making some old fashioned ginger snaps from my recipe from last Christmas, but then I saw a version Zsusza’s delightful cookie and was immediately drawn to it. I loved the way the cookie crackled on top. Well the kid got two batches for the bake sale (maybe a few were set aside!). I made a few alterations to the recipe, so please pop over to Zsuzsa’s blog to see the original recipe, I didn’t have nutmeg handy so I substituted allspice and I also added an extra teaspoon of dry ginger as well as a tablespoon of freshly grated ginger. It makes for a lovely warmly spiced cookie. And baking cookies is a hell of a lot easier than pulling a stuck wine fridge out of its spot.
They are soft and chewy on the inside
Old Fashioned Molasses Spice Cookies
Makes about 30-36 cookies (if you don’t sample the cookie dough)
Ingredients:
2 cups flour
1 Tbsp baking soda
1 tsp cinnamon
2 tsp dry ginger
1 tbsp freshly grated ginger
1 tsp allspice
3/4 tsp salt
3/4 cup shortening
1 cup sugar
1/4 cup molasses
1 large egg
Directions:
Preheat the oven to (175°C) 350° F.
Line a baking sheet with parchment paper.
In a medium bowl, combine the flour, baking soda, cinnamon, ginger, cloves and salt; set it aside.
In the bowl of your mixer, beat the shortening and sugar until fluffy.
Beat in the molasses, egg and the freshly grated ginger and beat on low speed until just combined.
Stir in the flour mixture.
Chill the dough for 30 minutes.
Using a melon baller, form the dough into 19 g balls.
Place the balls leaving at least 2 inches apart on the prepared baking sheet.
Bake for 8 to 10 minutes (baking more will cause the cookies to be hard)
The cookies will be very soft when you take them out of the oven but they will harden up as they cool, then transfer to a wire rack.
As I mentioned before, I met Barb at KPMG in the early nineties; after a year or so, Barb decided to move to Vancouver. JT and I had just bought our home in the upper beach in Toronto and had a vacant basement apartment. We had never had a tenant before so we thought it might be nice to see if we liked it — so, to help Barb save money for her trip, we offered the apartment as a short term rental at a very low rent rate. Barb loved the idea and we became room-mates of sorts for a few months. During Barb’s last Christmas party at KPMG, one of the much loved partners (Evelyn) discovered that Barb lived in our basement, and she blurted out in her adorable Irish accent: “Bargain Basement Barb!” The entire table howled with laughter and to this day she is known as Bargain Basement Barb (I can hardly wait to mention this story to her children — but I want to do it when they are old enough to remember! No need to thank me Barbie!). In fact, this naming convention carried forward to our two other tenants (another friend and then a relative) there was Lower Level Leanne and Also Atilla (pronounce “ulshow” it means beneath in Hungarian!).
Barb has long since moved back to Toronto and is happily married with two young active girls. I am not sure if this recipe came about while Barb was living in our basement (there were many cookies left at the top of the stairs while she lived with us), but she did include them in our welcome package in our hotel room at her wedding in Niagara-on-the-Lake. They have remained a favourite throughout the years. There is no argument that the chunks of chocolate are an extravagent addition but I am often out of my slab chocolate (it seems to evaporate, not sure how!!! ;-)) so I substitute chips. Still yummy!
Holy Batman, that’s a lot of chocolate
Bargain Basement Barb’s Ultimate Chocolate Chunk (or Chip) Cookies
Ingredients:
1 cup butter
1 cup tightly packed brown sugar
½ cup granulated sugar
2 large eggs
1-1/2 teaspoon pure vanilla extract
3 cups plus 2 tbsp all purpose flour
1 teaspoon baking soda
½ tsp salt
8 oz semi-sweet chocolate, chopped into chunks (chocolate chips work too)
8 oz milk chocolate, chopped into chunks (chocolate chips work too)
1 cup of dried, unsweetened cranberries or cherries (option)
Directions:
Prehaeat the oven to 350°F.
Line two heavy baking sheets with parchment paper and set aside.
In the bowl of an electric mixer fitted with the paddle attachment (or by hand), cream the butter and both sugars until light and fluffy.
Add the eggs, one at a time, beating well and scraping down the sides of the bowl after each addition.
Beat in the vanilla.
Sift the flour, baking soda and salt together into a small bowl.
Add the dry ingredients to the butter-sugar mixture, mixing until just combined.
Fold in the chocolate chunks or chips.
Using your hands, shape knobs of dough about the size of a large walnut into balls and place them 2 inches apart on the baking sheets (I prefer to use a 1″ dual handle ice cream scooper). Stagger the rows of cookies to ensure even baking.
Bake 12 to 15 minutes for smaller cookies, 14 to 17 minutes for larger cookies, or until the tops are light golden brown. If the cookies are neither firm nor dark when they are removed from the oven, they will cool chewy and soft. Cool the cookies on the sheets for 5 minutes, then transfer to wire racks to cool completely. Can be stored in air-tight container for 1 week or freeze in a zip lock bag and defrost as required!
A yummy addition to our Christmas Cookie Baking Frenzy