Feeds:
Posts
Comments

Archive for the ‘Cookies’ Category

Still on our quest to lose a few nasty pounds but we (ahem, JT🤣) needed a bit of a treat so I converted this old favourite into a low-carb cookie. The flavours are bang on and they really satisfied our cravings for a treat.

Low-Carb, Gluten-Free Crunchy Peanut Butter Cookies

Makes about 17 cookies

Ingredients:

  • 260 g crunchy, natural peanut butter
  • 100 g erythritol
  • 1 egg
  • 5 mL vanilla
  • 3 g salt
  • 20 g salted peanuts

Directions:

  1. Preheat the oven to 350° F. Line a baking sheet with parchment paper.
  2. Combine all of the ingredients in a bowl except the salted peanuts. Mix with a hand mixer so that everything is well combined.
  3. Portion out 25 g of the cookie dough and press into your palm to form a circle about 5 cm or 2.5 inches in diameter. Lay each cookie on the parchment-lined baking tray about 5 cm or 2.5 inches apart. Bake for 10-15 minutes. Allow to cool on the cookie sheet.

Read Full Post »

These cookies came about because of two things: the first thing was, one of the items I brought home from England was Treacle, we don’t easily get it here and I was curious about it and secondly, I was cleaning out my baking drawer when I came across a small package of candied ginger so I thought I’d kill two birds with one stone and bake up a batch of these tasty treats. These are not low-carb, they are what they are. Sometimes you just need a treat.

Ginger Snaps

Makes about 36-46 Cookies depending on how big your melon baller is.

Ingredients:

  • 76 g butter
  • 100 g brown sugar
  • 60 mL Lyle’s Golden syrup
  • 60 mL treacle
  • 250 g all-purpose flour
  • 4 g baking powder
  • 4 g baking soda
  • 4 g ground ginger
  • 5 g freshly ground ginger
  • 4 g ground allspice
  • 30 g finely chopped candied ginger tossed in icing sugar

Directions:

  1. Preheat the oven to 350°F.
  2. Line two baking sheets with parchment paper, sprayed with non-stick cooking spray.
  3. In a small saucepan gently melt the butter, brown sugar and both syrups (do not boil unless you want to end up with jawbreakers!). Cool slightly.
  4. Sift dry ingredients together into a medium-sized bowl.
    Make a well in the centre and pour in the syrup mixture. Mix well to make a soft dough.
  5. Using a large melon baller shape into small balls (about the size of a walnut). Place each ball about two inches apart; press down to form even rounds about 1/2 cm thick.
  6. Bake 10-12 minutes or until very very lightly browned. Cool on the cookie sheet for a minute and then remove to fully cool on a wire rack. If you were to err, err on the shorter baking time so they don’t get super hard.
  7. Store in an airtight container or freeze. If they get too hard, add a slice of bread or a moist brown sugar disk for a few hours.

Read Full Post »

As we wait with bated breath for season three of Ted Lasso, I thought it would be fun to recreate his infamous shortbread cookies. These cookies conjured swoons from Rebecca, Ted’s boss! And rightly so, a well-made shortbread biscuit will melt in your mouth with the creamy taste of butter but not choke you to death with a puff of flour.

Years ago, I met a fellow running a shortbread cookie business in Toronto, he made both savoury (my favourite) and sweet and his shortbread was absolutely dreamy. I asked him what his secret was and he said cornstarch! Who knew? So I always like to include a little cornstarch in my shortbread to make them melt in your mouth, although, this is not part of Ted Lasso’s recipe.

A lovely, melt-in-your-mouth shortbread.

Ted Lasso-ish Shortbread Biscuits

This recipe makes one 23 cm x 23 cm (9 inch x 9 inch) pan.

Ingredients:

  • 250 g unsalted butter, room temperature
  • 100 g  icing sugar, sifted
  • 5 mL pure vanilla extract
  • 5 g lemon zest
  • 240 g all-purpose flour
  • 75 g cornstarch
  • Pinch of salt

Directions:

  1. Prepare a 23 cm x 23 cm (9 inch x 9 inch) pan by lining with parchment.
  2. Beat the butter until light and fluffy, add the icing sugar, vanilla, and lemon zest; whip this mixture until fluffy and completely combined.
  3. Sift the flour, cornstarch, and salt together, add it to the butter mixture and beat on low speed, just until combined.
  4. Press the dough into the pan evenly and cut into slices (this will make it easier to cut when baked). Refrigerate for 30 minutes.
  5. Preheat the oven to 300° F. Evenly dock the cookies with a fork and bake the shortbread for 45-60 minutes (mine were perfect at 45) or until just beginning to get golden on the edges. Cool in the pan and retrace the cut marks with a sharp, dry knife. Allow the cookies to cool completely in the pan. When cool, remove the cookies by lifting the parchment out of the pan and gently break the cookies at the cut marks but they should separate easily.

Notes:

  • Ted’s cookies don’t have vanilla or lemon zest but I can’t resist these flavours so I added them. Cornstarch isn’t part of the original recipe either, as I mentioned previously.
  • North American icing sugar already has some cornstarch in it to prevent clumping, but I’ve upped the ante and added more.
  • The cookies are fragile when hot, avoid touching them as you will leave fingerprints all over them.
  • Store the cookies in a cool, dry place or freeze them if they are not being consumed immediately, although they’re probably delicious when frozen too!

Read Full Post »

As our time in Spain was dwindling in late May, I began to think more about using up pantry items. Here is another recipe that was created to use up pantry ingredients I purchased for our time in Spain. I wanted to use up the flour, sugar and a lime that I had sitting around. Unfortunately, I had only a little butter that I needed for the remainder of the week so I improvised and used reduced table cream. I figured if you could make cookies using olive oil, then you should be able to make cookies using cream, but I only had table cream which is generally about 18% fat so I reduced it about half in volume which I was hoping would give me about 36% fat or at least more than 18%. The cookies turned out delicate, not crumbly and slightly chewy. JT thought some coconut would be lovely in them so perhaps I’ll try that next time. I would have liked a little more lime flavour so I upped the zest in the recipe below because I only had one lime, two I think, would be perfect.

A deliscious, chewy cookie.

Lime Sugar Cookies

A KitchenInspirations Original Recipe

Makes about 24 cookies about 5 cm in diameter

Ingredients:

  • 270 g all-purpose flour
  • 5 g baking soda
  • 2.5 g kosher salt
  • 251 g granulated sugar, plus more for rolling
  • 78 g reduced table cream (see notes)
  • 2 large eggs
  • 2.5 mL vanilla extract
  • 15 mL lime juice 
  • Zest of 2 limes

Directions:

  1. Whisk together the flour, baking soda and salt and set aside.
  2. Combine the sugar, table cream, eggs, vanilla, lime juice and zest and mix well.
  3. Pour the dry ingredients into the wet and just fold in so that there is no visible flour. Set in the freezer for 30 minutes.
  4. Preheat the oven to 350° F. Drop about 15 mL cookies (about a tablespoon) onto a parchment-lined sheet bake for 8-10 minutes. Allow to cool completely.

Notes:

  • For the table cream in this recipe, pour 250 mL table cream into a heavy bottom saucepan and reduce on high heat until about half (about 30 minutes), stirring occasionally so it doesn’t over boil. Cool completely.

Read Full Post »

We’re coming up to our last few weeks in Spain and I’m thinking about how to use up all the groceries we bought. I probably shouldn’t have bought a pack of sugar (about 350 g) but it was only about €0.50 so I’m not going to kill myself but I will give an honest go of using some of it. Peanut butter is not a common ingredient in Spain (most likely all of Europe) and is therefore expensive (€6.00 for a 500 g jar) but JT loves the stuff, so we splurged. We’ll be away for about 9 days of the last 18 days in Spain so I wanted to start on my pantry cleanup sooner than later.

I didn’t want to buy another package of butter so I needed a recipe that did not use it. Fortunately, this one is an old favourite, slightly modified to incorporate pantry ingredients. The 30 g portions make a decent size cookie but not large by any stretch of the imagination. The butter is not beaten into the peanut butter (mainly because I didn’t have a mixer) just mixed in well, without too much exertion which makes it an easy cookie recipe. I’ll be definitely keeping this one in my repertoire.

Delicious cookies with just the right amount of chewiness.

Pantry Clean Out Peanut Butter Cookies

A KitchenInspirations Original Recipe

Makes 19 cookies about 30 g each

Ingredients:

  • 250 g crunchy peanut butter (natural, no salt or sugar added)
  • 2 eggs
  • 80 g flour
  • 165 g sugar
  • 3 g salt
  • 50 dark chocolate with sea salt

Directions:

  1. Preheat the oven to 350° F.
  2. Combine the peanut butter and eggs and mix well.
  3. Combine the flour, sugar and salt and mix well.
  4. Add the dry ingredients to the wet and mix well.
  5. Portion out 30 g balls and flatten slightly with your palm. Dot the chocolate pieces onto each one evenly.
  6. Bake for 8-12 minutes at 350° F.

Read Full Post »

I know I can always count on my friend, Liz, over at That Skinny Chick Can Bake and I can tell you that this recipe did not disappoint! I must admit that I did find the Biscoff a wee bit odd (I can’t imagine smearing it on toast) but it did give the cookies a fabulous background flavour. I am sure glad that I initiated my freeze the cookies raw and bake as required to avoid overindulging because these cookies are very easy to overindulge. I had to make a couple of small alterations as well as turning the recipe into metric because that is how I like to bake. Thank you, Liz, for another wonderful addition to my cookie repertoire!

Liz’s Biscoff Cookies

For Liz’s original recipe, please click here.

Makes about 60 cookies, depending on size.

Ingredients: 

  • 400 g flour
  • 10 g baking soda
  • 5 g baking powder
  • 3 g salt
  • 215 g cup sugar
  • 115 g brown sugar
  • 300 g Biscoff Spread (crunchy or creamy)
  • 113 g shortening
  • 113 g butter
  • 2 large eggs
  • 1 teaspoon pure vanilla extract
  • 200 g Skor bits
  • 200 g dark Chocolate Chips

Directions:

  1. Preheat oven to 350º. Line baking sheets with parchment.
  2. Using a mixer, combine sugar, brown sugar, Biscoff, shortening, and butter and mix until well combined. Add egg and vanilla and beat until well combined. 
  3. Mix in baking soda, baking powder, then salt. Mix in flour just till incorporated, then stir in toffee chunks.
  4. Roll about 1 1/2-2 tablespoons of dough into balls, then place on prepared pans, about 2 inches apart. Bake 12 to 14 minutes or until golden. Allow to cool completely on wire cooling racks.

Notes:

  • These cookies freeze very well. Freeze before baking on a large sheet and then put them into a ziplock bag. Bake from frozen for 10 minutes in a preheated 350° F oven..

Read Full Post »

Loaded Double Belgian Chocolate Cookies

Makes about 40 cookies using a 4.5 cm ice cream scoop

Ingredients:

  • 227 g unsalted butter at room temperature
  • 200 g brown sugar
  • 100 g granulated sugar
  • 2 large eggs
  • 10 mL pure vanilla extract
  • 360 g all-purpose flour
  • 1 teaspoon baking soda
  • ½ tsp salt
  • 150 g semi-sweet chocolate, chopped into chunks (chocolate chips work too)
  • 150 g milk chocolate chips
  • 50 g Skore bits
  • 100 g of dried, unsweetened cranberries or dried cherries

Directions:

  1. Cream the butter and the sugars together until light and fluffy. Add the eggs one at a time until well incorporated, add the vanilla.
  2. Sift the flour, baking soda and salt together and add to the butter mixture to form a batter.
  3. Fold in the inclusions (reserving a small amount to add after the cookies come out of the oven for presentation, if desired).
  4. Bake in a pre-heated 350° F oven for 12-15 minutes or until the cookies are slightly golden at the bottom.
  5. Add the remaining inclusions, if desired and allow to cool completely on a cooling rack.

Notes:

  • I used a 4.5 cm releasing ice cream scoop, if you use the slightly smaller one, you will likely get about 60 cookies.
  • To help with portion control, I generally freeze the raw batter in scoops on a cookie sheet and bake as needed, 1 to 2 at a time (it drives JT crazy but he is grateful for the portion control).

Read Full Post »

In mid-November, JT had surgery on his right hand to help correct carpal tunnel syndrome and I was worried we were going get dumped on with snow so we asked the teenaged boys across the way to help with the shovelling and they were very happy to oblige. They were out there in PJs,  jackets and boots at 7:30 most mornings it snowed, which is more than I was willing to do. Their mom wouldn’t let me negotiate payment for their troubles so I baked cookies for them instead. These were one set that made the rounds. JT has totally healed but they still insist on helping out, so I keep baking.

These are more complex than traditional ginger snaps.

Lauren’s Spice Cookies

Makes about 42 cookies

Ingredients

  • 180 mL vegetable oil
  • 60 mL dark molasses
  • 200 g sugar
  • 2 large eggs
  • 365 g all-purpose flour
  • 10 g baking soda
  • 12 g cinnamon
  • 10 g tablespoons ground ginger
  • 10 g ground cloves
  • 3 g ground mace
  • 150 g Skor bits
  • 1/3 cup sanding sugar

Directions:

  1. In a large bowl with an electric mixer beat together the oil, molasses, sugar, and the eggs until the mixture is smooth.
  2. In another bowl sift together the flour, the baking soda, the cinnamon, the ginger, the cloves, and the mace and then add the mixture to the molasses mixture.
  3. Beat the mixture until it is well combined, fold in the Skor bits. Chill the dough, covered, overnight.
  4. Form the dough into 1 1/2-inch balls and roll the balls in the remaining 1/4 cup sugar to coat them well.
  5. Bake the balls 3 inches apart on buttered baking sheets in the middle of a preheated 350° F. oven for 10 to 12 minutes, or until the tops crack. Transfer the cookies to racks and let them cool.

If you don’t bake them too long, they remain chewy.

Read Full Post »

I may have bought a few too many pistachios when I made the gelato so I thought I’d recreate the almond cookies  of Sevilla with pistachios, we loved them so much. I also had exactly 7 g of the matcha powder which was the perfect amount for the cookies. I served them for dessert one evening we had a friend over (in the back yard) and she couldn’t stop raving about them.

Pistacho-Matcha Tuiles de Sevilla

Makes one sheet pan about 34 cm x 38 cm (13.5″ x 15″)

Ingredients:

  • 1 large egg, at room temperature
  • 80 g sugar
  • 30 g unsalted butter, melted
  • 1/2 tsp pure vanilla
  • 50 g cake and pastry flour
  • 7 g matcha powder
  • pinch of salt
  • 75 g pistachios, chopped

Directions:

  1. Melt the butter and set aside to cool.
  2. Beat the egg with the sugar until it reaches the ribbon stage, about 5 minutes. Beat in the flavourings and cooled butter.
  3. Sift the flour with the salt and matcha powder and fold into the egg mixture.
  4. Pre-heat the oven to 265° F (130° C).
  5. Pour the entire batter onto a parchment-lined cookie sheet and spread out with an offset spatula until it is quite thin (about 3-4 mm) works out to about 34 cm x 38 cm. Evenly sprinkle the chopped pistachios onto the batter and gently push into the batter.
  6. Bake for 45 minutes to an hour or until evenly golden, turn the pan once about halfway.
  7. Cool completely and break into uneven pieces.
  8. Once cooled, store in an airtight container for about a week, but they won’t last that long!

Read Full Post »

We have been doing a lot of entertaining since our return from Arizona. I love feeding my friends, it really does make me happy. A few weekends ago we had a marathon weekend entertaining on Friday, Saturday, Sunday AND Tuesday! Fortunately, I was able to plan ahead and make a few things for a couple of the dinner parties considering both friends had gluten-free requirements. First, I made a batch of the original recipe with almonds then I recalled that my dear friend’s hubby is a nut-hater (the food kind) so I created a chocolate version of the recipe. It was wonderful. I served them with coffee.

The snow just doesn’t want to stop.

Gluten-Free Chocolate Tuiles of Sevilla (Tejas Dulces de Sevilla)

A KitchenInspirations Original Recipe

Makes 25 cm x 30 cm (10″ x 12″) sheet, cut to make cookies of various sizes

Ingredients:

  • 1 large egg, at room temperature
  • 95 g sugar
  • 1 tsp pure vanilla
  • 30 mL unflavoured oil
  • 50 g Gluten Free flour (I used this mix)
  • 15 g cocoa powder
  • 80 g milk chocolate chips

Directions:

  1. Pre-heat the oven to 250° F.
  2. Beat the egg with the sugar until it reaches the ribbon stage, about 5 minutes. Beat in the vanilla and oil.
  3. Sift the gluten-free flour with the cocoa powder and salt together then fold into the egg mixture.
  4. Pour the entire batter onto a parchment-lined cookie sheet and spread out until it is quite thin (about 3-4 mm (about 1/8-3/16 inch) works out to about 25 cm x 30 cm (10″ x 12″). Evenly sprinkle the chocolate chips onto the batter and gently push into the batter.
  5. Bake for 45 to 50 minutes or until evenly baked, turn the pan once about halfway.
  6. While still warm, move parchment onto a cutting board and cut into uneven shapes with a pizza cutter or break into natural shapes after it cools. Transfer parchment to a cooling rack and allow to cool. Cookies will firm up as they cool.
  7. Once cooled, store in an airtight container for about a week, but they won’t last that long!

Notes:

  • I use an offset spatula to spread the batter onto the parchment paper.
  • This recipe will work well with store-bought gluten flour too.

Read Full Post »

Many years ago, a dear friend discovered this recipe for chocolate chunk cookies; she shared it with us and then. Here is the original recipe.

Granted, there are A LOT of chocolate chips in these babies but damn, they’re GOOD!

Double Chocolate Chip and Cranberry Cookies

Makes 60 cookies

Ingredients:

  • 227 g unsalted butter at room temperature
  • 200 g brown sugar
  • 100 g granulated sugar
  • 2 large eggs
  • 10 mL pure vanilla extract
  • 360 g all-purpose flour
  • 1 teaspoon baking soda
  • ½ tsp salt
  • 300 g semi-sweet chocolate, chopped into chunks (chocolate chips work too)
  • 300 g milk chocolate chips
  • 150 g of dried, unsweetened cranberries or dried cherries

Directions:

  1. Preheat the oven to 350° F.
  2. Combine the butter and two sugars in the large bowl of your stand mixer with the creaming paddle attachment and cream until light and fluffy.
  3. Add the eggs one at a time beating well. Add the vanilla.
  4. Sift the flour, baking soda and salt together and add in two batched into the batter, mixing until combined.
  5. Fold in the chocolate chips and dried cranberries.
  6. Drop walnut-sized balls onto a parchment-lined baking sheet and press down a bit.
  7. Bake for 12-15 minutes or until slightly golden. For chewier cookies, slightly underbake.


Read Full Post »

As you know, we spent just over a month in Arizona again, and our friends house-sat for us. I made these tasty treats for dessert the night before we left, they absolutely loved them. The cornflakes replaced the graham crackers and we didn’t even miss them. I have made these treats a few times since then.

I often get my dessert inspiration from my dear friend Liz, that Skinny Chick Can Bake; this tasty treat came from her but I modified it to be gluten free. Although I’ve never tasted the original version, I can tell you hands down that this one is a real winner! If you like peanut butter and chocolate, give this super easy, tasty treat a go.

Gluten-Free Reese’s Peanut Butter Squares

Makes one 20 cm pan

Please click here for the original recipe.

Ingredients:

  • 45 mL butter, melted
  • 120 g corn flakes, pulsed to a powder
  • 170 g icing sugar
  • 195 g natural peanut butter
  • 6 g sea salt
  • 190 g semi-sweet chocolate chips
  • 15 g butter or vegetable oil

Directions:

  1. Combine everything but the chocolate chips and vegetable oil in the large container of your food processor and process until smooth and comes together.
  2. Press into a 20 cm square pan lined with parchment paper and refrigerate for 30 minutes.
  3. Meanwhile add the chocolate chips and butter or vegetable oil to a microwaveable bowl and melt, stirring intermittently.
  4. Cool slightly and pour over chilled peanut butter pan, spread evenly. Refrigerate for an hour before slicing.
  5. Slice with a warm, dry knife, wiping between slices.

The winter light is quite evident here, but don’t allow that to dissuade you, these are very yummy.

The cornflakes add an incredible texture that make these taste just like Reese’s Peanut Butter Tarts, only better!

Notes:

  • I’ve used a variety of natural peanut butters (no sugar or salt) to make these, including crunchy, with no substantial difference to the outcome of this recipe.
  • To make this recipe vegan, try melted coconut oil. Although I have not tried using melted coconut oil, I’m certain it would work because there is not much in the recipe.
  • Once the recipe initially sets, you can bring the bars to room temperature to serve.
  • Try using other nut butters (such as Hazelnuts) to up the ante!

Read Full Post »

This is an old recipe that I’ve made on the blog before, I just wanted to update it using weight measures instead of imperial volume and I also wanted to use fresh ginger instead of the dried powder. If you like the bite of ginger, this one is for you. This day I made them in late October was actually quite lovely and I braved the chill to take this photo on our back deck. Winter is coming!

It has that delicious chewy texture that some ginger snaps might have if they don’t dry out.

Ginger Snaps Revisited

Makes about 36 to 46 cookies, depending on how large you make them\

Ingredients:

  • 75 g butter
  • 115 g brown sugar
  • 1/4 cup light corn syrup
  • 1/4 cup black molasses
  • 30 g fresh ginger
  • 280 g you all-purpose flour
  • 3 g salt
  • 5 g baking powder
  • 5 g baking soda
  • 2 g ground allspice

Directions:

  1. Combine the butter, brown sugar, corn syrup and molasses and heat gently until melted. Set aside.
  2. Grate the fresh ginger and stir into the melted butter mixture.
  3. Combine the remaining ingredients and whisk or sift to stir. Make a well in the centre and pour the melted butter mixture into it and mix until all of the flour mixture is incorporated.
  4. Preheat the oven to 350° F. Line a baking sheet with parchment paper.
  5. Drop the cookie dough by even spoonfuls (I used a large melon baller) onto the lined cookie sheet. Roll each ball in the palm of your hand to create a smooth ball, then press down to flatten with a flour cookie press to about half a centimetre.
  6. Bake for 10-12 minutes (I baked mine for 10) and cool on a wire rack. Store in an air-tight container but don’t worry, you won’t have to store them for long.

Read Full Post »

It’s been a busy year and I’ve seen spending a lot of time in front of my computer. I don’t mind doing that type of work, but I do miss cooking and with that, getting my advanced blog posts ready to publish. In fact, I am nowhere near the advanced the blog posts I should be, in preparation for our yearly sojourn to Arizona. I have four posts ready to go but I should have 10! That makes me nervous because I may not have time to post while we are in Arizona; we have three separate group friends coming down for 5-7 days each! That means a lot of sightseeing and daily adventures and less cooking and recipe developing.

You can definitely see the winter light creeping in.

I modified and made this little recipe because during one coffee break JT mentioned that he would love to have a little biscotti to nibble on while we sit and enjoy our coffees. I like making biscotti because they are easy and are not overly finicky. This recipe came together quickly and more or less in one bowl.

Chocolate Chip and Almond Biscotti

For the original recipe, please click here.

Makes about 20 biscotti but it depends on how thickly you form and cut the logs

Ingredients:

  • 57 g unsalted butter, at room temperature
  • 225 g brown sugar
  • 10 mL pure vanilla extract
  • 5 mL almond extract
  • 275 g all-purpose flour
  • 75 g almond flour
  • 20 g baking powder
  • pinch salt
  • 165 g chocolate chips

Directions:

  1. Preheat the oven to 350° F.
  2. Cream butter and brown sugar until light and fluffy.
  3. Add the eggs, one at a time and best until entirely incorporated. Add the extracts and beat.
  4. Whisk together the dry ingredients (omit the chocolate chips) and blend into the butter mixture.
  5. Fold in the chocolate chips.
  6. Form into two even logs and place on a parchment-lined baking sheet and flatten slightly. Bake for 30 minutes.
  7. Slice diagonally into 10 slices each and lay flat on the same parchment-line baking sheet and bake again for about 10 minutes or until lightly golden. Cool completely before serving.

Notes:

  • I shaped my logs too wide, next time I shall make them more slender and have twice the number of biscotti.
  • Biscotti store well in an airtight container but if it will take you more than a week to consume, I would freeze them until required. Defrost at room temperature.
  • I didn’t have whole almonds but this would have been lovely having a few whole almonds folded into the batter.

Read Full Post »

Late last summer, I did some prop shopping for a prop-stylist colleague who was swamped and needed a hand. It’s a lot of work, don’t get me wrong, the shopping bit is fun but there is a lot of schlepping! And you have to be extremely organized to be able to return some of the props that weren’t used! That being said, it’s a job I don’t envy, they earn every penny and then some. While I was waiting for a store to open, I stopped into an Italian cafe for a coffee and biscotti. The coffee was fine but the biscotti was atrocious, it was soggy! Imagine that. Such an unsatisfying treat. The worst. So I had to make my own! These definitely hit the spot!

Cranberry and Almond Biscotti Revisted

Makes about 30 biscotti

Ingredients:

  • 320 g AP unbleached flour
  • 4 g baking powder
  • 3 g salt
  • 340 g sugar
  • 125 g butter, room temperature
  • 2 large eggs
  • 7 mL almond extract
  • 150 g frozen cranberries, defrosted
  • 70 g almonds, toasted

Directions:

  1. Preheat the oven to 350° F. Line a baking sheet with parchment.
  2. Combine the flour, baking powder and salt and mix well. Fold in the cranberries and almonds (I used whole)
  3. In the large bowl of your stand mixer, combine the sugar, butter, eggs and almond extract and mix for about 4 minutes.
  4. Fold in the dry ingredients until entirely combined (I did this using my whisk attachment so I didn’t break up the cranberries.
  5. Divide the batter in half and shape into relatively skinny logs on the parchment, leaving sufficient space between the two as they will spread during baking.
  6. Bake for 35 minutes or until golden.
  7. Remove logs from the oven and transfer to a cutting board. Using a serrated knife, slice each log into 1.5 cm slices. Place cut-side down on the baking sheet (reuse the original parchment) and bake for 10 minutes, flip and continue to bake for 5 more minutes or until lightly golden. Cool completely.
  8. Store in an air-tight container or freeze. Serve with coffee or tea.

You’ll need to bake these a little longer because the cranberries are moist.

Read Full Post »

You guys know of our dear friends, Paul & T, they summer in Wisconsin and winter in Arizona. This year, they decided to sell their Wisconsin home and move permanently to Arizona. They were kind enough to invite us to the Lake House one last time. Because they are imminently selling their home in Wisconsin, we were not able to bring lasting gifts because their trip home to Arizona will be packed solid with whatever they move from their home in Wisconsin. Food is always a good bet with them, so I’ve been experimenting with recipes and this one, I must say is a winner. Don’t skip the drizzle, it just makes it OTT lemony. You have to love lemons to make this tasty treat, or at least, have someone that does. It probably works with lime too, although I haven’t tried it.

I used this recipe as my starting point, I just loved how they looked, with the drizzle and all. Plus, it sounded like they were really lemony, but I wanted to up the ante so I also added a splash of lemon extract as well as lemon zest to the cookie dough. BANG!

Buttery, melt in your mouth lemon shortbread that has balanced sweetness.

Lemony Shortbread Cookies

Makes 54 cookies, about 3 cm x 3 cm

For the original recipe, kindly click here.

To print this recipe, please click here.

Ingredients:

  • 227 g unsalted butter, at room temperature
  • 86 g powdered sugar
  • 5 mL vanilla extract
  • 5 mL lemon extract
  • 5 g lemon zest
  • 240 g AP unbleached flour
  • 56 g cornstarch
  • 2.5 mL salt

Ingredients for the drizzle:

  • 80 g confectioner’s sugar
  • 15 mL fresh lemon juice
  • 5 mL lemon zest
  • water (to thin, if needed)

Directions:

  1. Combine the butter and confectioner’s sugar and beat until light and fluffy. Beat in the vanilla, lemon extracts and lemon zest.
  2. Sift the flour, cornstarch and salt into the butter and mix until a smooth dough is formed. It will take about 1.5-2 minutes.
  3. Between two pieces of parchment, roll out the dough to a 33 cm x 23 cm rectangle and cut into little squares (I did 3 cm x 3 cm), refrigerate cookies on the cookie sheet for 30 minutes. They don’t spread much, so you needn’t leave more than 1 cm between each cookie.
  4. Preheat the oven to 325° F. Bake for 15-20 minutes, you don’t want them too golden because these are pretty if pale white.
  5. For the drizzle, mix the confectioner’s sugar, lemon juice and zest in a food processor and process until smooth and drizzle-able. If necessary, add water.
  6. Allow the cookies to cool completely before drizzling with the lemony mixture.
  7. Allow the drizzle to set at room temperature before stacking the cookies.

Notes:

  • I baked these on a super hot day, not sure why my version took so much longer than the original recipe.
  • I found the original drizzle recipe made way too much drizzle, it has a good lemon flavour and is intended to enhance the shortbread, not overwhelm it so I reduced the quantities by half.

Read Full Post »

In mid-March JT and I went to the large National Home Show at the Enercare Centre. I found discounted tickets on Groupon AND I also found a Groupon discount code, which made the two tickets $17.80; that was an awesome deal because the regular price of the tickets are $20 each! These shows are getting more and more expensive and I really don’t understand why, the vendors pay through the nose to exhibit, AND the public pays a hefty entrance fee. The kicker was parking at $21! The Enercare Centre is not located downtown, it is slightly west but still within the city, but there is not much else around it — total money grab! And that completes my rant.

While at the show, there are always a few food vendors exhibiting and one of my favourites is a shortbread company who generously hands out samples. JT and I sampled one of their savoury shortbread cookies and I knew I had to make a batch. On the drive home, we brain-stormed the possible flavours and I knew the moment JT said caramelized onion that it had to be the one. We bought a very special sharp cheddar to accompany the sweet flavour of the caramelized onion, they were absolutely perfect!

Caramelized Onion and Cheddar Shortbread Cookies

A KitchenInspirations Original Recipe

Makes about 75 cookies that are about 3 cm in diameter.

To print recipe, please click here.

Ingredients:

  • 114 g unsalted butter, room temperature
  • 80 mL caramelized onions, slightly dried out, see notes
  • 120 g sharp cheddar, grated
  • 5 g sea salt
  • 120 g “00” flour
  • 90 g cornstarch

Directions:

  1. Preheat the oven to 350° F. Line a baking sheet with parchment paper.
  2. Cream the butter, caramelized onions and grated cheddar until light and fluffy (about 5-8 minutes).
  3. Sift the salt, flour and cornstarch into the creamed butter mixture and mix until well combined but do not overmix.
  4. Create two disks and wrap in plastic wrap and freeze for 15 minutes or refrigerate for 30 minutes.
  5. Turn out to a lightly floured surface and roll about 4 mm thick.
  6. Cut with 3 cm round cookie cutter. Continue until the dough has been used up. Bake for 14-16 minutes or until lightly golden. Cool on a wire rack.
  7. Serve with wine or your favourite cocktail.

Notes:

  • We used the KitchenAid Flex Edge Beater, it creams the cheese, butter and onion beautifully.
  • We always keep caramelized onions in the freezer in ziplock baggies for such uses. I use this recipe.
  • Spread the caramelized onion on a piece of parchment and allow it to sit for 10 minutes, this allows some of the moisture to wick out and will allow the shortbread its melt-in-the-mouthfeel.
  • The cheddar we used today was a Welsh cheddar.
  • The “00” flour we used was an imported Italian flour.
  • The rolling pin we used was this one. To be honest, I don’t love it, it’s a pain to unscrew the disks that are not required but it does roll the dough out evenly.

The flavour of the caramelized onion shines in this delicate little savoury cookie.

Read Full Post »

We had just completed a gorgeous hike one weekend in February at Kortright Centre for Conservation. It was a warmer day and the sun was beaming beautifully throughout the hike. There were some muddy spots and some icy spots but it was totally manageable. This park is not manned this time of year, but, fortunately they leave the gate open for visitors like us. The park is not maintained during the winter but a good pair of hiking boots and you’re good to go. Click down to the end to see a few pictures of our hike.

Unfortunately all of the service buildings are closed this time of year, and after an hour-long hike and ingesting 500 mL of water, one might need facilities, so we decided to stop at a Starbucks on our way home. I usually like to purchase something when I use the facilities in a place but it was well into the afternoon and I really didn’t want a cup of regular coffee and ordering a decaf at Starbucks is about the most painful experience I have ever endured so I avoid it at all costs. Instead, we ordered an oatmeal cookie which they had unfortunately sold out of so, we shared one of their Ginger Molasses cookies. It was so delicious that I wanted to replicate the recipe and bake some at home. JT and I are HUGE ginger fans and I prefer to use fresh ginger whenever I can, so in this lovely recipe, I quadrupled the ginger and used fresh and I added a small amount of candied ginger chopped roughly. These definitely satisfied my ginger craving! Do you ever feel obligated to purchase something if you use a restaurant’s facilities?

Chewy Ginger Molasses Cookies

Makes about 72 x 20 g cookies.

For the original recipe, please click here.

To print this recipe, please click here.

Ingredients:

  • 284 g unsalted butter at room temperature
  • 450 g white sugar
  • 2 eggs
  • 125 mL molasses
  • 20 g fresh ginger, finely minced
  • 570 g all-purpose unbleached flour
  • 3 g salt
  • 23 g baking soda
  • 6 g ground cinnamon
  • 1 g ground cloves
  • 50 g candied ginger, chopped
  • 50 g white sugar for rolling

Directions:

  1. Cream the butter and sugar together until light and fluffy. Beat in the eggs, one at a time.
  2. Add the molasses and fresh ginger and beat well.
  3. In a separate bowl, combine the flour, salt, baking soda, cinnamon and cloves and whisk to combine well.
  4. Add to the butter mixture and beat until well combined.
  5. Refrigerate the batter for 1 hour.
  6. Pre-heat the oven to 350° F.
  7. Make 20 g balls and roll in the sugar and position on the parchment lined baking sheet leaving about 5 cm between each cookie (don’t be tempted to flatten, it will flatten out on its own in the heat of the oven). Bake for 10-11 minutes, remove from the oven but leave them on the baking sheet because they will finish baking on the sheet. Remove cookies from the baking sheet once they have all but cooled completely.
  8. Enjoy with coffee or tea or a glass of bubbly!

Notes:

  • 11 minutes was absolutely perfect in my oven, the cookies hardened up perfectly sitting on the hot cookie sheet on the counter.
  • I always test-bake 1 or 2 cookies before I decide on how big to make the entire batch, it also gives you a solid idea of how long to bake them perfectly.
  • Weighing the cookie dough will give you more evenly-sized baked cookies. I can almost eyeball them after making a few balls, but I still like to weigh them for consistency.

Read Full Post »

gf-tejas-dulces_first

Last week I shared with you a traditional Sevillian Cookie, the Tejas Dulces and I was so smitten with it that I had to develop a gluten-free version. There are some recipes that are not worth converting to gluten free, they simply would not work, but some, like this particular recipe, shines brighter than its glutenated counterpart! I absolutely love this recipe, to the point that I’ll probably make this one my standard.

The original tuiles we brought back from Sevilla.

The original tuiles we brought back from Sevilla.

Gluten Free Almond Tuiles of Sevilla (Tejas Dulces de Sevilla)

A KitchenInspirations Original Recipe

Makes 25 cm x 30 cm (10″ x 12″) sheet, cut to make cookies or various sizes

Ingredients:

  • 30 g (2 tbsp) unsalted butter
  • 75 g (3/4 cup) almonds, thinly sliced and toasted
  • 1 large egg, at room temperature
  • 80 g (~1/3 cup) sugar
  • 1 tsp almond flavour
  • 1 tsp pure vanilla
  • 50 g Gluten Free flour (I used this mix)
  • pinch of salt

Directions:

  1. Toast the almonds until golden. Set aside to cool.
  2. Melt the butter and set aside to cool.
  3. Beat the egg with the sugar until it reaches the ribbon stage, about 5 minutes. Beat in the flavourings and cooled butter.
  4. Sift the flour with the salt and fold into the egg mixture, cover and allow to rest at room temperature for 30 minutes.
  5. Pre-heat the oven to 265° F (130° C).
  6. Pour the entire batter onto a parchment-lined cookie sheet and spread out until it is quite thin (about 3-4 mm (about 1/8-3/16 inch) works out to about 25 cm x 30 cm (10″ x 12″). Evenly sprinkle the toasted almonds onto the batter and gently push into the batter.
  7. Bake for 45 to 50 minutes or until evenly golden, turn the pan once about halfway.
  8. While still warm, move parchment onto a cutting board and cut into uneven shapes with a pizza cutter. Transfer parchment to a cooling rack and allow to cool. Cookies will firm up as they cool.
  9. Once cooled, store in an airtight container for about a week, but they won’t last that long!

Notes:

  • I increased the flavourings to one teaspoon each because I am not a fan of the taste of gluten-free flour mix.
  • You may use a commercially prepared gluten free flour but I tested the recipe with my mix.
  • The gluten-free baked up about 10 minutes quicker because the batter spread a little further than the glutenated one!

Read Full Post »

tejas-dulces_first

Happy Halloween Everyone! Hope you all have a ghoulish night!!!

While in Europe this past September, we spent four extremely hot days in Sevilla. It’s no wonder they call Spain the “Frying pan of Europe”! It wasn’t as hot as it had been (near 50° C or 122° F) but it was hot enough for us! The sun was relentless and most locals only walk in the shade (you can tell who lives there because they hug the shadows directly beside the old buildings!). The city has covered some of its sunnier streets with canopy sails to shade the citizens and tourists, it’s that bad!

Many of the historic town streets have these sails in both Sevilla and Madrid.

Many of the historic town streets have installed these canopy sails to protect citizens and tourist from the unyielding sun, in both Sevilla and Madrid, though I did not see them in Granada.

During one of our last walks though the beautiful historic part of town, we stumbled into the area where the locals actually live. There were no tourist shops, a few restaurants, just butchers, bakers, children’s clothing stores, kitchen stores (yes, I did buy something), grocery stores and specialty shops. One such shop was a beautifully designed little cookie shop where they sold only one type of cookie in three flavours: La Tejas Dulces de Sevilla, in almond, pistachio and coconut. A young lady was handing out samples in front of the beautiful store and we couldn’t resist. In one taste, we were immediately hooked on the simple almond flavour and lovely crunchy texture and we had to buy some. Upon returning to Toronto, I hid the small package so that I could work on a recipe and perfect it for the blog. I told JT it was for the greater good, he wasn’t impressed.

The cookies are light, airy, crunchy and full of flavour; imagine a genoise batter spread paper-thin, topped with almonds and baked until golden. They are so GOOD! The recipe is relatively simple but follow the instructions to get the signature airy, crunchy texture. I think this could easily convert to a gluten free variety, stay tuned!

I must warn you, though, because these are not like the French Tuiles, these have a bit more body than a traditional French tuiles. They are really more cracker-like than a tuile or a cookie.

Scroll down to the end of this post to see pictures from this part of our trip.

tejas-dulces_2

Delicately sweet, these crispy, flavourful cookies hit the spot for an afternoon craving!


original

These are the originals we brought back from Sevilla, sadly only three left and a mess of crumbs but I’ve finessed the recipe so I can make more!

Almond Tuiles of Sevilla (Tejas Dulces de Sevilla)

A KitchenInspirations Original Recipe

Makes 25 cm x 30 cm (10″ x 12″) sheet, cut to make cookies or various sizes

Ingredients:

  • 30 g (2 tbsp) unsalted butter
  • 75 g (3/4 cup) almonds, thinly sliced and toasted
  • 1 large egg, at room temperature
  • 80 g (~1/3 cup) sugar
  • 1/2 tsp almond flavour
  • 1/2 tsp pure vanilla
  • 50 g cake and pastry flour
  • pinch of salt

Directions:

  1. Toast the almonds until golden. Set aside to cool.
  2. Melt* the butter and set aside to cool.
  3. Beat the egg with the sugar until it reaches the ribbon stage, about 5 minutes. Beat in the flavourings and cooled butter.
  4. Sift the flour with the salt and fold into the egg mixture, cover and allow to rest at room temperature for 30 minutes.
  5. Pre-heat the oven to 265° F (130° C).
  6. Pour the entire batter onto a parchment-lined cookie sheet and spread out until it is quite thin (about 3-4 mm (about 1/8-3/16 inch) works out to about 30 cm x 30 cm (12″ x 12″). Evenly sprinkle the toasted almonds onto the batter and gently push into the batter**.
  7. Bake for 45 minutes to an hour or until evenly golden, turn the pan once about halfway.
  8. While still warm, move parchment onto a cutting board and cut into uneven shapes with a pizza cutter. Transfer parchment to a cooling rack and allow to cool. Cookies will firm up as they cool.
  9. Once cooled, store in an airtight container for about a week, but they won’t last that long!

Spread batter out thinly (about 30 x 30 cm or 12 x 12 inches)

Spread batter out thinly (about 30 x 30 cm or 12 x 12 inches)


tejas-dulces_3

I made another batch but spread the batter out much thinner. They probably could have baked a little longer to get a little richer colour, but the flavour and texture is spot on.

Notes:

  • *for additional flavour, brown the butter in a frying pan until hazelnut in colour.
    ** to insure that all of the almonds are ‘stuck’ to the batter, I did a little toss of the pan quickly and that way I was able to move ‘unstuck’ almonds to a better place.
  • Add a teaspoon of lemon zest because lemon and almond go so wonderfully together!
  • Drizzle melted chocolate over the cookies once they are cool, refrigerate until set then store in an airtight container for about a week, but be warned, these won’t even last as long as the originals!

This slideshow requires JavaScript.


Read Full Post »

AmarettiCookies_1

Ever since we recently had our Jura Espresso Machine serviced, we have been indulging in an espresso after lunch. We stock our coffee maker with decaffeinated espresso coffee beans so we’re not worried about being kept up at night with caffeine. Every time I have an espresso in the afternoon, I always feel like a little something to have with it, a biscotti (like this, this or this) or in most recent times, an amaretti cookie. Having just the right amount of ground almonds on hand, I decided to whip up these traditional but super easy cookies for our afternoon espresso.

Did you know that the first amaretti were made with crushed apricot kernels and almonds? You can read the story here.

They are deliciously almondy.

They are deliciously almondy.

Amaretti Cookies

Original recipe may be found here, I had to modify it because the cookies were flattening too much with the original proportions.

Makes about 44 cookies

Ingredients

  • 410 g ground almonds
  • 410 g granulated sugar
  • 4 egg whites
  • 1 tsp almond flavouring
  • 1 tsp lemon zest
  • 44 whole almonds, skin on

Directions:

  1. Pre-heat the oven to 325° F  (163° C).
  2. In small portions, add the ground almonds, granulated sugar and lemon zest to the small container of your NutriBullet and using your milling blade, grind to a fine consistency. Run through a coarse sieve to avoid the almond bits sticking together.
  3. Beat the egg whites until stiff but not dry, add the almond flavouring and mix well.
  4. Add the sugar and almond mixture to the beaten egg whites and gently combine. It should have the consistency of a thick paste.
  5. Spoon by generous teaspoons onto a parchment-lined baking sheet about 5 cm (2 inches) apart and top each cookie with a whole almond, pressed gently into it. Bake for 15-18 minutes or until golden. Allow to cool slightly on the sheet and gently remove to a wire cooling rack. Store in an air-tight container separating rows with parchment paper. Or freeze.

Read Full Post »


LemonyCookies_First

Recently we travelled to Arizona to visit our very dear friends Paul and T at their new home where they plan to spend the winter every year. I always like to arrive with a little thoughtful, but useful gift. Of course, folks our age have everything we could ever want, and if we don’t, we simply go out and get it. So buying a gift for their new home is becoming increasingly more difficult so I usually default to baking. After all, who doesn’t love home baked goods?

Our national grocery chain Loblaws’ private label brand PC (President’s Choice) has many great products in their lineup (you may be familiar with PC Chocolate Chip Cookies — I know that particular product was distributed nationwide in the U.S. Did they capture the market in the UK, Europe and Australia too?) and one particularly wonderful product was a Lemon Sandwich Cookie. Sadly this cookie has not been available for some time now (years, really) and our dear friend Paul LOVES them. Like, he really, really LOVES them. What set this cookie apart was its strong lemony flavour, in both the sugar biscuit and the creamy butter icing, sandwiched in the middle.

My usual MO is to make a couple of baked goods that are favourites below the 49th, but just like my Christmas baking, this list can get out of control over time. Cue JT to roll his eyes.

Now this one came about quite innocently, at least, to me it did (but then again, I can justify virtually anything!). You see, I was at Dollarama, picking up a few little things (never food) and I spotted the Wilton Sandwich Cookie Pan. Oh dear.

  • I did not go over and touch it.
  • I did not stop to look at it.
  • I did not even spend more than a split second thinking about it.
  • I simply passed by it and went on my merry way.

Of course, the memory of this specialty cookie pan tucked itself into a far corner of my brain, only to exert itself in the wee hours of the night as I was desperately trying to sleep. By the morning, I had already decided to go back and purchase one. They were only $3 so I got two and that way I could bake in tandem, my logic is that it uses less electricity if I could have a tray ready to go in the oven when the other comes out. You see? That’s justification! Cue JT to roll his eyes, again. But in all honesty, $3 is really quite reasonable for a quality Wilton product, particularly when it’s on their website for $8.99!
I used the Wilton recipe for the cookie that is on the packaging because I figured it must be tried and true and, for the most part, it worked out well. The only thing I would suggest is to add a bit of lemon zest to the cookie dough and not spray the pan with non-stick spray because the pan is already non-stick and I had no issues with the cookies releasing easily.


Lemony Sandwich Cookies

Makes 24 sandwich cookies.

Lemon Sandwich Sugar biscuit ingredients:

  • 1/2 cup vegetable oil
  • 1 egg
  • 1 tsp natural lemon extract
  • 1/2 tsp almond extract
  • 1/2 cup granulated sugar
  • 1/4 tsp salt
  • 1 1/3 cup unbleached, all-purpose flour
  • a very small bit of yellow gel food colouring (optional)

Lemon Butter Cream Ingredients:

  • 94 g butter, room temperature
  • 360 g icing sugar
  • 2 tsp natural lemon extract
  • 3 tsp fresh lemon juice
  • 2 lemons, freshly grated zest
  • a very small bit of yellow gel food colouring (optional)

Lemon Cookie Batter Directions:

  1. In the bowl of a stand mixer, combine the oil and egg and beat until combined.
  2. Add the extracts, sugar and salt and beat for 1 minute.
  3. Add the flour a bit at a time, beating well to incorporate.
  4. Add the colouring a bit at a time until the desired colour is achieved.
  5. Create little round balls about 8 grams or 1/2 teaspoon each and put into the centre of each form (no need to spray with non-stick spray), press down evenly (I used a press like this cookie stamp without the silicon bit, make sure you press the bottom into flour first! You could also use an espresso tamper).
  6. Bake for 9 minutes or until no longer soft in the centre but not beginning to brown. Allow cookies to cool in the pan for a few minutes then gently coax out. Cool cookies completely before filling.

Lemon Butter Cream Filling Directions:

  1. Beat the butter until fluffy. Add the icing sugar a little each time, beating well.
  2. About half-way through the sugar, add the flavouring and lemon zest.
  3. Continue to add the sugar and beat until a desired consistency is achieved.
  4. Freeze unused buttercream in an airtight container. To use, defrost in the refrigerator. When ready to use, whip for a few minutes to ensure it is consistent.

Assembly:

  1. Using a Wilton #12 tip, fill a piping bag with the creamy filling and pipe onto one cookie at a time about half-way to the edge. Place a similarly sized cookie on top and gently squeeze. Repeat until you have 24 sandwiched cookies. In the unlikely occurrence that they are not consumed in one sitting, store in an airtight container for a day or two, or freeze for longer periods of storage. Frozen cookies have been known to be consumed quite happily, we’re not picky!!!

Read Full Post »

HomeMadePhyllo_First

Growing up, one of our family favourites was Rétes (Hungarian Strudel) and my dear Mom made Hungarian delicacies like Káposztás Rétes (Savoury Cabbage Strudel) and Túrós Rétes (sweet Cottage Cheese Strudel) and even sometimes but not often, Almás Rétes (Apple Strudel). Mom’s favourite was Káposztás Rétes (Cabbage Strudel) and although as kids we couldn’t stand it, I often find myself craving the savoury flavours of this treat.

My dear Mom always told stories as she was cooking or baking, stories about food, of course! The one story that has resonated with me all these years is that Grandma (Nagymama) made her own Rétes dough! The story goes that Nagymama laid a clean, white sheet on the dining room table, dusted it with flour and stretched and stretched and stretched her homemade dough until you could read newsprint through it. I always imagined an enormous dough (like this) on the table! Mom never made strudel dough that I recall, by the time she was a homemaker, ready made, frozen dough was already available and so much easier than making it yourself. I have used ready made Phyllo more times than I can count on all my fingers and toes, but I’d never made it myself. So you can well imagine why homemade phyllo dough is on my bucket list.

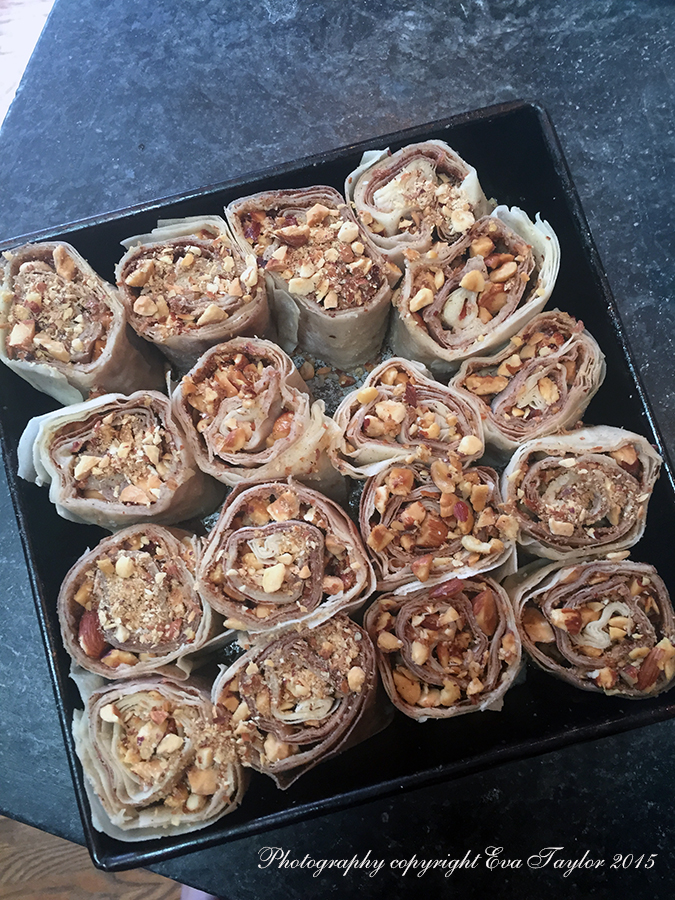
Recently, we invited dear friends to the cottage and I thought homemade Baklava would be a lovely dessert over the weekend and a great excuse to make homemade phyllo dough. I chose Baklava because if the Phyllo didn’t work out as well, the syrup would ‘hide’ its flaws, unlike Rétes. The recipe I followed is here (why reinvent the wheel?) but I can tell you right now that using the pasta maker is not nearly as satisfying as rolling by hand. A marble rolling pin (or something really heavy) would be helpful…I had a rolling pin made by one of my dear Mom’s friends many years ago and I paid the price by bruising my palms and fingers!

Bucket List

Homemade Phyllo Dough

This recipe makes 25 sheets approx. 25 cm x  41 cm (10″ x 16″)

I allowed the dough to rest overnight.

The recipe instructions indicate to take the dough to #9 on the pasta maker (mine is a KitchenAid Stand Mixer with attachments) but I recommend to take it to #8 and do the rest by hand. I also tried rolling it entirely by hand (see photos below – only took about 12 minutes each) and it wasn’t as difficult as I had anticipated but it did bruise my hands badly). Between each number of stretching the dough by pasta machine, keep rubbing a little flour to both sides of the flattened dough, this is how the correct texture is achieved. Believe me, you will know when you feel it.

I also found that rolling the dough through each pass on the pasta maker a couple of times instead of just once results in a finer dough.

Baklava

Yields:

  • 17 (4-sheet) baklavas
  • 11 (2-sheet) baklavas
  • 4 left over sheets (freeze for later).

Ingredients:

  • 21 sheets of phyllo dough
  • 120 g hazelnuts
  • 200 g almonds
  • 2 tbsp brown sugar
  • 1/2 cup sugar
  • 1 tbsp cinnamon
  • 1/8 ground cloves
  • 1/2 cup butter, melted

Directions:

  1. Roast both nuts on 163° C (325° F) for 18 minutes or until most of the skins have separated from the hazelnuts (almonds may or may not separate).
  2. Using a clean tea towel, rub the hot nuts until most of the skins come off. Separate skins from nuts.
  3. Chop both hazelnuts and almonds roughly and combine with sugar, cinnamon and cloves. Set aside.

Syrup Ingredients:

  • 1/2 cup butter
  • 2/3 cup water
  • 1 cup honey
  • 4 tbsp fresh lemon juice

Directions:

  1. Combine  first three ingredients in a small saucepan and bring to a boil. Boil for 2 minutes, remove from heat and add lemon juice. Stir well, set aside.

Baklava assembly:

  1. Preheat the oven to 163° C (325° F).
  2. Divide the dough into 40 g dough portions.
  3. Lightly flour a large, clean surface and roll out to approximately 25 cm x 41 cm or 10″ x 16″ sheets. Continue to roll all of the dough like this until you have rolled it all out. Cover with a lightly damp cloth and a jelly roll pan to protect it from drying out.
  4. Take one sheet of phyllo and lay it length-wise in front of you. Brush generously with the melted butter. Sprinkle 3/4 cup of the nut mixture per sheet. Continue for 2-3 sheets.
  5. Taking the long end, begin to roll the phyllo tightly. Brush the finished roll with melted butter.
  6. Cut into 5 cm or 2.5″ lengths (or smaller equal lengths). Place cut side up into a lightly buttered pan, it doesn’t matter if they touch. Continue until all the dough and nut mixture is exhausted.
  7. Bake for approximately 45-50 minutes.
  8. Allow to cool completely and then pour the syrup over The rolls and allow to rest for a few hours.

Phyllo40g

I found that 40 g made the perfect sheet size.

Phyllo_1

A relatively damp and somewhat elastic dough (not nearly as elastic as pizza dough)

Phyllo_2

You can roll to 9 in your pasta maker, but honestly I did not find rolling by hand difficult.

Phyllo_3

OK. By saying “I did not find the rolling difficult”, what I meant was “not difficult as I was rolling” but the next day, my palms were bruised from the shear pressure I had to put onto the rolling pin. You may wish to roll with a marble rolling pin.

Phyllo_4

For some reason, my Nagymama (grandma) always said the dough has to be thin enough to read a newspaper through it, I figured a nut panel would suffice!

Phyllo_5

This is one of the rolls of Baklava.

Phyllo_6

Cut rolls into 16-17 equal lengths and place into a greased pan. It’s OK if they touch because the dough has been greased sufficiently so they won’t stick.
Baklava_Beauty

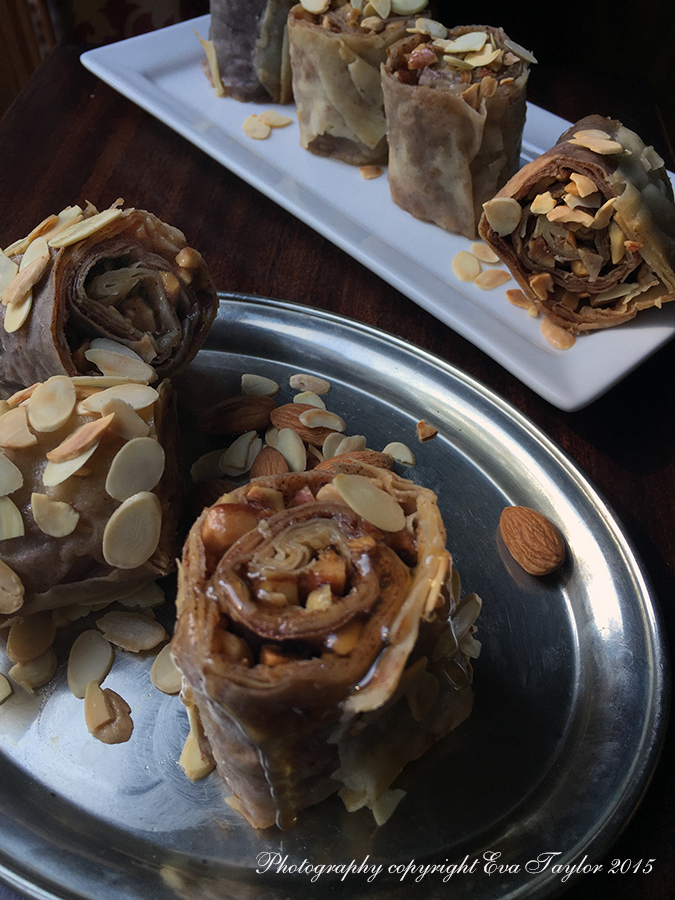
The finished product, with a little extra honey drizzled on. PS, that silver tray comes from my Dad’s side of the family, it’s probably over 100 years old!


Notes:

This is quite a damp dough and it’s a bit sticky but don’t worry, you’ll be stretching and rolling additional flour into it to give it the correct wet/dry ratio.

The dough only becomes difficult to work with (breaking, cracking) when it dries out; make sure you have a lightly damp tea towel to cover any rolls or sheets. I also used a 10″ x 16″ jelly roll pan to cover it.

In hindsight, I should have used only 2 or 3 (not 4) sheets per roll. Next time I think I’ll sprinkle the nut mixture on each sheet and not just the end — I have adjusted the recipe above.

I was 100% sure I would not be making this recipe again because it’s so inexpensive to buy ready made, but in reviewing the ingredient list I may have to resort to making it myself as there is one or two ingredients that gross me out.

Read Full Post »

Macarons

Strike one off the bucket list: French Macarons


Updated May 2016.

Do you have a cooking bucket list? I’ve had an informal (read: in my head) bucket list for quite some time; on it you’ll find duck, szalonczukor (a Hungarian fondant candy), spun sugar, puff pastry, phyllo pastry and last but not least, French Macarons! This post is about Macarons.

I was first introduced to these French Macarons a few years ago, a friend had brought a few back for me from Ladurée in Paris. My first bite experience was INCREDIBLE: crunchy, airy, lightly sweet, slightly chewy, fragrant, creamy, buttery. It was an awakening! It’s what you Aussie’s would call moreish and I would even go further to say needish, wantish, must-haveish!

The flavour combinations are limitless and I’ve even seen some savoury versions floating about the web-o-sphere (I must admit, a savoury version makes me cringe a bit). Today, I will share with you my second attempt recipe even though my first version turned out wonderfully, they were rather irregular in size and therefore not blog worthy. I used a Martha Stewart recipe for the meringue bit and a standard custard-based butter cream for the filling. The flavours I chose were: attempt 1 was lemon, attempt 2 were ice wine and pomegranate, chocolate and hazelnut. All were really delicious but my favourite was the lemon.

I will begin by saying that making Macarons are not as difficult as you might think; you need patience, a little know how and perseverance. The ingredients are simple and few. It makes me wonder why they charge so much for them, it must be the pomp and circumstance because it isn’t the cost of ingredients!

This blog post is an excellent reference; the professional baker did all the time-consuming comparisons and experimentation and documented it. My advice: Go with confidence and you WILL rock the recipe.

Bucket List

Macarons

Original Martha Stewart recipe can be found here.

Ingredients for basic Macaron:

  • 35 g blanched almond meal or flour
  • 58 g icing sugar
  • 1 large egg white, room temperature
  • 25 g granulated sugar
  • 1/4 tsp gel food colouring (I used Christmas red)

Ingredients for Favoured Macarons:

  • 35 g blanched almond meal or flour
  • 53 g icing sugar
  • 5 g flavour such as unsweetened cocoa powder (sifted) or espresso powder
  • 1 large egg white, room temperature
  • 25 g granulated sugar

Directions:

  1. Preheat oven to 350° F (177° C). Place the rack in lower part of the oven.
  2. Prepare your macaron template using your computer to draw 2.5 cm or 1″ circles about 2.5cm or 1″ apart. Print two sheets. Put the two sheets under your UNSTICK™ baking sheet liner to use as your circle templates.

    MacaronTemplate

    This is the circle template under the UNSTICK liner.

  3. In a coffee grinder, grind the almond flour in batches to a fine consistency (being careful not to make paste (marzipan) out of it). Omit if you can purchase extra finely ground almond flour.
  4. Transfer ground almonds to a food processor and add the icing sugar; process until combined, about 1 minute.
  5. Press the almond/sugar mixture through a fine-mesh sieve to remove the larger bits. You should have no more than 1 tbsp left, if you do, grind in coffee grinder again and press through fine sieve until you have no more than 1 tbsp left (save larger almond bits for something else).
  6. Whisk egg whites and granulated sugar by hand to combine. Then beat on medium speed (#4 on a KitchenAid) for about 2 minutes, then increase speed to medium-high (#6) and beat 2 additional minutes. Then beat on high (#8) for 2 minutes more. The beaten egg whites will hold very stiff, glossy peaks when you lift the whisk out of the bowl. DO NOT OVER WHIP.
  7. Add your choice of flavourings and food colourings and beat on the highest speed for about 1 minute. Just a drop if using flavouring or colour.
  8. Then add dry ingredients ALL at ONCE (yes, I know many recipes say to fold in gingerly, but you really don’t have to), then fold with a spatula from bottom of bowl upward and end by pressing the flat side of the spatula firmly through centre of mixture. Repeat this process until all of the almond/sugar mixture has been incorporated and the ‘batter’ flows like lava (I counted about 35 complete strokes).
  9. Prepare you pastry bag fitted with a 1 cm or 3/8″ round tip. Transfer the batter to the pastry bag.
  10. Begin piping the batter onto the prepared UNSTICK™ baking sheet liner directly over the circles you’ve previously prepared. I found starting at the outer edge and piping into the centre to the easiest way to keep the Macarons uniform, repeat until you’ve used up your batter. Martha suggests you pipe about 1 cm or 1/2″ above the pan, whatever you do, you must be consistent to keep the batter even (so your circles are all the same size). Gently slide out the template paper from beneath the UNSTICK™ baking sheet liner.
  11. Allow the pan to rest for 15 minutes, by doing this you give the peaks time to even out so your Macarons are beautiful and flat on top. Some suggest that you gently bang the pan a few time to remove air bubbles, I found I didn’t have many bubbles.
  12. Bake each sheet separately for 13 minutes, rotating halfway through if your oven doesn’t bake evenly. Gently slide the liner off the baking sheet and allow to cool for a couple of minutes. The UNSTICK™ baking sheet liner allows you to  pry off each macaron half easily onto a cooling rack and allow to cool completely. You may freeze the Macaron halves at this point in a well sealed, air-tight container.
  13. Prepare your butter cream.

MacaronFlavours

Great flavours to make macarons with.

Basic Butter Cream Recipe:

Ingredients:

    • 3 egg yolks
    • 35 g granulated sugar
    • 3 1/2 tablespoons milk
    • 105 g unsalted butter, softened
    • 62 g icing sugar

Ingredients for Ice Wine and Pomegranate Butter Cream:

    • 5 g ice wine syrup
    • 1 g pomegranate molasses
    • 2 drops generic red icing colour

Ingredients for Chocolate Hazelnut Butter Cream:

    • 2 tbsp Nutella or hazelnut chocolate spread

Directions:

  1. In a small saucepan, combine the egg yolks, milk and granulated sugar and whisk. Cook over medium heat until the egg thickens to coat the back of a spoon (like pudding). Remove from heat and allow to cool COMPLETELY.
  2. When cool, beat the butter with the icing sugar until light and fluffy and add the cooked egg mixture and beat on high until very fluffy.
  3. To make two flavours, divide the buttercream in half (roughly) and to each half add the flavourings.
  4. Pair each Macaron half to a half that is more or less is the same size and shape, set aside.
  5. Onto one-half of each Macaron pair, pipe the buttercream but not to the edge. Take the other half and gently squeeze the to side together so the buttercream squishes almost to the edge. Set aside. When you have filled all the halves, set on a clean baking sheet and refrigerate until buttercream is set. Store in an air-tight container on their sides until ready to serve. Allow to come to room temperature before serving.

A few notes:

    • I prefer weight measures over volume because it’s more accurate.
    • I ground my almonds in a coffee grinder because it results in a finer grind and apparently the grind is very important. Update May 2016: a fine grind almond meal is now available at my Bulk Barn so I no longer require to grind it in the coffee grinder.
    • I used Wilton’s paste food colouring for the ice wine Macaron cookies.
    • I ruined a batch using the convection setting in my oven; they didn’t spread nor did they rise or develop feet.
    • Over the years, I have made quite a few batches of these treats (the latest May 2016 was 146 macarons for our anniversary party). Two observations: Do not over beat the egg whites or they will not form feat and they will crack. Also, I found that they will crack if you do not fold the almond meal into the egg whites enough, the batter really needs to behave like lava, a slow moving thick batter.
    • Update May 5, 2016: I have also used this recipe from the very lovely Lorraine over at Not Quite Nigella and it is excellent. Her recipe makes 461 g of buttercream and by my estimation, each macaron takes about 14 g of buttercream (or if you make small macarons, only about 7 g of buttercream).

Macarons_2

Tender, delicious, delicate cookies

Macarons_4

Betcha can’t eat just one!

Macarons_1

Yes, I did get carried away with the photos!

FirstMacarons_2

For my first attempt, I didn’t grind the almonds quite fine enough and that’s why the macaron is not smooth.

FirstMacarons_1

This is my first attempt, it’s lemon flavoured.

Read Full Post »

The thing that’s quite a challenge in Vegan baking is not being able to use eggs. I can understand and convert recipes to use Vegan margarine or even substituting coconut oil but the egg thing is a biggy because of the science behind the egg’s participation in the recipe. At first I avoided egg recipes because they are just too difficult to convert but then the blog Vegan Baking came to my rescue, again. Although this recipe does not contain eggs the next one will. Substituting coconut oil for butter was an easy conversion because the cookie already had coconut in it — it was a no brainer. True Anzac lovers might miss the butter, but if it means not being able to indulge at all, I think it’s worth the slight difference in flavour. I hope you like it too.

VeganAnzac_4202

I wasn’t disappointed with the coconut oil substitution.

Vegan Anzac Biscuits

Makes about 22 cookies (I used a 4 cm ice cream scoop)

Ingredients:

  • 1 cup all-purpose flour
  • 3/4 cup rolled oats
  • 1/4 cup flaked quinoa
  • 1 cup sugar
  • 1/2 cup desiccated coconut
  • 1/2 cup coconut oil
  • 1 tablespoons Lyles Golden Syrup
  • 1/4 teaspoon plus a bit baking soda
  • 1/8 cup boiling water

Directions:

  1. Pre heat the oven to 350° F (177° C)
  2. Line baking sheets with parchment or some other non-stick surface (this is a greasy cookie).
  3. In a large bowl, combine flour, oats, flaked quinoa (I ran out of oats!), sugar, and coconut oil and stir well with a wire whisk. Set aside.
  4. In a small saucepan over medium heat, melt coconut oil with syrup. (I do this in the microwave on 30% so the oil does boil over and make a mess)
  5. Dissolve baking soda in boiling water, and add to butter mixture. Stir to combine. (Be careful; if the oil is hot, it will bubble up considerably.)
  6. Add oil mixture to dry ingredients, and stir to well combine. This will be a very crumbly mixture.
  7. Using a 4 cm ice-cream scoop (be sure to pack the scoop tightly so the mixture doesn’t crumble), drop onto prepared baking sheets, about 4 cm apart. Flatten cookies slightly with the palm of your hand.
  8. Bake until bottom and sides golden brown and firm but not hard, about 10-12 minutes (larger cookies will take longer). Coconut oil seems to have a lower burning point so watch because they’ll go from raw looking to too dark in an instant!
  9. Transfer to wire racks to cool.

VeganAnzac_4201

It’s still the same chewy texture we’ve all come to know and love.

Read Full Post »

Happy Canadian Thanksgiving everyone! We have so much to be thankful for! We’ve spent the weekend at my brother’s cottage up in the Muskoka’s and it was lovely even if the weather was not. Over the years we’ve had so many different experiences, from shorts n’T boat rides, to chilly walks in the country to snow flurries! Yes indeed, snow flurries. In October! This year there wasn’t snow but it was rainy and chilly, perfect for staying inside by a roaring wood fire and perhaps baking a thing or two!

When I first made these bars I wasn’t able to source puffed quinoa, even-so the original bar was tasty and full of texture. Since that first time, I have been able to source puffed quinoa as well I’ve made some other adjustments to the recipe: I replaced brown sugar with coconut sugar and have omitted the chocolate chips adding vanilla extract instead. Also, I added egg whites as the binder so it’s not as crumbly as the first go round. If you’re so inclined, you can dip one half into good quality dark chocolate.

These are crunchy bars.

These are crunchy bars.

Puffed Quinoa Bars

Makes 1  33 cm x 23 cm (9″ x 13″) pan of bars about 1 cm or 1/2″ thick.

Ingredients:

  • 60 g (2 cups) commercially puffed quinoa (like puffed rice)
  • 140 g (1 cup) unsalted sunflower seeds, slightly roasted in a frying pan
  • 180 g (2 cups) uncooked oatmeal, old-fashioned or instant
  • 45 g (1/4 cup) partly ground flax seeds
  • 60 g (1/2 cup) dried cranberries or other dried fruit
  • 120 g (1/2 cup) coconut sugar
  • 125 mL (1/2 cup) agave syrup or honey
  • 30 mL (2 tbsp) molasses
  • 60 mL (4 tbsp) egg whites
  • 15 mL (1 tbsp) vanilla
  • 63 mL (1/4 cup) water
  • 2 mL (1/2 tsp) salt

Directions:

  1. Pre-heat the oven to 350° F (177° C ).
  2. Prepare a 33 cm x 23 cm (9″ x 13″) pan by lining it with parchment paper, enough to have the sides come up as handles.
  3. Combine dry ingredients in a bowl. Combine wet ingredients and whisk thoroughly to combine.
  4. Pour into the dry ingredients into the wet and mix well (I used a very large bowl with a wooden spoon). You want to make sure that everything is coated with the wet ingredients.
  5. Pour the combined ingredients into the prepared pan and press evenly into all corners (I used a glass as a rolling pin). Bake for about 20 minutes.
  6. Carefully remove from the pan with the parchment handles onto a cutting board and cut into 20 bars. Place onto a parchment lined cookie sheet and continue to bake for 12 minutes or until lightly browned. I wanted a crunchy bar and not a soft chewy one, if you would prefer a soft chewy bar, skip this bake step.
  7. Allow to cool completely before storing in an airtight container in the refrigerator or freezer.

Notes:

Depending on how dry your house is, you may need to adjust the wet ingredients as the final product can be a bit crumbly.

A delicately flavoured energy bar.

A delicately flavoured energy bar.

1 bar serving (recipe makes 20 Bars)

1 bar serving (recipe makes 20 Bars)

Read Full Post »

This winter we had a lot of snow. And by a lot, I’m talking over a metre (yard) high piled up on our front yard. It’s been really crazy. I’ve talked about our wonderful neighbours before and I just have to say something again. It snowed about 10cm (4 inches) overnight and by the time we had gotten up the next morning, our wonderful neighbour John had shoveled our sidewalk, all 59 feet of it and even some of our other neighbour’s sidewalk too! Isn’t that nice? As a thank you I made a batch of biscotti, a little different than this version I made last year to give them after all, I wouldn’t want to discourage such neighborly behavior!

Almond, Cranberry and Orange Biscotti

Makes about 4 dozen little cookies

Ingredients:

  • 2 cups unbleached AP Flour
  • 2 tsp baking powder
  • pinch of salt
  • 3/4 cup toasted almonds
  • 1/2 cup dried cranberries
  • 2 eggs, lightly beaten
  • 3/4 cup granulated sugar
  • 1/3 cup melted butter
  • 2 tsp vanilla extract
  • 1 tsp almond extract
  • 2 tbsp orange zest
  • 1 lightly beaten egg white
  • Plus a small amount of dark chocolate, melted with a little butter (just enough to drizzle).

    Directions:

    1. Preheat the oven to 350°F or 180°C.
    2. Toast the whole almonds on a baking sheet for 10-12 minutes. Cool completely.
    3. Combine the flour, baking powder, salt, orange zest and nuts in a medium-sized bowl.
    4. In another bowl, whisk the eggs together with the sugar, melted butter, vanilla extract and almond extract ; stir the wet ingredients into the flour/nut mixture and combine until a sticky dough forms.
    5. Transfer to a floured surface and form the dough into two narrow logs about 30 cm or 12 inches long.
    6. Place the logs onto an ungreased baking sheet and brush with the beaten egg whites.
    7. Bake for about 25 minutes. Remove from the oven and allow to rest for about 6 minutes and then slice into 1 cm or 0.5 inch thick diagonal slices. Return slices to the cookie sheet and bake again for about 15-20 minutes or until golden brown. Allow to cool.

    Read Full Post »

    As we are approaching the end of autumn and the beginning of a long cold winter, I am once again excited about… Halloween! Last year I started telling you about some spooky stories all true, and now I’m going to continue this tradition. Buckle your seat belts ladies and gents.
    JT and I bought our first house north and east of Toronto in a small bedroom community called Stouffville. It was an old farming community from the 1800’s that the city planners linked to Toronto via the GO Train (Government of Ontario Train). The small city was limited only by the fact that it wasn’t on either main water or sewage; our little city’s water was from an arteasesn well. Being limited by the water made Stouffville even more desirable because it constrained mass building which was happening in droves in similar bedroom communities (we used to call it ‘the sea of houses’ because they went on and on). Our subdivision was the last of its kind until Stouffville joined up to city water and sewage in the mid-2000’s, which made it the fastest growing community north of Toronto. But we were gone long before that.
    Although the house was brand new, it always gave me the willies! I only ever spent one night by myself in that house, I would go spend the night with my Mom or in laws when JT travelled. There were creepy noises, creeks and cracks. But the weirdest thing that happened even made skeptic JT agree that the house was strange.
    One evening after dinner I was baking in our little kitchen, JT was watching television in the adjacent family room. I was turned away from the doorway and as I turned to put something in the sink out of the corner of my eye, I saw someone poke their head into the kitchen, they were wearing red. I just figured it was JT seeing if there were any samples to be had. But then a few moments later JT actually came into the kitchen and asked me what I wanted. I said I was just about to ask him the same thing. He said he thought I just poked my head into the family room, he thought I was wearing red too! Except neither of us had red on. Super freaked out, we checked all the doors and windows and they were locked tight. Then we checked all the rooms and closets. We found nothing.
    Even though I wasn’t baking biscotti that night, I think JT and our mystery guest would have enjoyed a few tasters from this recipe.

    ChocAlmondBiscotti_0978

    There is something so civilized about eating a little biscotti with an afternoon espresso, don’t you think?


    Chocolate Almond Biscotti

    Makes 2 logs, about 48 biscotti

    Original recipe from Food Network

    I was drawn to this recipe because it doesn’t have melted butter in it. Not having butter actually makes this cookie very hard and I would recommend not biting down on it unless you have dipped it into something warm.

    Ingredients:

    • 2 c flour
    • 1 c sugar
    • 1/3 c cocoa powder
    • 1 tbsp espresso powder
    • 1 tsp baking soda
    • 1/4 tsp salt
    • 2 eggs
    • 2 egg whites
    • 1 tsp vanilla extract
    • 2/3 c whole almonds, toasted skin on
    • 1/3 c chocolate chips
    • 1 egg white for brushing

    Directions:

    1. Combine flour, sugar, cocoa powder, baking soda and salt in a stand mixer with paddle attachment.
    2. Mix together eggs, egg whites and vanilla extract.
    3. Gradually add egg mixture to flour mixture blending on low speed.
    4. Toss almonds with chocolate chips and fold into the flour mixture until combined.
    5. On a well floured surface roll dough into 2 logs, 2 inches in diameter. They will expand quite a bit.
    6. Place on a greased pan and brush with beaten egg white.
    7. Bake at 350 degrees until light golden brown, about 30-35 minutes.
    8. Allow logs to cool 15 minutes then cut into slices on the bias. Place slices on a greased sheet pan and bake in a 350 degree oven until toasted, about 15-20 minutes. Cool. Store in an airtight container.

    ChocAlmondBiscotti_0976

    Delicate flavours of the almond are accentuated by the rich, creamy chocolate. Isn’t that crema gorgeous?

    Read Full Post »

    We always really luck out with our neighbours. Our first house was in a new, bedroom community north of Toronto and JT and I bought the smallest house snuggled in between two of the larger models in the subdivision. The neighbours to the west of us built our shared fence and didn’t even ask us for a penny for it; we built our fence to the east of us with the neighbour over a weekend culminating with a great big shared BBQ. When we moved back to the city, our northern neighbours held a BBQ for us and invited the entire street so that we could meet everyone; it was wonderful. We shared a driveway with these people and more often than not, when I couldn’t find JT (who should have been doing chores), he was sitting on the neighbour’s back porch having a beer with the neighbour.
    When both our careers moved to the west side of Toronto, we made our third move; there were no parties or BBQs this time around, but there was always Biscotti! Our lovely neighbours on our north side made us delicious biscotti every Christmas. When I started living in our new reality, coffee breaks from the gruelling job search became imperative and I couldn’t help but crave ‘a little something’ with my java and that’s when I remembered our sweet neighbour’s almond biscotti. I’d never made biscotti before so it not only satisfied a craving but it also became a blog post! What more can I ask for?

    Original recipe from Eyetalian Magazine.

    Almond Biscotti (Biscotti Albani)

    Makes about 2 dozen

    Ingredients:

    • 2 c unbleached All Purpose Flour
    • 2 tsp baking powder
    • pinch of salt
    • 3/4  c  almonds
    • 2 eggs
    • 3/4 cup granulated sugar
    • 1/3 but melted butter
    • 2 tsp vanilla extract
    • 1 tsp almond extract
    • 1 1/2 tsp lemon zest
    • 1 lightly beaten egg white

    Directions:

    1. Preheat the oven to 350°F or 180°C.
    2. Combine the flour, baking powder, salt, lemon zest and nuts in a medium-sized bowl.
    3. In another bowl, whisk the eggs together with the sugar, melted butter, vanilla extract and almond extract ; stir the wet ingredients into the flour/nut mixture and combine until a sticky dough forms.
    4. Transfer to a floured surface and form the dough into two logs about 30 cm or 12 inches long (as the dough bakes, it will increase in size, so unlike what I did, I would make the logs much thinner next time).
    5. Place the logs onto an ungreased baking sheet and brush with the beaten egg whites.
    6. Bake for about 25 minutes. Remove from the oven and allow to rest for about 6 minutes and then slice into 1 cm or 0.5 inch thick diagonal slices. Return slices to the cookie sheet and bake again for about 15-20 minutes or until golden brown. Allow to cool.
    7. Serve with a beautiful espresso.

    Biscotti_IMG_0950

    We’ve had a hankering for biscotti these coolish days

    Biscotti_IMG_0948

    A perfect snack when dipped into the aromatic, creamy espresso

    Biscotti_IMG_0947

    Oh go ahead and take one please, I insist!

    Read Full Post »

    Happy Mother’s Day to all! Hope it was lovely.

    JT and I babysat my 13 year old nephew, Jack and my 10 year old niece, Annie on a recent weekend while their parents went to the Caiman Islands for a benchmark birthday party! We had a great action packed weekend filled with a visit to the High Park Zoo, bowling at Lucky Strike, cake decorating and cookie baking. Jack had his head burried in his laptop or smart phone at any given time; surprisingly he was not playing games, but monitoring a help desk he set up.

    At the zoo, we were very lucky to see the 1 month old baby Wallaby, hoping along side of Mama (he/she even crept back into Mama’s pouch)! And we reacquainted with the Lama that was born last year. Lots of great things to do at this quaint little zoo — chickens to hold, bunnies to pet and Capybaras to feed, and best of all, it’s FREE! If you’re in Toronto, take the kids to High Park, in addition to the zoo, there is an amazing Jamie Bell Adventure Playground that was recently rebuilt due to vandals burning it to the ground (hundreds of volunteers and a celebrity contractor rebuilt the castle, click here to read the article).

    BabyWallaby_4555

    The baby Wallaby and Mama drinking water. Shortly after this photo, the baby crawled back into Mama’s pouch.

    AnnieLama_4565

    Annie feeding the baby lama. He had such an adorable face.

    He really was having fun, even though he hid it well.

    He really was having fun, even though he hid it well.

    But even after bowling, the weekend wasn’t complete without some quality kitchen time. We wanted to take a cake over to Grandma and Papa’s as a get well gift for Grandma who recently had an operation, so I baked two vanilla slab cakes (well, that’s not the fun part) and Annie cleverly decorated both, one as a gift and one for dessert over the weekend — which was thoroughly enjoyed!

    Getting ready to decorate the cakes.

    Getting ready to decorate the cakes.

    Cake Decorating2_4548

    With everything going on, I didn’t have time to make the icing, but the cake was home made.

    This cake was for Grandma and Papa.

    This cake was for Grandma and Papa.

    This one was for us!

    This one was for us!

    20130512-102912.jpg

    We ate al fresco all weekend, which was a HUGE contrast to this past weekend when it SNOWED! Yes, you read that correctly!

    We also baked the easiest Peanut Butter Cookies we’ve ever made and I thought I would share them with you because they are gluten free!

    The Easiest Gluten Free Peanut Butter Cookies EVER (recipe from Kraft)

    Makes about 24 medium-sized cookies

    Ingredients:

    • 1 cup Kraft Smooth Peanut Butter (UPDATE) I made these cookies again using all natural peanut butter and they turned out perfectly. I won’t be buying Kraft again for this easy and tasty cookie. Take into consideration how oily the natural pb is, the last batch I made (2015) was excessively oily so I upped the sugar to 3/4 cup).
    • 1/2 cup sugar
    • 1 large egg
    • Optional 24 milk chocolate wafers

    Directions:

    1. Preheat the oven to 325°F.
    2. Mix all of the ingredients together until well blended (no need to drag out the hand mixer, just mix well with a spoon).
    3. Roll into 24 balls and place on parchment paper about 4 inches apart. Flatten with fork (or with a flatten with a milk chocolate wafer pressing it into the cookie).
    4. Bake 20 minutes or until lightly brown. Do not over bake. Cool for 5 minutes on the baking sheet and transfer to wire racks. Cool completely if you can resist eating.

    CookieMaking_4538

    Cookie making is serious business.

    PB Cookie 1_4554

    Batch one, traditional peanut butter cookie.

    PB Cookies_4551

    Annie claimed that we had mice because the cookies kept disappearing.

    Cookie batch one.

    They were so successful, we made another batch the next day.

    PB Chocolate_4606

    Delicious PB and Chocolate, what’s not to love? I didn’t have quite enough Kraft PB so I used a couple of tablespoons of natural crunchy PB I had on hand. Next time, I’ll try it all with the natural stuff.

    Read Full Post »

    You know the saying, when you’ve got lemons, make lemonade? Well I had purchased a few lemons for a recipe and didn’t end up making that recipe, so I had lemons. And in these parts, during the winter, lemons are expensive so I didn’t want them to go to waste. Not knowing exactly what I wanted to make. I just zested both lemons and then squeezed all the juice out. The zest went into a ziplock bag in the freezer (perfect for baked goods, fresh lemon zest anytime) and the juice went into a jar into the fridge. It was the juice I was most concerned about, after all the expense and now the trouble and mess of juicing them, I knew I needed to use up the lemon juice soon.

    This is the part I love about blogs: I sat down at the island in the kitchen and simply Googled “lemon recipes” and soon there were literally hundreds if not thousand lemony options. The one that caught my eye was “lemon cookies”! So now to find The One! By Googling “lemon cookies” recipe I found the recipe I wanted: Chewy Lemon Cookies by Patent and the Pantry. What drew me to these cookies was that they had four tablespoons of lemon juice and the zest of one lemon; coincidentally, I had EXACTLY four tablespoons of lemon juice from my lemons (and the zest from the freezer) so I knew this recipe was The One! And another coincidence is that the author of this blog also loves shoes, high heeled shoes, in patent leather! Sigh. And I loved the look of the cookies too. I made a few alterations in the recipe because of ingredients on hand (i.e. two small eggs instead of one large one). These cookies have a lovely lemony flavour and they are not too sour; it’s balanced by the sweetness of the sugar but they are not sickly sweet as some lemony recipes can be. This batch was taken in to JTs work with a few set aside for our enjoyment (and the photoshoot).

    Lemon Cookies Square_BLOG

    Fresh out of the oven, get ’em while they’re hot! (night shot)

    Chewy Lemon Cookies

    Makes about 66 smallish cookies (using a 2.5 cm or 1 inch ice cream scoop)

    For the original recipe kindly click here

    Ingredients:

    • 3 c all-purpose flour
    • 1 tsp baking soda
    • 1/2 tsp baking powder
    • 1/2 tsp salt
    • 1 c butter, softened
    • 1 1/2 c white sugar
    • 2 small eggs
    • 1/2 tsp vanilla extract
    • zest of one large lemon
    • 4 tbsp fresh lemon juice
    • 1/2 c sugar for rolling cookies

    Directions:

    1. Preheat oven to 350°F.
    2. Whisk together flour, baking soda, baking powder and salt.
    3. Beat the softened butter and sugar until light and fluffy. Beat in the eggs, vanilla, lemon zest and juice until thoroughly combined.
    4. Add the dry ingredients and mix until just combined.
    5. Using a 2.5cm or 1 inch ice cream scoop, make balls of dough and roll in the sugar. Place about 2″ apart on a parchment lined cookie sheet (they will flatten out and expand).
    6. Bake for 14 minutes for a golden bottom but still chewy.
    7. Remove from oven and let cool on cookie sheet for 2 minutes before removing to cool thoroughly on wire racks.
    8. Store in an air tight container, or eat right away!

    Lemon Cookies Top_BLOG

    Delicately crackled.

    Lemon Cookies Half_BLOG

    They really are quite chewy.

    Lemon Cookies right_BLOG

    This one insisted this was her best side.

    Lemon Cookies Front_BLOG

    This one was being a Prima Donna and made me shoot it from several angles.

    Read Full Post »

    ChristmasDay

    My Christmas baking list was altered somewhat because I just couldn’t get it all done with the small diversions I subjected myself to. This is what I had intended on baking:

    Here is this 2012′s round up:

    Plates ready to be delivered

    Plates ready to be delivered. May I send you one too?

    Here’s what actually went down:

    Very festive little parcels

    Very festive little parcels

    Card with legend

    Read Full Post »

    I promised a new take on the ma’amoul cookie, this one dates back to my Fannie Farmer Cookbook, first published in 1896, my version in it’s 12th edition. I first made this cookie in 2009 and have been keeping my eyes open for a new and updated version. I love the shape the ma’amoul brings to this old favourite and I love how the oatmeal adds a bit of texture to this delicious filled cookie. I would be leading you astray if I said this was an easily formed cookie, and I had to keep wetting my hands to make the dough pliable and not brittle around the sweet date paste, but once I got the hang of it, it went like clockwork.

    Oatmeal Date Filled Ma’amouls

    Still the same cookie, just in ma'amoul's clothing!

    Still the same cookie, just in ma’amoul’s clothing!

    Makes about 24 cookies

    Ingredients for the Date Paste:

    • 1 cup pitted dates
    • 1/2 cup sugar
    • 1/2 cup water

    Ingredients for the Dough:

    • 1/2 cup butter
    • 1/2 cup packed brown sugar
    • 1 1/2 cups flour
    • 1/4 tsp baking soda
    • 1/2 tsp salt
    • 1 1/4 cups oatmeal, pulsed for 2-4 minutes in a food processor

    Directions:

    1. Preheat oven to 350°F.
    2. In a small saucepan, put the dates, sugar and water and gently cook until thick and smooth. Set aside and allow to cool completely.
    3. Cream the butter and add the brown sugar, mix well.
    4. Sift flour, baking soda and salt and add to the butter sugar mixture.
    5. Add the pulsed oatmeal, mixing thoroughly and adding 2-4 tbsp water to make a dough that can be rolled.
    6. Refrigerate for 15 minutes.
    7. Make 23 g balls of the dough. Gently press each ball into the palm of your hand so that it covers the entire palm (you’ll need the extra to fold up and cover the paste). Add about 1 teaspoon of the date paste into the centre and bring all the sides up to close in the paste. Place the ball of fill dough into the ma’amoul mold and gently press in. Tap firmly to release. Repeat until all the dough is used.
    8. Bake at 350°F for 15-20 minutes or until lightly golden. Allow to cool and enjoy!

    The difference is that this is not a shortbread crust, it's an oatmeal cookie.

    The difference is that this is not a shortbread crust, it’s an oatmeal cookie.

    And that concludes the Christmas Baking 2012 Series. I hope you enjoyed it.

    Read Full Post »

    I’m sure I’m not the only one. In fact, I’ve seen it many times on-line, mainly when I’ve been sulking around the net after hours. I even know of a few professional photographers guilty of it, but not during work hours. It really snuck up on me quite innocently. I uploaded it on my iPhone after I saw someone using it on Facebook. I thought, WHAT? How could that be? I was sure you could only achieve that look professionally. That is, what I mean to say, is that only a professional could achieve that look. But there it is on Facebook, and it’s more than just professionals doing it.

    Of course, I am referring to Instagram, that incredible quirky photo app that can take photo, apply an effect and store it on various platforms. But if you’re sneaky like me, you might even use that shot for your blog. There I said it, yes, I have been guilty of using this app on my iPhone for some of my blog photos. And have received some very lovely compliments on some of those shots. Not that I’m saying I don’t like to use my lovely Canon Rebel, but it is a pain to get it all set up with the tripod and setting the aperture, blah, blah, blah…when all I have to do is reach over and shoot. Yep, that’s all I do. Sometimes I don’t even bother with lighting (the Naan shots, the Chicken Soup Shots to name a couple). Until now. Instagram was acquired by Facebook last April, and you know that can only mean trouble, with a capital T. So December 18 they posted an updated to their privacy policy which basically said that any photo posted on Instagram (and there is no other way to use it) belongs to them and they can sell it. REALLY? Sell. my. own. photos? I think not. But then later that same day, after a lot, and I mean A LOT of backlash they backtracked and took it all back. But it’s only a matter of time and frankly, I’m not sticking around for it. So I found a great app called Camera Awesome, it’s free and they won’t steal your photos — yet anyway, and it has A LOT more features than Instagram. Given, some of these features are for purchase, but they are only 99¢ so they are not bank breaking. The best features are the selected focus and exposure that operate independently to each other (unlike the iPhone camera). Also, it has some really cool features to change the sharpness, vibrance, temperature and contrast, so you don’t need to export and open in Photoshop. I also found an app that can super impose text over the existing photo, so I can copyright it direct from my iPhone. I’ll never have to fire up the iMac again. So now you know my dirty little secret, I hope I can trust you not to tell. 😉

    Do you sometimes cheat and use your iPhone for the shot, and if so, what apps do you use to help you make them stand out?

    My friend, boss, neighbour Kim and I exchange a small token gift every year and this year she got me something I had my eye on from over at Angie’s lovely blog, this beautiful cookie stamp! I couldn’t believe it, I was very excited to give it a go.

    This stamp makes a lovely cookie

    This stamp makes a lovely cookie. iPhone Photo.

    I made the recipe that came with the stamp. Big mistake. It was way too buttery and the indentations all but melted into a flat, round cookie. I was disheartened. But then I remembered I had a batch of chocolate marshmallow fondant left over from cake pops I made a previous week, so I had an idea! The cookies had good texture and great flavour, you just couldn’t make out the stamp, so I rolled out the fondant to about 1 mm thick and pressed the stamp into it, cut it with a similarly sized cookie cutter and applied it to each cookie after it had cooled completely. SUCCESS! I’m tempted to make another batch because this one might have been sampled over.

    So if you want to make cookies like this, just bake up a batch of your favourite shortbread or sugar cookies. You can buy the stamp at Chapters or Indigo or on line. The fondant is a very easy recipe from my dear friend Sawsan’s blog, Chef in Disguise. I simply added about 1/2 cup of sifted unsweetened cocoa powder to the finished fondant and kneaded it well to distribute evenly. It was very easy and very tasty!

    They chocolate fondant covered cookies turned out better than expected.

    They chocolate fondant covered cookies turned out better than expected. Instagram photo on my iPhone

    Or you can head over to Ilan’s blog and bake up this recipe; Ilan is an amazing baker and blogger. Just make sure you leave out the leavening as he suggests so that your formed cookie doesn’t lose it’s shape.

    A nice, old fashioned gingerbread cookie. And there is no question that they are 'Home Made'

    A nice, old fashioned gingerbread cookie. And there is no question that they are ‘Home Made’. Camera Awesome Photo on my iPhone but I hadn’t figured out how to select focus with it yet!

    Read Full Post »

    I got off to a slow start this year due mainly to the fact that my cold just didn’t want to give up, even though I was doing everything right, like my Chicken Soup, Kelly’s delicious alcohol free Hot Toddy and lots of ginger tea with honey. And I still have a slightly lower octave voice but I’m feeling a lot better!

    My Hungarian blogging buddy Zsuzsa suggested I post a list of my baking again this year, so here you go, my friend! I will also snap a few photos and post recipes in the days to come. Previously posted recipes are linked back, unless the photos were gross, in which case, I redid them and posted them again with a little twist!

    Here is this 2012’s round up:

    Now I bet you’re wondering where on earth did I get this gorgeous cookie mold; my dear friend Barb of Profiteroles and Ponytails was lovely to give it to me as a gift last June (shame on me for taking six months to make these gorgeous cookies with them). I know some of the bloggers (Betsy’s recipe, Sawsan’s recipe to name a couple) I follow have posted some very tantalizing recipes for ma’amouls, but I lacked their ingredients so I needed to find a recipe for which I had everything in my pantry. Plus these shortbread cookies have a lot, and I mean a lot of fat in them, so I searched and searched for a slightly lighter version. I made Bethany’s recipe with minor alterations and I also halved the quantity not knowing if we would love them. The dough is melt in your mouth shortbread dough, but it’s also a bit crumbly. The filling is lovely with the right amount of spice; before you jump to conclusions about the powdered sugar, I read somewhere that the date filled cookie is never sprinkled with powdered sugar . I will make these again, and I you’ll see how I’ve changed them up.

    Ma’amouls

    Please click here for original recipe, Bethany gives some great instructions.

    IMG_3635_BLOG

    Apparently the traditional ma’amoules are not dusted with powdered sugar.

    Dough Ingredients:

    • 425 g semolina
    • 100 g potato starch
    • 225 g of butter, melted
    • 125 mL orange blossom water (I substituted water with a few drops of orange essence)
    • 100 g of caster sugar
    • 1 tsp ground green cardamom
    • 1 ma’amoul mold

    Date Filling Ingredients:

    • 125 g dates, pitted
    • 1/8 teaspoon nutmeg
    • 25 g of almond flour

    IMG_3634_BLOG

    I was lucky that mine did not crack. Picture perfect.

    Directions:

    1. Combine the semolina, farina, cardamom, sugar and butter together.
    2. Slowly add the orange water a tablespoon at a time, kneading it into a soft sticky dough (it shouldn’t stick to your fingers). Cover the dough and let it sit 2 hours.
    3. Prepare the filling while the dough rests. Add all the ingredients to a food processor container and process until smooth
    4. After it has rested, knead dough one more time and then divide into two or three even balls. Roll out each ball into a rope with a thickness of 2.5 to 3 cm. Cut to about 2.5-3 cm and roll into a ball.
    5. Flatten the dough using the palm of your hand on the counter and spoon a small size ball of filling into the centre. Lift up all sides and form into a nice round ball. It was suggested to roll this in some additional semolina before you press it into the mold, but it was greasy enough and the mold released it quite quickly.
    6. Bake in a preheated oven 200° C / 400° F until the sides are slightly brown in color. It will vary depending on oven — I baked mine for 20 minutes. Cool and serve.

    No one will kick you out of bed for leaving crumbs!

    Read Full Post »

    Happy Thanksgiving to all my American friends! And anyone else who happens to celebrate Thanksgiving now. Hope you enjoyed an overload of turkey, stuffing and pies! And then there’s Black Friday, which for some reason Canadian retailers have jumped on and are promoting the heck out of it! Get out there and get some GREAT DEALS, but not before you leave me some of your lovely words.
    Honestly, I don’t eat sweets. I just like to bake ’em! And fortunately, JT started a new job (and career) in June and his office are the perfect guiney pigs recipients of my baking! I wanted to bake another batch of the molasses spice cookies, but JT put in a request for something chocolate. OK, I can live with that. The cookies lasted less than one hour and JT only had two. He came home with a request for the next bake: macarons! Can you believe it?

    A very tasty treat, if I do say so myself

    The recipe is an adaptation from the wonderful Chocolate Crinkle Kisses I make every year at Christmas, but since it’s not Christmas yet (unbenounced to many department stores who are playing Christmas music incessantly) I altered the recipe to be a Chocolate Espresso flavour and I omitted the Candy Cane Kisses!

    These cookies have a strong coffee and chocolate flavour and it’s texture is a little browny like.

    An explosion of chocolate and espresso in every bite

    Chocolate Espresso Crinkle Cookies

    Makes about 30-36 cookies

    Ingredients:

    • ½ cup icing sugar
    • 3/4 cup melted butter
    • 1/2 cup unsweetened cocoa powder
    • 1/4 cup espresso powder
    • 1 cup sugar
    • 2 cups all-purpose flour
    • 1 tsp baking powder
    • 1 tsp baking soda
    • 2 tsps vanilla extract
    • 1/2 tsp salt
    • 2 large eggs
    • 6 ounces semi-sweet chocolate chips

    Directions:

    1. Sift icing sugar into a small bowl.
    2. In a large bowl, mix the melted butter with the cocoa powder, espresso powder and sugar.
    3. Using an electric mixer, beat the eggs and vanilla Into the chocolate mixture.
    4. Slowly mix in all the dry ingredients until combined. Stir in the chocolate Chips.
    5. Cover and refrigerate about 2 hours.
    6. Preheat oven to 350°F. Roll dough into a small ball about the size of a walnut; roll balls in the icing sugar and press flat with the palm of your hand.
    7. Place on parchment covered baking sheet, leaving about 2 inches between the cookies. Bake 8-10 minutes.
    8. Let the cookies cool on the sheet; transfer to racks to cool completely before storing.

    Read Full Post »

    I thought I had my workout in the gym today. That’s what I thought when I got home and prepared to go for a walk around the hood and admire the changing leaves before they are all on the ground. I was wrong. As I went into the kitchen for a glass of water (the wine would come after the walk) I noticed the hardwood in front of our wine fridge was buckling a bit. No problem, I’ll just pull out the fridge and see what’s going on. I should have waited for JT to get home because clearly I was in the ‘blue job’ territory. But I just couldn’t help myself, I’m like that. I discovered that the fridge didn’t budge; oh no, it must be buckling under it and catching the little feet. Oh no. Now THIS is a challenge. Some brains and some brawn (and some good old fashioned Eastern European sweat) I managed to get the fridge out and the boards cut out (with my handy Dremel tool, which I use about once every four years). BRING ON THE DYI, I’m freakin’ READY! Tomorrow I’m ripping out tiles from the stairs and I’m cladding them in wood!

    Fortunately, there was no water or even wetness below, so there is relief because if you’ve ever had a water leak, it’s almost impossible to figure out where it’s coming from. But now the question is, why did the boards buckle? Any suggestions would be greatly appreciated.

    Doing manual labour like that inspires me to bake. Fortunately, my friend’s (boss, neighbour) daughter’s after school program is having a bake sale and since my friend (Kim) doesn’t bake much, I told her I would bake some cookies for the sale. I ended up making some old fashioned ginger snaps from my recipe from last Christmas, but then I saw a version Zsusza’s delightful cookie and was immediately drawn to it. I loved the way the cookie crackled on top. Well the kid got two batches for the bake sale (maybe a few were set aside!). I made a few alterations to the recipe, so please pop over to Zsuzsa’s blog to see the original recipe, I didn’t have nutmeg handy so I substituted allspice and I also added an extra teaspoon of dry ginger as well as a tablespoon of freshly grated ginger. It makes for a lovely warmly spiced cookie. And baking cookies is a hell of a lot easier than pulling a stuck wine fridge out of its spot.

    They are soft and chewy on the inside

    Old Fashioned Molasses Spice Cookies

    Makes about 30-36 cookies (if you don’t sample the cookie dough)

    Ingredients:

    • 2 cups flour
    • 1 Tbsp baking soda
    • 1 tsp cinnamon
    • 2 tsp dry ginger
    • 1 tbsp freshly grated ginger
    • 1 tsp allspice
    • 3/4 tsp salt
    • 3/4 cup shortening
    • 1 cup sugar
    • 1/4 cup molasses
    • 1 large egg

    Directions:

    1. Preheat the oven to (175°C) 350° F.
    2. Line a baking sheet with parchment paper.
    3. In a medium bowl, combine the flour, baking soda, cinnamon, ginger, cloves and salt; set it aside.
    4. In the bowl of your mixer, beat the shortening and sugar until fluffy.
    5. Beat in the molasses, egg and the freshly grated ginger and beat on low speed until just combined.
    6. Stir in the flour mixture.
    7. Chill the dough for 30 minutes.
    8. Using a melon baller, form the dough into 19 g balls.
    9. Place the balls leaving at least 2 inches apart on the prepared baking sheet.
    10. Bake for 8 to 10 minutes (baking more will cause the cookies to be hard)
    11. The cookies will be very soft when you take them out of the oven but they will harden up as they cool, then transfer to a wire rack.

    Read Full Post »

    Last night I was running around the blog-o-sphere looking for something to do and I came across my friend Jed’s recipe for his Grandma’s Oatmeal Cookies on his blog (Sports Glutton). I love oatmeal cookies; maybe because you can almost convince yourself that they are healthy snacks (not even close! wink wink, Kelly). But what I do love about them is the bite of the rolled oats, the wonderful chewy texture and the warm spice of the cinnamon. I prefer traditional oatmeal cookies with just raisins (sometimes I put nuts in but I didn’t this time because JT was taking them into work on Saturday, and I figured it was just safer that way).
    I want to thank Jed, that gluttonous-sports-loving-dude for inspiring me with his treasured recipe; sadly I didn’t have enough butter (WHAT?) in the house so I had to find a recipe that used slightly less butter and opted for my good old Fanny Farmer recipe, modified ever so slightly for our taste. I’m not sure why it’s called Cape Cod Oatmeal Cookies, perhaps one of my New England blog-friends can help with that. And if you love oatmeal cookies this is another great recipe, tipping my hat to my Australian friends (Charlie, Lorraine and Maureen)

    Can you just taste that chewy oaty goodness?

    Cape Cod Oatmeal Cookie

    Makes 36 cookies, about 5cm (2.5″) in diametre (recipe has been adapted from the original Fanny Farmer Cape Cod Oatmeal Cookie, you can find it on-line, but it’s best to get her cookbook as there are several yummy treasures in it).

    Ingredients:

    • 1 1/2 cups all purpose flour
    • 1/2 tsp baking soda
    • 2 tsp cinnamon (original recipe called for one but I like the heat)
    • 1/2 tsp salt
    • 1 cup brown sugar
    • 2 1/2 cups rolled oats, uncooked
    • 1/2 cup raisins, optional
    • 1 egg, lightly beaten
    • 1/2 cup melted unsalted butter
    • 1/2 cup melted shortening
    • 1 tbsp molasses
    • 1/4 cup milk

    Directions:

    1. Preheat oven to 177°C (350°F) degrees.
    2. Combine flour, baking soda, cinnamon, sugar and salt together in your food processor (metal blades) and pulse to combine well.
    3. Pour dry ingredients into a bowl and add the raisins and rolled oats and mix well.
    4. Mix cooled melted butter, shortening, molasses and milk with the egg and whisk lightly to combine. Pour this mixture into the dry ingredients and stir with a wooden spoon until it is entirely incorporated.
    5. Drop by tablespoons-full* onto parchment lined cookie sheet and bake until bottoms are golden-brown, 10-15 minutes (depends on size of cookie).

    *I used a 4cm, (1.5″) ice cream scoop, packed well, and then I flattened the cookie with my palm as they don’t spread much.

    May I get you a coffee or tea with your cookies?

    Read Full Post »

    Just a quick word about the blog…I just posted my 500th post! Woohoo!

    A week or so ago I was intrigued by a recipe at my friend Liz’s blog That Skinny Chick can Bake for Chocolate Meringue Cookies; it’s a meringue cookie for which you need not beat the egg whites. WHAT? How could this be? I had to give it a try! They were EVERY BIT AS GOOD as Liz made them out to be. EVEN BETTER some might say. So chocolatey and chewy with all the texture of a typical meringue cookie without the fuss. Please pop over to Liz’s blog to check out what all the fuss is about this cookie (plus she has some other tasty treats to ogle over).

    So that got me thinking (oh oh, this means trouble), if it worked so well for the chocolate version, I wonder if I can work it with an almond version! So I tried and it worked like a charm! The first time too! Although, I did adjust the recipe a teensy tiny bit. I think next time, I will toast the almonds so that that they give the cookie a bit more interest.

    Chewy, crunchy and very almondy

    Almond “Meringue” Cookie

    Makes about 4 dozen small cookies

    Ingredients:

    • 3 cups confectioners sugar (icing sugar)
    • 1 cup almond flour
    • 1/4 teaspoon salt
    • 2 1/2 cups sliced almonds
    • 4 egg whites (no need to beat like with a traditional meringue)
    • 1 tablespoon almond essence

    Directions:

    1. Preheat oven to 350º F. Line baking sheets with parchment and spray with non-stick cooking spray.
    2. Mix sugar, almond flour and salt in a bowl. Stir in almonds (if you are going to toast the almonds, I would allow them to cool entirely). Add egg whites and almond essence, and mix until just moistened. Do not over-mix batter. The batter should not be runny.
    3. Drop by small teaspoonfuls onto prepared baking sheets. Leave plenty of space between cookies as they spread quite a bit. I got about 12 per sheet in general.
    4. Bake until the bottoms begin to colour, about 12 minutes. Remove the parchment with the cookies from the hot tray and cool briefly before carefully moving to a cooling rack. Cookies are fragile, but I found them easily removed to a cooling rack with a large spatula. Store with parchment between layers.

    If you like almonds, this is the cookie for you!

    Norma, over at Garden to Wok had asked that I photograph my onion and garlic harvest, and I finally got around to it, sorry it’s been so late. I planted my garlic too early last fall and it sprouted and then proceeded to rot over the winter. I was so disappointed this spring when they didn’t sprout again that I pulled them out and planted more garlic and a few green onions. The garlic was planted too late and the heat, lack of rain did not help so they are a bit stunted. But I will persevere this fall and plant garlic again.

    I like the contrast on the Canadian Soapstone counters

    Read Full Post »

    This is the second last installment of the Christmas Baking Frenzy of 2011. The cookies I am posting today are a Christmas tradition that I started for my father-in-law and my husband’s brother-in-law, neither of whom should eat sugar; I present to you the Peanut Butter Cookie. Coincidentally, these are also gluten free.

    The cookies are a little dry, so you'll need a cup of tea or coffee with them.

    I was having a little fun with Photoshop

    Sugar Free and Gluten Free Peanut Butter Cookies

    Original Recipe by Paula Deen, Food Network
    21 cookies

    Ingredients:

    • 1 cup peanut butter, creamy or crunchy
    • 1 cup baking sugar replacement (recommended: Splenda)
    • 1 egg
    • 1 teaspoon vanilla extract

    Directions:

    1. Preheat the oven to 350° F. Line a large baking sheet with parchment paper.
    2. In a mixing bowl, combine the peanut butter, 1 cup sugar replacement, the egg, and vanilla, and beat until entirely combined. Roll the dough into balls (I used a 1.25″ melon baller).
    3. Place the balls on the prepared baking sheet. Press down each cookie with the palm of your hand. With a fork press once in the typical PB Cookie method
    4. Bake for 14 minutes remove from the oven and cool.

    On another note I wanted to share with you something absolutely AWESOME! For many years now, our neighbour to the north of us has brought Christmas to his house during the years our weather was not cooperative. This year was no different and although we have had a few light sprinklings of snow there was not enough to ‘stick’ and subsequently we have yet another ‘green Christmas’! Not to be outdone by nature, neighbour John goes out to the local skating arena and scoops up their leftover snow (what the Zamboni clears off the ice) and shovels it onto his front lawn in time for Christmas morning. The kids are teenagers now, but still LOVE this tradition and neighbour John is more than happy to oblige. Enjoy the snow.

    The only lawn in Toronto that has snow!

    Just in case you didn't believe me, that's our house next door!

    Read Full Post »

    Older Posts »