Feeds:
Posts
Comments

Archive for the ‘Quinoa’ Category

Happy Canadian Thanksgiving everyone! We have so much to be thankful for! We’ve spent the weekend at my brother’s cottage up in the Muskoka’s and it was lovely even if the weather was not. Over the years we’ve had so many different experiences, from shorts n’T boat rides, to chilly walks in the country to snow flurries! Yes indeed, snow flurries. In October! This year there wasn’t snow but it was rainy and chilly, perfect for staying inside by a roaring wood fire and perhaps baking a thing or two!

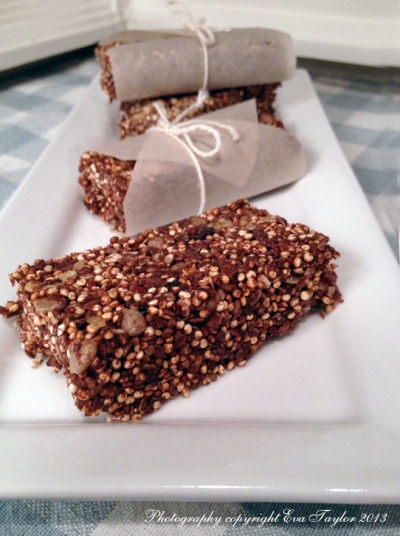
When I first made these bars I wasn’t able to source puffed quinoa, even-so the original bar was tasty and full of texture. Since that first time, I have been able to source puffed quinoa as well I’ve made some other adjustments to the recipe: I replaced brown sugar with coconut sugar and have omitted the chocolate chips adding vanilla extract instead. Also, I added egg whites as the binder so it’s not as crumbly as the first go round. If you’re so inclined, you can dip one half into good quality dark chocolate.

These are crunchy bars.

These are crunchy bars.

Puffed Quinoa Bars

Makes 1  33 cm x 23 cm (9″ x 13″) pan of bars about 1 cm or 1/2″ thick.

Ingredients:

  • 60 g (2 cups) commercially puffed quinoa (like puffed rice)
  • 140 g (1 cup) unsalted sunflower seeds, slightly roasted in a frying pan
  • 180 g (2 cups) uncooked oatmeal, old-fashioned or instant
  • 45 g (1/4 cup) partly ground flax seeds
  • 60 g (1/2 cup) dried cranberries or other dried fruit
  • 120 g (1/2 cup) coconut sugar
  • 125 mL (1/2 cup) agave syrup or honey
  • 30 mL (2 tbsp) molasses
  • 60 mL (4 tbsp) egg whites
  • 15 mL (1 tbsp) vanilla
  • 63 mL (1/4 cup) water
  • 2 mL (1/2 tsp) salt

Directions:

  1. Pre-heat the oven to 350° F (177° C ).
  2. Prepare a 33 cm x 23 cm (9″ x 13″) pan by lining it with parchment paper, enough to have the sides come up as handles.
  3. Combine dry ingredients in a bowl. Combine wet ingredients and whisk thoroughly to combine.
  4. Pour into the dry ingredients into the wet and mix well (I used a very large bowl with a wooden spoon). You want to make sure that everything is coated with the wet ingredients.
  5. Pour the combined ingredients into the prepared pan and press evenly into all corners (I used a glass as a rolling pin). Bake for about 20 minutes.
  6. Carefully remove from the pan with the parchment handles onto a cutting board and cut into 20 bars. Place onto a parchment lined cookie sheet and continue to bake for 12 minutes or until lightly browned. I wanted a crunchy bar and not a soft chewy one, if you would prefer a soft chewy bar, skip this bake step.
  7. Allow to cool completely before storing in an airtight container in the refrigerator or freezer.

Notes:

Depending on how dry your house is, you may need to adjust the wet ingredients as the final product can be a bit crumbly.

A delicately flavoured energy bar.

A delicately flavoured energy bar.

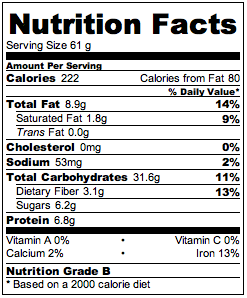
1 bar serving (recipe makes 20 Bars)

1 bar serving (recipe makes 20 Bars)

Read Full Post »

With JTs job, he sometimes misses lunch or dinner, so I went to our local health food stores to pick up some healthy energy bars. I was shocked! The high protein versions could run as high as $5 EACH! That’s absolutely crazy, and they are not even that “good” for you. So instead I bought some quinoa (sorry indigenous people of Peru), sunflower seeds, flax seeds, dark chocolate, dried cherries and agave and came home to search for a tasty recipe. My inspiration came from this recipe in Epicurious but it was purely Barb (from Profiteroles and Ponytails) that inspired the Quinoa addition to this treat, thank you Barb!

I toasted the quinoa so that it popped like pop corn; toasting brings out the nuttiness (hmmm, that’s a coincidence, when I’m toasted I become nuttier too ;-)!) and makes them nicely crunchy and not too jaw breaking.

Note that I updated the nutritional facts because someone asked about calories. Check out the tool I used here.

A delicious healthy snack or meal replacement

A delicious healthy snack or meal replacement

Quinoa Energy Bars

Makes one pan 10″ x 13″ (25cm x 33cm), cut into 20 bars

Ingredients:

  • 2 cups toasted quinoa (or you could buy the commercially puffed quinoa, which is like puffed rice)
  • 1 cup unsalted sunflower seeds, slightly roasted in a frying pan
  • 2 cups uncooked oatmeal, old-fashioned or instant
  • 1/4 cup partly ground flax seeds
  • 1/2 cup dried cherries or other dried fruit
  • 3/4 cup crunchy peanut butter, organic, just peanuts
  • 1/2 cup packed brown sugar
  • 1/2 cup agave syrup or honey
  • 1/2 cup dark chocolate chips
  • 1/2 cup water

Directions:

  1. Pre-heat the oven to 121° C or 250° F.
  2. Prepare a 10″ x 13″ pan by lining it with parchment paper, enough to have the sides come up as ‘handles’.
  3. Add the quinoa to a hot dutch oven (you will need the high sides) and stir as the quinoa pops. Keep stirring so it doesn’t scorch. This volume will take about 10-12 minutes. The quinoa pops like corn, but not nearly as aggressively, but you do need the high sides of the pan, otherwise you’ll be chasing the quinoa all over the place!
  4. In the same pan, slightly roast the sunflower seeds. Combine with the puffed quinoa, oatmeal, flax and cherries. Set aside.
  5. In a micro-wave proof bowl, add the peanut butter, brown sugar, agave syrup and chocolate chips and microwave on a low setting until chocolate and sugar have melted . Add the water and stir well.
  6. Pour into the dry ingredients and mix well (I used a very large bowl with a wooden spoon). You want to make sure that everything is coated with the wet ingredients.
  7. Pour the combines ingredients into the prepared pan and press evenly into all corners (I used a glass as a rolling pin). Bake for about 20 minutes.
  8. Allow to cool about 10 minutes, carefully remove from the pan with the parchment handles onto a cutting board and cut into 20 slices. Allow to cool completely before storing in an air tight container in the freezer.

Notes: depending on how dry your house is, you may need to adjust the wet ingredients as the final product can be a bit crumbly (so say the comments on Epicurious). That’s why I added the water and baked it out. Mine came out nice and tight and even after freezing wasn’t crumbly.

Screen Shot 2014-01-27 at 12.29.17 PM

Read Full Post »

As most of you already know, my family Christmas was cancelled due to illness, both my niece and nephew came down with the stomach bug (in the olden days, we called it the 24 hour bug). Fortunately they both recovered, but we had to postpone the festivities so they wouldn’t spread the nasty virus.

Our Do-over Christmas was Sunday, January 13 and I made a full Turkey dinner along with stuffing, celeriac and cauliflower mash, Cherry Soup, Cherry Squares and Pumpkin Brûlée mini-tarts! Needless to say, it was a grand success and everyone went home with their bellies filled and their hearts happy. We may have to make this another tradition!

IMG_3845_BLOG

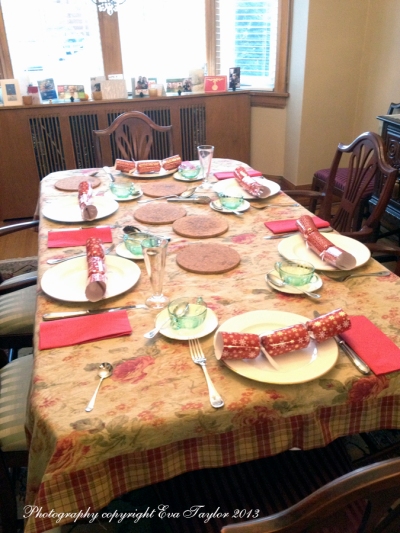
Even though we had already taken down our real Christmas tree, I put up a small, artificial tree so that the kids would have their presents underneath it!

IMG_3847_BLOG

Christmas dinner wouldn’t be complete without the traditional crackers. No one but me wore the stupid hats.

IMG_3848_BLOG

Quinoa Stuffing

Serves 8-10 (yes, I made way too much!)

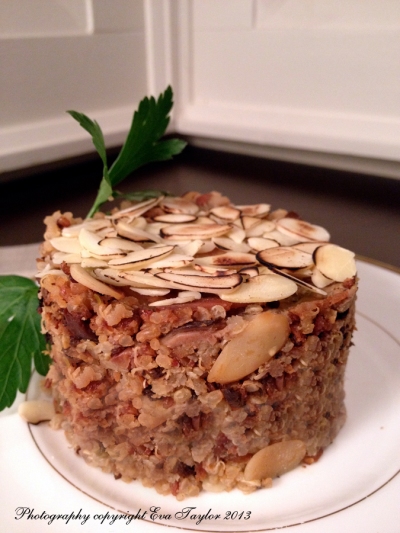
IMG_3851_BLOG

Quinoa stuffing, trying to keep the carbs down.

Ingredients:

  • 1 cup quinoa (we had a mix of red and white)
  • 100 g celery, cubed
  • 50 g roasted chestnuts, roughly chopped
  • 100 g onion, finely chopped
  • 100 g chorizo, finely choppedd
  • 100 g shitaki mushrooms, sliced thinly
  • 50 g dried cherries, roughly chopped
  • 1 tsp butter, melted
  • 1 tsp thyme
  • 2 eggs well beaten
  • 1/4 cup sliced almonds, toasted

Directions:

  1. Cook the quinoa according to the directions, plus add 1/2 cup more water.
  2. Melt the butter in a small frying pan, and cook the onions until translucent. Add the mushrooms and sauté until soft.
  3. Mix quinoa, onion, mushrooms, chestnuts, chorizo and dried cherries together. Add herbs and eggs and combine well.
  4. Pre-heat oven to 350°F
  5. Press the stuffing mixture into a well greased baking pan and bake for 30 minutes.
  6. Top off with the toasted, sliced almonds and bake an additional 15 minutes.
  7. Serve warm.

Read Full Post »

The weather was unbelievable on the May long weekend. We couldn’t help ourselves to drag the table down to the dock and two chairs so we could have lunch right on the water.

The sun was so bright, my photo turned out a little ‘hot’

The recipe is the similar to one I posted some time ago, but I changed it up so here it is again. It’s so versatile that you can put anything you desire in it. AND what was new and different was the amazing poached egg on top (yes, I had the egg yolk on this one, I figured I earned it!).

The yolk just oozed all over the tabouleh making it so delicious and rich. That little sprinkling of feta sure didn’t hurt either!

Quinoa Tabbouleh and a Poached Egg

Serves 4 (or two for lunch with leftovers)

Ingredients:

  • 1 cup Quinoa
  • 2 cups water
  • 2 tsp sea salt
  • 1/3 each red, yellow and orange peppers
  • 2 green onions
  • 1 cup halved grape tomatoes
  • 1/2 cup chopped fresh parsley
  • 6 mint leaves
  • 4-6 cloves finely minced garlic
  • 1/2 cup lemon juice
  • Sea Salt
  • 2 tbsp crumbled sheeps milk feta
  • 2 or 4 poached eggs

Directions:

  1. Add salt to water and boil.
  2. Toast Quinoa for a couple of minutes in a dry pan – moving around so it doesn’t burn (when you hear it pop, count to 5 and remove immediately)
  3. Add Quinoa and cook for 12 minutes on a soft boil, or until all the water is soaked into the Quinoa.
  4. While cooking the Quinoa, add minced garlic to lemon juice, allow to sit.
  5. Remove Quinoa from heat and add lemon juice and garlic mixture, mix well. Allow to absorb and cool.
  6. Chop all veg into similar sized pieces (I like about 1/4″ dice).
  7. Chop parsley and mint finely.
  8. When Quinoa has cooled, mix everything together. Serve with a poached egg over it and crumbled feta.

Read Full Post »

I would have never thought that eating vegetarian would leave me so satisfied. And I don’t have the afternoon snackie feeling either. I’ve done well, down 3lbs this week…but I’ve also been working out like a fiend. 16km each day on my bike on Tuesday and Wednesday, and working out cardio and weights everyday this week (don’t worry, I mix up the muscle groups that I work on!). But I am tired…not quite 25 anymore (who am I kidding, I’m not even 35 anymore!!!).

The foods we have prepared are tasty but I must admit it is a bit of a challenge when you have to find recipes each day to cook (kinda like learning to cook again!). I came up with the Quinoa Mushroom Risotto because I was in the mood for a risotto and I didn’t want the carbs that rice has (and I’m still not eating meat during the week). I also came up with a great idea on how to achieve the creaminess that Arborio rice brings to the table, without adding cream or butter!

Pull up a chair and enjoy.

Gluten Free and Vegetarian Quinoa Mushroom Risotto

Serves 4

Ingredients:

  • 1 cup red and white Quinoa uncooked
  • 545 g variety of mushrooms
  • 3 small shallots, finely chopped
  • 1 tbsp roasted garlic purée (see note below)
  • 3 tbsp navy bean paste (see note below)
  • 100 mL water
  • 1/4 tsp thyme
  • 1 tbsp low sodium soy sauce
  • Parmesan cheese

Directions:

  1. In a cast iron pan, toast the quinoa until they begin to pop, remove immediately. Cook as per directions on package.
  2. In cast iron dutch oven, give a good squirt of cooking spray and heat. Add the Shallots and cook gently, adding a bit of water if the oil dries up. Add the mushrooms and cook until soft.
  3. Mix the roasted garlic purée with the navy bean paste, adding enough water to make a thick sauce (like a roux). Pour it into the mushroom mixture and stir well.
  4. Add the cooked Quinoi, thyme and soy sauce to the mushrooms and stir until everything is coated with the garlic bean purée.
  5. Serve with freshly grated parmesan cheese.

Quinoa is a super food, but you still shouldn't wear a cape if you eat it.

Notes:

Roasted garlic purée

Take a head of garlic and roast with olive oil and sea salt in the oven until soft (I usually do it in a ramekin, not foil). Pop the cloves out into an immersion blender jar and purée until smooth. Add vegetable stock or water to make the consistency you need. I usually roast a bunch and freeze in special ice cub trays — pop out into a zip lock bag and return to freezer (don’t do it in your regular ice cub tray, otherwise your gin and tonic will taste garlic-y!)

Navy bean purée

Cook dried navy beans until soft. Purée with an immersion blender until you have a very smooth paste adding only as much water as the blender needs to continue the purée. Store in a glass container in the fridge and use as needed. I have used this paste as a roux for many things.

Read Full Post »

I wanted something healthy and not too heavy to go with ribs we were BBQ’ing for Rae and Mon, so we settled on Moroccan Style Quinoa. This recipe is a delicious combo or tart, salty and sweet, with the great texture of the Quinoa (super grain). I used a lovely bowl I picked up in Budapest during one of our first visits as a married couple. It’s about 25 years old now!

Moroccan Style Quinoa Salad

  • 1 cup dry Quinoa
  • 2 cups water (I usually do 50-50 water and LS Chicken Stock)
  • 1/2 tsp salt, or to taste
  • 1/2 chopped, roasted pistachios
  • 1/2 cup mixed dried cherries, cranberries and raisins (you can use currents too)
  • 1/4 chopped honey dates, chopped
  • 2 green onions, finely chopped
  • 1/4 cup lemon juice
  • 2 cloves garlic finely minced
  • 1-2 tbsp mint, finely chopped
  • 2-4 tbsp parlsey, finely chopped

Moroccan Style Quinoa

  1. Toast Quinoa in deep pan over medium heat (it will sound like pop corn, when you hear it start to pop, count to ten and remove from heat).
  2. Add water stock mixture and salt. Stir on medium heat until it comes to a boil. Cook 10-12 minutes or until the Quinoa has absorbed the liquid. Allow to completely cool.
  3. When cool, add the remaining ingredients (reserve a few pistachios for presentation) and stir well. Serve with your favourite BBQ!

I’ll probably have this for lunch on Monday with some roast chicken on top! YUM! Let me know if you have any favourite Quinoa recipes you’d like to share.

Read Full Post »

I love Tabouleh – absolutely love it. But bulgar is still a carb, so I don’t make it often. Recently I thought of Quinoa, why not? Searching for recipes, I found that I wasn’t the first to think of it. Oh well! I usually add any veg I have in the house, keeping in mind that you eat with your eyes first – I think it looks like jewels! And it’s a delicious, healthy salad – if you’re hungry, add grilled shrimp or tuna!

Serves 4

Quinoa Tabouleh with Lemon Garlic Grilled Shrimp

Ingredients:

  • 1 cup Quinoa
  • 2 cups water
  • 2 tsp sea salt
  • 2 celery stalks
  • 1/3 each red, yellow and orange peppers
  • 2 green onions
  • 10-12 Kalamata olives or sun-dried olives
  • 1 vine ripened tomato, seeded
  • 1/4 cup frozen corn (may be omitted)
  • 1/2 cup chopped fresh parsley
  • 6 mint leaves
  • 4-6 cloves finely minced garlic
  • 1/2 cup lemon juice
  • Sea Salt
  • 10 grilled shrimp seasoned with lemon juice and garlic (juice of 1/2 lemon, 3 finely minced garlic cloves, sea salt to taste, 3 tbsp EVOO, well stirred; marinate shrimp for no more than 1 hour)

Directions:

  1. Add salt to water and boil.
  2. Toast Quinoa for a couple of minutes in a dry pan – moving around so it doesn’t burn (when you hear it pop, count to 5 and remove immediately)
  3. Add Quinoa and cook for 12 minutes on a soft boil, or until all the water is soaked into the Quinoa.
  4. While cooking the Quinoa, add minced garlic to lemon juice, allow to sit.
  5. Remove Quinoa from heat and add lemon juice and garlic mixture, mix well. Allow to absorb and cool.
  6. Chop all veg into similar sized pieces (I like about 1/4″ dice).
  7. Chop parsley and mint finely.
  8. When Quinoa has cooled, mix everything together. Serve with grilled shrimp!

Oh YUM!

Read Full Post »