Feeds:
Posts
Comments

Posts Tagged ‘honey’

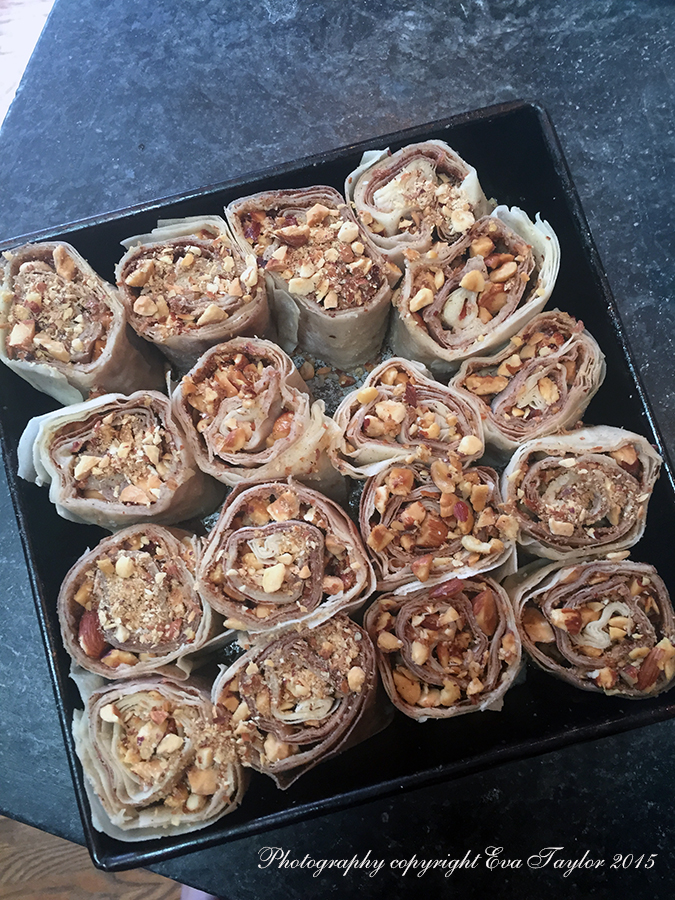
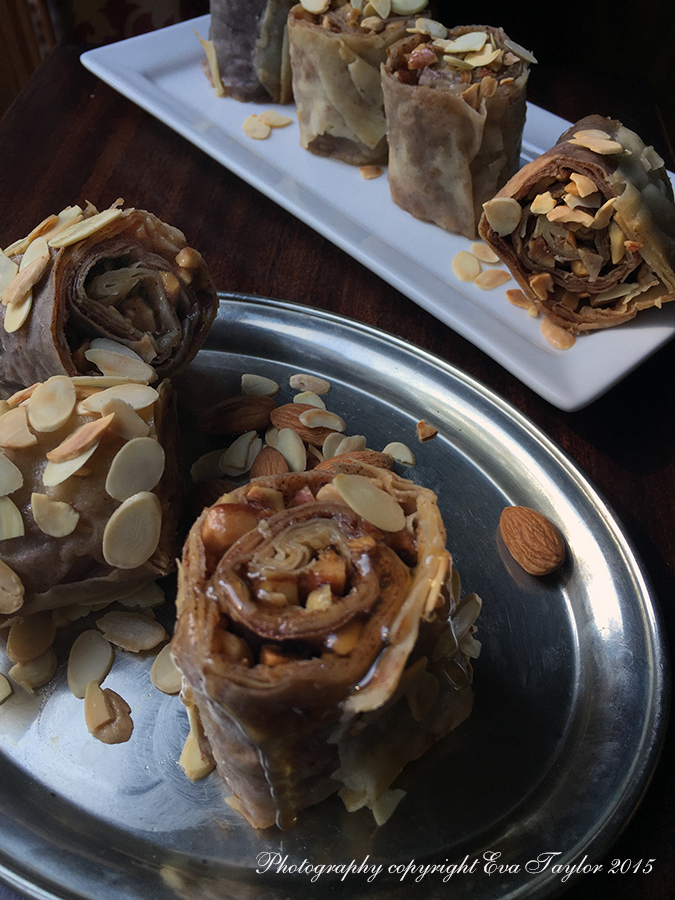
We had some dear friends over for a BBQ in late-August and we made homemade Moroccan lamb burgers with a wonderful spiced prune and nut couscous; I needed a Morrocan-style dessert so I chose this wonderful baklava recipe. To be honest, I wasn’t able to differentiate between Middle Eastern baklava and Morrocan baklava but rest assured, they are both delicious. This version has walnuts, pistachios and almonds with a syrup flavoured with orange and lemon rind, cloves and orange blossom water. It should have rose water in it as well, but I am not a fan so I skipped it. 

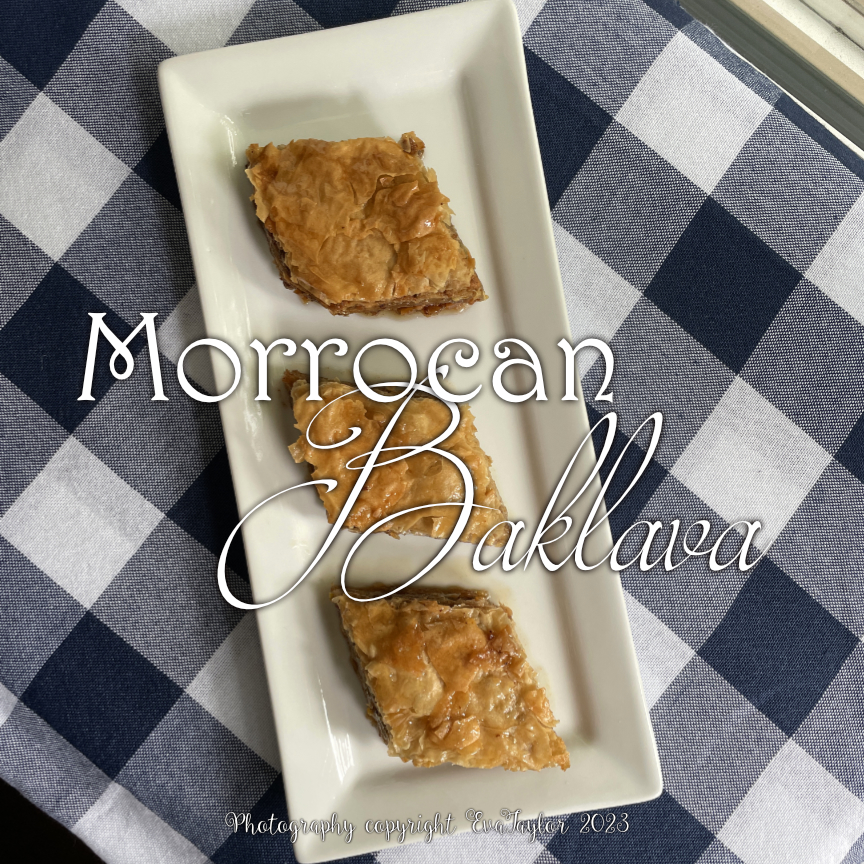
Metaxas (Moroccan Baklava)

For the original recipe, please click here. Makes about 33 cm x 23 cm 5 cm (12 inches x 9 inches x 2 inches) baking pan of Metaxas.

Ingredients

  • 150 g sugar
  • 150 mL water
  • rind of an orange (no white pith)
  • rind of a lemon (no white pith)
  • 5 whole cloves
  • 60 mL honey
  • 5 mL orange blossom water
  • 100 g walnuts
  • 100 g pistachios
  • 100 g lightly toasted, blanched almonds
  • 100 g sugar
  • 2.5 g ground cinnamon
  • 200 g unsalted butter, melted
  • 10 commercial phyllo dough sheets, cut in half length-wise to fit your pan

Directions:

  1. Combine the sugar, water, both orange and lemon rinds, cloves and cinnamon stick in a medium saucepan. Bring to a slow boil then turn the heat down to simmer, uncovered for 8 minutes. Remove the pan from the heat and strain to remove the spices and rinds. Stir in the honey and orange blossom water. Set aside to cool. See notes to make use of the orange and lemon rind.
  2. Preheat the oven to 300° F and toast the nuts for 12 minutes. Remove from the heat and cool. Increase the oven temperature to 350° F.
  3. In the small bowl of your food processor, combine the cooled nuts, sugar and cinnamon and pulse so they are relatively finely chopped with some larger pieces.
  4. Line a 33 cm x 23 cm 5 cm (12 inches x 9 inches x 2 inches) pan parchment and brush generously with butter.
  5. Begin by lining the bottom of the pan with one sheet of phyllo pastry and brush generously with the melted butter. Continue until you have five sheets stacked. Spread about one-third of the nut mixture over the fifth sheet evenly to the sides. Continue with the next five sheets spreading each sheet generously with the melted butter. Spread another third of the nut mixture over the tenth sheet evenly to the edges. Continue with the next five sheets as before, and spread the fifteenth sheet with the last third of the nut mixture. Finish with the last five sheets of phyllo as before, drizzling any remaining butter over the top of the last sheet.
  6. Bake in a preheated oven at 350° F for 45 minutes. Cover with foil if the top browns too quickly. Remove the pan from the oven and cut immediately. To cut the Metaxas in the traditional diamond pattern, begin by cutting a line from one corner to the opposite corner and repeat to the last corner. Then cut parallel lines to create small diamond slices. Pour the cooled syrup over the hot Metaxas. Allow to stand overnight at room temperature before serving.

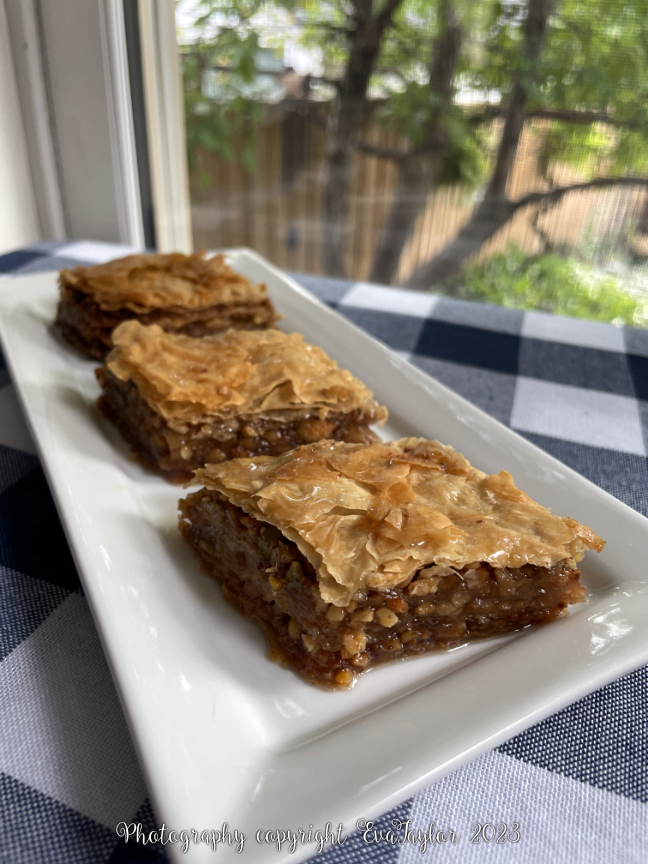
Layers of delicious nuts bathed in a luxurious syrup between crunchy sheets of phyllo.

Notes:

  • Remove and separate the orange and lemon rinds and place on a parchment-lined baking sheet. Bake for 10 minutes at 300° F until firm. Eat as a snack.

Read Full Post »

HomeMadePhyllo_First

Growing up, one of our family favourites was Rétes (Hungarian Strudel) and my dear Mom made Hungarian delicacies like Káposztás Rétes (Savoury Cabbage Strudel) and Túrós Rétes (sweet Cottage Cheese Strudel) and even sometimes but not often, Almás Rétes (Apple Strudel). Mom’s favourite was Káposztás Rétes (Cabbage Strudel) and although as kids we couldn’t stand it, I often find myself craving the savoury flavours of this treat.

My dear Mom always told stories as she was cooking or baking, stories about food, of course! The one story that has resonated with me all these years is that Grandma (Nagymama) made her own Rétes dough! The story goes that Nagymama laid a clean, white sheet on the dining room table, dusted it with flour and stretched and stretched and stretched her homemade dough until you could read newsprint through it. I always imagined an enormous dough (like this) on the table! Mom never made strudel dough that I recall, by the time she was a homemaker, ready made, frozen dough was already available and so much easier than making it yourself. I have used ready made Phyllo more times than I can count on all my fingers and toes, but I’d never made it myself. So you can well imagine why homemade phyllo dough is on my bucket list.

Recently, we invited dear friends to the cottage and I thought homemade Baklava would be a lovely dessert over the weekend and a great excuse to make homemade phyllo dough. I chose Baklava because if the Phyllo didn’t work out as well, the syrup would ‘hide’ its flaws, unlike Rétes. The recipe I followed is here (why reinvent the wheel?) but I can tell you right now that using the pasta maker is not nearly as satisfying as rolling by hand. A marble rolling pin (or something really heavy) would be helpful…I had a rolling pin made by one of my dear Mom’s friends many years ago and I paid the price by bruising my palms and fingers!

Bucket List

Homemade Phyllo Dough

This recipe makes 25 sheets approx. 25 cm x  41 cm (10″ x 16″)

I allowed the dough to rest overnight.

The recipe instructions indicate to take the dough to #9 on the pasta maker (mine is a KitchenAid Stand Mixer with attachments) but I recommend to take it to #8 and do the rest by hand. I also tried rolling it entirely by hand (see photos below – only took about 12 minutes each) and it wasn’t as difficult as I had anticipated but it did bruise my hands badly). Between each number of stretching the dough by pasta machine, keep rubbing a little flour to both sides of the flattened dough, this is how the correct texture is achieved. Believe me, you will know when you feel it.

I also found that rolling the dough through each pass on the pasta maker a couple of times instead of just once results in a finer dough.

Baklava

Yields:

  • 17 (4-sheet) baklavas
  • 11 (2-sheet) baklavas
  • 4 left over sheets (freeze for later).

Ingredients:

  • 21 sheets of phyllo dough
  • 120 g hazelnuts
  • 200 g almonds
  • 2 tbsp brown sugar
  • 1/2 cup sugar
  • 1 tbsp cinnamon
  • 1/8 ground cloves
  • 1/2 cup butter, melted

Directions:

  1. Roast both nuts on 163° C (325° F) for 18 minutes or until most of the skins have separated from the hazelnuts (almonds may or may not separate).
  2. Using a clean tea towel, rub the hot nuts until most of the skins come off. Separate skins from nuts.
  3. Chop both hazelnuts and almonds roughly and combine with sugar, cinnamon and cloves. Set aside.

Syrup Ingredients:

  • 1/2 cup butter
  • 2/3 cup water
  • 1 cup honey
  • 4 tbsp fresh lemon juice

Directions:

  1. Combine  first three ingredients in a small saucepan and bring to a boil. Boil for 2 minutes, remove from heat and add lemon juice. Stir well, set aside.

Baklava assembly:

  1. Preheat the oven to 163° C (325° F).
  2. Divide the dough into 40 g dough portions.
  3. Lightly flour a large, clean surface and roll out to approximately 25 cm x 41 cm or 10″ x 16″ sheets. Continue to roll all of the dough like this until you have rolled it all out. Cover with a lightly damp cloth and a jelly roll pan to protect it from drying out.
  4. Take one sheet of phyllo and lay it length-wise in front of you. Brush generously with the melted butter. Sprinkle 3/4 cup of the nut mixture per sheet. Continue for 2-3 sheets.
  5. Taking the long end, begin to roll the phyllo tightly. Brush the finished roll with melted butter.
  6. Cut into 5 cm or 2.5″ lengths (or smaller equal lengths). Place cut side up into a lightly buttered pan, it doesn’t matter if they touch. Continue until all the dough and nut mixture is exhausted.
  7. Bake for approximately 45-50 minutes.
  8. Allow to cool completely and then pour the syrup over The rolls and allow to rest for a few hours.

Phyllo40g

I found that 40 g made the perfect sheet size.

Phyllo_1

A relatively damp and somewhat elastic dough (not nearly as elastic as pizza dough)

Phyllo_2

You can roll to 9 in your pasta maker, but honestly I did not find rolling by hand difficult.

Phyllo_3

OK. By saying “I did not find the rolling difficult”, what I meant was “not difficult as I was rolling” but the next day, my palms were bruised from the shear pressure I had to put onto the rolling pin. You may wish to roll with a marble rolling pin.

Phyllo_4

For some reason, my Nagymama (grandma) always said the dough has to be thin enough to read a newspaper through it, I figured a nut panel would suffice!

Phyllo_5

This is one of the rolls of Baklava.

Phyllo_6

Cut rolls into 16-17 equal lengths and place into a greased pan. It’s OK if they touch because the dough has been greased sufficiently so they won’t stick.

Baklava_Beauty

The finished product, with a little extra honey drizzled on. PS, that silver tray comes from my Dad’s side of the family, it’s probably over 100 years old!


Notes:

This is quite a damp dough and it’s a bit sticky but don’t worry, you’ll be stretching and rolling additional flour into it to give it the correct wet/dry ratio.

The dough only becomes difficult to work with (breaking, cracking) when it dries out; make sure you have a lightly damp tea towel to cover any rolls or sheets. I also used a 10″ x 16″ jelly roll pan to cover it.

In hindsight, I should have used only 2 or 3 (not 4) sheets per roll. Next time I think I’ll sprinkle the nut mixture on each sheet and not just the end — I have adjusted the recipe above.

I was 100% sure I would not be making this recipe again because it’s so inexpensive to buy ready made, but in reviewing the ingredient list I may have to resort to making it myself as there is one or two ingredients that gross me out.

Read Full Post »

Bircher Muesli

Muesli was invented by a Swiss physician to help his patients recover from surgery. It originally was a wet version (unlike the dry ones you buy at the grocery store) with raw oats, a grated apple and nuts and dairy such as milk or yogurt but it can be made using whatever you prefer. I love making a large batch to have over the weekend when we go to the cottage, it’s a delicious and nutritious breakfast particularly when you have projects to finish up like we did. I served it with a half a grapefruit and it satisfied us even working hard!
The first time I had this lovely breakfast was in Zurich in the late 80’s; JT had a business meeting with a wonderful Swiss gentleman (with whom we are still friends) and his wife was kind enough to take me around. I couldn’t wait to introduce JT to it. Years later, I’m still making it even though I confuse the name quite often!

20130811-141933.jpg

The variety of textures is a pleasant way to start the day.

Bircher Muesli

(makes about 4 cups)

Ingredients:

  • 1 apple, grated
  • 2 cups Greek yogurt
  • 1/2 mixed in salted nuts (I used the Turkish honey and nuts my friend Barb of Profiteroles and Ponytails gave me)
  • 16 grapes cut into halves
  • 1 cup raw rolled oats

Directions:

  1. The night before you wish to eat this breakfast, mix everything together and refrigerate.

20130811-141921.jpg

The honey nuts make a lovely addition to this old favourite.

20130811-141908.jpg

You could add a piece of toast, but I find the oats filling enough.

Read Full Post »

With JTs job, he sometimes misses lunch or dinner, so I went to our local health food stores to pick up some healthy energy bars. I was shocked! The high protein versions could run as high as $5 EACH! That’s absolutely crazy, and they are not even that “good” for you. So instead I bought some quinoa (sorry indigenous people of Peru), sunflower seeds, flax seeds, dark chocolate, dried cherries and agave and came home to search for a tasty recipe. My inspiration came from this recipe in Epicurious but it was purely Barb (from Profiteroles and Ponytails) that inspired the Quinoa addition to this treat, thank you Barb!

I toasted the quinoa so that it popped like pop corn; toasting brings out the nuttiness (hmmm, that’s a coincidence, when I’m toasted I become nuttier too ;-)!) and makes them nicely crunchy and not too jaw breaking.

Note that I updated the nutritional facts because someone asked about calories. Check out the tool I used here.

A delicious healthy snack or meal replacement

A delicious healthy snack or meal replacement

Quinoa Energy Bars

Makes one pan 10″ x 13″ (25cm x 33cm), cut into 20 bars

Ingredients:

  • 2 cups toasted quinoa (or you could buy the commercially puffed quinoa, which is like puffed rice)
  • 1 cup unsalted sunflower seeds, slightly roasted in a frying pan
  • 2 cups uncooked oatmeal, old-fashioned or instant
  • 1/4 cup partly ground flax seeds
  • 1/2 cup dried cherries or other dried fruit
  • 3/4 cup crunchy peanut butter, organic, just peanuts
  • 1/2 cup packed brown sugar
  • 1/2 cup agave syrup or honey
  • 1/2 cup dark chocolate chips
  • 1/2 cup water

Directions:

  1. Pre-heat the oven to 121° C or 250° F.
  2. Prepare a 10″ x 13″ pan by lining it with parchment paper, enough to have the sides come up as ‘handles’.
  3. Add the quinoa to a hot dutch oven (you will need the high sides) and stir as the quinoa pops. Keep stirring so it doesn’t scorch. This volume will take about 10-12 minutes. The quinoa pops like corn, but not nearly as aggressively, but you do need the high sides of the pan, otherwise you’ll be chasing the quinoa all over the place!
  4. In the same pan, slightly roast the sunflower seeds. Combine with the puffed quinoa, oatmeal, flax and cherries. Set aside.
  5. In a micro-wave proof bowl, add the peanut butter, brown sugar, agave syrup and chocolate chips and microwave on a low setting until chocolate and sugar have melted . Add the water and stir well.
  6. Pour into the dry ingredients and mix well (I used a very large bowl with a wooden spoon). You want to make sure that everything is coated with the wet ingredients.
  7. Pour the combines ingredients into the prepared pan and press evenly into all corners (I used a glass as a rolling pin). Bake for about 20 minutes.
  8. Allow to cool about 10 minutes, carefully remove from the pan with the parchment handles onto a cutting board and cut into 20 slices. Allow to cool completely before storing in an air tight container in the freezer.

Notes: depending on how dry your house is, you may need to adjust the wet ingredients as the final product can be a bit crumbly (so say the comments on Epicurious). That’s why I added the water and baked it out. Mine came out nice and tight and even after freezing wasn’t crumbly.

Screen Shot 2014-01-27 at 12.29.17 PM

Read Full Post »

We invited my friend Kim and her hubby for coffee and cake after seeing Cloud Atlas at the TIFF film festival. I was hoping to have a great discussion about the film (and there was a lot to discuss) but unfortunately, they hated the film so instead of prolonging their misery, I served coffee and cake.

I started the recipe and was committed to it when I realized I didn’t have quite enough GF Flour, so I improvised and added the remainder as finely ground corn meal. It added a very nice texture to the cake and no body threw it back at me!

Original recipe can be found here.

A lovely honey and ginger taste, it’s garnished with fresh figs, candied ginger slices, candied walnuts and edible rose petals.

Gluten Free Honey & Ginger Cake

Ingredients:

  • 3 oz liquid honey
  • 6 oz gluten-free flour
  • 2 oz of fine cornmeal (just run regular cornmeal through a coffee grinder to get a fine powder)
  • 1 tsp gluten-free baking powder
  • 1 tsp ground ginger
  • 2 tsp ground cinnamon
  • 1/4 tsp allspice
  • 3 oz of sugar
  • 1/2 tsp orange essence
  • 1/2 tsp lemon essence
  • 4 oz butter
  • 1 egg (the cake was very crumbly, I might add another egg next time)
  • 1 tsp baking soda
  • 1 oz finely grated fresh ginger

Directions:

  1. Preheat the oven to 350°F (170°C).
  2. Sift the flour, baking powder and spices into a large bowl and add the sugar and zest. Rub the butter in (you can do this in a food processor with plastic blades)
  3. Warm the honey slightly, and beat it with the egg. Mix into the flour mixture.
  4. Mix the baking soda with 3 tbsps of water until dissolved, then process it into the flour mixture.
  5. Stir in the finely minced ginger pour into a greased or lined 8″ square pan.
  6. Bake for about 50 minutes (mine was ready in about 40 minutes). Cool it in the pan for about 10 minutes then turn it onto a cooling rack until cold.

A very tasty but crumbly cake

I garnished the cake with additional warmed honey, fresh figs cut into quarters, honey walnuts, slices of candied ginger and edible rose petals.

Read Full Post »

I released the polenta squares too early! So annoyed with myself so I thought I’d follow it up with some more tapas. I wrote this post before our trip thinking that I’ll be swamped and jet-lagged when we get back, so glad I did because I so am all of the above. Work is nice and busy, I got a great little freelance job in and I’m ready for bed at 8pm most nights! I’m not complaining, just giving you the lay of the land.
I had mentioned that I love tapas dinner parties, so the Sunday before our holiday we had friends Rae and Monica over for a simplified tapas dinner party; their two youngest girls went to a concert close by and they needed to kill a few hours, so we said, come on over! We didn’t have a lot of time, so I had to abbreviate the standard 3×4 courses, so we only had 4×1 courses in total. It was plenty of food. In fact, I had to forgo one of the planned courses; fortunately tapas are make as you go so nothing went to waste, we just had it for dinner later in the week.

I’m also trying Instagram on my iPhone 4Gs, not quite as nice as the Canon, but pretty close. It really does better during the daylight as opposed to night. I never use the flash, mainly because my 3Gs never had one, so I really don’t miss it. What do you think?

Abbreviated Tapas Dinner Party

Sawsans Flat Bread with Tapenade and John’s home made Ricotta

Because you fold the tapenade and ricotta into the dough, it makes it flavourful throughout

Chilled cucumber shooters with greek yogurt. I made the soup with vegetable stock as we had a vegetarian in our midst.

Very tasty little shots

Sizzling garlic Shrimp with cilantro and lemon with home made spelt fajita shells

I thought I made too much food…not

Gluten-free Honey Ginger Cake with fresh figs, candied ginger slices and edible rose petals

No one was gluten-free, but I had some left over cake from the previous night


Lyon and Paris also had to be broken down into two parts, too much stuff to talk about, you’ll see why. I’ll need a vacation from my vacation!

Read Full Post »

I saw this recipe on a few blogs because it was the daring bakers challenge (on Lorraine’s blog here and Sawsan’s blog here) and I was immediately drawn to it. I love spice cakes and combined with nuts and rose petals? I just couldn’t resist. Poor Sawsan had an issue with her cake, but I loved that she posted it anyway! It’s a very tasty cake and I will more than likely make it again.

We were having friends Rae and Monica over for dinner and they like dessert (but not rich chocolate, for some reason) so I am always on the lookout for something new to try. Lorraine topped her cake with a gorgeous combo of pistachios and edible rose petals…OMG so lovely, and she also made a light syrup to drizzle over it, which I also did. Unfortunately I did not have edible rose petals nor pistachios so I used dried cherries and mixed nuts. I also added a bit of cognac to the honey drizzle for some adult effects!

Now I must digress for a moment and talk about that jar you see in the background. It is a jar or Turkish nuts (variety) in honey. My friend Barb of Profiteroles and Ponytails gave it to me last year and I have hesitated to open it because of my previously bad behaviour (I devoured the last jar in a matter of months, just standing at the pantry and spooning copious amounts into my mouth); so I stashed it at the back and immediately forgot about it. We were out for dinner with Barb and Carol, a good friend from out East when I remembered that I had the jar in my pantry. I mentioned I was going to bake this cake and we all agreed the nuts would be exceptional on the cake as décor, texture and flavour. Carol asked how I used up my first jar: I said I stood in front of the pantry and ate it by spoonfuls until it was no longer. I don’t think she believed me, but it’s true!

It’s like ruby jewels decorating the cake

Armenian Nutmeg Cake

Recipe adapted from these lovely and talented ladies: Lorraine’s blog Not Quite Nigella and Sawsan, Chef in Diguise

Serves 6-8

Ingredients:

  • 1 cup (240 ml) milk
  • 1 tsp baking soda (bi carb of soda)
  • 2 cups all-purpose (unbleached) flour
  • 2 tsp baking powder
  • 1.5 cups brown sugar, firmly packed
  • 3/4 cup butter, cubed, chilled
  • 1 to 1-1/2 teaspoons freshly ground nutmeg
  • 1 teaspoon vanilla
  • 1 egg, at room temperature
  • 1/2 cup walnuts, chopped
  • 1/2 cup dried cherries, chopped
  • 1/4 cup Turkish nuts with honey (or just 1/4 cup nuts and 1/4 cup honey)
  • 2 tbsp cognac (you can also use rosewater instead, however I find the flavour a little too strong, plus I prefer booze ;-))

Directions:

  1. Preheat oven to 340°F. Line a 10 x 5 inch loaf pan with parchment paper on the base and sides. In a cup mix the baking soda and milk and set aside. In a large food processor add the flour, baking powder, brown sugar and butter and process until it resembles fine breadcrumbs. Place half of the above mixture in the base of the pan patting it down with fingers to make a base and set aside.
  2. In the bowl of an electric mixer, beat the egg and nutmeg for 2 minutes until fluffy and pale. Add the vanilla and the milk and soda mixture and whisk until combined. Then add the remaining half of the flour and butter mixture and mix until smooth (you can still use the whisk for this as it is quite liquidy still). Pour on top of the base crumbs and then sprinkle the walnuts on top (my walnuts baked right into the cake, they actually fell into the centre, so I will suggest you fold the walnuts into the cake. Bake for 50-60 minutes until a skewer inserted comes out clean – many have found that while the top looks cooked, the batter is runny underneath so try the skewer in several places.
  3. When cake is ready, remove from oven and allow to cool in the pan (thank you Sawsan for your experience). While doing this, heat nuts and honey mixture gently and add the cognac. Pour the nut and honey mixture over the top of the cake allowing the honey to soak into the cake. Sprinkle the chopped dried cherries over the cake. Serve warm or at room temperature.

The walnuts fell into the batter during baking, so I suggest folding them in.

I used the loaf pan because I knew I wanted a certain sized cube as a small portion. I dressed each portion individually for my dinner party. I froze the remainder of the cake.

The jar has the nuts layered in a beautiful pattern.

Read Full Post »

Today would have been my parents 51 Wedding Anniversary. Sadly they are both gone now, but I needed to remember.

Éva and Gustáv Hársfai, 1960

Autumn is definitely here and winter is following closely on her heels. Our grand old maple in the front yard finally released the last of her stubborn leaves this week and the temperatures have plummeted to the minus side most nights. We’re still very fortunate not to hit the minus (Celsius) temperatures during the day, yet. We’ve had wood fires burning every night this weekend to take the chill off; ok, I’m exaggerating, the house is toasty warm, and the fire is just for coziness and ambiance. 🙂
Work has been crazy busy since I’ve returned, but I’m not complaining – it’s better too busy than not enough. Even working late nights and on the weekend, which is why I have been unable to post and for that I do apologize, dear reader.
We’ve been cooking really healthy all week, no fat, small portions and low sodium trying to rid ourselves the few extra pounds the fine cooks and chefs in Morocco gifted us. But on Friday night we felt like a bit of a treat and decided on pizza! Pizza, of course is JTs domain; he makes his deliciously thin and crispy dough from Jim Lahey (of the New York Times). We cannot take credit for the toppings either! There is a very nice restaurant in BWV called Villa, and they serve this pizza (and it’s delicious, but of course, our’s is better!)

Rustic Fig, Goats Cheese & Prosciutto Pizza with Honey

Ingredients for the dough
Makes one very thin 12″-15″ inch pizza

  • 2/3 cup all-purpose flour, plus more for work surface ( about 1/2 cup more!)
  • 1/3 cup whole wheat flour
  • 1/2 warm water
  • 1/8 teaspoon active dry yeast
  • Fine corn meal
  • Coarse salt
  • 4-5 dried figs (or if in season, please use fresh)
  • 100 grams goats cheese
  • 3 slices prosciutto, roughly torn into smaller pieces (remove excess fat)
  • 1-2 tbsp honey

Directions:

  1. Soak the figs in warm water for 2-3 hours; you just want to take the chewiness out of them, you don’t want them pulpy. When done, remove from water, dry and slice into bite-sized pieces.
  2. In a large bowl, combine flour, 1/8 teaspoon salt, yeast, and water, stir until blended; dough will be shaggy and rough. Let dough rest in a warm place (about 72 degrees) until doubled in volume, about 3 hours.
  3. Turn the dough out onto a lightly floured work surface and cover with a clean, damp kitchen towel. Let stand until doubled in size, 30 minutes to 1 hour.
  4. Place a pizza stone (we use our trusty Chicago-land cast iron pizza pan) on the lowest rack of oven and preheat to 550°F for 25 minutes (you want your stone really hot)
  5. Roll out the dough into a 12″-15″ round or to fit your particular pizza pan. We prefer our pizza crust to be wafer thin.
  6. Carefully transfer dough to hot pizza stone. Working quickly, top dough with Goats Cheese, Prosciutto, and Figs. Drizzle lightly with honey.
  7. Bake pizza until until dough is cooked through and golden brown, about 10 minutes.
  8. We topped our pizza with a little arugula and spinach because we just love the peppery taste – I didn’t shoot it because you would not have been able to see the gorgeous toppings!

Read Full Post »

I’ve been reading up on Moroccan blogs; one such blog mentioned that a Moroccan host can take up to a week to prepare a meal for her honoured guests! I started Monday… does that count?

Onto dessert #2 for my little trio for Saturday night’s Moroccan themed dinner party. I found this one on Epicurious, and just liked the way it sounded but I did verify that this dessert does exist in Moroccan cuisine. I cut this recipe in half but list the full ingredients below, and it made five mini tarts, perfect! (ok, three are for the dinner party – I don’t eat dessert- and one was the taster for JT to make sure it was yummy and it sure was!!! the larger round one is for my friend (and boss) because she gives me a ride home most evenings (believe it or not, we live across the street from each other…we are indeed good friends!)

Moroccan Fig & Sesame Tart with Orange Cardamom Cream

Fig and Sesame Tart

Ingredients for pastry:

  • 1 1/2 cups all-purpose flour
  • 1/2 cup confectioners sugar
  • 1/4 teaspoon salt
  • 3/4 stick (6 tablespoons) cold unsalted butter, cut into 1/2-inch cubes
  • 4 large egg yolks
  • 1 tablespoon heavy cream
  • 1 teaspoon sesame seeds, toasted

For filling:

  • 9 ounces dried Turkish figs, stemmed and finely chopped (1 1/2 cups)
  • 1/2 cup water
  • 4 1/2 tablespoons granulated sugar
  • 3/4 teaspoon cinnamon
  • 3 tablespoons sesame seeds, toasted
  • 1 tablespoon orange-flower water (preferably Mymouné) I googled orange water substitutions and found that you can use an orange liqueur like Triple Sec.

For cardamom orange cream:

  • 1 cup heavy cream
  • 2 tablespoons mild honey
  • 1 1/2 teaspoons finely grated fresh orange zest
  • 1/4 teaspoon ground cardamom
  • Accompaniment: fresh orange sections

Directions, pastry dough:

  1. Pulse together flour, confectioners sugar, and salt in a food processor until combined.
  2. Add butter and process until mixture resembles fine meal.
  3. Add 3 yolks (reserving the fourth for egg wash) and process until it forms a smooth dough, 2 to 3 minutes. (Don’t worry about overworking dough.)
  4. Transfer dough to a work surface and gather into a ball, then divide into 3 equal pieces. Form one third of dough into a small disk, then form remaining dough into a larger disk. Chill disks, each wrapped in plastic wrap, until firm, at least 1 hour.

Make filling while dough chills:

  1. Simmer figs, water, sugar, and cinnamon in a 1- to 2-quart heavy saucepan, uncovered, stirring occasionally, until mixture is thickened, 2 to 3 minutes.
  2. Stir in sesame seeds (3 tablespoons) and cook, stirring, 1 minute.
  3. Remove from heat and stir in orange-flower water, then transfer filling to a bowl.
  4.  Cool filling to room temperature, about 30 minutes.

Assemble and bake tart:

  1. Put oven rack in middle position and preheat oven to 350°F. Line a baking sheet with parchment paper and place flan ring in center.
  2. Roll out larger disk of dough into an 11-inch round on a lightly floured surface with a floured rolling pin. (If dough is too firm to roll out, let stand at room temperature 5 minutes.)
  3. Fit dough into flan ring, pressing dough up side of ring (dough is very tender and tears easily; patch as needed; they will blend in during baking), then trim dough flush with top of ring. Spoon filling into crust and spread evenly.
  4. Roll out remaining disk of dough into a 9-inch round on lightly floured surface with floured rolling pin. Gently lay round over filling, then roll rolling pin over top to trim. Patch if necessary.
  5. Beat together remaining yolk and cream (1 tablespoon) in a cup with a fork and brush some of egg wash over top crust, then chill until egg wash appears darker and is slightly tacky, about 3 minutes. Brush with second coat of egg wash and chill again. Lightly score top with back of a small knife to make a decorative pattern and sprinkle with sesame seeds (1 teaspoon).
  6. Bake tart until top is golden, 30 to 35 minutes (I found 40-45 minutes did the trick).
  7. Transfer tart on baking sheet to a rack and cool 10 minutes, then slide tart off parchment onto rack to cool. Gently remove ring.

Make cream and serve tart:

  1. While tart bakes, stir together cream, honey, zest, and cardamom in a medium bowl and chill, covered. Just before serving, beat cream mixture with an electric mixer until it holds soft peaks.
  2. Serve tart, warm or at room temperature, with cream and oranges.

My tarts were very small, about 10 cm x 4cm and the round one was about 8cm. I plan on serving the three desserts on a long rectangular plate. My ‘Platogram” is below. I usually do this for more complex dinners so I don’t mess it up after a couple of glasses of wine!

Plating the Dessert

Read Full Post »