Feeds:
Posts
Comments

Posts Tagged ‘butter’

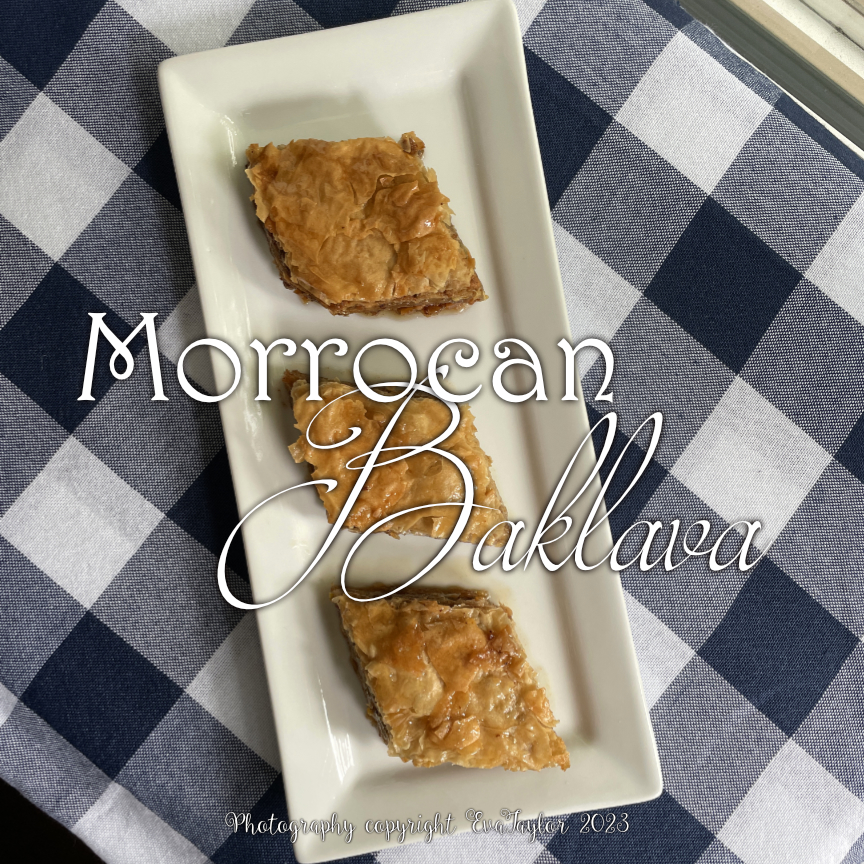
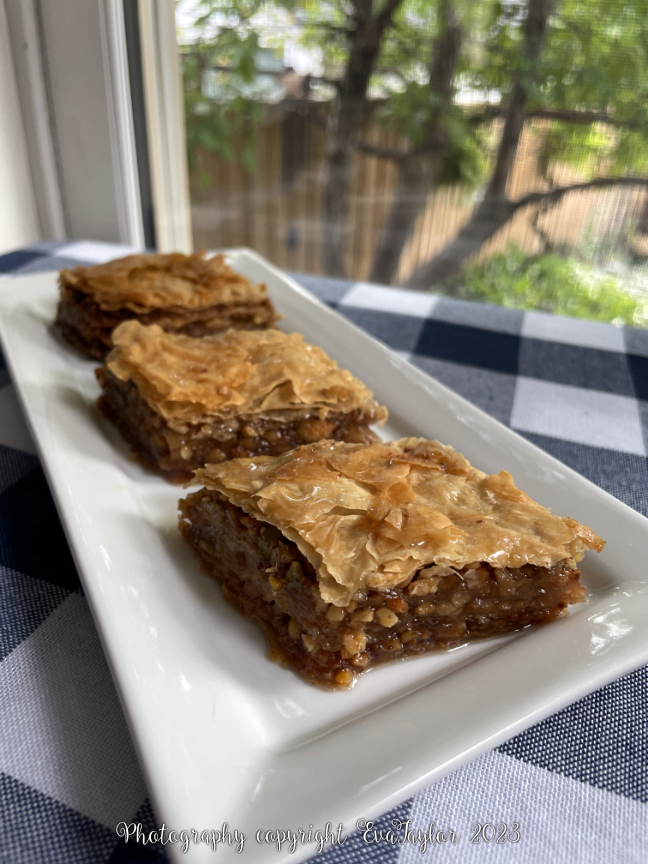
We had some dear friends over for a BBQ in late-August and we made homemade Moroccan lamb burgers with a wonderful spiced prune and nut couscous; I needed a Morrocan-style dessert so I chose this wonderful baklava recipe. To be honest, I wasn’t able to differentiate between Middle Eastern baklava and Morrocan baklava but rest assured, they are both delicious. This version has walnuts, pistachios and almonds with a syrup flavoured with orange and lemon rind, cloves and orange blossom water. It should have rose water in it as well, but I am not a fan so I skipped it. 

Metaxas (Moroccan Baklava)

For the original recipe, please click here. Makes about 33 cm x 23 cm 5 cm (12 inches x 9 inches x 2 inches) baking pan of Metaxas.

Ingredients

  • 150 g sugar
  • 150 mL water
  • rind of an orange (no white pith)
  • rind of a lemon (no white pith)
  • 5 whole cloves
  • 60 mL honey
  • 5 mL orange blossom water
  • 100 g walnuts
  • 100 g pistachios
  • 100 g lightly toasted, blanched almonds
  • 100 g sugar
  • 2.5 g ground cinnamon
  • 200 g unsalted butter, melted
  • 10 commercial phyllo dough sheets, cut in half length-wise to fit your pan

Directions:

  1. Combine the sugar, water, both orange and lemon rinds, cloves and cinnamon stick in a medium saucepan. Bring to a slow boil then turn the heat down to simmer, uncovered for 8 minutes. Remove the pan from the heat and strain to remove the spices and rinds. Stir in the honey and orange blossom water. Set aside to cool. See notes to make use of the orange and lemon rind.
  2. Preheat the oven to 300° F and toast the nuts for 12 minutes. Remove from the heat and cool. Increase the oven temperature to 350° F.
  3. In the small bowl of your food processor, combine the cooled nuts, sugar and cinnamon and pulse so they are relatively finely chopped with some larger pieces.
  4. Line a 33 cm x 23 cm 5 cm (12 inches x 9 inches x 2 inches) pan parchment and brush generously with butter.
  5. Begin by lining the bottom of the pan with one sheet of phyllo pastry and brush generously with the melted butter. Continue until you have five sheets stacked. Spread about one-third of the nut mixture over the fifth sheet evenly to the sides. Continue with the next five sheets spreading each sheet generously with the melted butter. Spread another third of the nut mixture over the tenth sheet evenly to the edges. Continue with the next five sheets as before, and spread the fifteenth sheet with the last third of the nut mixture. Finish with the last five sheets of phyllo as before, drizzling any remaining butter over the top of the last sheet.
  6. Bake in a preheated oven at 350° F for 45 minutes. Cover with foil if the top browns too quickly. Remove the pan from the oven and cut immediately. To cut the Metaxas in the traditional diamond pattern, begin by cutting a line from one corner to the opposite corner and repeat to the last corner. Then cut parallel lines to create small diamond slices. Pour the cooled syrup over the hot Metaxas. Allow to stand overnight at room temperature before serving.

Layers of delicious nuts bathed in a luxurious syrup between crunchy sheets of phyllo.

Notes:

  • Remove and separate the orange and lemon rinds and place on a parchment-lined baking sheet. Bake for 10 minutes at 300° F until firm. Eat as a snack.

Read Full Post »

peach, butter, jam,

My parents emigrated to Canada from Hungary in 1956 during the Hungarian Revolution; the citizens revolted against the Russian takeover. After about 12 days of Revolution, the Russian army mounted and squashed Hungary once and for all. At 20 years old, my Mom left just prior to the Russian’s ending the revolution to escort her sister to Vienna but ended up continuing her journey on to Canada; she celebrated her 21st birthday alone in Halifax. My Dad was relatively active against the Russians and decided to leave to protect himself (my uncle and aunt were expecting their first child so they were not able to leave). My Dad’s family lost everything to the Russians (the Puppet theatre(Báb Szinház) in the Liget, their family home…E V E R Y T H I N G). My Mom’s family had already lost everything to the Germans during the WWII (they had a small store that sold coffee, flour etc.). The Russian hostility toward Hungary surprised the world and both my parents were able to immigrate to Canada as Refugees of War.

My parents did not know one another in Hungary so they made their way to the New World on their own. My Mom (13 years younger than Dad) talked about her journey but Dad sadly did not. I only know that Dad came through Gibraltar and an Ocean Liner. Mom also arrived by boat but I can’t remember how or where from. You know the movies that show people trying to escape oppression, desperately crawling on their bellies across vast lands under the cloak of darkness? That was my Mom’s story. She and her sister came across the farmlands of Hungary, all the way to the Austrian border near Vienna. The Austrians were very sympathetic to the plight of the Hungarians and they helped make their way to a better life.

I’m not sure either of the parents had a “plan” as such but I know my Mom already had some relatives in Canada (an Aunt and her husband, children and their spouses). My Mom’s sister’s husband had already arrived in Toronto and was instrumental in making arrangements for my Aunt to meet him there, sadly Mom was not in that equation due to the economic circumstances of my Aunt and Uncle so she had to find her own way to Toronto. Did you ever read Angela’s Ashes? I remember reading the bit about Angela only having enough money for one egg and it resonated with me…there were many times my dear Mom only had enough money for one egg during the first months in Canada. It’s difficult to understand that this happened only 59 years ago. Mom landed in Halifax and stayed for a few months. All Canadian immigrants were given $5 (around $45 today) upon arrival and were told to have a good life. Mom found a sympathetic Swiss woman who owned a beauty shop and she worked various odd jobs at her shop and rented a room in the woman’s home. Neither of my parents spoke a word of English, so they learned from listening to the radio.

My Dad found his way to Toronto and worked in restaurants to make a living, at first waiting tables and then later as a Maî·tre d’hô·tel (Maître-D) at a very prestigious hotel near the airport. Mom’s sister introduced Mom and Dad  in 1957; they dated on and off and then lived together in 1958 (yes, that was very risqué back then!). My Mom was the hold-out, she didn’t want to marry a ‘pretty boy’ as she called him. It’s true, Dad was quite the looker and the ladies loved him. Dad taught Mom puppetry and they travelled together working on the Chrysler Canada Tour in the late 50’s. He finally wore her down and they married in 1960. They eventually settled in Toronto and began having a family.

I remember my dear Mom making most of our pantry items, just like her mother did and my Dad’s mother. Jam was always a treat and as I mentioned before, Mom’s strawberry jam was one of my favourites. I bought some peaches for a photoshoot and it turned out we didn’t need them so I decided to make peach butter out of it. Mom would bottle several mason jars of jam, but since it’s only JT and I, I only made a small amount. Now that we’ve already gone through the first jar, I wish I had made more.

Jam, peaches, preserves,

A delicious, smooth peach butter or jam made without pectin.

Peach Butter

A KitchenInspirations Original Recipe

Makes 400 mL

Ingredients:

  • 650 g peaches, I had about 6  peaches (measure with peel and stone)
  • 100 mL water
  • 160 g white sugar
  • 30 mL lemon juice

Directions:

  1. Peel peaches and remove stone (see notes for tip on peeling). Cut into eighths and set into a heavy bottom pan. Add water and set over medium heat and cook until peaches are softened.
  2. Add sugar and lemon juice and purée with an immersion blender or run through your food mill.
  3. Return peach purée to pan and cook for 30-40 minutes until thickened, testing often with the freezer method.
  4. Once the butter has thickened, pour into mason jars and follow canning best practice instructions.

Notes:

  • An easy way to peel peaches is to score the skin into quarters, pour boiling hot water over them to cover and allow to sit for a minute. Take a sharp knife and begin by sliding the knife between the skin and flesh and peel away. Repeat for all of the peaches.
  • If you have a food mill, you need not peel the peaches (I have one but felt like peeling them anyway), the mill will capture all of the skin.

Read Full Post »

I was fortunate enough to be introduced to a recipe developer by a colleague from my previous position and as it turned out they needed a Recipe Tester right away! How serendipitous is that? And cool. The experience is amazing! I know I’ve talked about what it is to be a recipe tester briefly so here is a more detailed synopsis. And no, I won’t be posting any of those recipes here.

You read the recipe thoroughly with a highlighter in hand and highlight any discrepancies or things you need clarified. You ask the Recipe Developer questions re your highlights. The recipe is hashed out. Now switch to a different coloured pen. Start your stop watch, you need to time how long it takes you to prep (mise en place) and cook the ingredients. Follow the recipe to a “T” making notes along the way, there is no “a little this and a little that” when you’re testing! Once you have finished cooking the recipe, stop the stop watch and make a note of the time it took. Baking time is noted separately than the prep and cooking time; there is always a bake time on the recipe but you need to confirm that it’s accurate, one of the recipes I recently tested had to have its bake time doubled!

When the recipe has finished cooking or baking, you review it for appearance, texture and taste (yes, you have to taste the recipe!). Sometimes you are required to take a volume measurement of a product after its cooked for reference. Usually there is more than one recipe tester and the results are accumulated and assessed by the recipe developer. The finished recipes are usually for your consumption but sometimes they are just not your taste so your neighbours get lucky! My recent testing was baking sweets and I divided the bounty up between two friends who were very happy to receive the food!

Just before Christmas my Recipe Developer asked me to participate in a client tasting; I had to shop for the product, prep about 1/2 day on a few recipes and then finish cooking the recipes on the day of the tasting. We had 10 recipes in total. We cooked each recipe to its full volume and then spooned out small portions for tasting, I kept the tasting portions warm while the previous portion was discussed and evaluated. Each recipe was discussed for about 10-20 minutes and the discussion resulted in approved recipes with minor changes or complete revisions. The full portions are prepared to show the size the recipe yields for a family dinner. It’s actually quite an interesting process. Photos of the tested recipes are only used as reference. When the recipes are finally approved, the client will hire a photographer, a prop stylist, a food stylist and hopefully a food stylist assistant ;-)! The food stylist will prepare the final approved recipe and make it pretty for the photo.

I suspect that when you develop a recipe for your blog you work in much the same way that a recipe tester would work. It really needs to be buttoned down otherwise there may be disappointment if someone tries to make the recipe and it doesn’t work out. I really appreciate the detailed photos some bloggers do to show each and every step but I decided at the beginning of my blog that my photos would be only of the final product.

When I started blogging I came to realize how undisciplined I have been cooking, a little of this, a little of that; blogging makes you button down really well, measure, measure, measure and write it down — it has been a great starting point for my recipe testing. I am going to be doing more recipe testing in the new year!

But now, back to what we really eat! I’ve been making a lot of soups lately and this soup came together beautifully; the nutty roasted garlic and the earthy and sweet mushrooms were a great combination. I don’t think I would change a thing but I won’t mind if you do!

RoastedGarlicMushroomSoup_1354

The cognac butter really made the soup

Roasted Garlic Mushroom Soup with Cognac

Ingredients:

Makes 4 servings, about 250 mL each

  • 35 g or 1 1/2 cups of dried mushrooms (I used Chinese Mushrooms with the crackle-like tops and Chinese Black Fungus)
  • 2 cups water
  • About 1/4 cup of puréed roasted garlic (1 head)
  • 3-4 tbsp EVOO
  • Pinch of sea salt
  • 1 tbsp unsalted butter
  • 85 g or 1/2 cup finely chopped shallots
  • 200 g (2 cups) Fresh Cremini and Shitaki Mushrooms, finely chopped
  • 2 cups water
  • 2 fresh thyme branches
  • 1 tsp lemon zest
  • Salt and Pepper to taste
  • 1 tbsp unsalted butter
  • 2 tsp cognac
  • 2-4 fresh finely sliced Cremini and Shitaki mushrooms for garnish.

Directions:

  1. Rehydrate the dried mushrooms in 2 cups of boiling water (about 2-4 hours). Drain through a fine sieve and reserve the drained liquid. Chop mushrooms finely.
  2. Roast 1 head of garlic in a small ramekin with about 4 tbsp EVOO and sea salt, about 45 minutes at 350°F. Cool and remove the softened cloves and the olive oil and set aside.
  3. Sauté the shallots in the butter until soft. Add the all of fresh mushrooms and rehydrated mushrooms to the shallots and cook until soft.
  4. Add the reserved rehydrating liquid and 2 additional cups of water. Add the thyme and lemon zest and bring to a boil.
  5. Using your immersion blender, blend until very smooth, add the roasted garlic cloves and roasting EVOO. You may wish to press it through a fine sieve so that it is silky smooth. Set aside until you are ready to serve.
  6. When ready to serve, reheat the velvety smooth soup.
  7. Melt 1 tbsp butter in a frying pan, add the remaining sliced Cremini and Shitaki and sauté until soft. Remove from heat and add the 2 tsp cognac and stir well.
  8. Serve the hot soup in a warmed rimmed soup bowl, garnished with the softened mushrooms and drizzled with the cognac butter.

RoastedGarlicMushroomSoup_1353

There is no cream in this lovely soup

Read Full Post »

GuinessStew_1287

The biscuit was the perfect flaky texture to sop up the lovely gravy from the slow roasted Guinness Stew.

As you know we had our fourth progressive dinner on our street and you already know that I made this amazing Guinness Stew but what I didn’t tell you is that I had a major meltdown about four hours before the dinner was to begin. The stew was going perfectly smoothly, the aromas as it finished cooking on the day of filled the house, it was heavenly; the meat was fork tender, the vegetables still had a touch of bite to them and the cauliflower celeriac mash was creamy and wonderful. But I still needed to make the puff pastry topping.

I had fully intended on learning to make this wonderful laminated dough a few days before but as luck would have it, things got busy (I’m assisting more and more these days, but I’ll tell you about that later) so the day before I pulled out the emergency puff pastry dough from the freezer. I had a few errands to do that day and I finally got back to the house around 2pm which would have given me plenty of time to roll out the dough, cut and bake it ready for assembly for the dinner. But things would not go that smoothly.

ButterBiscuit_1297

A very flaky biscuit indeed

As I pulled the dough out of the fridge, I found it looked a little odd, and then when I opened the package, it had gone off. I was stunned. When I checked the expiry date I realized my error, it was expired!!!! Well, that was that. Or was it? I tossed the package and quickly went to work; several weeks before I had read about a ‘quick’ laminated pastry dough that Liz (from That Skinny Chick Can Bake) made. So out came the iPad and I went to work! The ‘quick’ laminated pastry dough still required more hours than I had to allow the dough to rest in between foldings, but I was determined! I reduced the resting times significantly and I turned Liz’s sweet pastry dough into a savoury one, the results were exceptional. I didn’t use the entire batch so I stored the leftovers in the freezer, resting and I’ll get back to it in the near future, but this quirky version of ‘quick’ laminated dough exceeded my expectations and best of all, it was a hit at the dinner table. Thank you Liz, you saved the day!

Butter Biscuits — a ‘quick’ laminated pastry dough

I made 10 biscuits and put the remainder of the dough in the freezer for another time. Please check here for the original recipe.

Ingredients:

  • 1/4 cup warm water
  • 1 tbsp bread maker quick dissolve yeast
  • 1 tsp sugar
  • 1/2 cup milk, at room temperature
  • 1 egg, at room temperature
  • 1 teaspoon salt
  • 1 tbsp fresh rosemary, finely chopped
  • 2-1/2 cups unbleached all-purpose flour
  • 1/2 cup cold unsalted butter, cut into 1/2 cm or 1/4″ thick slices
  • 1 egg, lightly beaten
  • 1 tbsp merlot sea salt (I received the merlot sea salt as a gift from my friend Kristy at Our Family Food Adventures when we met up )

Directions:

  1. Add the warm water to a bowl and gently mix in the yeast and sugar. Allow to stand until frothy and then add the milk, egg and salt; set aside.
  2. Add the flour to a food processor with metal blades. Drop cut butter and the finely chopped rosemary into the flour, pulsing 8 to 10 times, so that the butter is cut into 1 cm or 1/2 inch pieces.
  3. Combine the flour mixture with the yeast mixture and gently fold the two with a rubber spatula,  just until the dry ingredients are moistened. Don’t be too energetic, the butter must remain in pieces so that you will produce a flaky pastry, not a bread dough or cookie.
  4. Cover bowl with plastic wrap and place in the freezer for 30 minutes.
  5. Lightly flour your work surface and turn the dough out onto it; dust very lightly with flour.
  6. Gently roll out the dough to 41 cm or 16 inches along one side and fold it into thirds similar to how one would fold a letter.
  7. Turn dough clockwise 1/4 turn. Roll out again into a narrow rectangle and fold into thirds again.
  8. Roll dough one more time into a 51 cm or 20 inch square and fold into thirds again to make a narrow rectangle, then fold up the ends to make a square. Cover with plastic wrap and put into the freezer for another 30 minutes. Note, it is very important to keep the dough cold so the butter doesn’t begin melting, if you find it’s warming up, put back into the freezer for a few minutes to cool down.
  9. Preheat the oven to 400°F.
  10. Roll the dough out to a 1 cm or 1/2 inch thickness and using a desired cookie cutter (mine was a triangle that was about 20 cm or 4 inches wide).
  11. Brush with beaten egg and sprinkle merlot sea salt on top.
  12. Place triangles onto a cookie sheet and bake 15-20 minutes until the tops are golden.

ButterBiscuit_1305

I decorated the biscuit with Merlot Sea Salt

Read Full Post »

As you know I’m a free agent at this particular juncture in my life and although I am keeping my ear to the ground and looking actively for work in my field, I am pretty realistic about the prospects out there and I’m keeping an open mind. The support from my blogging peeps is phenomenal and I thank you for your interest and offer to help! I am constantly touched and surprised by the generosity and kindness of, for all intensive purposes, strangers! It is because of you I am keeping my mind open for alternative opportunities, one such opportunity became a reality just two weeks ago.

About a year and a half or so ago, I had the good fortune to be invited to a taping of Top Chef Canada, Season 3 and there I met with Lucie Richard, Toronto-based Food Stylist with whom I chatted extensively about her craft. At that time, she very generously offered to have me ‘assist’ on one of her photo shoots. Two weeks ago it came to fruition and I assisted on a National Brand ice cream shoot. You cannot imagine how excited I was!

Ice cream is one of the most difficult things to shoot because of the very short window of opportunity before it begins to melt. I was thrilled to experience such a challenging product with one of the best in the field; Lucie was kind and generous with her advice and patience and she taught me an incredible volume of information on shooting ice cream. The tricks of the trade tend to be quite personal and what one stylist does may not necessarily be exactly what another does, so experiencing variety is key to coming up with your own tricks of the trade. The client has very specific expectations in what the characteristics of the ice cream should look like so you really need to know what you’re doing.

We used dry ice to super cool the tools, we worked in small batches for short periods of time, constantly re-freezing the ice cream so it doesn’t glaze over in the melting process. And the studio was kept very cool with air conditioning so I brought a sweater and I even brought gloves in case I needed to warm my hands. Of course, the work is fast and furious and there is no time to be cold.

The trends 15-20 years ago was to use ‘fake’ product. Ice cream was a highly guarded secret recipe of shortening, food colourings and inclusions. Today, most companies want the real deal and that in itself presents some interesting opportunities. And then there is Photoshop®, which has at times saved this incredible craft. We even took Photoshop into consideration, shooting slightly brighter and darker versions of the same shot in order to make sure we have what it takes to make the best composite. Of course, the Photoshopers are so skilled and talented, you can’t tell that they have added a little of this and a little of that to make that shot.

The client was very happy with the ice cream photo and we even finished a few minutes early. It was a huge success for me, and gave me the confidence to send out notes to my Food Stylist peeps that I’d love to assist. Who knows, this may become something!

Sadly, blogging is the driver and result of cooking passion; I make recipes for meals that I want to blog about. But we also want to eat the food I blog about. It’s wasteful to make an extra portion just for the blog so either JT or I will suffer with the pretty but stone cold blog version of a dish or eat separately which is what happened with this amazing ‘ravioli’.

uova-da-raviolo_1069

The pasta is relatively thin, so you can see all the good stuff inside!

Some time ago I saw this unique ‘ravioli’ treatment on my friend Celi’s blog (the kitchen’s garden), she was inspired to make this delightful dish after her daughter who works in a very upscale restaurant in Melbourne told her about it. We were at the cottage at the time I read the post and you know how we are unable to divert from plan because of ingredient limitations, so I was itching to make this beautiful dish as soon as we returned to the city.

One thing led to another and it wasn’t until the Friday before Thanksgiving that I finally got it together to make this tasty dish. Thank you Celi, it is exceptional! It’s reasonably fussy so I will have to figure out a way to simplify it so I can make it as a starter for a dinner party. I used John’s recipe (from the Bartolini Kitchen) for the pasta dough (with minor modifications) and Celi’s rough description for the filling. Even JT commented that he would definitely have it again. So it’s a win/win, all the way around. Thank you Celi and John for inspiring me to make this gorgeous dish.

The ravioli is comprised of sautéed spinach, ricotta and parmesan cheese  and the crowning glory is the simple egg yolk enveloped within the light pasta dough. When it is cooked, the yolk is simply warmed so that it becomes thick but remains runny and once it’s broken into, it mixes with the sage brown butter and becomes a delightful sauce over the ricotta, spinach and pasta. This is definitely a winner and will be shared with friends soon.

Ravioli with Egg Yolk and Sage Brown Butter Sauce (uova-da-raviolo)

I forgot to sprinkle additional parmesan on this one, shhhh.

I forgot to sprinkle additional parmesan on this one, shhhh.

Serves 2 with lots of pasta left over (I made additional plain ravioli and filled it with seasoned ricotta and froze them for future use).

Ingredients, for the pasta:

  • 1 scant cup flour
  • 2 egg whites

Directions, for the pasta:

  1. In a food processor, combine the flour and egg whites and process until you achieve a ball of dough.
  2. Allow the dough to rest for 30 minutes.

Ingredients, for the brown butter sauce:

  • 2 tbsp unsalted butter
  • 1 tbsp finely sliced sage
  • 1 clove garlic, finely minced

Directions, for the Brown Butter Sauce:

  1. Melt the butter and cook until it is brown, remove from heat and add the sage and garlic and allow to infuse while making the filling.

Ingredients, for the ravioli filling:

  • 2 whole egg yolks, at room temperature
  • 2 handfuls of spinach
  • 1/4 cup ricotta
  • 1 roasted garlic, puréed (I used a fork)
  • 2 tbsp Parmesan Cheese, and 1 tbsp for garnish

Directions, for the ravioli filling:

  1. In a small frying pan, sauté the spinach with a splash of EVOO until wilted, set aside to cool.
  2. In a small bowl, mix the ricotta, roasted garlic and 2 tbsp parmesan cheese. Taste and season with salt as desired.

Directions, for assembly of the ravioli:

  1. Heat a large deep pan of salted water to a steady boil.
  2. Roll out four thin sheets of pasta about 10-15cm in diameter (4-6″) (I used #5 on my Kitchenaid Pasta Attachment, but I think #6 would have worked very well too).
  3. In the centre of two of the pasta sheets, add a mound of spinach and on top of that add 1/2 the ricotta mix. Make a divot in the centre and add the room temperature, raw egg yolk. Place the second sheet on top and push out any air and seal the edges well. Cut this into a shape or leave it rustic.
  4. In the meantime, reheat the brown butter sauce on low.
  5. Boil the large ravioli for 2-3 minutes or until the pasta is completely cooked but leaving the egg yolk runny. Serve with the hot brown butter sauce and parmesan cheese for garnish. If you have a few extra sage leaves, add them as garnish too.
  6. Enjoy while the yolk is still runny.

uova-da-raviolo_1074

The egg yolk oozes out and mixes with the brown butter very nicely.

uova-da-raviolo_1072

We had these for lunch, for appetizers I will make them smaller and use small egg yolks!

Read Full Post »

I seem to have come into quite a bit of free time of late; you may have noticed my sporadic commenting and I do apologize but we’ve been spending a lot of time at the cottage (cabin/lake house). We renovated or more accurately, gave it a face lift and that makes me want to spend more time there. Freshly painted white walls instead of the dowdy wood panelling from the 1960’s, replaced the linoleum and industrial carpeting with lovely wood laminate flooring added some kitchen cabinets in my efforts to annoy the mice and even gave the furniture a face lift too with new slip covers — and purchased new artwork! You can see my excitement. So we’ve been making the most of it. Come September I hope to be back in the normal swing of things.
In the meantime I wanted to share a recipe for Butter Tartlets that I made for my birthday bash from my very ancient Five Roses Flour cookbook and I’ve been making these tartlets since I began to bake in my early teens — they have been a family favourite. This time I used a flower cookie cutter to give them a lovely scalloped edge and I baked them in mini muffin tins so they are quite small, one or two bites.

ButterTartlette_0475

Caramelized brown sugar coating the flaky pastry.

Prize Butter Tartlets

Original recipe from Five Roses Flour Cookbook (1983)

Makes about 18 mini two bite tartlets

Ingredients for the pastry:

  • 1 1/2 cup of AP flour
  • 1/2 tsp salt
  • 1/2 cup vegetable shortening
  • 5-6 tbsp ice cold water

Directions for the pastry:

We all have our favourite pastry recipes so if you prefer to use your own, by all means do so but I hope you make these tasty tarts!

  1. Mix flour and salt together and cut in the shortening with a pastry blender or fork until the mixture is crumbly (like oatmeal).
  2. Add water a little at a time until the mixture hold together, do not overwork.
  3. Roll out to about an 1/8th of an inch or 1 mm thick and cut with an appropriate cookie cutter (I used a lovely scalloped edge to make my tartlets).
  4. Press into a mini muffin tin and refrigerate until you have prepared the filling.

ButterTartlette_0474

They are rather small, are you sure I can’t interest you in more than one?

Ingredients for the filling:

  • 1/2 cup brown sugar
  • 1/4 cup or 36 small pieces of walnuts
  • 1/4 cup melted butter (unsalted)
  • 1 small egg, beaten
  • 1 tbsp milk
  • 1/2 tsp vanilla
  • 1/2 tsp dark rum (secret ingredient)

Directions for the filling:

  1. Melt brown sugar and butter together (I do this in a microwave, on low) allow to cool a bit.
  2. Add the beaten egg, milk and flavourings. Mix well.
  3. Spoon about 2 teaspoonful into each pastry tartlet and add 2 walnut pieces to each. Bake in a 375°F oven for about 15-20 minutes or until the pastry has browned a bit.

ButterTartlette_0473

You know you want one!


These two are before photos, dark and dowdy:

20130817-151016.jpg

20130817-151030.jpg

20130817-151049.jpg

20130817-151155.jpg

20130817-151220.jpg
We changed the colour scheme to blues and whites to reflect the boathouse theme a bit more. The refrigerator was a later gift from my Mom’s husband so it’s a bit of an after thought, we’ll incorporate it into the kitchen when we get rid of the propane burners, which protrude out from the wall.
Sigh, back to reality!

Read Full Post »

Happy Independence Day! Since it’s Thursday, do you take Friday off and make it an extra long holiday? How do you celebrate? Last year we were in Wisconsin at our friend’s lake house (Paul & Ts) and at around 9pm we boated out to the middle of the lake and watched the most amazing fireworks–it was awesome!
Speaking of awesome, if you want your guests to see fireworks in their heads, THIS is the dessert to serve. It’s a perfect summer dessert combining popular tropical flavours: pineapple, rum and coconut. You can’t go wrong, and it’s very impressive making it the perfect dessert to serve on such an important holiday.

Happy Fourth of July!

Happy Fourth of July!

The first time I saw this recipe was at Jed, the Sports Glutton’s blog and I knew I would make it, I just didn’t realize how soon! We were entertaining my uni BFF and her hubby a while back and I needed a gluten free desert (she is gluten intolerant) and I wanted something that wasn’t too bad for you…so I chose fruit but even better it was sweet, caramelized Pineapple. I loved the grilled pineapple salsa we made for the grilled shrimp so I knew this dessert would be a hit; it turned out so well, JT suggested that I make it for our next progressive dinner, so I did! What was super cool about the latest progressive dinner was that each course had to be made on the BBQ! This is the perfect summertime dessert, not having to heat the house up by turning on the oven — there are better ways to heat things up ;)!

This is the version I served to my BFF for brunch, no cake!

This is the version I served to my BFF for brunch, sadly there was no cake!

So, I present to you, an inspired version of Los Angeles Angels of Anaheim.

Since we sliced the pineapple thinner, they didn't hold their shape, I suggest skewering them as well.

Since we sliced the pineapple thinner, they didn’t hold their shape, I suggest skewering them as well.

Deconstructed Piña Colada: Grilled Buttered Rum Pineapple with Grilled Coconut Pound Cake

Serves 8 (1 cm or 1/2″ slices of cake, with lots left over)

Ingredients:

  • 1 cup fat free Greek yogurt
  • 1 tbsp vanilla
  • 3 tbsp powdered sugar
  • the rind of one lemon

I

  • 1 /4 cup of unsalted butter
  • 1/8 cup dark rum
  • 1/2 tbsp brown sugar
  • pinch of salt
  • 2 pineapples, peeled and cored and cut into 8 spears each
  • 24 smallish strawberries
  • 1 Coconut pound cake (recipe can be found here).
  • pineapple sage finely julienned (or mint)

Directions:

  1. Combine the Greek yogurt, vanilla, powdered sugar and lemon rind and stir well. Refrigerate.
  2. In a small saucepan, melt the butter and then add the rum, brown sugar and salt and give it a good boil (to burn off the alcohol).
  3. Using the buttered rum sauce, baste the pineapple spears and grill until you have achieved grill marks, you can baste throughout the grilling process but make sure you reserve some sauce for drizzling. Keep the grilled pineapple spears warm.
  4. Slice the coconut pound cake into 1-2 cm (1/2″-3/4″) slices, brush lightly with the buttered rum sauce and grill until you have achieved grill marks.

Assembly:

  1. Place the slice of grilled coconut pound cake on the plate, arrange the spears so that they overlap the pound cake and each other.
  2. Add three washed strawberries clustered together.
  3. Add a dollop of the Greek Yogurt sauce and finally drizzle with the remaining buttered rum.
  4. Garnish with the pineapple sage julienne. Serve immediately.

*Clip art from Microsoft Clip Art.

Read Full Post »

My friend Angela is having a Titanic Anniversary Party (April 14 is the 100 year Anniversary of its sinking) and she is going all out. We will all come in period clothing (hopefully I will have photos!) and I will provide some of my heirloom silverware and serving dishes and some crystal (I inherited many lovely things of that time period from my MIL, fortunately for me, my SIL is not much into cooking or entertaining!). It sounds like it’s going to be a real blast.
I wanted in on the fun, so I asked Angela if I could help out and she kindly offered an hors d’œuvres and a dessert, both of which sound really fun to make. Of course, I needed to practice and test our the recipe so I will blog about my contribution to this momentous affair!

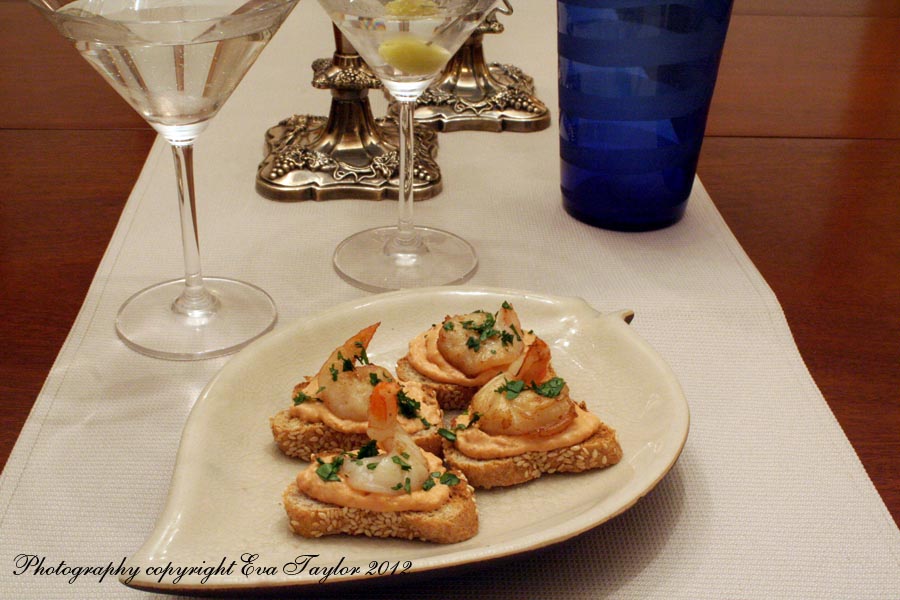
Canapés à l’Amiral are little toasts covered in a “shrimp butter” with a butter sautéed shrimp on top (oops, I forgot the roe as finishing, I shan’t do that for your evening, Angela!). The “shrimp butter” was delicious, and JT bought a beautiful whole wheat baguette with sesame seeds from Cobs near our home – the seeds just added the right amount of texture to the toasts! And the sweet shrimp on top was a wonderful bite with the creamy “shrimp butter”. The roe would have been a nice little burst of texture and saltiness…darn, I wish I had remembered because I do have some in the fridge!

Please help yourself to an hors d'œuvres.

Canapés à l’Amiral

Makes 20 canapés

Ingredients:

  • 1/2 thin baguette
  • 1 tsp lime juice
  • 10 small shrimp, halved lengthwise and sautéed in butter
  • Fresh Italian flat-leaf parsley
  • 2 tbsp flying fish roe

Ingredients Shrimp Butter:

  • 1 tbsp vegetable oil
  • 1 large shallot, minced
  • 1 clove garlic, minced
  • 8 oz shrimp in shells
  • 1/4 cup brand
  • 4 oz cream cheese, softened
  • 2 tbsp butter, softened
  • 1 tbsp tomato paste
  • salt and pepper to taste
  • 1″ vanilla bean pod, cut lengthwise (dash of vanilla)

That martini is MINE! Hands off.

Directions Shrimp Butter:

  1. In a skillet, heat oil over medium heat; add shallots and garlic; cook stirring often for about 5 minutes or until softened.
  2. Increase heat to high and add shrimp in shells and sauté, stirring 3 to 4 minutes or until shells are opaque.
  3. Transfer this mixture to a food processor. Return pan to stove and pour in the brandy, add the vanilla bean pod; cook stirring for about 30 seconds or until brandy is reduced to a glaze. Remove the vanilla bean pod and scrape into shrimp mixture in the processor.
  4. Process the shrimp mixture until finely chopped. (YES, the shells are still in there! It’s about the flavour). Add the softened cream cheese, butter, tomato paste, salt and pepper and process until smooth. Press through a fine sieve and set aside.
  5. Slice baguette into 20 thin slices (about 6mm or 1/4″) and toast under broiler for about 1 minute per side or until lightly golden. Set aside.
  6. Melt butter in previously used skillet and cook shrimp halves until opaque. Drizzle lime juice over shrimp halves and reserve.
  7. Place shrimp butter in a piping bag (or just slather on like I did) and pipe onto toasts equally. Top each one with a cooked shrimp half, a parsley leaf (or cut parsley, like I did) and top each canapé with an equal amount of fish roe (which I forgot to do).

Are you doing anything special for April 14th?

Read Full Post »
As you’ve read by now, I’m kind of on a croissant kick; I’m trying to master the art of croissant making and it’s going well. Sawsan over at Chef in Disguise originally inspired me to take on the lofty croissant!
This is attempt number three. I’m using
The Fresh Loaf recipe again, mainly because it was designed for a mixer (my shoulder is still bad, I have an xray and ultrasound booked!)

The cold, formed croissants, just before baking

What I’ve learned is this:

  • The dough and the butter must be cold all the time.
  • The dough should be a harder bread dough, and not soft, so that the butter doesn’t melt into it (you want the butter to define the layers).
  • I actually followed Sawsan’s folding after folding the butter into it (The Fresh Loaf doesn’t fold as much and I like a flaky croissant).
  • After each rolling and folding, return to the fridge to rise for a few hours or as I did, over night.
  • NEVER allow the dough to warm up (this melts the butter).
  • The two temperature baking is essential for a golden, flaky croissant. Super hot to begin, then lower to bake it through.

    The final product. Flaky, butter, yummy.

    I do hope you try baking croissants sometime. They really are not as difficult as you might think. Thanks Sawsan, again!

    Read Full Post »