Feeds:
Posts
Comments

Posts Tagged ‘Spinach’

Warm Spanakopita Dip

A KitchenInspirations Original Recipe

Makes about 250 mL dip

Ingredients:

  • 15 mL garlic-infused EVOO
  • 30 g shallots, small dice
  • 160 g zucchini, grated
  • 70 g spinach, finely chopped
  • 0.5 g dill weed
  • 50 g cream cheese
  • 70 g Greek feta, crumbled, divided
  • Salt and Pepper to taste

Directions:

  1. Heat the olive oil in a medium-sized pan and sweat the shallots until translucent. Add the zucchini and cook until softened. Add the spinach and wilt completely. Season with the dill and stir well.
  2. Add the cream cheese and stir until it has melted into the vegetables.
  3. Add about three-quarters of the feta and stir well into the warm dip. Reserve one-quarter of the feta for garnish.
  4. Reheat the dip and serve with pita bread.

Read Full Post »

My friend David of Fine Dining at Home (blog on hiatus) put me onto this recipe on his instagram; it looked absolutely delicious, so, then and there, I decided I wanted to make it. I renamed the recipe mille-feuille lasagna because the number of layers reminded me of one of my favourite pastries. I won’t lie, this is a labour-intensive recipe, but then again, what lasagna recipe isn’t? I will say that it is well worth the effort. The homemade pasta is so delicious, light and somewhat crispy. The spinach and basil layers against the creamy béchamel and the stringy mozzarella are divine! Don’t skip the resting and searing step, it really makes the recipe.

Mille-Feuille Lasagna

For the original recipe, please click here.

Makes one 21.6 cm x 11.4 cm (4″ x 7″) loaf pan, about 6 servings

Ingredients:

  • 300 g Spinach, blanched
  • ~50 g basil, blanched
  • 125 mL passata
  • 15 mL tomato paste
  • 15 mL roasted garlic, puréed (fresh is fine too)
  • 300 g mozzarella, ground

Directions:

  1. Combine the spinach and basil and wring out the water well. Set aside.
  2. Combine the passata, tomato paste and garlic and mix well. Set aside.

Ingredients for the Béchamel:

  • 30 g butter
  • 40 g flour
  • 500 mL milk, warmed

Directions:

  1. Melt the butter in a medium, heavy-bottom pan. Whisk in the flour and mix well. Cook on medium-heat for 2 minutes.
  2. Slowly add the warm milk and whisk. Whisk the sauce until smooth and creamy. Cool completely.

Ingredients for the Pasta:

  • 1 large egg
  • 125 g Flour (“00”)
  • Salt

Directions:

  1. Add the egg to the small bowl of a food processor and whisk. Add the flour and salt and pulse until it forms into a soft dough.
  2. On a lightly floured surface, knead gently a few times until it comes together into a smooth ball. Cover in plastic wrap and allow to rest in the refrigerator for 30 minutes.
  3. Using a pasta maker, create 12 sheets that are #8 thickness on the kitchenaid pasta maker. Cook the sheets in salted boiling water for 1 minute or less. Cool in an ice bath, remove and dry off.

Ingredients for the Spinach Pesto Sauce:

  • 150 g spinach and arugula
  • 30 g ricotta or cream cheese
  • 30 g pesto
  • 200 mL milk or cream
  • Salt to taste

Directions:

  1. Blanch the spinach and arugula, immerse in ice water to stop the cooking. Wring out as much water as possible.
  2. Place spinach, arugula, cheese, pesto and milk into a bullet and purée until smooth. Season to taste.
  3. Press through a fine sieve into a heatproof container, set aside.

Final Assembly:

1. Line a loaf pan with parchment paper, it will make it easier to pull out.

2. Add one pasta sheet to the base, follow with

    • A thin layer of spinach,
    • Another pasta sheet
    • A layer of passata
    • Another pasta sheet
    • A layer of béchamel
    • Another pasta sheet
    • A layer of cheese
    • Another pasta sheet

3. Repeat until all the ingredients have been exhausted ending with a pasta sheet and cheese on the top.

4. Bake in a 350° F preheated oven for 50 minutes or until cheese has entirely melted and béchamel is bubbling.

5. Allow to cool completely. When cool, wrap tightly with plastic wrap and refrigerate 24 hours.

6. To serve, cut into 5-6 slices and reheat in the oven. Then sear one side on a non-stick frying pan.

7. Serve on a bed of warmed spinach pesto sauce (recipe above) with a little crème fraiche.

The pasta crisps up on the seared side to give you a wonderful crunch against the creamy textures of the cheese and spinach and basil layers. 

Read Full Post »

This recipe has become a staple that we have once every two weeks. The pastry comes together easily (use any favourite pastry recipe you like), great texture and has a nice depth of flavour with the sesame seeds. The custard with spinach, shallots and goats cheese are a delight in every bite. 

Low Carb Spinach and Goats Cheese Tart

Makes one 20 cm tart

Ingredients for the pastry:

  • 100 g almond flour
  • 8 g psyllium husk powder
  • 30 g unsalted butter
  • 30 mL egg whites
  • pinch of salt
  • 20 g toasted sesame seeds

Directions for the pastry:

  1. Combine all of the ingredients with the exception of the sesame seeds in a small food processor and process until smooth and totally combined. Gently knead in the sesame seeds. Refrigerate for 30 minutes. Preheat the oven to 350° F.
  2. Roll out the dough between two pieces of parchment, so that it is a bit larger than the pan. Gently peel off the parchment and roll onto the pan, pressing into the sides. Fold-down excess and press into the sides making the thickness even all around. Dock.
  3. Bake for 20 minutes or until lightly golden. Cool slightly.

Ingredients for the filling:

  • 40 g shallots, finely sliced
  • 15 mL EVOO
  • 100 g baby spinach
  • 2 eggs
  • 5 mL roasted puréed garlic
  • 2 tbsp milk or cream
  • Salt
  • Pinch of nutmeg
  • 15 g Beamster, finely shredded, divided
  • 50 g soft unripened goats cheese, sliced into 6 rounds
  • Directions:

  1. Sauté the shallots in the olive oil until soft. Add the baby spinach and wilt completely. Cool on a piece of parchment.
  2. Combine the eggs, roasted garlic purée, cream, salt, nutmeg and about half of the Beamster and whisk until smooth.
  3. When the spinach cools, evenly spread it into the baked tart shell and pour the egg mixture evenly over it. Sprinkle with remaining Beamster.
  4. Top with the sliced goats cheese and bake for 35-40 minutes or until the egg has set. You may wish to protect the side crust if it gets too dark.
  5. Serve with a green salad.

Read Full Post »

Our dear friends gave me a beautiful cookbook from their last cruise, it is a celebration of courses through the journies of their fleet: Culinary Courses Journeys. Although most of the recipes are quite fancy, the book is amazing inspiration and a week doesn’t go by that I don’t check it for reference!

It was such an occasion that I was leafing through the book that I found a gorgeous representation of a Minestrone Soup and I knew I had to make it for dinner. And then I realized that I did not have a Minestrone on the blog. Gads!

The soup is packed with fresh vegetables in a light tomato and basil scented broth. The protein is navy bean to keep it healthy. You could add a parmesan rind or two to the broth while cooking.

The tuile melts into the soup for a beautiful flavour and textural addition.

Rustic Vegetable Minestrone

A KitchenInspirations Original Recipe

Makes about 1.5 L (6.25 cups) soup.

Please click here to print this recipe.

Ingredients:

  • 1 tbsp EVOO
  • 125 g (~1 cup) sweet onion, diced
  • 10 g (2 – 3 cloves) garlic, finely minced
  • 150 g (~1 cup) zucchini, diced
  • 115 g (~1 cup) celery, diced
  • 120 g (~1 cup) red pepper, diced
  • 75 g (~1 cup) king mushrooms, diced
  • 140 mL (4 oz) puréed tomatoes, juice or sauce
  • 15 mL (1 tbsp) tomato paste
  • 350 mL (1 2/3 cups) chicken stock
  • 2 stems of basil
  • 4 stems of lemon thyme
  • 100 g (1/2 cup) dried beans
  • 35 g (~1 cup) baby spinach
  • 5-8 fresh basil leaves, roughly torn

Directions:

  1. Cook the dried beans according to directions.
  2. Heat Olive Oil in a large pot and sauté onions until translucent, you may need to add a little stock or water. Add the garlic and cook until fragrant.
  3. Add all of the vegetables and cook for about 10-15 minutes.
  4. Combine the puréed tomatoes, tomato paste, and chicken stock. Pour over the vegetables and add the basil and thyme stems and simmer for 10 minutes. Remove stems.
  5. Add the cooked beans and baby spinach, stir and heat through.
  6. Serve garnished with a Parmesan tuile (recipe below) and roughly torn basil leaves.

Basil Cheese Tuile

Makes 1 tuile

Ingredients:

  • 7 g (1/4 oz) hard fatty cheese (like Parmesan or Cheddar), finely grated
  • 1 large basil leaf, chiffonade
  • pinch of granulated garlic

Directions:

  1. Pre-heat the oven on high broil.
  2. Mix cheese, basil and granulated garlic well.
  3. On a parchment lined baking sheet, shape the tuile as desired (I made a tear drop).
  4. Broil until evenly browned (mine took about 4 minutes but it depends on how thick you make your tuile); to prevent burning, you may need to cover part of it with bits of parchment as it bakes.

Notes:

  • I like a little crunch left in my vegetables, so I generally under cook rather than over cook.
  • If you make this in advance, keep the beans separately so they don’t turn to mush.
  • I used Ivanhoe Horseradish Cheddar because I thought it would be a nice zing to the soup.
  • Make as many tuile as you need, just multiply the ingredients by the servings required.

Read Full Post »

On May 5, we hosted a Cinco de Mayo dinner party with a few friends. I’m not sure what I was thinking because I had already a very busy week planned, then my dear Mom’s widow became ill and had to be hospitalized so we were running up to the hospital he was in (about 45 minutes away) every few days (he is doing better but still in the hospital). I only had 3 days to prepare!!! I chose the menu based on foods that I can make ahead of time, knowing that they would only get better! In case you wondered, I made a variation of this dip as hors d’œuvres, this salad and for the main, this pulled chicken molé AND a Dolce de Leche tiramisu (recipe to come) for dessert. It was a bit decadent, but sometimes I really need to play in the kitchen!

This lasagna is a delicious combination of flavours and it’s worth making each layer yourself, if you must, choose canned beans to save a little time.

It’s a flavour sensation! I put a poached egg on top the next day for a very tasty brunch!

Mexican Lasagna

A KitchenInspirations Original Recipe

Serves 4 as a meal or 6-8 as an appetizer

Ingredients for the Pulled Pork:

  • 250 g pork tenderloin
  • 125 mL (1/2 cup) stock (I used beef)
  • 250 mL (1 cup) passata (tomato sauce)
  • 125 g (1/2 cup) sweet onions, thinly sliced
  • 5 mL (1 tsp) cumin
  • 5 mL (1 tsp) coriander
  • 5 mL (1 tsp) Hungarian paprika
  • 1.25 mL (1/4 tsp) smoked paprika
  • 2.5 mL (1/2 tsp) salt
  • 1.25 mL (1/4 tsp) pepper

Directions for the Pulled Pork:

  1. Combine all of the ingredients in the bowl of a slow cooker or crock pot and mix well.
  2. Cook on high for 4 hours or until pork is easily pulled using two forks.

Ingredients for the Lasagna:

  • 6 corn tortillas, cut in half
  • 250 mL (about 1 cup) shredded pork (recipe above)
  • 85 g (1/2 cup) dried black beans, cooked and either puréed or mashed with a fork
  • 80 g (1/2 cup) sweet onions
  • 125 mL (1/2 cup) grilled corn
  • a handful (~1/4 cup) of cilantro
  • 125 mL (1/2 cup) Salsa
  • 150 g (about 1 cup) Mexican cheese or mozzarella
  • cilantro, for garnish
  • loosened yogurt (in a squeeze bottle)
  • sriracha sauce mixed with loosened yogurt (in a squeeze bottle)

Directions for the Lasagna:

  1. Preheat the oven to 220° C (425° F).
  2. In a non-stick skillet, caramelize the onions, add the beans, mushing some of the beans (add some stock if necessary). Set aside.
  3. Spray a pate terrine with non-stick spray.
  4. Layer 2 half corn tortillas on the bottom of the pan, cover with 1/3 of the shredded pork, 1/3 of the mashed beans, 1/3 of the corn, 1/3 of the cilantro, 1/2 of the salsa and 1/3 of the cheese. Repeat for two more layers, leaving out the salsa on the last layer. Cover with a non-stick sprayed piece of foil or the top of the pan, if you have one.
  5. Bake for 15-20 minutes covered, then uncover and bake for 10-15 minutes or until cheese is bubbling and lightly golden. Allow to sit for 10 minutes before serving.
  6. Serve garnished with a drizzle of loosened greek yogurt and sriracha sauce and a sprinkling of chopped cilantro.

Notes:

  • I was unable to find Mexican cheese so I used Manchego and Mozzarella.
  • If you cannot grill fresh corn, frozen is acceptable but you will miss the grilled flavour.

Read Full Post »

Mediterranean Sriracha Fish

Recently, I worked on an on-location two-day motion shoot. I was one of four food stylist employed for the two days. We worked from the compact, professional, mobile kitchen called Maindish, it was rather cosy! They were 15 hour days with few opportunities to sit down (who said food styling was glamorous?). I’m always amazed at the shear number of people it takes to make a commercial happen, 60, in this case! By the way, on location also means cramped, because you’re having to squeeze in everyone and everything into relatively small spaces, it really is quite the orchestration! 

I found this recipe on Epicurious; I chose it because I had most of the ingredients at home (along with an inordinate amount of sun-dried tomatoes). It was absolutely delicious, so I decided to document it for the future, plus, I made a few changes.

Mediterranean Fish in a Tomato Sriracha Sauce

Serves 2

Ingredients:

  • splash of EVOO
  • 70 g (1/2 medium) sweet onion, peeled and finely sliced
  • 90 g (~1/2 medium) fennel bulb, finely sliced
  • 1/2 tsp sriracha sauce (add more if you like heat)
  • 250 mL (1 cup) tomato purée from fresh or canned tomatoes (I used homemade)
  • 30 g (~1/4 cup) sun-dried tomatoes, chopped
  • 2oo g white fish fillets
  • Sea salt and freshly ground pepper
  • A handful of baby spinach
  • Black olives (I used Niçoisse)

Ingredients for the topping:

  • 2 tbsp flat-leaf parsley
  • Small handful of spinach
  • 2 tbsp sun-dried tomatoes
  • 1 small clove of garlic, peeled and finely chopped or grated
  • Zest of 1 lemon, plus a squeeze of juice

Directions:

  1. In a medium-sized, frying pan (I used cast iron), heat a splash of olive oil and sauté the onion, fennel and sun-dried tomatoes for 2 to 3 minutes.
  2. Combine the tomato purée with the sriracha sauce and stir well. Add the tomato purée to the frying pan and simmer for 4 to 5 additional minutes. Season to taste with a little salt and pepper.
  3. Place the fish on top of the tomato mixture, spooning a little of the sauce over the fish. Cover and simmer on medium-low for 8 to 10 minutes, or until the fish is fully cooked.
  4. Meanwhile, in the small bowl of a food processor combine the parsley, spinach, sundried tomatoes, garlic, lemon zest and juice and process until chopped and well mixed. Set aside.
  5. When the fish is completely cooked, carefully stir in the olives (putted and sliced, if you’re using larger olives) and baby spinach and warm through (spinach should wilt).
  6. To serve, place the fish on a spoonful or two of cauliflower mash or polenta and dollop the tomato sauce over the hot fish. Dot the herb topping over the fish and sauce to finish.

Notes:

  • This combination of vegetables and tomatoes would work very well with chicken, but you’ll need to increase your cooking time.
  • I used Tilapia for this particular recipe, but haddock, cod, sea bass or monkfish would also work well.
  • The first time I made this recipe, I did not have fennel so I substituted 2 stalks of celery, it was equally as delicious.
  • I used sun-dried tomatoes in olive oil, you may use dry but you might need to soak them in water so they are not chewy.
  • To reduce calories, omit the olives and use non-stick spray instead of olive oil.
  • If you use ordinary black olives, pit them and cut them into thirds.
  • The weights I suggest in the recipe are not carved in stone, just gives you an idea of proportions for two.


Read Full Post »

VeganSpanakopita_4208

In converting a recipe to Vegan, I generally try to keep in mind all the flavours AND the textures in the non-vegan version. When I decided to make Vegan Spanakopita I became very excited until I remembered that there was crumbled feta in my recipe. Crumbled feta is not Vegan, so I began to think…what oh what can I use to replace the flavour and the unique texture this delicious cheese brings to the table. Yes, I could have omitted it altogether, but then it wouldn’t be as delicious!  Some time ago, I’d made a note to marinate tofu in ‘feta’ flavours like lemon juice, apple cider vinegar, salt, oregano and olive oil…so I did a little experimentation and came up with this version. It’s actually pretty tasty on its own, but I needed it for this recipe so there won’t be marinated tofu on the buffet table, but this spanakopita more than makes up for it. I don’t think the non-vegans will mind this version. But there will be pulled pork and bacon wrapped dates just in case ;-)!

Vegan Spanakopita

A kitcheninspirations original recipe.

Makes about 50, 6 cm (about 3 inch) triangles

Ingredients:

  • 1 tbsp canola oil
  • 1 large sweet onion, sliced thinly
  • 5 cloves garlic ~20 g, finely minced
  • 500 g zucchini grated (about 2 medium-sized)
  • 300 g spinach
  • 3-4 tbsp finely chopped fresh dill
  • 2 tbsp chopped fresh oregano
  • 350 g marinated tofu, drained, roughly chopped (recipe below)
  • About 8-10 sheets phyllo
  • 1/4 cup canola oil

Directions:

  1. Heat canola oil in a large dutch oven. Add the sliced onion and sweat it out a bit, add the garlic and cook for about a minute. Add the grated zucchini (click here for some clear steps on making this dish) and cook for 3-4 minutes. Add the spinach and cook until it has totally wilted.
  2. Remove from the heat and add the fresh dill, oregano and roughly chopped marinated tofu. Set into a fine sieve and allow to cool and drain.
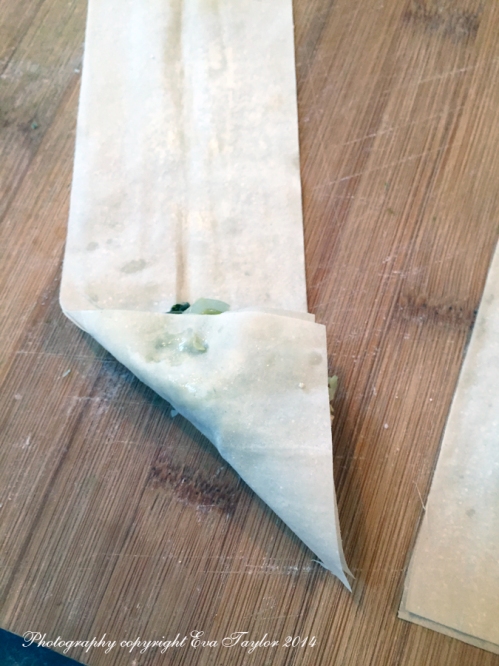
  3. Once completely cool, prepare the phyllo sheets by cutting them into 3 cm or 2.5 inch strips and lightly spraying each one with canola oil. Use two strips per triangle. Place one heaping teaspoon of the cooled filling onto one end and start folding into a triangle. Brush or spray lightly all over with the canola oil.

    VeganSpanakopita_4196

    A heaping teaspoon of filling goes at the end.

    VeganSpanakopita_4197

    Begin folding into a triangle and continue until the length is used up.

    VeganSpanakopita_4198

    The nature of the folds covers in the filling very well.

    VeganSpanakopita_4200

    A tidy little triangle.

  4. Bake at 350°F for 12-14 minutes if saving for the freezer or 116-18 minutes to serve immediately.
  5. To reheat, place a single layer of the triangles onto a baking sheet and reheat in 300°F for 10 minutes or until golden.

VeganSpanakopita_4209

The oil makes the phyllo very crispy.

Marinated Tofu

Makes enough for one batch of Spanakopita (prepare 1-2 days ahead to allow tofu to absorb the marinade flavours)

Ingredients:

  • 350 g extra firm tofu
  • 1/4 cup apple cider vinegar
  • 1/4 cup lemon juice
  • 1/4 cup water
  • 1/4 cup EVOO
  • 1 tbsp fresh oregano
  • 1 tbsp plus 1 tsp sea salt
  • 1/2 tsp freshly ground mixed peppercorns

Directions:

  1. Place the drained tofu on a cutting board over a sink so it’s tilting a bit into the sink. Place another cutting board on top and a heavy cast iron pan. Leave for 30 minutes to drain.
  2. Meanwhile, combine the apple cider vinegar, lemon juice, water, EVOO, oregano, sea salt and peppercorns and mix well.
  3. Once drained, dry off the tofu and cut into 1 cm cubes. Place into a glass container and cover with the marinating liquid. Marinate in the refrigerator, shaking the jar intermittently over 1 to 2 days. Drain to use.

Read Full Post »

The ice is melting. Thank God! We are so over winter. This past weekend was warm enough to walk outside in a light jacket and no hat (ok, I did start out wearing gloves, but took them off). The ground is defrosting and the air smelled like my childhood spring; do you remember that wet mud, musty smell? I don’t know about other ladies in our hemisphere but I’ve stopped wearing socks! There I said it. My poor dogs are so sick of being all locked up and claustrophobic in socks and boots that they needed to be liberated! Yes, they may still get a bit chilled at times, but I don’t care! I’m done. And sadly the start of this week is back down to 2C (xxF) so this soup post is not entirely outside of expectation even though it was made about a month ago.
This soup was a last minute St. Paddy’s Day effort to make something green for dinner and I dare say it turned out even better than expected, so here it is on the blog for posterity and for me so I remember to make it again (it was that good)! It’s so creamy and smooth you’d never guess there is no cream in it!

BroccoliSpinachSoup_2286

The smooth creamy texture makes you think it’s much more sinful than it is!

It’s a nice thick vegetable soup without cream or any type of starch in it. The beautiful green colour comes from purée-ing raw baby spinach leaves into the warm broccoli soup and blitzing it for about two to three minutes to get the creamy consistency you see, I didn’t even push it through a fine sieve. There is no butter nor cream but you can add a pinch if you’d like.

The garnish is oven dried baby spinach leaves which I was hoping to make into a post on their own, but alas they were far too delicate and did not make the test! But they do make a gorgeous garnish, n’est pas?

Broccoli and Spinach Soup

Serves 2-4

Ingredients:

  • 1 bunch broccoli florets, including stems
  • 1 Vidalia onion, roughly chopped
  • 6-8 medium cloves garlic, roughly chopped
  • 3-4 cups water or stock
  • salt and white pepper to taste
  • 2 handfuls of baby spinach leaves, raw

Directions:

  1. Sauté the onion and garlic in a quick spray of non-stock or olive oil, adding water as needed until they are translucent. Add the broccoli florets and stems and cook stirring often until they are very tender. Add a couple of cups of water or stock and simmer for about 15 minutes.
  2. Pour contents into a heat proof beaker and purée using your immersion blender (or you may do this step in a regular glass blender). Purée for a minute or so and then  add the raw baby spinach and purée for another 2-3 minutes until very smooth. Salt and pepper to taste. Add more water or stock if you feel it’s too thick.
  3. Serve warm garnished with dried spinach leaves*.

Notes:

  • To oven dry spinach leaves: Pre-heat the oven to the lowest temperature, mine is 170°F. Take the largest leaves from the package of baby spinach and lay over a dry cooling rack making sure they do not overlap. Place in the warm oven and watch for 15-20 minutes until they are completely dry and crispy. This would also work wonderfully with basil leaves. This is a great alternative to deep frying them.

BroccoliSpinachSoup_2291

The bright green colour is attributed to the raw spinach that’s been puréed into the cooked broccoli soup. Do you think I have a thing for green?

Read Full Post »

I found this clever idea in the latest LCBO magazine. My vases were a little smaller than the idea in the magazine so some of my tulips had to stick out at the top.

I found this clever idea in the latest LCBO magazine. My vases were a little smaller than the idea in the magazine so some of my tulips had to stick out at the top.

Recently, we hosted a dinner party for guests who were doing Weight Watchers and because I don’t like to sabotage anyone’s journey to a healthy weight I decided to make the entire meal WW friendly and that meant putting my thinking cap on.  Now I don’t know about you, but I adore guacamole, it’s so creamy, fresh and tangy and it really enhances a few dishes as a condiment but may also be used as a wonderful dip with fresh vegetables!

Now I know what many of you will say, “but wait, avocados are a good fat” and while that is very true, it’s all about balance and budget so if you can save a little here you can spend it there (perhaps on an extra glass of vino?), is all I’m saying!

Before I even searched on line, I had the idea of creating a mockamole from spinach. Why spinach? I chose spinach because #1 it’s a gorgeous green and you can purée it smooth uncooked and #2 it fits well into the WW point system.  Once I determined what my basic ingredients would be, I started to search “mockamole” on the net and found that the majority of them are made with green peas. Now green peas are quite healthy but when I did the nutritional calculation using peas, my 1 tablespoon mockamole resulted in 1 WW point whereas my spinach mockamole resulted in 0 points for 1 tablespoon. So that was it.

Guacamole is a simple yet flavourful combination of ingredients and other than subbing out the avocado, I kept it pretty true to form. I used 4 tablespoons of cooked puréed navy beans as my ‘creamy’ ingredient and it worked out great. I loved the bright green colour as well as the bright flavours in this recipe. JT said it was an excellent substitute for real guacamole! It’s quite garlic-y so if it’s date night, you may wish to tone it down a notch or make sure your partner has some too ;-)!

Mockamole_2308

May I interest you in a little dip?

Mockamole (Spinach ‘guacamole’)

Makes about 3/4 cup.

Ingredients:

  • 100 g fresh spinach (may be frozen)
  • 4 tbsp navy bean paste (see notes)
  • 1 clove garlic, finely minced
  • 1 tbsp (15 mL) lime juice
  • 1 tbsp cilantro, chopped
  • 1 tbsp green onion, finely chopped
  • Cilantro or parsley for garnish
  • Chopped tomatoes (optional)

Directions:

  1. If using frozen spinach, wring out well. If using fresh spinach, wash and dry well.
  2. Combine the spinach, navy bean paste, garlic, lime juice and cilantro in a small food processor and process until very smooth (I found my immersion blender did this beautifully). Fold in chopped tomatoes if you are adding them.
  3. Add chopped green onion and garnish with a sprig of cilantro. Serve with cucumber slices, celery sticks or cauliflower florets or use in a meal that requires guacamole as a condiment.

Mockamole_2310

Choose vegetables that hold onto the dip like a spoon!

Mockamole_2303

The cooked puréed beans give this dip its creamy texture.

Mockamole_2306

Who are you calling “dip”?

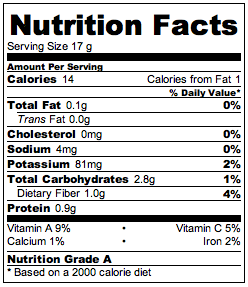
Per 1 tbsp serving

1 tbsp serving

Per 1 tbsp per serving.

1 tbsp serving.

Notes:

  • Navy bean purée: I usually make up a batch of plain navy beans for thickening soups, sauces and gravies and then freeze for later use. Cook navy beans in water without salt. Purée and press through a fine sieve. Allow to cool completely and put 1 tbsp portions into an ice cube tray (specifically for savoury things) and freeze. Once frozen, take each cube and put it into a larger ziplock bag and that way you have a creamy gluten-free thickening agent for future recipes.
  • If you add too much liquid to the puréed spinach mix, strain for a couple of hours in a coffee filter reserved for savoury things before serving.
  • To blanch spinach quickly, add spinach to a heat proof bowl with about 1/2 cup water and nuke for about 2-4 minutes until soft. Rince with cold water and wring out well.

Read Full Post »

Recently we entertained our lovely neighbours across the street; it was a thank you dinner of sorts because they happened to rescue us on my benchmark birthday party this past summer when we ran out of beer! We asked them what kinds of food they enjoy and Indian was one of the selections. I love cooking Indian food but because there are just the two of us I usually don’t bother but doubling the audience makes it all the more worth-while. It was an extravagant meal so I started cooking a couple of days in advance and it really didn’t seem to be that much trouble; the saucy, stewy dishes of India lend themselves to being made ahead and allowing the flavours to combine over time making them taste so much better than the day they were made. I was very pleased with the results and will definitely make these dishes again in the future.

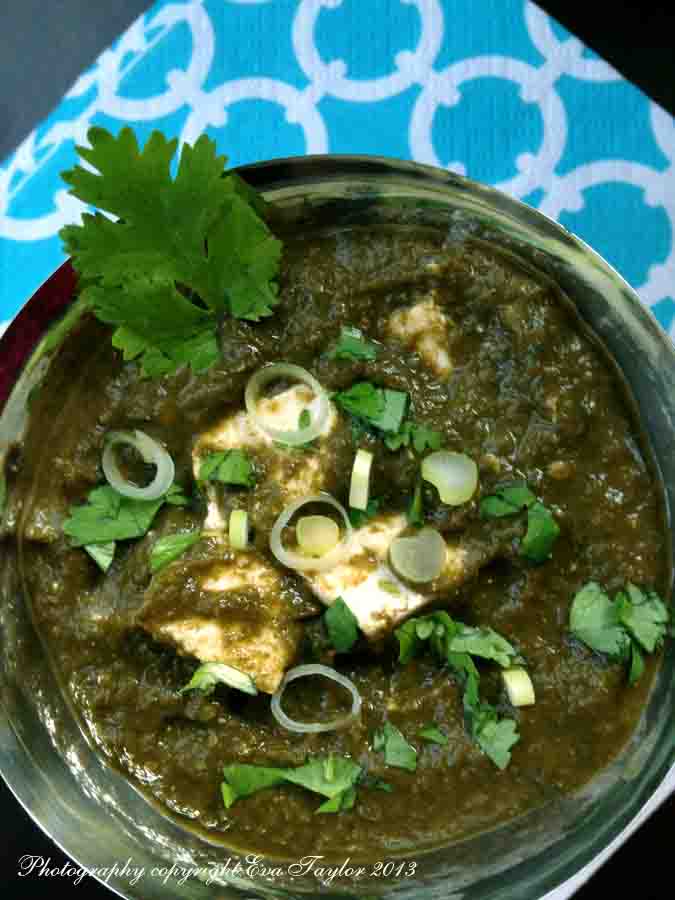
I also would like to thank Helene DeSouza (Masala Herb) for posting her favourite Palek Paneer recipe this month, if it wasn’t for her I likely would never have made this dish having tasted a restaurant version that was unremarkable. Helene’s recipe has the complex depth of flavours that one expects from Indian food. I urge you to try it.

The menu:

  • Onion Bhajis  (I made this one again and it was extremely tasty) with Tamarind Chutney (recipe to come)
  • Aloo Papri Chat (please click here for the recipe)
  • Carrot Pickle (please click here for the recipe)
  • Beef Bhuna (please click here for the recipe)
  • Butter Chicken (please click here for the recipe) NOTE: I used 1 lb fresh roma tomatoes and 2 cups of home made tomato sauce made from raw tomatoes cooked down and blended until smooth WITH oven roasted tomatoes blended and the whole thing run through a very fine sieve to get rid of the skin and seeds).
  • Palek Paneer (The Palek (spinach) gravy is new from Helene DeSouza who runs Masala Herb in Goya, India; recipe below)
  • Naan (please click here for the recipe) and Papadums (I bought some very special Papadums in Chicago when we visited with Chgo John of From the Bartolini Kitchens)
  • Chai Crême Brûlée (please click here for the recipe)

Paneer

The texture turned out perfectly this time.

The texture turned out perfectly this time.

This firm, unripened Indian cheese makes a rectangle 23 cm x 13 cm x 2 cm (9″ x 5″ x 3/4″).

This is the original recipe

Ingredients:

  • 4 liter Fresh whole milk
  • 5 tbsp lemon juice

Directions:

  1. Heat the milk in a deep and heavy bottom pan at medium heat (this is really important, so the milk doesn’t burn). Allow it come to a gentle boil (around 200 F) and stay there for a minute. Make sure the milk is not vigorously boiling, if it does, immediately reduce the heat and bring the milk back to gentle boil.
  2. Begin by adding the lemon juice a table spoon at a time, stirring gently to incorporate. With each addition you will notice that the milk separating. The final addition of lemon juice will separate the curds from the whey very obviously. Switch off the gas immediately or if you are cooking on electric, remove pan from the element to stop the heat.
  3. Line a sieve with double layered cheesecloth, making sure the cheesecloth is long enough to be bundled up and tied later. Pour the curd and whey through the cheese cloth. Set the whey aside or discard (I tried making ricotta from this whey but there was no more curd to be had. I understand that Whey is healthy so you can search the net to find uses, I did not and trashed it).
  4. Wash the curd in the cheese cloth, by running it through cold water to remove the lemon taste.
  5. Tie up the cheesecloth in a tight bundle and hang it over something to allow it to drain for about 30 minutes.
  6. Line a nice rectangular pan with a double folded cheese cloth making sure you have enough length and width to fold over the top. Add the curd to the pan, pressing it firmly into the pan. I didn’t press my corners and edges well enough and they were a bit crumbly. I used a small glass to help push the curd down and compress it. Place the  wrapped cheese between two cutting boards over a sink or a large pan and put a heavy pot on top for 1-2 hours.You don’t want to add too much weight for too long as it can drain out way too much moisture from the cheese making it hard and crumbly. Your cheese should have a slightly elastic texture so when you lightly press your finger into it, it will bounce back.
  7. Wrap it and store it in the fridge for up to a week or cover well with plastic wrap and freeze. Defrost entirely before use. If you find your cheese still is a bit too wet, you can store it LIGHTLY wrapped in the fridge and the chill will dehydrate it further (I did not have to).
  8. Cut the block into small one bite chunks and add to the Palek sauce to warm up. Be very gentle when stirring as to not crumble the cheese too much.

Paneer_1480

Cubes of firm unripened cheese remind me of firm tofu.

Palek Paneer (Spinach Gravy with Unripened Cheese Cubes)

Saag Paneer_1474

The lemon juice also helps to preserve the lovely green colour of the spinach.

Please click here to see Helene’s lovely recipe.

Ingredients:

  • 250 g baby spinach (or a standard large size bag)
  • 1 green Chili
  • 100 mL water
  • 1 small Onion, finely chopped
  • 2 tbsp Oil
  • 1 tbsp Garlic, finely minced
  • 1 tsp Cumin Powder
  • 1 tsp Coriander Powder
  • pinch Cinnamon powder
  • ½ tbsp Garam Masala
  • ½ tbsp red Chili Powder
  • 1 tbsp Tomato Paste
  • splash of lemon juice
  • 2 tbsp cream
  • Salt & Pepper to taste
  • 200 grams fresh Paneer bite size cubes (Indian Cottage Cheese)
  • cilantro and green onions to garnish.

Directions:

  1. Wash spinach well and if you’re not using baby spinach, remove all the hard stems.
  2. Blanch the spinach in 100 mL water, set aside.
  3. In 2 tbsp oil, fry the onions until caramelized. Add the garlic paste and stir for a moment. Add the cumin, coriander, cinnamon, Garam Masala and chili powder and allow to develop their aroma. As soon as you smell the herbs, remove from heat. Add the tomato past and combine with the blanched spinach.
  4. Purée with an emersion blender until very smooth, add a splash of lemon juice to brighten the flavours. Press through a fine seive.
  5. At this point you may put the finely puréed spinach mixture into a container and store in the fridge for a day or two.
  6. When you are ready to serve, reheat slowly in a pot, and add the two tablespoons of cream, salt and pepper. Add the Paneer and stir very gently so that the paneer does not break apart. Serve garnished with chopped cilantro and green onions.

Saag Paneer_1475

The gravy was rather thick, you can loosen it with water, vegetable stock or more cream.

Read Full Post »

As you know I’m a free agent at this particular juncture in my life and although I am keeping my ear to the ground and looking actively for work in my field, I am pretty realistic about the prospects out there and I’m keeping an open mind. The support from my blogging peeps is phenomenal and I thank you for your interest and offer to help! I am constantly touched and surprised by the generosity and kindness of, for all intensive purposes, strangers! It is because of you I am keeping my mind open for alternative opportunities, one such opportunity became a reality just two weeks ago.

About a year and a half or so ago, I had the good fortune to be invited to a taping of Top Chef Canada, Season 3 and there I met with Lucie Richard, Toronto-based Food Stylist with whom I chatted extensively about her craft. At that time, she very generously offered to have me ‘assist’ on one of her photo shoots. Two weeks ago it came to fruition and I assisted on a National Brand ice cream shoot. You cannot imagine how excited I was!

Ice cream is one of the most difficult things to shoot because of the very short window of opportunity before it begins to melt. I was thrilled to experience such a challenging product with one of the best in the field; Lucie was kind and generous with her advice and patience and she taught me an incredible volume of information on shooting ice cream. The tricks of the trade tend to be quite personal and what one stylist does may not necessarily be exactly what another does, so experiencing variety is key to coming up with your own tricks of the trade. The client has very specific expectations in what the characteristics of the ice cream should look like so you really need to know what you’re doing.

We used dry ice to super cool the tools, we worked in small batches for short periods of time, constantly re-freezing the ice cream so it doesn’t glaze over in the melting process. And the studio was kept very cool with air conditioning so I brought a sweater and I even brought gloves in case I needed to warm my hands. Of course, the work is fast and furious and there is no time to be cold.

The trends 15-20 years ago was to use ‘fake’ product. Ice cream was a highly guarded secret recipe of shortening, food colourings and inclusions. Today, most companies want the real deal and that in itself presents some interesting opportunities. And then there is Photoshop®, which has at times saved this incredible craft. We even took Photoshop into consideration, shooting slightly brighter and darker versions of the same shot in order to make sure we have what it takes to make the best composite. Of course, the Photoshopers are so skilled and talented, you can’t tell that they have added a little of this and a little of that to make that shot.

The client was very happy with the ice cream photo and we even finished a few minutes early. It was a huge success for me, and gave me the confidence to send out notes to my Food Stylist peeps that I’d love to assist. Who knows, this may become something!

Sadly, blogging is the driver and result of cooking passion; I make recipes for meals that I want to blog about. But we also want to eat the food I blog about. It’s wasteful to make an extra portion just for the blog so either JT or I will suffer with the pretty but stone cold blog version of a dish or eat separately which is what happened with this amazing ‘ravioli’.

uova-da-raviolo_1069

The pasta is relatively thin, so you can see all the good stuff inside!

Some time ago I saw this unique ‘ravioli’ treatment on my friend Celi’s blog (the kitchen’s garden), she was inspired to make this delightful dish after her daughter who works in a very upscale restaurant in Melbourne told her about it. We were at the cottage at the time I read the post and you know how we are unable to divert from plan because of ingredient limitations, so I was itching to make this beautiful dish as soon as we returned to the city.

One thing led to another and it wasn’t until the Friday before Thanksgiving that I finally got it together to make this tasty dish. Thank you Celi, it is exceptional! It’s reasonably fussy so I will have to figure out a way to simplify it so I can make it as a starter for a dinner party. I used John’s recipe (from the Bartolini Kitchen) for the pasta dough (with minor modifications) and Celi’s rough description for the filling. Even JT commented that he would definitely have it again. So it’s a win/win, all the way around. Thank you Celi and John for inspiring me to make this gorgeous dish.

The ravioli is comprised of sautéed spinach, ricotta and parmesan cheese  and the crowning glory is the simple egg yolk enveloped within the light pasta dough. When it is cooked, the yolk is simply warmed so that it becomes thick but remains runny and once it’s broken into, it mixes with the sage brown butter and becomes a delightful sauce over the ricotta, spinach and pasta. This is definitely a winner and will be shared with friends soon.

Ravioli with Egg Yolk and Sage Brown Butter Sauce (uova-da-raviolo)

I forgot to sprinkle additional parmesan on this one, shhhh.

I forgot to sprinkle additional parmesan on this one, shhhh.

Serves 2 with lots of pasta left over (I made additional plain ravioli and filled it with seasoned ricotta and froze them for future use).

Ingredients, for the pasta:

  • 1 scant cup flour
  • 2 egg whites

Directions, for the pasta:

  1. In a food processor, combine the flour and egg whites and process until you achieve a ball of dough.
  2. Allow the dough to rest for 30 minutes.

Ingredients, for the brown butter sauce:

  • 2 tbsp unsalted butter
  • 1 tbsp finely sliced sage
  • 1 clove garlic, finely minced

Directions, for the Brown Butter Sauce:

  1. Melt the butter and cook until it is brown, remove from heat and add the sage and garlic and allow to infuse while making the filling.

Ingredients, for the ravioli filling:

  • 2 whole egg yolks, at room temperature
  • 2 handfuls of spinach
  • 1/4 cup ricotta
  • 1 roasted garlic, puréed (I used a fork)
  • 2 tbsp Parmesan Cheese, and 1 tbsp for garnish

Directions, for the ravioli filling:

  1. In a small frying pan, sauté the spinach with a splash of EVOO until wilted, set aside to cool.
  2. In a small bowl, mix the ricotta, roasted garlic and 2 tbsp parmesan cheese. Taste and season with salt as desired.

Directions, for assembly of the ravioli:

  1. Heat a large deep pan of salted water to a steady boil.
  2. Roll out four thin sheets of pasta about 10-15cm in diameter (4-6″) (I used #5 on my Kitchenaid Pasta Attachment, but I think #6 would have worked very well too).
  3. In the centre of two of the pasta sheets, add a mound of spinach and on top of that add 1/2 the ricotta mix. Make a divot in the centre and add the room temperature, raw egg yolk. Place the second sheet on top and push out any air and seal the edges well. Cut this into a shape or leave it rustic.
  4. In the meantime, reheat the brown butter sauce on low.
  5. Boil the large ravioli for 2-3 minutes or until the pasta is completely cooked but leaving the egg yolk runny. Serve with the hot brown butter sauce and parmesan cheese for garnish. If you have a few extra sage leaves, add them as garnish too.
  6. Enjoy while the yolk is still runny.

uova-da-raviolo_1074

The egg yolk oozes out and mixes with the brown butter very nicely.

uova-da-raviolo_1072

We had these for lunch, for appetizers I will make them smaller and use small egg yolks!

Read Full Post »

Recently we opened our cottage for the summer. It was a busy weekend made even busier by someone’s hair-brained idea to redecorate (paint the wood paneling, new flooring, update kitchen upper cupboards, etc)! And that doesn’t stop me from complicating things by making an entire menu for the weekend home-made.
I’ve mentioned that our cottage is remote, so everything has to be brought in because even a 45 minute trip to the closest largest city doesn’t guarantee that one can find what one is looking for. So preparing a Menu Plan is essential as is the List of what needs to be brought up to execute said Menu Plan.
The list is key, here’s how I organize the list:
Menu Plan, Shopping List; things to be brought from home: the Pantry, the Freezer and the Refrigerator. As we pack for the weekend, things get checked off The List. The Menu Plan is followed to a T. If I bring four eggs, it means I’ll use four eggs. The trick is to end up with less than what we came up with, which usually works well. The Menu Plan also allows for left overs to be utilized in some sort of wrap for our return drive home, guaranteeing a healthier lunch than the truck stops on the road. Over the last twenty years I’ve only forgotten one thing and that was before The List was implemented, we were young and lived dangerously. If you’d like to download my template, feel free to use this one May 24 2013 Cottage Menu. The other essential thing is the running list once we get to the cottage — things that need to be brought the next time (toilet paper, paper towel, hand soap etc, you get the picture!)
JTs sister uses my FIL’s cottage about 15 metres (50 feet) from our place, so we generally get together at least once for cocktails during the weekend. I usually make something for cocktails because I like to cook! I came up with the idea of spinach and feta tartlets using my friend Zsuzsa’s cottage cheese pastry after seeing Sawsan’s post of Fatayer. They can be baked and then reheated to serve. I like them because they are full of flavour and small (portion control or eat them ALL!). This recipe makes 36 mini tarts using mini muffin tins with lots of pastry left over which can be frozen for future use. My lovely niece Laura (soon to be a full-fledged Lawyer) made Spanakopita, a delicious Weight Watchers recipe…great minds! This recipe isn’t for the dieter even though the serving is small, there is a lot of butter in the pastry. An alternative to the buttery pastry would be using wonton shells like my lovely friend Sissi has done here!

Spanakopita Tartlets

A single bite portion packing great flavours

A single bite portion packing great flavours

Makes 36 mini 2.5 cm or 1″ tarts

Ingredients:

  • 1/3 Zsuzsa’s cottage cheese pastry dough
  • 200 g (7 oz) baby spinach
  • 50 g (2 oz) finely chopped sweet onion
  • 2 cloves garlic finely chopped
  • 1 tsp oregano
  • 1 tsp dill weed100 g (3.5 oz) crumbled Greek Feta

Directions:

  1. Preheat the oven to 350F
  2. Sweat the onions until translucent.
  3. Add garlic and sauté until you can smell its aroma, add the spinach and cook down until spinach has wilted.
  4. Remove from heat and allow to cool completely.
  5. Add to a food processor and pulse a few times, you don’t want paste, just smaller bits.
  6. Add the oregano, dill and the crumbled Greek Feta and stir well.
  7. Roll the dough to about 2mm (a hair more than 1/8th inch) thick and cut with a 5 cm (2 inch) scalloped cookie cutter.
  8. Press each round into the bottom of an ungreased mini muffin tin.
  9. Fill with about 1 tbsp of the spinach filling.
  10. Bake for 20-25 minutes or until pastry is golden. Serve warm. Can be frozen and reheated for 10-12 minutes at 350F.

The pastry is crisp on the outside and soft and tender on the inside.

The pastry is crisp on the outside and soft and tender on the inside.

Read Full Post »

Good day everyone, I’m still in Lyon (figuratively speaking, of course) and cooking with Chef Villard and his lovely recipes. This is a condiment that he paired with lightly cooked snow peas and a little goats cheese and boy was it good. I particularly loved the colour, unfortunately when you add the goats cheese it lightens up quite a bit, but by then you’re starving for having enjoyed the aromas of the meal all afternoon long!

That sure is green

To be honest, JT wasn’t in love with the pesto which was originally Rocket (arugula), pine nuts and Parmesan cheese so I decided to be inspired by Chef Villard and not follow the recipe 100% (of course you did, says JT). The rocket tends to get a touch bitter when processed, although I do enjoy the peppery taste I wanted to temper the bitterness so I used the same amount of spinach as the rocket. Then I was thinking of the entire meal and wanted to repeat some flavours for consistency, so instead of pine nuts, I used roasted hazelnuts (the pumpkin soup has a drizzle of hazelnut oil to finish it). So in the essence of our meal in Lyon, here is the pesto recipe.

Rocket and Spinach Pesto with Hazelnuts (on Snow Peas with Goats Cheese — not shown)

Serves 6 (I had enough pesto left over for some hors d’œuvres the next day),

Ingredients:

  • 35 g roasted hazelnuts
  • 35 g combined baby rocket (arugula) and baby spinach
  • 1 clove garlic, finely minced
  • 1 tbsp parmesan cheese
  • 2-4 tbsp EVOO
  • Salt to taste
  • 60 g snow peas
  • 20 g goats cheese

Directions:

  1. In a small food processor add the hazelnuts, rocket, spinach, finely minced garlic and Parmesan cheese and drizzle a small amount of EVOO to get the chopping going adding a little bit to allow the purée to happen with ease (you don’t want this too runny). Taste and salt as desired.
  2. When you have achieved the consistency desired set aside (this is actually quite good if you make it in advance and the flavours have time to really develop).
  3. Cook the snap peas and as soon as they are done, immerse them into ice cold water to stop the cooking quickly. Simmer water on the stove to reheat just prior to serving.
  4. To serve, add a few tablespoons of the pesto to the hot, drained snow peas and crumble the goats cheese into it, stir lightly to distribute evenly.
  5. Enjoy warm.

Read Full Post »

We’re still on vacation, and on our last night in Lyon we tool a wonderful cooking class; our chef-host had a beautiful fig tree in the back yard, and we ate fresh figs right from the tree! Although I prepared this post well before we left, I thought it appropriate to post before I return. I do hope you’re all doing well, know that You know that I miss reading about what you’re cooking and that I’ll be back next week with lots of stories!!

One of our dear friends brought us a package of fresh, beautiful figs as a hostess gift (I love my friends!). Coincidentally I had taken out a portion of goats cheese from the deep freeze, so this salad was literally staring me in the face. A quick weeknight meal. There are no directions or quantities, do what your heart dictates, you can even throw in some crispy prosciutto or don’t make it crispy. It’s simple and wonderful. I sautéed the onions until they were soft and then I poured in about 1/4 cup balsamic vinegar and cooked it down until it was the consistency of syrup. You can use this to dress the salad…it doesn’t need much.

My salad has fresh figs, quartered, toasted sliced almonds, goats cheese, caramelized onion, balsamic dressing, arugula (rocket) and spinach.

It’s kinda like the kitchen sink salad

Fresh Figs, Goats Cheese, Caramelized Onion and Walnuts on Arugula and Spinach

I’m posting this from our little apartment in Paris in the Le Marais … Correction: Montmatre district. Here is a little peak. Cheers!

20120925-175959.jpg

20120925-180017.jpg

20120925-180024.jpg

20120925-180036.jpg

20120925-180044.jpg

Read Full Post »

What goes around comes around right? My friend Charles at Five Euro Food posted this recipe last week and coincidentally I was just thinking about making a chick pea salad for dinner, so I thought, why not his recipe? His recipe incorporated all the flavours I love in Hummus but he made it into a delightful summer salad; and with the heat wave we’ve been having, it’s a perfect summertime dish (well, maybe not declared perfect by guest, but certainly perfect in my mind!). Of course, I didn’t have time to get to the green grocer, so I used vegetables I had on hand, which is exactly what Charles had prescribed.

I actually made it with two rather healthy sized cloves of garlic, and woe, it was strong; in fact, so strong, I had to rinse a portion off for JT so he doesn’t offend his customers! I ate mine full octane, because, well, it’s been rather slow these last couple of weeks so I just thought, what the heck! I’ll be eating the entire parsley plant later!

I took a bit of artistic license by adding roasted red and yellow peppers and tomatoes

Deconstructed Hummus Salad

A recipe from Five Euro Food, slightly altered.

Serves 4

Ingredients:

  • 540 mL (19 oz) chick peas
  • 1-2 mini cucumbers, chopped into bite sized pieces
  • 1/2 each roasted red and yellow peppers, cut into small cubes
  • 1 green onion, finely chopped
  • 1 jalopeño, finely chopped
  • 2 oven roasted tomatoes, diced (please see this post for oven roasting tomatoes; because of the heat, I did it on the BBQ)

Dressing Ingredients:

  • 30 mL (2 tbsp) EVOO
  • 59 mL (1/4 cup) lemon juice
  • 1 small clove garlic, finely minced
  • 1 tbsp tahini
  • 2 tsp cumin
  • 1/2 tsp coriander
  • 1/2 tsp salt

Directions:

  1. Combine the dressing ingredients and set aside.
  2. Combine the vegetables and chick peas and mix well. Drizzle with the dressing and serve immediately. If you wish the vegetables to mix with the dressing in advance, I would suggest leaving out the cucumber until serving as it tends to get a bit on the mushy side.
  3. Serve over greens or spinach, as below.

It was a light, refreshing and garlicy dinner. Lunch will be wonderful tomorrow.

Read Full Post »
As I’ve mentioned in a previous post, my brother and his family came for brunch this past weekend and I wanted a slightly healthier salad to go with a slightly less healthy savoury bread pudding (you can see a similar recipe at Bits and Breadcrumbs, but my version had ham and cheddar cheese, you get where I’m going with this?). This spinach salad comes from an old recipe book that I bought for my MIL about 15 years ago. She had talked about Oprah and her chef and that they were coming out with a cookbook, In the Kitchen with Rosie; she loved Oprah, so I made a mental note and put it on her Christmas list. Well, I should have known because she went out and got it for herself, so then I was stuck with the book.

There are some darn good ‘low fat’ recipes in this little book and some great tricks as well. But the one recipe that keeps making an appearance in my kitchen is the warm orange dressing on a spinach salad (this one is for you, Lisa). Now you can add what-ever you wish to create your very own spinach salad, but this is what our’s had on Sunday: baby spinach, hard-boiled egg whites, grape tomatoes (I like the colour), a little crispy fried pancetta (I know, not healthy but there was not very much of it), thinly sliced mushrooms, orange sections and toasted pine nuts. When you toss this lovely salad with the warm dressing a symphony of flavours start playing in your mouth. So delicious.

A slightly healthier alternative to Spinach Salad

Warm Orange Dressing

Serves 6

Ingredients:

  • 1 Navel orange
  • 1⁄3 c Shallot, minced finely
  • 2 Cl Garlic, peeled and minced finely
  • 5 T White Balsamic vinegar
  • 2 t Sherry vinegar
  • 1/24 cup of orange juice with pulp
Directions:
  1. Peel the orange and remove the white pith, and separate the segments (do this over a bowl in order to reserve the juice). Squeeze the residual juice from the membranes into the bowl and reserve; add the additional OJ to this mix.
  2. In a small saucepan, add the shallots, garlic, vinegars, and reserved orange juice, and bring to a boil over low heat.
  3. Just before you wish to serve, combine all the salad ingredients, add the warm dressing and toss to coat.

I know it's just salad, but doesn't it look yummy?

Read Full Post »

Every so often we like a meal without meat. Indian flavours are always so welcome particularly on these bitterly cold winter nights. I saw one of our celebrity chefs, Chef Michael Smith, made this recipe on his show Chef at Home, and I’ll be darned if I can find it. It’s a really easy recipe and comes together quite quickly. It also serves up lunch very well the next day. And if you tire of it, just add bit of vegetable stock and purée into a lovely creamed soup.

There

Curried Cauliflower and Chickpeas

Ingredients:

  • 450 g cauliflower cut into small florets
  • 300 g rehyrdated chick peas (if using canned, drain and rinse)
  • 160 g onion roughly chopped
  • 75 g raisins
  • 1 tsp cumin
  • 1 tsp corriander
  • 2 tsp curry
  • 1 cup water
  • 2 tbsp coconut milk powder*
  • splash of EVOO

Directions:

  1. Heat the oil in a large dutch oven and sauté the onions until translucent.
  2. Add the cauliflower and sauté for a couple of minutes. Add the chick peas.
  3. Sprinkle the spices over the hot cauliflower and stir until you can smell their wonderful aroma. Add the raisins.
  4. Add water and mix in the coconut milk powder. Cover and allow to simmer until the cauliflower is tender.
  5. Serve over a bed of mixed greens.

* In Toronto, they sell coconut milk in cans in our grocery stores, but I usually find I need only about 1/2 of a can. It doesn’t freeze well so I end up keeping in the fridge until it grows something weird and then it gets tossed. I found the coconut milk powder in the ethnic section in our large grocery retailer and thought it’s the perfect solution for me. You can do a search on line, I’m sure you will be able to find it in your local ethnic store.

Read Full Post »

Another tip of the hat to Laura Calder’s Soufféed Omelet. We had BBQ’d a couple of gorgeous BC wild salmon fillets late last week but then didn’t have the opportunity to use them as left-overs (we always make two extra servings so we can each take a delicious lunch to work – saves money and allows you to know exactly what you are eating!) Did you know that the pink-ness of Salmon is determined by how much shrimp they eat? The pinker the colour, the more shrimp they ate (one of our clients is a seafood canner)!  So, back to the story. On Saturday as we sat reading the paper at our beautiful Soapstone island, I pondered what to make for breakfast…and then it came to me: Salmon Spinach Souffléed Omlette! I threw in the greens to use them up…they were slowly wilting away. I love this recipe because it makes more than you think it should, using only two eggs! It’s light and airy, and the BBQ’d salmon added such a lovely smoked flavour. (I wasn’t going to post this, but it was so damn tasty, so I took this photo with my lowly iPhone 3GS)

Salmon Spinach Souffléed Omlette

Serves 2

20110821-080658.jpg

Ingredients:

  • 2 eggs, separated
  • 2-3 oz BBQ’d Salmon, flaked
  • 3 shallots finely chopped
  • a handful of greens
  • 1/4 cup non-fat yogurt (for the omlette)
  • 1/4 cup non-fat yogurt (for the sauce; I haven’t had a chance to try PC’s non-fat Greek Yogurt, but I’m certain it would be amazing in this)
  • 1 tbsp finely chopped chives
  • Non-stock cooking spray
  • 2-3 tbsp LS stock (I used chicken)
  • Sea Salt

Directions:

  1. Pre-heat oven to 375°F.
  2. Sauté shallots in a small cast iron pan until translucent. I find the cooking spray doesn’t really give you enough moisture to do this, so I usually splash a bit of LS Chicken Stock to help it along).
  3. Add the greens and allow to wilt.
  4. While this is going on, beat the egg whites until stiff peaks form (not dry).
  5. Then, beat the egg yolks until significantly lighter in colour and thick. Add the yogurt and beat in well.
  6. Mix a little bit of the egg white into the yolk cream. The fold in the rest, carefully so that you don’t deflate it.
  7. Lightly fold in the sautéed greens and shallots, and lastly the flaked salmon. Season to taste.
  8. Carefully pour this mixture into the hot cast iron pan, spreading evenly in the pan so it reaches all sides.
  9. Place into the hot oven for 15-20 minutes, or until a cake tester comes out clean.
  10. In the meantime, mix the yogurt and the chives.
  11. Serve with the yogurt chive sauce and a bit of whole grain toast.

Read Full Post »

On Saturday, we had my dearest friend Kim (from University) and her hubby Mike over for brunch. They have been away so much in the last month (oh, you know, Hungary, France, Germany and Alberta) that we had to “sneak” in a quick visit. Kim’s birthday is 11 days before mine (yes, SHE is older!), and we ALWAYS get together for our birthdays.

I’m very proud of Kim, she lost 65lbs a few year’s ago doing the same Dr. monitored diet I did and she has kept it off. She looks hot and sexy and gorgeous; a truly amazing and giving woman. So whenever they come over, I try to cook a reasonably healthy meal. She has some intolerance, such as soy and gluten; and Mike has some significant dislikes, onions and nuts and some things out of the blue. I always like to cook things our guests really enjoy eating, so it’s a bit of a challenge, but I’m always up for it! PS Mike seemed to like everything I made!!!

The other day, we saw Laura Calder on French Food at Home cook up a lovely Soufléed Omelet and I thought it would be a wonderful brunchy meal. Of course, I had to ‘lighten’ it up a touch. We started the meal with our home-grown tomato and Bocconcini skewers with home grown basil. And then it was Roland’s Deconstructed Grilled Caesar Salad, and then the Spinach and Feta Soufléed Omlette, and to finish, a fruit cup with ‘sabayon.

Deconstucted Caesar Salad – to keep it a bit healthier, we cut the Peameal in half. The dressing is a low fat Caesar I make.

The Deconstructed Caesar Salad

Soufléed Omlette with Spinach and Feta

Soufléed Spinach and Feta Omlette

I bought these adorable little square cast iron pans a while ago and decided a square omelet would be cool! I had a half a celery root and a clove of garlic that I roasted and then puréed with a splash of LS chicken stock, then I strained it through a fine sieve to get rid of the lumps; I folded this mixture into the egg yolks for added flavour.

Serves 4

Ingredients

  • 4 large eggs separated, plus 1 egg white
  • 1/2 cup of puréed, strained roasted celery root and garlic (you may also add 1/2 onion, but I left this out, due to Mike’s extreme dislike of onions)
  • 4 cups spinach, rinsed and dried
  • 2 cloves garlic finely minced
  • 1/2 cup of crumbled feta
  • 4 basil leaves as garnish

Directions

  1. Pre heat oven to 350°F.
  2. Beat egg yolks until light and thick, fold in the roasted celery root mix.
  3. Beat egg whites until fluffy but not dry.
  4. Mix in a little of the egg whites into the egg yolk mixture.
  5. Slowly fold in the egg yolk mix into the whites, incorporating the whites well, but not deflating.
  6. Heat a small squirt of non-stick spray in the cast iron pans. Remove from heat.
  7. Divide egg mixture evenly between all four pans. Insert into oven and bake for about 10-15 minutes.
  8. While baking, sauté the spinach and garlic until it has shriveled. Pour into cheese cloth and squeeze out the excess liquid. Chop and set aside.
  9. When the souflée has browned a tiny bit, add the spinach and crumbled feta. Broil for about 1 minute or until cheese begins to bubble a tiny bit.
  10. Serve immediately.

The ‘sabayon’ is about 2 tbsp low fat mayo, 1/2 cup low fat yogurt, 1 tsp vanilla and 2 tbsp honey. Mix well and serve drizzled over fruit.

PS. On TV Laura did not cook the egg yolks, but in the recipe, she does. It works well without the cooking as above.

Read Full Post »

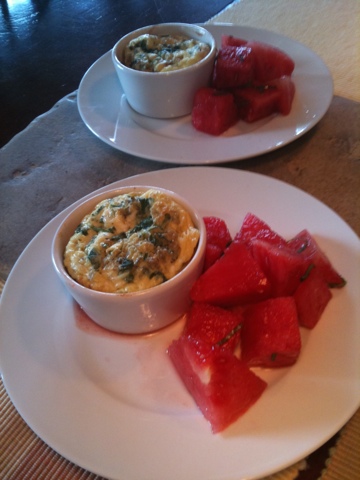
A lovely, flavourful breakfast at the cottage are these individual ramekins of spinach and feta fritatta. One egg, 1 tbsp of feta, 1 small finely chopped shallot, 1 tsp finely sliced chives, pinch of basil or oregano and 1/4 cup chopped spinach per person – a little brunch!

20110731-093046.jpg

Pre-heat oven or BBQ to 350F.
Prepare one ramekin per person by spraying with non-stick spray.
In a small skillet and a quick spray of non-stick spray cook the shallots until translucent, add spinach and wilt.
Remove from heat.
Beat eggs well, adding all remaining ingredients, mix well.
Divide mixture between the number of ramekins you’ve prepared.
Bake for 12-15 minutes or until cake tester comes out clean.
Serve with a salad of watermelon sprinkled with lime juice and a chiffonade of mint.

20110731-095924.jpg

Read Full Post »