Feeds:
Posts
Comments

Posts Tagged ‘Easy’

NoKneadBread_intro

Several years ago I posted a few no knead bread recipes (here, here and here) and over the years we (read JT) have continued to make this mindless, easy, delicious and beautiful artisan looking bread so I thought it would be good to revisit the post and update with new images. You may recall that this was JTs baby and to this day, he is the maker of this tasty bread. I also wish to add a caveat that this bread is CRAZY EASY to make so, all you yeast doubters (you know who you are) I strongly encourage you to make this bread. Seriously, you can’t fail!

We made this batch for Valentine’s Day to be served with the meatless balls and boy was it successful — our dinner guests loved it so much they asked for the recipe and then they made it the very next day! How cool is that?

IMG_4688

This is our friend’s bread, pictured in their spankin’ new kitchen!

I don’t know what happened to the recipe but it disappeared. I have included it now. I must give a shout-out to A-Boleyn from Live Journal, who asked some questions which lead me to discover that the recipe went AWOL.

No Knead Bread

No Knead Bread Ingredients:

  • 375 g (3 cups) all purpose, unbleached flour
  • 2 tsp salt
  • 1/4 tsp bread machine yeast
  • 1/4 tsp red wine vinegar
  • 380 mL (1 2/3 cup) warm water

Directions:

  1. Combine flour, yeast and salt in a large bowl, mix with a wooden spoon.
  2. In a measuring cup, add the red wine vinegar to the water and stir. Pour the vinegar water mixture into the flour and stir with a wooden spoon until combined. The dough will be shaggy. Let rest for 4 hours in a warm area. JT usually puts a piece of clear plastic wrap over the top of the bowl.
  3. Dough is ready when it is dotted with bubbles. Lightly flour work surface and place the dough on it, sprinkle a little more flour on top and fold the dough over itself a couple of times. Leave bread on the work surface and cover loosely with the recycled plastic wrap from the first rising and allow to rest for 15 more minutes.
  4. Using just enough flour to keep the dough from sticking to your fingers, gently and quickly shape the dough into a ball (JR does this by simply pushing and folding, no kneading necessary). Generously dust a clean cotton towel (not terry cloth) with cornmeal and lay dough ball directly on it, seam-side down. Dust dough lightly with more cornmeal and cover with another clean cotton towel.
  5. Dough should rest 2 hours or until it is more than double in size. At least 30 minutes before you wish to bake the bread, heat the oven to (232° C) 450° F. Put a 6 to 8 quart heavy cast iron pot with a lid into the oven and heat both oven and pot up as the oven warms. When the pot is heated through, add some cornmeal to the bottom and gently roll the dough into the hot pot, seam side up (JT does this by taking the cloth that the bread rested on and just roll it off the cloth into the pot). Be careful, the pot is extremely hot. It will look like a mess, but it will be OK. Cover with lid and bake for 35 minutes, then remove lid and bake for an additional 10 minutes.
  6. Cool on wire rack.
NoKneadBread_2
The crust is incredible. Sadly, the photo is not.
NoKneadBread_3

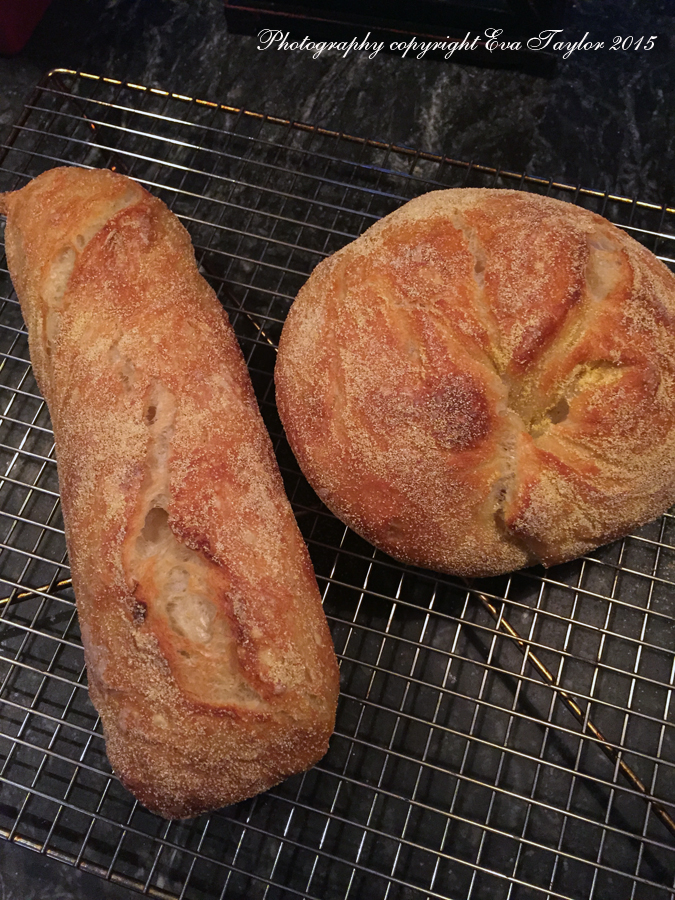
The baguette is about 25-30cm (12 inches) long x 7-8 cm (3 inches) wide and the boule is about 15-20cm in diametre, perfect for 4 for a meal!

Notes:

  • We usually make one large boule out of this recipe but the last time we did 1 small boule ( in a 1.8L cast iron enamel pot with lid) and 1 baguette (in a similar pan as this)
  • If you use Le Creuset then make sure you change the lid knob out to a metal one because the black ones shouldn’t be heated at that high temperature.

Read Full Post »

Merry Christmas everyone, I do hope you are all enjoying the season of giving! Christmas wouldn’t be Christmas without my traditional baking and I like to change it up every so often and so I’ve added a couple of new items to my existing Christmas Repertoire and one is Sponge Toffee. I began my Christmas baking at the end of November anticipating that I will be busy with the food styling assisting and I am SO GLAD I did because I have BEEN BUSY! I’m ready to take bookings for the new year, so if you need a passionate, determined assistant or recipe tester, please give me a shout.

2013 Christmas Baking Round Up

I made 9 different goodies this year.

I made 9 different goodies this year.

I know the Anzac Biscuit is made only during certain times in Australia, but this delicious oat cookie has become a fast favourite in our home so I like to make the treat for the holidays. And it wouldn’t feel like Christmas without Date Filled Oatmeal Cookies. I also like to include a few Gluten Free options, Mexican Macaroons (which I made using almond flour instead of white flour). Milk and Dark Chocolate Chunk with Cranberries are a favourite recipe from my friend Barb (Profiteroles and Ponytails) and this year I added dried cranberries to the batch to make them a little more festive. And last but not least, the delightful Chocolate Crinkle Kisses that really embrace the festive season with the lovely candy cane kiss! I even snuck in some wonderfully easy truffles because I was given 4 kgs of chocolate chunks from a photoshoot, so I really needed recipes that used a lot of chocolate. The truffles are with Chocolate, Chocolate Orange and Chocolate Coconut truffle flavours. I just realized I have not posted this recipe before so I will remedy it over the holidays, they are really easy to whip up. I hope you enjoyed the round up, stay tuned for a few more festive recipes over the holidays.

SpongeToffee_1521

Make sure your baking soda is fresh otherwise it won’t puff up properly!

Sponge toffee is a favourite of mine since my childhood. I remember my Mom buying us a brick and eating it slowly over the course of a day or two. It’s quite decadent and I am so happy to have made it because it brings back so many wonderful childhood memories. This is a simple recipe and you could easily fancy it up by dipping one end into cooled melted chocolate just like that famous chocolate bar! I’ve kept this recipe simple without any extra flavourings, but you can go ahead and add a little vanilla or other extracts to jazz it up.

It’s very easy but you need two essential things: 1. an accurate candy thermometer and 2. FRESH baking soda (bicarbonate of soda). Prepping all the ingredients and equipment is also necessary because once the candy starts to cook, you will need to focus your attention to it.

Sponge Toffee

Makes about 10″ x 12″ x 1.5-2″ thick block. I googled a number of recipes and videos to help make this toffee.

Ingredients:

  • 1 c granulated sugar
  • 1 c  golden corn syrup
  • 1 tbsp baking soda

Directions:

  1. Prepare a baking sheet by spraying it with non-stick cooking spray and lining it with parchment paper. Set aside.
  2. Mix together the sugar and corn syrup in a large heavy bottomed pan with an accurate candy thermometer attached. Put the pan onto medium heat and stir until the sugar dissolves (about 4 minutes).
  3. Cook this syrup until it reaches 300° F (about 10-15 minutes). Your syrup will turn golden.
  4. When it reaches 300° F, remove it from the heat and sprinkle on the baking soda (I found it to distribute more evenly by using a fine sieve), mix gently with a wooden spoon being careful not to over mix because it WILL deflate. This mixture will bubble up a great deal and that’s why you need a large pot.
  5. Gently turn out the bubbling candy onto the prepared cookie sheet and allow it to spread itself; DO NOT push it around, just leave it. The beauty will be the variety of thicknesses. Allow it to cool and harden.
  6. When it’s cool, remove the hard sheet to a cutting board and using the tip of a knife, allow the toffee to break apart in inconsistent shards. Alternate finishes: Dip one end into melted chocolate (slightly cooled).
  7. Store in an airtight container and enjoy responsibly.
SpongeToffee_1522

Sweet, sticky caramel, you old smoothy!

Read Full Post »

Hello Spring

Spring has finally sprung in The Big Smoke so I thought I would run some lovely signs of spring first. I’m always surprised at how elated I am when I see the first buds on the trees and then somehow, it seems that from one minute to the next BOOM, we have blooms. It’s like spring explodes into nature; trees go from no leaves to full leaves, bulbs spring up, lilacs bloom and everything is glad to be alive. Finally.

Azaleas_4633

The Azaleas are one of the first to bloom

Cardinal_4628

A visiting Cardinal. He is just too big for our feeder, so he eats the dregs.

Flowering Tree_4626

Our new Japanese Cherry Tree just loves its new home.

Flowering Tree_4627

Completely covered in blooms

HeatLight_4632

Even sitting on the back deck is quite pleasant with a little fire and heat.

Trillium_4656

Our lovely trillium returned in the back 20.

Lilac_4642

And last but not least, this 7 year old lilac FINALLY bloomed this year. Ironically, this was the year I had planned to replace it with a Rose of Sharon.

JapaneseCherryBlossoms_4636

A drive through High Park to showcase the beautiful Japanese Cherry trees just prior to their peak.

JapaneseCherryBlossoms_4637

It’s a lovely fresh aroma

JapaneseCherryBlossoms_4638

There were tour buses on the weekend

JapaneseCherryBlossoms_4639

The trees are dispersed throughout the park, but there are also gorgeous clumps of them.

CherryBlossoms_4644

I took these pictures on Saturday; the trees were definitely at their peak.

CherryBlossoms_4646

Such gorgeous delicate blossoms.

CherryBlossoms_4647

I wish they bloomed all year round; that would make me very happy.

We had my family Easter dinner in mid-April because my brother and family always have other plans on Easter Weekend. I don’t mind having these holiday dinners at a different time, things are generally cheaper, it’s fun to have the festivities again (we had an Easter Egg Hunt) and it gives a good excuse to get together regardless of missing the holiday. Win-win.

We made a couple of BBQ’d Herbes of Provence chickens which always turn out exceptionally well, even though we remove every bit of skin it’s super moist and flavourful (I can’t believe I haven’t done a post about this flavourfull chicken, but here is a photo of the bird on the BBQ). And of course, this wonderful dish pairs so well with Susur Lee’s Singapore Slaw (aka 19 Ingredient Slaw) that I made it again. We also had some lovely roasted sweet potatoes.

Angel Food Cake_4479

My first Angel Food Cake from scratch. Who knew it would be so easy?

And of course, the dessert: Strawberry Shortcake made with a lovely Angel Food Cake. My very first scratch Angel Food Cake. I always hesitated to make this cake because my MIL warned me about how difficult and finicky it was. So as she did, I used a mix. Strange but true. I hadn’t thought about an Angel Food Cake in a lot of years (she’s been gone for more than 15 years) but I wanted a light cake with little to no fat and this fit the bill. Now to find a recipe which doesn’t use 14 or 16 egg whites! I found this recipe created by Anna Olson for a light chiffon cake using 8 egg whites. Perfect.

Now you know me by now that I generally don’t have a lot of dessert eaters, so when I chose a dessert (whether it be slightly better for you than ordinary) I always make it smaller. Who needs left overs? So I figured out the volume of the 10″ tube pan Anna used and cut it in half to fit my 8″ spring form pan! Clever? I must warn you, that the tube pan is used to help bake this light, airy meringue-like cake through the centre; my small spring form was just the right size and it baked relatively evenly. I would not recommend going larger as your edges will dry out and your insides will be runny. Anyway, food for thought!

I got a nice crumb on the cake, the bottom of the spring form had a harder time releasing due to the little dimples in it, so next time, I will line it with a piece of ungreased parchment, that should do the trick. Oh, and it’s really important not to jump around the oven like a mad dance, or even open the oven door during the first 20 minutes of baking. Also note that although this pan is smaller, it did take a bit longer to bake through, probably because there wasn’t the chimney effect heating the centre through. And having said that, I’d do it again in an instant, it’s a lovely light-feeling dessert.

Strawberry Shortcake_4489

A cake slathered in stabilized whipped cream and way too many strawberries.

You’re probably wondering “what the heck is stabilized whipped cream?” Well, maybe only some of you. I was looking for a way to make this cake up a few hours in advance and not have the whipped cream fall flat and runny on me. It’s really rather easy, 1 tsp of gelatin in about 3 tbsp cold water, nuked until gelatin melts complete, cooled down but not set and drizzled into the whipped cream with (1 tbsp icing sugar and 1/2 tsp pure vanilla extract) as you’re whipping. So easy and it sets the whipped cream ever so slightly so it won’t go all sloppy and meltie. You can’t taste the difference.

Strawberry Shortcake_4490

It just looked so yummy, I had to take another photo.

Ingredients:

Serves 4-6 from an 20 cm or 8″ spring form pan

  • 1/2 cup cake and pastry flour (less protein than bread flour)
  • 1/2 cup granulated sugar
  • 4 large egg whites, room temperature
  • 1/4 teaspoon cream of tartar
  • pinch of salt
  • 1/4 cup icing sugar, sifted
  • 1/4 teaspoon vanilla extract
  • 236 mL (1/2 pint) whipping cream, stabilized as above
  • Strawberries, to serve

Directions

  1. Preheat the oven to 163° C or 325° F.
  2. Sift the flour and granulated sugar twice and set aside.
  3. Whip the egg whites with the cream of tartar and salt until foamy, then gradually add the icing sugar, whipping until the whites hold a medium peak when the beaters are lifted. Stir in the vanilla.
  4. Sift in the flour and sugar mixture to the whipped whites in 2 additions and using a whisk to fold in the flour evenly and easily. Scrape the batter into a 8-inch ungreased spring form pan, spread it to level and bake the cake for 40-45 minutes, until it springs back when gently pressed (try not to open the oven before 25 minutes).
  5. Cool upside down (this is apparently important so the cake doesn’t deflate and fall). Wait until it is thoroughly cook (I’m not kidding) to remove from pan (you must cut it out with a clean knife). To slice the cake in half, use an unserated blade and cut with short delft strokes until full severed.
  6. Serve the cake with whipped cream and berries, if you wish. The cake will keep, well wrapped (not refrigerated – it will dry it out) for up to 3 days.
Strawberry Shortcake_4491

It’s only about 20 cm or 8″ wide. My 13 year old nephew had half of it.

Read Full Post »

It’s not a swear word. I swear. It just sounds like one. “What the Ebelskiver were you thinking?” or “Where in the ebelskiver were you for two and half hours?” You see? But I can assure you, it’s much more delicious than a swear word. It’s actually a little spherical pancake! I know you’ve seen this over at my friend Barb’s when she posted about it last May but I just had to write about my experience because this pan was her wonderful, thoughtful Christmas present to me!

My first attempt was half of Barb’s recipe for the ebelskivers was Christmas day, a few hours after I brought it home and I kept them simple. But as you can see by my deformed little ‘balls’, it takes some skill to be able to prepare them as perfect little balls of joy. I had some practicing to do.

First attempt Christmas Morning

First attempt Christmas Morning

Still no where near perfect, my second attempt I added blue berries to the batter. Still some practicing to do before I could serve them to guests.

Second attempt when we returned from NOTL.

Second attempt when we returned from NOTL. Poor JT had to be the guinea pig for the second batch too. A very sunny day indeed!

IMG_3814_BLOG

After practice, I was able to make more perfect little balls of joy.

Batch numbers 3, 4 and 5 were much better. In fact, most of them turned out very well. And I had the opportunity to experiment with some additional flavours. I did cruise the net to see other recipes and they varied quite a bit, but since I had some experience with Barb’s lovely recipe, I decided to stick to it, with minor modifications. I found this recipe on squidoo and the batter was much thicker (if you scroll down, there is a video of a young lady successfully making ebelskivers one Christmas Eve), so I decided to add a bit more flour to Barb’s version to thicken it up. They were much easier to flip or turn without the batter running out from the centre of the ebelskiver.

IMG_3815_BLOG

Brown sugar, cinnamon and butter are swirled into the batter

If you pile them while they are hot, you will cause indentations. Mind you, I doubt your tummy will care either way.

IMG_3811_BLOG

A little twist Ham, Cheese and Dijon but still breakfast food

Ebelskivers

Original recipe from Barb at Profiteroles and Ponytails

Each batch makes about 24 ebelskivers, I divided the batter into two portions for the ham, cheese and cinnamon bun versions. If you wish to make the entire batch for one flavour, double the flavour ingredients but not the basic batter.

Basic Batter Ingredients:

  • 1 1/2 cups all-purpose flour
  • 1-½ teaspoons sugar
  • ½ teaspoon baking powder
  • 2 large eggs, separated
  • 1 cup milk
  • 2 tbsp unsalted butter, melted and slightly cooled
  • ½ tsp pure vanilla extract (omit for savory ebelskivers)

Directions:

  • In a large bowl, whisk together the flour, sugar, baking powder and salt, set aside.
  • In a small bowl, lightly whisk the egg yolks, then whisk in the milk, melted butter and vanilla extract (if using). Add the yolk mixture to the flour mixture and, using a wooden spoon, stir until well blended. The batter will be lumpy.
  • In a clean bowl, using an electric mixer on high speed, beat the egg whites until stiff, but not dry, peaks form. Using a spatula, fold about one-third of the egg whites into the batter to lighten it, then fold in the rest just until no white streaks remain.
  • Use the batter right away.

Ham, Cheese and Dijon Ebelskiver Ingredients:

  • 1 tbsp Dijon mustard
  • 1/2 finely diced ham
  • 1/2 cup old cheddar, shredded

Directions:

  • For the savoury Ebelskiver, whisk in the Dijon and then gently fold in the diced Ham and cheddar cheese, cook using your lovely ebelskiver pan.

Cinnamon Bun Ebelskiver Ingredients:

  • 2 tbsp brown sugar
  • 1 tsp unsalted butter, melted
  • 1 tsp cinnamon
  • 40 g chopped walnuts

Directions:

  • Mix the brown sugar, butter and cinnamon well. Fold in the walnuts into the basic ebelskiver batter, then drizzle in the brown sugar mix into the batter and fold gently. Since the batter is quite cold, it will seize the butter/sugar mixture allowing you to fold in the swirls. You don’t want to entirely incorporate the butter/sugar mixture, you want swirls throughout the batter. Continue until you have used up all of the mixture.

Ebelskiver cooking directions:

  1. Spray the ebelskiver pan with a good squirt of non-stick spray and place over medium heat. Add about 1/4 cup batter to each round as soon as the pan is quite hot. Maintain the heat at medium, you don’t want to burn the ebelskiver edges before the insides get a chance to cook.
  2. Cook until the bottoms of the pancakes are lightly browned and crisp, 3-5 minutes. Using a fork, lightly push the ebelskiver until it entirely turns around in the pan and the uncooked portion is now facing the bottom.
  3. Transfer the finished pancakes to a platter and keep warm in the oven while you repeat to finish the batter.
  4. Serving suggestions: dust the warm pancakes with the confectioners’ sugar and serve right away. Or serve with warmed maple syrup and fruit.

Read Full Post »

This is an absolute favourite of our household, but to be honest the gravy is usually laden with butter and ghee which is really bad for you, so I prefer to make my own so that it’s healthier. The Makhani gravy is from this recipe, but as I mentioned in the menu post, I had to add a little sweetness (I used Agave Nectar) to counter the very acidic tomatoes — I suspect that the full butter and cream of the original recipe would do the same, so if you choose to go full fat on this baby, omit the agave. There I said it.

The paneer is a soft unripened cheese made similarly to Ricotta, but instead of leaving it loose, you press it into a rectangular shape to be cut into cubes. Easy.

A delicious, rich tasting tomato gravy with gently firm paneer

Paneer Makhani

This is the original recipe I just doubled the quantity

Serves 4-6 as a part of several dishes

Ingredients:

  • 4 liter Fresh whole milk
  • 4-6 tbsp lemon juice

Directions:

  1. Heat the milk in the deep and heavy bottom pan at medium heat (this is really important, otherwise you will need to spend at least a half hour trying to clean the burnt milk off the bottom). Allow it come to a gentle boil and stay there for a minute. Make sure the milk is not vigorously boiling (also important, see note above). If it does, immediately reduce the heat and bring the milk back to gentle boil. But if you do burn your enamel pan, I have a great tip at the end.
  2. Add two tablespoons of lemon juice and quickly stir it in (because I had doubled the recipe, it took a bit longer to develop). At this point, you will start to see small curdles in the milk but no whey. Add another tablespoon or two of juice and again stir it in. The curdles will increase and you will slowly begin to see the yellowish whey. Add the last tablespoon of juice and with this, you should be able to see a clear yellowish whey separating from the curdles, switch of the gas immediately at this point. Depending on the acidity of the juice, the amount of juice you require may differ. Start with one tablespoon at a time till you achieve the results.
  3. You could save the whey, and if you do: Line another pan with double layered cheesecloth. Make sure the cheesecloth is long enough to be bundled up and hanged later. Run the whey through the cloth which will collect all the curdles. Set the whey aside.
  4. Wash the curdles in the cheese cloth, by running it through cold water to remove the lemon taste.
  5. Tie up the cheesecloth in a tight bundle and let it drain for about 30 minutes. Then place weight on the cheese to get it to be flatter and drain out extra moisture. I wanted a nice block of cheese so I pressed the contents of the cheese cloth into a square cake pan about 20 cm (8 inch). Then I took the still wrapped cheese and placed it between two cutting boards and put a heavy pot on top for 1-2 hours.You don’t want to add too much weight for too long as it can drain out way too much moisture from the cheese making it hard and crumbly. Your cheese should have a slightly elastic texture so when you lightly press your finger into it, it will bounce back.
  6. Wrap it and store it in the fridge for up to a week.
  7. Reheat very slowly in the microwave for 30 second spurts until too warm to touch. Add to the makhani gravy at the last minute (I didn’t want my paneer to fall apart).

TIP: if you happen to burn the milk to the bottom of your pan, try this handy tip, cover burnt area with a good thick layer of table salt, add a bit of water and heat but don’t hard boil. Using a silicon scraper, see if it comes off. If it doesn’t, do the same but instead of water, use lemon juice and this time bring to a soft boil. Using a silicon scraper, peel away the burnt layer. Voilà!

Read Full Post »

A lovely, flavourful breakfast at the cottage are these individual ramekins of spinach and feta fritatta. One egg, 1 tbsp of feta, 1 small finely chopped shallot, 1 tsp finely sliced chives, pinch of basil or oregano and 1/4 cup chopped spinach per person – a little brunch!

20110731-093046.jpg

Pre-heat oven or BBQ to 350F.
Prepare one ramekin per person by spraying with non-stick spray.
In a small skillet and a quick spray of non-stick spray cook the shallots until translucent, add spinach and wilt.
Remove from heat.
Beat eggs well, adding all remaining ingredients, mix well.
Divide mixture between the number of ramekins you’ve prepared.
Bake for 12-15 minutes or until cake tester comes out clean.
Serve with a salad of watermelon sprinkled with lime juice and a chiffonade of mint.

20110731-095924.jpg

Read Full Post »

It’s seven in the morning and I’m posting a recipe from my bed at the cottage! It still amazes me! What I really should be doing is going for a half hour swim, but the air is a bit nippy – hmmm, comfy bed or chilly swim?

Simple red cabbage slaw
2-3 cups finely shredded red cabbage
1/2 finely shredded celeriac (celery root)
1 green onion finely chopped
About a dozen or so mini cherry tomatoes sliced in half
3 tbsp low fat mayo
2 tsp Dijon mustard
2 tbsp lemon juice
Salt to taste

Combine all vegetable ingredients and mix well.
Combine all wet ingredients and mix well.
Toss the slaw with the dressing to coat well, refrigerate for 30 minutes.
Serve chilled.

20110731-072421.jpg

Read Full Post »

The heat wave in Toronto continues and since we ate heavily on the weekend with our good friends Rae and Mon, tonight seemed like a good night for lighter fare: Vietnamese Lettuce Wraps. We use Boston Bibb or Butter Lettuce for the wraps, and ground turkey for the meat, the rest is what ever your heart desires. We adapted this recipe from Epicurious, click here for the original. Serves 4.

For the meat

  • 1 quick spray of Pam
  • 1/2 sweet onion, chopped finely
  • 400 g lean ground turkey
  • 2 cloves garlic, finely minced
  • 1 tbsp peanut sauce (you can use peanut butter, if you don’t have the sauce)
  • 1 tablespoon hoisin sauce
  • 1 tablespoon soy sauce

Garnish

  • 1 English cucumber, shreaded
  • 1/3 cup coarsely chopped fresh mint
  • 1/3 cup coarsely chopped fresh cilantro
  • 1/3 cup coarsely chopped fresh thai basil
  • 1/3 cup green onion, finely chopped
  • 1 small jalopeño pepper, finely diced
  • 12 large butter lettuce leaves, cleaned and dried
  • Lime wedges

Dipping Sauce

  • 2 tbsp hoisin sauce
  • 1 tsp peanut butter or peanut sauce
  • 1 tbsp rice vinegar

Directions

  1. Heat a heavy large skillet over medium-high heat and spray with Pam. Add onion and sauté until beginning to brown, about 3 minutes.
  2. Add turkey and sauté until brown and cooked through, breaking up with back of spoon, about 7 minutes. Add garlic.
  3. Add peanut sauce, hoisin sauce, and soy sauce; heat through. (Can be made 8 hours ahead. Cover and refrigerate. Reheat in microwave or skillet, adding water by tablespoonfuls to moisten if necessary, before continuing.)
  4. Transfer turkey mixture to medium bowl. Serve with individual bowls of each of the garnishes.
  5. Make dipping sauce by mixing all three ingredients well.

To make wraps, spoon turkey mixture onto a lettuce leaf, add garnishes as desired, fold in sides over filling, and roll up. Either dip lettuce wrap into the dipping sauce, or spoon a little spoonful into onto the meat before rolling. Note: I usually mix the chopped cilantro, basil and mint all together. The green onion and jalopeño are also mixed in one bowl, as JT eats neither, but I love them! This dish is wonderful either hot or cold.

Dinner in our back yard.

20110725-063201.jpg

This is my lettuce wrap before I wrapped it! So tasty!

20110725-063211.jpg

Read Full Post »