Feeds:
Posts
Comments

Posts Tagged ‘Indian’

AppleChutney_First

There is nothing like the push of having extended stay visitors to open your eyes to see all the deficiencies in your home. Case in point, several years ago I filled a few cracks on one of my kitchen walls and then I painted over the patches but since the rest of the wall was about 4 years old, the paint dried a slightly different colour and the wall looked patchy in certain lights. It was on my to do list f o r e v e r! So a couple of weeks ago, after I filled in a few new cracks, bought a new can of paint (when did paint become SO expensive?) I finally repainted the entire wall. A fresh coat of paint really freshens up a room. Of course, once I started filling in cracks all over the house and painting, there was no stopping me…it turned into a two-day project. But then it’s another thing off the list.

Recently we had James, a long-time college friend of JTs over for an Indian dinner and I made my new favourite Jamie Oliver Chicken Tikka Masala recipe along with Palek Paneer, the best Naan ever and a few condiments, pickled carrot and this delightful Apple Chutney. I am certain that James, who is a renovator, was too polite to say anything about my patchy walls but I kept the lighting low anyway!

What are some of the nagging to do’s on your home maintenance list?

AppleChutney

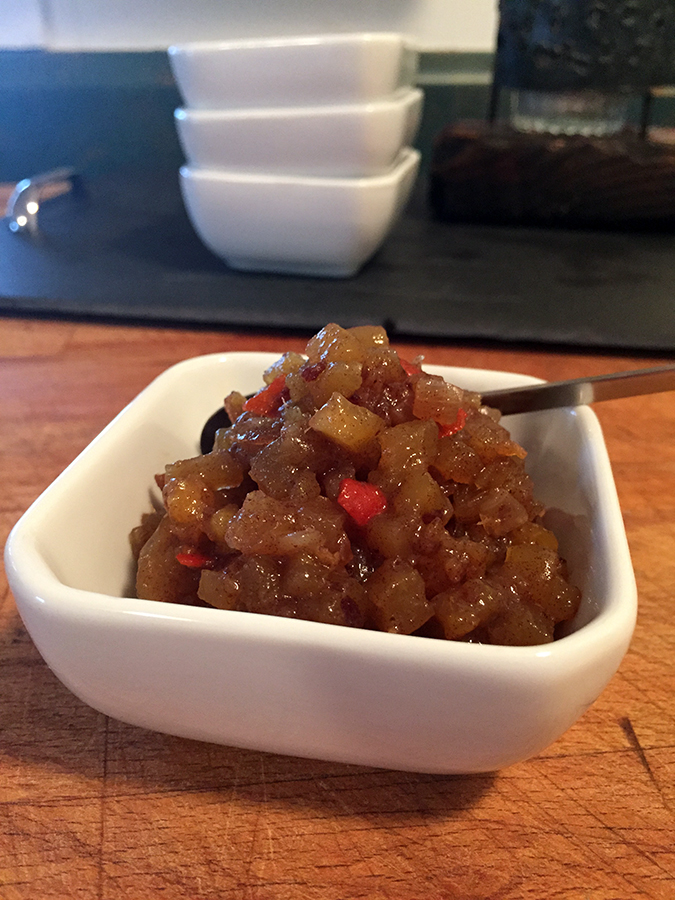
Sweet, tangy with a little bit of heat.

Apple Chutney

A KitchenInspirations Original Recipe

Ingredients:

  • 1 Granny Smith apple (about 165 g)
  • 165 onion, coarsely chopped
  • 80 g dates, coarsely chopped
  • 10 g fresh ginger, grated
  • 3 tbsp white balsamic vinegar
  • 1/8 tsp cloves
  • 70 mL water
  • 1 tbsp Sweet Apricot Chili Sauce
  • 1/4 cup Coconut Sugar

Directions:

  1. Combine all the ingredients in a heavy bottom sauce pan and cook on medium heat until onions have caramelized and the sauce is thick but still have texture.
  2. Cool. Serve at room temperature.
  3. Store in the refrigerator for 1 week or freeze.

Read Full Post »

I have three Indian cookbooks from which I can usually find something I want to make, perhaps with some additional guidance from a cooking site or blog. The one cookbook I bought because every single recipe had a lovely photograph! It’s relatively small 12 cm x 15 cm (5″ x 6″) which makes it even more adorable! It came with a ribbon book mark attached to the spine so you can mark the recipe you are making or the next one since it has lay-flat binding. With all these things going for it, you would think I would love this cookbook, but sadly I don’t. In fact, I have not enjoyed one of the recipes I’ve made from this book without significant changes! I should just chuck the thing but I can’t because I really like the way it looks. I know it’s silly but it is what it is.

This is a recipe I altered after having acquired a Meyer Lemon from a shoot in November and I wanted to make something with it. I puréed the soup to a smooth velvety consistency and I dressed it with a cumin yogurt drizzle with green onion slices, you could also drizzle with a flavour olive oil. The Papadams are from our trip to Chicago when Chgo John took us to his favourite ethnic stores.

Lemon Lentil Soup_1334

The earthy lentils burst with fresh, lively flavour with the lemon

Lemon Lentil Soup

Serves 2 generously (1 cup portions or 250 mL each)

Ingredients:

  • 100 g dahl or yellow lentils
  • 1 tsp fresh ginger, peel and finely chopped
  • 1 tsp fresh garlic, finely chopped
  • 1 tsp chili powder
  • 1/2 tsp turmeric
  • 1 tsp salt
  • 2-4 cups water (depending on how thick you prefer your soup)
  • 3 tbsp lemon juice
  • grated rind of one lemon
  • 1/4 cup yogurt
  • 1 tsp cumin
  • Shopped green onions as garnish
  • papadums

Directions:

  1. Rinse the lentils and cook with the ginger, garlic, chill and turmeric and 2 cups water until soft.
  2. Add the salt, lemon juice and rind and blend with an immersion blender until smooth, adding water to achieve the consistency you prefer.
  3. Press through a fine sieve and set aside.
  4. In a small frying pan add the cumin and toast until fragrant. Cool. Once cool add to the yogurt and mix well. Salt to taste. Transfer to a small plastic squeeze bottle.
  5. Reheat soup and pour into rimmed soup bowls. Begin piping the yogurt from 12 o’clock to 6 o’clock, then 2 to 7 and finally from 9 to 3. Then using a sharp knife beginning in the centre of the bowl, draw a spiral circle culminating at the outer ring (this will make the pattern). Garnish with the chopped green onions and papadums.

Print

Lemon Lentil Soup_1337

It’s super creamy and super filling

Read Full Post »

Recently we entertained our lovely neighbours across the street; it was a thank you dinner of sorts because they happened to rescue us on my benchmark birthday party this past summer when we ran out of beer! We asked them what kinds of food they enjoy and Indian was one of the selections. I love cooking Indian food but because there are just the two of us I usually don’t bother but doubling the audience makes it all the more worth-while. It was an extravagant meal so I started cooking a couple of days in advance and it really didn’t seem to be that much trouble; the saucy, stewy dishes of India lend themselves to being made ahead and allowing the flavours to combine over time making them taste so much better than the day they were made. I was very pleased with the results and will definitely make these dishes again in the future.

I also would like to thank Helene DeSouza (Masala Herb) for posting her favourite Palek Paneer recipe this month, if it wasn’t for her I likely would never have made this dish having tasted a restaurant version that was unremarkable. Helene’s recipe has the complex depth of flavours that one expects from Indian food. I urge you to try it.

The menu:

  • Onion Bhajis  (I made this one again and it was extremely tasty) with Tamarind Chutney (recipe to come)
  • Aloo Papri Chat (please click here for the recipe)
  • Carrot Pickle (please click here for the recipe)
  • Beef Bhuna (please click here for the recipe)
  • Butter Chicken (please click here for the recipe) NOTE: I used 1 lb fresh roma tomatoes and 2 cups of home made tomato sauce made from raw tomatoes cooked down and blended until smooth WITH oven roasted tomatoes blended and the whole thing run through a very fine sieve to get rid of the skin and seeds).
  • Palek Paneer (The Palek (spinach) gravy is new from Helene DeSouza who runs Masala Herb in Goya, India; recipe below)
  • Naan (please click here for the recipe) and Papadums (I bought some very special Papadums in Chicago when we visited with Chgo John of From the Bartolini Kitchens)
  • Chai Crême Brûlée (please click here for the recipe)

Paneer

The texture turned out perfectly this time.

The texture turned out perfectly this time.

This firm, unripened Indian cheese makes a rectangle 23 cm x 13 cm x 2 cm (9″ x 5″ x 3/4″).

This is the original recipe

Ingredients:

  • 4 liter Fresh whole milk
  • 5 tbsp lemon juice

Directions:

  1. Heat the milk in a deep and heavy bottom pan at medium heat (this is really important, so the milk doesn’t burn). Allow it come to a gentle boil (around 200 F) and stay there for a minute. Make sure the milk is not vigorously boiling, if it does, immediately reduce the heat and bring the milk back to gentle boil.
  2. Begin by adding the lemon juice a table spoon at a time, stirring gently to incorporate. With each addition you will notice that the milk separating. The final addition of lemon juice will separate the curds from the whey very obviously. Switch off the gas immediately or if you are cooking on electric, remove pan from the element to stop the heat.
  3. Line a sieve with double layered cheesecloth, making sure the cheesecloth is long enough to be bundled up and tied later. Pour the curd and whey through the cheese cloth. Set the whey aside or discard (I tried making ricotta from this whey but there was no more curd to be had. I understand that Whey is healthy so you can search the net to find uses, I did not and trashed it).
  4. Wash the curd in the cheese cloth, by running it through cold water to remove the lemon taste.
  5. Tie up the cheesecloth in a tight bundle and hang it over something to allow it to drain for about 30 minutes.
  6. Line a nice rectangular pan with a double folded cheese cloth making sure you have enough length and width to fold over the top. Add the curd to the pan, pressing it firmly into the pan. I didn’t press my corners and edges well enough and they were a bit crumbly. I used a small glass to help push the curd down and compress it. Place the  wrapped cheese between two cutting boards over a sink or a large pan and put a heavy pot on top for 1-2 hours.You don’t want to add too much weight for too long as it can drain out way too much moisture from the cheese making it hard and crumbly. Your cheese should have a slightly elastic texture so when you lightly press your finger into it, it will bounce back.
  7. Wrap it and store it in the fridge for up to a week or cover well with plastic wrap and freeze. Defrost entirely before use. If you find your cheese still is a bit too wet, you can store it LIGHTLY wrapped in the fridge and the chill will dehydrate it further (I did not have to).
  8. Cut the block into small one bite chunks and add to the Palek sauce to warm up. Be very gentle when stirring as to not crumble the cheese too much.
Paneer_1480

Cubes of firm unripened cheese remind me of firm tofu.

Palek Paneer (Spinach Gravy with Unripened Cheese Cubes)

Saag Paneer_1474

The lemon juice also helps to preserve the lovely green colour of the spinach.

Please click here to see Helene’s lovely recipe.

Ingredients:

  • 250 g baby spinach (or a standard large size bag)
  • 1 green Chili
  • 100 mL water
  • 1 small Onion, finely chopped
  • 2 tbsp Oil
  • 1 tbsp Garlic, finely minced
  • 1 tsp Cumin Powder
  • 1 tsp Coriander Powder
  • pinch Cinnamon powder
  • ½ tbsp Garam Masala
  • ½ tbsp red Chili Powder
  • 1 tbsp Tomato Paste
  • splash of lemon juice
  • 2 tbsp cream
  • Salt & Pepper to taste
  • 200 grams fresh Paneer bite size cubes (Indian Cottage Cheese)
  • cilantro and green onions to garnish.

Directions:

  1. Wash spinach well and if you’re not using baby spinach, remove all the hard stems.
  2. Blanch the spinach in 100 mL water, set aside.
  3. In 2 tbsp oil, fry the onions until caramelized. Add the garlic paste and stir for a moment. Add the cumin, coriander, cinnamon, Garam Masala and chili powder and allow to develop their aroma. As soon as you smell the herbs, remove from heat. Add the tomato past and combine with the blanched spinach.
  4. Purée with an emersion blender until very smooth, add a splash of lemon juice to brighten the flavours. Press through a fine seive.
  5. At this point you may put the finely puréed spinach mixture into a container and store in the fridge for a day or two.
  6. When you are ready to serve, reheat slowly in a pot, and add the two tablespoons of cream, salt and pepper. Add the Paneer and stir very gently so that the paneer does not break apart. Serve garnished with chopped cilantro and green onions.
Saag Paneer_1475

The gravy was rather thick, you can loosen it with water, vegetable stock or more cream.

Read Full Post »

The same restaurant that I mentioned in a previous post, Bombay Palace serves a pickled carrot that I just can’t get enough of. It’s sweet, tangy and crunchy and delicious. Their version is very red because they put food colouring into it, I omitted the colouring.

Lightly crunchy and packed full of flavour

Carrot Pickle

Original recipe from here, but I changed it up.

Serves 4-6

Ingredients:

  • 1 medium carrot, about 200 g cut into cubes
  • 1/2 tbsp mustard powder
  • 1/4 tsp chili powder
  • a pinch each ground cloves and cardamom
  • 1 tsp salt
  • 1/2 cup rice vinegar
  • 1/4 cup olive oil

Directions:

  1. Blanche the carrots and stop the cooking in an ice bath. Drain well.
  2. Mix remaining ingredients in a seal-able container, add the carrot and refrigerate for 1-2 days.
  3. To serve, drain and rinse.

Sweet Mango Chutney

Ingredients:

  • Mango, not too ripe
  • 1/4 cup chopped red onion
  • 1 clove garlic, finely minced
  • 1 tbsp freshly grated ginger
  • 1/2 tsp ground cinnamon
  • pinch of ground cloves
  • 1/2 tsp salt
  • 1/2 cup cider vinegar
  • 1/4 tsp chili paste
  • water

Directions:

  1. Peel and seed the mangos and chop into 5-10 mm cubes.
  2. Place all ingredients into a non-aluminum saucepan and bring to a boil, reduce heat and simmer for 1 hour or until fruit and onion is very soft. Lightly mash with a fork. Allow to cool and place in a clean glass jar. Store in the refrigerator

Read Full Post »

Indian Dinner Party: Naan

Revised April 23, 2018, added weight measurements.

I have searched high and low for a good Naan recipe and much to my chagrin, I have never found one that was quite what I was looking for. I thought I had found them on occasion, but not quite. That is, until now. I found the Evil Shananigans and it seems that the author Kelly was in the same spot I had been in for so many years. Thank goodness that Kelly did all the work and came up with this fabulous recipe. The only thing I did was reduce the quantity as I didn’t need quite as many and I added 1 level tablespoon of milk powder. Why milk powder you ask? I read somewhere that it adds to the elasticity of the dough and I wanted a chewy dough and it worked wonders! Quite possibly the best Naan ever, I kid you not.

I used an inverted cast iron dutch oven in my gas BBQ to try to replicate the tandoor oven, and by George, I think I got it! The baking method really allowed the dough to bake slowly over indirect heat, maintaining the elasticity and also allowing some parts to crisp up. Dare I say, genius? I hope you’ll bring me down to earth, so I don’t get too comfortable tooting my own horn, even if it is once in a while.

Chewy and crispy at the same time

Chewy and crispy at the same time

Naan

Makes 4 109 g servings

Ingredients:

  • 245 g (1 3/4 cups) all-purpose flour
  • 5 g (1/2 tsp) salt
  • 2 g (1/4 tsp) dry active yeast
  • 3/4 cup milk, heated to 110F
  • 2 g (1/2 tsp) sugar
  • 5 g (1 tbsp) milk powder

Directions:

  1. Warm the milk to about 44° C or 110° F and dissolve the yeast and sugar. Allow to bubble up (about 5 minutes).
  2. Combine the flour, milk powder and salt in the bowl of your stand mixer and add the activated yeast. Kneed for 5 minutes until the dough is smooth and elastic (dough is rather tacky).
  3. Cover with plastic wrap and allow to rest for two hours in a warm place.
  4. Once rested, turn out the dough and divide into four equal portions (I measured mine to be about 109 g each). Make each portion into a ball and allow to rest 30 minutes.
  5. Roll out each ball into thin flat sheets (you’ll need a little flour so it doesn’t stick (15 cm x 30 cm) and then cover with a towel and allow to rest another 30 minutes. You can rub a little olive oil on top so it doesn’t dry out.
  6. Pre-heat your BBQ with an inverted cast iron dutch oven to the highest temperature. (I used an inverted cast pan to replicate the tandoor oven).
  7. One by one, drape each naan sheet over the ‘oven’ and bake until golden and slightly puffy (don’t worry, they will deflate).
  8. Keep warm in parchment wrapped in foil in an oven or serve immediately.
The most delicious naan yet

The most delicious naan yet

Read Full Post »

There is another Indian Restaurant in Toronto that we really like, and you’ve probably heard of it because it’s in all the major cities around the world, it’s called Bombay Palace on Jarvis Street. We usually go there for lunch and there are two particular things I love, the carrot pickle and the Aloo Papri Chaat (described as a sweet Medley of crispy wafers chickpeas, potatoes with yogurt-mint chutney dressing). I tried to find as close a recipe as possible to this tangy, sweet and crunchy side, and this one was pretty darn close. I had to make a few changes due to unavailable ingredients, but to be honest, the flavour didn’t suffer for it. I must warn you, it does take a lot of steps.

Aloo Papri Chaat

A delicious mix of sweet and tangy flavours with the crunchy texture of the wafers

Serves 4-6 as a side dish

Ingredients:

  • 1/2 cup all purpose flour
  • 1/4 cup Semolina flour
  • 1 teaspoon tamarind paste
  • 7-8 teaspoon sugar
  • 1/2 teaspoon red chili powder
  • 1 dried apricot
  • 1 small cooked potato, cubed
  • 100 g chick peas
  • 1/2 cup low fat yogurt (if using Greek yogurt, you will need to add milk to achieve the right consistency)
  • 1 chopped green chili
  • 1/2 teaspoon Chaat Masala (see spice mix below)
  • Salt
  • 1 cup peanut oil for frying

Directions:

  1. Make a soft dough with the flour and semolina by adding a little bit of water at a time.
  2. Roll the dough out into a rectangle and cut into bite-sized squares.
  3. Heat the oil to fry the squares and fry them until they puff a little and are golden. Drain oil off and set aside.

Directions for the Tamarind Chutney:

  1. In a small heavy bottom sauce pan, add the tamarind paste and the apricot. Add about 1 cup of hot water to it and heat to a boil until the tamarind paste dissolves and the apricot is mushy. Blend well with an immersion blender. Strain out any hard bits from the tamarind paste.
  2. Add the sugar, chili powder and mix well. Boil until all of the water evaporates and you are left with a thick rich paste.

Ingredients for the Chaat Masala:

Note: the original recipe for Chaat Masala called for Mango Powder which I did not have, and therefore I substituted the apricot into the tamarind mix to replicate the sweet and tangy flavour of the mango powder.

  • 1 tbsp coriander
  • 1 tsp cumin
  • 1/8 tsp cayenne
  • 1/4 tsp ginger
  • 1/2 tsp paprika
  • 1/4 tsp black salt

Directions for the Chaat Masala:

  1. Put all ingredients into a bowl and mix well. If some of the spices are seeds, you will need to grind them well.

Directions for the Yogurt Sauce and assembly:

  1. Whip the yogurt with a whisk until thin and runny (or if it’s Greek Yogurt, add a little milk),
  2. Add  the cubed potatoes, chopped green chili, the chickpeas and a teaspoon or two of the tamarind and mix well (being careful not to break up the potatoes).
  3. Add the bite sized Papri (wafers) and mix gently to coat.
  4. Garnish with Coriander leaves and finely chopped green onions.

A quick shot of the actual serving dish at the dinner party, the lighting sucks as it was already night

Read Full Post »

I am very excited to tell you that THIS post will tip this blog over the 100,000 views! I can hardly believe it. My humble little blog from Bloor West Village. Go figure. I was going to do some sort of prize, but I have no idea how to measure who my 100,000 visit was. So I’ll have to think of something else. WOOO HOOO!

20121204-154841.jpg

Oh Christmas Tree

We decorated the tree a few days after we got it home. Now I know it’s probably a lot larger than many cultures, but for Canadians this tree is small; even by our standards it’s a wee bit puny, we had to put it up on a table to get the height we needed! But I’m OK with that, because that just gives us more room for presents!

These delicious little bites were baked, believe it or not, and you will be surprised at how soft and chewy the centre is and how crispy the exterior becomes when you reheat. I don’t think I will deep fry my bhajis ever again.

Baked Onion Bhajis

Don’t be fooled by their size, they pack a big punch of flavour

original recipe from BBC. Makes about 24 mini bhajis.

Ingredients:

  • 2 large eggs
  • 1 Vidalia onion very thinly sliced
  • 120 g/4 oz all-purpose flour
  • 1 tsp ground coriander
  • 1 tsp cumin
  • non stick cooking spray

Directions:

  1. Pre-heat the oven to 400°F. Pre-heat a 12 or 24 mini muffin tin.
  2. Beat the eggs and add the finely chopped onion rings, mix well.
  3. Combine the flour, ground coriander and cumin and stir well. Add to the egg, onion mixture and stir well to combine.
  4. Generously spray the mini muffin tin, add about 1 tbsp of the batter per cavity. Bake for 7-10 minutes, then flip each bhaji so that it browns evenly on both sides and bake for another 7-10 minutes.
  5. Remove from the oven and allow to cool completely. To serve, pre-heat oven to 350°F and place bhajis onto a cookie sheet and heat for about 10-12 minutes, crisping up the exterior.
  6. Serve immediately with some onion chutney or tamarind chutney.

Read Full Post »

Dinner Party Menu: India

The other day my new friend Trang nominated me for the Liebster award. Thank you Trang.

liebster-award-21

You must be getting a sense that we love themed dinner parties. I love everything about it, researching the food, experimenting, cooking and decorating. We had the “King and Queen” 😉 of themed dinner parties over for dinner recently (remember Titanic Anniversary Dinner and Truman Capotes Black and White?) and as one of only two couples from our group who love Indian food as much as we do, we decided to have Indian night. All the food is home-made, of course, but don’t worry, I didn’t spend all day in the kitchen; what’s great about Indian food is that it’s down-to-earth home-cooking at its best and stews are often better tasting the second day, so I was able to prepare much of the feast in advance. This post will show the menu and the photos but the recipes will come one by one, so that I can find them in the future.

This was staged, we actually had A LOT more food than that!

Hors D’œuvres:

  • Baked Onion Bhajis — I’m excited about this recipe because I did a little experiment and figured out a way to bake them instead of deep frying them and they worked out GREAT!
  • Appetizer: Mulligatawny Soup — I prepared this soup similarly to the link to my original recipe, except that I omitted the proteins as the rest of the meal is rather heavy and I didn’t want to be full after the first course! I also puréed about 1/4 of the soup so that the broth is thicker and creamier, but left the majority as chunks.

Mains:

  • Paneer Makhani — this is a rich and delicious tomato gravy with home made unripened, pressed cheese. I used this Makhani recipe but I had to add about 2 tbsp Agave Nectar as the tomatoes were extremely acidic. I suspect that this acidity would be reduced if I had used full cream and butter of the original recipe, but then that wouldn’t be me, would it now?
  • Beef Bhuna — a tasty beef stew with a deliciously flavourful gravy
  • Basmiti Rice
  • Aloo Papri Chaat — a very flavourful and texture filled cold side dish with a yogurt sauce and chick peas

Condiments:

  • Carrot Pickle — a lightly spicy, crunchy pickle to cleans the palate
  • Mango Chutney — I wanted a mango chutney that wasn’t full of sugar

Bread

  • Naan — a delicious chewy Indian bread, baked on the outside of their tandoori ovens, stay tune for my experiment!

Dessert:

  • Light Lemon Mousse — this is where I skipped Indian and went straight to light and satisfying. I checked with our guests and similar to our tastes they find Indian desserts a little too sweet so I improvised. Plus I wanted to use the gorgeous little cups we bought our yogurt in while in Paris.

Read Full Post »

Welcome to my new series, Out of the Recipe Box. As you may have guessed from the title, this series will explore new ingredients, sometimes scary and always out of the ‘recipe’ box! This of course means I will be experimenting with ingredients I have never used before — I’m hoping with the enormous volume of info on the net, it will be much less guess-work than it might have been 20 years ago! I’m hoping. My intention is to post once a month for this series. Hey, if you have a suggestion and I can source it, I may just make it!

My first inspiration: I was walking in our new grocery store at Maple Leaf Gardens (they have just an incredible variety of everything, in fact, it is where this new series came to me!) and I spotted a Banana Flower. What the heck is THAT? was my first thought. It is certainly exotic enough, but will I be able to find a recipe I would want to eat? After much research I have found a few recipes, instructional videos that I will share with you. I hope you enjoy this series — and as usual, I adore your feedback.

What is really strange about the choice of vegetable is that I had never heard of it previously and shortly after I decided it would premiere my Out of the Recipe box series, Lorraine at Not Quite Nigella posts a restaurant review and a photo of the banana flower salad! Go figure!

The banana flower salad. An interesting combination of Asian Flavours

After much searching, I decided on this recipe by Tara Shetty over at Indian Food Blog, but before you go out and get yourself a banana flower, beware that preparing the flower is quite a tedious process. It secretes a sticky gell, so you must wear gloves or constantly oil your hands because I have read it is virtually impossible to remove. I used this video to help me figure out how to properly prepare the banana flower. Would I make it again? I doubt it, but it was an interesting experiment!

The coconut and tamarind really added the sweetness that the recipe needed for my taste, otherwise it can be a bit bitter

Read Full Post »