A few years ago, JT suggested he take on making lunches and dinners on Tuesdays and Thursdays. I have to admit, it really takes the pressure off. Being responsible for creating a menu plan every WEEK, AND making lunches and dinners every DAY is a lot, so I really appreciate that he does two days. JT likes to be original and will research recipes and put his take on them. This one was a real winner, Shepherd’s Pie, using lamb and Cauliflower Mash instead of beef and potatoes. The cauliflower mash lends a wonderful sweetness to the dish and the lamb gives it a wonderful earthy flavour.
Updated Shepherd’s Pie
A Kitcheninspirations original recipe
Makes one 21 cm x 11 cm (~8.25″ x 4.5″) loaf pan or 4 servings
Ingredients:
1/2 head of cauliflower, cut into florets and roasted with olive oil until very soft
15 g butter
30 g grated Parmesan cheese, plus more for sprinkling
1 egg
30 mL olive oil
50 g sweet onion, finely chopped
300 g ground lamb
100 g mixed vegetables, carrots, corn, peas 1 medium onion, chopped (about 1 1/2 cups)
30 mL beef broth or more, depending on how moist the lamb is
5 mL Worcestershire sauce
Salt and Pepper to taste
Directions:
Purée the cauliflower with the butter, and Parmesan cheese, season with salt and pepper to taste. Add the egg and purée until entirely incorporated. Set aside.
Preheat the oven to 400° F.
Sweat the onions in the olive oil until translucent, add the ground lamb and cook until no longer pink. Add the mixed vegetables and mix into the lamb well.
Combine the beef broth and Worcestershire sauce and mix into the lamb and vegetable mixture. Season with salt and pepper to taste. You may need a bit more broth if your lamb is dry. Our lam was moist enough so we just used what the recipe calls for.
Line a loaf pan with parchment paper (makes it easier to lift out to cut and serve) and add the lamb mixture first, pressing down firmly. Top with the cauliflower mixture, being careful not to leave any holes, and smooth out the top. Sprinkle with some additional grated Parmesan cheese.
Bake the shepherd’s pie for 30-40 minutes or until it is warmed through, vegetables are soft and the top is golden.
Notes:
The pie may be refrigerated or frozen after Step 5 or baked right away as per Step 6.
To make life easier, purchase frozen diced veg instead of fresh, it will also reduce the baking time.
The Parmesan and the egg firm up the roasted cauliflower mash and give it extra body.
I thought this might need a sauce, but it really doesn’t.
This post was inadvertantly published on the same day as another, so we apologise if you’ve already seen/been here. Also, this post was written during our first foray out of lockdown.
We have continued to entertain one couple at a time outdoors, keeping well below the allowed maximum of five (outdoors only). Our space allows for four people socially distanced, any more, we’re less than two metres (six feet) apart and we are not comfortable with that.
I try to make meals that are hearty and warm. This is one such dip I made as an hors d’œuveres for friends who came for lunch (the main was JT’s Bœuff Bourguignon). That day in February was 6° C (43° F) outside but our heater warmed our little area to 15° C (59° F) which made it very comfortable with light coats on (in fact, my friend came seriously over dressed and had to peel layers off to be comfortable).
It’s quite romantic eating outside in the winter, and even my naysayer hubby is loving it. In fact, most of the negativeness has come from the men, the women are all over being outside but once the guys experience our little cozy nook, they are sold. Just like this dip, one taste and you’re sold. I make a similar dip using canned crabmeat but I must tell you that this salmon dip is so much more flavourful.
Warm Salmon Dip
A KitchenInspirations Original Recipe
Makes about 375 mL dip
Ingredients:
250 g Cream Cheese, room temperature
1 tsp dill (dried is fine)
2 tsp horseradish (the original recipe called for horseradish cream, but I never had horseradish cream on hand)
20 g red onion or shallot, finely minced
salt & pepper to taste
25 g celery, finely minced
150 g canned salmon, without skin or bones. It’s about 1/2 cup, or one can give or take.
Directions:
Combine all of the ingredients and mix well (a light-duty hand mixer is perfect for this).
Season with salt and pepper.
If you are making this for the future, line three 125 mL or half-cup ramekins with plastic wrap.
Divide the mixed dip into the three ramekins pressing into the ramekin so it will retain the shape. Try not to have too many folds so that the plastic comes off easily. Carefully twist the plastic wrap to seal. Place the ramekins in the freezer. Once the dip has frozen to the ramekin shape, remove the frozen dip and label it and return the shaped dip to the freezer until needed. Put your ramekins away.
About 30-40 minutes before serving, pre-heat the oven to 375° F. Remove plastic wrap from the frozen dip and pop the shaped-frozen dip into the original ramekin you used to freeze it. Place on a cookie sheet (it may boil over depending on how full your ramekin was) and bake for 30-40 minutes or until dip is bubbling in the centre.
Remove the baked dip, garnish with a smoked salmon rose and serve with papadams, crostini, crackers or even sliced cucumbers.
A warm, boldly flavoured salmon dip that is perfect for outdoor entertaining.
This past July, we traveled to Wisconsin to visit friends at their gorgeous lake house; it was bittersweet because they were selling it to move down to Arizona for good. The weather wasn’t great so we only got in one very short boat ride but we enjoyed every last minute. We shall miss visiting this little gem in Wisconsin. But that just means we’ll be visiting Arizona even more!
While we were in Wisconsin, our dear friends introduced us to an incredible product: Rick Bayless’ Fonterra Grill salsa! It was to die for! The layered flavours of grilled vegetables and fresh cilantro created a complex salsa that was totally unexpected, so of course, I had to try to recreate it upon our return. I used our Big Green Egg which is the ultimate charcoal barbecue! It imparts the most incredible smoky flavours but if you have gas or propane, just fire up some wood chips on the side for a similar experience.
Grilled Vegetable and Cilantro Salsa
A KitchenInspirations Original Recipe
Yields about 1 Litre of salsa (about 4 cups)
Ingredients:
1.5 kg tomatoes, seeded (reserve seeds and pulp for tomato jam)
2 sweet red peppers
4 jalopeño peppers, seeded and veins removed or to taste
2 nora peppers, rehydrated in warm water, skins and seeds removed (yields about 15 mL flesh), optional
1 sweet onion
1/2 garlic bulb, skin on
2.5 mL smoked sweet paprika
Salt
Cilantro leaves, good handful or to taste
juice of 2 limes
Directions:
Remove seeds and pulp from the tomatoes and set cut-side down on a cooling rack lined with parchment paper. Overnight is best, you want to dry out the tomatoes as much as possible.
Roast the tomatoes, peppers, jalapeños and onion on an open flame (I used our Big Green Egg) until softened and slightly charred. Wrap the garlic in parchment and then foil and roast over the open flame until soft.
Remove the skins from the tomatoes, peppers and garlic, discard skins. Add roasted veggies and cilantro leaves to a food processor and chop to desired consistency. Add salt and lime juice and pulse to combine.
Add the scraped flesh from the Nora peppers to the processor and pulse a few more times.
Fill sterilized jars with the salsa. If you are not using right away, you will want to process the jars in the typical canning methods. I processed my salsa for 15 minutes.
Tomato Jam
Yields a scant 250 mL (1 cup) tomato jam
Ingredients:
370 g tomato pulp (all the seeds and pulp from the tomatoes that you plan to roast for the above recipe)
100 g shallots, minced finely
10 g garlic, minced finely
15 mL EVOO
50 mL cooking sherry
15 mL white balsamic vinegar
1.25 mL baking soda
basil, chiffonade
salt, to taste
Directions:
Cook the onions and garlic until caramelized, deglaze the pan with cooking sherry. Add the tomato pulp, basil, season with salt and then add the baking soda, being careful because the baking soda will foam up.
Cook for about an hour until most of the water has cooked off. About half-way through the cooking, add the white balsamic vinegar and stir well.
Notes:
I used a combination of vine-ripened tomatoes and Roma because that is what looked the best to me.
I have mentioned this before, baking soda neutralizes the acidity of the tomato and therefore there is NO NEED TO ADD SUGAR (yes, I yelled that!).
You could do whatever you wish with the pulp, I just don’t like throwing away food!
Since this post was written, I’ve made two additional batches of this salsa and the last batch was rush so I used the entire tomato instead of seeding it, it made for a wetter salsa so I strained it before canning. The seeds added a bit more texture that wasn’t unpleasant. But, I’d still go the extra mile and seed the tomatoes if I have the time.
One of my New Year’s resolutions is to eat a more vegetable-based diet. I have no intention on going vegetarian but I would like to limit my intake of meat a bit more; currently, we don’t eat a lot of beef, but we do eat pork, chicken and lamb (we will continue to eat fish). In this effort, I searched out a meatless chickpea recipe with turmeric. Turmeric has gained some notoriety for its medicinal properties that I wanted to take advantage of. If you wish to read more about it, read this article. Turmeric is also quite beautiful and tasty too! I altered a Guy Fieri recipe to our taste.
Be careful as the turmeric discolours everything, even nailpolish!
Roasted Cauliflower and Chickpeas with Raisins and Turmeric
Pour the oil into a large mixing bowl, and then add the spices, ginger, garlic, cauliflower, chickpeas and onions, and toss to coat everything evenly. Toss in the raisins and zest and mix in evenly. Place on a sheet tray and season with salt and pepper.
Roast in the oven until lightly browned and the cauliflower is tender, 30 to 35 minutes.
Serve on a bed of sautéed spinach or baby kale, dressed with a light vinaigrette.
Notes:
I always used dried chickpeas, about 140 g dried chickpeas will yield the cooked amount required for this recipe.
If you have leftovers, simply warm up with some vegetable stock and purée into a smooth, velvety soup.
1/4 cup olive oil seems like a lot, but it really just covers the cauliflower and chickpeas.
The turmeric shaded the cauliflower in a beautiful yellow colour.
On May 5, we hosted a Cinco de Mayo dinner party with a few friends. I’m not sure what I was thinking because I had already a very busy week planned, then my dear Mom’s widow became ill and had to be hospitalized so we were running up to the hospital he was in (about 45 minutes away) every few days (he is doing better but still in the hospital). I only had 3 days to prepare!!! I chose the menu based on foods that I can make ahead of time, knowing that they would only get better! In case you wondered, I made a variation of this dip as hors d’œuvres, this salad and for the main, this pulled chicken molé AND a Dolce de Leche tiramisu (recipe to come) for dessert. It was a bit decadent, but sometimes I really need to play in the kitchen!
This lasagna is a delicious combination of flavours and it’s worth making each layer yourself, if you must, choose canned beans to save a little time.
It’s a flavour sensation! I put a poached egg on top the next day for a very tasty brunch!
Mexican Lasagna
A KitchenInspirations Original Recipe
Serves 4 as a meal or 6-8 as an appetizer
Ingredients for the Pulled Pork:
250 g pork tenderloin
125 mL (1/2 cup) stock (I used beef)
250 mL (1 cup) passata (tomato sauce)
125 g (1/2 cup) sweet onions, thinly sliced
5 mL (1 tsp) cumin
5 mL (1 tsp) coriander
5 mL (1 tsp) Hungarian paprika
1.25 mL (1/4 tsp) smoked paprika
2.5 mL (1/2 tsp) salt
1.25 mL (1/4 tsp) pepper
Directions for the Pulled Pork:
Combine all of the ingredients in the bowl of a slow cooker or crock pot and mix well.
Cook on high for 4 hours or until pork is easily pulled using two forks.
Ingredients for the Lasagna:
6 corn tortillas, cut in half
250 mL (about 1 cup) shredded pork (recipe above)
85 g (1/2 cup) dried black beans, cooked and either puréed or mashed with a fork
80 g (1/2 cup) sweet onions
125 mL (1/2 cup) grilled corn
a handful (~1/4 cup) of cilantro
125 mL (1/2 cup) Salsa
150 g (about 1 cup) Mexican cheese or mozzarella
cilantro, for garnish
loosened yogurt (in a squeeze bottle)
sriracha sauce mixed with loosened yogurt (in a squeeze bottle)
Directions for the Lasagna:
Preheat the oven to 220° C (425° F).
In a non-stick skillet, caramelize the onions, add the beans, mushing some of the beans (add some stock if necessary). Set aside.
Layer 2 half corn tortillas on the bottom of the pan, cover with 1/3 of the shredded pork, 1/3 of the mashed beans, 1/3 of the corn, 1/3 of the cilantro, 1/2 of the salsa and 1/3 of the cheese. Repeat for two more layers, leaving out the salsa on the last layer. Cover with a non-stick sprayed piece of foil or the top of the pan, if you have one.
Bake for 15-20 minutes covered, then uncover and bake for 10-15 minutes or until cheese is bubbling and lightly golden. Allow to sit for 10 minutes before serving.
Serve garnished with a drizzle of loosened greek yogurt and sriracha sauce and a sprinkling of chopped cilantro.
Notes:
I was unable to find Mexican cheese so I used Manchego and Mozzarella.
If you cannot grill fresh corn, frozen is acceptable but you will miss the grilled flavour.
Recently, I worked on an on-location two-day motion shoot. I was one of four food stylist employed for the two days. We worked from the compact, professional, mobile kitchen called Maindish, it was rather cosy! They were 15 hour days with few opportunities to sit down (who said food styling was glamorous?). I’m always amazed at the shear number of people it takes to make a commercial happen, 60, in this case! By the way, on location also means cramped, because you’re having to squeeze in everyone and everything into relatively small spaces, it really is quite the orchestration!
I found this recipe on Epicurious; I chose it because I had most of the ingredients at home (along with an inordinate amount of sun-dried tomatoes). It was absolutely delicious, so I decided to document it for the future, plus, I made a few changes.
Mediterranean Fish in a Tomato Sriracha Sauce
Serves 2
Ingredients:
splash of EVOO
70 g (1/2 medium) sweet onion, peeled and finely sliced
90 g (~1/2 medium) fennel bulb, finely sliced
1/2 tsp sriracha sauce (add more if you like heat)
250 mL (1 cup) tomato purée from fresh or canned tomatoes (I used homemade)
30 g (~1/4 cup) sun-dried tomatoes, chopped
2oo g white fish fillets
Sea salt and freshly ground pepper
A handful of baby spinach
Black olives (I used Niçoisse)
Ingredients for the topping:
2 tbsp flat-leaf parsley
Small handful of spinach
2 tbsp sun-dried tomatoes
1 small clove of garlic, peeled and finely chopped or grated
Zest of 1 lemon, plus a squeeze of juice
Directions:
In a medium-sized, frying pan (I used cast iron), heat a splash of olive oil and sauté the onion, fennel and sun-dried tomatoes for 2 to 3 minutes.
Combine the tomato purée with the sriracha sauce and stir well. Add the tomato purée to the frying pan and simmer for 4 to 5 additional minutes. Season to taste with a little salt and pepper.
Place the fish on top of the tomato mixture, spooning a little of the sauce over the fish. Cover and simmer on medium-low for 8 to 10 minutes, or until the fish is fully cooked.
Meanwhile, in the small bowl of a food processor combine the parsley, spinach, sundried tomatoes, garlic, lemon zest and juice and process until chopped and well mixed. Set aside.
When the fish is completely cooked, carefully stir in the olives (putted and sliced, if you’re using larger olives) and baby spinach and warm through (spinach should wilt).
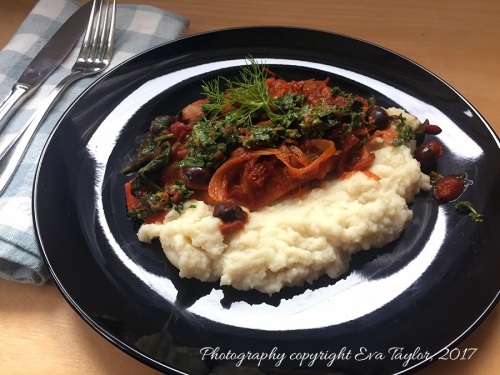
To serve, place the fish on a spoonful or two of cauliflower mash or polenta and dollop the tomato sauce over the hot fish. Dot the herb topping over the fish and sauce to finish.
Notes:
This combination of vegetables and tomatoes would work very well with chicken, but you’ll need to increase your cooking time.
I used Tilapia for this particular recipe, but haddock, cod, sea bass or monkfish would also work well.
The first time I made this recipe, I did not have fennel so I substituted 2 stalks of celery, it was equally as delicious.
I used sun-dried tomatoes in olive oil, you may use dry but you might need to soak them in water so they are not chewy.
To reduce calories, omit the olives and use non-stick spray instead of olive oil.
If you use ordinary black olives, pit them and cut them into thirds.
The weights I suggest in the recipe are not carved in stone, just gives you an idea of proportions for two.
We had a bunch of dear friends for Superbowl a few weeks ago and I made this vegetarian chili. I know I’m a little late, but I wanted to capture the recipe for next year. It was delicious and it makes a huge amount (1 L or 8 cups). It has a lot of great flavours and textures, I’ll definitely add it to my repertoire for future Superbowl parties.
Vegetarian Butternut Squash Chili
A KitchenInspirations Original Recipe
Makes 1 L (8 cups)
Ingredients:
180 g (1 cup) dried red kidney beans (soaked for 12 hours)
1 small onion, diced (100 g)
1 small carrot, diced (100 g)
1/2 butternut squash, diced (150 g)
2 celery ribs, diced (100 g)
250 mL puréed tomatoes (200 g)
vegetable stock or water, to cover
1 tbsp tomato paste
1 tbsp red pepper paste
2 tsp ground cumin, toasted
1 tsp oregano
1 tsp cocoa powder
1 tsp smoked sweet paprika
1/2 tsp chili powder
1 cup frozen corn
1 cup Pearl Barley, cooked
1 avocado, for garnish
1/2 cup sour cream, for garnish
chopped cilantro, for garnish
Directions:
Put the beans in a pot, cover with 2 inches of water, and bring to a boil. Boil for ten minutes. Drain.
Combine beans with everything but the frozen corn, cooked barley and the garnishes in the bowl of a slow cooker. Add enough water to cover. Cook for 8 hours on low or until beans are tender. Add frozen corn and cooked barley about 30 minutes before serving to allow to heat through.
One of the first courses we had at the One Star Michelin Restaurant, Alejandro, just outside of Almeria (in the quiet town of Roquetas de Mar) was a wonderful Gazpacho Sorbet. During our Paella Lesson in Madrid, we discovered that Gazpacho is a staple in most Spanish households. They make a few batches each week, drinking a cup-full when peckish or feeling down. It makes total sense, as it’s packed with raw vegetables and full of vitamins. I, too, have begun to keep a litre or so in the fridge, particularly now, with the seasons changing, and it’s so easy to catch a cold.
This is the original Gazpacho Sorbet at Alejandro’s in Spain. I didn’t care for the odd presentation in the glass so mine was more freestyle. It was garnished with a candied lemon slice.
You may use any old Gazpacho recipe, I used the one we made during our Paella Cooking Lesson at Cooking Point. The main difference is that the Spaniards add a slice of bread (for body) and a significant amount of olive oil to balance the acidity. The New York Times published a beautiful description of a good Gazpacho (see original article here), “The texture is always smooth and light, with a mouth feel similar to that of whole milk. It is not the watered-down salsa or grainy sludge often served in the United States under the name of gazpacho, but an emulsion of fat (olive oil) in liquid (vegetable juice and vinegar) that is light and fluffy on the tongue and a fantastic conductor of flavor, just like vinaigrette or hollandaise.”
The recipe below is perfectly balanced, I wouldn’t change a thing. There is just a hint of onion and garlic, you don’t want this to be too oniony or garlicky. And while I would normally shudder at the volume of olive oil in this recipe, you really need it to balance out the acidity and it adds that silky mouthfeel Eric Asimov of the New York Times described above. Turning it into Sorbet is a surprising, yet satisfying dish. Definitely bookmark for the warmer weather.
Authentic Spanish Gazpacho
Serves 4-6
Ingredients:
500 g ripe tomatoes, roughly chopped
50 g green pepper (about 1/2 an ordinary sized pepper)
40 g cucumber, peeled and roughly chopped (English is fine)
30 g onion, roughly chopped
20 g bread, crust removed
1/2 garlic clove, roughly chopped
15 mL sherry or red wine vinegar
5 mL cumin
salt, to taste
60 mL EVOO
Directions:
Add all of the ingredients but the Extra Virgin Olive Oil to a blender or a large measuring cup. Blend or use an immersion blender to blend until smooth.
Pass the liquid through a fine sieve. Return the liquid to the blender or large measuring cup and blend in the Olive Oil in a slow, steady stream to emulsify. Refrigerate for 1 hour.
Pour the soup into the bowl of your chilled ice cream maker and turn it on until it has thickened and frozen like sorbet. Serve immediately or store in an airtight freezer container in the freezer for no more than one hour, it will freeze solid.
Garnish with herbs, or finely chopped vegetables. Alejandro served it with a slice of candied lemon.
I celebrated a birthday a few months ago. It wasn’t a particularly special birthday other than the many wonderful birthday wishes that my many social media friends bestowed. JT took me to my favourite French restaurant, Le Select Bistro where we are treated like VIPs since we dined there with our good friends and neighbours Tom & Iona (Tom is an architect and designed the interior of the restaurant).
Several months back, my trusty old food processor’s plastic top broke. It didn’t entirely break, just the little, wee bit broke off that clicks into the special spot to allow the thing to be turned on. I get that it’s a safety feature so that you can’t turn it on without the top clicking in, but honestly, such a crappy little piece of plastic breaks off and my food processor is rendered useless?! Well, kind of useless, because I figured out that I can jam a chopstick into the spot and I had it working for a few additional months. It was all fine and dandy until I had to take it to a photo shoot and we were all jamming the chopstick into the top to get it to work, how embarrassing was that?!?!? So when my birthday rolled along, I decided I wanted a real, grown-up food processor and JT got me the Cuisinart 12-cup!
The 12-Cup version has a little 4-cup insert so you can make small amounts of stuff.
It’s been brutally hot and humid in Toronto so even though I had a brand new food processor, I just couldn’t bring myself to make anything, particularly something that required the oven! I broke down and baked these delightful cheese and onion scones for a little dinner we had; fortunately, the oven was only on for 15 minutes including the pre-heat time and I had the hood fan on full blast, sucking out the hot air so it didn’t heat up the kitchen too badly. The food processor worked like a dream, I can’t wait to use the little 4-cup bowl insert.
Combine flour, sugar, baking powder, salt, shallot and cheese in the bowl of a food processor and pulse to combine. Add cubed butter and pulse until crumbly.
Combine, milk and egg and whisk until frothy. Pour into food processor while pulsing to combine well. Turn dough out to a lightly floured surface and knead once or twice. Roll out to about 2.5 cm (1 inch) thick and cut into 5 cm (2 inch) circles. Brush tops with milk.
Bake for 15 minutes or until lightly golden. Serve warm with butter.
This recipe nothing new. You’ve seen it posted a million times on a million blogs (OK, maybe I exaggerate!). And I wasn’t going to post about it, but it turned out SO WELL so I kinda felt like I had to. I’ve made the oven roasted garbanzo beans (chickpeas) before and although they were pretty good, they didn’t have the crispy crunch that I had been lead to believe they would. Sure they were crisp on the exterior but the interior was rather pasty. These beans are crunchy through and through! In fact, if I hadn’t “unfried” them, I would not, could not, have believed that they were not deep fried. Yes, you read that correctly, my dear friend: they are UNFRIED.
Some time back, I cooked for a short testimonial-piece for the T-Fal ActiFry Express XL appliance (not published yet) where I had to cook twelve dishes in advance for an on-location motion shoot with a local celebrity. The great folks at T-fal gave me an ActiFry Express XL for the job. I started cooking at 5am so that food would look fresher than cooking it the night before and left just in the nick of time to get there (far end of town). We got the house at 12:30 and had to be out at 3:30! It was challenging, to say the least, particularly because the kitchen was the commercial set! I had to prep on the floor in the hall, and at one point, in the garage so that I could have access to an electrical outlet! That profession kitchen truck would have come in very handy!
JT and I are not big on fried foods, so this cool appliance is perfect for us and recently I needed a cocktail snack for the cottage and I wanted something healthy with protein and crispy garbanzo beans (chick peas) popped into my head. I thought the beans would be perfect for the ActiFry (see notes). So I purchased two 540 mL (19 oz) cans of low sodium chick peas (garbanzo beans), rinsed and dried them on a clean towel and popped them into the non-stick coated ActiFry. The result was magical, it did not dehydrate the beans (which sometimes makes them a bit leathery), it actually fried them in 1 tbsp oil! They are crunchy through and through! And the next best part? I didn’t have to turn on the oven because it was 30° C (86° F) outside and humid! And cleanup was a cinch (I vacuumed it and wiped it out with a soft cloth).
I know that this recipe will be a repeat for all parties from now on!
“Unfried” Garbonzo Beans (or chick peas)
A KitchenInspirations Original Recipe
Makes ~250 g or 2 cups unfried garbanzo beans (chick peas)
Ingredients:
540 mL (19 oz) cans of low sodium chick peas
1 tbsp dehydrated onion powder (see notes)
1 tbsp granulated garlic (see notes)
1 tsp smoked paprika
1 tsp cumin
1 tsp salt
1 tbsp canola oil
dash of sesame oil
Directions:
Combine all of the spices and salt and mix well.
Drain and rinse the garbanzo beans (chick peas) and lay out on a clean towel to dry for 30 minutes).
Add the dried beans to the ActiFry bowl and drizzle in the oils. Set the timer to 45 minutes and close the lid. Start, allow the paddle to rotate a full circle and open the lid and sprinkle about 1/3 of the spice blend onto the beans. Close the lid and allow the paddle to go around twice. Repeat until all of the spice blend is used up. Close the lid and wait for the magic to happen.
Test the beans around 35 minutes and then about 5-minute increments. You want a crunch, much like the crunch you get when you eat potato chips. Keep it going until you achieve a great, crunchy bean.
Pour the beans out onto a clean cookie sheet (with sides) and allow to cool. Store in an air-tight container in the fridge until needed (it was too humid to store in the pantry).
Be creative and come up with your own blend of spices, like garlic, ginger and sea salt.
I did not have time to use dried beans but feel free to soak, dry and ActiFry dried beans, I’m sure the result would be the same.
Although the ActiFry paddle moves around at a very slow pace, I find larger things get a bit beat up without the stationery tray but it’s perfect for these beans.
Disclosure:
Eva Taylor/Kitcheninspirations received T-fal ActiFry Express XL from Group SEB, Toronto; this recipe was developed by Eva Taylor for Kitcheninspirations, and the opinions expressed in this post are that of Eva Taylor/Kitcheninspirations.
My Father in Law passed recently. He made his 92nd birthday two-weeks earlier. It was very sad to lose him but to be honest, the last few years have not been kind to him, he simply existed, partly by choice and partly by nature (use it or lose it). That’s all of our parents now and I must tell you that it feels weird being an orphan at my age, both JT and I were very close to each other’s parents. Since Dad lived in Toronto, we made arrangements close to home and our home was the hub, which proved to be a lovely distraction. Our dearest friends Paul and T drove up from Wisconsin to help us and console us. Paul had known JT’s Dad through business so there was a strong connection with him. My newly married nephew and his bride also stayed with us because they live about two and half hours from the city. The house was alive with action! My FIL would have LOVED it!
Everyone came to the city to be at his bedside—I know he would have loved that too, although he didn’t love attention, he loved the buzz of activity. He passed very peacefully during the early hours of the morning of May 28, he didn’t suffer long. That evening, everyone gathered at our home and we had a wonderful family dinner telling stories and being there for each other. We ate rotisserie chicken, a variety of store bought salads and some homemade cookies I had in the freezer (I didn’t have time to throw anything together). We had the visitation on June 2 and the service on the 3rd. At 12pm on the 2nd, I discovered that everyone was coming for dinner just prior to the service the very next day so I sprung into action and made a huge batch of chicken mole out of the leftover rotisserie chicken. Fortunately, I had tried this recipe before and got the thumbs up from JT, so it was an easy decision to make it again.
We had a couple of leftovers that JT and I had for dinner later that week.
The mole sauce can be made in a slow cooker but I did it stove-top this time—I found it therapeutic to be involved in the dish, chopping, stirring and cooking. Like any saucy dish, this definitely tastes better the next day. The rotisserie chicken is an easy addition to the mole, just shred it and stir it into the cooled mole sauce, fill the corn tortillas, refrigerate overnight so the flavours can meld. It was a huge success! Everyone loved it.
JT usually orders a mole when we dine at a Mexican restaurant and I’ve always wanted to try my hand at it. Although there are many recipes handed down generations that take two to three days to make, this one can be made in about an hour. It developes the depth of flavour as it sits overnight. I would not rush it, make it a day or two ahead.
Chicken Mole Enchiladas
Makes 24 Enchiladas (15 cm or 6 inch corn tortillas)
750 mL (3 cups) sodium-free chicken stock (or vegetable stock)
500 mL (2 cups) freshly squeezed orange juice (about 3 good sized oranges)
30 mL (2 tbsp) EVOO
570 g (1 1/4 lb) sweet onions, sliced
55 g (about 1/2 cup) sliced almonds
6 large garlic cloves, finely chopped
8 g (4 tsp) cumin seeds
8 g (4 tsp) coriander seeds
4 g dried pasilla chiles, stemmed, seeded, torn into 1-inch pieces, rinsed*
4 g dried ancho chiles, stemmed, seeded, torn into 1-inch pieces, rinsed*
40 g (about 1/4 cup) raisins
4 8 cm x 1 cm (1/2-inch) strips orange peel (orange part only)
1.5 g (1 1/2 tsp) dried oregano
45 g semi-sweet chocolate, chopped
4 g ground cinnamon (omit if using Mexican chocolate)
Chopped fresh cilantro or green onions
24 corn tortillas
1 rotisserie chicken (or 3 left over), shredded (replace with firm tofu or beans if vegetarian)
200 g (2 cups) Queso de Oaxaca or Mozzarella Cheese, grated
Crème fraîche, sour cream or yogurt as garnish
Sriracha sauce/or chipotle mayo as garnish
Directions:
Heat the EVOO (Extra Virgin Olive Oil) a large Dutch oven, add the sliced onions and sweat them out.
Add the almonds and toast slightly. Add the garlic and cook until they release aroma, then add the cumin, coriander, two types of chilies (*replace with 15 mL (1 tbsp) smoked paprika if you prefer less spicy food) and cook until you can smell the spices.
Add the raisins, orange peel, oregano, chicken stock and orange juice. Mix well. Simmer for 30-40 minutes, stirring occasionally. If using the dry chilis, remove them and discard.
Add the chocolate and cinnamon (or Mexican chocolate) and stir until chocolate has completely melted. Using an emersion blender, blitz the sauce until very smooth. Cool completely. Set aside 2 cups of sauce. Stir in the cold shredded rotisserie chicken.
Fill each corn tortilla with some chicken mole and a little cheese, tuck the rolls into an oven proof pan with the rolled end secured. Repeat until there is no more mole. Pour reserved sauce over the enchiladas, sprinkle with grated cheese. Cover with foil and refrigerate overnight.
1 hour prior to sitting down to eat, preheat oven to 350° F (177° C). Bake enchiladas for 30-40 minutes or until totally heated through (inside temperature should be around 150° F (66° C) and cheese should be melted and bubbling.
To serve, drizzle with Crème fraîche, sour cream or yogurt and Sriracha sauce or chipotle mayo. Sprinkle with chopped cilantro and/or green onions. Serve over Coconut Cauliflower Rice (recipe to come).
We had these at the cottage a week or so ago. I added a little guacamole for fun. I don’t have many food style tools at the cottage so the garnish is quite rough.
Notes:
The enchiladas freeze well. You may wish to slip a piece of parchment between each enchiladas so you can easily separate them.
*If you are concerned about the dish being too spicy, omit the dried chilis and replace them with 15 mL (1 tbsp) smoked paprika.
Recently we had some good friends for Brunch and my friend Angela told me how she makes the most delicious vegetable stock from vegetable trimmings. Of course, this isn’t the first time I’d heard of this frugal stock but to be honest, I was skeptical on how good it would be — stock from trimmings? That’s bunny food! I’ve been using roast chicken carcass for soups for a few years now but I’ve never jumped into the compost bin head first to make this vegetable stock before. Angela and her husband were quite convincing on how good this stock is, so I decided to give it a try.
My first attempt was a simple stock using vidalia onion skins, garlic skins, eggplant ends, zucchini ends, celery leaves, cilantro stems and green onion ends. I made sure to wash the skins very well and tossed them into a large stock pot with enough water to cover. I tossed in a tiny bit of salt and boiled, then I reduced to a simmer for about 4 hours. WOW! I can’t tell you how good this was! For a lunch, I simply sautéed more zucchini, eggplant, onions, garlic and celery and ladled the “Compost Stock” over it and drizzled it with parmesan cheese, boy was it GOOD!
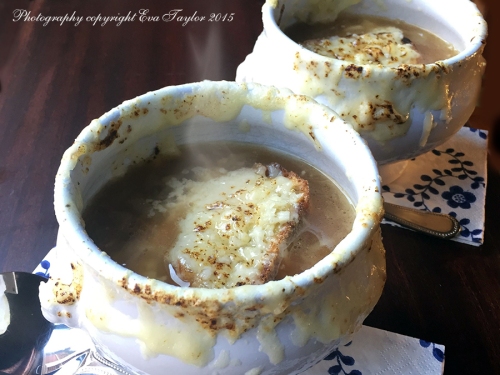
When I saw how dark and rich the onion skins made the stock, I thought: why not make a French Onion Soup from it (we’ve made French Onion Soup here and here and here before)? And that is the way this recipe came about. It’s so easy and inexpensive that I urge you to try it. You can make it vegan by omitting the cheese or just use vegan cheese (not sure how good that could be!). And if you’re looking to save a few calories, omit the croutons and the cheese.
JT tried it and could not believe it was made with onion skins and caramelized onions, no stock at all — verdict, he loved it. For this version, we saved around $4 because I usually use an organic beef stock or sometimes I even roast some beef bones which would have saved us $6.00)!
Would you like a bowl?
A Vegetarian French Onion Soup
A Kitchen Inspirations Original Recipe.
Makes 1.5 L (6.25 cups) of soup
Ingredients:
3 large organic Vidalia onions, including skins
1/4 cup white balsamic vinegar
4 L (roughly 4 quarts) water
2 tbsp EVOO
3 bay leaves
1 tsp salt
100 g (3.5 oz) Gruyère cheese, grated (omit if vegan or vegetarian)
croutons, enough to fill 2 French Onion Soup bowls
Directions:
Pre-heat oven to 250°F (121° F).
Wash outer skin of the onions well. Peel onions, add skins with the bay leaves and salt to a large stock pot with 4L (4 quarts) water in it. Stir and bring to a boil then turn down and simmer for 2-3 hours.
Slice onions very thinly on a mandoline (any larger bits that can’t be sliced, just add to the onion skin stock pot).
Heat olive oil to a large Dutch oven and once hot (but not smoking) add onions; sweat onions until translucent and just beginning to caramelize (about 20 minutes). Add the white balsamic vinegar and stir well. Cover with a piece of parchment (as illustrated below) and bake for 2-3 hours at 250° F (121° C) or until golden and fully caramelized.
When stock is a rich, dark colour strain through a fine sieve to remove skins and bits and finally through a very fine sieve to remove any fine particles (I use a reusable coffee filter). Combine stock with caramelized onions and heat through. Taste for seasonings and add salt and pepper as required.
Plate in French onion soup bowls with croutons and mounds of Gruyère cheese, broil so it’s all melty and bubbly and serve hot!
For a vegetarian or vegan version, omit the cheese or use vegan cheese.
Parchment cover for the onions
Based on 4 servings per batch without the Gruyère and croutons
Based on 4 serving per batch, without the Gruyère and crouton
The Hungarians have arrived and the “to do” list is finally complete! Just in the nick of time too. We decided to start their visit off with a little welcome party but we all know it’s just my excuse to cook and feed my kin!!! I was fortunate enough to score a sizeable number of vine ripened tomatoes so I decided to make barbeque sauce because JT made a special request for Pulled Pork. The sauce turned out perfectly, sweet, piquant and zesty — cooking it with the pork tenderloin for 5 hours made the flavours all the more richer and balanced the vinegar very nicely. Like any low and slow cooked meal, I made the pulled pork a day in advance because we all know it tastes better the next day!
I’ve geared up a couple of posts for the following weeks, but I may be AWOL depending on how busy things get, so if I miss to comment on your blog or I don’t post, I apologize in advance. Thanks for understanding.
Barbeque Sauce
Makes 1.25 L (42 oz)
Ingredients:
200 g onions, coarsely chopped
50 g garlic, finely chopped
125 mL white vinegar
1.2 kg tomatoes, chopped
30 mL tomato paste
125 mL molasses
50 g sundried tomatoes (not in oil)
1/2 tsp salt
1/2 cup packed brown sugar
1 tsp smoked paprika
1 tbsp of each sweet paprika, cumin, coriander and cocoa powder
Directions:
In a splash of canola oil, sauté onions and garlic until translucent, add dry spices and stir until fragrant.
Add remaining ingredients and stir well. Simmer for one hour or until dark and thickened.
Purée until smooth and press through a fine sieve.
May be kept in the refrigerator for 3-4 days or freeze for 3 months.
1 cup dried red kidney beans, soaked overnight in water
250 g sweet onions, chopped
25 g garlic, finely chopped
300 mL tomato sauce
2 tbsp tomato paste
500 mL water and or chicken stock
900 g ground turkey breast
1 1/2 tbsp cumin
1 tbsp coriander
1/2 tsp smoked paprika
1/2 tsp chili
1/2 tsp sea salt
5 g dried ancho chili (seeds and veins removed)
1 tbsp unsweetened cocoa
30 mL tequila (a nice smokey one)
Garnish:
1 ripe avocado, sliced thinly
10 tbsp Greek Yogurt (approx 150 mL)
10 tbsp mozzarella cheese
handful of Cilantro, or to taste
3-4 Green onions, finely chopped
1 red chili pepper, finely sliced
Directions:
Pre-heat slow cooker on high. Rinse beans and add to the slow cooker along with the onions, garlic, tomato sauce, tomato paste and the water and/or stock and give it a good stir.
Brown the turkey meat in a very hot cast iron pan in batches. Add the browned turkey and juices into the slow cooker in batches. Once you have browned all of the turkey, remove the pan from the heat and deglaze the pan with the tequila, scraping off all the delicious turkey bits from the pan. Add this liquid into the slow cooker.
Give the chili a good stir. Cook on high for 4-5 hours or until the beans are fork tender. If the chili is too liquidy, then remove the lid for the final hour of cooking.
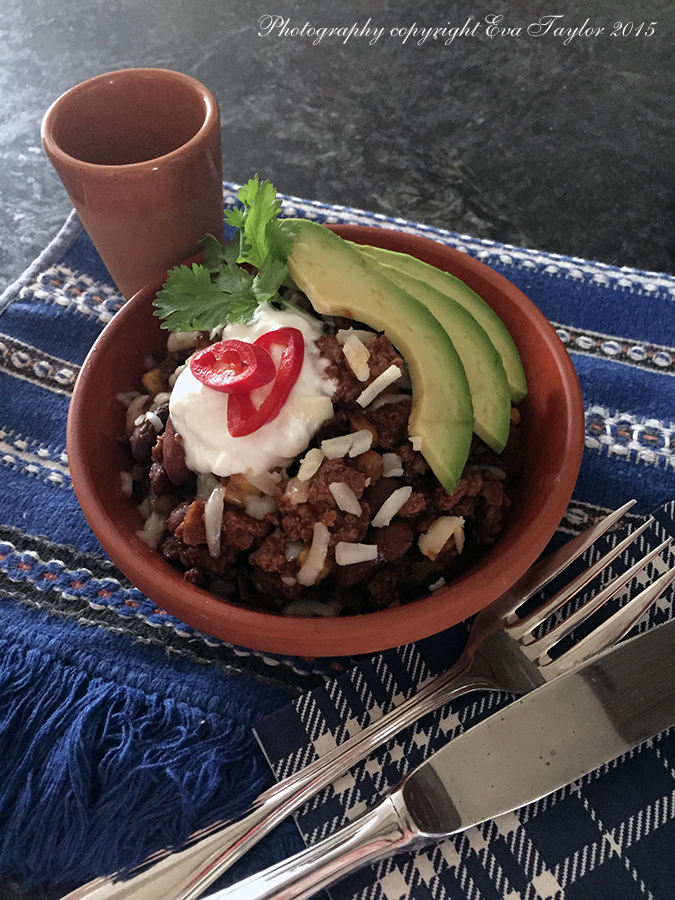
Serve hot garnished with sliced avocado, a tablespoon of yogurt or sour cream, cilantro, chopped green onion, shredded mozzarella cheese and finely sliced peppers.
Based on 10 Servings
It’s heavy on the points but high on flavour.
A delicious Mexican Flavoured Chili
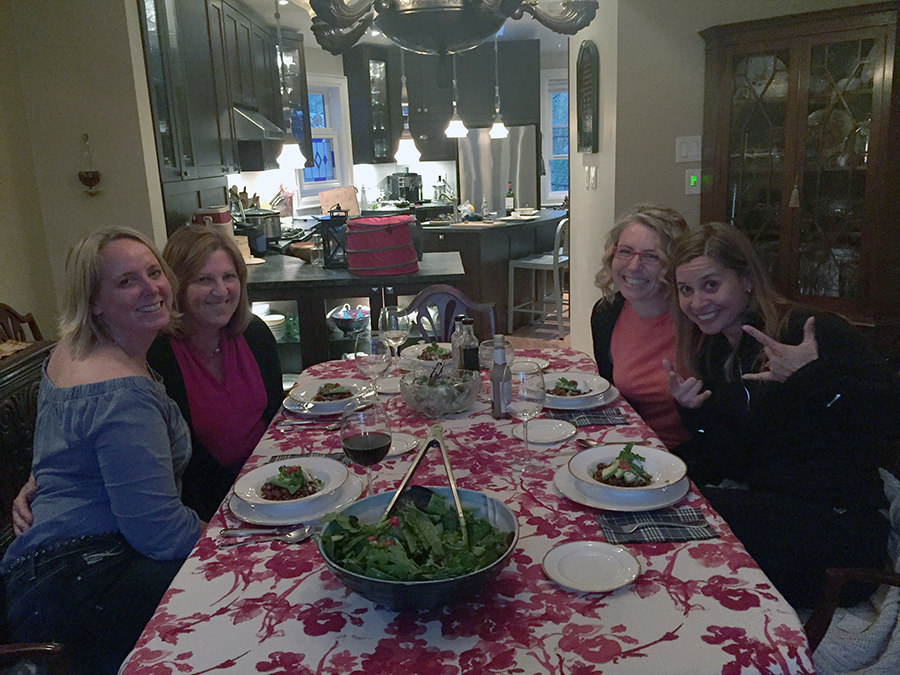
Ladies Night May 2015
I should have set up the tri-pod for an all in shot.
Hello loyal readers, I do hope you are all well and adjusting to climate changes you are experiencing (spring-ish for us Northern Hemispherers, fall-ish for those down under!). Cottage season has begun for Canadians, starting with what we call the May 2-4 (two-four) weekend which happened to be last weekend, even though it wasn’t May 24rth! Therefore list season has begun. Since last Saturday, I have made no less than 5 lists believe it or not. Once it goes on the list, I can safely delete it from my memory, so don’t bother asking me about it, check the list! Why 5? We needed a menu plan for last weekend: List 1, then there is the shopping list for said menu plan, List 2. Then we get to the cottage and almost as soon as the front door is opened for the first time of the season, a third list has begun: List 3, things we need to bring/buy for the next time. And then there is the next time, List 4 is the new menu plan and then List 5 the new shopping list and of course, list 6 (to come) is the list of things we need to bring/buy for the next time around! Such fun.
Being the suck that I am, this was taken in the screened in porch because the bugs were BRUTAL. Believe it or not, even JT put on a bug shirt for the first time EVER.
You also may have realized that I failed to post on Thursday, and sadly for the time being I’ve decided to reduce my blog posts to once per week, I hope you don’t mind. It’s still a joy for me and I want to keep it that way; plus my marketing freelance gig writing for social media has upped the anti and I’ve been contracted until September, god forbid I run out of words. Good news is that it’s steady, bad news is that I’m using up my Data plan like it was going out of style. But I’m not complaining, I’m loving the projects and the people I’m working with so all is good in the new reality!
Now you have probably been wondering why there hasn’t been an Ebelskiver post in a while. I know, I asked myself the same question…and if you’re interested in the other posts, please click here, and here and here. Remember that I have my dear friend Barb (from Profiteroles and Ponytails — she’s on a bit of a break, so busy!) to thank for that gorgeous cast iron Ebelskiver pan, so I can’t let it go unused.
I’m getting much better at making perfectly spherical Ebelskivers.
Bacon, Feta, Kale and Onion Ebelskivers with a Yogurt a Dill Sauce
Makes about 17 Ebelskivers (I used 5 Ebelskivers for breakfast and froze the remainder for another time — guess who had 3)
Filling Ingredients:
140 g onions
60 g bacon (should have been 80!)
60 g feta
100 g kale (or mixed spinach and kale)
1 tsp lemon zest
1 tbsp EVOO
Filling Directions:
Heat the EVOO and cook the bacon until crispy. Set aside. If there is more than one teaspoon of bacon grease left in the pan, remove excess (or not, it’s your arteries!). Cook the onions until soft and translucent, add the greens and wilt. Set aside to cool completely. In the meantime make the batter.
Basic Ebelskiver Batter Ingredients:
1 1/2 cups all-purpose flour
1 teaspoon sugar
1/2 teaspoon baking powder
2 large eggs, separated
1 cup milk
1 tbsp unsalted butter, melted and slightly cooled
1/2 tsp salt
Directions:
In a large bowl, whisk together the flour, sugar, baking powder and salt, set aside.
In a small bowl, lightly whisk the egg yolk until thick and pale, then whisk in the milk and melted butter. Add the yolk mixture to the flour mixture and, using a wooden spoon, stir until well blended. The batter will be lumpy.
In a clean bowl, using an electric mixer on high speed, beat the egg whites until stiff, but not dry, peaks form. Using a spatula, fold about one-third of the egg whites into the batter to lighten it, then fold in the rest just until no white streaks remain.
Fold the cooled wilted greens, onions, bacon and crumbled feta and mix thoroughly.
Ebelskiver cooking directions:
Preheat oven to 325°F.
Spray the ebelskiver pan with a good squirt of non-stick spray and place over medium heat. Add about 1/4 cup batter to each round as soon as the pan is quite hot. Maintain the heat at medium, you don’t want to burn the ebelskiver edges before the insides get a chance to cook.
Cook until the bottoms of the pancakes are lightly browned and crisp, 3-5 minutes. Using a fork, gently push the ebelskiver until it entirely turns around in the pan and the uncooked portion is now facing the bottom.
Transfer the finished spheres to a platter and finish baking in the oven while you repeat to finish the batter (about 15-20 minutes).
Yogurt Dill Sauce
Enough for two servings
Ingredients:
1 cup non-fat yogurt, well stirred
1 tsp butter
1 tbsp flour
2 tbsp dill
Directions:
In a small sauce pan melt the butter and add the flour. Cook the flour but don’t brown it. Add the yogurt and stir.
Remove from heat and stir in the dill.
Serve warm over the Ebelskivers.
I was surprised and thrilled that the feta stayed whole and did not melt into the batter, it was so tasty.
The ice is melting. Thank God! We are so over winter. This past weekend was warm enough to walk outside in a light jacket and no hat (ok, I did start out wearing gloves, but took them off). The ground is defrosting and the air smelled like my childhood spring; do you remember that wet mud, musty smell? I don’t know about other ladies in our hemisphere but I’ve stopped wearing socks! There I said it. My poor dogs are so sick of being all locked up and claustrophobic in socks and boots that they needed to be liberated! Yes, they may still get a bit chilled at times, but I don’t care! I’m done. And sadly the start of this week is back down to 2C (xxF) so this soup post is not entirely outside of expectation even though it was made about a month ago.
This soup was a last minute St. Paddy’s Day effort to make something green for dinner and I dare say it turned out even better than expected, so here it is on the blog for posterity and for me so I remember to make it again (it was that good)! It’s so creamy and smooth you’d never guess there is no cream in it!
The smooth creamy texture makes you think it’s much more sinful than it is!
It’s a nice thick vegetable soup without cream or any type of starch in it. The beautiful green colour comes from purée-ing raw baby spinach leaves into the warm broccoli soup and blitzing it for about two to three minutes to get the creamy consistency you see, I didn’t even push it through a fine sieve. There is no butter nor cream but you can add a pinch if you’d like.
The garnish is oven dried baby spinach leaves which I was hoping to make into a post on their own, but alas they were far too delicate and did not make the test! But they do make a gorgeous garnish, n’est pas?
Broccoli and Spinach Soup
Serves 2-4
Ingredients:
1 bunch broccoli florets, including stems
1 Vidalia onion, roughly chopped
6-8 medium cloves garlic, roughly chopped
3-4 cups water or stock
salt and white pepper to taste
2 handfuls of baby spinach leaves, raw
Directions:
Sauté the onion and garlic in a quick spray of non-stock or olive oil, adding water as needed until they are translucent. Add the broccoli florets and stems and cook stirring often until they are very tender. Add a couple of cups of water or stock and simmer for about 15 minutes.
Pour contents into a heat proof beaker and purée using your immersion blender (or you may do this step in a regular glass blender). Purée for a minute or so and then add the raw baby spinach and purée for another 2-3 minutes until very smooth. Salt and pepper to taste. Add more water or stock if you feel it’s too thick.
Serve warm garnished with dried spinach leaves*.
Notes:
To oven dry spinach leaves: Pre-heat the oven to the lowest temperature, mine is 170°F. Take the largest leaves from the package of baby spinach and lay over a dry cooling rack making sure they do not overlap. Place in the warm oven and watch for 15-20 minutes until they are completely dry and crispy. This would also work wonderfully with basil leaves. This is a great alternative to deep frying them.
The bright green colour is attributed to the raw spinach that’s been puréed into the cooked broccoli soup. Do you think I have a thing for green?
Spring has been slowly emerging, taking its dear sweet time, but today, it’s finally going to be 17°C (62.6°F). Even on Tuesday, the sun was shining and it was actually warm enough to sit outside in the sun with a cup of hot coffee. We’re cautiously hopeful for spring, although there is still some ice in our backyard believe it or not. Stubborn ice that just won’t give up. One of our radio stations has a repeating ad that goes something like this: “April, you have just one job: melt the GD ice so spring can finally show up.” Seriously, just one job! Can it be THAT hard? Yes, we are frustrated! But at least it’s starting…
I’m beginning to think about summer foods, lighter fare and this is a quick and delicious recipe I came up with for lunch about a month ago; I think it may have even been snowing at the time (a month ago). The bright, fresh flavours contrasted against the peppery arugula will make a sensational meal on a super hot, humid day (soon, please be soon). Definitely making this lovely dish for the cottage, it’ll be perfect for eating on the dock, wearing shorts and a light T!
A delightful combination of shrimps and scallops cooked in lime juice
Shrimp and Scallop Ceviche
Makes 1 small serving (to make a meal of it, increase the weight of shrimp and scallop to 100 g in total).
Ingredients:
30 g shrimp*, cubed rather small
20 g scallop*, cubed rather small (similar size to shrimp)
1 tbsp lime juice
1/4 tsp non-calorie sweetener of your choice
1 tbsp cilantro, minced
1 green onion, minced
1 stalk celery, cubed
5 cm (2 inches) English cucumber, cubed
1/4 apple (or Jicama)
5 cm (2 inches) English cucumber, cubed
100 g Arugula
Directions:
Combine the lime juice and the non-calorie sweetener of your choice and mix well.
Make sure you cube your seafood into equal sized cubes so that they ‘cook’ at the same rate. Combine the cubed shrimp, scallop, cilantro and green onion with lime dressing and toss well. Set aside in the refrigerator for 30 minutes to one hour.
When the seafood has become opaque, add the celery, cucumber and apple and toss well. Serve over arugula or lettuce of choice
The apple adds the sweetness that the jicama would have.
*’cooking’ seafood in citrus does not kill off any parasites, so you should be very careful with the choice of seafood — it should be fresh, or boil in water until done and prepare the salad just prior to serving.
Happy New Year! Are you doing anything special? JT and I usually go out to our favourite French restaurant but this year we’re having good friends come over — we’ll be snacking tapas-style all evening. I’m really looking forward to our intimate New Year this year.
Although I didn’t make this soup for New Years Eve, I did make it several weeks ago when I needed to use up some kale and wanted a hearty and satisfying lunch. I adore soup, in fact I often say that I love it so much, Soup could be my middle name. JT is not as fond of soup as I am but he still eats without griping too much. My dear friend Kelly (Inspired Edibles) made a gorgeous and colourful version here and although I am posting it a few weeks after her recipe went live, I actually made it last month. The Original recipe is from Gourmet, 2003, and contained chestnuts but I wanted to keep my version is little lighter in calories so I omitted the chestnuts, but I would encourage you to add them, they would definitely take this warming soup to the next level.
The kale retains its texture and the beans are creamy in contrast
Kale and Navy Bean Soup
Serves 4
Ingredients:
1/2 pound dried white beans such as cannellini, Great Northern, or navy (about 1 1/4 cups), picked over and rinsed
1 piece Parmigiano-Reggiano rind (roughly 3 by 2 by 1/2 inch)
1 1/2 teaspoons salt
1/4 teaspoon black pepper
1/2 pound cavolo nero or regular green kale, stems and centre ribs discarded and leaves cut into bite-sized pieces
2 teaspoons chopped fresh thyme
Optional Garnish: Parmigiano-Reggiano shavings
Directions:
Soak beans overnight by covering them in about two inches of water. Or you can cook the beans relatively quickly in a pressure cooker or make this soup in a slow cooker. Drain well.
Sauté onion and garlic in a pinch of oil large heavy pot over moderate heat. Add the kale and sauté for 5 additional minutes. Add the beans, broth, water, cheese rind, salt and pepper and simmer uncovered, until beans are tender, 45 minutes to 1 hour (or in a slow cooker on high for 4 hours). Discard or eat the cheese rind.
A deliciously warming soup
Tip:
I usually keep all my parmesan rinds in a zip lock bag in the freezer and use them in various stews and soups because they add so much flavour. I always eat them and never discard them as the instructions indicate, they are really very tasty and I know my friend Sissi (With a Glass) would adore the texture.
I find inspiration in your blogs, thank you! A few weeks ago, my Hungarian friend Zsuzsa prepared a very beautiful Leek and Potato soup that looked so gorgeous and creamy, I knew I wanted to make it for a dinner we had with my nephew Brian. But I was lazy because I didn’t feel like heading out to buy potatoes, so I used what I had which were parsnips (I had three left over from a chicken soup I made to help combat our persistent colds)! When ever I see leeks on sale, I buy a few bunches and slice them into thin slices and freeze on a cookie sheet and then transfer them to a plastic baggy, that way I have leeks when ever I need them, and I needed them for this!
I was surprised at how well the parsnips replaced the potato, adding just a touch of sweetness to the soup (by oven roasting them) and not compromising the creamy texture that potatoes generally add. Parsnips have slightly fewer carbohydrates than potatoes but they also contain fibre, and potatoes do not; they are also effectively lower on the glycemic index (for a similar weights, a potato can be 56-110 where the parsnip is a lowly 10!). I think I have found my new vegetable combo for this traditional soup!
Crispy fried Chorizo and grated Parmesan add just the right amount of salt to this creamy soup.
Creamed Leek and Parsnip Soup
Makes around 1000 mL or 4 quarts, depending on how thick you want the soup.
Ingredients:
200 g (about 1.5 cups) parsnips, peeled and cut into relatively equal chunks
100 g (about 1 cup) onions, cut into large slices
250 g (about 1 1/2 cups) leeks, finely sliced
4 cloves garlic
2 tbsp EVOO
sea salt to taste
4-6 cups low sodium chicken stock (or vegetable stock if you wish to make this vegetarian)
non-stick spray
2-3 tbsp crispy fried chopped chorizo (omit for vegetarian version)
Parmesan cheese
Directions:
Pre-heat the oven to 177°C or 350°F. Give a small pan a couple of squirts of non-stick spray and roast the parsnips and the onions until soft.
In a small ramekin with 2 tbsp EVOO, add the unpeeled garlic and a good pinch of sea salt. Cover with aluminum foil and roast along side of the parsnips.
Spray a couple of squirts of non-stick spray into a good size soup pot (one that will take at least 1000 mL or 4 quarts). Cook the leeks until softened.
When the garlic is soft enough to easily push a fork through, remove and pop out of the peel (be careful, it’s really hot). The parsnips and onions are done when they are soft enough to push a fork through as well.
Remove the leek pot from heat and add the roasted parsnips, onion and roasted garlic (including the oil) to the leek pot. To start, add 2 cups of stock and begin blending with an immersion blender and blend until smooth. You may need to add more stock until the desired thickness is achieved. Taste and salt as desired, keeping in mind that the chorizo and Parmesan will add a certain amount of saltiness to it.
To ensure a super velvety texture, press the soup through a fine sieve. Take the bits left over in the sieve and put into the immersion blender container and add a cup or two of the strained soup. Blend again for a couple of minutes (you will be surprised at how much additional thick soup you can get out of this). Press through a fine sieve into the soup. The left over pulp can be a tasty treat if you don’t mind the texture!
To crispy fry the Chorizo, chop into small pieces and in about 1 tsp of canola oil, fry the bits until crispy. Blot on paper towel to remove the oil.
Warm the bowls in a low temperature oven and reheat the soup (I usually reheat in my Microwave); run the immersion blender through it one last time before serving (our chef in Lyon suggested this aerates the soup and makes it even lighter in the mouth!).
Ladle the soup into each bowl and grate about 1 tsp of Parmesan cheese onto the centre, add about a tsp of crispy fried Chorizo. Serve while hot.
Earth Hour, did you do your part? We were the appetizer course for our third progressive dinner on our street and our course fell right on Earth Hour! We were ready, candle light, a wood fire in the fireplace, and gas cooking! It was lovely. We made Sopa Azteca (tortilla soup) but I didn’t write the recipe down (great excuse to make it again). But I did snap a cool photo of it, by candle light of course. Photo with Camera Amazing by Smug Mug and a little digital correction by Art Studio, all on my iPhone!
I used a hybrid of Rick Bayless’s Sopa Azteca and the one I previously posted.
Now you must be thinking that I’m obsessed with Ebelskivers. No, please don’t think THAT — it’s pretty harsh, don’t you think? Well, I have been making a lot of these wonderful Danish treats (see this recipe and this recipe), but I just can’t help myself. Allow me to explain: Way, way back in time, it was Shrove Tuesday or Pancake Tuesday. Of course, that cold February day, I sleepily stood in front of the freezer wondering what we should have for dinner. Completely forgetting about Pancake Tuesday and I took out two 100 g servings of Salmon.
Fast forward to dinner time, and AHHHHHK! It finally hits home that it’s pancake Tuesday and we NEED to eat pancakes. But what about the salmon? We had plans on Wednesday so I couldn’t put it off; I had to create the savoury Ebelskiver Salmon with Spinach and Dill! Quite clever, don’t you think? Without tooting my own horn too much, I really MUST tell you this is one of the BEST versions of this Danish pancake I have made so far. It’s the BEST JERRY, THE BEST!
And now for something completely different: A precariously perched squirrel.
Savoury Ebelskiver: Salmon with Spinach and Dill with a Dijon Dill Béchamel Sauce
Makes 8-10 round Ebekskivers
The Salmon was perfectly paired with the subtle spinach and earthy dill.
Filling Ingredients:
40 g onions (few tablespoons)
20 g spinach (a good handful)
2 tbsp fresh dill, finely chopped
200 g Fresh or canned Salmon without skin, roughly chopped into 1-2 cm bits)
1 tsp EVOO
Ebelskiver batter (below)
Dijon dill béchamel sauce (below)
Filling Directions:
Heat the EVOO and cook the onions until soft and translucent, add the spinach and wilt. Set aside to cool completely. In the meantime make the batter.
Basic Ebelskiver Batter Ingredients:
3/4 cups all-purpose flour
1/2 teaspoon sugar
1/4 teaspoon baking powder
1 large egg, separated
1/2 cup milk
1 tbsp unsalted butter, melted and slightly cooled
1/2 tsp salt
Directions:
In a large bowl, whisk together the flour, sugar, baking powder and salt, set aside.
In a small bowl, lightly whisk the egg yolk, then whisk in the milk and melted butter. Add the yolk mixture to the flour mixture and, using a wooden spoon, stir until well blended. The batter will be lumpy.
In a clean bowl, using an electric mixer on high speed, beat the egg whites until stiff, but not dry, peaks form. Using a spatula, fold about one-third of the egg whites into the batter to lighten it, then fold in the rest just until no white streaks remain.
Fold the cooled wilted spinach, onions, dill and chunks of salmon, and mix thoroughly.
Ebelskiver cooking directions:
Preheat oven to 325°F.
Spray the ebelskiver pan with a good squirt of non-stick spray and place over medium heat. Add about 1/4 cup batter to each round as soon as the pan is quite hot. Maintain the heat at medium, you don’t want to burn the ebelskiver edges before the insides get a chance to cook.
Cook until the bottoms of the pancakes are lightly browned and crisp, 3-5 minutes. Using a fork, gently push the ebelskiver until it entirely turns around in the pan and the uncooked portion is now facing the bottom.
Transfer the finished spheres to a platter and finish baking in the oven while you repeat to finish the batter (about 10-12 minutes).
Serve hot with a Dijon Béchamel.
The Dijon Dill Béchamel was a sophisticated change to Maple Syrup.
Dijon Dill Béchamel
makes 1/2 cup
Ingredients:
1 tbsp unsalted butter
1 tbsp flour
pinch of salt and pepper
2 tbsp fresh dill, finely chopped
1 tbsp Dijon mustard
1/2 cup milk
Directions:
Melt butter in a small sauce pan. Add the flour and stir until well combined. Cook this flour paste but don’t allow it to brown. Add the Salt and pepper.
Slowly add the milk whisking to combine and cook this mixture until smooth and thick, stirring constantly. If it’s too thick, just add a bit more milk and stir until hot.
Remove from heat. Add the mustard and the dill and whisk until smooth.
Serve warm over Salmon Spinach and Dill Ebelskivers.
Enjoy.
They are rather filling, so you only need two, but believe me you’ll want FOUR!
We purchased this salmon well before the hoopla about Canadian Salmon having a fish influenza virus.
This is a wonderfully creamy soup that has no cream in it. The Hungarians know only celery root, they really don’t eat the stalks like we do (the stalks are an amazing snack, I ALWAYS keep some washed in a sealed container in the fridge for snacking. I once read that it takes more calories to eat one that the calories in the stalk!). I do add a bit of Olive Oil (EVOO) to the soup and I used butter to toast the croutons, but there is no other fat in this dish.
It’s creamy and rich without a drop of cream!
Celeriac Velouté
Serves 4 (one cup portions)
Ingredients:
1 celery root, cleaned, peeled and cut into relatively equal cubes.
1/2 a large sweet onion, cut into quarters
1 small head of garlic, bottom chopped off and excess skin removed.
Spray a large cookie sheet with non-stick spray and distribute the onion and celeriac cubes evenly. Roast in a pre-heated oven set at 350°F until soft.
Add the EVOO to a small ramekin and place the garlic cut side down. Salt with sea salt. Cover with aluminum foil and bake with the rest of the vegetables until soft.
In a large pyrex bowl, add the cooked vegetables with the olive oil from the roasted garlic, and squeeze the roasted garlic into the same bowl. Add vegetable stock and purée with your immersion blender until very smooth. Press through a fine sieve to make sure your soup is very creamy.
Melt the butter in a small frying pan and toast the focaccia so that it is crispy on all sides.
Reheat the soup to serve; pour into your rimmed soup bowls, garnish with the focaccia toasts and enjoy.
As most of you already know, my family Christmas was cancelled due to illness, both my niece and nephew came down with the stomach bug (in the olden days, we called it the 24 hour bug). Fortunately they both recovered, but we had to postpone the festivities so they wouldn’t spread the nasty virus.
Our Do-over Christmas was Sunday, January 13 and I made a full Turkey dinner along with stuffing, celeriac and cauliflower mash, Cherry Soup, Cherry Squares and Pumpkin Brûlée mini-tarts! Needless to say, it was a grand success and everyone went home with their bellies filled and their hearts happy. We may have to make this another tradition!
Even though we had already taken down our real Christmas tree, I put up a small, artificial tree so that the kids would have their presents underneath it!
Christmas dinner wouldn’t be complete without the traditional crackers. No one but me wore the stupid hats.
Quinoa Stuffing
Serves 8-10 (yes, I made way too much!)
Quinoa stuffing, trying to keep the carbs down.
Ingredients:
1 cup quinoa (we had a mix of red and white)
100 g celery, cubed
50 g roasted chestnuts, roughly chopped
100 g onion, finely chopped
100 g chorizo, finely choppedd
100 g shitaki mushrooms, sliced thinly
50 g dried cherries, roughly chopped
1 tsp butter, melted
1 tsp thyme
2 eggs well beaten
1/4 cup sliced almonds, toasted
Directions:
Cook the quinoa according to the directions, plus add 1/2 cup more water.
Melt the butter in a small frying pan, and cook the onions until translucent. Add the mushrooms and sauté until soft.
Mix quinoa, onion, mushrooms, chestnuts, chorizo and dried cherries together. Add herbs and eggs and combine well.
Pre-heat oven to 350°F
Press the stuffing mixture into a well greased baking pan and bake for 30 minutes.
Top off with the toasted, sliced almonds and bake an additional 15 minutes.
I am very excited to tell you that THIS post will tip this blog over the 100,000 views! I can hardly believe it. My humble little blog from Bloor West Village. Go figure. I was going to do some sort of prize, but I have no idea how to measure who my 100,000 visit was. So I’ll have to think of something else. WOOO HOOO!
Oh Christmas Tree
We decorated the tree a few days after we got it home. Now I know it’s probably a lot larger than many cultures, but for Canadians this tree is small; even by our standards it’s a wee bit puny, we had to put it up on a table to get the height we needed! But I’m OK with that, because that just gives us more room for presents!
These delicious little bites were baked, believe it or not, and you will be surprised at how soft and chewy the centre is and how crispy the exterior becomes when you reheat. I don’t think I will deep fry my bhajis ever again.
Baked Onion Bhajis
Don’t be fooled by their size, they pack a big punch of flavour
Pre-heat the oven to 400°F. Pre-heat a 12 or 24 mini muffin tin.
Beat the eggs and add the finely chopped onion rings, mix well.
Combine the flour, ground coriander and cumin and stir well. Add to the egg, onion mixture and stir well to combine.
Generously spray the mini muffin tin, add about 1 tbsp of the batter per cavity. Bake for 7-10 minutes, then flip each bhaji so that it browns evenly on both sides and bake for another 7-10 minutes.
Remove from the oven and allow to cool completely. To serve, pre-heat oven to 350°F and place bhajis onto a cookie sheet and heat for about 10-12 minutes, crisping up the exterior.
Serve immediately with some onion chutney or tamarind chutney.
While in Barcelona, Spain we enjoyed many tapas that we’d never tried before and one particular tapa was the Potato Omelet. Now you know that I am not a huge potato eater, but for some reason I really wanted to try it. The starch in the potato makes for a very dense and slightly chewy omelet, which was usually served as a small cube, sometime with bread but most often not.
The potato omelet is the cube centre back. We enjoyed this plate while dining along side of the Mediterranean Sea!
Now that we’re home, I’ve experimented with other ‘fillings’ for this simple treat and yesterday I think I hit the jackpot. I made this little hors d’œuvres with a shallot, finely diced chorizo and a sliced mushroom. What made it hit the jackpot for me was the texture and because I wasn’t using a potato in this version, I needed to add something to help thicken the egg. I remembered Sissi’s recipe for a Korean Pancake (which I thoroughly enjoyed) and she added corn starch to the egg batter to firm it up. So that’s exactly what I did. Thanks Sissi. It made eight 2.5cm squares (1″) that were tasty and incredibly easy to make. You can even make it in advance and reheat.
A lovely dense texture and a little spice from the Chorizo
Chorizo, Shallot and Mushroom Omelet Tapa
Ingredients:
1 whole egg and 1 egg white
1 tbsp corn starch
1 mushroom, sliced about 2mm thick
30 g finely diced chorizo (I didn’t add extra salt as I find Chorizo salty enough)
20 g finely chopped shallot
Directions:
Preheat oven to 350°F.
Beat the egg and white together, add the corn starch and beat until all the lumps have disolved.
Generously grease a small loaf pan 7cm x 13cm (2.75″ x 5″) or 200 mL (3/4 cup size).
Add the chorizo, shallots and mushrooms and make sure they are distributed evenly in the pan. Pour the egg batter over it and tap a few times so that it reaches under and over all the inclusions. Bake for 30-40 minutes or until egg is entirely set. You may serve immediately or cool completely and reheat this mixture prior to serving.
And definitely don’t let my ingredient mix stop you from trying something you have on hand…for example, ham and gruyère cheese!
Ham, Gruyère cheese and a little Dijon
The possibilities are definitely endless. I do hope you enjoy this snack.
The potato and bacon omelet took a nose dive out the pan. It must have been possessed! And NO, for all the guys, the three second rule did NOT apply.
Just a quick word about the blog…I just posted my 500th post! Woohoo!
A week or so ago I was intrigued by a recipe at my friend Liz’s blog That Skinny Chick can Bake for Chocolate Meringue Cookies; it’s a meringue cookie for which you need not beat the egg whites. WHAT? How could this be? I had to give it a try! They were EVERY BIT AS GOOD as Liz made them out to be. EVEN BETTER some might say. So chocolatey and chewy with all the texture of a typical meringue cookie without the fuss. Please pop over to Liz’s blog to check out what all the fuss is about this cookie (plus she has some other tasty treats to ogle over).
So that got me thinking (oh oh, this means trouble), if it worked so well for the chocolate version, I wonder if I can work it with an almond version! So I tried and it worked like a charm! The first time too! Although, I did adjust the recipe a teensy tiny bit. I think next time, I will toast the almonds so that that they give the cookie a bit more interest.
Chewy, crunchy and very almondy
Almond “Meringue” Cookie
Makes about 4 dozen small cookies
Ingredients:
3 cups confectioners sugar (icing sugar)
1 cup almond flour
1/4 teaspoon salt
2 1/2 cups sliced almonds
4 egg whites (no need to beat like with a traditional meringue)
1 tablespoon almond essence
Directions:
Preheat oven to 350º F. Line baking sheets with parchment and spray with non-stick cooking spray.
Mix sugar, almond flour and salt in a bowl. Stir in almonds (if you are going to toast the almonds, I would allow them to cool entirely). Add egg whites and almond essence, and mix until just moistened. Do not over-mix batter. The batter should not be runny.
Drop by small teaspoonfuls onto prepared baking sheets. Leave plenty of space between cookies as they spread quite a bit. I got about 12 per sheet in general.
Bake until the bottoms begin to colour, about 12 minutes. Remove the parchment with the cookies from the hot tray and cool briefly before carefully moving to a cooling rack. Cookies are fragile, but I found them easily removed to a cooling rack with a large spatula. Store with parchment between layers.
If you like almonds, this is the cookie for you!
Norma, over at Garden to Wok had asked that I photograph my onion and garlic harvest, and I finally got around to it, sorry it’s been so late. I planted my garlic too early last fall and it sprouted and then proceeded to rot over the winter. I was so disappointed this spring when they didn’t sprout again that I pulled them out and planted more garlic and a few green onions. The garlic was planted too late and the heat, lack of rain did not help so they are a bit stunted. But I will persevere this fall and plant garlic again.
I like the contrast on the Canadian Soapstone counters
Years ago we were watching Easy Entertaining with Michael Chiarello and he and a friend had a pizza cook-off. I cannot recall who won, but I do know we came away with the best Onion Confit recipe EVER. I usually make up a couple of batches and freeze; they are perfect for a pizza base, sauce base, dip base, even on a salad with crumbled blue or goats cheese. And because I freeze small quantities, they defrost quite easily. Please click here for Chef Chiarello’s original recipe.
I posted my take on the original recipe here, but I never took a photo of it. Well, you’re in luck because I made some up on the weekend and I was smart enough (wink, wink) to remember to take a gorgeous daylight filled photo of it.
Incredibly sweet and tangy, these onions make an amazing topping to pizza, salads brioche...the possibilities are endless
For additional ideas on how to use these gorgeous sweet onions, please see: