Feeds:
Posts
Comments

Posts Tagged ‘Mexican’

Recently, we have fallen in love with Cholula Green Pepper Hot sauce but it is very difficult to find in Toronto. Sure, everyone carries the original red version, but we can never seem to find the green one. It’s not quite as hot as the red one but it really livens up flavours, like our Huevos Rancheros! I decided I would try and make my own and so I shall share it with you.

Green Pepper Jalopeño Hot Sauce

A KitchenInspirations Original Recipe

Makes 400-500 mL hot sauce

Ingredients:

  • 15 mL olive oil
  • 440 g green peppers (about 355 g cored and seeded)
  • 320 g jalapenos (about 235 g cored and seeded)
  • 1 large shallot (about 65 g)
  • 15 mL puréed garlic
  • 300 mL water
  • 75 mL cider vinegar
  • splash of agave syrup
  • Salt and white pepper

Directions:

  1. Core, seed and remove veins of the peppers (to your taste) and toss with the olive oil.
  2. Roast the peppers until their skin blisters. Peel off the skin as best as you could. Roast the shallot so that it’s almost soft.
  3. Add everything but the agave syrup to a pan and cover with the water and vinegar. Simmer until everything is super soft, about 10-15 minutes.
  4. Purée the pepper mixture until smooth and press through a fine sieve. Add in a splash of the agave syrup, salt and pepper to taste.
  5. Transfer to sterilized jars and refrigerate. Will last a few months in the fridge.

Notes:

  • The quantity will depend on how fine a sieve you have. I generally run it through a fine metal sieve to catch larger bits, then I press it through a very fine, reusable coffee filter. It makes a beautiful, silky sauce.
  • If you prefer a hotter sauce, leave more of the ribs on the Jalopeños. I can’t tolerate the extreme heat so my sauce is only mildly hot.


Read Full Post »

In mid-July, we were one of five couples invited to a socially responsible BBQ at a friend’s house. They put three tables together outside giving us ample space to distance ourselves. Each couple was asked to bring something and this marvellously flavourful side was one of the dishes someone brought. Everyone asked for the recipe, including me! I chose to make it as a dip for a summer evening cocktail party, socially responsibly distanced, of course. Each couple had their own plate!

The beans and lentils are packed with flavour, the salsa and lime yoghurt just up the ante.

Baja Mexican Beans and Lentil Dip with Lime Sauce and Salsa

From Bowls of Goodness: Vibrant Vegetarian Recipes Full of Nourishment By Nina Olsson

For the original recipe please click here

  1. Combine all of the ingredients and set aside.
  1. Combine all of the ingredients and mix well. Refrigerate until needed
  • Olive oil
  • 2 shallots, diced
  • 200 g dried navy beans (400 g cooked)
  • 100 g dried lentils du puy (200 g cooked)
  • 4 cloves garlic, finely minced
  • 1 avocado, finely diced
  • 1 tsp dried oregano
  • 1 1/2 tsp cumin
  • 1 tsp sweet paprika
  • 1 tsp smoked sweet paprika
  • 3/4 tsp salt
  1. Cook the beans and lentil until softened, rinse.
  2. Heat oil in a frying pan and add the shallots until caramelized, add the garlic and cooked beans and cook until they can easily be mashed about 5 minutes. Add the remaining ingredients and cook for 2 minutes.
  3. Serve in a bowl or on a plate drizzled with the Baja Sauce and Salsa with baked tortilla chips

I chose blue tortilla chips because they were gluten-free and organic.

Read Full Post »

At the time I wrote this post, the last week of June, we were still not finished our renovation. Someone mentioned it might be because of my treats. Whatever the reason, it is rather frustrating. A trade might come in for a few hours and then leave. I can see other things that can be done in the meantime, but it’s usually just one thing at a time. Our last reno was the same, so I guess it is “normal”. Still frustrating.

In the meantime, I am scouring the web for new recipes and this one stood out for me. My friend Liz of That Skinny Chick that can Bake is my GoTo for outrageous treats. Her blog is filled with decadent sweets, beautifully presented and photographed. As I was cruising through her beautiful blog, I came across her Caramel Butter Squares and WHAM! I knew what my next treat would be. Plus I had a jar of Argentinian Dulce de Leche in my pantry, it was a done deal.

I converted Liz’s recipe to metric measures because I find it much easier. The Dulce de Leche caramelizes in some parts and is a bit runny in others. It really is dreamy. We will see how the guys like it.

Douce de Leche Butter Squares

For original recipe, please click here.

Ingredients:

  • 227 g unsalted butter, at room temperature
  • 100 g sugar
  • 100 g powdered sugar
  • 15 mL vanilla
  • 280 g flour
  • 8 g salt
  • 230 g Dolce de Leche sauce

Directions:

  1. Preheat the oven to 325° F. Prepare a 23″ x 23″ cm (9″ x 9″) pan by lining with parchment and spraying with non-stick spray.
  2. Cream the butter with the sugars until fluffy. Beat in the vanilla.
  3. Beat in the flour and salt on low speed until entirely incorporated.
  4. Portion about 1/2 of the flour mixture into the bottom of the pan and press evenly to all sides. Bake for 20 minutes. Refrigerate the remaining pastry.
  5. After you have baked the base pastry, pour in the Dolce de Leche sauce and spread evenly with an offset spatula. Crumble the remaining pastry onto the top, being careful not to cover entirely.
  6. Bake for an additional 25-30 minutes or until the topping is golden.
  7. Allow to cool completely and cut into squares or bars.

Notes:

  • Liz’s recipe calls for an 8″ square pan, but I had quite a bit of pastry left over so I upped it to 9″. In fact, the second time I made this, I used a 9″ x 13″ pan and it was excellent.
  • You may use premium caramel sauce, as Liz’s recipe does.
  • You may also use 300 mL caramelized sweetened condensed milk. Learn how to make caramel from sweetened condensed milk here.
  • Liz also has a recipe that includes chocolate chips.

For these squares, I used Caramelized Sweetened Condensed Milk. They were pretty darned tasty.

Read Full Post »

This past July, we traveled to Wisconsin to visit friends at their gorgeous lake house; it was bittersweet because they were selling it to move down to Arizona for good. The weather wasn’t great so we only got in one very short boat ride but we enjoyed every last minute. We shall miss visiting this little gem in Wisconsin. But that just means we’ll be visiting Arizona even more!

While we were in Wisconsin, our dear friends introduced us to an incredible product: Rick Bayless’ Fonterra Grill salsa! It was to die for! The layered flavours of grilled vegetables and fresh cilantro created a complex salsa that was totally unexpected, so of course, I had to try to recreate it upon our return. I used our Big Green Egg which is the ultimate charcoal barbecue! It imparts the most incredible smoky flavours but if you have gas or propane, just fire up some wood chips on the side for a similar experience.

Grilled Vegetable and Cilantro Salsa

A KitchenInspirations Original Recipe

Yields about 1 Litre of salsa (about 4 cups)

Ingredients:

  • 1.5 kg tomatoes, seeded (reserve seeds and pulp for tomato jam)
  • 2 sweet red peppers
  • 4 jalopeño peppers, seeded and veins removed or to taste
  • 2 nora peppers, rehydrated in warm water, skins and seeds removed (yields about 15 mL flesh), optional
  • 1 sweet onion
  • 1/2 garlic bulb, skin on
  • 2.5 mL smoked sweet paprika
  • Salt
  • Cilantro leaves, good handful or to taste
  • juice of 2 limes

Directions:

  1. Remove seeds and pulp from the tomatoes and set cut-side down on a cooling rack lined with parchment paper. Overnight is best, you want to dry out the tomatoes as much as possible.
  2. Roast the tomatoes, peppers, jalapeños and onion on an open flame (I used our Big Green Egg) until softened and slightly charred. Wrap the garlic in parchment and then foil and roast over the open flame until soft.
  3. Remove the skins from the tomatoes, peppers and garlic, discard skins. Add roasted veggies and cilantro leaves to a food processor and chop to desired consistency. Add salt and lime juice and pulse to combine.
  4. Add the scraped flesh from the Nora peppers to the processor and pulse a few more times.
  5. Fill sterilized jars with the salsa. If you are not using right away, you will want to process the jars in the typical canning methods. I processed my salsa for 15 minutes.

Tomato Jam

Yields a scant 250 mL (1 cup) tomato jam

Ingredients:

  • 370 g tomato pulp (all the seeds and pulp from the tomatoes that you plan to roast for the above recipe)
  • 100 g shallots, minced finely
  • 10 g garlic, minced finely
  • 15 mL EVOO
  • 50 mL cooking sherry
  • 15 mL white balsamic vinegar
  • 1.25 mL baking soda
  • basil, chiffonade
  • salt, to taste

Directions:

  1. Cook the onions and garlic until caramelized, deglaze the pan with cooking sherry. Add the tomato pulp, basil, season with salt and then add the baking soda, being careful because the baking soda will foam up.
  2. Cook for about an hour until most of the water has cooked off. About half-way through the cooking, add the white balsamic vinegar and stir well.

Notes:

  • I used a combination of vine-ripened tomatoes and Roma because that is what looked the best to me.
  • I have mentioned this before, baking soda neutralizes the acidity of the tomato and therefore there is NO NEED TO ADD SUGAR (yes, I yelled that!).
  • You could do whatever you wish with the pulp, I just don’t like throwing away food!
  • Since this post was written, I’ve made two additional batches of this salsa and the last batch was rush so I used the entire tomato instead of seeding it, it made for a wetter salsa so I strained it before canning. The seeds added a bit more texture that wasn’t unpleasant. But, I’d still go the extra mile and seed the tomatoes if I have the time.

Read Full Post »

Our neighbourly South-Western- themed progressive dinner party was scheduled two days after we returned home from Arizona, I didn’t think it would be a problem because we were only responsible for hors d’œuvres and appetizers, easy-peasy! HA! Had I read more than the heading of the organizer’s email, I would have realized that things would get a bit more complicated since one person decided to go vegetarian, gluten and dairy free (for health reasons). But, you know me, I do love a challenge and as luck would have it, my experiments turned out even better than I expected! So much so, that JT has asked for it several times since, so I documented the recipe for the future use.

This recipe originated from Emeril Lagasse but I tweaked it a little bit. What attracted me to this recipe was, of course, that it was baked an not deep fried, and although deep fried would be awesome, it’s always nice to lower calories whenever possible particularly if you need not sacrifice flavour or texture! I think you will be very happy with the baked version (our group could not get enough of them)! I’ll speak to the vegetarian, gluten-free and dairy- free version in my notes below (no pics, sorry).

You can see how crispy these turned out.

Baked Jalapeño Poppers

Makes about 24 jalapeño poppers

For the original recipe, please click here.

Ingredients:

  • 12 fresh jalapeno peppers, halved lengthwise, stems, seeds and membranes removed
  • 170 g (6 oz) cream cheese, at room temperature
  • 140 g (1 1/2 cups) grated sharp or old cheddar
  • 3 g (1/2 tsp) ground cumin
  • pinch of cayenne, or less, to taste
  • 2 large eggs
  • 30 mL (2 tbsp) milk
  • 8 tsp Essence, divided
  • 1 cup panko crumbs
  • 1/2 cup coconut flour
  • non-stick spray

Directions:

  1. In a small mixing bowl, combine the cream cheese and grated cheddar and mix well.
  2. Toast the cumin until you can smell the aroma, allow to cool and add to the cream cheese mixture and stir well. Set aside.
  3. Prepare your breading station by whisking 2 large eggs with 2 tsp of the Essence and the milk in a shallow bowl. In a second shallow bowl, mix 4 tsp of the Essence with the coconut flour. In the third shallow bowl, add 2 tsp of the Essence to the panko and mix well. Reserve remaining essence for the next time (and believe me, there will be a next time!)
  4. Fill each jalapeño densely with the cream cheese mixture, being careful not to mound it too high; continue filling until you have filled all of the jalapeño halves.
  5. Dredge each jalapeño half in the coconut flour, then dip into the egg mixture and repeat once more. Finally, dip each pepper into the panko and press panko into the jalapeño to coat well. Repeat until all are coated.
  6. Pre-heat the oven to  375° F. Place jalapeño cut side up on a parchment-lined baking sheet. Give each jalapeño a light coating with the non-stick spray. Bake for 30 minutes or until panko is golden and crisp.
  7. Serve warm with sour cream and salsa.

Notes:

  • For the vegetarian, gluten-free and dairy-free version, I simply replaced the cheeses with creamed lentils (about 1/4 cup cooked in vegetable broth and puréed with a stick blender) and the panko with shredded unsweetened coconut. Even the non-vegetarians loved them! (Sorry, no pics).
  • I use coconut flour for baked “fried” foods because the coconut has an unbelievable absorption property which makes the batter so much crispier than all-purpose flour.
  • I used gloves to protect my hands from the jalapeños as I cleaned them, you might consider doing this too.
  • Leftovers? Freeze unbaked jalapeños on a parchment-lined baking sheet and when frozen, pop them into a ziplock bag.To bake frozen jalapeños, no need to defrost, just bake for a little longer to crisp up.

Read Full Post »

In early April, my dear friend from University invited me to spend a few days at her second home in southwestern Florida. I did a lot of the cooking because I enjoy doing so and she just loves my creations. I whipped up a batch of the zucchini wraps that JT and I often have, because I thought she might enjoy this calorie reduced, gluten free deviation and I was right. I knew I had to share the recipe and spread the love. It’s a cross between a crêpe and a wrap but it is sturdy enough to hold in your hand and fill with whatever your heart desires. I’ve tried the cauliflower version and to be honest, I did not find them satisfying nor were they sturdy enough to hold the filling. We have these at least once a week, I hope you will give them a try.

Zucchini Wraps

Updated March 19, 2019

A KitchenInspirations Original Recipe

Makes 6 wraps 15 cm (6-inch) diametre (they shrink quite a bit)

ZucchiniWraps Recipe

Ingredients:

  • 400 g (4 cups) raw zucchini, grated
  • Salt for osmosis
  • 30 g (1/4 cup) coconut flour
  • 5 g (1/2 tsp) sea salt
  • 125 mL (1/2 cup) egg whites, lightly whisked
  • Non-stick spray

Directions:

  1. Preheat the oven to 200° C (400° F).
  2. Grate the zucchini and salt generously in a bowl to remove excess liquid. Allow to sit for about 30 minutes.
  3. Rince zucchini well and squeeze out as much liquid as possible, return to a clean, dry bowl.
  4. Combine the grated zucchini with the coconut flour and toss until evenly coated. Add the salt.
  5. Pour the egg whites over the zucchini and mix well. Allow to stand for 5 minutes.
  6. Line a baking sheet with parchment (I have only tested this recipe with parchment, not Silpat or any other silicon matt). Spray well with non-stick spray.
  7. Tightly fill an 80 mL (1/3 cup) measuring cup with the zucchini mixture. Turn out onto the prepared parchment and using the back of a fork, spread out the zucchini to make a 20 cm (8-inch) diameter pancake, the same thickness throughout (they will shrink to about 15 cm (6-inch)).
  8. Bake for 30 minutes or until golden along the edges, carefully flipping about halfway through. Spray lightly with non-stick spray before you flip.

Notes:

  • You may flavour the zucchini wraps with herbs or spices but I prefer to keep mine relatively simple so that the filling can do all the flavouring. We usually have these as fish tacos or chicken fajitas.
  • The zucchini wraps do shrink quite a bit as they bake so make sure you make them large enough to hold the filling of your choice.
  • Spraying the parchment is necessary because, without it, they really stick to the parchment.

Nutrtional Facts for 1 Shell

Weight Watchers Points

Read Full Post »

Dulce de Leche Tiramisu

A KitchenInspirations Original Recipe

Makes 1 round 18 cm (7 inch) round dessert

Ingredients:

  • 6 churros (I bought mine from here)
  • 125 mL (1/2 cup) strong coffee
  • 30 mL (2 tbsp) Tequila (I used this one)
  • 415 mL (14 oz) dulce de leche (I made this recipe), divided
  • 2 egg yolks
  • 125 g  (1/2 cup) cream cheese, softened
  • 5 mL (1 tsp) cinnamon, divided
  • 237 mL (8 oz) whipping cream, stabilized (see below)

Directions:

  1. Cut the churros in half lengthwise. Cut each end about 6 cm (2 inches) long. Lay cut churros into a pan large enough to hold them in one layer.
  2. Combine the coffee, tequila and 15 mL (1 tbsp) of the dulce de leche and mix well. Pour half of this mixture over the cut churros and set aside for 10 minutes, turned occasionally.
  3. In the meantime, in a double boiler or bain-marie, combine the remainder of the coffee, 30 mL (2 tbsp) dolce de leche and 2 egg yolks and mix well. Set over hot water and beat with a hand mixer constantly until doubled in bulk and thickened. Remove from heat and allow to cool to room temperature.
  4. Cream the cream cheese until smooth and slowly add the thickened egg mixture and beat until fluffy and well combined.
  5. In a 18 cm (7 inch) springform pan, begin to line the edges with the churros, placing cut side down so the nice curly side is up. Line the bottom of the churros with the remaining middle cuts (this will also help hold the churros on the sides up!).
  6. Reserve 30 mL (2 tbsp) dulce de leche. Add the remaining dulce de leche sauce to the bottom of the tiramisu directly on top of the bottom layer, spread as evenly as possible. Sprinkle with 2.5 mL (1/2 tsp) of cinnamon. Spoon the cream cheese mixture on top and spread evenly. Sprinkle with the remainder of the cinnamon.
  7. Whip the cream with the final 30 mL (2 tbsp) dulce de leche until incorporated. To stabilize, see notes below. Spoon the whipped cream over the cream cheese mixture and swirl naturally on top.
  8. Chill well to cut nice slices. To serve, sprinkle with additional cinnamon if desired.

Notes:

  • No need to stabilize the whipped cream if you are eating this treat right away, only if you plan to keep leftovers.
  • To stabilize whipped cream, melt 1 tsp of gelatin in about 3 tbsp cold water, nuked until gelatin melts completely, cools to room temperature but does not set, whip into the whipping cream.
  • You may use whole churros, you’ll need to buy 12.
  • The churros I purchased were 6 for nine Canadian dollars, which I found to be pricey. I will make my own next time (and there will be a next time!). This recipe looks good!

Read Full Post »

On May 5, we hosted a Cinco de Mayo dinner party with a few friends. I’m not sure what I was thinking because I had already a very busy week planned, then my dear Mom’s widow became ill and had to be hospitalized so we were running up to the hospital he was in (about 45 minutes away) every few days (he is doing better but still in the hospital). I only had 3 days to prepare!!! I chose the menu based on foods that I can make ahead of time, knowing that they would only get better! In case you wondered, I made a variation of this dip as hors d’œuvres, this salad and for the main, this pulled chicken molé AND a Dolce de Leche tiramisu (recipe to come) for dessert. It was a bit decadent, but sometimes I really need to play in the kitchen!

This lasagna is a delicious combination of flavours and it’s worth making each layer yourself, if you must, choose canned beans to save a little time.

It’s a flavour sensation! I put a poached egg on top the next day for a very tasty brunch!

Mexican Lasagna

A KitchenInspirations Original Recipe

Serves 4 as a meal or 6-8 as an appetizer

Ingredients for the Pulled Pork:

  • 250 g pork tenderloin
  • 125 mL (1/2 cup) stock (I used beef)
  • 250 mL (1 cup) passata (tomato sauce)
  • 125 g (1/2 cup) sweet onions, thinly sliced
  • 5 mL (1 tsp) cumin
  • 5 mL (1 tsp) coriander
  • 5 mL (1 tsp) Hungarian paprika
  • 1.25 mL (1/4 tsp) smoked paprika
  • 2.5 mL (1/2 tsp) salt
  • 1.25 mL (1/4 tsp) pepper

Directions for the Pulled Pork:

  1. Combine all of the ingredients in the bowl of a slow cooker or crock pot and mix well.
  2. Cook on high for 4 hours or until pork is easily pulled using two forks.

Ingredients for the Lasagna:

  • 6 corn tortillas, cut in half
  • 250 mL (about 1 cup) shredded pork (recipe above)
  • 85 g (1/2 cup) dried black beans, cooked and either puréed or mashed with a fork
  • 80 g (1/2 cup) sweet onions
  • 125 mL (1/2 cup) grilled corn
  • a handful (~1/4 cup) of cilantro
  • 125 mL (1/2 cup) Salsa
  • 150 g (about 1 cup) Mexican cheese or mozzarella
  • cilantro, for garnish
  • loosened yogurt (in a squeeze bottle)
  • sriracha sauce mixed with loosened yogurt (in a squeeze bottle)

Directions for the Lasagna:

  1. Preheat the oven to 220° C (425° F).
  2. In a non-stick skillet, caramelize the onions, add the beans, mushing some of the beans (add some stock if necessary). Set aside.
  3. Spray a pate terrine with non-stick spray.
  4. Layer 2 half corn tortillas on the bottom of the pan, cover with 1/3 of the shredded pork, 1/3 of the mashed beans, 1/3 of the corn, 1/3 of the cilantro, 1/2 of the salsa and 1/3 of the cheese. Repeat for two more layers, leaving out the salsa on the last layer. Cover with a non-stick sprayed piece of foil or the top of the pan, if you have one.
  5. Bake for 15-20 minutes covered, then uncover and bake for 10-15 minutes or until cheese is bubbling and lightly golden. Allow to sit for 10 minutes before serving.
  6. Serve garnished with a drizzle of loosened greek yogurt and sriracha sauce and a sprinkling of chopped cilantro.

Notes:

  • I was unable to find Mexican cheese so I used Manchego and Mozzarella.
  • If you cannot grill fresh corn, frozen is acceptable but you will miss the grilled flavour.

Read Full Post »

vegetarianbutternutsquashchili_first

We had a bunch of dear friends for Superbowl a few weeks ago and I made this vegetarian chili. I know I’m a little late, but I wanted to capture the recipe for next year. It was delicious and it makes a huge amount (1 L or 8 cups). It has a lot of great flavours and textures, I’ll definitely add it to my repertoire for future Superbowl parties.

Vegetarian Butternut Squash Chili

A KitchenInspirations Original Recipe

Makes 1 L (8 cups)

Ingredients:

  • 180 g (1 cup) dried red kidney beans (soaked for 12 hours)
  • 1 small onion, diced (100 g)
  • 1 small carrot, diced (100 g)
  • 1/2 butternut squash, diced (150 g)
  • 2 celery ribs, diced (100 g)
  • 250 mL puréed tomatoes (200 g)
  • vegetable stock or water, to cover
  • 1 tbsp tomato paste
  • 1 tbsp red pepper paste
  • 2 tsp ground cumin, toasted
  • 1 tsp oregano
  • 1 tsp cocoa powder
  • 1 tsp smoked sweet paprika
  • 1/2 tsp chili powder
  • 1 cup frozen corn
  • 1 cup Pearl Barley, cooked
  • 1 avocado, for garnish
  • 1/2 cup sour cream, for garnish
  • chopped cilantro, for garnish

Directions:

  1. Put the beans in a pot, cover with 2 inches of water, and bring to a boil. Boil for ten minutes. Drain.
  2. Combine beans with everything but the frozen corn, cooked barley and the garnishes in the bowl of a slow cooker. Add enough water to cover. Cook for 8 hours on low or until beans are tender. Add frozen corn and cooked barley about 30 minutes before serving to allow to heat through.
  3. Serve with garnishes or plain.

vegetarianbutternutsquashchili

Read Full Post »

WholeWheatFajitaShells_first

Happy Civic Holiday to my Ontario readers! It’s the second last long weekend of the summer! I can’t believe summer is almost over! I don’t even want to think of The Ex (Canadian National Exhibition). So let’s not!

How many times have you heard or experienced: Necessity is the Mother of Invention? Some of my best cooking experiences come from exactly that expression, either I’ve forgotten to purchase something or what I was counting on was no longer viable. Case in point: we were at the Upper Deck a couple of weeks back and I had intended on making Waldorf Tuna Wraps for our car lunch for the way home but the fajita shells were old and too dry to make a decent wrap that wouldn’t fall apart, so I decided to make some fajita shells from scratch! They worked out so well, JT proclaimed he liked them better because they had flavour and did not feel dry and crumbly when he bit into it, in fact, they reminded me of a very thin Naan because they are slightly chewy. My wraps held together perfectly. So one afternoon in the city, I decided to experiment and create a recipe that was blog worthy and this post was developed.

I had no idea making these fajita shells was so easy, 4 ingredients, mixed together and knead a little, rest a little (both the dough and the cook), roll out, cook on stove-top in a skillet and they are done! See? So damn simple. I doubt I’ll buy ready made fajita shells ever again. This recipe makes 7 wraps that are about 25 cm or 10 inches in diameter, if you make smaller ones you’ll get more of them! I was being lazy and didn’t want to have to wash a whole bunch of measuring tools so I simply put my bowl on my scale, tared it to zero and kept adding ingredients, each time, tarring to measure from zero. One bowl makes it even easier.

FajitaShells

Easy Whole Wheat Fajita Shells

A KitchenInspirations Original Recipe

This recipe makes 7 shells that are about 25 cm or 10 inches in diameter

Ingredients:

  • 275 g (scant 2 cups) AP unbleached white flour
  • 75 g (2/3 cup) whole wheat flour
  • 20 g (2 tbsp) EVOO
  • 5 g (3/4 tsp) sea salt
  • ~200-220 g (2/3-1 cup) water
  • non-stick cooking spray or a light vegetable oil

Directions:

  1. Measure all of the ingredients into the large bowl of your stand mixer. Insert dough hook and slowly knead the ingredients together until a smooth ball forms (I made this dough while it was rather humid so you may need to adjust the water). Set aside for 10 minutes and allow to rest.
  2. Divide the dough into 7 equal portions (about 83 g each). Dust your work surface with a little flour, and roll out each ball into a 25 cm or 10-inch circle. It’s best not to stack them because they will stick together.
  3. Heat to medium, a cast iron skillet that is at least 10 inches in diameter. Spray or oil the skillet lightly. Cook each fajita shell about 2 to 2.5 minutes each side or until slightly browned.
  4. Allow the shells to cool ever so slightly and bag them immediately with parchment separators in a zip-lock bag, use as needed. These will stay fresh for 4 days but they have no preservatives so if you are not using them right away, store parchment separated shells in the freezer. Thaw in the refrigerator overnight to use. If they have hardened, heat very gently prior to use to make them more supple.
  5. You won’t regret this.

Notes:

  • I cooked my fajitas on a well-seasoned cast iron crêpe pan, you may use a non-stick pan or a large skillet.
  • Purée spinach or basil with some water and use it instead of just plain water.
  • Use tomato juice instead of plain water.
  • Flavour with herbs or spices for a change.
  • I updated the ingredients with imperial volume measures August 3.
GreekWrap2

The shells have excellent texture, unlike that sticky white-bread quality the store-bought kind have. The Greek-Style chicken with goats cheese and black olives were absolutely delicious and they did not fall apart or get too soggy even after having been made in the morning for a later lunch.

FajitaShellsCalories

Based on 7 Servings but I would make them smaller next time.

FajitaShellsWW

Based on 7 servings. Make 10 servings out of this recipe to have more manageable points.

Read Full Post »

CoconutCauliFriedRice
A Chicken Mole Enchilada is not a low calorie dish, it’s about balance so I decided that I wanted a lighter side, hence the Coconut Cauliflower “Fried Rice”. It’s really easy to prepare and goes well with Mexican and Thai dishes. The coconut flour absorbs moisture and helps the cauliflower “fry” instead of steam.

Coconut Cauliflower “Fried Rice”

A KitchenInspirations Original Recipe

Makes about 1 L or 8 cups coconut cauliflower “fried rice”

Ingredients:

  • 2 heads cauliflower, washed and chopped roughly
  • 1/2 cup coconut flour
  • salt and pepper to taste
  • 2 tbsp EVOO

Directions:

  1. Add cauliflower to the bowl of your food processor (blender or emersion blender will not work), plus a few times until cauliflower resembles rice. Add the coconut flour and pulse to combine.
  2. Season with salt and pepper.
  3. Heat the EVOO in a large Dutch oven, add the cauliflower rice in batches (we don’t want to steam it, just heat it and give it a rough fry, like fried rice). Continue until all of the “rice” has been fried. Keep warm until ready to serve.

Notes:

  • Coconut flour absorbs moisture so the coconut cauliflower rice actually retains a similar texture to rice.
  • Coconut flavour may not work with all dishes but it was absolutely wonderful with the Chicken Mole Enchiladas.
  • You may also add some spices to this dish, like cumin or coriander but the mole was flavourful enough, I did not want to confuse the palette.


CoconutCauliflowerRice NutFacts

Based on 15 servings.

CauliflowerCoconutRice

Read Full Post »


My Father in Law passed recently. He made his 92nd birthday two-weeks earlier. It was very sad to lose him but to be honest, the last few years have not been kind to him, he simply existed, partly by choice and partly by nature (use it or lose it). That’s all of our parents now and I must tell you that it feels weird being an orphan at my age, both JT and I were very close to each other’s parents. Since Dad lived in Toronto, we made arrangements close to home and our home was the hub, which proved to be a lovely distraction. Our dearest friends Paul and T drove up from Wisconsin to help us and console us. Paul had known JT’s Dad through business so there was a strong connection with him. My newly married nephew and his bride also stayed with us because they live about two and half hours from the city. The house was alive with action! My FIL would have LOVED it!

Everyone came to the city to be at his bedside—I know he would have loved that too, although he didn’t love attention, he loved the buzz of activity. He passed very peacefully during the early hours of the morning of May 28, he didn’t suffer long. That evening, everyone gathered at our home and we had a wonderful family dinner telling stories and being there for each other. We ate rotisserie chicken, a variety of store bought salads and some homemade cookies I had in the freezer (I didn’t have time to throw anything together). We had the visitation on June 2 and the service on the 3rd. At 12pm on the 2nd, I discovered that everyone was coming for dinner just prior to the service the very next day so I sprung into action and made a huge batch of chicken mole out of the leftover rotisserie chicken. Fortunately, I had tried this recipe before and got the thumbs up from JT, so it was an easy decision to make it again.

ChickenMole_2 We had a couple of leftovers that JT and I had for dinner later that week.

The mole sauce can be made in a slow cooker but I did it stove-top this time—I found it therapeutic to be involved in the dish, chopping, stirring and cooking. Like any saucy dish, this definitely tastes better the next day. The rotisserie chicken is an easy addition to the mole, just shred it and stir it into the cooled mole sauce, fill the corn tortillas, refrigerate overnight so the flavours can meld. It was a huge success! Everyone loved it.

JT usually orders a mole when we dine at a Mexican restaurant and I’ve always wanted to try my hand at it. Although there are many recipes handed down generations that take two to three days to make, this one can be made in about an hour. It developes the depth of flavour as it sits overnight. I would not rush it, make it a day or two ahead.

Bucket List

Chicken Mole Enchiladas

Makes 24 Enchiladas (15 cm or 6 inch corn tortillas)

For the original recipe, please click here.

Ingredients:

  • 750 mL (3 cups) sodium-free chicken stock (or vegetable stock)
  • 500 mL (2 cups) freshly squeezed orange juice (about 3 good sized oranges)
  • 30 mL (2 tbsp) EVOO
  • 570 g (1 1/4 lb) sweet onions, sliced
  • 55 g (about 1/2 cup) sliced almonds
  • 6 large garlic cloves, finely chopped
  • 8 g (4 tsp) cumin seeds
  • 8 g (4 tsp) coriander seeds
  • 4 g dried pasilla chiles, stemmed, seeded, torn into 1-inch pieces, rinsed*
  • 4 g dried ancho chiles, stemmed, seeded, torn into 1-inch pieces, rinsed*
  • 40 g (about 1/4 cup) raisins
  • 4 8 cm x 1 cm (1/2-inch) strips orange peel (orange part only)
  • 1.5 g (1 1/2 tsp) dried oregano
  • 45 g semi-sweet chocolate, chopped
  • 4 g ground cinnamon (omit if using Mexican chocolate)
  • Chopped fresh cilantro or green onions
  • 24 corn tortillas
  • 1 rotisserie chicken (or 3 left over), shredded (replace with firm tofu or beans if vegetarian)
  • 200 g (2 cups) Queso de Oaxaca or Mozzarella Cheese, grated
  • Crème fraîche, sour cream or yogurt as garnish
  • Sriracha sauce/or chipotle mayo as garnish

Directions:

  1. Heat the EVOO (Extra Virgin Olive Oil) a large Dutch oven, add the sliced onions and sweat them out.
  2. Add the almonds and toast slightly. Add the garlic and cook until they release aroma, then add the cumin, coriander, two types of chilies (*replace with 15 mL (1 tbsp) smoked paprika if you prefer less spicy food) and cook until you can smell the spices.
  3. Add the raisins, orange peel, oregano, chicken stock and orange juice. Mix well. Simmer for 30-40 minutes, stirring occasionally. If using the dry chilis, remove them and discard.
  4. Add the chocolate and cinnamon (or Mexican chocolate) and stir until chocolate has completely melted. Using an emersion blender, blitz the sauce until very smooth. Cool completely. Set aside 2 cups of sauce. Stir in the cold shredded rotisserie chicken.
  5. Fill each corn tortilla with some chicken mole and a little cheese, tuck the rolls into an oven proof pan with the rolled end secured. Repeat until there is no more mole. Pour reserved sauce over the enchiladas, sprinkle with grated cheese. Cover with foil and refrigerate overnight.
  6. 1 hour prior to sitting down to eat, preheat oven to 350° F (177° C). Bake enchiladas for 30-40 minutes or until totally heated through (inside temperature should be around 150° F (66° C) and cheese should be melted and bubbling.
  7. To serve, drizzle with Crème fraîche, sour cream or yogurt and Sriracha sauce or chipotle mayo. Sprinkle with chopped cilantro and/or green onions. Serve over Coconut Cauliflower Rice (recipe to come).
ChickenMole_3 We had these at the cottage a week or so ago. I added a little guacamole for fun. I don’t have many food style tools at the cottage so the garnish is quite rough.

Notes:

  • The enchiladas freeze well. You may wish to slip a piece of parchment between each enchiladas so you can easily separate them.
  • *If you are concerned about the dish being too spicy, omit the dried chilis and replace them with 15 mL (1 tbsp) smoked paprika.

Read Full Post »

TurkeyChiliFirst

JapaneseCherryBlossoms

The Japanese Sakura Cherry Blossoms in High Park

CherryBlossomTree

Our Cherry Blossom tree in the front yard

Cinco de Mayo Inspired Turkey Chili

A Kitcheninspirations Original Recipe

Serves 8-10

Ingredients:

  • 1 cup dried red kidney beans, soaked overnight in water
  • 250 g sweet onions, chopped
  • 25 g garlic, finely chopped
  • 300 mL tomato sauce
  • 2 tbsp tomato paste
  • 500 mL water and or chicken stock
  • 900 g ground turkey breast
  • 1 1/2 tbsp cumin
  • 1 tbsp coriander
  • 1/2 tsp smoked paprika
  • 1/2 tsp chili
  • 1/2 tsp sea salt
  • 5 g dried ancho chili (seeds and veins removed)
  • 1 tbsp unsweetened cocoa
  • 30 mL tequila (a nice smokey one)

Garnish:

  • 1 ripe avocado, sliced thinly
  • 10 tbsp Greek Yogurt (approx 150 mL)
  • 10 tbsp mozzarella cheese
  • handful of Cilantro, or to taste
  • 3-4 Green onions, finely chopped
  • 1 red chili pepper, finely sliced

Directions:

  1. Pre-heat slow cooker on high. Rinse beans and add to the slow cooker along with the onions, garlic, tomato sauce, tomato paste and the water and/or stock and give it a good stir.
  2. Brown the turkey meat in a very hot cast iron pan in batches. Add the browned turkey and juices into the slow cooker in batches. Once you have browned all of the turkey, remove the pan from the heat and deglaze the pan with the tequila, scraping off all the delicious turkey bits from the pan. Add this liquid into the slow cooker.
  3. Give the chili a good stir. Cook on high for 4-5 hours or until the beans are fork tender. If the chili is too liquidy, then remove the lid for the final hour of cooking.
  4. Serve hot garnished with sliced avocado, a tablespoon of yogurt or sour cream, cilantro, chopped green onion, shredded mozzarella cheese and finely sliced peppers.
Based ib 10 Servings

Based on 10 Servings

It's heavy on the points but high on flavour.

It’s heavy on the points but high on flavour.

TurkeyChili

A delicious Mexican Flavoured Chili

Ladies Night May 2015

Ladies Night May 2015

LadiesNight2

I should have set up the tri-pod for an all in shot.


Read Full Post »

Spring has been slowly emerging, taking its dear sweet time, but today, it’s finally going to be 17°C (62.6°F). Even on Tuesday, the sun was shining and it was actually warm enough to sit outside in the sun with a cup of hot coffee. We’re cautiously hopeful for spring, although there is still some ice in our backyard believe it or not. Stubborn ice that just won’t give up. One of our radio stations has a repeating ad that goes something like this: “April, you have just one job: melt the GD ice so spring can finally show up.” Seriously, just one job! Can it be THAT hard? Yes, we are frustrated! But at least it’s starting…

I’m beginning to think about summer foods, lighter fare and this is a quick and delicious recipe I came up with for lunch about a month ago; I think it may have even been snowing at the time (a month ago). The bright, fresh flavours contrasted against the peppery arugula will make a sensational meal on a super hot, humid day (soon, please be soon). Definitely making this lovely dish for the cottage, it’ll be perfect for eating on the dock, wearing shorts and a light T!

CevicheWW_2269

A delightful combination of shrimps and scallops cooked in lime juice

Shrimp and Scallop Ceviche

Makes 1 small serving (to make a meal of it, increase the weight of shrimp and scallop to 100 g in total).

Ingredients:

  • 30 g shrimp*, cubed rather small
  • 20 g scallop*, cubed rather small (similar size to shrimp)
  • 1 tbsp lime juice
  • 1/4 tsp non-calorie sweetener of your choice
  • 1 tbsp cilantro, minced
  • 1 green onion, minced
  • 1 stalk celery, cubed
  • 5 cm (2 inches) English cucumber, cubed
  • 1/4 apple (or Jicama)
  • 5 cm (2 inches) English cucumber, cubed
  • 100 g Arugula

Directions:

  1. Combine the lime juice and the non-calorie sweetener of your choice and mix well.
  2. Make sure you cube your seafood into equal sized cubes so that they ‘cook’ at the same rate. Combine the cubed shrimp, scallop, cilantro and green onion with lime dressing and toss well. Set aside in the refrigerator for 30 minutes to one hour.
  3. When the seafood has become opaque, add the celery, cucumber and apple and toss well. Serve over arugula or lettuce of choice
CevicheWW_2270

The apple adds the sweetness that the jicama would have.

*’cooking’ seafood in citrus does not kill off any parasites, so you should be very careful with the choice of seafood — it should be fresh, or boil in water until done and prepare the salad just prior to serving.

Ceviche Nut

Based on 1 small serving

CevicheWW

Based on 1 small serving.

Read Full Post »

I found this clever idea in the latest LCBO magazine. My vases were a little smaller than the idea in the magazine so some of my tulips had to stick out at the top.

I found this clever idea in the latest LCBO magazine. My vases were a little smaller than the idea in the magazine so some of my tulips had to stick out at the top.

Recently, we hosted a dinner party for guests who were doing Weight Watchers and because I don’t like to sabotage anyone’s journey to a healthy weight I decided to make the entire meal WW friendly and that meant putting my thinking cap on.  Now I don’t know about you, but I adore guacamole, it’s so creamy, fresh and tangy and it really enhances a few dishes as a condiment but may also be used as a wonderful dip with fresh vegetables!

Now I know what many of you will say, “but wait, avocados are a good fat” and while that is very true, it’s all about balance and budget so if you can save a little here you can spend it there (perhaps on an extra glass of vino?), is all I’m saying!

Before I even searched on line, I had the idea of creating a mockamole from spinach. Why spinach? I chose spinach because #1 it’s a gorgeous green and you can purée it smooth uncooked and #2 it fits well into the WW point system.  Once I determined what my basic ingredients would be, I started to search “mockamole” on the net and found that the majority of them are made with green peas. Now green peas are quite healthy but when I did the nutritional calculation using peas, my 1 tablespoon mockamole resulted in 1 WW point whereas my spinach mockamole resulted in 0 points for 1 tablespoon. So that was it.

Guacamole is a simple yet flavourful combination of ingredients and other than subbing out the avocado, I kept it pretty true to form. I used 4 tablespoons of cooked puréed navy beans as my ‘creamy’ ingredient and it worked out great. I loved the bright green colour as well as the bright flavours in this recipe. JT said it was an excellent substitute for real guacamole! It’s quite garlic-y so if it’s date night, you may wish to tone it down a notch or make sure your partner has some too ;-)!

Mockamole_2308

May I interest you in a little dip?

Mockamole (Spinach ‘guacamole’)

Makes about 3/4 cup.

Ingredients:

  • 100 g fresh spinach (may be frozen)
  • 4 tbsp navy bean paste (see notes)
  • 1 clove garlic, finely minced
  • 1 tbsp (15 mL) lime juice
  • 1 tbsp cilantro, chopped
  • 1 tbsp green onion, finely chopped
  • Cilantro or parsley for garnish
  • Chopped tomatoes (optional)

Directions:

  1. If using frozen spinach, wring out well. If using fresh spinach, wash and dry well.
  2. Combine the spinach, navy bean paste, garlic, lime juice and cilantro in a small food processor and process until very smooth (I found my immersion blender did this beautifully). Fold in chopped tomatoes if you are adding them.
  3. Add chopped green onion and garnish with a sprig of cilantro. Serve with cucumber slices, celery sticks or cauliflower florets or use in a meal that requires guacamole as a condiment.
Mockamole_2310

Choose vegetables that hold onto the dip like a spoon!

Mockamole_2303

The cooked puréed beans give this dip its creamy texture.

Mockamole_2306

Who are you calling “dip”?

Per 1 tbsp serving

1 tbsp serving

Per 1 tbsp per serving.

1 tbsp serving.

Notes:

  • Navy bean purée: I usually make up a batch of plain navy beans for thickening soups, sauces and gravies and then freeze for later use. Cook navy beans in water without salt. Purée and press through a fine sieve. Allow to cool completely and put 1 tbsp portions into an ice cube tray (specifically for savoury things) and freeze. Once frozen, take each cube and put it into a larger ziplock bag and that way you have a creamy gluten-free thickening agent for future recipes.
  • If you add too much liquid to the puréed spinach mix, strain for a couple of hours in a coffee filter reserved for savoury things before serving.
  • To blanch spinach quickly, add spinach to a heat proof bowl with about 1/2 cup water and nuke for about 2-4 minutes until soft. Rince with cold water and wring out well.

Read Full Post »

Remember back in March, we held our second progressive dinner on our street and it happened to fall right smack in Earth Hour? Our course was the appetizer and I chose to make Sopa Azteca or Tortilla Soup. The soup was a resounding success, full of flavour, colour and texture, but I did the unthinkable — I completely forgot to record my recipe which worked out to be a hybrid of Rick Bayless’s Sopa Azetca and a recipe that my good friend Barb of Profiteroles and Ponytails posted about some time ago!

Cinco de Mayo was just a few weeks ago and I thought it’s a perfect time to recreate this wonderful soup, before the weather starts getting too hot to enjoy soup. There is a bit of prep work, but once it’s all done, you pop it into a slow cooker and forget about it. I would even suggest you make it the day before you want to serve it because it’s just that much tastier the next day.

This soup is well worth the effort. This soup is well worth the effort.

Sopa Azteca (Tortilla Soup)

Serves 4, dinner portions

Ingredients:

  • 100 g onions, coarsely chopped
  • 3 large cloves of garlic, coarsely chopped
  • 2 small smoked dried haberno chili peppers, seeds removed (haberno is hot)
  • 1 large pasilla chili pepper, seeds removed (pasilla is much more mild)
  • 4 coriander stems with roots (rinsed well)
  • 2-3 epazote stems (I could only find dried, you could probably use a bay leaf instead, but remember to remove it or omit it entirely)
  • 800 mL strained tomato purée (I prefer low sodium)
  • 2 L low sodium chicken stock
  • 1 tsp unsweetened cocoa
  • 2 tsp cumin
  • 1 tsp chili powder
  • 1 tsp smoked paprika
  • 2 tsp coriandre
  • 1 tsp salt
  • 2 cups frozen corn (or fresh on the cob BBQ’d and kernals cut off)
  • 1 small whole wheat soft tortilla shell

BBQ’d Chicken or Turkey Breast (omit if you are using a previously roasted whole chicken)

  • 400 g skinless, boneless chicken or turkey breast or 1 previously roasted chicken
  • 1 dried haberno pepper, seeds removed
  • 1 tsp cumin
  • 1 tsp granulated garlic
  • 1 tsp coriander
  • 1 tsp smoked paprika
  • pinch of sugar
  • 1 tsp salt

Avocado Garnish (or use guacamole):

  • 1 small avocado
  • 1 clove garlic, finely chopped
  • juice of one lime
  • 1/4 cup roughly chopped cilantro leaves
  • 2 green onions, roughly chopped

Other Garnishes:

  • 4 tbsp low fat yogurt
  • 4 tbsp shredded Mexican melting cheese (like Chihuahua or mozzarella)
  • 1 lime cut into wedges

Directions for the Soup:

  1. Prepare your slow cooker by preheating it. Add the tomato sauce and chicken stock to the slow cooker; add the dried epazote and cilantro stems and roots.
  2. If you are using a previously roasted chicken, remove all the tiny bones and add it to the slow cooker, covering with the liquid.
  3. Add the seeded, dried chilli peppers (if you prefer less heat, put these peppers into a cheese cloth bag and tie off).
  4. Add the onions and garlic and cocoa, cumin, chili powder, smoked paprika and coriander into the tomato sauce and stir well. Add  1 cup of corn.
  5. Cook on a medium low setting for 3-5 hours.
  6. Remove the woody stems and roots of the cilantro and epazot and discard, blend with an immersion blender until smooth. Strain through a fine sieve to remove all the corn husks return to the slow cooker and add the other cup of corn. Keep warm until you wish to serve.

Directions for the Chicken or Turkey (omit if you are using a previously roasted chicken):

  1. Combine everything for the rub but the chicken or turkey in a dedicated coffee grinder for spices and grind until it’s a fine powder.
  2. Remove any bits of fat or skin from the chicken or turkey and completely coat with the dry rub. Refrigerate while soup is cooking.
  3. BBQ (with or without smoke) until the internal temperature is 74°C or 165°F. Set aside for 10 minutes and then using a fork, tear bite size pieces off. If you’re not going to use it right away, refrigerate and reheat when ready to use.

Directions for the Avocado Garnish:

  1. Peel and chop the avocado into half centimetre cubes (1/4″).
  2. Combine with the garlic, lime juice, cilantro and green onions and stir well.
  3. Refrigerate until serving.

Tortilla Cones:

  1. Preheat the oven to 175° C or 350°F.
  2. Lightly brush the tortilla shell with olive oil to prevent it from drying out.
  3. Using a pizza cutter and a kitchen ruler, cut the tortilla shell into 5-7mm strips (1/4″).
  4. Join 3 strips together end to end using a bit of water and pressing the strips firmly together.
  5. Carefully wrap each strip, oiled side in, on the cannoli cones. I found that pressing some tin foil on the tips prevented them from unraveling.
  6. Bake for about 10 minutes turning once. You are aiming to dry out the tortilla into a crisp, cracker cone.
  7. When finished, allow to cool for a minute and gently pry the cone from the cannoli mold. Reserve for presentation.
Tortilla1_4657 The strips are being attached to each other.
Tortilla Cone_4658 I won’t lie and say it’s easy, but with a little practice, it worked out very well.
OvenReadyCone_4659 The cones are ready for the oven
They released perfectly without casualties. They released perfectly without casualties.

Soup Assembly:

  1. Reheat the soup and chicken/turkey separately until piping hot. Ladle a generous amount of soup into each bowl, if using BBQd chicken or turkey breasts, shred into bite sized pieces and pile the chicken/turkey in the centre. If using the whole pre-roasted whole chicken, remove from bones and shred and pile into the centre of the bowl. Add a tablespoon of the avocado mixture and a tablespoon of yogurt. Sprinkle a tablespoon of the grated cheese over the hot soup and add the tortilla cone last to stand in the centre.Serve immediately with a wedge of lime.

Serving suggestions:

  • Serve with Jalopeño corn bread.
  • Instead of fussing with the tortilla cones, just toast the sliced tortilla strips until crisp and serve piled in the centre like a Tee-Pee.


Read Full Post »

A very popular Mexican restaurant opened a second location just north of our hood in The Junction, Playa Cabana Cantina. We were elated because the original location is always so busy they regularly have one hour line ups outside, rain or shine. About a month ago a friend made reservations and they still had to wait an hour for their table! I don’t do lines (queues), period. If I can’t get a reservation and timely seating, I just can’t be bothered to go, no matter how delicious the food claims to be. There are too many really good restaurants in Toronto to waste time standing in line!

Cabana Cantina Junction_4254

The eclectic retro décor really suits the place.

When Playa Cabana Cantina opened in The Junction we were very happy to have a good Mexican restaurant so close to home. We’ve eaten there twice for lunch/brunch both times and I am very happy to report an excellent review BOTH times! We’ve tried going back for dinner but that’s another story.

Our first lunch we each ordered our own meal, and we knew that future visits would entail sharing, the portions are HUGE. JT had a Burrito with Guajillo-chipotle marinated free range chicken grilled over coals with fresh mango salsa which was wrapped with melted Oaxacan cheese, rice, and beans, they topped it with fresh guacamole, pico de gallo, crema, and it sat in two very colourful sauces: green tomatillo sauce and red tomato sauce $13. JT couldn’t say enough good things about it; I had a taste and it was a flavour explosion in my mouth. The red tomato sauce was delicious, the tomatillo was a bit tasteless, but I’ve not had tomatillo sauce before so maybe it is supposed to be mild. Again, there is enough food on the platter to share between two people and I guarantee you will not leave hungry. I ordered a smaller order of three Tacos de Chori-Queso; the tacos were homemade corn and water tacos filled with homemade Mexican Chorizo wrapped with Oaxacan cheese $14. Although my selection was delicious, it was a bad choice for me because the tacos were actually deep fried and the Chorizo was a bit greasy; not withstanding, it was still quite delicious, but I prefer healthier options, particularly when I’m not sharing.

On our second visit we smartened up and shared one of our favourite brunchy plates: Heuvos Rancheros and we were not disappointed. Made with three eggs, Spanish and Mexican Chorizo, rice with corn, black beans, flour tortilla, guacamole, sour cream and queso. The eggs could have been a bit more cooked (the whites were pretty runny) but the yolks were perfect. We divided the plate one third-two thirds (the larger one for JT) and it was perfect. The Chorizo was plentiful and very flavourful and it wasn’t greasy like my first taco experience; it also spiced up the plate with a bit of heat perfectly.

Service was good and both times the food came quickly, but the second time we had to ask for water fill ups. The noise level during Brunch is relatively quiet but another table (bit older than we are) asked them to reduce the volume for the music (we chose a table as far from the hanging speakers as possible). I suspect that it’s likely much more animated during the dinner hours.

Cabana Cantina Junction Huevos Rancheros_4230

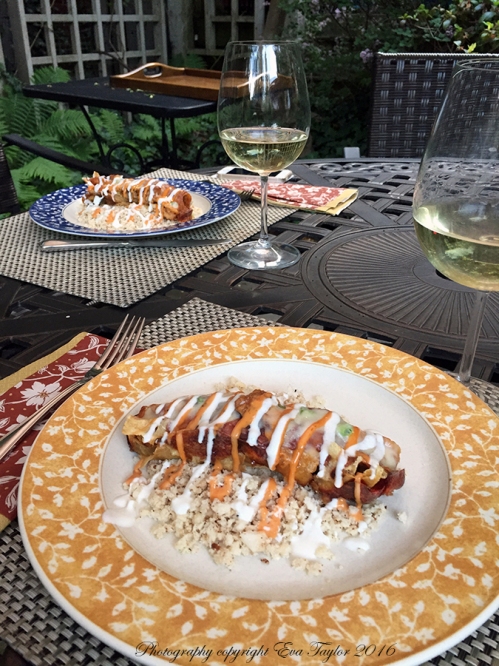
Three eggs, chunks of chorizo, a flour tortilla, black beans, guacamole, sour cream, rice and corn.

Cabana Cantina Junction Huevos Rancheros_4254

We shared the Huevos Rancheros the second visit and boy were we glad we did, it was enough food for both of us.

One Thursday night, we decided to try Playa Cabana Cantina in our neighbourhood, but we knew we were playing with fire, so we called first. The gentleman said they were fully booked with reservations but there is ALWAYS seating at the bar; don’t worry, I’ll find you a seat, he said. We do bars! In fact, I love sitting at the bar because you can often get to know the bar tender and it’s always a pleasant conversation. Sadly this was not to happen that Thursday night. About 15 minutes after we called we arrived at the restaurant and guess what? No room, not one seat, not even at the bar. Needless to say we were rather annoyed and likely won’t be going back for a while (they shouldn’t have made promises they knew they couldn’t keep), not that they will miss our business because they seem to be booked every night even without us! Too bad, I liked their food.

Playa Cabana Cantina
2883 Dundas St. W, Toronto, ON
647-352-7767

Monday Closed
Tuesday 5pm – 12am
Wednesday 5pm – 12am
Thursday 5pm – 2am
Friday 5pm – 2am
Saturday 5pm – 2am
Sunday 5pm – 12am

Overall rating of The Junction Playa Cabana Cantina (in my opinion): Decor 4/5, service 3.5/5, food 4/5, Value 4/5, Noise: 4/5 (1 being very noisy, and 5 being very quiet).

Disclaimer: We purchased our meals for full price and my opinions just that, my opinions.

Read Full Post »

We adore Mexican food, not the fast food kind, but a genuine ma and pa Mexican restaurant. Sadly we have few and far between in Toronto but there are a couple of good ones. The one I love for lunch is Cucina Lucerno down by Maple Leaf Gardens and why I love it for lunch is that they make a TO DIE FOR Sopa Azteca. Full bodied, flavourful and filling, the three F’s! When I saw the link to slow cooker chicken tortilla soup on Barb’s blog (Profiteroles and Ponytails) in her weeknight survival techniques post, I was immediately drawn to it. The sound of the ingredient combo, just made me think of Sopa Azteca (cue mouth watering), which according to Rick Bayless is one and the same! Go figure!

As Yorkesgirl recommends, I BBQ’d a couple of chicken breasts with a flavourful dry rub*, and then I shredded them and ‘finished’ them off in the slow cooker for about 20 minutes. The soup is divine and is so darn easy. You can even drop the chicken breasts directly into the slow cooker and just let it cook for hours and hours, the chicken is best shredded so over cooking is not a problem!

A very tasty soup, if I do say so myself

Sopa de Tortilla

Serves 6-8

Ingredients:

  • 2 small chicken breast, BBQ’d* with dry rub (see notes below)
  • 1 can whole peeled tomatoes, crushed, low sodium
  • 300g enchilada sauce (I wouldn’t bother putting this in next time).
  • 1 onion, chopped
  • 2 cloves garlic, minced finely
  • 1 fresh green jalopeño, minced finely
  • 4 cups water
  • 2 tsp cumin
  • 2 tsp chili powder
  • 2 tsp smoked paprika
  • 1 tsp unsweetened cocoa
  • 1 bay leaf
  • 1 tbsp chopped cilantro leaves
  • 1 cup frozen corn kernels
  • 1 tsp lime juice

Directions:

  1. Place everything but the chicken into the slow cooker on high, stir. Cook for 2-3 hours and then add the frozen corn and cook five minutes and then add the shredded BBQ’d chicken* and cook for 20 minutes until thoroughly heated through.
    Or, sauté onions and garlic in a soup pot, add the jalopeño, spices, cocoa and cilantro and stir until you smell the spices. Add the canned tomatoes, enchilada, water and simmer for 20-40 minutes (longer you simmer the better the flavours).
  2. Serve with a dollop of low fat Greek yogurt, a sprinkling of cheese of your choice (I had cheddar), some green onions and of course some oven dried tortilla strips. Enjoy.

*BBQ Chicken Rub

Ingredients:

  • 1 tsp cumin
  • 1 tsp chili powder
  • 1 tsp unsweetened chocolate
  • 2 tbsp brown sugar
  • 1 tsp salt
  • 1 tsp granulated garlic (not garlic salt)
  • 1 tsp ground dehydrated onion flakes

Directions:

  1. Mix the spices together in a small bowl.
  2. Remove skin from the chicken breasts and cover with the dry rub. Grill or pan fry finishing in the oven on medium heat until chicken juices run clear (around 165° F).
  3. Tent and allow to cool for 10 minutes. Using a couple of forks, shred the chicken into bite-sized bits.

I’ve had this soup a couple of times now and still have a serving in the freezer which I’m saving for a particularly ugly day when I need some soup to cheer me up.

Read Full Post »

20121007-101639.jpg

We’re celebrating Canadian Thanksgiving at my brother’s place on the Muskoka’s and it’s pretty chilly. Although on the way up the trees seemed to be at their height of Autumn colours, the trees along Lake Rosseau aren’t quite there yet.

I set up a couple of posts before our holidays knowing that I would be busy when I returned; I’m still trying to organize all my photos from the trip, but that is a full time job. It’s great to have the camera (iPhone) at your disposal all the time, but it does make it too very easy to take too many photos. I have more than 300 and JT has over 150 photos (he didn’t bother taking too many because my phone takes better pictures!). I am hoping to have the Paris part of our trip next week sometime, in the meantime, I hope you enjoy this post…continuing on the tapas theme.

We had a tapas dinner party for some friends the weekend before we left and I made Spelt Fajita Shells; I made them myself instead of buying them at the store because I wanted smaller shells, so that we wouldn’t fill up on one tapa. They worked out great, and I’ll be making them again.

Can you guess what this is?

How about this?

We had a garlic shrimp skillet to stuff these little babies with. It was quite successful as the shrimp vanished in no time!

I made mini fajita shells so that we could eat more of them!

Spelt Fajita Shells

Original recipe can be found here.

Ingredients:

  • 3/4 cup spelt berries, ground in a mill or 1 cup spelt flour
  • 1/2 teaspoon salt
  • 3/4 teaspoon baking powder
  • 1/2 tablespoon oil
  • 1/2 cup hot water

Directions:

  1. Combine all the ingredients (I used my food processor, but don’t over process) and mix into a ball of dough. It should have a little elasticity but not too much.
  2. Cover and let sit in a warm place for 20 minutes.
  3. Divide the dough into 16-20 equal parts and let sit, covered, another 20 minutes (these will make a tortilla about 10cm or 4inches in diametre).
  4. Take each ball and place closer to the hinge of the tortilla press (not centre) and press down. To get it even thinner and bigger, pulse the press a few time so that the dough reaches to the edges of the press. Repeat until all of the dough balls have been pressed. Keep covered with a damp cloth so they don’t dry out.
  5. Preheat a skillet on medium high heat. Spray with non-stick cooking spray.
  6. Cook each side of the tortilla until golden (or slightly brown, like mine)
  7. Cook all of the tortillas, watching carefully. The instructions said to place the tortillas in a plastic bag, with wet paper towels in between them to keep them soft and moist but if you forget, you can steam the tortillas just before serving and they will become soft and moist and fresh again.
  8. Freeze leftovers and reheat by steaming.

Yes, that is a glazed ceramic flower pot bottom, you caught me ;-)!

Sizzling garlic shrimp with cilantro and lemon

Read Full Post »

Our final day in the Big Apple. After our delightful walk along the Hudson River, we ended up deep in the Financial District of New York City. JT wanted to take me to lunch in the oldest part of the city. We decided on Mad Dog and Beans, a Mexican Cantina. It got mediocre reviews on Yelp, but we really wanted to eat outside and we figured we’d order something simple so they wouldn’t screw it up.

The restaurant logo

We both ordered the Black Eyed Tuna Salad which was pan seared black eye tuna with sesame seeds, romaine lettuce, diced avocado, radish, orange wedges and a jalapeno ginger dressing ($10). We were both quite pleasantly surprised. See, my theory is to lower your expectations and you will never be disappointed! It doesn’t always work. But the tuna was perfectly cooked, fresh the avocado was creamy and the orange was a wonderful foil for the flavour combinations. The only downfall would have been the dressing, which was tasteless (can’t even guess what it was!).

Seared Tuna with Avocado and Orange

The street patio

Looking at the opposite direction

My handsome honey

I really liked the area and will plan to come back on our next trip. But there was another restaurant Smorgas Chef that I would likely try next.

Overall rating of The Mad Dog and Beans (in my opinion): Decor ?/5 (we sat outside and didn’t even go in), service 4:5, food 3/5, Value 4/5, Noise: 4/5 (1 being very noisy, and 5 being very quiet). We paid for our meal in full.

And that concludes our 26th Anniversary trip to New York City. I hope you enjoyed it as much as I did. I’ll leave you with this last photo (an ad for a storage company, but I photoshop’d the ad out). This last photo is for Kristy (Eat, Play, Love), Sissi (With a Glass), Liz (That Skinny Chick can Bake) and Charlie (Hotly Spiced), my ‘shoe sisters’.

This is a real billboard we saw while on the High Line

Read Full Post »

The weather has been incredible and day one in the Big Apple was no different. When we landed it was a teeny tiny bit overcast and cool, but that’s great walking weather (and like Kelly’s family last week, we walked and walked and walked), so we were thrilled! Our amazing hotel, Eventi is located in Chelsea so JT selected a restaurant only about 12 blocks away. We always choose Mexican for our first lunch and NYC has a handful of exceptional restaurants and Crema will probably be our new flavourite! It has more contemporary décor with a touch of Mexican! It’s nice and cool inside even though the door is is wide open, it’s hot and humid outside and there is an open kitchen. We’re very glad because during our walk the sun came out blazing and I was really sweating (like the Eastern European that I am!).
We are seated and served immediately without reservations. The server described our food with detail and passion when he served us.
I had the Ceviche de ($14) which was
African Octopus marinated in orange citrus vinaigrette, avocado, cilantro and garnished with four flour tostadas with avocado mousse in a Mille Feuille presentation. It had black sea salt speckled on it (gotta get me some). Incredible! Beautifully presented and so incredibly tasty!

20120526-073132.jpg
JT had Flautas en Trilogia de Salsas ($12) it was crispy corn tortillas with shredded chicken, corn, caramelized onions and served with a trio of salsas: tomatillo-avocado, chili aioli paste, and a velvety pinto bean. Very tasty, and beautifully presented.

20120526-073243.jpg
We may even break our cardinal rule and come here again on this trip!

Overall rating of Crema (in my opinion): Decor 3/5, service 3.5:5, food 4.5/5, Value 4/5, Noise: 4/5 (1 being very noisy, and 5 being very quiet). We paid for our meal in full.

Read Full Post »

My friend Angela (Titanic dinner party) sent me this link. Her boys (the lovely stewards of the same party) said it reminded them of a play dough toy they once had. It is pretty gross so be warned if you’re squeamish! I’m not sure what disturbs me more, the video or the comments!

Yesterday was Cinco de Mayo a wonderful holiday sadly not celebrated to any degree in Canada, in fact, it’s only been a few years that I have even heard of it, believe it or not. Being one who loves to celebrate, I thought, why not this lovely holiday? And it could and should be celebrated with celebration food, of course. Still watching my carbs, sugars, fats and such, I had to come up with a recipe that would work in this regime I am following.

Celebrate with Ceviche

Serves 1 (or multiply by the number of people you wish to serve)

A little Ceviche never hurt anyone!

Ingredients:

  • 100 g Shrimp, deveined, cleaned, tails removed
  • 1 tbsp mint, chiffonad finely
  • 1 tbsp green onion, finely chopped
  • 2-3 tbsp cilantro, finely chopped
  • 1/3 cup celery, cubed
  • 1/4 cup apple, cubed
  • 1/4 cup cucumber, cubed
  • 1/4-1/2 cup lime juice
  • 1/4 cup Piri Piri Sauce (see recipe below)
  • 1 tbsp red pepper coulis (or you can use honey or agave, but I am limiting my sugars)
  • 1 tbsp toasted shredded coconut (unsweetened, desiccated), plus a pinch for garnish
  • Arugula greens

Directions:

  1. About 3-4 hours before serving, chop the shrimp up into relatively even bits (this is so that they ‘cook’ in the citric acid evenly).
  2. Combine the mint, green onion, cilantro and celery together and mix well. Add about 2 tbsp of this mixture to the shrimp. Toss.
  3. Combine the lime juice and Piri Piri Sauce and red pepper coulis and mix well. Pour over the shrimp mixture and coat evenly. Refrigerate for 3-4 hours or until shrimp is opaque. You may wish to stir this from time to time.
  4. When the shrimp is totally cooked, add the remaining mint, green onion, cilantro and celery combo. Toss in the apple, toasted coconut and stir well.
  5. Garnish with the pinch of toasted coconut and extra hot sauce. Enjoy!

Tangy, sweet, crunchy, soft; it’s everything I dreamed of.

Piri Piri Sauce

(Inspired by Kristy at Eat, Play Love Our Family Food Adventure)

  • 1-2 Serrano chiles
  • 4-5 cloves of garlic
  • 1 tbsp smoked paprika
  • 1/2 cup freshly squeezed lemon juice
  • 1 tbsp vinegar
  • 1/3 cup low sodium vegetable stock (I used vegetable stock as it is slightly sweeter than chicken stock, because I replaced the wine vinegar with white vinegar)
  • hand full of roughly chopped parsley
  • hand full of roughly chopped cilantro

Directions:

  1. Preheat the oven on high broil. Cut the chile peppers in half (don’t bother removing the seeds and stems, they come off easily after roasting). Place the chiles on a lightly sprayed (with fat free cooking spray) baking sheet and roast until blackened, Kristy says about 10 minutes (I didn’t time it).
  2. Trim the stems and remove the seeds (the seeds are the really hot bits)
  3. In your immersion blender container, combine the chiles, garlic, paprika, lemon juice, vinegar, vegetable stock, parsley and cilantro and purée the ingredients until smooth.
  4. Store in the refrigerator, you won’t regret making an extra large batch!

Read Full Post »

Yesterday was a busy day; to keep up with all the eating out JT and I decided to work out at our local gym each morning. That’s 30 minutes on the elliptical and 20 with free weights! I’m hoping it’s enough :).
We checked out two new grocery stores in Toronto: Maple Leaf Garden Loblaws and the Longo’s Maple Leaf Square. Yes, we are obsessed with hockey (OK, not me, really).
Maple Leaf Gardens was Toronto’s hockey arena where our beloved Maple Leafs played from 1931 to 1999. It then sat purposeless until 2004 when Loblaws purchased it. (American’s will know Loblaws by it’s Private Label Brand, President’s Choice). They were going to convert it to a Real Canadian Superstore but were met with heaps of criticism that the retailer will diminish the buildings historical value (see history). So it sat again for a number of years without much work within it other than some structural testing. In 2009 Loblaws announced that they were in discussion with Ryerson University regarding a future joint venture. Construction for the newly purposed building began in 2010 to be converted into a multi-purpose building: Ryerson University (fitness centre, studios, high-performance courts, and an NHL sized ice hockey rink seating 2,796 guests*), Loblaws, LCBO and Joe Fresh. We checked out the retail spaces.

To call this place a grocery store would be an enormous understatement — it’s absolutely incredible! From prepared gourmet selections to the on site bakery, butcher, fish monger, fresh market (with fruits and vegetables I have never heard of!) and the list goes on — it’s a feast for the eyes. We had no intention to buy anything, but somehow we came out with a $100 bill for things I just couldn’t pass up! It’s a beautifully merchandised store, with something to look at in every corner. Sadly this store is about a 20 minute drive through the city for us, so it’s not likely a place we will shop every day, but it certainly will be a destination from time to time!

The Wall of Cheese

Longo’s Maple Leaf Square was a bit of a let down after the “wall of cheese” but I suppose it was expected. None-the-less there were new products to admire (and I bought my very first Give-Away to be held in the new year!).

The elevator doors from the parking level at Longo's Maple Leaf Square. Yes, we are a little hockey nuts!

We ate lunch at Cochina Lucero a small family owned Mexican Restaurant about a 5 minute drive from Maple Leaf Gardens. The restaurant itself is very quaintly decorated in the Mexican style; brightly coloured tiles, thick wooden tables and chairs that weighed about 50lbs! 😉 It was not packed, but then again we arrived around 2:30. The service was friendly and quick; we received complimentary tortilla chips and a lovely spicy tomato salsa. I ordered Sopa Azteca which was $7.00. It was a generous portion made with pasilla chili, tomato and chicken soup topped with
tortilla strips, feta cheese, avocados & sour cream. It hit my taste buds perfectly; just the right spiciness, and enough chicken to make it a meal. It was likely the best Mexican soup I’ve ever had. JT had the El Burro Chicken Tortilla for $9; it was a 12 inch tortilla crammed with beans, rice, pico de gallo, cheese, guacamole & sour cream; he said he has had better. I had a bit of a taste and would agree, it could have had a bit more flavour to it! All in all it was a great experience, and I would recommend this little hole-in-the-wall place.

iPhone photo! Hey, get your grubby fingers out of that dip

Overall rating (in my opinion): Decor 4/5, service 4/5, food 4/5, Value 4/5, Noise: 5/5 (1 being very noisy, and 5 being very quiet). The restaurant was not packed, I would imagine it gets pretty loud at night. Great lunch place.

Disclaimer: We purchased our meal for full price and my opinions just that, my opinions.

*Historical data is from Wikipedia

Read Full Post »

Please excuse the roughness of this post, I’m typing it in on my lowly little iPhone 3Gs, sitting on the deck, at the cottage! Gotta LOVE technology!
It’s cottage closing weekend. This time of year is always so sad, marking the end of yet another summer. This year was not a good year for cottaging for me; counting this weekend, it’s only my second time up! I never like to be one of ‘those’ people who turn down city invitations because, ‘sorry, we’re going to the cottage!’ On the other hand, it was a very sociable summer!
I left work early so we could have cocktails at the cottage, HAH! The drive up was a joke! The ridiculous drive that usually takes three and a quarter hours took FIVE! FIVE EFFIN HOURS! Can you feel my frustration???? It was pouring rain the entire way up, which made it even worse. Did you ever notice that people are TOTAL IDIOTS on the road? Breathe, breathe, breathe! That martini sure tasted good!
The cottage is on a smallish spring-fed lake called Limerick Lake (spring-fed=bone chilling cold!). JTs grandfather bought the land in the early 1900’s; it took them 24 hours to come up: 1)Two trains, 2)Stage coach 3)row boat. The grandfather had a log cabin built on it. Back in those days Canadian Indians canoed across the lake. How cool is that? The grandfather then sold the cottage and the land in the early 1920’s and bought it back in the late 1940’s! JTs Dad and Dad’s sister shared it until the late 1960’s at which point, JTs Dad built his own Panabode cottage (http://www.panabodeloghomes.com) about a kilometer away as two families in an old log cabin was getting too cozy (the family owns about a hundred acres!). We had electricity put in about 20 years ago, prior to that we used a gas generator, a propane fridge and stove. It was pretty rustic. In the late-1960’s JTs dad built a boathouse with three slips and a two bedroom cabin above it that they used to use in the winter (no running water, chemical toilet, basic and ugly). 20 years ago, JTs dad had a road put in; before that we would keep a boat at the marina and boat in the 20 minute ride! It does sound romantic, but shlepping groceries and necessities from the car to the boat, then from the boat to the cottage was no fun!
About 15 years ago JT and I took over the boathouse; we put in a composting toilet, a small shower and a decent kitchen (it’s not legal to have septic over water). We call the boathouse The Upper Deck – I have some pics at this link if you’re interested. We tried renting it to friends a few years ago, and discovered we’re not renting types. We like our stuff just so. http://evaandjohntaylor.shutterfly.com/2383. Please don’t think it’s fancy, far from it! But I know for sure that we are fortunate to have access to it. JT and I own land across the bay from the family ‘compound’ and had thought about some day building our dream cottage on it, but the five and a half hour drive (and so many others like it) convinced us otherwise! Anyone interested in 33 gorgeous Canadian acres, 1300 feet of shoreline? No road access, yet!
Our lake is still remote; the closest store is about a 20 minute drive on a dirt road and it doesn’t really have things that I would want anyway (mostly canned goods!). You really have to plan your weekend, food, libations, etc. Once, I forgot cream cheese for our bagel and lox breakfast and the only thing we could get was sour cream and onion chip dip! It was ghastly!
JTs sister used to use the log cabin, but now that their 87 year old Dad no longer comes up, she’s taken over his cottage too. Her two adult kids use both the log cabin and the Panabode.
There are so many things that I like about our cozy little cabin, it’s hard to list them all; but my most favorite thing has to be that we are right on the water! And that it’s small enough to clean it from top to bottom in less than an hour.
Back to the matter at hand, Huevos rancheros: a recipe I developed after a similarly called dish at our local restaurant, Dr. Generosity (stupid name but good food).

heuvos rancheros

A delicious combination of flavours

Huevos Rancheros (updated September 2014)

Serves 2

Ingredients:

  • 1/2 cup cooked navy beans (I like navy beans because they are so creamy)
  • 1/2 cup ground meat (we used turkey because it’s lowest in fat)
  • 1/4 cup chopped sweet onion (we like Vidalia)
  • 1/4 cup sweet corn
  • 2 cloves garlic, finely minced
  • 1 tsp cumin
  • 1 tsp coriander
  • 1/2 tsp smoked paprika
  • Pinch of cayenne
  • 2 soft poached eggs
  • Sour cream (we used fat free yogurt)
  • Hot sauce
  • 2 small ancient grain fajita shells warmed
  • Chopped cilantro and green onions for garnish.
  • 1 avocado, sliced

Directions:

  1. In a splash of olive oil, fry the onions and garlic until translucent, add the ground meat and cook thoroughly.
  2. Add the spices and garlic and mix until evenly distributed.
  3. Add the beans and corn and mix well, heat the beans through.
  4. Serve 1/2 the bean meat mix on one warmed fajita shell, with a poach egg on top. Garnish with chopped cilantro, sliced avocado and green onions.
  5. Serve with a dollop of sour cream and hot sauce.

Read Full Post »

My best friend and her hubby were to come down to the big smoke for our holiday brunch today, but sadly the weather in god’s country prevented this from happening. So JT and I enjoyed an elaborate Mexican brunch all to ourselves.

The menu:

  • Whole wheat pesto pin wheels (gluten light)
  • Southwestern corn chowder
  • Heuvos Rancheros
  • Lemon squares with vanilla ice cream and strawberry coulis

Southwestern Corn Chowder (an adaptation of Michael Smith’s Southwestern Corn Soup)

Southwestern Corn Chowder

Serves 4; 3/4 cup portions

  • 2 tablespoons of corn, vegetable or olive oil
  • 2 small onions, thinly sliced (I omitted onions as Michael doesn’t like them!)
  • 2 cloves of garlic, minced
  • 2 1/2 cups frozen corn
  • 1 tablespoon of cumin powder
  • 1/2 tsp smoked paprika
  • 2 cups of chicken broth, homemade or canned (I used sodium reduced)
  • 1 ancho pepper (I only had dried)
  • Juice of 1/2 lime
  • 1/2 cup of chopped cilantro
  • 2 tbsp pancetta, crispy fried
  • 4 tbsp crème fraiche
  • 2 tbsp cilantro oil
  1. Heat oil and sauté onions until soft. Add garlic and sauté just until you can smell it. Add cumin and smoked paprika and stir until combined. Add ancho pepper.
  2. Add 2 cups of corn and stock. Cook until corn is very soft. Add cilantro.
  3. With an immersion blender, blend until corn is creamed well. Press through a fine seive to get all the corn skin. Add lime juice and stir well.
  4. Garnish with 1 tbsp crème fraiche, pancetta and cilantro oil. Serve warm.
  5. Enjoy!

Read Full Post »