Feeds:
Posts
Comments

Archive for the ‘Progressive Dinners’ Category

We were scheduled for a Progressive Dinner when we returned from Arizona. Our neighbours John and Nancy were the main-course hosts so they chose the theme: the Kentucky Derby. This group is a hoot and everyone chose something fun to wear that was indicative of the Derby. JT and Tom wore bow ties (JT made his bow-tie from a standard tie using this video, don’t you just love Google?!). Iona and I wore crazy hats and Nancy dressed up as a jockey, she is around 5 feet tall and really looked the part. Neighbour John dressed as a stable-hand, all in denim! It was a super fun night that ended somewhere around 2am!

People at the Derby seem to wear brightly coloured clothes and the guys always seem to sport bow ties.

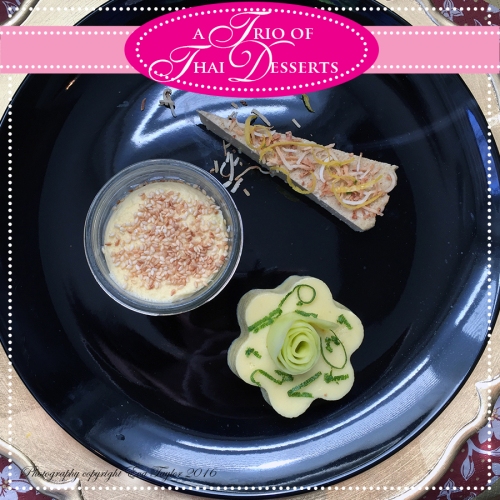
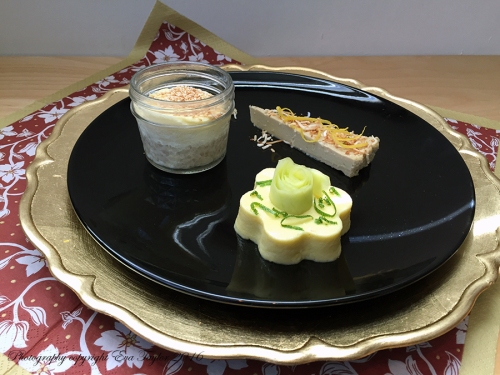
I was responsible for dessert and I went a little crazy and did Mint Julep three ways: Panna Cotta, Macarons and Trifle! You may notice a sablé horse on the plate too but I didn’t like the recipe so it will be ignored. The desserts went over well, the bourbon was noticeable but not overwhelming, as was the mint. I doubt I’ll make these flavours again but it was fun for the night. And yes, we were served Mint Julep’s at Tom and Iona’s as part of our starters.


My crazy hat!

Kentucky Derby, Mint Julep Three Ways

  • Panna Cotta
  • Macarons
  • Trifle

Mint Julep Panna Cotta with White Chocolate Almond Crumb

To print the Mint Julep Panna Cotta, please click here.

Serves 6

Ingredients:

  • 8 g Powdered unflavored gelatin
  • 50 mL Cold water
  • 700 mL Whole milk
  • 75 g Sugar
  • 2 g Tonka bean, finely grated
  • 1 cinnamon stick
  • 1 g small bunch Fresh mint leaves, including stems
  • 1/4 tsp Real Mint extract
  • 65 mL Kentucky Bourbon (to taste and optional)
  • 1-2 tablespoon finely chopped mint leaves

Directions:

  1. Dissolve gelatin in the cold water. Set aside. Lightly rub vessels with a non-flavoured oil, set aside.
  2. Warm milk with sugar, grated tonka bean and cinnamon to 150° F (DO NOT BOIL), add mint leaves and allow to steep for 10 minutes Stir in gelatin until dissolved.
  3. Strain milk mixture through a fine sieve and discard mint. Into the strained mixture, stir in the mint extract and Kentucky Bourbon a little at a time, tasting each time until the desired flavour is achieved. Cool slightly.
  4. Pour into prepared vessels and chill for 2-4 hours or until set.

White Chocolate Almond Crumb

Ingredients:

  1. 50 g white chocolate chips
  2. 5 mL Bourbon
  3. 25 g ground almonds
  4. 15 g coconut flour

Directions:

  1. Melt the chocolate with the bourbon on low heat, stir in the ground almonds and coconut flour, it will be rather thick.
  2. Sprinkle/spread relatively thinly on a Silpat and bake for 3 minutes in a preheated 350° F oven, until golden.
  3. Cool completely and crumble with a fork until relatively fine. Reserve for assembly.

Please click here to print this recipe.

Serves 6

The Blueberries

Ingredients:

  • 300 g Blueberries
  • 125 mL Bourbon

Directions:

  1. Combine the blueberries and bourbon and allow to sit at room temperature for at least 30 minutes or one day.
  2. Strain, reserving the blueberry bourbon. Set aside until assembly.

The Sponge

Ingredients:

  • 4 large eggs
  • 120 g sugar
  • 120 g all purpose flour
  • 1 tsp vanilla
  • 2 tbsp granulated sugar

Directions:

  1. Pre-heat oven to 350° F. Line a 23 cm x 33 cm (9″ x 13″) cake pan or jelly roll pan with parchment paper, carefully folding the corners. Spray with non-stick cooking spray.
  2. Separate the eggs into two medium bowls. Beat the egg whites until stiff peaks form, but not dry. Set aside.
  3. Beat the egg yolks with the sugar until pale and creamy and falls in a thick ribbon.
  4. Fold in 1/3 of the egg whites into the pale egg yolk mixture.
  5. Sift about 1/3 of the flour into the egg yolk mixture, then alternate folding in with the egg whites being careful not to deflate the batter.
  6. Once all of the egg whites and flour have been folded in, the mixture will be thick. Pour carefully into your prepared baking pan and spread out evenly. Bake for 20-25 minutes or until your cake tester comes out clean.
  7. Lift the cake out of the pan using the parchment edges and allow to cool completely.
  8. Measure your Mason jar diameter and select a round cookie cutter of similar size. Cut 12 rounds for the trifle and set aside.

Stabilized Mint Julep Whipping Cream

Ingredients:

  • 3 g unflavoured gelatin
  • 15 mL Cold water
  • 15 mL Bourbon
  • 1 mL mint extract
  • 125 mL whipping cream,
  • 8 g icing sugar
  • 2 g freshly chopped mint, as garnish

Directions:

  1. Dissolve the gelatin in the cold water, mix in the bourbon and mint extract, set aside.
  2. Whip the cream with the icing sugar. Add a bit of the whipped cream to the gelatin mixture and whisk well to combine. Strain this mixture if it’s lumpy. As you are whipping the cream, add the gelatin mixture and whip until well-combined.
  1. Layer one sponge round into the bottom of each mason jar, sprinkle about 5 mL to 10 mL of the reserved blueberry bourbon onto each sponge in the mason jar. Add about 15 blueberries on top of the sponge in each jar. Using a pipping bag, trop the blueberry layer with the stabilized whipped cream. Sprinkle lightly with the chopped mint garnish.
  2. Layer the second sponge on top of the whipped cream, sprinkle about 5 mL to 10 mL of the remainder of the reserved blueberry bourbon onto each sponge in the mason jar. Top with the whipped cream and finish with about 12-15 blueberries in each jar. Sprinkle with the remaining mint garnish. Tightly close lid and refrigerate until serving.

Mint Julep Macarons

Makes about 10 macarons (four ;-)for the cook!).

To print this recipe, please click here.

Ingredients:

  • 35 g blanched, finely ground almond meal or flour
  • 58 g icing sugar
  • 1 large egg white, room temperature
  • 25 g granulated sugar
  • A pinch of gel food colouring (I used green)

Directions:

  1. Pre-heat the oven to 350° F. Line your baking sheet with parchment with circle-round templates beneath it (this is a more detailed account of this recipe).
  2. Combine the almond meal with the icing sugar and sift a few times, discard or reserve the larger bits for something else.
  3. In the small bowl of your stand mixer, whisk the granulated sugar and egg white together by hand and then beat on #4 for 2 minutes, #6 for 2 minutes.
  4. Add the pinch of food colouring now and beat for a final two minutes on #8.
  5. Pipe onto the prepared parchment onto the circle-rounds. Tap the baking sheet on the counter to remove any air bubbles and bake for 13 minutes or until feet have developed but the cookie does NOT brown. Cool on parchment and remove carefully. Fill with Mint Julep Buttercream (recipe below).
  6. Unfilled cookies may be kept in the freezer for up to one month in an air-tight container.

Mint Julep Buttercream

Ingredients:

  • 57 g butter (softened)
  • 200 g icing sugar
  • 2.5 mL mint extract
  • 25 mL bourbon
  • 2.5 mL brandy
  • Gel food colouring of choice

Directions:

  1. Combine softened butter with the icing sugar, mint extract, bourbon and brandy and beat until extremely light and fluffy.
  2. I wanted this buttercream to resemble the colour of bourbon so I coloured it with a little brown, red and yellow gel colouring.
  3. Fill a piping bag with the buttercream and fill each half cookie carefully. Top with the second half of the cookie. Store on its side in an air-tight container in the fridge. Cookies remain fresh for up to one week. Allow to come to room temperature before serving, but make sure the room isn’t too warm otherwise the buttercream will melt.

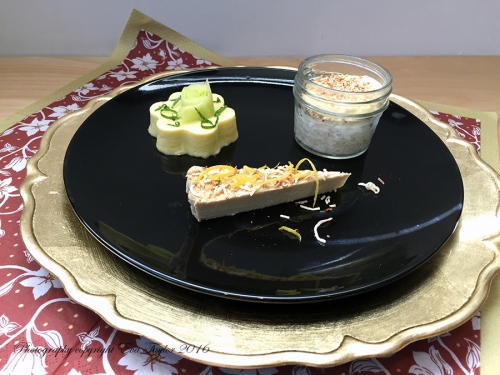
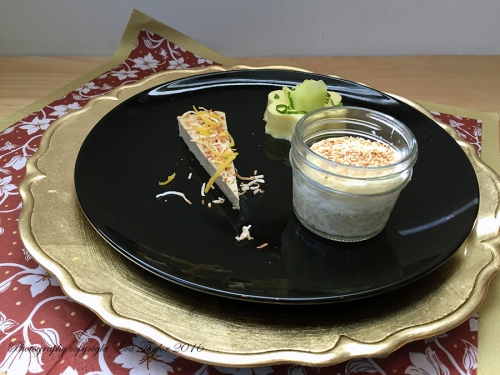
Mint Julep Four Ways Plating

  1. Sprinkle the white chocolate crumb on one side of the plate. Top with the mint julep pannacotta and garnish with small mint leaves.
  2. Add the macaron on its side and finish with the uncovered trifle. Serve with a shot of bourbon, or pass like we did (I just thought it looked nice for the photo).

The horse cookie was a sablée that did not work out as well as I had hoped. Recipe will not be forthcoming. Yes, I bought a horse cookie cutter!

Read Full Post »

I wish you all the Merriest Christmas and the Happiest New Year! Thank you for your continued support, you have all made this blogging experience so much richer than I ever could have imagined, thank you.

Our neighbourhood progressive dinner party was scheduled for the Saturday after we returned home from Arizona; I didn’t think it would be a problem since we were responsible for hors d’œuvres and appetizers. Had I read more than the heading of the email from the organizers (the main course couple), I would have realized that things were to get a bit more complicated since one person decided to go vegetarian and dairy free (for health reasons). I love a challenge but I would have liked to experiment a bit more, notwithstanding, it turned out delicious so I documented the recipe for the future. Like most recipes, this tastes better the day after it is made!

South Western Bean Soup

A KitchenInspirations Original Recipe

Serves 6-8 depending on serving size

To print recipe, please click here.

Ingredients:

  • 40 g black beans, soaked overnight
  • 160 g navy beans, soaked overnight
  • 100 g kidney beans, soaked overnight
  • 200 g sweet onion, finely chopped
  • 15 mL olive oil
  • 5 g toasted cumin
  • 2 g toasted coriander
  • pinch of chili powder, or to taste
  • 5 g smoked paprika, or to taste
  • 7 g cocoa powder
  • 10 g garlic, finely minced
  • 40 g tomato paste
  • 2 g puréed chipotle peppers
  • 750 mL vegetable stock
  • 250 mL passata
  • 165 g grilled corn, removed from cob
  • cilantro to garnish
  • sour cream or Greek yogurt to garnish
  • grated cheese to garnish
  • 125 mL creamed lentils (see notes)
  • 1 large avocado, cubed to garnish

Directions:

  1. Caramelize chopped onions in the olive oil. In the meantime, add the vegetable stock, passata, beans to the warm crock pot and put on high for 5 hours.
  2. Add the onions, all of the spices, tomato paste, and enchilada sauce and stir well. Cover and cook for 5 hours.
  3. When the beans are soft, add the creamed lentils and stir into the soup so it is consistent and creamy. Add the grilled corn kernels, and cook for an additional 30 minutes on high, stirring occasionally.
  4. Serve in warmed bowls and top with avocado, a spoonful of Greek yogurt, cilantro, and cheese. Serve immediately with Cornbread.

Notes:

  • I use lentils as a thickener particularly when I make gluten-free recipes. Simply cook lentils until soft and purée with a stick blender until smooth. Freeze the excess in an ice-cube tray and when frozen, pop into a zip lock bag.
  • I buy chipotle peppers in a can, purée and freeze the excess in an ice-cube tray and when frozen, pop into a zip lock bag, same goes for tomato paste.

Read Full Post »

Our neighbourly South-Western- themed progressive dinner party was scheduled two days after we returned home from Arizona, I didn’t think it would be a problem because we were only responsible for hors d’œuvres and appetizers, easy-peasy! HA! Had I read more than the heading of the organizer’s email, I would have realized that things would get a bit more complicated since one person decided to go vegetarian, gluten and dairy free (for health reasons). But, you know me, I do love a challenge and as luck would have it, my experiments turned out even better than I expected! So much so, that JT has asked for it several times since, so I documented the recipe for the future use.

This recipe originated from Emeril Lagasse but I tweaked it a little bit. What attracted me to this recipe was, of course, that it was baked an not deep fried, and although deep fried would be awesome, it’s always nice to lower calories whenever possible particularly if you need not sacrifice flavour or texture! I think you will be very happy with the baked version (our group could not get enough of them)! I’ll speak to the vegetarian, gluten-free and dairy- free version in my notes below (no pics, sorry).

You can see how crispy these turned out.

Baked Jalapeño Poppers

Makes about 24 jalapeño poppers

For the original recipe, please click here.

Ingredients:

  • 12 fresh jalapeno peppers, halved lengthwise, stems, seeds and membranes removed
  • 170 g (6 oz) cream cheese, at room temperature
  • 140 g (1 1/2 cups) grated sharp or old cheddar
  • 3 g (1/2 tsp) ground cumin
  • pinch of cayenne, or less, to taste
  • 2 large eggs
  • 30 mL (2 tbsp) milk
  • 8 tsp Essence, divided
  • 1 cup panko crumbs
  • 1/2 cup coconut flour
  • non-stick spray

Directions:

  1. In a small mixing bowl, combine the cream cheese and grated cheddar and mix well.
  2. Toast the cumin until you can smell the aroma, allow to cool and add to the cream cheese mixture and stir well. Set aside.
  3. Prepare your breading station by whisking 2 large eggs with 2 tsp of the Essence and the milk in a shallow bowl. In a second shallow bowl, mix 4 tsp of the Essence with the coconut flour. In the third shallow bowl, add 2 tsp of the Essence to the panko and mix well. Reserve remaining essence for the next time (and believe me, there will be a next time!)
  4. Fill each jalapeño densely with the cream cheese mixture, being careful not to mound it too high; continue filling until you have filled all of the jalapeño halves.
  5. Dredge each jalapeño half in the coconut flour, then dip into the egg mixture and repeat once more. Finally, dip each pepper into the panko and press panko into the jalapeño to coat well. Repeat until all are coated.
  6. Pre-heat the oven to  375° F. Place jalapeño cut side up on a parchment-lined baking sheet. Give each jalapeño a light coating with the non-stick spray. Bake for 30 minutes or until panko is golden and crisp.
  7. Serve warm with sour cream and salsa.

Notes:

  • For the vegetarian, gluten-free and dairy-free version, I simply replaced the cheeses with creamed lentils (about 1/4 cup cooked in vegetable broth and puréed with a stick blender) and the panko with shredded unsweetened coconut. Even the non-vegetarians loved them! (Sorry, no pics).
  • I use coconut flour for baked “fried” foods because the coconut has an unbelievable absorption property which makes the batter so much crispier than all-purpose flour.
  • I used gloves to protect my hands from the jalapeños as I cleaned them, you might consider doing this too.
  • Leftovers? Freeze unbaked jalapeños on a parchment-lined baking sheet and when frozen, pop them into a ziplock bag.To bake frozen jalapeños, no need to defrost, just bake for a little longer to crisp up.

Read Full Post »

We had our 15th or 16th (I’ve lost count) progressive dinner recently. It was our turn to host the main course, so we got to choose the theme and we chose Canada’s 150th birthday! This opens up the menu to several options and we all did very well! We began our feast with appetizers at John and Nancy’s, they had a lovely selection of Canadian cheeses with a variety of crackers. We were up next and we chose Tourtière as our main course. We finished the evening off at Tom and Iona’s where we enjoyed a Canadian Touque cake! I wish I had taken a picture of it, but it was dark and we were already into a few bottles of vino! 😉

Tourtière is a traditional Québequois meat pie with as many variations on the recipe as there are families! So, of course, I had to put my own spin on it. But before I get to the recipe, allow me to give you a bit of history that I found interesting (like to learn more? This is a good article).

This was the first test recipe.

Tourtière can be traced back to the 1600’s, served on Christmas Eve as part of a massive réveillon after Christmas Mass, it is time-consuming and expensive to make. Original recipes were made of cubed meat instead of ground meat and usually contained a variety of pork, beef, veal and in some cases, wild game. The uniqueness of Tourtière comes from the spices used to flavour the meat blend, most commonly would be cinnamon, cloves, nutmeg, summer savoury, and thyme. Some even added grated potato, bread crumbs or oatmeal to help soak up the liquid. The pastry is always a rich, savoury, buttery pastry in a pie form, or are baked in layers like a lasagna; I chose to make mine a log similar to Beef Wellington. I will say, it was tasty but I doubt I would make it again (unless it was a special request).

The first one looked a little rough.

The first recipe I tried included grated raw potato which was added to the browned meat at the end and stock poured over to help cook it. Both JT and I agreed that it lead to a starchy filling and I decided right then and there that I would not go that route. You do need a little something to absorb some of the flavouring liquid so I chose bread crumbs. For this quantity of meat, some recipes added an entire cup, but I really wanted to avoid that starchy, gummy texture so I reduced both the stock and breadcrumbs significantly and was much happier with the outcome. The other thing I did slightly differently, is I added cooked bacon! It really brought a nice, layer of flavour to the pie without being overly bacon-ie.

The pastry is rather rich and employs a completely different method than regular pastry, the butter is room temperature and is basically rubbed into the flour and then the lightly beaten eggs and water are added at once, using the paddle attachment until just combined. Then it is set into the refrigerator to allow for the butter to set. It is rather odd, but it does work and it does make a very rich pastry that is both delicate but firm enough to hold the heavy meat filling. I decorated the log with maple leafs and then I scored the leaves for effect.

Just about ready to be popped into the oven.

Tourtière

Please click here to print recipe
Serves 6, plus

Ingredients:

  • 100 g bacon
  • 275 g each beef, veal, and pork
  • 130 g onion, finely diced
  • 125 g celery, finely diced (roughly 2 ribs)
  • 10 g garlic, finely minced (roughly 2 cloves)
  • 125 mL beef stock
  • 1 tbsp Worcestershire sauce
  • 20-30 g bread crumbs (unseasoned and finely ground)
  • 1 tsp each, salt and pepper (less salt if your bacon was really salty or to taste)
  • 1 tsp ground nutmeg
  • 1/4 tsp ground cloves
  • 1/2 tsp ground cinnamon
  • 1 tsp dried thyme

Directions:

  1. Crisp the bacon. Reserve 30 mL (2 tbsp) of the rendered fat (set remainder aside if desired).
  2. Caramelize the onions in the 15 mL (1 tbsp) bacon fat. Near the end, add the garlic and stir until you can smell the aroma (this will cook further, later in the process). Reserve the onions and garlic mixture.
  3. Brown meat in batches using a little bit of the remaining 15 mL of bacon rendering. On the last batch of meat, deglaze the pan with a mixture of the beef stock and Worcestershire sauce.
  4. Turn the heat right down and return all of the meat to the pan, and add the celery and stir well.
  5. Sprinkle the breadcrumbs a little at a time while stirring to achieve a slightly drier texture but be careful, because it can make it mushy and starchy (I used about 20 g of the bread crumbs).
  6. Lightly toast the aromatic spices (nutmeg, cloves, and cinnamon). Mix with salt, pepper and dried thyme and sprinkle evenly onto the meat mixture and stir well. Allow the meat to cool completely and then assemble into the pie crust.


This one turned out very well.

The Savoury Pastry Recipe

Please click here for original recipe. The recipe makes enough for 1 log.

Please click here to print this recipe.

Ingredients:

  • 470 g cake and pastry flour
  • 12 g salt
  • 254 g unsalted butter, room temperature
  • 125 mL cool water
  • 2 eggs

Directions:

  1. Combine flour, salt and smallish chunks of butter in the large bowl of your stand mixer, equipped with the paddle attachment. Mix until the butter is fully incorporated into the flour (should be mealy).
  2. Combine the water and eggs and mix well. Add the water egg mixture to the dough all at once and mix until just incorporated, the dough will be very shaggy.
  3. Transfer the dough without a lot of handling to a smaller bowl and cover with plastic wrap and refrigerate for 2 hours so the butter can set.
  4. Turn the shaggy dough out and bring it together with your hands, flattening and folding the crumbs until it comes together.
  5. Roll as required or wrap and chill or freeze for future use.


May I offer you a slice? Please have some smoked ketchup with it.

Assembly:

Ingredients:

  • 1 egg, lightly beaten

Directions:

  1. Preheat the oven to 350° F.
  2. Bring the pastry out of the refrigerator about 15 minutes (or less if it is hot in your kitchen) before you wish to begin rolling. Roll pastry with a little flour on parchment paper.
  3. Roll a rectangle about 30 cm x 40 cm (12″ x 16″) and place the meat mixture into the centre in a long log, leaving space at each end. Fold up the ends and pinch closed and fold up the sides and pinch closed. Cut off excess pastry at the ends, reserve for decoration.
  4. Flip the entire log so that the seam is underneath. Roll the remaining pastry a little thinner than the rectangle and cut out shapes with a cookie cutter (I used a maple leaf).
  5. Lightly brush the pastry with the lightly beaten egg. Decorate with cut outs and then brush the cutouts with the remaining egg.
  6. Bake for 45-50 minutes or until pastry is golden and shiny. Slice into a variety of thicknesses to please all your guests.

Notes:

  • I served the Tourtière with Bacon Jam recipe and home made ketchup (recipe to come) and this Chutney.
  • Sides to consider: creamed corn, peas, green beans with garlic and almonds, and or mashed potatoes. It is a heavy meal so you may wish to include a salad.
  • JT made a wonderful no knead bread and I cut little patts of butter with my small maple leaf cookie cutter.

Night photos always suck.

Read Full Post »

Last month we hosted dessert for our fifteenth(?) progressive dinner. Our neighbour, John selected Georgia State as the theme because of the Golf that was going on (what golf?) at that time so food had to be a Georgia favourite or something connected to the PGA. Of course, I went straight to the expert, my dear friend Betsy of Bits and Breadcrumbs for her advice and she really came through for me, Thank you, Betsy. I made three mini desserts, one of which, the Chocolate Pecan Pie is traditionally served at the Open, the other two were Southern favourites, Peach Crumble (recipe below) and Chess Pie, that I really just wanted to make. All of the desserts are miniatures because we always tend to over do it at these progressive dinners and I served them all in the living room at the coffee table, take as many or as few as you wish. I followed some tried and true recipes for the Chocolate Pecan Pie and the Chess Pie (see links above) and I loosely followed Betsy’s recipe for the crumble. Hope you don’t mind, Betsy, I combined a few ingredients from various southern recipes on your blog and I think I scored a hole in one! And that concludes my golfing puns!

So, let me tell you about our dinner! For the first course, Tom and Iona (read Iona) did a bunch of things, we began with an Arnold Palmer (with vodka)! I’d never heard of this concoction before this past February when we were in Arizona visiting friends, it was very tasty! Then, the food: Iona made Pimento Cheese sandwiches (OMG, so GOOD!), jalopeño Poppers (baked) and a wonderful bean and rice dish served in a glass. Then we had the main course, it was Mike Weir’s (Canadian) signature Master’s Dinner (I had no idea the winner can choose the dinner menu!) It was Elk and Arctic char (that’s a fish), with Canadian beer (I had some of his wine!). And, of course, there was dessert! We also set up a little putting green for fun!


Mini Chocolate Pecan Pies and Mini Chess Pies. How many would you have?

The putting green was quite successful!

Bourbon Peach Crumble: Progressive Dinner #15(?)

Makes 4 60 mL (2 oz) ramekins and 4 30 mL (1 oz) ramekins

Ingredients:

  • 2 cups roughly chopped peaches (I used frozen because it is not peach season)
  • Bourbon, to cover peaches for soaking
  • 2 tbsp flour
  • 1/4 cup sugar (reduce if your peaches are sweet, mine were not)
  • 1/4 tsp cinnamon
  • 2 tbsp soaking bourbon
  • 1 tsp vanilla
  • pinch of salt

Ingredients for the crumble:

  • 1/4 cup brown sugar
  • 2 tbsp toasted pecan pieces
  • 1/4 cup oats
  • 1 tbsp flour
  • 1/4 tsp cinnamon
  • 2 tbsp unsalted butter
  • 2 tsp Skor® bits
  • pinch of salt

Directions:

  1. Chop the peaches into wedges and then into thirds so they fit better in the ramekins.
  2. Add the peaches to bowl with a cover, and pour the bourbon over it so it covers all of the peaches, Soak peaches overnight in the fridge.
  3. The next day, strain the liquid from the peaches reserving 30 mL (2 tbsp), reserve the remainder for another use.
  4. Preheat the oven to 175° C (350° F).
  5. Spray the ramekins with non-stick baking spray.
  6. Combine the flour, cinnamon, reserved bourbon from soaking liquid, vanilla and salt and mix well. Sprinkle over the strained peaches and stir well to coat.
  7. Add roughly 15-30 mL (1-2 tbsp) of the coated peaches to each prepared ramekin.
  8. Combine the brown sugar, toasted pecans, oats, flour and cinnamon and mix well, cut in the butter until the butter is well mixed. Top each ramekin with about 15 mL (1 tbsp) of the crumble and then sprinkle about 1.5 mL (1/4 tsp) Skor bits over the top.
  9. Bake uncovered for 30 minutes. Allow to cool slightly to serve or reheat when ready to serve. Serve with stabilized Bourbon Whipped Cream (to stabilize whipping cream, please click here).

Oozy, boozy goodness. I intended for the sauce to drip and bake down the sides. No, really, I did!

Notes:

  • For the mini tarts, I used Martha Stewarts cream cheese pastry recipe, but I doubled it. You can freeze left over pastry dough.
  • I made 1/2 of this chess pie recipe and I netted about 20 tarts various sizes (although I only show the tear-drop shape in the photo. If I make this again, I’ll make half of the recipe.
  • I made 1/4 of this pecan pie recipe (I melted 10 g of semi-sweet chocolate, allow to cool, into the recipe) and netted about 14 small tarts (muffin tin-sized).

We added a few tee’s and golf balls but it was too dark for a pic.

MiniMeringueTarts_Rev

This shot is part of a creative collaboration I recently did with a professional photographer and prop stylist for our portfolios. I also served the little bite-sized lemon curd meringues for the progressive dinner just because you can’t have too much dessert! Photograph by Paula Wilson and Props by OK Props, Oksana Slavutych.


Read Full Post »

TrioThaiDesserts_First

Last month we had another progressive dinner (number 11 to be exact) and we decided to make up some new rules. In general, we alternate clockwise for the courses and this time it was neighbours John and Nancy’s turn to make the main course. The first new rule is that the couple who has the main course chooses the theme. The second new rule, is that the main course couple may also invite a “guest couple” to participate in the eating but not in the making; having four courses has put the main course much too late in the evening (around 10:30-11) because we inevitably stay too long at each house! For this progressive dinner, John and Nancy chose Thai food because Nancy was recently in Thailand and had a marvellous time. It was our turn for dessert.

There aren’t too many desserts in Thailand and I recently learned that they generally don’t serve a sweet after dinner, desserts are usually saved for celebrations, like weddings. Thai desserts are often not sweet and sometimes even savoury (don’t you worry, I didn’t choose savoury (you know who you are!)). I did have a rather difficult time landing on three desserts that would WOW our party because I wanted to choose something obviously Thai and put my own spin on it. I finally chose a baked Coconut Custard Slice (from my Easy Thai-Style Cookery from the Australian Woman’s Weekly, published in 1996), also from the same cookbook, a Sticky Rice Pudding infused with Kafir Lime Leaves with a Coconut and Lime Custard and lastly a Mango Mousse garnished with a Mango Rose (from Epicurious). All three desserts were served in small portions, as above. I made all three in advance and portioned them out so that on the evening I needed only to plate them. These dinners always get out of control with the volume of food so small portions is all anyone ever wants, but I had made enough for leftovers in case someone wanted more. I really like coconut so both the custard cake and the rice pudding were high on my favourite list, but I have to say the mango mousse was also refreshing and delicious. Which one would you choose as your favourite?

A very nicely textured coconut lemon custard.

A very nicely textured coconut lemon custard.

Baked Coconut Custard Cake

Makes one 24 cm (9.5 inch) tart, about 1 cm (0.5 inch) deep.

For original recipe, please click here.

Ingredients:

  • 1/2 cup (125 mL) coconut cream
  • 1 cup 18% cream
  • eggs, lightly beaten
  • 1/2 cup (100 g) brown sugar, firmly packed
  • 2 tbsp unsweetened coconut, toasted
  • Lemon or Lime zest for garnish

Directions:

  1. Pre-heat the oven to 350° F. Prepare an 24 cm (9.5 inch) removable bottom scalloped tart pan by lightly greasing and lining the exterior bottom in foil making sure it comes up more than half way on the sides and is waterproof. Set aside.
  2. Combine coconut cream, cream, eggs and brown sugar in a heavy bottomed pan and stir over medium-low heat until warm; do not boil (the coconut cream will separate).
  3. Pour mixture into the prepared pan. Place the tart pan into larger pan that can accommodate enough boiling water to come halfway up the side of the tart pan.
  4. Bake for 30 minutes or until the centre of custard is just set. Cool custard for 30 minutes and then refrigerate custard 1 hour or 1-2 days before serving.
  5. Cut into wedges and sprinkle with extra coconut and lemon or lime zest, if desired.
RicePuddingCustard

A delicious rice pudding scented with kaffir lime leaves and a baked custard topping.

Kaffir Lime Sticky Rice Pudding

Serves 4 individual portions or 9 mini portions.

For original recipe, please click here.

Ingredients for the rice pudding:

  • 1/2 cup (100 g) short grain rice
  • 2 tbsp brown sugar
  • 1 cup (250 mL) coconut milk (including the cream)
  • 1 cup (250 mL) water
  • 10-20 dried kafir lime leaves (depending on how much you like kafir limes)
  • 2 tbsp white sesame seeds, toasted

Ingredients for the custard:

  • 3 eggs
  • 1 cup (250ml) coconut milk, including the cream
  • 2 tbsp sugar
  • juice from 1/2 a lime

Directions:

  1. Lightly grease nine 125 mL (1/2 cup) capacity ovenproof mason jars with coconut oil. Preheat oven to 350° F.
  2. Combine rice, 2 tablespoons brown sugar, coconut milk and water in a thick bottom pan, and slowly bring to a boil while stirring. Simmer uncovered, stirring occasionally until rice is tender and liquid has been absorbed (about 30 minutes). Cool slightly. Remove Kafir lime leaves, discard.
  3. To make the custard, combine the milk with the eggs, sugar and lime juice and whisk together. Set aside.
  4. To each prepared mason jar, add 2 slightly heaping tablespoons of the rice pudding and press into the bottom of the jar. Pour the prepared custard evenly into each of the nine jars.
  5. Place jars into a large rimmed pan and fill the pan with warm water to about 1/2 way up the mason jars. Cover the pan with foil and bake for 30 minutes or until custard has set.
  6. Remove jars and allow to cool. Refrigerate until 2 hours before serving, then remove from fridge and serve at room temperature garnished with the toasted sesame seeds.
MangoMousse

A lightly set mousse (not heavy on the gelatin) with a good punch of mango and a dash of lime.

Mango Mousse

Makes one 23 cm x 23 cm (9″ x 9″) pan of mousse.

For original recipe please click here.

Ingredients:

  • 1 envelope (1 tablespoon) unflavored gelatin
  • 500 mL (2 cups) fresh mango purée (about 4 small mangos)
  • 1/3 cup sugar
  • 1/2 tsp vanilla extract
  • 1 cup plain yogurt (I used Greek)
  • 3 egg whites, beaten until stiff but not dry (you may substitute whipped cream for the egg whites, about 1 cup whipped)
  • 1 mango for rose garnises and lime zest

Directions:

  1. In a small saucepan sprinkle the gelatin over 1/4 cup cold water, let it soften for 1 minute, then heat the mixture over low heat, stirring until the gelatin is dissolved.
  2. In a blender or using an emersion blender, blend together the mango purée, sugar, vanilla, and yoghurt and add the gelatin mixture and blend the mixture well.
  3. Beat the egg whites (or whipping cream) until they hold stiff peaks, fold it into the mango mixture gently but thoroughly.
  4. Pour into a plastic-lined 23 cm x 23 cm (9″ x 9″) pan.
  5. Chill the mousse for at least 4 hours or overnight. Freeze for 30 minutes before serving (improves both the flavour and texture, and makes it much easier to handle).
  6. Cut 9 servings using a flower cookie cutter and place carefully on a plate, garnish with mango roses. To make mango roses, I simply used my vegetable peeler and peeled slices about 30 cm (12 inches) long from each mango and then rolled into a rose. I prepared the roses in advance to make serving easier.


Read Full Post »

Tiropitakia_First

Our tenth progressive dinner was this past Friday and the theme we chose was Greece. We chose Greece for a couple of reasons: we figured we would be knee deep in snow and a tip of the hat to the warm climate and mediterranean cuisine would be just what the doctor ordered and the other reason is that two of our neighbours were just there this summer visiting family!

Fortunately, winter has been somewhat mild this year (shhhhhhh)…not overly cold and although we have had a few flakes, we certainly don’t have the (any) accumulation we have had in the past. Here is a little blast from the past (December 11, 2014) for good measure! Click on the images to see a larger version.

So you can see why the Mediterranean cuisine seemed appropriate. I didn’t want to make something predictable and when I was chatting with the neighbour who went to Greece this summer, she suggested the slightly lesser known phyllo triangle called Tiropitakia which is like Spanakopita but without the vegetables, it’s just cheese! You had me at cheese! I decided to splurge and use butter to coat the phyllo sheets (I usually skip it because of the calories) and it really made the pastry beautifully crispy and flaky. I read quite a few recipes on line, some ven used gruyère and ricotta so I made some changes and used Greek Feta, goats cheese and a little parmesan. The combination made a lovely cheesy filling. I used an actual imported Greek  feta (Alra Feta) which is pretty difficult to come by in Toronto (we have a very strong cheese board in Canada) made with sheep and goats milk, it is far tangier than Canadian feta (and more expensive).

This hors d’œuvres freezes very well but you have to be very careful as the pastry becomes very brittle over time in the freezer. With all the holiday cheer going on in the next few weeks, I’m sure I’ll be popping a few in the oven every weekend for visitors.

Tiropitakia_7695 It’s a deliciously crispy hors d’œuvres. Please help yourself to one (or two).

Tiropitakia

Makes 48 5 cm (2 inch) triangles

Ingredients:

  • 300 g Greek Feta cheese, crumbled
  • 160 g goats cheese, crumbled
  • 25 g Parmesan Cheese, finely grated
  • 2 eggs, beaten lightly
  • 1 tbsp parsley, finely chopped
  • pinch of nutmeg
  • freshly ground pepper
  • 8 sheets phyllo pastry, cut into 5 cm (2 inch) strips, long side.
  • 150 g unsalted butter, melted

Directions:

  1. In the bowl of a food processor, add the two eggs and pulse to beat slightly. Add all of the cheese and pulse a few times to combine well (do not turn into a paste). Add the parsley, nutmeg and freshly ground pepper and pulse to incorporate. Set aside.
  2. Cut each phyllo sheet into six, 5 cm (2 inch) strips along the long side. Brush generously with the melted butter. Add one tablespoon of the filling to one side of the long strip and begin to fold into a triangle as the diagram below suggests. Continue until you have used up all of the filling. I was able to get 48 triangles.
  3. Bake in a pre-heated 400° F (200° C) oven for 13-15 minutes or until nicely browned. Freeze on a piece of parchment and then gently place into a ziplock bag for future. Reheat frozen triangles at 350° F (176° C) for 10-12 minutes or until warmed through.

Folding Tiropitakia

Tiropitakia_7698 I usually don’t put egg into my spanakopita so these ones puffed up quite a bit more than the spanakopita does.

Notes

  • This recipe can also be made into squares. Use 5 sheets of Phyllo, generously buttered, in a 9″ x 9″ square pan. Add the filling and top with 5 additional, generously buttered sheets. Fold in the edges to make a neat square, add 2 more sheets, generously buttered, cut to the exact size (to make it pretty). Butter. Bake for 15-20 minutes or until nicely browned on top.
  • If you wish to save calories, skip the butter on each strip, just butter the triangle, both sides.
  • Some recipes added dill, but it was not comment.

Read Full Post »

BourbonStreetMudPie_1

We had another Progressive Dinner a short time ago and because it was in such close proximity to Mardi Gras, we decided it would be a perfect theme! JT and I had dessert so I experimented with King’s Cake, a brioche style pastry roll with pecans and sugar, decorated with yellow, green and purple sanding sugars, but honestly it tasted like breakfast to me and not dessert (sorry Southerners), so back to the drawing board I went. JT suggested Mississippi Mud Pie and after a little research I agreed. Definitely decadent enough for a Mardi Gras dessert and it can be classed up, restaurant style. I found a delightful warm chocolate tart recipe on Anna Olson’s website and altered it a bit to include some of the warm spices reminiscent of King’s Cake. OK, I am fully aware that mud pie is usually made from ice cream and whipped cream, but hey, I’m taking artistic licence!

This was our 9th progressive dinner, we’ve been having them since 2012! It’s the BEST group of neighbours and everyone gives it their all to make the evening fantastic, which often lasts until the wee hours of the morning…

Here is the menu from this time around, everything was incredibly DELICIOUS!

House #1 Appetizers:

  • Spicy Cajun Shrimp
  • Fried Andouille Sausage
  • Crab Cakes

House #2 Main Course:

  • Blackened Chicken Thighs
  • Corn Maque Choux
  • Rice and Beans

House #3 Dessert:

  • Bourbon Street Mud Pie with Bourbon Whipped Cream
  • Limoncello
  • Late night snack: homemade potato chips with sour cream (Greek yogurt) and onion dip
BoubonStMudPie_2687

It’s a tasty, chocolate tart.

Bourbon Street Mud Pie

Makes 8 servings of 10 cm or 4 inch mini tarts. Original recipe can be found here.

Ingredients for the pastry:

  • 1/2 cup unsalted butter, at room temperature
  • 80 g icing sugar, sifted
  • 3 large egg yolks
  • 160 g cake & pastry flour
  • 24 g Dutch Process cocoa powder
  • 20 g cornstarch
  • 1/4 tsp salt
  • 1 tsp bourbon

Directions for the pastry:

  1. Cream the icing sugar and butter until smooth, then add the yolks and bourbon all at once and beat until fully encorporated.
  2. Sift the dry ingredients (flour, cocoa powder, cornstarch and salt) into the butter mixture and stir by hand until evenly combined. The dough is much looser than most pastries. Shape the dough into a disc, wrap and freeze for 30 minutes.
  3. Roll out the dough between two sheets of parchment until just less than 2mm (¼” thick). Cut circles of the pastry to line eight 10 cm (4-inch) fluted tart shells with a  removable bottom, pressing the dough into the shells and trimming away any excess. If the dough softens, just pop it back into the freezer to harden up for a few minutes. Prick the pastry with a fork. Chill the tart shells for at least 20 minutes.
  4. Preheat the oven to 350°F. Place the chilled tart shells onto a baking sheet and bake them for about 15-18minutes, until you see that the pastry has an even, dull finish. Allow to cool while preparing the filling.

Ingredients for the filling:

  1. 3 large egg separated
  2. 112 g sugar, divided
  3. 1 tsp finely grated orange zest
  4. 1 tsp cinnamon
  5. 1 tsp vanilla extract
  6. 12 g Dutch Process cocoa powder, sifted
  7. 86 g bittersweet chocolate, melted (but still warm)
  8. 30 bourbon

Directions for the filling:

  1. Whip the remaining 3 egg whites until foamy then slowly add ¼ cup of the sugar and continue whipping on high speed until the whites hold a soft peak. Set aside.
  2. Whip the 3 egg yolks with the remaining ¼ cup (112 g) of sugar, the vanilla and orange zest until pale and thick. Fold in the egg whites and gently whisk in the cocoa powder, melted chocolate and bourbon. You may refrigerate this overnight (I did for 1 night and 1 full day and it was fine).
  3. Pour the filling into the cooled tart shells and bake for about 8-12 minutes at 350°F until the tarts just begin to lose their shine around the edges, but the centre is still dark and glossy. Allow the tarts to cool 2 minutes, before carefully removing them from their shells to serve warm or allow to come to room temperature. Serve with whipped cream.
BourbonStreetMudPie

You may have noticed that this one has ganache on top…we determined was a bit excessive as it’s a very chocolatey tarte.

BoubonStMudPie_3 copy

This was my first try for a friend’s dinner but it turned out way too rich.


Read Full Post »

ArgentinianChorizo_1_4091

The long one’s are mild and the short one’s are hot!

Remember the group of neighbours with whom we share a progressive dinner from time to time? Well, we’ve had two such dinners since my last post about them, one was at the cottage of one of the neighbours and the other was just a couple of weeks ago back in the city. The one at the cottage had a European theme and because we had it at the cottage, we left it pretty loose for interpretation and it was fantastic! We were in charge of the hors d’œuvres and appetizers and because it was held dock-side we did an antipasto platter with lots of meat, cheese and roasted vegetables. We snacked on them for a few hours while the Bœuff Bourguignon simmered in the kitchen. For dessert, the other neighbour had the most incredible S’mores with belgian chocolate bars and decadent chocolate chip cookies (instead of graham crackers) by the fire pit. We slipped in dessert just before the skies opened and the rain poured and poured!

The most recent progressive dinner had Latin America as the theme and boy did it ROCK! We started with Cassava and cheese fritters, delicious empanadas and of course, nachos with guacamole and salsa. JT and I had the main and we went all out. I wanted Argentinian because I just love how they adore their meat! I made home-made Argentine Chorizo, we grilled steaks AND ribs! (OK, I confess, I just really wanted to make sausage and that’s why I picked this platter!) We also roasted small yellow potatoes (we were going to have Fried Papas Criollas but I just couldn’t bring myself to do it) and stir-fried a variety of coloured peppers; I even caramelized some onions in case someone wanted to eat Choripan (chorizo in french bread with caramelized onions and peppers) and of course we had Chimichurri sauce (both hot and not!). We had WAY too much food and now we’re enjoying variations of this feast for lunches, dinners and snacks! Dessert was a very tasty and refreshing lime ice cream.

The Argentine Chorizo sausage recipe is slightly different than other Latin American recipes in that it contains nutmeg; it’s not a lot but it does give it a slightly different flavour. I used this recipe with some minor alterations. What I didn’t skimp on was the garlic, it seems like a lot, but it’s not and it’s totally worth it! I made a sweet version and a hot version (sweet was longer and hot were the short ones) and I think both went over excellent. Even though I did use some pork belly, it was still a little dry but more than a couple of people said they preferred it to a greasy sausage. I know I will experiment with other flavours in the near future (like spinach, chicken and feta for example!)

ArgentinianMeat_1_4103

We grilled steaks, ribs and home-made sausages!

ArgentinianMeat_1_4105

It was a meat-lovers heaven.

Argentine Chorizo

Makes about 6 mild Chorizo (15 cm or 6″ long) and about 10 hot Chorizo (8 cm or 3″ long)

Ingredients:

  • 1 cup red wine (we used this wine)
  • 1 entire head of garlic
  • 5 whole cloves, crushed
  • hog casings
  • 1 kg of pork
  • 400 g of beef
  • 150 g pork belly
  • 6 cloves garlic, finely chopped
  • 1 tbsp salt
  • 1 tbsp sweet paprika
  • 1 tbsp smoked paprika
  • 1 tsp (heaping) nutmeg
  • 1 tsp cumin
  • 1 tsp pepper
  • 1 tbsp hot chilli pepper flakes (reserve for hot portion)

Directions:

  1. On low heat, gently boil the wine with the whole head of garlic and crushed garlic for 15 to 20 minutes and allow to cool. Strain and reserve the liquid (discard the garlic) should be about 1/2-3/4 cup.
  2. Cut the pork, beef and pork belly into small cubes and pass through the meat grinder set on coarse grind. Mix meat with hands until well blended.
  3. Pour the cooled wine over meat mixture and mix thoroughly. Combine all of the spices together with the exception of the hot chilli pepper flakes and sprinkle over meat mixture. Add the finely chopped garlic and mix into meat well. Divide the meat into two equal portions and set one portion aside. Over the second portion, sprinkle the hot chilli pepper flakes and mix well with hands. Refrigerate both hot and mild sausage meats overnight to allow flavours to develope and mature.
  4. Prepare your sausage casing by rinsing in cold water for at least 30 minutes. Any unused portions may be resalted with seasalt and frozen for future use.
  5. Untangle a reasonable portion of the casing and feed it onto the sausage stuffer attachment, tie a knot at the end. Then in small portions, slowly feed the meat mixture through the sausage stuffer into the casing making sure that it’s relatively evenly filled (it should really fill on its own). Tie off the other end and twist into portion sizes. Poke a lot of small holes throughout the sausage to allow any air bubbles to dissipate (this step will also prevent the sausage from bursting open when grilling). Allow the sausage rest in the refrigerator uncovered for 2- 3 days before cooking or freezing. Once the casing has time to dry out, you should be able to cut the sausages into individual pieces without unravelling the casing.
  6. Grill on a charcoal grill over indirect heat for 30 minutes or until internal temperature is 71° C or 160° F. Serve hot off the grill with french stick and mustard.
Casing_1_4080

This is the natural casing. Someone on-line said it smelled really bad, but I couldn’t bring myself to smell it.

ArgChorizo_1_4081

The meat fills into the casing relatively easily. In fact, you hardly need to help it.

ArgentinianChorizo_1_4083

This is a really long sausage.

ArgentinianChorizo_1_4084

This is the sausage twisted into portions. I made two sizes so I could easily tell which one was hot. As the sausage dries in the fridge, the twisted ends will also dry out and be strong enough to cut through without it unravelling..

Notes:

  • Whenever I grind meat, I always prepare a medium-sized bowl which I submerged in an ice bath to ensure the meat remains cool as I work it through the grinder. My hands are always cold, so I don’t worry about mixing the meat but if your hands are hot, you may wish to use a wooden spoon.
  • To gage how much casing you’ll need, just tell the butcher how much meat you have, I had about 2 kg (4.4 lb) and he portioned out the casings which ended up to be about 2X too much. He suggested I could salt it and freeze it for next time. Casing are not expensive.

Read Full Post »

GuinessStew_1287

The biscuit was the perfect flaky texture to sop up the lovely gravy from the slow roasted Guinness Stew.

As you know we had our fourth progressive dinner on our street and you already know that I made this amazing Guinness Stew but what I didn’t tell you is that I had a major meltdown about four hours before the dinner was to begin. The stew was going perfectly smoothly, the aromas as it finished cooking on the day of filled the house, it was heavenly; the meat was fork tender, the vegetables still had a touch of bite to them and the cauliflower celeriac mash was creamy and wonderful. But I still needed to make the puff pastry topping.

I had fully intended on learning to make this wonderful laminated dough a few days before but as luck would have it, things got busy (I’m assisting more and more these days, but I’ll tell you about that later) so the day before I pulled out the emergency puff pastry dough from the freezer. I had a few errands to do that day and I finally got back to the house around 2pm which would have given me plenty of time to roll out the dough, cut and bake it ready for assembly for the dinner. But things would not go that smoothly.

ButterBiscuit_1297

A very flaky biscuit indeed

As I pulled the dough out of the fridge, I found it looked a little odd, and then when I opened the package, it had gone off. I was stunned. When I checked the expiry date I realized my error, it was expired!!!! Well, that was that. Or was it? I tossed the package and quickly went to work; several weeks before I had read about a ‘quick’ laminated pastry dough that Liz (from That Skinny Chick Can Bake) made. So out came the iPad and I went to work! The ‘quick’ laminated pastry dough still required more hours than I had to allow the dough to rest in between foldings, but I was determined! I reduced the resting times significantly and I turned Liz’s sweet pastry dough into a savoury one, the results were exceptional. I didn’t use the entire batch so I stored the leftovers in the freezer, resting and I’ll get back to it in the near future, but this quirky version of ‘quick’ laminated dough exceeded my expectations and best of all, it was a hit at the dinner table. Thank you Liz, you saved the day!

Butter Biscuits — a ‘quick’ laminated pastry dough

I made 10 biscuits and put the remainder of the dough in the freezer for another time. Please check here for the original recipe.

Ingredients:

  • 1/4 cup warm water
  • 1 tbsp bread maker quick dissolve yeast
  • 1 tsp sugar
  • 1/2 cup milk, at room temperature
  • 1 egg, at room temperature
  • 1 teaspoon salt
  • 1 tbsp fresh rosemary, finely chopped
  • 2-1/2 cups unbleached all-purpose flour
  • 1/2 cup cold unsalted butter, cut into 1/2 cm or 1/4″ thick slices
  • 1 egg, lightly beaten
  • 1 tbsp merlot sea salt (I received the merlot sea salt as a gift from my friend Kristy at Our Family Food Adventures when we met up )

Directions:

  1. Add the warm water to a bowl and gently mix in the yeast and sugar. Allow to stand until frothy and then add the milk, egg and salt; set aside.
  2. Add the flour to a food processor with metal blades. Drop cut butter and the finely chopped rosemary into the flour, pulsing 8 to 10 times, so that the butter is cut into 1 cm or 1/2 inch pieces.
  3. Combine the flour mixture with the yeast mixture and gently fold the two with a rubber spatula,  just until the dry ingredients are moistened. Don’t be too energetic, the butter must remain in pieces so that you will produce a flaky pastry, not a bread dough or cookie.
  4. Cover bowl with plastic wrap and place in the freezer for 30 minutes.
  5. Lightly flour your work surface and turn the dough out onto it; dust very lightly with flour.
  6. Gently roll out the dough to 41 cm or 16 inches along one side and fold it into thirds similar to how one would fold a letter.
  7. Turn dough clockwise 1/4 turn. Roll out again into a narrow rectangle and fold into thirds again.
  8. Roll dough one more time into a 51 cm or 20 inch square and fold into thirds again to make a narrow rectangle, then fold up the ends to make a square. Cover with plastic wrap and put into the freezer for another 30 minutes. Note, it is very important to keep the dough cold so the butter doesn’t begin melting, if you find it’s warming up, put back into the freezer for a few minutes to cool down.
  9. Preheat the oven to 400°F.
  10. Roll the dough out to a 1 cm or 1/2 inch thickness and using a desired cookie cutter (mine was a triangle that was about 20 cm or 4 inches wide).
  11. Brush with beaten egg and sprinkle merlot sea salt on top.
  12. Place triangles onto a cookie sheet and bake 15-20 minutes until the tops are golden.
ButterBiscuit_1305

I decorated the biscuit with Merlot Sea Salt

Read Full Post »

We celebrated our fourth Progressive dinner a few weeks ago with our lovely neighbours. During the last dinner the boys dreamed up our next theme: Beer! I was lucky enough to be next up for the main course so I was excited because I don’t often cook with beer and I don’t often make stew; I was thinking Guinness Stew!

We started at house one with a variety of beer cheeses and beer candied bacon (definitely on my list to make!), they also served a delicious Steam Whistle Butternut Squash Soup garnished with bits of the candied bacon and a splash of cream, very tasty indeed. Then of course it was our place and then at the third house we enjoyed dessert which was a fantastic Beer Brownie, it was definitely moist and flavourful. All of the dishes were wonderful and the company was great. We’ve even determined our next theme: Mad Men! We’re going to have fun with that as far as I could tell, all they did was eat cake and drink. Should be an interesting party!

Guinness is by far my favourite beer; thick, creamy, caramel tones and even a little liquorish flavours are a perfect pairing with the hearty, earthy beef. My friend Angela (of Titanic Anniversary, Truman Capote’s Black and White, James Bond 60th Anniversary dinner parties) served up this Beef and Guinness Stew for the Bond party and I knew it would be the recipe I wanted to make. Plus it has Guinness in it. Did I mention it has Guinness in it?

I made this stew the day before because stews always taste better the next day and I would urge you to do the same. JT confessed he likes this stew better than his Bœuff Bourguignon! Make sure you refrigerate overnight and then bring it to room temperature before you reheat. I also added carrots because one of our neighbours is not a mushroom eater so I wanted another vegetable in it and it tastes and looks amazing. I used eye of round which is a rather tough cut of beef, but I wanted to bake it longer at a lower temperature and I wanted a meat that would stand up; it was amazing, totally fork tender keeping its shape for serving. I also added a bit of beef stock when I reheated because the sauce thickened up a bit too much, use your own discretion on how thick or watery you want your sauce to be. Guinness’ website offers up a recipe that looks very watery but it’s entirely up to you.

GuinessStew_1292

The biscuits were perfect for this type of stew

Guinness Beef Stew

Serves 6-8 (it’s a filling meal, so you may even get 9 out of it!)

(original recipe is by Executive chef John Cordeaux of The Fairmont Royal York Hotel in Toronto as published in Canadian Living) I have altered the original recipe.

Ingredients:

  • 2 lb (907 g) eye of round beef roast, trimmed and cut into 5-8 cm (2-3″) cubes (I like bigger chunks of meat, serving size is 2-3 per person
  • 2 tbsp (30 mL) vegetabIe oil
  • 6 slices chopped bacon
  • 2 tbsp (30 mL) butter
  • 1 medium Vidalia onion, finely sliced
  • 4 cups (1 L) small mushrooms, either halved (if large) or whole (if small)
  • 2 cups carrots, sliced in 2-3 cm (1.5″) chunks
  • 2 tbsp (30 mL) tomato paste
  • 2 tbsp (30 mL) all purpose flour
  • 1 can (440ml) Guinness draught beer
  • 1 tbsp (15 mL) grainy mustard (I made my own here)
  • 1/4 tsp (1 mL) salt
  • 1/4 tsp (1 mL) white pepper
  • 1 cup of beef stock (to be added when reheating the stew)
  • Fresh Rosemary to garnish

Directions:

  1. In ovenproof Dutch oven, heat oil over medium-high heat and brown the beef in batches, transferring to bowl using slotted spoon (don’t drain, you’ll want the liquid from the beef too).
  2. Once the meat has been browned and removed, cook the bacon until crisp, 5 to 8 minutes; remove bacon with slotted spoon to a piece of paper towel to drain and then reserve.
  3. Drain off the pan fat and melt the butter over medium head. Add the onions and sweat until translucent. Add the mushrooms and cook until all the liquid has evaporated. Reserve the mushrooms (I was concerned that they would over cook over the 3 hours in the oven).
  4. Stir in the tomato paste and cook continually stirring for 2 minutes. Sprinkle with flour and cook stirring for another minute. Whisk in Guinness, grainy mustard, salt and pepper until smooth.
  5. Return beef and bacon and juices to the pan, cover and bake at 250°F (121° C) until beef is tender, about 2.5-3 hours.
  6. In the meantime, peel and cut carrots into chunks. Roast on a cookie sheet for about 1 hour (not 100% done).
  7. When beef is cooked, add the carrots and mushrooms and allow to cool to room temperature. Refrigerate until day of serving.
  8. Remove beef from the refrigerator and allow to come to room temperature (2-3 hours).
  9. Pre heat the oven to 200°F (93° C). On the stove top, warm beef slowly to boiling, adding beef stock as required. Fold instead of stirring to avoid breaking apart the meat.
  10. Cover and put into the oven until ready to serve.
  11. Serve with Cauliflower Celeriac “Mashed Potatoes” and a Butter Biscuit (recipe).
GuinessStew_1287

Thick, rich Guinness Stew, I know you want some!

Note: Don’t be concerned that the stew might be bitter, the long cooking process, sweet tomato paste and onions certainly round out what ever bitterness there may have been. Allowing to rest overnight also helps round out the flavours.

Read Full Post »

Happy Independence Day! Since it’s Thursday, do you take Friday off and make it an extra long holiday? How do you celebrate? Last year we were in Wisconsin at our friend’s lake house (Paul & Ts) and at around 9pm we boated out to the middle of the lake and watched the most amazing fireworks–it was awesome!
Speaking of awesome, if you want your guests to see fireworks in their heads, THIS is the dessert to serve. It’s a perfect summer dessert combining popular tropical flavours: pineapple, rum and coconut. You can’t go wrong, and it’s very impressive making it the perfect dessert to serve on such an important holiday.

Happy Fourth of July!

Happy Fourth of July!

The first time I saw this recipe was at Jed, the Sports Glutton’s blog and I knew I would make it, I just didn’t realize how soon! We were entertaining my uni BFF and her hubby a while back and I needed a gluten free desert (she is gluten intolerant) and I wanted something that wasn’t too bad for you…so I chose fruit but even better it was sweet, caramelized Pineapple. I loved the grilled pineapple salsa we made for the grilled shrimp so I knew this dessert would be a hit; it turned out so well, JT suggested that I make it for our next progressive dinner, so I did! What was super cool about the latest progressive dinner was that each course had to be made on the BBQ! This is the perfect summertime dessert, not having to heat the house up by turning on the oven — there are better ways to heat things up ;)!

This is the version I served to my BFF for brunch, no cake!

This is the version I served to my BFF for brunch, sadly there was no cake!

So, I present to you, an inspired version of Los Angeles Angels of Anaheim.

Since we sliced the pineapple thinner, they didn't hold their shape, I suggest skewering them as well.

Since we sliced the pineapple thinner, they didn’t hold their shape, I suggest skewering them as well.

Deconstructed Piña Colada: Grilled Buttered Rum Pineapple with Grilled Coconut Pound Cake

Serves 8 (1 cm or 1/2″ slices of cake, with lots left over)

Ingredients:

  • 1 cup fat free Greek yogurt
  • 1 tbsp vanilla
  • 3 tbsp powdered sugar
  • the rind of one lemon

I

  • 1 /4 cup of unsalted butter
  • 1/8 cup dark rum
  • 1/2 tbsp brown sugar
  • pinch of salt
  • 2 pineapples, peeled and cored and cut into 8 spears each
  • 24 smallish strawberries
  • 1 Coconut pound cake (recipe can be found here).
  • pineapple sage finely julienned (or mint)

Directions:

  1. Combine the Greek yogurt, vanilla, powdered sugar and lemon rind and stir well. Refrigerate.
  2. In a small saucepan, melt the butter and then add the rum, brown sugar and salt and give it a good boil (to burn off the alcohol).
  3. Using the buttered rum sauce, baste the pineapple spears and grill until you have achieved grill marks, you can baste throughout the grilling process but make sure you reserve some sauce for drizzling. Keep the grilled pineapple spears warm.
  4. Slice the coconut pound cake into 1-2 cm (1/2″-3/4″) slices, brush lightly with the buttered rum sauce and grill until you have achieved grill marks.

Assembly:

  1. Place the slice of grilled coconut pound cake on the plate, arrange the spears so that they overlap the pound cake and each other.
  2. Add three washed strawberries clustered together.
  3. Add a dollop of the Greek Yogurt sauce and finally drizzle with the remaining buttered rum.
  4. Garnish with the pineapple sage julienne. Serve immediately.

*Clip art from Microsoft Clip Art.

Read Full Post »

Happy Canada Day! Today is Canada’s birthday and she’s a whopping 146 (now my birthday won’t seem half bad!). How are you celebrating this auspicious holiday?

Happy Canada Day!

Happy Canada Day!*

We’re at the cottage, spending a long overdue weekend with good friends. The redecorating has taken a bit of a back seat due to being crazy busy at work and not being able to take a little extra time up north, so it’ll just get done later. Being at the cottage means everything slows down and it forces you to enjoy the quiet. I usually bring a craft to do or read, which I don’t often get to do in the city. It also forces you to reflect and in reflection I remember some really good times; one in particular is this:

A couple of months ago I received an email from my friend Kristy (Eat, Play, Love, Our family food adventures) that she was coming up to Toronto and did I want to meet her? WHAT? Of course I want to meet her, who wouldn’t? Kristy and Mike have an incredible blog where they actively involve their two beautiful children, Mr. N and Miss. A; I particularly love that they do that because it’s how I became interested in cooking.

At first I was going to keep Kristy all to myself and not share the adventure, but then I felt that would be selfish so I emailed Barb (Profiteroles and Ponytails) and that got me thinking…what about Kelly (Inspired Edibles), she’s not far from Toronto and she might also be interested, and that’s where it all started. You already know that I’ve known Barb for many years and we’re very good friends with she and her husband — Barb’s blog is a lovely presentation of easy, family friendly recipes. Kelly is a fellow Ontarian, up in Ottawa (only a four hour drive away) and she runs a fantastic blog focusing on health and nutrition. Kelly and I have emailed once or twice before so I didn’t feel awkward in presenting the invitation. Without hesitation both ladies jumped (and I mean JUMPED) at the offer and boy am I glad because it was an incredible night of camaraderie, friendship, good conversation and few very hearty laughs! Thank you ladies for making the evening.

We started at a the classy Roof Lounge at the top of the Park Hyatt in Yorkville; it was as if we’d known one another a lifetime, the conversation just flowed and it was so easy to talk to everyone. We then made our way to Bar Mercurio our favourite Italian restaurant. JT and I have been dining at Bar Mercurio for quite some time and they know us by name so I knew were would get the royal treatment, and we weren’t disappointed. We had a complimentary dessert platter of biscotti and complimentary Lemoncello. Of course, I forgot to take photos early in the evening when there was still daylight, but fortunately Barb and Kristy both brought their iPhone 5s and the very lovely Omar obliged us with a photo. Thank you ladies again for a wonderful evening, I hope we can do it again soon.

It's a shame you can't see our lovely shoes!

It’s a shame you can’t see our lovely shoes!

Complimentary Biscotti always hits the spot.

Complimentary Biscotti always hits the spot.

Of course, one very popular topic of conversation was food and I happened to mention that we’re doing another progressive dinner on our street and that this time our theme is the BBQ, which means that every part of this meal must be grilled. I volunteered for dessert, because I love the challenge. This Coconut Pound Cake is one component to this very delicious dessert, but I won’t spoil the surprise!
I did alter this recipe to make it slightly healthier, by cutting the butter in half and replacing it with puréed apple (or you can use store bought unsweetened apple sauce). It worked out very well indeed!

PoundCakePan_0263

Preparing the cast iron pan for the BBQ

PoundCakeBatter_0264

I photographed the batter so you could see that the apple purée did not affect the texture

PoundCakeBBQ_0268

Baking on the BBQ

PoundCake_0272

Cooling the pound cake. Or do I call it the kilo cake?

Coconut Pound Cake

Serves 10-12

Original recipe from Epicurious, I made some adjustments to make it a bit healthier (original recipe had 1 cup butter in it)

Ingredients:

  • 2 cups all-purpose flour plus additional for dusting
  • 1 teaspoon baking powder
  • 1/2 teaspoon salt
  • 1 stick (1/2 cup) unsalted butter, softened
  • 2/3 cup of apple purée – see note below
  • 1 cup sugar (reduced from 1 1/2 cups)
  • 4 large eggs
  • 1 teaspoon vanilla extract
  • 1/2 teaspoon coconut extract
  • 1 1/2 cups unsweetened flaked coconut (6 oz) (original used sweetened)

Directions:

  1. Preheat the BBQ to 325°F. Turn off 1 burner completely.
  2. Prepare1.4L pâte terrine enamelled cast iron pan with non-stick cooking spray (or you can use a 9″ by 5″ by 3″ loaf pan) and line it with parchment leaving ‘handles’ on the long sides.
  3. Sift together the flour, baking powder, and salt in a bowl, set aside.
  4. Beat together butter and sugar in a large bowl with an electric mixer at medium-high speed until pale and fluffy, about 5 minutes with a stand mixer or 8 to 10 minutes with a handheld. In small increments, add the apple purée and beat an additional minute it two until full incorporated (don’t worry if it looks separated, just beat a little longer on a higher speed and it will smooth out).
  5. Add eggs 1 at a time, beating well after each addition, then beat in extracts. Reduce speed to low and mix in flour mixture until just combined. Fold in coconut gently but thoroughly with a rubber spatula.
  6. Spoon batter evenly into the prepared loaf pan, smoothing top. Bake in a BBQ on a warming rack in the back with the burner directly below turned off until golden and a wooden pick or skewer inserted into center comes out clean, 1 1/4 to 1 1/2hours.
  7. Cool cake in pan on a rack 15 minutes. Run a thin knife around edge of cake, then invert onto rack and cool completely.

Notes:

  • In order to reduce the butter, I used baked and puréed apples. Peel and core two apples, cut into small cubes, microwave in a heat proof glass bowl with 2-3 tbsp of water until very soft. Purée with an immersion blender until smooth. Push through a fine sieve. Cool and use as directed in recipe above.
  • Cake may be made in advance and stored in an air tight container in the refrigerator until required.
  • Cut slices may be frozen for future use (this is what I did)

Read Full Post »

Remember back in March, we held our second progressive dinner on our street and it happened to fall right smack in Earth Hour? Our course was the appetizer and I chose to make Sopa Azteca or Tortilla Soup. The soup was a resounding success, full of flavour, colour and texture, but I did the unthinkable — I completely forgot to record my recipe which worked out to be a hybrid of Rick Bayless’s Sopa Azetca and a recipe that my good friend Barb of Profiteroles and Ponytails posted about some time ago!

Cinco de Mayo was just a few weeks ago and I thought it’s a perfect time to recreate this wonderful soup, before the weather starts getting too hot to enjoy soup. There is a bit of prep work, but once it’s all done, you pop it into a slow cooker and forget about it. I would even suggest you make it the day before you want to serve it because it’s just that much tastier the next day.

This soup is well worth the effort. This soup is well worth the effort.

Sopa Azteca (Tortilla Soup)

Serves 4, dinner portions

Ingredients:

  • 100 g onions, coarsely chopped
  • 3 large cloves of garlic, coarsely chopped
  • 2 small smoked dried haberno chili peppers, seeds removed (haberno is hot)
  • 1 large pasilla chili pepper, seeds removed (pasilla is much more mild)
  • 4 coriander stems with roots (rinsed well)
  • 2-3 epazote stems (I could only find dried, you could probably use a bay leaf instead, but remember to remove it or omit it entirely)
  • 800 mL strained tomato purée (I prefer low sodium)
  • 2 L low sodium chicken stock
  • 1 tsp unsweetened cocoa
  • 2 tsp cumin
  • 1 tsp chili powder
  • 1 tsp smoked paprika
  • 2 tsp coriandre
  • 1 tsp salt
  • 2 cups frozen corn (or fresh on the cob BBQ’d and kernals cut off)
  • 1 small whole wheat soft tortilla shell

BBQ’d Chicken or Turkey Breast (omit if you are using a previously roasted whole chicken)

  • 400 g skinless, boneless chicken or turkey breast or 1 previously roasted chicken
  • 1 dried haberno pepper, seeds removed
  • 1 tsp cumin
  • 1 tsp granulated garlic
  • 1 tsp coriander
  • 1 tsp smoked paprika
  • pinch of sugar
  • 1 tsp salt

Avocado Garnish (or use guacamole):

  • 1 small avocado
  • 1 clove garlic, finely chopped
  • juice of one lime
  • 1/4 cup roughly chopped cilantro leaves
  • 2 green onions, roughly chopped

Other Garnishes:

  • 4 tbsp low fat yogurt
  • 4 tbsp shredded Mexican melting cheese (like Chihuahua or mozzarella)
  • 1 lime cut into wedges

Directions for the Soup:

  1. Prepare your slow cooker by preheating it. Add the tomato sauce and chicken stock to the slow cooker; add the dried epazote and cilantro stems and roots.
  2. If you are using a previously roasted chicken, remove all the tiny bones and add it to the slow cooker, covering with the liquid.
  3. Add the seeded, dried chilli peppers (if you prefer less heat, put these peppers into a cheese cloth bag and tie off).
  4. Add the onions and garlic and cocoa, cumin, chili powder, smoked paprika and coriander into the tomato sauce and stir well. Add  1 cup of corn.
  5. Cook on a medium low setting for 3-5 hours.
  6. Remove the woody stems and roots of the cilantro and epazot and discard, blend with an immersion blender until smooth. Strain through a fine sieve to remove all the corn husks return to the slow cooker and add the other cup of corn. Keep warm until you wish to serve.

Directions for the Chicken or Turkey (omit if you are using a previously roasted chicken):

  1. Combine everything for the rub but the chicken or turkey in a dedicated coffee grinder for spices and grind until it’s a fine powder.
  2. Remove any bits of fat or skin from the chicken or turkey and completely coat with the dry rub. Refrigerate while soup is cooking.
  3. BBQ (with or without smoke) until the internal temperature is 74°C or 165°F. Set aside for 10 minutes and then using a fork, tear bite size pieces off. If you’re not going to use it right away, refrigerate and reheat when ready to use.

Directions for the Avocado Garnish:

  1. Peel and chop the avocado into half centimetre cubes (1/4″).
  2. Combine with the garlic, lime juice, cilantro and green onions and stir well.
  3. Refrigerate until serving.

Tortilla Cones:

  1. Preheat the oven to 175° C or 350°F.
  2. Lightly brush the tortilla shell with olive oil to prevent it from drying out.
  3. Using a pizza cutter and a kitchen ruler, cut the tortilla shell into 5-7mm strips (1/4″).
  4. Join 3 strips together end to end using a bit of water and pressing the strips firmly together.
  5. Carefully wrap each strip, oiled side in, on the cannoli cones. I found that pressing some tin foil on the tips prevented them from unraveling.
  6. Bake for about 10 minutes turning once. You are aiming to dry out the tortilla into a crisp, cracker cone.
  7. When finished, allow to cool for a minute and gently pry the cone from the cannoli mold. Reserve for presentation.
Tortilla1_4657 The strips are being attached to each other.
Tortilla Cone_4658 I won’t lie and say it’s easy, but with a little practice, it worked out very well.
OvenReadyCone_4659 The cones are ready for the oven
They released perfectly without casualties. They released perfectly without casualties.

Soup Assembly:

  1. Reheat the soup and chicken/turkey separately until piping hot. Ladle a generous amount of soup into each bowl, if using BBQd chicken or turkey breasts, shred into bite sized pieces and pile the chicken/turkey in the centre. If using the whole pre-roasted whole chicken, remove from bones and shred and pile into the centre of the bowl. Add a tablespoon of the avocado mixture and a tablespoon of yogurt. Sprinkle a tablespoon of the grated cheese over the hot soup and add the tortilla cone last to stand in the centre.Serve immediately with a wedge of lime.

Serving suggestions:

  • Serve with Jalopeño corn bread.
  • Instead of fussing with the tortilla cones, just toast the sliced tortilla strips until crisp and serve piled in the centre like a Tee-Pee.


Read Full Post »

Earth Hour, did you do your part? We were the appetizer course for our third progressive dinner on our street and our course fell right on Earth Hour! We were ready, candle light, a wood fire in the fireplace, and gas cooking! It was lovely. We made Sopa Azteca (tortilla soup) but I didn’t write the recipe down (great excuse to make it again). But I did snap a cool photo of it, by candle light of course. Photo with Camera Amazing by Smug Mug and a little digital correction by Art Studio, all on my iPhone!
I used a hybrid of Rick Bayless’s Sopa Azteca and the one I previously posted.
20130324-085213.jpg

Now you must be thinking that I’m obsessed with Ebelskivers. No, please don’t think THAT — it’s pretty harsh, don’t you think? Well, I have been making a lot of these wonderful Danish treats (see this recipe and this recipe), but I just can’t help myself. Allow me to explain: Way, way back in time, it was Shrove Tuesday or Pancake Tuesday. Of course, that cold February day, I sleepily stood in front of the freezer wondering what we should have for dinner. Completely forgetting about Pancake Tuesday and I took out two 100 g servings of Salmon.

Fast forward to dinner time, and AHHHHHK! It finally hits home that it’s pancake Tuesday and we NEED to eat pancakes. But what about the salmon? We had plans on Wednesday so I couldn’t put it off; I had to create the savoury Ebelskiver Salmon with Spinach and Dill! Quite clever, don’t you think? Without tooting my own horn too much, I really MUST tell you this is one of the BEST versions of this Danish pancake I have made so far. It’s the BEST JERRY, THE BEST!

IMG_4162_BLOG

And now for something completely different: A precariously perched squirrel.

Savoury Ebelskiver: Salmon with Spinach and Dill with a Dijon Dill Béchamel Sauce

Makes 8-10 round Ebekskivers

IMG_4140_BLOG

The Salmon was perfectly paired with the subtle spinach and earthy dill.

Filling Ingredients:

  • 40 g onions (few tablespoons)
  • 20 g spinach (a good handful)
  • 2 tbsp fresh dill, finely chopped
  • 200 g Fresh or canned Salmon without skin, roughly chopped into 1-2 cm bits)
  • 1 tsp EVOO
  • Ebelskiver batter (below)
  • Dijon dill béchamel sauce (below)

Filling Directions:

  1. Heat the EVOO and cook the onions until soft and translucent, add the spinach and wilt. Set aside to cool completely. In the meantime make the batter.

Basic Ebelskiver Batter Ingredients:

  • 3/4 cups all-purpose flour
  • 1/2 teaspoon sugar
  • 1/4 teaspoon baking powder
  • 1 large egg, separated
  • 1/2 cup milk
  • 1 tbsp unsalted butter, melted and slightly cooled
  • 1/2 tsp salt

Directions:

  1. In a large bowl, whisk together the flour, sugar, baking powder and salt, set aside.
  2. In a small bowl, lightly whisk the egg yolk, then whisk in the milk and melted butter. Add the yolk mixture to the flour mixture and, using a wooden spoon, stir until well blended. The batter will be lumpy.
  3. In a clean bowl, using an electric mixer on high speed, beat the egg whites until stiff, but not dry, peaks form. Using a spatula, fold about one-third of the egg whites into the batter to lighten it, then fold in the rest just until no white streaks remain.
  4. Fold the cooled wilted spinach, onions, dill and chunks of salmon, and mix thoroughly.

Ebelskiver cooking directions:

  1. Preheat oven to 325°F.
  2. Spray the ebelskiver pan with a good squirt of non-stick spray and place over medium heat. Add about 1/4 cup batter to each round as soon as the pan is quite hot. Maintain the heat at medium, you don’t want to burn the ebelskiver edges before the insides get a chance to cook.
  3. Cook until the bottoms of the pancakes are lightly browned and crisp, 3-5 minutes. Using a fork, gently push the ebelskiver until it entirely turns around in the pan and the uncooked portion is now facing the bottom.
  4. Transfer the finished spheres to a platter and finish baking in the oven while you repeat to finish the batter (about 10-12 minutes).
    Serve hot with a Dijon Béchamel.
IMG_4141_BLOG

The Dijon Dill Béchamel was a sophisticated change to Maple Syrup.

Dijon Dill Béchamel

makes 1/2 cup

Ingredients:

  • 1 tbsp unsalted butter
  • 1 tbsp flour
  • pinch of salt and pepper
  • 2 tbsp fresh dill, finely chopped
  • 1 tbsp Dijon mustard
  • 1/2 cup milk

Directions:

  1. Melt butter in a small sauce pan. Add the flour and stir until well combined. Cook this flour paste but don’t allow it to brown. Add the Salt and pepper.
  2. Slowly add the milk whisking to combine and cook this mixture until smooth and thick, stirring constantly. If it’s too thick, just add a bit more milk and stir until hot.
  3. Remove from heat. Add the mustard and the dill and whisk until smooth.
  4. Serve warm over Salmon Spinach and Dill Ebelskivers.
  5. Enjoy.
IMG_4145_BLOG

They are rather filling, so you only need two, but believe me you’ll want FOUR!

We purchased this salmon well before the hoopla about Canadian Salmon having a fish influenza virus.

Read Full Post »

You may recall I posted the hot and cold smoked salmon for our progressive dinner party here and I served it with a Quinoa Tabouleh (leave out the feta and poached egg) and a rather simple Creamy Cole Slaw by Martha Stewart. Since the recipe was basically verbatim, I wasn’t going to post it, but I’m still having the slaw having added more vegetables and made up more dressing, so I thought to my self, “self, this is good enough to post.” And so I shall. The dressing is sweet, tangy and creamy and it is not over the top. I don’t like the creamy slaws they serve in deli’s either as they are just too mayonnaise-y. This one is perfect. I know I will make this again during this summer. Because we had no salmon left over for lunches, on Sunday I had roasted a whole chicken with Herbs en Provence and just shredded it on the slaw. It was delicious.

A tangy but not too creamy slaw.

A Very Simple Creamy Cole Slaw (by Martha Stewart)

Serves 8-12

Ingredients:

  • 1 tablespoon Dijon mustard
  • 1 tablespoon cider vinegar
  • 1 tablespoon freshly squeezed lemon juice
  • 1/2 tablespoon sugar (you may not think this is necessary, but it really smooths out the flavours)
  • 1 teaspoon coarse salt
  • 1/2 cup fat free mayonnaise (this was regular mayo)
  • 1/4 cup fat free Greek Yogurt (this was sour cream)
  • 1 small napa cabbage, (about 1 3/4 pounds), finely shredded
  • 1 medium carrot, finely shredded (this was 2)
  • 1 small celeriac, finely shredded (this is my addition)
  • 1 small chili pepper, diced finely as garnish (thank you Sissi for pointing out that I had missed this).

Directions:

  1. Whisk together mustard, vinegar, lemon juice, sugar, salt, mayonnaise, and sour cream in a small bowl. Refrigerate dressing, covered, until ready to use, or up to 2 days.
  2. Put cabbage, carrots, and celeriac in a large bowl and toss. Reserve dressing until an hour or so before serving.
  3. Pour in dressing over the amount of slaw you will consume and toss thoroughly. Refrigerate, covered, until slaw begins to soften about 1 hour. If not using immediately, refrigerate undressed slaw, covered.

The shredded BBQ’d chicken with the herbs en Provence made it a lovely summertime dinner

Read Full Post »

Three neighbours on our street are participating in a progressive dinner party. It’s where we each have a course at our home for the dinner. The idea came to me after seeing Episode 23 of Season 7 (clip), full episode for US readers only of Desperate Housewives, the Come on Over for Dinner episode. I can only hope that no one will burn their food, that there will not be a murder and that none of the husbands plan to leave any of the wives at our event. JT and I are doing the main course and after careful consideration, we decided that a cold dinner on such a hot night 88°F or 31C, would be perfect. And it’s pretty easy too, not leaving any chance for timing issues because everything is prepared in advance and kept in the fridge. Clever, eh? That also saves me from burning the dinner, oh, my, my.

Let me start off that I am no expert smoker like Greg at Rufus’ Food and Spirits Guide but I dare say that I do make a great hot and cold smoked salmon! The texture is more like baked salmon, but it parlays that gorgeous smoky flavour that cold smoking brings to the table. I would also like to add that we do not have the professional smoker that Greg has, but we do have an 8″ Smoke Daddy cold smoker. Now these folks at Smoke Daddy have taken the guess work out of the equation for us amateur smokers and made it very easy to adapt our Weber to be able to add the sophisticated flavour of smoke to any BBQ’d dish.

We prefer to get the Wild Pacific Salmon which has the deep pink colour because it’s beautiful and very flavourful (incidentally, the pinker the salmon the more shrimp it ate in the wild) but this recipe will work with any salmon.

Hot and Cold Smoked Wild Pacific Salmon

I prefer my fish soaking in a brine.

Recipe is from a multitude of sources perfected over the years

Serves 6

Ingredients:

  • 1/2 cup brown sugar (or maple syrup)
  • 1/4 cup table salt
  • 4 cups cold water
  • 1 kg wild Pacific Salmon, skin on or off (it’s easier to move about if you leave the skin on, it practically falls off on its own when it’s done)

Directions:

  1. Mix the brown sugar, salt and water until dissolved. Lay salmon in a long container with a good lid (one that fits into the fridge).
  2. Pour brine over the salmon and refrigerate with the lid on over night or up to two days.
  3. About 1 hour before you are ready to smoke, remove the salmon from the brine and dry off completely. Place the fish on a wire rack above the now empty container it was in and refrigerate without any cover for 1-2 hours. It needs to dry out (much like me, after a long weekend with Paul and T!)
  4. Prepare your cold smoker according to directions (we used mesquite wood). Place salmon skin side down in the smoker and cold smoke for 45 minutes (I placed my fish close to the front because eventually I will turn the back burner on).
  5. After about 45 minutes, turn the back burner on to a very low heat of 121°C or 250°F continuing to cold smoke (with the 8″ Smoke Daddy, I had to refuel once during the entire cooking process). Bake and smoke the fish for an additional 30-90 minutes, depending on how thick it is. You can tell it’s done by pressing down on the thick flesh, it should bounce right back.
  6. Serve cold, warm or hot with a lemon aioli.

Smokey, sweet and just ever so slightly salty. This will go very well with the lemon aioli (sorry Katherine).

Read Full Post »