Feeds:
Posts
Comments

Posts Tagged ‘Salad’

This is an update of a salad I used to enjoy at one of favourite Italian restaurants in Yorkville. Unfortunately, they took it off the menu so I had to remake it at home.

They roasted the tomato slices in their wood-fired pizza ovens because Toronto tomatoes are brutal, particularly in the winter. I don’t have a wood-fired pizza oven, so I air-fried them with my Instant Pot Air-Fryer lid. You don’t want the tomatoes completely dehydrated, just enough to condense the flavour so it actually tastes like a tomato. Top the slices with a fresh mozzarella or better yet, a burrata and dollop homemade pesto mixed with a little prosecco vinegar and sprinkle some toasted Italian (or Spanish, as I had) pinenuts over the dish. Presto, you have a memorable appetizer.

The tomatoes really pop when you remove some of the moisture, a perfect foil for the rich fresh mozzarella

Fresh Mozzarella Salad

Serves 2-4

Ingredients:

  • 4-6 tomatoes, sliced in half, deseeded and air-fried
  • 1 Fresh Mozzarella or Burrata
  • 60 mL Pesto
  • 30 mL Prosecco vinegar
  • 15 g pinenuts, toasted
  • 1 lemon, zested
  • Fresh basil leaves

Directions:

  • With everything at room temperature, lay the dehydrated/roasted tomatoes on the plate(s) and add the sliced mozzarella on top.
  • Combine the pesto with prosecco vinegar and drizzle on top of the tomatoes and mozzarella. Sprinkle the lemon zest on top and garnish with the toasted pinenut and torn fresh basil leaves.

I wanted to try the newest rage, grated frozen tomato over the fresh mozzarella and although it was enjoyable, it isn’t practical if serving more than 4 people and it’s hot outside, the frozen tomato will melt too quickly.

Read Full Post »

We usually have small quantities of a lot of different produce leftover as we approach shopping day, you know, a little of this, a little of that. That is where this bowl came from — it was an inspiration to use up the small portions of veggies before they were past their prime. The recipe is just whatever you have on hand, so I have not posted actual quantities, but there is no denying that this bowl is a keeper! It’s filled with flavour, texture, crunch against the creaminess of the avocado dressing. 

Lots of flavours and textures make up this tasty bowl.

Green Goodness Bowl

A KitchenInspirations Original Recipe

Ingredients:

  • Greens, shredded
  • a handful of Chickpeas, cooked
  • about half a Mango, small dice
  • 1/2 Avocado, small dice 
  • Cheese, small cubes
  • a handful of Pearl barley, cooked
  • a handful of vinegar coleslaw
  • a couple of good pinches of Sunflower Seeds, toasted

Directions:

  1. Place the greens at the base of the bowl and add each ingredient on top, into its own quadrant, leaving the sunflower seeds to garnish after you have dressed your bowl.
  2. Dress with the avocado dressing (recipe below) and garnish with the sunflower seeds. Serve immediately.

A delicious combination that is satisfying.

Green Goodness Dressing

A KitchenInspirations Original Recipe

Makes enough dressing for 2 bowls.

Ingredients:

  • 1/2 Avocado
  • ~ 15 mL mayonnaise
  • ~ 15 mL greek yoghurt
  • ~ 15 mL lemon juice
  • pinch of tarragon
  • water, to thin

Directions:

  1. Add all of the ingredients with the exception of the water to a tall, thin jar made for your immersion blender and blend until smooth adding water, little by little to make it loose enough to pour.

Notes:

  • It is more flavourful to have sweet, salty and savoury things. 
  • I like to toast the barley for a nuttier flavour when cooked.
  • Alternatives to mango: craisins, raisins, grapes.
  • Alternatives to chickpeas: lobster meat, crab meat, tuna, chopped ham, edamame.
  • Alternatives to barley: rice, bulgar, Isreal couscous, couscous.
  • Additions: peas, corn, diced peppers.
  • Alternatives to sunflower seeds: pepitas, roasted walnuts, roasted peanuts.


Read Full Post »

We just love Asian flavours, particularly in the summertime. The food is light, fresh and easy to eat on these endless, hot, muggy, summer days. I’ve made quick-pickled daikon in the past as a garnish but this time I wanted something that will serve a few meals. I love Nami’s no-nonsense approach to authentic Japanese food so her blog Just One Cookbook is generally my go-to and this was no exception. I did make a minor change by omitting the heat and reducing the sugar (even though she warned against it). I love the fresh crunch of this daikon pickle. But be warned, the daikon odour will penetrate everything and it is potent! I put the Lamp Berger on every time I open the jar!

Pickled Daikon

For the original recipe, please click here.

Makes about 500 mL

Ingredients:

  • 454 g fresh daikon, julienned thinly
  • 45 g sugar
  • 30 mL rice vinegar
  • 5 mL mirin
  • 2 g salt

Directions:

  1. Combine all of the ingredients in a tightly sealable container (you may wish to double bag it because it really stinks up the refrigerator).
  2. Mix well. Seal the container and place in the fridge for 2 days.
  3. After 2 days, rinse well and strain. Sterilize a jar and add the daikon to the jar, seal and refrigerate. Will keep for about 1 month.

Read Full Post »

This fresh, tasty bowl was a staple a few years ago and then I completely forgot about it. What I love about this dish is the versatility, it has a lot of fresh taste but if you don’t have something, don’t fret, just substitute it with something you have.

Presentation is always colour blocked but to eat, simply mix it all up. The dressing is super easy too, just mix and taste. The only downside is that there is a bit of prep but you can do it in advance and just assemble the dish. Below is a rough recipe for one person, just multiply it for as many as you need!

Avocado, Mango and Shrimp Bowl

A KitchenInspirations Original Recipe

Makes one bowl

Ingredients for the bowl:

  • 80 g cooked salad shrimp
  • 50 g sticky rice (uncooked weight)
  • 15 mL rice vinegar
  • 1/2 an Avocado
  • 1/2 an Mango
  • 10 cm Cucumber
  • small handful Corn
  • 1 rib of Celery
  • Toasted sesame seeds
  • Green onions

Directions:

  1. Cook the rice and sprinkle with the rice vinegar and mix well. Allow to cool.
  2. Chop the vegetables into similarly sized cubes.
  3. Layer the rice on the bottom of the bowl, then add each of the vegetables in groups. Add the shrimp and garnish with the green onions and toasted sesame seeds.

Ingredients for the dressing:

  • 15 mL rice vinegar
  • 15 mL hoisin sauce
  • 30 mL fresh lime juice
  • 2.5 mL toasted sesame oil

Directions:

  1. Combine the dressing ingredients and whisk until emulsified completely.
  2. Pour evenly over the bowl, making sure you get it into the crevices so that the rice is evenly coated.

Notes:

  • Add finely chopped shallots if you can tolerate raw onion.
  • Change the flavour profile completely and add chopped black olives, marinated artichokes and roasted red peppers for a Greek bowl. Make a tzatziki dressing, or a simple white wine vinegar vinaigrette and olive oil with lemon juice and chopped oregano.
  • Use defrosted frozen corn or grilled corn if you have it.

Read Full Post »

During our time in Spain, we ate a lot of delicious tapas. One such tapa was the Ensalada de Aguacate y Atún, a simple yet spell-binding combination of tuna, avocado, lemon juice and olive oil. Using the very best of all four ingredients allows each one to shine individually and together they melt into the most magical concerto. We just couldn’t get enough of it. It was, however, not easy to find in our little town so I decided to make it part of our weekly meal plan. I made this one for our Valentine’s Day lunch.

Ensalada de Aguacate y Atún

Serves 2

Ingredients:

  • 150 g canned tuna in oil
  • 200 g ripe avocado, cubed
  • Juice of one lemon
  • A good drizzle of olive oil
  • Arugula

Directions:

  1. Drain the tuna and combine it with the cubed avocado and lemon juice.
  2. Spoon evenly onto a bed of arugula. Drizzle generously with olive oil.

Notes:

  • For presentation purposes, I layered the ingredients over the arugula. In reality, it is served well combined.
  • The arugula was my addition, the true dish is served on its own.

Read Full Post »

Summer has finally rolled in along with the humidity that comes along for fun. I get tired of the humidity but I won’t complain, winter is just around the corner and I’ll be longing for the sunshine and heat soon enough. I am constantly looking for cool summer dishes that don’t need a lot of heat or kitchen time and this salad fits the bill. Shirataki noodles are an acquired taste, they have an unusual aroma straight out of the package and the texture can be a bit off-putting. But once you get the taste for it, it’s really addictive. I love the fresh ingredients that we toss in with the noodles, it’s a wonderful summer meal. And it’s very little effort other than marinating the noodles overnight. The marinating helps manage the strong aroma of the noodles.

Shirataki Noodle Salad

A KitchenInspirations Original Recipe

Serves 2 as mains or 4 as sides

Ingredients:

  • 1 package shirataki noodles (about 200 g)
  • 30 mL dark soy sauce
  • 30 ml rice vinegar
  • 15 ml hoisin sauce
  • 25 mL sesame oil
  • Coleslaw
  • Salad shrimp
  • 30 mL rice vinegar
  • 5 mL honey
  • 15 mL toasted sesame oil
  • 15 mL soy sauce
  • Sesame seeds and green onion for garnish

Directions:

  1. Rinse the noodles 5-6 times in cold water.
  2. Combine the soy sauce, rice vinegar and hoisin sauce and mix well.
  3. Pour over the rinsed noodles and turn several times until well coated.
  4. Refrigerate overnight.
  5. Strain and stir fry the noodles in the hot sesame oil until most of the moisture has dried off, some bits can be crunchy.
  6. Allow to cool completely.
  7. Toss the noodles with the coleslaw and shrimp. Set aside.
  8. Make up the dressing by combining the second rice vinegar, honey, toasted sesame oil and soy sauce and mix well.
  9. Pour over the salad and garnish with sesame seeds and thinly sliced green onions.

This salad is quite versatile, in the photo below, I had some shredded spinach in the fridge so in it went!

This salad has a lite marinade and I used shredded BBQd chicken.

b

Read Full Post »

We have been really enjoying Korean cuisine for a while now, and my dear friend Barb (Profiteroles and Ponytails, in hiatus) gave us a wonderful jar of gourmet Kimchi for Christmas. The first time I ever tried Kimchi was in Paris with my friend Charles (Five Euro Foods, also in hiatus) when he took us to a Korean BBQ place. It was a delicious lunch filled with bright and heady flavours but I have to tell you that I did not love my first experience with Kimchi. Fortunately, since then, I have tried many different versions and I am very happy to report, I LOVE IT! My friend Sissi over at With a Glass is the Kimchi expert, she has made several versions and recipes using Kimchi, check out her lovely blog. In fact, it was the persistence of Sissi’s recipes on her blog that made me want to make my own, plus that jar that Barb so generously gave us was awesome and I wanted more! Thank you, Sissi and Barb.

The recipes are as easy as they sound, the most difficult part will be the waiting until it ferments and then dig in. It works well with Korean but we’ve also had it with Indian and it is wonderful. This makes a smallish batch but it is enough for a few meals.

Kimchi

Please click here for original recipe.

To print recipe, click here.

Makes 1 650 mL jar

Ingredients:

  • 450 g chopped and grated vegetables (see notes)
  • 75 g table salt
  • water to cover
  • 20 g ginger, grated
  • 16 g garlic, grated
  • 6 g Korean red pepper
  • 13 g sugar
  • 30 mL fish sauce (or 45 mL, to taste)

Directions:

  1. In a large bowl, add the coleslaw mix (minus the celeriac). Pour the salt over the entire mix and rub in with your hands. Cover with water. Allow to sit at room temperature for 12-24 hours, stirring occasionally.
  2. Rince the salted coleslaw mix 4-5 times with fresh water. Add the green onions and celeriac and mix thoroughly.
  3. In a small glass bowl, combine the ginger, garlic, red pepper sugar and fish sauce and mix well to create a smooth paste. Pour over the coleslaw mix.
  4. Using a gloved hand, rub the paste into the slaw until it is fully incorporated and evenly mixed. Pack the entire slaw mix into a sterilized jar, pressing down to remove large air bubbles, leaving about 2.5 cm space at the top, then cap with the lid. Allow to ferment for 2-3 days in a cool spot but not the refrigerator. It’s probably a good idea to open the jar every-so-often to release the gases that build up during fermentation. Once it has reached your desired flavour, refrigerate. Some recipes need to sit in the refrigerator for a couple of weeks but this one you may use right away, knowing that the flavours will only get better as it ages.

Notes:

  • Buying an entire cabbage is far too much for just the two of us, it would take us a year to go through it all, so I buy the pre-shredded coleslaw mix in the bag salad section and augment it with what I have at home, this time it was celeriac and green onions.
  • I would use gloves to massage the paste into the vegetables, the red pepper may stain your hands and nails.

Read Full Post »

pickledradishes_first

I had an excess of radishes in my pantry so I decided to pickle them before they turned bad. They will make a nice garnish to pulled pork or a rich stew like bœuf bourguignon.

Pickled Radishes

A KitchenInspirations Original Recipe

Makes 250 mL (1 cup)

Ingredients:

  • 160 g (~1 cup) radishes, sliced thinly
  • 30 g (~5 cloves) garlic, sliced thinly
  • 250 mL (1 cup) white vinegar
  • 5 mL (1 tsp) salt
  • 5 mL (1 tsp) sugar
  • 5 g (~ 6 sprigs) dill sprigs
  • 250 mL (1 cup) sterilized canning jar

Directions:

  1. Combine vinegar, sugar and salt and heat until both salt and sugar have dissolved, stir well.
  2. Add the radishes and garlic slices to the jar and pour the hot liquid over to cover. Tap the jar a few times to burst any air bubbles.
  3. Pour the liquid over the radishes and tap the jar on the counter a few times to get the liquid dispersed evenly. Add the dill sprigs, making sure they are covered in the liquid. Screw on the lid.
  4. Use immediately or process jar for 10 minutes (or as required in your neck of the woods), allow to cool on the counter. Label. Store for 3 months in a cool, dark place or use within a month in the fridge.

pickledradishes

Read Full Post »

WheatBerryTabbouleh_First

Isn’t it funny how the universe works? Some things seem like they are way to coincidental and happen for a reason. I’m fatalistic that way. Case in point: recently I assisted (yes, I’m still assisting because I’d rather be working than not, so if I have free time on my calendar, I’ll assist) a lovely stylist for a print shoot at an amazing house up in Caledon Hills. This house is 15,000 square feet (1,400 square metres!), indoor pool, outdoor pool, fitness gym, billiards room and the list goes on. The custom kitchen with a massive stove, a walk-in pantry (with huge side-by-side fridge freezer like this) was just fantastic to work in! A bit grand for lil ol’ me but gorgeous none-the-less. Around 7:30-8 the owner came home and sat in the kitchen to have a bit of dinner from the craft table. We started chatting while I was grilling chicken breasts and it turns out that she is a recipe developer and cookbook author! In fact, she is a fitness guru (and gorgeous and amazingly fit), you may have heard of her…Tosca Reno!!!! How cool is that??? She gave me a copy of her Eat-Clean Diet® recipe book, autographed and all! I gave her my contact info and am hoping to have the honour and privilege of working with her sometime soon. But that’s just half the story.

Fast forward to the following Wednesday and I’m down-town for my weekly meeting (and very generous birthday lunch, thanks KiK gang!) and I’m telling Andrea, one of the partners my amazing story and lo and behold, that very Saturday (the day after I was assisting in Caledon Hills) Andrea bumped into a woman in Caledon carrying boxes and some boxes fell and Andrea went over to help, so who was the woman? Tosca Reno!!! Andrea recognized her immediately because she has followed her on Facebook and just loves her Eat-Clean Diet® program. Coincidence? I think not!

So what does this story have to do with this post? I’m getting to it…As we are in the heat of the summer, enjoying every bit of the 35° C (with 90%+ humidity) we’re trying to eat lighter (plus losing a few pounds wouldn’t hurt either) and in light of my new, delicious Eat-Clean Diet® cookbook, I decided to make a wonderful wheat berry tabbouleh. For me, a tabbouleh is always a combination of my favourite things, so this recipe is quite unique to my tastes, but feel free to amend to your own specific tastes. True tabbouleh aficionados will baulk at my recipe saying it’s not authentic tabbouleh and that’s just fine with me…call it whatever you wish, but I hope you make it and I hope you enjoy it.

Would you like a bowl?

Would you like a bowl?

Wheat Berry Tabbouleh with Shrimp

A KitchenInspirations Original Recipe

Serves 4-6

Ingredients:

  • 1 cup wheat berries, rinsed and sorted through
  • 3 cups low sodium chicken stock, or water
  • 20-30 shrimp (21-30 per pound, 5 per person)
  • 1 ripe avocado
  • 1/2 cup each fresh or frozen corn and peas
  • 1/2 cup quartered grape tomatoes
  • 1/4 cup finely diced red onion
  • 1/4 cup chopped green onion
  • 1/4 cup roughly chopped fresh parsley
  • 1 tbsp roughly chopped mint
  • 1 lemon
  • 1 clove garlic
  • 1 tbsp olive oil

Direction:

  1. Bring wheat berries to a boil and then simmer for about an hour.
  2. Meanwhile,  put the diced red onion into a small bowl of very cold water (this mellows the pungency of the onion).
  3. Cut the avocado into smallish cubes and set into a bowl. Squeeze one lemon and add the finely chopped garlic and olive oil and stir well. Pour over the avocado.
  4. Combine the corn, peas, green onion and tomatoes and set aside.
  5. Grill the shrimp until opaque, set aside.
  6. Once the wheat berries are cooked, add the avocado and corn mixture and stir well. Season with salt and pepper to taste. Gently stir in the shrimp and the finely chopped herbs.
  7. Serve warm or at room temperature.

WheatBerryTab_2

This is truly a delicious and filling meal.

We were lucky enough to have a couple of events for the PanAm games right in our neighbourhood so JT and I took a short walk down to see one of them, The Women’s Road Cycling in High Park. We took Gold and Bronze in this gruelling race (I say gruelling because I was dripping sweat just standing in the heat, I can’t imagine how hot it was for the athletes!).

I made this short film of our experience, it was amazing being there in such a positive crowd!

Read Full Post »

For a luncheon one weekend at the cottage, I served the Empanadas because I wanted something reasonably fast as we were leaving to get back to the city. While the Empanadas were warming in the oven, I put this simple, yet tasty salad together. The salad really should have been entitled The Kitchen Sink Salad because in all honesty I was just trying to use up some ingredients we had left on our cottage weekend. It’s a delightful combination of salty, sweet and peppery. If you don’t like feta, add some crispy fried bacon. But don’t leave out the watermelon or avocado!

salad

Watermelon, Avocado and Feta Salad

Serves 2

Ingredients:

  • 1 cup cubed watermelon
  • 2 ounces feta
  • 1 avocado, cubed
  • a handful or two of arugula and spinach mix
  • 2 tbsp olive oil
  • 4 tbsp white balsamic vinegar
  • t tsp Dijon mustard

Directions:

  1. Combine all of the ingredients to the arugula mix.
  2. In a small glass jar, combine the olive oil, white balsamic vinegar and Dijon and shake vigorously to combine.
  3. Toss salad just before serving.


Empanada and salad2

A really tasty lunch.

Read Full Post »

September ALREADY? WTF? Where on earth did this summer go? Good luck to all the mini humans going back to school!

I thought I’d share a little info about a food photo shoot that some of you may not know. It’s actually quite amazing at how many people this industry employs — so next time you see a food commercial, ad or packaging with a food photo, consider this (I’ve really simplified this complex process):

A designer designs the packaging or advertising prior to the photo shoot. There are many layers in the design phase and several people involved but it boils down to the art director and client who dictates the look and feel of the photo. The Food Stylist is involved in the design phase if there needs to be special ‘recipes’ or plating requirements (like I was involved in coming up with 8-10 ideas for the products we were shooting last week).

Once a design is established, the Art Director creates a “Pre-Pro” which details the props and “recipes” that will be photographed. The “Pre-Pro” is approved by the client and distributed to:

  • The Prop Stylist (this person is an expert in props, where to find them, rent them or buy them). A prop is anything that may be used in the photo, such as fabric, plates, noise (background items that are out of focus) and cutlery. Props are generally reserved for the photograph and not used in the preparation of the food. Depending on the photo shoot complexity, the Prop Stylist may be required to stay on set to select the exact props to be used in each shot. If they don’t stay, the Art Director makes that decision.
  • The Food Stylist (this person is an expert in food, how to get the best out of food so that the consumer recognizes instantly the message the Art Director and client wishes to convey). The food stylist buys the components to make the ‘recipe’ happen. Contrasting colours and textures are paramount. The Food Stylist may have an assistant depending on the complexity and budget of the shoot.
  • The Photographer (this person is the expert in photography, understands light whether natural or man-made and even how to make man-made light look natural because they have more control over it). The photographer will prepare the lighting set up required to execute the art director’s wishes. The Photographer may have an assistant depending on the complexity and budget of the shoot. And sometimes the Photographer brings a tasty breakfast.
  • The Client: The Boss. The client knows the intricacies of the product and what they feel is important to convey in the photo. The client approves the shot before we move on to the next one. Sometimes the client is off site, but that adds a layer of time to the shoot and we all know that food generally doesn’t last long on set. Things dry out, melt and don’t look appealing. We always prefer the client to be on set.

Shoot day starts early and is busy from the get-go. Photographer, Prop Stylist and Food Stylist are usually the first to arrive. There is a lot of shlepping, but it’s generally a very generous group and everyone helps get everything organized. Of course, the behind the scenes studio team sets everything in motion the day before, food, snacks, coffee/tea, water are all provided generally — the one thing for sure, there is ALWAYS A LOT of food!

Once everything and everyone is set up, we begin to work getting things ready for the first shot (as a Food Stylist, I also keep in mind all of the shots for that day to see if I can consolidate any tasks that will save a bit of time in the long run). The Art Director I recently worked with enjoys shooting with natural light, but that can be challenging since natural light changes all the time so the photographer is constantly tweaking the settings and extra lighting to make the shot perfect.

In terms of food styling, there are many tricks of the trade and the stylists I’ve worked with have been incredibly generous with their advice, but as with anything else, I still have a lot to learn. Apparently, wearing comfortable shoes is something I haven’t learned…but I am trying ;-). I have a couple of pairs of stylish yet comfortable shoes but I still gravitate to stylish over comfort. One of these days, I’ll learn, it’s generally a very long day where the only time I sit is for about 30 minutes at lunch!

So I hope you’ve gained a little appreciation for the energy, people and time involved for food photography; after all, that strawberry on the front of the cereal package was carefully chosen over hundreds of strawberries, deliberated over (with such phrases as “it’s not doing it for me”, or “is it just me..,?”, and “do you see a face in that?”) intentionally placed and oiled for shine and to catch a little sparkle! Who knew?

CapreseSalad_3580

A delicious combination of flavours.

Recently we had my GF BFF and her hubby for brunch and I wanted to serve something that just screamed SUMMER! And for me, there is nothing that screams summer than a Caprese Salad. We searched for a local farmers market but sadly missed the boat because we were too late getting there so I was stuck with grocery store tomatoes. I bought the best, vine ripened variety but was still disappointed. They lacked that great, summer tomato flavour. So I decided to oven roast them to concentrate the flavours and we were not disappointed!

Caprese Salad with a Twist

Serves 4

Ingredients:

Directions:

  1. Alternately layer the sliced Bufala Mozzarella with the tomatoes on a plate.
  2. Combine the home made pesto with the white balsamic until a drizzle-able consistency is achieved. Drizzle over the tomatoes and mozzarella. Serve at room temperature.
  3. Enjoy.

CapreseSalad_3578

A nice, summer salad.

Notes:

  • I would not substitute sun-dried tomatoes for oven dried tomatoes because they are much stronger in flavour and will over power the subtle flavour of the bufala mozzarella.
  • Bocconcini may be substituted for the Bufala Mozzarella but it is a harder cheese with a slightly stronger flavour.
  • Burrata cheese is a beautiful substitute but you wouldn’t want to cut it because all that delicious cream will pour out. Serve a small Burrata and surround it with the tomato slices and drizzle the pesto over everything.

Read Full Post »

AsianPorkSalad_2379

It’s tangy, crunchy and quite delicious.

I always knew that my blogging would someday parlay into something more but did I ever hope it would be two-fold? Never in a million years! First it was food styling (which I’m still doing) and as luck would have it, I recently reconnected with a colleague and a new opportunity was born: I’ve been social media content! How cool is that? I’ve been very fortunate to have been given this opportunity and I thank my lucky stars every minute! And I thought I was just lucky in love! So if you need food related social media content, I’m your gal! Email me at evataylor at bell dot net  and we’ll ‘talk’!

I know you’re scrolling ahead to see these photos so let me take the suspense out: they were taken on the morning of April 15, 2014 — I kid you NOT! I was hoping to be yearning for light, salad-ie dishes by now but sadly the weather is STILL not cooperating. Yes, we did have a couple of exceptionally warmish days last weekend but for the most part it’s still soup and stew weather. And like my rebellious feet I am holding out and silently switching gears to a more summery palate!

Snow_2420

I took this photo in High Park on my morning walk. Yes indeed it’s pretty…if it were December! Not April 15 for sure.

Snow_2424

It was cold enough that the snow stayed all day.

Snow_2425

It really is rather beautiful.

As I’m sure most of you operate with similar intentions, I cruise blogs particularly when inspiration evades me and this recipe was no different; it was inspired by the lovely Sawsan’s beautiful Sushi Salad. I must confess that I didn’t record or photograph the first attempt of this creation which was a huge mistake (or was it?) so we actually had this tasty dish two nights in a row! And if it were up to me, it would have been three or four!
The volumes are ball-park, use what you like, omit what you don’t! Easy. If you have celery add it, if you don’t, no worries. The beauty of this dish is the crunch and variety of each and every bite.

Sawsan used ‘cauliflower’ rice but the cauliflower was not nice the day I wanted to make this dish so I substituted Napa cabbage. Since we were having this as a dinner course, I added a marinated BBQ’d pork tenderloin as our protein but chicken or fish would be an excellent substitution.

AsianPorkSalad_2378

The avocado adds a certain je ne said quo is, but may be omitted if you’re watching calories.

Asian Inspired Crunchy Spring Salad

Serves 2 as a dinner portion. Please click here for the original recipe.

Ingredients for the pork and marinade:

  • 200 g pork tenderloin
  • 1 tbsp soy sauce
  • 2 tbsp lime juice
  • 1 tbsp finely chopped garlic
  • 1 tbsp grated ginger
  • 1/4 cup mirin
  • 1 tsp toasted sesame oil
  • 1 tbsp hoisin sauce

Directions for the pork and marinade:

  1. Remove all fat and silver skin from the tenderloin. Stab it a few times with a fork, all the way around.
  2. Combine the ingredients for the marinade and roll the prepared tenderloin in it to cover. Let rest in the fridge for a minimum of 20 minutes or overnight.

Ingredients for the dressing:

  • 1 tsp soy sauce
  • 1/4 cup rice vinegar
  • 1 tbsp grated ginger
  • 1 tbsp toasted sesame oil

Directions for the dressing:

  1. Combine all ingredients and mix well. Set aside. (may be prepared the day before)

Ingredients for the salad:

(as suggestions, if you dislike something omit it and if you love something, by all means add more!)

  • 5-6 cups of finely sliced Napa cabbage
  • 1 cup cucumber, cubed
  • 1/2 avocado, cubed
  • 1/2 red pepper, cubed
  • 1/2 medium sized red beet (raw, peeled and julienned)
  • 2 green onions finely chopped
  • a good bunch of cilantro, finely chopped
  • 1 tbsp toasted sesame seeds

Directions for the salad:

  1. BBQ the tenderloin until the internal temperature reads 71° C or 160°F at its thickest part. Allow to rest for 10 minutes before slicing.
  2. Lay a generous bed of the finely sliced Napa cabbage on each plate.
  3. Sprinkle the cubed cucumber, avocado and red pepper along the outer edge of the base. Add the julienned beets to the centre so it just peeks outside the ring (the beets discolour the Napa so I didn’t want it to bleed all over it).
  4. Garnish with the green onions and cilantro.
  5. After the pork rests for 10 minutes, slice into thin slices. Lay 100 g sliced pork onto each plate and garnish with the dressing and the toasted sesame seeds.

AsianPorkSalad_2380

The abundance of colour was no mistake…perfect for a dreary, wet spring day.

Read Full Post »

Has this ever happened to you: you hear about something for the first time and then you keep hearing about it again and again? It’s happened to me recently and it’s the absolute, lip smacking, deliciously tantalizing Kale Salad by renowned chef and restauranteur of Gusto 101, Daniel Mezzolo. My friend Kim (old boss, neighbour) mentioned this salad a while back and I’ve seen it come up more and more often which has made me want to taste said salad, however, that is much more difficult than one would think. You see, Gusto 101 takes reservations only until 6pm and then it’s a free for all. We’ve driven by many times around 7 or 8 and there is always quite the line-up outside, waiting for a table. Now, I know I’ve mentioned this before, but I just don’t like to line up. I figure if I am about to spend upwards of $80 for a meal, I shouldn’t have to wait in line to do so. But this is the reality if one needs to try this salad, and I really, really needed to try it.

I searched the net and found this helpful video on making this healthy salad, but alas there was no recipe for the dressing…so I looked further and found several versions all based on similar ingredients. My friend Celi from The kitchen’s garden just competed her September Home Grown challenge during which time she only allowed herself to eat what she grew on her little farmie! By the end of the challenge she mentioned that she was quite tired of eating the same old things. So when I finally hunkered down and made a decent effort to make the Kale Salad, I immediately thought of Celi. I know I’m a little late for the challenge, but it’s definitely a good recipe and I hope you have a chance to try it before the snow falls.

KaleSalad_1012

It’s a melt in your mouth salad

What makes this salad unique is the finely cut curly kale and how the lemon juice in the dressing acts to ‘cook’ the kale as it sits (like a ceviche would cook the seafood!). It’s a wonderful balance of sour, sweet and salty. I added a couple of slices of crispy cooked Serrano ham, but that is easily omitted if you wish to make it vegetarian.

Cavolo Nero (Kale Salad)

Serves 2

Ingredients:

  • 4 cups finely chopped kale
  • 2 tbsp raisins or dried cranberries or dried sour cherries
  • 2 tbsp toasted pine nuts or toasted sunflower seeds
  • 1/4 cup freshly squeezed lemon juice
  • 2 tbsp honey
  • 1 tbsp EVOO
  • pinch of salt
  • 2 slices of Serrano ham, baked or fried until crisp and crumbled (omit for vegetarian)
  • 1/4 c + 2 tbsp of freshly grated Parmesan Cheese or Pecorino
  • 1 tbsp fresh basil
  • 1 tbsp EVOO
  • pinch of salt

Directions:

  1. About 20-30 minutes before serving, combine the lemon juice, honey, Extra Virgin Olive Oil and salt and mix well in a large unreactive bowl (not metal).  Add the finely cut kale and toss to coat evenly. Set aside for a minimum of 20 minutes (I did 30 minutes) tossing a few times over the 30 minutes. (an update October 16: I made this salad at my brother’s cottage last weekend and I suspect the kale was older and tougher so 30 minutes wasn’t enough time to macerate, please keep this in mind when making the salad. Just as baby kale will take less time than the 30 minutes because it is not has tough).
  2. Muddle the fresh basil in 1 tablespoon of olive oil, with a pinch of salt. Set aside. I’ve made this lovely salad without the basil oil without missing it.
  3. Just before serving, add the raisins, pine nuts, crispy serano ham and 1/4 cup of grated parmesan cheese to the dressed kale and toss well. Divide the kale between two plates.
  4. Drizzle the basil olive oil on the plate and garnish with 1 tablespoon of grated parmesan cheese over each plate. Serve immediately.

KaleSalad_1009

Perfectly balanced sweet, sour and salty

KaleSalad_1010

A perfect salad for a hot summer’s day. Where did it go, anyway?

EarlyFallColours_0991

The fall colours were just starting when I took these photos in late September.

FallColours2013_0990

The cottage colours happen a bit earlier than the city colours.

SunsetSept2013_0992

The sun also moves to the far left during the fall. We see more of the sunset during the summer months.

Read Full Post »

20130830-101628.jpg

The egg yolk acts as part of the dressing on this tasty salad

This post was written and photographed entirely on my iPhone 4S sitting on the deck at the cottage. Apps used for photos are: PS (Photoshop) Express and Art Studio Lite.

We’ve been enjoying our time at the cottage but sadly the lazy days of summer are quickly coming to an end so we’re savouring every bite minute. Many of you have suggested that I write a cookbook/manual about the cottage and I’m going to seriously consider it. Thank you for being so very complimentary, I am very touched by your kind words and voices of encouragement.
Cottage life to me means taking the time that is normally not available in the city; take things low and slow. It’s been incredibly hot up north and humid! This morning it was 20C (68F) at 8am, projected humidity throughout the day is 97% which makes the 20C feel like 27C (81F)! Now that’s a scorcher for sure. Our little cottage is a heat sink powered by the low and slow moving sun on the horizon with inside temperatures in excess of 32C (90F) so I’ve been focussing on easy, lighter summer meals some with grilling instead of roasting. Yesterday’s lunch was a reinvention of a delightful salad I’ve enjoyed many times at a local place where I used to work. What’s incredibly delicious is the poached egg with a runny yolk on top which, when broken into flows all over the salad making a warm, creamy and delicious dressing. It’s not really a recipe as such, but mere suggestions; I urge you to try this wonderful dish at the earliest opportunity. Don’t be fooled by its simplicity – it will impress your taste buds for sure.

Poached Egg Smoked Salmon, Endive, Roasted Sweet Potato on Baby Arugula and Baby Kale Salad:

Serves 2

Ingredients:

  • 2 eggs
  • 2 handfuls each of baby arugula and baby kale
  • 2 large or 4 small endive
  • 100 g smoked salmon
  • 1 sweet potato
  • juice of half a lemon
  • 1/2 tsp chopped dill
  • 2 tbsp EVOO
  • 1 tsp Dijon Mustard
  • 2 tbsp capers
  • Salt and Pepper to taste

Directions:

  1. Peel and cube the sweet potato into about 2.5 cm or 1″ cubes and roast on the BBQ (or oven) with a 1 tbsp of olive oil until soft.
  2. Add a handful of the greens to each bowl. Slice endive and divide into each bowl.
  3. Add about 50 g of the smoked salmon to each bowl.
  4. In a small measuring cup, add the juice of half a lemon, 1 tbsp olive oil, the Dijon mustard and dill and mix well, drizzle onto the greens.
  5. Poach two eggs so that the yolks remain runny. Add one egg to each bowl and divide the warm roasted sweet potato between each bowl.
  6. Add the capers and season to taste. Serve immediately.

20130830-101641.jpg

There is something extraordinary about a poached egg with a runny yolk.

Read Full Post »

Hi everyone, hope you all had a great weekend. I thought I would post a public service message in this post. As most of you know by now, I do most of my commenting using my iPhone 4s just because it’s more convenient and I am able to read and comment on the go! What some of you don’t know is that WordPress so generously provides Mobile Device optimization (I’m sure the other webwares do as well, I just don’t know how to set it up) which means that when I go to your WordPress blog on my phone, WordPress recognizes that I’m checking it out on my mobile device and reformats it to the best viewing configuration. Cool huh?

I have to zoom in so I could read it.

This is the example that is Not Optimized for Mobile.
I have to zoom in so I could read it.

This is optimized for my mobile device. See how WordPress compacts everything so it's easy to navigate and read?

This is optimized for my mobile device.
See how WordPress compacts everything so it’s easy to navigate and read?

But some of you don’t have this turned on, so this is the public service bit. On your computer, go to your Dashboard and click “Appearance”, then “Mobile” in the menu across the far left. Click “yes” to enable mobile theme and that way your images and text will be formatted to look the best on the mobile device. By clicking yes to “show excerpts on front pages instead of full posts” gives you a reader digest version of the post, which makes it much easier if you are looking for something specific.

Mobile Optimization 1

See Mobile at the bottom? Highlight it.

Mobile Optimization 2

I’ve set my options they way I want my blog to look on your mobile device.

And while I’m at it, I also noticed that some of you don’t have a “search” button on your site (mobile or not), which I personally find frustrating when I’m trying to source a recipe I remember reading about on your blog. In WordPress, it is in “Appearance” under “Widgets”; you will need to add the search widget so it’s on your blog.

And not that I am any expert in blogging or Google, I recently found out that Google reads content and the more robust your content is the more likely it will come up on the first page when someone Google’s something you’ve blogged about (ever wonder why Wiki is usually first on a search? It’s subject specific content!). Why did I bring this up? Well, it’s because I used name my photos IMG 12345_BLOG.jpg, which to Google means absolutely nothing. So to increase the ‘value’ of content on your blog, name your photos what it is so that Google can read it, for example Pesto.jpg. You can also add alternative text which also increases its search capability, for example, for my pesto photo, I might add basil pesto as the alternative text.  Now if you will excuse me, I have a lot of work to rename my 1,712 images! Back to regular programming.

Remember the crab legs we bought for Christmas Eve when my brother cancelled Christmas because the kids were sick? We froze them in good thick plastic bags for another time and I’m so glad I did. Two of the four legs made this salad and it was absolutely delightful. I used Thai flavours to bring out the fresh, sweet flavour of the crab. I will make it again it’s a very tasty salad.

Crab and Avocado Salad

IMG_4089_BLOG

The King Crab is very flavourful, so you really don’t need much.

Serves 4 as an appetizer portion

Ingredients:

  • 2 large King crab legs, cooked, shelled and cut into bite sized pieces.
  • 1/4 cup sweet yellow corn
  • 1/2 an avocado, cut into small cubes
  • 1 tbsp cilantro, chopped and a few sprigs for garnish
  • 1 green onion, chopped finely.
  • 1/4 cup lime juice
  • 2 tsp sugar
  • 4 handfuls of baby arugula
  • 2 tbsp of the 19-ingredient slaw apricot dressing

Directions:

  1. Combine the king grab legs, sweet yellow corn, avocado, cilantro and green onion. Set aside.
  2. Combine the lime juice and sugar so that the sugar melts.
  3. Toss the crab salad with the lime dressing to coat well.
  4. Toss the arugula with the 19-ingredient slaw dressing to coat well.
  5. Plate a handful of the arugula on each plate and top with the crab salad. Garnish with a sprig of cilantro.
  6. Serve cold.

Read Full Post »

I must apologize, we were away for a couple of days after Christmas so I haven’t been as attentive with responding to comments and commenting; thanks for understanding.

This salad has become a staple in our home and would have been a great alternative to the Paella for our progressive dinner. I had trouble finding the authentic Lentilles du Puy until I spotted them in our Superstore for a fraction of the cost, but they are from Alberta! I read that the soil conditions are similar to that of Du Puys in France, 500g for about $2.75. I have yet to taste them to compare to the French lentils, but as soon as I do, I will update this post.

You have Charles at Five Euro Food to thank for this post. On my last entry for Lentilles du Puy, he mentioned he goes for lunch to a small bistro and they serve this salad with a poached egg on top. Here is his comment verbatim, it was so inspiring: “Hi Eva, this is one of my absolute favourite lentil dishes – the place I eat it serves it with small cubes of raw carrot which provide a lovely texture and… the pièce de résistance on top… a soft poached egg. Seriously, you HAVE to try that. Cracking open the egg so the yolk runs out over the lentils… it’s so lovely!” Of course, you just knew I HAD to have it. And at a risk of making JT SICK TO DEATH of this salad, I made it again (Luv you JT). Unfortunately, the photos are at night so they are crap, but you can certainly see the most deliciousness of the cracked yolk flowing over the lentils…it was very delicious and highly recommended.

PS. This time, I even added the small cubes of carrot to be sure I had the same experience. Thanks again Charles.

Poached Egg on Lentilles du Puy Salad with a Dijon Mustard Vinaigrette

What an AMAZING idea Charles, thanks so much!

Serves 4-6

Ingredients:

  • 1 cup lentilles du Puy (French green lentils) picked over and rinsed
  • 3 cups water (the original recipe has 6 cups but you have to drain the remaining water)
  • 1 onion, finely chopped
  • 3 pancetta slices, chopped (about 3-4 table spoons)
  • 1 garlic clove, finely minced
  • 1/4 teaspoon dried thyme
  • 2 fresh flat-leafed parsley sprigs plus 1/2 cup leaves, finely chopped
  • 1 red bell pepper, finely diced (about 3/4 cup)
  • 1 yellow bell pepper, finely diced (about 3/4 cup)
  • 1 carrot, finely diced (about 3/4 cup)
  • 4-6 poached eggs

For vinaigrette

  • 2 tbsp white-wine vinegar
  • 1 tbsp white balsamic vinegar
  • 1 1/2 tbsp Dijon mustard, or to taste
  • 1-2 tbsp cup EVOO
  • 1 bunch arugula, coarse stems discarded, washed well and spun dry

Directions:

  1. In a heavy saucepan render the pancetta to a crispy consistency. Remove pancetta and add the onions and sweat until transparent. Add the garlic, type and parsley sprigs (reserve the leaves). Cook for about 1 minute.
  2. Add the lentils and sauté for another minute, add the water all at once and simmer, covered, 20 minutes. Stir in bells peppers and simmer mixture, covered, until lentils are tender, about 10 minutes. Lentils may be made 2 days ahead and kept covered and chilled. Reheat lentils before proceeding with recipe.

Directions for vinaigrette:

  1. Transfer 2 tablespoons lentil-cooking liquid to a medium bowl and whisk in vinegars, mustard, and salt and pepper to taste. Add oil in a stream, whisking, and whisk dressing until emulsified.
  2. Drain lentils (if required, I didn’t have to) well in a sieve and discard parsley sprigs. Toss lentils with chopped parsley and vinaigrette and season with salt and pepper.
  3. Just before serving, arrange arugula decoratively around salad, or serve without as is pictured below.

The wonderful yolk breaks into the most luxurious sauce over the tangy lentilles, it is quite a lovely flavour and texture experience

LentilsDuPuys-1

I retook this picture because I really didn’t like the light in the earlier ones. I also folded in baby Arugula into this version and laid it on a Kale salad.

Read Full Post »

This is the fallen tree. We have several in our neighbourhood,
all about the same age. I’m hoping they have stronger roots!

I’m on a bit of a lentil kick these days, and that’s rather funny as I have never really like them. My favourite is the Lentilles du Puy that I recently blogged about, but the recipe that inspired my recipe kept creeping into my head so I had to make it. It’s a warm or cold salad; for lunch the following day I had it cold over a bed of arugula and spinach (my favourite) and it was very tasty and filling (or the three F’s Full bodied, Flavourful and Filling). This shall definitely go into my repertoire for weeknight dinners and lunches. It was also very easy to make which is a bonus for everyone.

I found the lentils at Pusatari’s in Yorkville, but they were a bit more expensive than the package I bought in Lyon. I got many great tips on where to find them in Toronto from my readers and I thank you kindly. This recipe is from Epicurious and although I did not change much of it, I did change up the method considerably. Also, this would make a great vegetarian dish if you omit the pancetta, I just couldn’t help myself ;-)!

Lentilles du Puy Salad with a Dijon Mustard Vinaigrette

LentilsDuPuys-1

I took this photo over again in the summer of 2014 because I really hated the lighting in the original photos. While the lentils were still warm, I folded in a good handful of baby arugula leaves and served it on a massaged Kale salad.

A feast for the eyes as well.

Serves 4-6

Ingredients:

  • 1 cup lentilles du Puy (French green lentils) picked over and rinsed
  • 3 cups water (the original recipe has 6 cups but you have to drain the remaining water)
  • 1 onion, finely chopped
  • 3 pancetta slices, chopped (about 3-4 table spoons)
  • 1 garlic clove, finely minced
  • 1/4 teaspoon dried thyme
  • 2 fresh flat-leafed parsley sprigs plus 1/2 cup leaves, finely chopped
  • 1 red bell pepper, finely diced  (about 3/4 cup)
  • 1 yellow bell pepper, finely diced (about 3/4 cup)

For vinaigrette

  • 2 tbsp white-wine vinegar
  • 1 tbsp white balsamic vinegar
  • 1 1/2 tbsp Dijon mustard, or to taste
  • 1-2 tbsp cup EVOO
  • 1 bunch arugula, coarse stems discarded, washed well and spun dry

Directions:

  1. In a heavy saucepan render the pancetta to a crispy consistency. Remove pancetta and add the onions and sweat until transparent. Add the garlic, type and parsley sprigs (reserve the leaves). Cook for about 1 minute.
  2. Add the lentils and sauté for another minute, add the water all at once and simmer, covered, 20 minutes. Stir in bells peppers and simmer mixture, covered, until lentils are tender, about 10 minutes. Lentils may be made 2 days ahead and kept covered and chilled. Reheat lentils before proceeding with recipe.

Directions for vinaigrette:

  1. Transfer 2 tablespoons lentil-cooking liquid to a medium bowl and whisk in vinegars, mustard, and salt and pepper to taste. Add oil in a stream, whisking, and whisk dressing until emulsified.
  2. Drain lentils (if required, I didn’t have to) well in a sieve and discard parsley sprigs. Toss lentils with chopped parsley and vinaigrette and season with salt and pepper.
  3. Just before serving, arrange arugula decoratively around salad, or serve without as is pictured below.

I’m just about to have some, won’t you join me?

Read Full Post »

Lentilles du Puy

Before our recent trip to Europe, I had read many-a-blog about lentilles du Puy so you know what was on the top of my souvenir list. But of course, the Lentilles du Puy. Grown in the du Puy region of France, these lentils are known as the best of all the lentils for a few reasons: they cook quickly, they don’t break down and go mushy and they have a wonderful peppery taste. Many of their benefits can be attributed to the volcanic soil they are grown in. These delicious lentilles du Puy are wonderful in salads as they don’t lose their shape. We’ve just been home 10 days and I’m almost through my 500g box (yes, it was worth the weight) of dried lentils and I’m already panicking to find a source in the city. HELP!

The box could use a redesign, don’t you think?

I got my inspiration from this recipe on Epicurious and tuned it the second time as I forgot to photograph it the first time (and almost forgot to photograph it the second time too!).

This dish was almost a memory by the time I remembered to take the photo; hence the closeup, it was my lunch at work!

Lentilles du Puy

Serves 4,

Ingredients:

  • 1 cup lentilles du Puy picked over and rinsed
  • 3 cups water or chicken stock or wine
  • 1 onion, finely chopped
  • 1/4 cup finely chopped pancetta
  • handful of sliced white or brown mushrooms
  • 1 garlic clove, halved
  • 1/4 teaspoon dried thyme
  • 2 tbsp EVOO
  • grape tomatoes finely chopped
  • Freshly grated Parmesan Cheese
  • 1 bunch arugula, coarse stems discarded, washed well and spun dry

Directions:

  1. In a heavy saucepan sauté the pancetta until crispy in 2 tbsp olive oil. Remove but reserve the remaining olive oil.
  2. In the pancetta oil sauté the onions and when translucent, add the lentilles du Puy, garlic, thyme and mushrooms and give it a quick stir. Add the liquid and cook covered for 30 minutes on a low simmer (the original recipe called to strain the liquid off the lentils, but I reduced the liquid so that the lentils absorb it all and you have a beautifully cooked batch).
  3. Add the crisp pancetta, grape tomatoes and garnish with Parmesan cheese. Serve on a bed of Arugula or as is.

Read Full Post »

I’m always looking for something new and different and when I saw a Wheat Berry Salad on my friend Angie’s blog, Taste of Home, I knew I had to try it at least once. Angie cooks with a lot of whole grains, always healthy and always inventive. She is also a master of bread making, her loaves are gorgeous, appetizing and did I say gorgeous?

I had never heard of wheat berries before reading Angie’s post and I am so glad that I did see it and was inspired to make it. Thank you Angie, I know I will make this grain again and again.

Wheat Berries look very similar to pearl barley, but they are darker in colour and apparently have a nuttier taste. They are a very dense grain and therefore many sites suggest pre-soaking. I soaked my berries overnight and it still took about an hour of boiling. They have more of a bite than barley and are a bit chewier, which I liked, but JT did not.  I have found that you will need a ratio of 3 or 4 parts water to 1 part wheat berries. You can substitute wheat berries anywhere a grain is used, for example rice pilaf or even risotto!

The avocado and the mango are a nice contrast in textures to the wheat berry

Wheat Berry Salad

Serves 4, Inspired by Angie, Taste of Home, Wheat Berry and Watermelon Salad

Ingredients:

  • 1 cup wheat berries, soaked over night
  • 1/2 avocado, cubed
  • 1 Mango,  cubed
  • 1/2 chopped cilantro
  • 1 roasted red pepper, chopped
  • juice of 1/2 lime
  • salt to taste

Directions:

  1. Cook wheat berries in 3-4 cups of water, about 1 hour (at around 45 minutes check to see if you like the texture, and if you do, stop cooking).
  2. Add the cubed avocado, mango and chopped red pepper. Drizzle with the lime juice and salt to taste. Mix in the cilantro. Serve warm or cold as a side to a BBQ’d dish.

Read Full Post »

You may recall I posted the hot and cold smoked salmon for our progressive dinner party here and I served it with a Quinoa Tabouleh (leave out the feta and poached egg) and a rather simple Creamy Cole Slaw by Martha Stewart. Since the recipe was basically verbatim, I wasn’t going to post it, but I’m still having the slaw having added more vegetables and made up more dressing, so I thought to my self, “self, this is good enough to post.” And so I shall. The dressing is sweet, tangy and creamy and it is not over the top. I don’t like the creamy slaws they serve in deli’s either as they are just too mayonnaise-y. This one is perfect. I know I will make this again during this summer. Because we had no salmon left over for lunches, on Sunday I had roasted a whole chicken with Herbs en Provence and just shredded it on the slaw. It was delicious.

A tangy but not too creamy slaw.

A Very Simple Creamy Cole Slaw (by Martha Stewart)

Serves 8-12

Ingredients:

  • 1 tablespoon Dijon mustard
  • 1 tablespoon cider vinegar
  • 1 tablespoon freshly squeezed lemon juice
  • 1/2 tablespoon sugar (you may not think this is necessary, but it really smooths out the flavours)
  • 1 teaspoon coarse salt
  • 1/2 cup fat free mayonnaise (this was regular mayo)
  • 1/4 cup fat free Greek Yogurt (this was sour cream)
  • 1 small napa cabbage, (about 1 3/4 pounds), finely shredded
  • 1 medium carrot, finely shredded (this was 2)
  • 1 small celeriac, finely shredded (this is my addition)
  • 1 small chili pepper, diced finely as garnish (thank you Sissi for pointing out that I had missed this).

Directions:

  1. Whisk together mustard, vinegar, lemon juice, sugar, salt, mayonnaise, and sour cream in a small bowl. Refrigerate dressing, covered, until ready to use, or up to 2 days.
  2. Put cabbage, carrots, and celeriac in a large bowl and toss. Reserve dressing until an hour or so before serving.
  3. Pour in dressing over the amount of slaw you will consume and toss thoroughly. Refrigerate, covered, until slaw begins to soften about 1 hour. If not using immediately, refrigerate undressed slaw, covered.

The shredded BBQ’d chicken with the herbs en Provence made it a lovely summertime dinner

Read Full Post »

The weather in Toronto is warm and crisp this week, the humidity is all but gone, which is a lovely change to the close weather we were having over the last couple of weeks (sadly, it will turn ‘oven-hot’ again tonight). We turned the A/C off and opened windows, taking full advantage of all the fresh air, but someone forgot to tell the birds that 3:30am is far too early to get up and start chirping. Did they not get them memo?

Here is one of the culprits, I’m sure (I didn’t want to scare him so I took the photo through the screened window). This Blue Jay (not to be confused with our team*)  and his partner were at the feeder by the kitchen window the other day — the small bird feeder. The partner was smart and was picking up the seeds from the ground. Can you see how ridiculously he is balancing to get to the seeds (his feet are hanging onto the feeder just below his neck and he is balancing with his tail); clearly this feeder is not his size!

It’s like he sitting at the ‘kids table’

This incredible weather also means that we can enjoy our meals al fresco under the canopy of the arbor in our garden. Our lives are a little topsy turvy as JT recently started a new job that has him working some nights until 8:30 which leaves me to prepare ‘dinners’ that will mainly be used as lunches for us both the following day. I guess this forces me to eat, because I can get caught up in various chores around the house or blogging and simply forget to eat (I can be pretty focused). In general, I come home, cook ‘dinner’ eat it and prepare our lunches for the following day. Then I sit and blog. Sometimes I cook something I can blog about, this is one of those times.

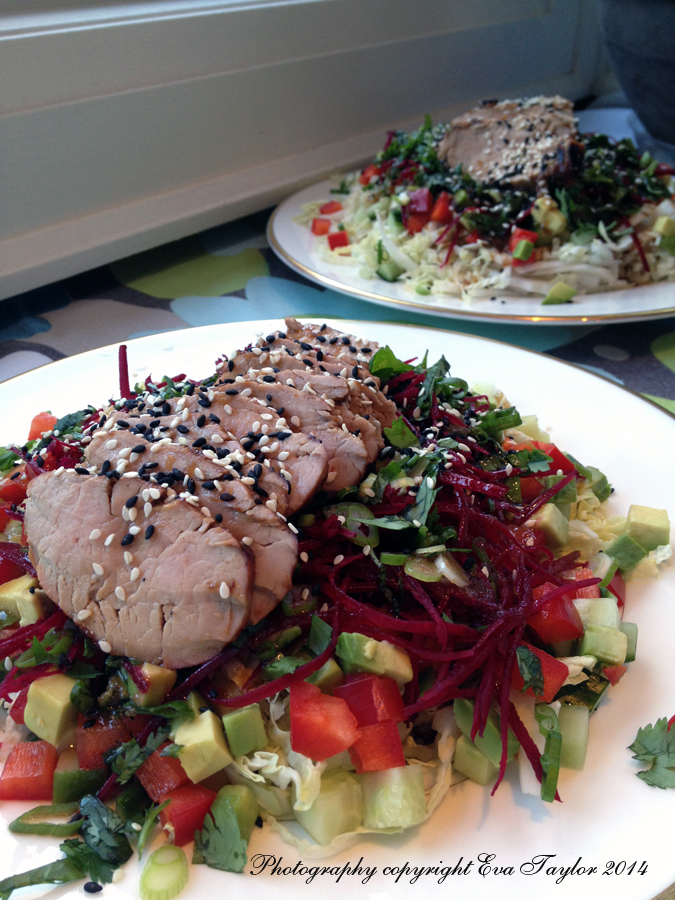
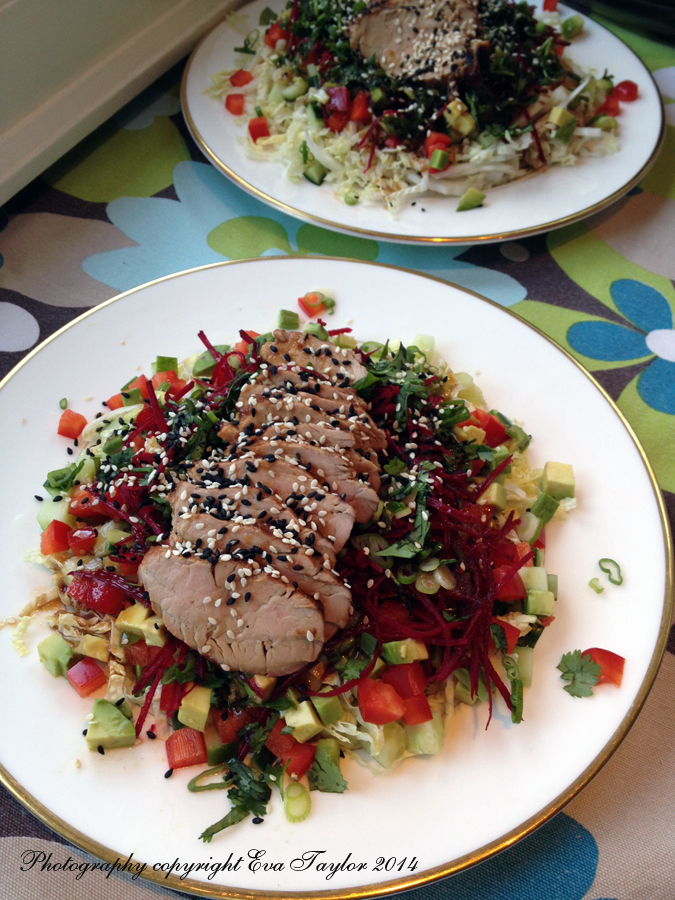
Would you say this is a 3 dressed up as a 9?

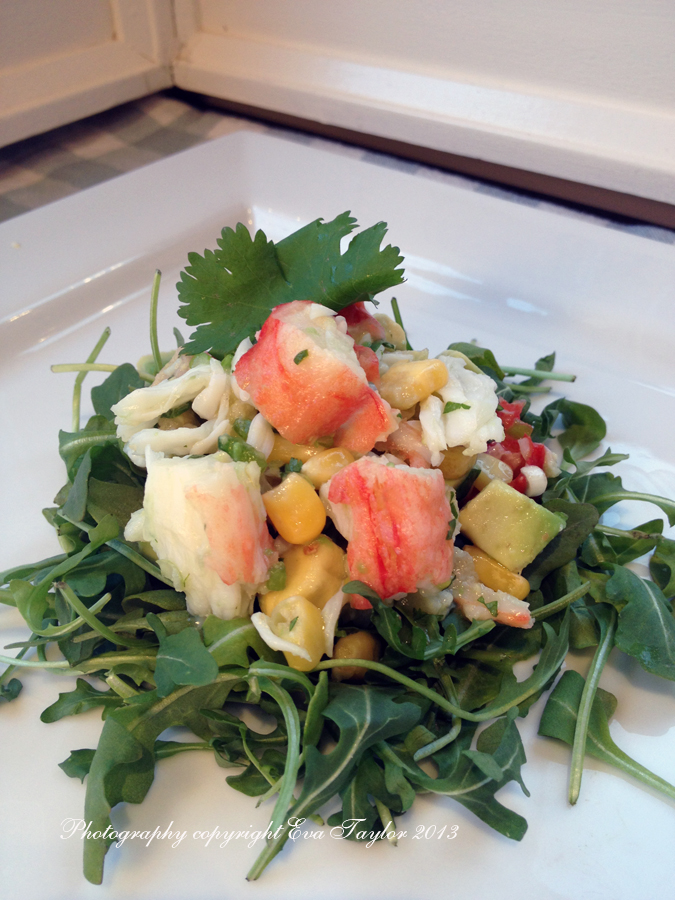
Sissi at With a Glass reminded me of Surimi Crab (yes, fake crab) and that it does have a place on the luncheon menu, as long as you buy good quality brand and pair it with a tasty side or salad (Sissi and Maria at A-Boleyn made fresh rolls out of them which for me ended up to be rather unattractive when I tried to make them, practice makes perfect!) So an Asian inspired Surimi ‘crab’ salad was to be on the menu on this day. Surimi ‘crab’ is low in fat, contains some omega-3 so it is a good low fat dinner/lunch option.

Incidentally, we are presently redesigning the packaging for Clover Leaf Surimi (we do all of their packaging, the photos in the link are NOT our’s, they were provided) so it’s apt that I post a recipe for it. Sadly, my photography skills do not compare to the skills at our studio, but then again, nor does my camera! The plate, however, is a hand-me-down from the studio!

We are heading out to Illinois and Wisconsin this weekend (it’s a long weekend for us too, in Canada we celebrate Canada Day on July 1) to visit our friends Paul and T, so I want to use up the fresh goods in the fridge so I don’t have to toss them (or worse yet, so they don’t walk out on their own!). Much of this recipe is what’s in my fridge right now, I was trying to go without purchasing new produce. The measures are eyeballed, go with your tastebuds. The trick to this salad (or slaw) is to cut all of the vegetables uniformly so you can get a little bite of everything. To keep this salad over a few days, separate the wet (cucumber and mango) from the rest and mix as required. The ratio should be about 1/3 wet to 2/3 dry.

Surimi “Crab” Salad

Serves 4 (2 for lunch and 2 for dinner, 100 g protein portions each)

Ingredients:

  • 4oo g Surimi Crab, flake style
  • 1./2 Jicama or Yambean, finely grated on  a mandolin
  • 1/2 celeriac or celery root, finely grated on  a mandolin
  • 6 radishes, finely grated on  a mandolin
  • 3 green onions, finely chopped
  • 5 mint leaves, finely chopped
  • 10-20 Thai basil leaves, finely chopped
  • 2 regular basil leaves, finely chopped
  • 1/2 English cucumber, finely grated on  a mandolin
  • 1 slightly unripened mango, finely grated on  a mandolin

Directions:

  1. Combine the Jicama to the basil leaves and mix well. I use my hands so all the ingredients are evenly distributed in the salad.
  2. Combine the cucumber and mango. Keep the wet from the rest so that the salad doesn’t wilt in the fridge. Mix only as required.

Dressing Ingredients:

This is just eyeballing, make the dressing to your own taste.

  • Trim off bits of mango from the stone (keeping away from the stone) that you weren’t able to grate with the mandolin (you’ll be surprised how much fruit is left over).
  • 1/4 cup rice vinegar
  • 1/4 lime cordial
  • 1-2 tsp fish sauce
  • 1-2 tsp sesame oil
  • 1/2 tsp hot pepper flakes (or to taste)

Dressing Instructions:

  1. Add all the ingredients to your immersion blender container and blend until smooth. Taste and adjust as required.

Assemble Instructions:

  1. Combine 1/3 wet ingredients with 2/3 dry and mix well. Add a few tablespoons of the dressing and mix again.
  2. Plate, adding about 100 g surimi crab.
  3. Garish with sesame seeds, if desired, I forgot.

What ever it is, it sure is tasty

Notes:

  • I use Rose’s Lime Cordial as a short cut for lime juice and honey. I find it has the right balance for sweet and sour for my taste buds.
  • About a 1/2 cup of chopped cilantro is a wonderful addition. I didn’t have cilantro at home (my plant died) and in order not to buy anything new to make this meal, I omitted it.
  • Red cabbage also makes a great addition to this salad (see above for why it’s not in the recipe)
  • Mango has the same toxic ingredient as does poison ivy, therefore you want to ensure you remove ALL of the skin and stay about 0.5 cm from the stone. This ingredient causes stomach upset.
  • If you run out of mango, I have successfully substituted dried apricot (reconstituted with a little water) or even tamarind paste, both make exceptional dressings but you will need to adjust the salty and sour bits to taste.

*Sports reference provided for my friend Jed, the Sportsglutton

Read Full Post »

My friend, Sawsan over at Chef in Disguise made this salad and posted it early this week and by luck we had all the ingredients on hand and by that same luck we needed something to go with our oven roasted Salmon. I can honestly say it was delicious, the flavours and textures really worked well together, please pop over to Sawsan’s blog and check out her photos (it was dark by the time I snapped the shots and my photos are pitiful!). If you don’t have salmon to eat with it, a little goats cheese would be very tasty indeed!

I left out the pomegranate seeds as they are now out of season and were $7.00 for a very small container! We should have substituted pine nuts for the pomegranate seeds…next time. Sawsan gave me a great tip, she said she buys her pomegranate when on sale and she seeds them into a little container and freezes them for just this type of application! That’s just genius, thank you for sharing that great tip!

Thank you Sawsan for another wonderful recipe.

I used a square form, the round one would have worked out better!

Layered Avocado Beet Citrus Salad

Serves 3 (I made extra for lunch the next day)

Ingredients for the Salad:

  • 4 Beets, roasted until fork tender, peeled and cubed
  • 2 oranges sectioned and cut into cubes (juice reserved)
  • 1 medium avocado, cut in half, pit removed and cubed
  • 1 1/2 cups arugula leaves, cleaned and dried

Ingredients for the Dressing:

  • 1/2 cup fresh orange juice (one to two oranges)
  • 2 Tbsp olive oil
  • 2 Tbsp vinegar
  • 2 Tbsp fresh lemon juice
  • 1/2 tsp honey
  • 1/8 tsp sea salt
  • 1/2 teaspoon mustard

Directions for the Dressing:

  • Combine all ingredients into a small jar and shake well. Refrigerate.

Directions for assembly:

  • Arrange the arugula leaves in the centre of the plate.
  • Place a plating ring or square (7 cm) on top of the arugula leaves.
  • Layer with the beets then the avocado and finally the oranges.
  • Remove the ring and drizzle with the dressing.
  • Enjoy!

Read Full Post »

The other day I was watching Jamie’s 30 minute meals (hey, I was on the elliptical doing a 30 minute cardo routine!!!) and saw a short part of a Celeriac Remoulade (it’s a mayo-type dressing) that I knew I would have to make for dinner. It turned out to be only an inspiration due to ingredients on hand but after searching the web, I came across Laura Calders Celeriac Remoulade, which resembled my salad a lot more (really, I only spotted it after I made mine for dinner the other night, really!)

It was already dark out, that's why the photo sucks! 🙂

One of the things that caught my eye in Jamie’s recipe was the prosciutto, but I completely forgot to add it in the end so we just had it plain :-(. I have to admit, I did not love the dressing and if I were to do this again (very likely as I adore raw celeriac) I would alternate the dressing to something else…I thought it was a bit too acidic not enough balance, but I really did love the contrast of the smooth Dijon to the Grainy Dijon (maybe all I needed was to add a touch of honey, since my granny smith was not as sweet as Jamie’s pear?).

Celeriac Remoulade

Ingredients:

  • 1/4 to 1/2 of a celeriac, cleaned, peeled and julienned (I have a wonderful julienne grater that makes this so easy)
  • 1 granny smith apple, washed but not peeled and julienned (the green of the peel adds a lovely light, fresh colour)
  • a handful of chopped flat leaf parsley

Dressing:

  • 2 tbsp Dijon Mustard
  • 2 tbsp grainy Dijon Mustard
  • 2 tbsp white wine or champagne vinegar
  • 4-6 tbsp EVOO
  • 1-2 pinches of flaked hot peppers

Directions:

  1. Mix the celeriac, apple and parsley together well and toss with the dressing.
  2. Enjoy.
  3. If you plan to have this on more than one day, I would only dress what I am eating now, so that it doesn’t get all soggy!

Read Full Post »

Happy Saturday, dear readers! This is a full weekend of chores…some more fun than others, but you shall have to wait for tomorrow to find out. Plus, tomorrow I am going to introduce you to a dear friend who has just started blogging, we’re going to make one of her first blog-recipes tomorrow! I am very excited about it.

Today is my blogging friend, Charles of Five Euro Food, birthday, so I’d like to take this moment and wish him a very happy birthday. Charles has been a loyal commenter since I have discovered the pleasure of reciprocal commenting (OK, it only took me 4+ years!). You have certainly enriched my blogging experience beyond my expectations. Happy Birthday Charles, and many many more!

If you have made any of the Moroccan Salad recipes, you will by now understand the mass quantity of salad you are left with. We have been eating Morrocan salads all week; dallop on this, mixed into that, etc, etc, etc. You can well imagine that we are now a little tired of the same thing :-(!

This week we decided to reinvent our Quinoa Tabouleh recipe; we used RED and regular Quinoa which added colour to an already beautiful salad. And we added the left overs of the Carrot and Courgette (zucchini) Moroccan Salads. We grilled our shrimp and then I made a very simple green sauce with lemon juice, parsley, cilantro and garlic (a tip of the hat to Chimichurri Sauce). It was DELICIOUS. I loved the added flavours that the Moroccan carrot and zucchini brought in and I loved the colour of the red quinoa. If you haven’t already tried tabouleh, you MUST. And making it with quinoa just adds the extra healthiness that we need (and it’s gluten free!).

Reinventing Quinoa Tabouleh

Some other Quinoa recipes I’m sure you will love (sorry if I missed your recipe, some of you didn’t have ‘search’ built into your home page!):

Read Full Post »

As the second course of our 4 course Moroccan meal this past weekend, I present the Trio of Moroccan Salads; these salads came out of our second cooking class at Maison MK. Our Chef, Omar El Ouahssoussi ran a very professional kitchen and both JT and I were equally impressed; colour coded cutting boards, one for meat and one for vegetables!

Chef Omar El Ouahssoussi

The class started out meeting the chef and the guide (not sure why, our chef spoke near perfect English) and we headed out to the souks to buy the food for our class. Our first stop was the vegetable vendor, where we bought onions, carrots, aubergine (egg plant) and courgette (zucchini). Then off to the spice vendor; I thought this was for our entertainment as the kitchen would be well stocked with the required spices, but the chef actually bought spices to give us as a gift! Then we stopped at the meat vendor where we bought our lamb and lastly the fresh herb vendor where we picked up some mint. But I digress, back to the salads.

Our shopping excursion

As our starter we have chosen to prepare the three salads that Chef Omar taught us to make, Aubergine, Courgette and Carrot Salads. We will serve them as close to the way Chef Omar served them to us. While preparing the salads, the one thing Chef Omar mentioned is that in Morocco, it is better to over cook than under cook, so the salads are all cooked vegetables richly flavoured with spices. I imagine this was originally done to rid the food of bacteria and if the food had spoiled a bit, the spices would make them palatable…but not in our case, the salads were unbelievably delicious! Over cooking reminded me of an article Greg sent over about a month or do ago from the New York Times. Click here for an interesting read.

Chef Omar generously gave us printouts of each of the recipes we cooked; sadly the translation is not as good, but I will fill in the gaps with my memory!

Trio of Cooked Moroccan Salads

Aubergine Salad

Ingredients:

  • 2 medium aubergines, chopped evenly into 1 cm or 1/2 inch cubes with the skins on (recipe calls for 1kg, which is too much)
  • 2 cloves garlic, finely chopped
  • 1 tbsp lemon juice
  • 1 tbsp tomato paste
  • 3 tsp paprika
  • 1 tsp cumin
  • 1 tbsp olive oil
  • 2 tbsp vegetable oil
  • Salt and paper to taste
  • 1/4 cup each finely chopped fresh cilantro and flat leaf parsley.

Directions:

  1. In a large pot cover the chopped aubergine with water, add the lemon juice and stir well (the lemon prevents it from turning brown)
  2. Cook over a medium simmer for 15-20 minutes or until the aubergine is soft.
  3. Drain water well and return to hot pot and cook off as much liquid as possible.
  4. Add garlic, tomato paste and spices and simmer for another 10 minutes, mashing the soft aubergine with a fork. Mix in both oils.
  5. Salt and pepper to taste.
  6. Once cooled to room temperature, add the fresh cilantro and flat leaf parsley and mix in well. Serve cold or at room temperature, shaped into little molds garnished with arugula and spinach.

Courgette salad

Ingredients:

  • 3 smallish courgettes, coarsest grated it cut into small even cubes
  • 2 cloves garlic, finely chopped
  • 1 tsp paprika
  • 1 tsp cumin
  • 1 tbsp olive oil
  • 1 tbsp vegetable oil
  • 1 tsp unsalted butter
  • 1 tsp white vinegar (to help maintain the bright green colour)
  • Salt and paper to taste
  • 1/4 cup each finely chopped fresh cilantro and flat leaf parsley.

Directions:

  1. Melt butter in a medium sized frying pan and stir fry the courgettes until soft.
  2. Add the vinegar, garlic and the spices.
  3. Mix in both oils and season with salt and paper to taste.
  4. Once cooled to room temperature, add the fresh cilantro and flat leaf parsley and mix in well.
  5. Serve cold or at room temperature, shaped into little molds garnished with arugula and spinach.

Carrot salad

Ingredients:

  • 3 large carrots cut into small even cubes
  • 2 cloves garlic, finely chopped
  • 2 tsp paprika
  • 1 tsp cumin
  • 1 tbsp olive oil
  • 1 tbsp vegetable oil
  • 1 tbsp lemon juice
  • Salt and paper to taste
  • 1/4 cup each finely chopped fresh cilantro and flat leaf parsley.

Directions:

  1. In a medium saucepan, cover carrot cubes with water and simmer until they are soft.
  2. Strain water off and return to pan and cook the remaining moisture off.
  3. Add the lemon juice, garlic and the spices and cook for about 5 minutes longer (carrots should be cubes but soft enough to squash – but don’t squash them), remove from heat.
  4. Mix in both oils and season with salt and paper to taste. Once cooled to room temperature, add the fresh cilantro and flat leaf parsley and mix in well.
  5. Serve cold or at room temperature, shaped into little molds garnished with arugula and spinach.

Courgette is top left, carrot is top right and the aubergine is front and centre

And I’ve finally got all the photos up on Shutterfly, so if you’re interested (and I am beyond flattered if you are), you are welcome to view our humble vacation photos in this link.

Read Full Post »

Isn’t the best thing in the world a fresh, ripe, just picked tomato? OK, I just happened to be given a large quantity (large for me!) of incredible Ontario tomatoes so I’m all about the tomato for this blog! They even smell like tomatoes. The little ones just pop in your mouth and the sweet juices ooze out. I’m salivating just writing this post. You can’t imagine how good these are.
20110908-055519.jpg

We’re having some landscaping done on both front and back yards of our home. The guys are working so hard, so I suggested to JT to buy them lunch today. We were going to get pizza, but one of our customers at work was kind enough to give me some of their product: ribs! I said, cook up the ribs and serve them with the tomato salad! But these guys don’t eat salad, he said. We’ll see!
20110909-060812.jpg
I sliced the tomatoes into bite-sized pieces, added some fresh basil from the garden (both purple and mini basil), grated some fresh garlic (also from my garden), EVOO (from our neighbours Tom and Iona – it’s from his Dad’s olive grove in Greece!) and some wonderful balsamic. Wow! Incredible salad – and it’s own story to tell. I’m hoping I’m wrong and the guys really don’t eat salad so I can have it for dinner tonight (I might add some goats milk Feta!)
For dinner last night, we grilled up a loin of pork and sliced them on top of our fresh tomato salad (you didn’t think I was going to give the salad all away, did you? I’m really not THAT generous!)

Read Full Post »

The sun is setting earlier and the temperatures are not reaching the highs that July gifted us. A tree in my neighbourhood has already begun to change colour which means the evening temperatures are dipping lower and lower. The Canadian National Exhibition has been in full swing for a 9 days already. And with that Autumn is fast approaching on Summer’s heals. Sadness at the loss of yet another year pokes at my heart, but as soon as my feet grow accustomed to wearing full shoes and socks, I become excited to dive into my fall wardrobe and of course, my wonderful collection of boots. BBQs, chilled soups and refreshing salads are soon to be replaced by warmer, heartier foods and with that, the house becomes alive again with the wonderful aromas of autumn foods. But I digress. I still have time for one more salad!

A couple of bloggers I follow were recently on the East Coast enjoying the plentiful sea foods offered out there, so I began hankering for a simple shrimp salad. Of course, I’ll make enough to have for lunch at work tomorrow.  And as usual, I’ll take my inspiration from Epicurious, but adding my own twist.

Spicy Shrimp Salad

Spicy Shrimp Salad

Serves 4

Ingredients:

  • 1 pound cooked medium shrimp, peeled, de-veined, tail off (I hate messing with my fingers when there is a dressing or sauce all over them)
  • 1/4 cup mayonnaise
  • 2-4tbsp lemon juice
  • 1 small red bell pepper, diced
  • 1 small yellow bell pepper, diced
  • 1/2 cup chopped green onions
  • 1/2 cup chopped celery
  • 1/2 cup cucumber, diced
  • 1 avocado diced (lightly sprinkled with the lemon juice so it doesn’t turn brown)
  • 1/2 cup mini tomatoes, halved
  • 1/2 tsp smoked paprika
  • pinch of cayenne
  • 1/4 tsp cumin
  • 1 garlic clove finely chopped
  • 2 garlic scapes, finely chopped
  • Handful of baby arugula, per person

Directions:

  1. Combine mayonnaise and seasonings in large bowl, add shrimp and avocado and gently mix well to coat.
  2. Create a bed of arugula and add the vegetables in the centre. Spoon on top the shrimp avocado mix. Garnish with green onions and chopped scapes.

Read Full Post »

My biggest pet peeve is seeing a raw tomato on a menu when it is clearly not in season. Tomatoes not in season are mealy, have little taste and just plain old bad. Why, why, why would you do it? Having said that, one of my most favourites is the Insalata Caprese. Our new hot spot restaurant in Toronto (Bar Mercurio) has by far, one of the best Insalata Caprese I have ever tasted and I am not kidding. And this salad is consistently amazing, whether the humble tomato is in season or not! Dare I share their secret?

Oven Roasted Tomatoes. There I said it. Slow roasting your sliced tomatoes over a long period of time will bring out the sugars and caramelize this lovely fruit to a point where it really doesn’t matter what it tastes like raw! Paired with some fresh buffalo mozzarella, fresh basil, a little spicy arugula and drizzled with EVOO and good quality aged balsamic…well, I have died and gone to heaven!

Oven Roasted Tomatoes

Ingredients:

  • 5-8 medium Roma tomatoes, washed and sliced about 1cm thick
  • sea salt to taste
  • paper towel to dry off tomatoes
  • non-stock spray, such as Pam
  • cookie sheet with a  cooling rack installed on it so there is about 1 cm to 2cm between it and the cookie sheet
  • parchment paper

Directions:

  1. Pre-heat oven to 200°F
  2. Line the cookie sheet with parchment.
  3. Install the cooling rack onto the cookie sheet.
  4. Spray the cooling rack with the non-stick spray.
  5. Dry each tomato slice, both sides.
  6. Place the tomato slices on the rack so that they are not touching.
  7. Sprinkle with a little sea salt.
  8. Bake for 3-4 hours or until the edges become caramelized. You may wish to flip the tomatoes half way during the baking period.
  9. Serve warm or cold.

Read Full Post »

Recently a friend and I dropped in for a bite at Susur Lee’s restaurant “Lee’s” on King Street. It was my first time there, but certainly not my first time enjoying his food. JT bought me his cookbook in 2009 for Christmas, and although most of the recipes are way too laborious, I definitely recommend this one. It is abso-f-in-lutely the most wonderful explosion of flavours you can imagine! It is an ever morphing ingredient list, which entirely depends on what’s fresh and available. Don’t allow my recipe or his to deter you from this dish…make it your own! Use the same shredder for all the ingredients that require shredding, and that way each bite is an adventure!

Inspired by Lee's Slaw

Lee Inspired Asian Slaw (adapted from Susur Lee’s Singapore Slaw)

  • 2 cups shredded purple cabbage
  • 2 cups shredded celeriac (celery root)
  • 1 cup shredded English cucumber
  • 1/2 cup shredded carrots
  • 1/2 cup very thinly sliced celery
  • 1″ diametre chives in similar length to the shredded veg
  • 1 cup any kind of vegetable sprouts (arugula would be great)
  • 1/2 cup of chopped cilantro
  • 1/2 cup chopped green onion
  • 3 tbsp chopped peanuts
  • 1/2 cup pickled onion (this is definitely worth the effort)
  1. Pile on a decorative plate, alternating colours. Dress and toss in front of your guests. It’s a real show stopper!

Pickled Onion (directly from Lee’s recipe)

  • 1 red onion
  • 1 cup rice wine vinegar
  • 1 cup water
  • 1/2 teaspoon salt
  • 1/4 teaspoon black peppercorns
  • 1/4 teaspoon fennel seeds
  • 1 bay leaf
  • 1 sprig thyme
  1. Peel and julienne red onion and set aside in a medium bowl.
  2. In small saucepan, bring vinegar and water to a boil. Season with salt, peppercorns, fennel seeds, bay leaf, and thyme; continue boiling for another 5 minutes.
  3. Pour mixture over onion while hot and let sit for 1 hour or more. This lasts a good long time in the refrigerator, if you don’t consume it first!

Papaya Dressing

The main thing about this dressing is that you need a balance of salty, sweet, sour and spicy – so if you don’t have something at hand, improvise, as I did!

  • 1/2 cup ripe sweet puréed papaya
  • 1/4 cup rice wine vinegar
  • 1 teaspoon mirin
  • 1 1/2 tablespoons puréed onion
  • 1 tbsp agave nectar
  • 2 tbsp Rose’s Lime Cordial
  • 1/2 tablespoon peeled and chopped fresh ginger
  • 1 tsp fresh green or red Thai chillies
  • 1/4  or more teaspoon salt
  1. Blend until smooth using an immersion blender.
  2. Refrigerate until ready to serve.

This salad keeps well refrigerated if you keep the wet ingredients (such as cucumber) separated from the dry and dress it when you serve it!

Read Full Post »