Feeds:
Posts
Comments

Posts Tagged ‘Soup’

We adore Ramen soup, we have it a few times a month during the cold weather. I used to freeze the actual Ramen soup but since I have downsized my freezer, I am always on the lookout for a more compact way of freezing dishes so I developed this batch Ramen soup base.

This batch Ramen soup base recipe is based on Just One Cookbook’s Miso Ramen recipe; my version gives you 10 single-serve dishes! Batch cooking saves a lot of time for quick meals in the future and it’s not difficult; I’ve figured out a way to freeze only the soup base without the bulk of the liquid! You simply defrost the Ramen base, add your liquid, then you bring it to a boil and you’re done! Easy peasy!

Of course, Ramen is all about the inclusions, roasted chicken, roasted pork etc., and to make it even easier, how about using shredded rotisserie chicken or as I have done below, leftover shredded rib meat! I like to prepare my Ramen egg the night before so it has time to take in the flavours of the marinade but it also works about an hour before you serve. Other inclusions could be grilled corn, peas, edamame, green onions or mushrooms, many of these veggies I have in the freezer ready for use. This time I used ready-made Ramen noodles but if you have the time, whip up a batch of homemade Ramen noodles and dry them out in small batches, and store in an air-tight container for a quick Ramen lunch.

Just pop one of these into a soup pan and add water, boil and you’re done!

Batch Miso Ramen Soup Base

Makes 562 g soup base (enough base for 10, 2-servings of Miso Ramen Soups)

For the original recipe, please click here.

Ingredients for the soup base:

  • 30 mL roasted sesame oil
  • 200 g pork, finely ground (see notes)
  • 2 shallots, finely diced (see notes)
  • 30 mL sake
  • 15 g roasted garlic paste
  • 5 g ginger, finely grated (see notes)
  • 30 g white sesame seeds, toasted
  • 10 mL doubanjiang
  • 30 g sugar
  • 2.5 g white pepper powder
  • 25 g bouillion (I used Better than Bouillon)
  • 75 g miso (I use white Miso Paste)

Directions for the soup base:

  1. Heat the roasted sesame oil in a large frying pan. Add the pork and shallots and cook until the pork is no longer pink.
  2. Combine the sake, roasted garlic paste, ginger, white sesame seeds, doubangjiang and sugar and mix well. Add this to the cooked pork mixture and mix it into the pork so it is evenly distributed. Cook until the sugar is dissolved.
  3. Combine the bouillon and the miso and mix well. Add this to the pork mixture and stir well until it is evenly distributed in the pork.
  4. Remove the pork mixture from the heat and spread the mixture onto a sheet to cool completely. Once cool, divide the mixture into 10 even single-portion servings and freeze individually. I froze 9 and used one for our meal that evening.

Preparing the Miso Ramen Soup from the soup base:

  1. Remove 1 packet from the freezer and defrost overnight in the refrigerator OR add 600 mL water (see notes) into a soup pot and drop the frozen packet into the water; heat until defrosted completely and hot. Taste for seasoning; the original recipe had additional salt but I find bouillon and Miso salty enough so I don’t add any extra but it’s up to you.
  2. Cook the Ramen noodles as per packet. Add either 1 packet of cooked noodles per bowl (I usually do half a packet per bowl) and top with inclusions of your choice; pictured below is shredded leftover rib meat, half a Ramen egg, grilled corn, green onions and cooked mushrooms. Serve hot.

Ramen Egg directions:

  1. Bring a small pot of water to a soft boil (water should be deep enough to mostly cover the egg). Carefully place the egg (see notes) into the water and set your timer for exactly 7 minutes. Once the 7 minutes is done, remove the egg and place it in an ice bath to immediately stop the cooking process.
  2. Peel the egg.
  3. Add 15 mL soy sauce and 15 mL mirin to a small cup, add the peeled egg and fill the cup with water just enough to cover the egg, stir. Place a spoon on the egg to hold it down in the liquid and refrigerate overnight or at least one hour before serving, left on the counter. Allow the egg to come to room temperature if you have refrigerated it overnight. Cut the egg in half and serve a half per serving.

Notes:

  • I usually add the raw pork tenderloin with the shallots to my small food processor and I process it until it is finely chopped.
  • You can use plain water, but I usually use whatever stock I have on hand; today’s soup was made from leftover whey and corn cob broth both adding a lovely depth of flavour to the soup. I also added half a piece of dried kombu into the stock as it defrosted overnight. I removed the kombu before serving.
  • I was only able to find spicy doubanjiang but I do not find 10 mL overwhelming in 10 portions of soup base but you may use more or less as is your taste.
  • I use Chef Michael Smith’s handy tip for keeping fresh ginger on hand all the time. He washes the root and allows it to dry, then he simply freezes it in a little zip-lock bag. You can use a fine micro plane to grate the frozen ginger, no need to peel as the peel pulls away from the frozen ginger as you grate it, or it may grate so finely, you won’t even notice it.
  • To get the hard-boiled egg to peel cleanly, give the raw egg a good tap on each end on the counter until you hear a distinct click (don’t tap to break the shell). That click is the outer membrane coming loose from the shell, it will make it much easier to peel.


Read Full Post »

Stracciatella is one of my favourite soups. Oh, who am I kidding, I adore all soups! The broth is the real star of this simple dish, homemade is best and this recipe will give you a quick solution to a flavourful broth in 30 minutes. Yes, it’s another Instant Pot recipe. I usually have homemade chicken stock in the freezer but if I don’t, I definitely have a BBQ’d chicken carcass in the freezer! This easy stock comes together quickly and I dare you to find a difference from the long, slow-cooked stocks of the past. I based this recipe on Frank’s lovely dish. The soup is more filling than you’d think, so limit the servings to the smaller side.

This is the perfect soup for a chilly day.

Stracciatella (egg drop soup)

For the original recipe, please click here.

Makes 1 L of soup

Ingredients for the quick stock:

  • A barbecued chicken carcass with most of the meat stripped off.
  • 1 onion
  • 1 rib celery
  • parsley stems
  • 15 mL better than bouillon chicken broth

Directions for the quick stock:

  1. Combine the ingredients in the instant pot and cover with water. Put the pressure cooker lid on and lock it into place. Set the IP to Pressure on High for 30 minutes making sure the steam release valve is closed (up position).
  2. Strain the bones and vegetables from the stock and reserve about 1 liter of stock for this soup, reserve the remaining stock for another recipe.

Ingredients for the Stracciatella:

  • 1 L of homemade stock (see above)
  • 2 eggs
  • 45 g Parmesan, finely grated
  • few drops of lemon juice
  • pinch of nutmeg

Directions for the Stracciatella:

  1. Bring the stock to a slow boil. Combine the eggs and parmesan cheese until it is whisked smooth.
  2. Once the stock boils, slowly drizzle the egg mixture into the stock, whisk the stock around in the same direction so the egg doesn’t form one large blob.
  3. Allow the soup to continue cooking for a couple of minutes; the egg will turn into beautiful little curds and the broth will clear.
  4. Add a few drops of lemon juice and a pinch of nutmeg and serve warm.
  5. You may add some additional grated parmesan as garnish at the table.

The soup comes together quickly if you already have chicken broth on hand but it only takes about 40 minutes if you make the stock from scratch.

Read Full Post »

We had a long late-summer with beautiful sunny days and warm temperatures. Then it stopped. It always surprises me when temperatures drop so quickly, it’s never a slow incremental decrease, it’s a fast dive to freezing! As soon as the boiler goes on, soups get onto my menu plan. I first saw this beauty on my long-time Chicago friend John’s delicious blog and I’ve been making my rendition ever since. It’s definitely one of my favourites. In our house, it has actually taken over from restaurant Phố as restaurant Phố is far too salty and we’re all trying to cut down.

I start the stock in the morning so the aromatics have time to infuse. You can do it in the Instant Pot pressure cooking function but I like to have the warm aromas wafting through the house as the broth infuses. I usually double the batch of stock and freeze it for an even quicker meal.

An aromatic soup, flavoured with fresh herbs from the garden.

Quick Phố

Serves 2 hearty bowls

Ingredients for the stock:

  • 2 g fresh ginger, finely minced with a microplane
  • 2 star anise
  • 1 cinnamon stick
  • 5 whole cloves
  • 250 mL beef broth
  • 250 mL chicken stock
  • 250 mL water
  • salt, to taste

Ingredients for the finished soup:

  • 150 g fettuccini rice noodles
  • 200 g very thinly sliced raw beef
  • fresh cilantro, Thai basil, spring onions for garnish, chopped
  • salt and pepper to taste
  • Hoisin sauce, Sriracha sauce

Directions:

  1. Combine the ingredients for the stock in a stockpot and bring to a boil. Turn the heat down and simmer for 3-4 hours. Alternatively, you may add it to your Instant Pot and pressure cook it for 30 minutes.
  2. About 15 minutes before you are ready to serve, bring a pot of water to a boil and remove it from the heat. Add the rice noodles and allow to soak to soften 10-15 minutes.
  3. Strain the stock to remove the aromatics and return to the pot to keep warm.
  4. Strain the noodles and divide them into two large bowls, top with the thinly sliced beef and ladle the boiling soup over the beef. Garnish with fresh cilantro, Thai basil and spring onions. Serve the hoisin and sriracha sauce at the table to allow each person to garnish their own bowls.

Read Full Post »

My brother loaned us his cottage for the last week of January. Yes, it is a lot colder up there but it is extremely beautiful with the pristine, sparkling snow and the occasional visit from wildlife. I needed to clean out the fridge before we left and created this tasty and satisfying soup. Pair it with a scone or grilled cheese and you have the perfect winter-time lunch. The measurements are not important here because I was just using up some less-than-perfect produce, it’s just an inspiration for future soups.

JT bought me the KitchenAid Vegetable Sheet Cutter to help me cut down our carbs so I had a lot of zucchini cores leftover which played right into this delicately flavoured soup. I was going to add cream but then I had a very ripe avocado that would meld perfectly into this winter meal.

Celery, Zucchini, and Avocado Cream Soup

A KitchenInspirations Original Recipe

Makes 1.45 L soup

Ingredients:

  • 15 mL EVOO
  • ~ 1/2 a bunch of celery, roughly chopped
  • ~ 1 zucchini, roughly chopped
  • ~ 1 small Vidalia onion, roughly chopped
  • 5-10 sprigs of parsley
  • 1 L chicken stock
  • 1 small Avocado, peeled and pitted
  • Salt and Pepper to taste

Directions:

  1. In a large pot, heat the EVOO, add the celery, zucchini, onion, and parsley, and cook until softened. Add the stock and simmer for 30 minutes or until all of the vegetables are very soft. Add the avocado.
  2. Blitz with your immersion blender or allow to cool and purée with a Nutri Bullet or VitaMix for a smooth and creamy soup. Strain through a fine sieve to remove the celery ‘hairs’.
  3. Serve hot.

Read Full Post »

Way back in January, we were getting some seriously cold temperatures. I had a ham bone leftover from Christmas Eve that I wanted to use and what better use is a rib-sticking split pea soup? I was able to get 6-8 portions out of the soup, about 250 mL or a cup each, it’s pretty thick. The soup is fairly filling so if you want to make it last a little longer, add a bit more stock to thin it down.

Fall Split Pea Soup with Ham

Serves 6-8

Ingredients:

Directions:

  • 175 g finely chopped onion
  • 100 g celery, diced
  • 100 g carrots, diced
  • 65 g pancetta, cut into small slices
  • 20 g garlic, finely chopped
  • 10 cumin
  • 1”5 g smoked paprika
  • 3 cups water
  • 4 cups homemade chicken stock
  • 430 g split peas
  • 175 g cooked ham, diced
  1. In a pressure cooker cook the pancetta until crispy then add the onions and until translucent.
  2. Add the split peas and sautée for a minute.
  3. Add the garlic and cumin and sautée for about 30 more seconds (or until you can smell the aroma), add the ham, water and stock. Now add the paprika and cinnamon stick.
  4. Seal the cover and cook under pressure for 45 minutes or until the split peas have softened (I use a fairly low setting). You should check the water level twice during the process to make sure it hasn’t boiled down to nothing, stir. If the liquid is too reduced, add more.
  5. Serve with a dollop of low fat Greek yogurt and home made bread.

Read Full Post »

Spring came early to Toronto, with warm, sunny days as early as the first week of April! Buds burst on trees and shrubs and we waited with bated breath for the blooms in hopes that we wouldn’t get a spring frost. A good spring always has rain and we’re OK with that as long as we get some sunny days interspersed to keep our mood elevated and this spring was perfect. The rainy days were a touch cooler (still above freezing) but cool enough to crave soup. JT has been a real trouper this winter, eating without complaint, my favourite brothy soups but his true love are creamed soups so I thought I’d create this creamy, tasty soup on a rainy mid-April day. I served this with Cheesy Onion Scones!

Cream of Celery Soup

A KitchenInspirations Original Recipe

Makes about 400 mL soup

Ingredients:

  • 15 mL EVOO
  • 50 g sweet onion
  • 300 g celery hearts, tender leaves included, roughly chopped
  • 50 g cauliflower florets (as a thickener)
  • 400 mL vegetable stock
  • 7.5 mL lemon juice
  • Salt to taste
  • 30 mL table cream

Directions:

  1. Heat the extra virgin olive oil in a soup pan and sweat out the onions until translucent, add the celery and cook on medium/low for about 3 minutes.
  2. Add the cauliflower florets and vegetable stock and simmer until all of the vegetables are soft.
  3. Purée until smooth and taste for acidity and salt, add as required. Keep warm until ready to serve.
  4. Just prior to serving, add 30 millilitres of table cream, stir well.

Celery in North America doesn’t have a strong anise flavour, it’s very mild.

Read Full Post »

We’ve been eating a lot of soup lately, Vietnamese Pho, Italian Wedding Soup, Thai Lemon Grass Soup and Japanese Ramen. The Ramen has been a favourite because of the soft boiled egg and the delicious noodles. I haven’t been able to find authentic fresh ramen noodles so I’ve been using those horrible little Ramen soup packets (don’t worry, I toss everything but the noodles) that we can usually get for 4 for $1.00 (you know those awful little packets we used to eat when we were poor students?). But I had an urge to make my own ramen noodles. I reviewed several recipes and discovered that they are not that difficult but they are time-consuming (isn’t anything good time-consuming?) I wasn’t able to source the sodium carbonate without having to buy about 250 g (that would last me years!) so I followed the directions to make my own and it worked out perfectly. 

The noodles take a bit of effort to make but they are well worth it. They are significantly better than the packaged noodles and they are a little heartier. I made two servings of the noodles which turned out to be 4 servings so I dried half of them for next time.

This is about half of the amount that the recipe made.

I used this ramen recipe with sliced grilled chicken breast and this ramen egg recipe

Homemade Ramen Noodles

Makes 2-4 servings

For the original recipe, please click here.

Ingredients:

  • 3 g sodium carbonate (baked baking soda) 
  • 80 g water
  • 2 g kosher salt
  • 2 g vital wheat gluten
  • 198 g “00” bread flour

Directions:

  1. Combine the baked baking soda and water and stir until the baked baking soda has entirely dissolved. Add the salt and stir to dissolve.
  2. Combine the vital wheat gluten in the large container of your food processor fitted with the blade attachment and process once or twice to combine the wheat gluten and flour.
  3. On a medium/low speed, pour one-third of the water into the bowl and process. Allow to rest for 30 seconds, add the second third and allow to rest for 30 seconds and finally finish with the last third of water combo and process for about a minu or until it is quite crumbly, allow to rest for 30 minutes.
  4. When rested, pour the dough onto a piece of parchment and press the dough together into a ball. Divide the ball into two and form two disks (the dough is very dry at this point). Roll each disk out so that it is about 0.5 cm so it will fit through the largest setting of your pasta maker. Wrap the disk you are not working on with plastic wrap to prevent it from drying out further.
  5. Put the dough through the thickest setting, then the second thickest, then the third and fourth thickest. Fold the dough in half and start again on the thickest setting to the fourth thickest setting. Repeat the process two more times. Fold the dough and wrap in plastic wrap and allow to rest for 30 minutes. Repeat with the second disk.
  6. Once they have rested, (I cut the sheets in half so that they are not too long) lightly coat each side of the sheets with flour and run the sheets through the spaghetti attachment and fold them into loose nests. Put them into a ziplock bag overnight in the refrigerator (this helps improve the taste and texture).
  7. Cook for about 2 minutes or until al dente in boiling UNSALTED boiling water (the exact time will depend on how thick your noodles are). Drain and rinse. Use immediately.

A delicious bowl of noodley soup.

Notes:

Why these specific ingredients are important:

  • Bread flour has a higher protein content than all-purpose flour which give the noodles a chewy texture.
  • Adding vital wheat gluten gives the noodles an even chewier texture.
  • Sodium carbonate (baked baking soda) gives the noodles elasticity, springiness and glossiness as well as flavour.
  • The Ramen soup recipe I follow is this one.
Baked Baking Soda
  • I baked about 115 g of baked baking soda so I don’t have enough for ten years! By using the 2/3 weight as per the instructions, it will take 2-5 hours. Once you have dehydrated the baking soda, it becomes extremely caustic, so don’t let it come into contact with your skin. Store in an airtight container.


Read Full Post »

This winter we ate a lot. I mean, we ate a lot of soup. Who am I kidding, we did eat a lot, but we also ate a lot of soup. I became quite proficient at some of our ethnic favourites, this Thai Lemongrass Shrimp soup being one of them. I reverted back to an old favourite recipe from an Australian cookbook a friend gave me years ago, Bay Books Cookery Collection, Thai Cooking Class, written by Somi Anuntra Miller and Patricia Lake. It is a well-illustrated cookbook with some great background, techniques and lists of ingredients for successful Thai cooking. In fact, it is my GoTo Thai cookbook. I have tweaked the recipe to resemble that of a favourite Thai restaurant.

Shrimp Lemongrass Soup (Tom Yam Goong)

Makes about 500 mL soup

Ingredients:

  • 500 mL chicken stock
  • 8 pieces fresh galangal
  • 8-12 Fresh Kaffir lime leaves
  • 2 pieces of 2 cm lemongrass, sliced in half lengthwise
  • 60 mL lime juice
  • 15 mL fish sauce
  • 2.5 mL chilli paste
  • 5-10 g of cane sugar
  • 8 fresh shrimp, peeled and deveined (skins reserved)
  • 10 fresh cremini mushrooms, cut into quarters
  • 80 g vermicelli rice noodles
  • 2 Campari tomatoes, cut into 6ths
  • Chiffonade of Cilantro leaves, Thai basil and thinly sliced green onions to garnish

Directions:

  1. Bring the chicken stock, galangal, Kaffir lime leaves and lemongrass along with the shrimp skin to a slow boil and then simmer for 30 to 60 minutes. Strain out the stock so that it is clear and without any bits.
  2. Add the lime juice, fish sauce, chilli paste and cane sugar and continue to simmer until sugar has completely dissolved. Taste for balance and add a bit of lime juice or sugar to balance if required.
  3. Boil water for the noodles, completely cover noodles in the hot water and allow to soak until al dente. Rinse in cold water to stop from cooking further.
  4. Bring the soup to a slow boil and add the mushrooms and shrimp and cook until the internal temperature of the shrimp is 120° F.
  5. Meanwhile, preheat the bowls (it’s winter and they cool down incredibly quickly). Reheat the noodles by running them under super hot water.
  6. Assemble the soup: add half of the heated noodles to each bowl, top with 4 shrimp in each bowl and spoon the hot liquid over the noodles and shrimp, dividing the mushrooms equally between the two. Add a cut tomato into each bowl and garnish with the chiffonade of cilantro and Thai basil and green onions.

Read Full Post »

Way back in late October, we went over to a friend’s house for dinner, outdoors of course. We’ve all been scrambling to make the outdoors as warm and cosy as possible not feeling comfortable enough to entertain inside. My friend went all out with a brand new gazebo (which we helped erect), heaters and electric blankets (even some for sharing). It was easy to enjoy this flavourful soup in large mugs, under infrared heaters, cosying up with electric blankets while gazing at a romantic wood fire. The soup was warming and soothing on a particularly chilly evening. I hacked the recipe because we liked it so much.

Thai Coconut Curry Soup

A KitchenInspirations Original Recipe

Makes 1 L soup

Ingredients:

  • 500 mL cauliflower purée
  • 400 mL coconut milk
  • 6 fresh kaffir lime leaves
  • 1 lemongrass stalk, cut into 5 cm lengths
  • 1 nub of fresh galangal
  • 15 mL fresh lemon juice
  • 15 mL fish sauce
  • 10-20 mL green curry paste
  • pinch of baking soda
  • leftover cooked chicken or turkey
  • 150 g diced frozen vegetables
  • 1 green onion, sliced into 3 cm lengths
  • handful of finely chopped cilantro
  • Vegetable or Chicken stock (optional)

Directions:

  1. Combine all of the ingredients except the baking soda, chicken or turkey, frozen vegetables, green onion and cilantro and bring to a boil. Boil for 10-15 minutes or until the broth is flavoured with the aromatics.
  2. Scoop out the aromatics (kaffir lime leaves, lemongrass and galangal) and discard. Add the baking soda and mix it in well (it will bubble up for a minute or so).
  3. Add the turkey and frozen vegetables and stir to warm. Add vegetable or chicken stock if you find the soup too thick. Serve piping hot.

Notes:

  • Frozen vegetables, like this, are a staple in my freezer, they are perfect for quick soups!
  • I keep kaffir lime leaves in the freezer, they are so flavourful.
  • I prefer to keep the soup on the thicker side, particularly if you’re eating it outdoors, it tends to stay warm longer.

Read Full Post »

Like many blogs have already declared, it is officially soup season in this part of the world. I often use lentils to “beef” up soups because they are super filling. JT loves creamed soups and I love brothy soups, so to be fair, I try to make a variety of each type to keep us both happy. That way he doesn’t complain when I make Phố or chicken soup at least once a month (read: week). This was a spur of the moment creation that was so tasty, that I wanted to make sure that I remembered what I did. Hope you enjoy it too.

Creamed Cauliflower, Lentil and Coconut Soup

A KitchenInspirations Original Recipe

Makes about 750 mL soup

Ingredients:

  • 1 small head cauliflower, cut into florettes
  • 1 small sweet onion, chopped
  • 1 small garlic clove, minced
  • 50 g red lentils
  • 250-400 mL vegetable or chicken stock
  • 250 mL coconut milk
  • 15 mL EVOO

Directions:

  1. Heat a large dutch oven with the olive oil and sauté the onions until translucent. Add the cauliflower and garlic and sauté for 5 minutes.
  2. Add the 250 mL chicken stock and lentils and cook until everything is soft. Blitz with an immersion blender slowly adding coconut milk, blending until smooth. Add more chicken stock to achieve your desired thickness, if necessary.
  3. Serve piping hot.


Read Full Post »

As you can imagine, I had hoped that winter would be on its way out by our return from Europe last week. Sadly, it wasn’t so. Temperatures, although slightly warmer were still not showing signs of spring. And Facebook was of no help, throwing into my face, a year that the crocus’ were out and the lily of the valley was growing in thickly. No, spring has not sprung — that damn groundhog lied, again.

During these colder days, I like to eat soup so I’ve been creating new flavours since our return. I cobbled together a version of this recipe just before we left and JT liked it so much he asked for it upon our return so I got out my measuring tools and recreated this tasty dish for posterity. To me, lentils have always been paired with warm South Asian spices, more like curries, which we adore but I wanted something different. This soup comes together quickly and is thick and luscious enough to make a meal on its own. It has some nice comforting flavours of roasted garlic and cumin with a beautiful fresh hint of kaffir lime leaves and coconut. I didn’t have time to source fresh Kaffir lime leaves so I used the dry stuff, if you use fresh, you may wish to cut it back a bit, they are meant to be a background note. The lentils purée up creamy and smooth and make a gorgeous luxurious soup. I will serve this at an upcoming dinner party, I know it will be a hit.

Some crispy rice crackers would have made a nice side for this dish.

Thai Inspired Lentil Coconut Soup

A KitchenInspirations Original Recipe

Makes about 1.25 L soup

Ingredients:

  • 15 mL coconut oil
  • 130 g sweet onion, chopped
  • 15 mL puréed, roasted garlic
  • 5 mL cumin
  • 8 kaffir lime leaves (mine were dried)
  • 300 g red lentils, rinsed and picked through
  • 1 L chicken stock, or vegetable stock
  • 250 mL coconut milk
  • salt, to taste

Directions:

  1. Heat the coconut oil in a Medium Dutch oven. Sauté the onions until translucent. Add the roasted garlic and stir until fragrant.
  2. Add the lentils and stir to coat. Dust with the cumin and cook until fragrant.
  3. Add the kaffir lime leaves and the chicken stock and cook until lentils are soft. Remove the kaffir lime leaves.
  4. You can run an immersion blender through the soup, leaving a few chunks for texture or entirely creamy or you may leave it soupy.
  5. Garnish with toasted coconut.

Notes:

  • I usually remove 250-500 mL of the chunky soup and purée the remainder until smooth and creamy and then I add back the chunky bits for texture.
  • Lentils generally thicken as they sit so you may wish to add a bit more stock or coconut milk depending on your preference for the thickness and how long it sits before serving.
  • America’s Test Kitchen recently mentioned that a sprinkle of baking soda on onions as you sauté them will reduce their acidity and make them caramelize quicker. I have been using this technique since I saw it.
  • When I prepped for Anjum Anand, she had me toast the cumin quite a bit, but for me, toasting until fragrant is enough.

Read Full Post »

As you know, my friend, David Chrighton (Fine Dining at Home) was on Master Chef UK last fall (I know, sooooo cool). He went all the way to the finals! Sadly, he didn’t win the title, but OMG, he went ALL THE WAY to the finals! David is a Captain for an airline and flies commercial jets. I can certainly see how nerve wracking Master Chef can be, and that’s where his pilot nerves of steel came into play! Not that he wasn’t a wee bit nervous (we did spot a few beads of sweat on his brow) but he never wavered, not even when he was cooking a Michelin Star Chef’s recipe! Ashley Palmer-Watt, head chef of Fat Duck, three-star-Michelin resto in Bray, was a guest on the show on Episode 24. Each participant had 5 hours (5 HOURS!) to complete one of Chef Ashley’s famous recipes. David lucked out and got one the most complicated recipes with 120 stages of preparation! Now THAT is stressful!

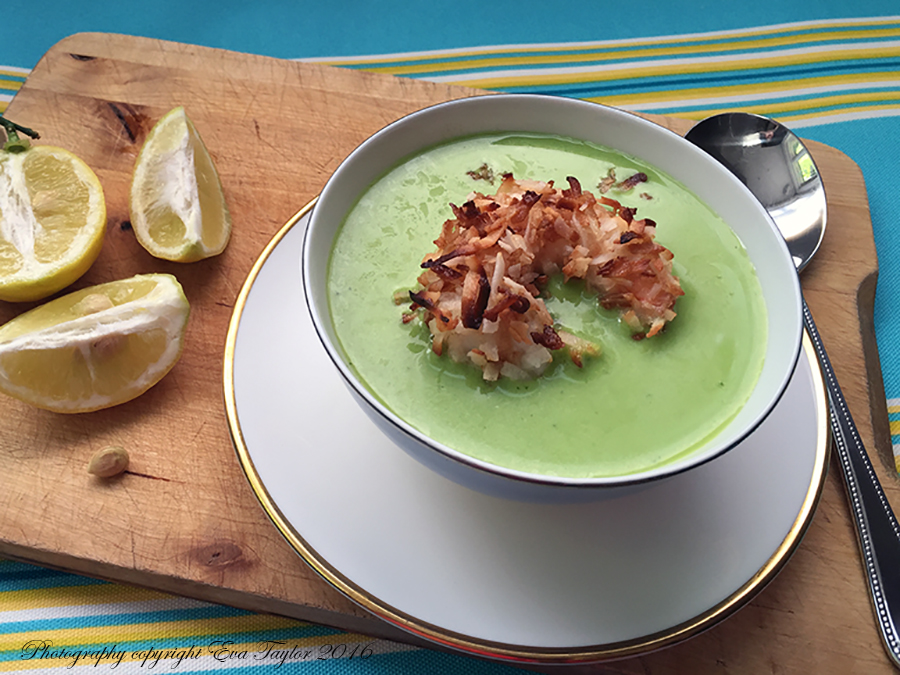
Now don’t get into a tizzy that I will post one of these complicated recipes, no sirree, I don’t have the the patience, but one of the positive windfalls of being a runner-up on Masterchef UK, is that Dave is now a celebrity chef! He is still a pilot but he also does pop-up restaurants and demonstrations at fairs and markets! During one such pop-up, he posted an awesome looking white gazpacho and since we were having a heat wave, I knew I had to recreate it for a dinner party. Dave didn’t post the recipe so I improvised; my version was a light green so I called it Spring Green Gazpacho!

The recipe is rich in flavour but not heavy. A variety of complex flavours coat the mouth and speaking of mouth, it has an incredibly smooth and creamy mouthfeel. Thank you, Dave, for the inspiration. By the way, Dave totally rocked that complicated recipe for Chef Ashley.

Spring Green Gazpacho

A KitchenInspirations Original Recipe

Makes 600 mL

To print recipe, please click here.

Ingredients:

  • 175 g cucumber, roughly chopped
  • 150 g grilled corned, removed from cob
  • 100 g avocado, peeled and chopped
  • 125 mL milk (avocado gives the fat, so feel free to use a low fat milk)
  • 1 lime, zested and juiced
  • 3 g fresh basil leaves
  • 100 g Greek yogurt
  • 20 g toasted almond flour
  • salt, to taste
  • Cubed cucumber, grilled corn, pomegranate arils, chiffonade of fresh basil as garnish

Directions:

  1. Combine all of the ingredients in a blender and blend until smooth.
  2. Press through a fine sieve. Store in the refrigerator for maximum 4 days.
  3. Serve chilled with a garnish of chopped cucumbers, fresh basil and grilled corn and pomegranate arils.

Read Full Post »

In the Spring edition of the LCBO’s (our liquor store) Food & Drink magazine, they featured a Turmeric, Miso & Ginger Soup that immediately caught my attention. In mid-March, we were still craving soups, believe it or not, so I thought I’d give this colourful soup a go in my humble kitchen. The flavours were earthy, brightened by the lemon juice and sweetened by the peas and corn, everything one could want from the spring soup.

An Earthy soup to warm and ward off any spring colds.

Turmeric, Ginger, Miso Soup with Peas and Corn

Makes 1 L soup

For the original recipe, please click here.

To print this recipe, please click here.

Ingredients:

  • 15 mL EVOO
  • 70 g sweet onion (such as Vidalia), finely chopped
  • 50 g celery, sliced
  • 1 L vegetable stock, divided
  • 20 g ginger, roughly chopped
  • 2 g garlic, roughly chopped
  • 5 g turmeric powder
  • 20 g white miso
  • 15 mL freshly squeezed lemon juice
  • 70 g each, frozen peas and frozen corn

Directions:

  1. In a medium stock-pot, heat the olive oil and add the chopped onion and cook until translucent. Add the celery and cook for a minute or so longer.
  2. In a small measuring cup fitted for your stick blender, add about 125 mL vegetable stock, the ginger, garlic, turmeric and miso and blend until smooth.
  3. Add the turmeric mixture to the celery and onions and cook for a few minutes, until you can smell the garlic. Add the remainder of the vegetable stock and lemon juice and bring to a boil. Add the frozen peas and corn and stir for a minute.
  4. Serve hot.

Read Full Post »

We’ve been away. In Arizona. Where it was high twenty, low thirty degrees (Celsius). I’m sorry you were still in winter, while I was enjoying endless sun and dry warmth in Arizona. Well, not really sorry. I may have even rubbed it in with some weather network posts. It was truly wonderful. It was liberating not to have that 10-minute dressing routine even before you step outside. My feet rejoiced! No socks! My feet weren’t freezing to death even though they were covered in wool and leather. I could totally get used to it. But now we’re back in reality and cooking warming and hearty dishes like we did for Super Bowl.

We hosted another Super Bowl party in February and you guessed it, the theme was the cuisine of the teams playing! I’ve always wanted to make an authentic clam chowder with oyster crackers so I took advantage of this serendipitous opportunity. The clams were sweet and the chowder was creamy and delicious. The party was a grand success and New England lost, now that’s karma, don’t you think?

New England Clam Chowder

Makes 1.75 L of chowder.

For the original recipe please click here.

Ingredients:

  • 300 g Yukon Gold potatoes, peeled, cut into 1/2-inch pieces
  • 30 g unsalted butter
  • 135 g finely chopped French shallots
  • 160 g chopped celery (about 2 large stalks)
  • 10 g garlic cloves, finely minced
  • 1 bay leaf
  • 32 g all-purpose flour
  • 282 g Vongole baby clams, drained, juices reserved
  • 300 mL evaporated milk (not condense)
  • Pinch of smoked paprika
  • sea salt to taste

Directions:

  1. Bring the potatoes to a boil in the reserved clam juice topped up with water to cover. Turn down to medium heat and simmer until potatoes are soft. Remove from heat, drain potatoes, reserve the liquid and set both aside.
  2. Melt butter in a heavy bottomed large pot, sauté shallots and celery with the bay leaf until soft. Add the garlic and sauté until fragrant. Add the flour and stir on low heat for two minutes, without allowing the flour to brown. Whisk in the reserved potato clam liquid with a pinch of smoked paprika. Cook until thickened.
  3. Add the baby clams and the evaporated milk and stir well. Simmer for 5 minutes. This chowder is much better the second day so if you are making this chowder in advance, refrigerate until cold, then re-heat on low when required.

A rich clam chowder with delicious clam bits in every bite.

A flavourful cracker that does not disintegrate in the chowder.

Lemon Pepper Oyster Crackers

Makes 150 g of crackers. For the original recipe, please click here.

To print recipe, please click here.

Ingredients:

  • 145 g 00 flour
  • 5 g sea salt
  • 2 g freshly ground black pepper
  • 5 g sugar
  • 5 g baking powder
  • 1 g freshly grated lemon zest
  • 30 g unsalted butter, cut into small pieces
  • 70 mL cold water, or enough to make a smooth dough

Directions:

  1. Combine flour, salt, pepper, sugar, baking powder and lemon zest in the small bowl of your food processor. Pulse until well combined.
  2. Drop the butter into the flour mix and pulse until it has been incorporated and is mealy. Slowly add the water while processing, add only enough to make a dough that holds together.
  3. Turn out to a lightly floured surface and form into a solid round. Allow to rest 15 minutes.
  4. Pre-heat the oven to 375° F. Line a baking sheet with parchment paper.
  5. Roll dough to about 2 mm thick and cut with very small cookie cutters (or cut with a knife into diamond shapes). Bake for 15 minutes, then turn the oven off and open the door and allow to cool and crisp up for an additional 30 minutes. Serve with New England Clam Chowder.

Read Full Post »

Soup has been on our menu quite often this winter. Personally, I adore soup, so much so, we’ve coined the expression “I love soup so much, it could be my middle name”! My favourite are brothie soups like chicken noodle, Phõ, lemongrass, and miso to name a few, but JT prefers creamy soups so I throw him a bone every so often and blitz the soup with my immersion blender. This one turned out exceptionally well so, I decided to repost. Plus the light is getting much better and I couldn’t resist.

Creamy Mushroom Soup

A KitchenInspirations Original Recipe

Makes about 500 mL

Ingredients:

  • 25 g variety of dried wild mushrooms
  • 35 g red lentils, dried
  • 140 g shiitake mushrooms, thinly sliced
  • 90 g sweet onion, roughly chopped
  • 60 g celery, roughly chopped (about 1 rib)
  • 25 g butter
  • 40 g roasted garlic (about 5 large cloves)
  • salt and pepper to taste
  • ~300 mL vegetable stock
  • 2-4 tbsp finishing olive oil

Directions:

  1. Soak the dried, wild mushrooms in about 500 mL water for a minimum of 30 minutes. Strain through a gold coffee filter and reserve liquid. Rinse the mushrooms.
  2. Caramelize the onions in the butter. Add the celery, roasted garlic and rehydrated mushrooms and cook until soft, about 15 minutes.
  3. Add the reserved mushroom liquid and lentils and simmer loosely covered for an additional 30 minutes, stirring often. Meanwhile, toss the sliced fresh shiitake mushrooms in some olive oil and roast in a hot oven (375° F) until caramelized (roughly 20-25 minutes), turning once.
  4. Remove soup from heat and purée with an immersion blender until smooth, adding vegetable stock to desired consistency (I added about 300 mL). Press through a fine sieve for a velvety, smooth texture. Add salt and pepper to taste and purée once more. Garnish with the caramelized mushrooms and drizzle with the finishing olive oil. Serve piping hot with Cheddar Orange Scones.

Notes:

  • No matter how well your blender purées creamed soups, push it through a fine sieve for a creamy and velvety texture. Then blitz it again just before serving. This is a tip from the 1-star Michelin chef we had a cooking lesson with in Lyon.
  • Thick creamy soups that are not made with cream, like this one, deserve a drizzle of Extra Virgin Olive Oil.
  • Serve with a scone to make a hearty lunch.

Read Full Post »

I have had a bum shoulder for the longest time. I’m seeing a chiropractor and she does acupuncture and some massage techniques which have been quite successful but I thought I’d help it along by adding some turmeric to my routine because it is widely known as an anti-inflammatory. We had a couple of days with back to back dishes with turmeric and it seems to have helped. Although it isn’t nearly as cold out as it was in December and early January, it is still winter in these parts and soup is definitely at the top of my list of cravings.

Slow Cooker Lentil Tomato Soup with Turmeric

A KitchenInspirations Original Recipe

Makes 750 mL of soup

To print recipe, please click here.

Ingredients:

  • 100 g onions, roughly chopped
  • 20 g roasted garlic (about 3 large cloves)
  • 60 g red lentils
  • 350 mL vegetable stock
  • 200 g tomatoes
  • 10 g turmeric
  • 5 g sea salt
  • 3 kaffir lime leaves
  • 250 mL Coconut Milk

Directions:

  1. Combine everything but the coconut milk in the bowl of a small slow cooker and cook (mine only has one temperature) for 4 hours.
  2. Purée to a smooth creamy velvety soup, adding the coconut milk slowly. Press through a fine sieve. Reheat if necessary. Serve hot with a drizzle of olive oil, chili oil or toasted coconut.


It is a smooth and velvety soup.

Notes:

  • Because I blitzed the kaffir lime leaves into the soup, it is imperative to press the soup through a fine sieve to catch the hard bits. It will also result in a velvety smooth, creamy soup.
  • The coconut milk adds a bit of sweetness to the soup, but doesn’t make it sweet.
  • The lentils add creamy texture and protein.

Read Full Post »

Our dear friends gave me a beautiful cookbook from their last cruise, it is a celebration of courses through the journies of their fleet: Culinary Courses Journeys. Although most of the recipes are quite fancy, the book is amazing inspiration and a week doesn’t go by that I don’t check it for reference!

It was such an occasion that I was leafing through the book that I found a gorgeous representation of a Minestrone Soup and I knew I had to make it for dinner. And then I realized that I did not have a Minestrone on the blog. Gads!

The soup is packed with fresh vegetables in a light tomato and basil scented broth. The protein is navy bean to keep it healthy. You could add a parmesan rind or two to the broth while cooking.

The tuile melts into the soup for a beautiful flavour and textural addition.

Rustic Vegetable Minestrone

A KitchenInspirations Original Recipe

Makes about 1.5 L (6.25 cups) soup.

Please click here to print this recipe.

Ingredients:

  • 1 tbsp EVOO
  • 125 g (~1 cup) sweet onion, diced
  • 10 g (2 – 3 cloves) garlic, finely minced
  • 150 g (~1 cup) zucchini, diced
  • 115 g (~1 cup) celery, diced
  • 120 g (~1 cup) red pepper, diced
  • 75 g (~1 cup) king mushrooms, diced
  • 140 mL (4 oz) puréed tomatoes, juice or sauce
  • 15 mL (1 tbsp) tomato paste
  • 350 mL (1 2/3 cups) chicken stock
  • 2 stems of basil
  • 4 stems of lemon thyme
  • 100 g (1/2 cup) dried beans
  • 35 g (~1 cup) baby spinach
  • 5-8 fresh basil leaves, roughly torn

Directions:

  1. Cook the dried beans according to directions.
  2. Heat Olive Oil in a large pot and sauté onions until translucent, you may need to add a little stock or water. Add the garlic and cook until fragrant.
  3. Add all of the vegetables and cook for about 10-15 minutes.
  4. Combine the puréed tomatoes, tomato paste, and chicken stock. Pour over the vegetables and add the basil and thyme stems and simmer for 10 minutes. Remove stems.
  5. Add the cooked beans and baby spinach, stir and heat through.
  6. Serve garnished with a Parmesan tuile (recipe below) and roughly torn basil leaves.

Basil Cheese Tuile

Makes 1 tuile

Ingredients:

  • 7 g (1/4 oz) hard fatty cheese (like Parmesan or Cheddar), finely grated
  • 1 large basil leaf, chiffonade
  • pinch of granulated garlic

Directions:

  1. Pre-heat the oven on high broil.
  2. Mix cheese, basil and granulated garlic well.
  3. On a parchment lined baking sheet, shape the tuile as desired (I made a tear drop).
  4. Broil until evenly browned (mine took about 4 minutes but it depends on how thick you make your tuile); to prevent burning, you may need to cover part of it with bits of parchment as it bakes.

Notes:

  • I like a little crunch left in my vegetables, so I generally under cook rather than over cook.
  • If you make this in advance, keep the beans separately so they don’t turn to mush.
  • I used Ivanhoe Horseradish Cheddar because I thought it would be a nice zing to the soup.
  • Make as many tuile as you need, just multiply the ingredients by the servings required.

Read Full Post »

Recently, we were dining at our favourite French restaurant in our hood. We were sitting at the bar chatting with the staff and another patron when, for no apparent reason, a wine glass slid off the top shelf and plummeted to the ground, shattering!

Well, that was interesting! No one was near it, and the manager said that they put rubber mats on the shelves to prevent this type of thing. Yet, it slid off the shelf entirely on its own. Later, someone mentioned that the location had been a funeral home when it was first built in 1923 (we’ve been here 17 years and have only known the location to be restaurants!). You decide what happened, but my bet is on a sneaky ghost giving us a fright!

Smoked Garlic and Roasted Cauliflower Soup

A KitchenInspirations Original Recipe

Please click here to print the recipe.

Makes 1.5 L (6 cups) soup

Ingredients:

  • 25 g smoked garlic (about 5 cloves)
  • 560 g cauliflower (about 1/2 a large head), cut into smallish florets
  • 1 L (4 cups) chicken stock (or vegetable)
  • 90 g (1/2 cup) red lentils
  • non-stick spray
  • 1/4 tsp smoked paprika
  • sea salt

Directions:

  1. Pre-heat the oven to 400° F (200° C).
  2. Add the unpeeled garlic cloves to a small ramekin, sprinkle with a little sea salt. Pour about 1 cm (1/2 inch) stock over cloves and cover with either foil or ramekin lid.
  3. Spray a large baking sheet with non-stick spray and add the cauliflower, sprinkle with a little sea salt. Add the ramekin with garlic to a corner of the baking sheet. Bake cauliflower and garlic for 30-40 minutes or until quite soft, turning frequently to avoid burning. I like to add a little stock to the bottom of the roasting pan to make sure I get all the little bits from the pan.
  4. Pour the cauliflower into a large pot. Peel the garlic and add it to the cauliflower, add some of the stock and purée until smooth. Add the red lentils and cook until lentils are soft. Purée again until smooth, adding stock until you achieve the desired consistency. You may wish to run this through a fine sieve to make it even more luxurious.
  5. Serve hot.

The cloves are cold smoked and are still raw.

Perfect timing as it’s getting pretty darn cold!

Notes:

  • A dear friend gave me a couple of heads of smoked garlic, she picked it up at a local farmers market. I had never seen or heard of it before but you can bet that I’ll be trying to make it soon!
  • The smoked garlic is raw and therefore needs some cooking when used in this quantity, I prefer roasting, usually with olive oil instead of stock, but we are trying to lose a few summer pounds.
  • The smoke in the garlic is very subtle, that is why I added the smoked paprika, but be careful, it can get overwhelming very quickly.
  • I added the lentils to get some protein into this meatless meal, and it also is an amazing thickener that becomes so velvety smooth when puréed.
  • Some topping suggestions:
    • Crumbled crispy bacon
    • Crispy onions
    • Grilled cheese croutons
    • Grated cheese (like gruyère or sharp cheddar)
    • a dollop of Crème Fraiche or sour cream

Read Full Post »

Today is Victoria Day of the long weekend, which happens to be very important for Canadians because it is the May Two-Four Weekend: Queen Victoria’s birthday, cottage opening, garden planting, and the first outdoor BBQs and patios!! It is also the weekend that JT and I tied the knot! Yes indeed, we hitched up on the holiday Monday of a long weekend. Now, now, don’t get your knickers in a knot, the wedding ceremony started at 3pm on the holiday Monday, so people realistically could still get up to the cottage, open and get back in time for the wedding. Not everyone was happy about our decision, but it wasn’t really our fault, you see it was our first time and we had no idea how far in advance you had to book your venue for the reception (we found one venue that was taking bookings 3 years from the date), so when we found one available on the holiday Monday only 5 months after we got engaged, we went for it.

The weeks leading up to our wedding were lovely; gorgeous, warm, spring weather, three beautiful bridal showers, and the shear excitement every time a parcel arrived at the door! I had everything planned out, it would be a glorious day and everything would be perfect. I should have known things don’t always go as planned.

The night before the wedding, I tried on my dress and Mom and I decided we really didn’t love the neckline, it was far too high; fortunately, the dress was lace and I was able to trim away the bits we didn’t care for, using manicure scissors, and it worked out perfectly. I went to bed that night with my hair in rollers and I said a little prayer for my Dad who had passed in 1981 and crossed my fingers and toes that it would be a beautiful, sunny, spring day.

I awoke Monday, May 19 to a cold, dark and dreary, rainy day. I honestly thought I would be devastated but I wasn’t, I was absolutely fine. Things would go on with slight modifications. No big deal. And because the rain persisted ALL DAY, people were not that upset about having to leave the cottage early (we had a lot of cottager guests). After the ceremony, we were going to take photos in my In-Laws’ garden but since we couldn’t, we moved it inside (they had a lovely mansion), everything was just fine. The strange thing about that day was that it rained constantly, without stopping ALL DAY with the exception of the few times I stepped outside — to get into the limo from my Mom’s home, to get out of the limo at the Church, and to and from my In-Law’s home and finally to and from our reception! It stopped EVERY SINGLE TIME! I didn’t use an umbrella and I did not get wet! Thanks, Dad! We had a typical dinner for a wedding of that time (caesar salad, roast beef, Yorkshire puddings, and steamed veg) but considering the cool day, we sure could have used some soup and this soup would have been perfect. (click on the photo below for a short slide show). Please forgive me, the eighties were unforgiving style-wise!

To celebrate our 31st wedding anniversary (I was a child bride ;-)), we took a little road trip to Stratford, Ontario to see Guys and Dolls and stay overnight. Stratford is aptly named for the city in England and its primary mandate is to present Shakespearean plays but also includes a variety of Greek tragedies and Broadway-style musicals (wiki) to broaden its reach. It was a great weekend, although the weather went from 30° C (86° F) to 10° C (50° F) with high cold winds, we enjoyed walking around this pedestrian-friendly town with an excellent food scene. Here is a little slideshow of our trip.

As I mentioned, the weather turned on the morning of our trip (and our actual wedding day) and we were basically back in November! I had a huge soup craving and this one would have certainly hit the spot. I have made these grilled cheese croutons, again and again, they are excellent in a caesar salad too (use Parmesan instead of cheddar)!

Creamed Broccoli Pesto Soup with Grilled Cheese Croutons

A KitchenInspirations Original Recipe

Makes 1 L or 4 cups soup

Ingredients:

  • Extra Virgin Olive Oil
  • 100 g (1 medium size) sweet onions, chopped
  • 300 g (2 stems) broccoli, including the stems, chopped
  • 20 g (3-4 cloves) garlic, roughly chopped
  • 45 ML (3 tbsp) basil pesto (I used this recipe but used ground almonds instead of pine nuts)
  • vegetable or chicken stock

Directions:

  1. Using a splash of olive oil, caramelize the onions, about 15 minutes.
  2. Add the broccoli and garlic and cover with stock and cook until softened (about 30 minutes).
  3. Add the basil pesto and cook for an additional minute.
  4. Using an immersion blender, blend soup until very smooth, adding more stock to achieve desired thickness (I did not need to). Press through a fine sieve.
  5. Serve with Grilled Cheese croutons (recipe below).

These are crisp, cheesy croutons.

Grilled Cheese Croutons

Ingredients:

  • 1 slice of seeded bread (we like this one)
  • 30 mL (2 tbsp) Mycryo
  • 50 g (1/2 cup) shredded sharp cheddar cheese

Directions:

  1. Preheat the oven to 350° F (177° C).
  2. Cut the bread into bite-sized cubes and coat with the Mycryo. Bake, stirring often until bread has become dried croutons. Toss with the shredded cheddar and return to the oven and bake until cheese melts and caramelizes.
  3. To serve the soup, ladel soup into warm bowls and toss the grilled cheese croutons on top and serve piping hot.

If you love crispy cheese, you will love these croutons.

Read Full Post »

pickledradishes_first

I had an excess of radishes in my pantry so I decided to pickle them before they turned bad. They will make a nice garnish to pulled pork or a rich stew like bœuf bourguignon.

Pickled Radishes

A KitchenInspirations Original Recipe

Makes 250 mL (1 cup)

Ingredients:

  • 160 g (~1 cup) radishes, sliced thinly
  • 30 g (~5 cloves) garlic, sliced thinly
  • 250 mL (1 cup) white vinegar
  • 5 mL (1 tsp) salt
  • 5 mL (1 tsp) sugar
  • 5 g (~ 6 sprigs) dill sprigs
  • 250 mL (1 cup) sterilized canning jar

Directions:

  1. Combine vinegar, sugar and salt and heat until both salt and sugar have dissolved, stir well.
  2. Add the radishes and garlic slices to the jar and pour the hot liquid over to cover. Tap the jar a few times to burst any air bubbles.
  3. Pour the liquid over the radishes and tap the jar on the counter a few times to get the liquid dispersed evenly. Add the dill sprigs, making sure they are covered in the liquid. Screw on the lid.
  4. Use immediately or process jar for 10 minutes (or as required in your neck of the woods), allow to cool on the counter. Label. Store for 3 months in a cool, dark place or use within a month in the fridge.

pickledradishes

Read Full Post »

gazpachogelato_first

One of the first courses we had at the One Star Michelin Restaurant, Alejandro, just outside of Almeria (in the quiet town of Roquetas de Mar) was a wonderful Gazpacho Sorbet. During our Paella Lesson in Madrid, we discovered that Gazpacho is a staple in most Spanish households. They make a few batches each week, drinking a cup-full when peckish or feeling down. It makes total sense, as it’s packed with raw vegetables and full of vitamins. I, too, have begun to keep a litre or so in the fridge, particularly now, with the seasons changing, and it’s so easy to catch a cold.

gazpachosorbet_alejandro

This is the original Gazpacho Sorbet at Alejandro’s in Spain. I didn’t care for the odd presentation in the glass so mine was more freestyle. It was garnished with a candied lemon slice.

You may use any old Gazpacho recipe, I used the one we made during our Paella Cooking Lesson at Cooking Point. The main difference is that the Spaniards add a slice of bread (for body) and a significant amount of olive oil to balance the acidity. The New York Times published a beautiful description of a good Gazpacho (see original article here), “The texture is always smooth and light, with a mouth feel similar to that of whole milk. It is not the watered-down salsa or grainy sludge often served in the United States under the name of gazpacho, but an emulsion of fat (olive oil) in liquid (vegetable juice and vinegar) that is light and fluffy on the tongue and a fantastic conductor of flavor, just like vinaigrette or hollandaise.”

The recipe below is perfectly balanced, I wouldn’t change a thing. There is just a hint of onion and garlic, you don’t want this to be too oniony or garlicky. And while I would normally shudder at the volume of olive oil in this recipe, you really need it to balance out the acidity and it adds that silky mouthfeel Eric Asimov of the New York Times described above. Turning it into Sorbet is a surprising, yet satisfying dish. Definitely bookmark for the warmer weather.

gazpachogelato_2Authentic Spanish Gazpacho

Serves 4-6

Ingredients:

  • 500 g ripe tomatoes, roughly chopped
  • 50 g green pepper (about 1/2 an ordinary sized pepper)
  • 40 g cucumber, peeled and roughly chopped (English is fine)
  • 30 g onion, roughly chopped
  • 20 g bread, crust removed
  • 1/2 garlic clove, roughly chopped
  • 15 mL sherry or red wine vinegar
  • 5 mL cumin
  • salt, to taste
  • 60 mL EVOO

Directions:

  1. Add all of the ingredients but the Extra Virgin Olive Oil to a blender or a large measuring cup. Blend or use an immersion blender to blend until smooth.
  2. Pass the liquid through a fine sieve. Return the liquid to the blender or large measuring cup and blend in the Olive Oil in a slow, steady stream to emulsify. Refrigerate for 1 hour.
  3. Pour the soup into the bowl of your chilled ice cream maker and turn it on until it has thickened and frozen like sorbet. Serve immediately or store in an airtight freezer container in the freezer for no more than one hour, it will freeze solid.
  4. Garnish with herbs, or finely chopped vegetables. Alejandro served it with a slice of candied lemon.

Read Full Post »

PeaKaffirLime_First

A few months ago, one of my Chef FB peeps posted about a product she received called Mycryo®. I was intrigued, I had never heard of such a product so off I went to research it. The product is powdered cocoa butter and their website touts that it seals in flavour with fewer calories than pan firing in oil! How exciting is that?! I immediately thought of a few applications that release fluids quickly making it difficult to sear: Scallops, mushrooms, potatoes, and the list goes on! I HAD to HAVE it! So off I went to their website to see where I might purchase this unique product, and to my delight, there were quite a few stores. I made the mistake of not calling ahead to see if they had it in stock and I shuffled off to several stores (sigh, you know how I hate going to specialty grocery stores!) to track it down but was sadly disappointed, although I did make some other purchases so my trips were not entirely useless. I returned home, with a sunken heart and proceeded to call and email around but, I was not able to find it. What to do? My desire for this product had not waned, so I tweeted the Canadian company and they immediately responded and the next thing I knew, they sent me a full-size sample! Isn’t that lovely?

Mycryo

I’ve been using Mycryo® in my everyday cooking (I even transferred some to a small bottle to take to the cottage), although I haven’t had a blog worthy recipe before this one, it works just as they claim. I’ve tried Mycryo® with mushrooms, scallops, shrimp, pork shoulder (for pulled pork) and pork tenderloin (roast), oven roasted potatoes and sweet potatoes. It doesn’t splatter as much as oil does and that makes me happy because I don’t need to clean up a mess! Although, I must tell you that I haven’t had as much success with potatoes or sweet potatoes, but that may be due to the fact that I only have a small convection oven at the cottage, where I tried it. This recipe, however, works out perfectly with this unique product, the shrimp did not release any liquid, making a wonderfully crisp coating, just like deep frying but without the excessive calories.

PeaKaffirLime3

That shrimp is either enormous or that’s a very small bowl 😉!

Chilled Pea Soup with Kaffir Lime Coconut Milk garnished with Toasted Coconut Shrimp

A KitchenInspirations Original Recipe

Makes 1.25 L (5.5 cups)

Ingredients:

  • 25 g coconut milk powder (around 4 heaping tbsp)
  • 1 cup milk (I used 2%)
  • 1 cup water
  • 750 g frozen peas (about 1 lb)
  • 10 g dried Kaffir Lime Leaves (a good handful, use less if fresh)
  • 1 tbsp chopped cilantro
  • 10 g grated frozen ginger (about 1 tsp)
  • 2 cups vegetable stock or water
  • 2 tbsp lime juice
  • pinch of sea salt

Directions:

  1. Combine coconut milk powder with milk and water and blend with an immersion blender until well blended.
  2. Add the defrosted peas, dried kaffir lime leaves, cilantro, ginger and 2 cups vegetable stock (or water) to the coconut milk. Blend with an immersion blender until smooth. Strain through a fine sieve and add the lime juice, blend again briefly (see notes below).

PeaKaffirLime2

The soup tastes like summer!

Serving Suggestion, per person:

Ingredients, per person:

  • 1 large shrimp, entirely peeled (I hate to have to fish the shrimp out with my fingers to pull off the tail)
  • 1/2 tbsp AP unbleached flour
  • 1/2 tbsp egg white with a pinch of sugar or honey, whisked
  • 1 tbsp toasted coconut
  • 1/2 tsp Mycryo®*

Directions:

  1. To toast the coconut, Toss with 1/2 tsp Mycryo® and toast lightly in a small frying pan set aside to cool,.
  2. Dredge the shrimp in the flour and coat well. Next coat the shrimp with the egg white mixture. Then back into the flour and dip back into the egg white mixture (see notes). Then lastly,  coat the shrimp well with the toasted coconut, set aside. Continue until you have all of the shrimp prepared.
  3. Preheat the oven to 190° C (375° F). Lay shrimp on their sides onto a baking sheet. Gently sprinkle Mycryo® on side one, then flip the shrimp and sprinkle on side two. Bake for 3-5 minutes or until entirely opaque.
  4. Pour the chilled soup into a soup bowl, gently add the shrimp so that it remains visible (I may have propped said shrimp on an inverted bowl in the soup, food styling trick for photography ONLY!). Serve immediately.

Notes:

  • Obviously, to be vegetarian and vegan, omit the shrimp!
  • Substitute 1 cup coconut milk plus 1 cup water for the coconut milk powder and milk. To reduce calories, reduce the proportion of coconut milk to 1/2 cup plus 1 1/2 cup milk and 1 cup water.
  • To get more out of your soup, blend the remaining pulp from the sieve a few times adding only a little water or vegetable stock, press through a fine sieve each time and add to the main soup. I usually do this 2 or 3 times and the pulp is reduced about 1/2 to 1/4 each time!
  • Pulp broth: do yourself a favour and boil some water (I did about 500 mL or 2 cups) and pour it over the pulp, allow to sit until cooled and then strain it through a fine sieve (like a metal coffee filter) and reserve the liquid for your next soup. It packs a bunch of flavour and now you have stock from something that would have been compost! Compost the remaining pulp.
  • Refrain from adding additional sweetness to the soup until you have tasted the final product, I feel the peas should be sweet enough.
  • Other garnish options are:
    • Whipped coconut milk with toasted coconut.
    • 1 or 2 grilled shrimp per serving (just dust the dry shrimp in Mycryo® on both sides and put on a hot grill)
    • Toast some coconut and chiffonade some mint, dress each bowl.
    • a dollop of crème fraîche with some toasted coconut.

Disclosure:

Eva Taylor/Kitcheninspirations received 550 g container of Mycryo® by Mycryo® Canada free of charge; this recipe was developed by Eva Taylor for Kitcheninspirations, and the opinions expressed in this post are that of Eva Taylor/Kitcheninspirations.

nutrition

Nutritional facts based on 250 mL soup with 1 shrimp, approximately 26 g.

WWnutrition

WW tables based on 250 mL soup with 1 shrimp, approximately 26 g.

Read Full Post »

CHilledAppleSoup_First

Recently, I assisted on a motion shoot (defined as a video/film shoot) on location at someone’s very lovely home. These shoots can be challenging particularly when the kitchen is part of the set that they are shooting. In the past, I’ve had to prepare everything in advance and simply plate on location (on the floor, no less) but this was a much bigger production and we were provided a specially designed portable, professional kitchen! This portable kitchen was such a luxury because we were off on our own (no one bugging us) with 2 ovens, 1 upright freezer, 2 refrigerators a bakers rack and lots of counter space! And best of all, we had Air Conditioning because with two full-sized ovens running at 218° C (425° F), it can get pretty toasty inside!

This is an example of a prep area that is less than perfect!

This is an example of a prep area that is less than perfect because the kitchen was part of the set!

The story of this professional kitchen is rather interesting. The creator noticed that Food Stylists were usually provided less than satisfactory circumstances even though the food they were preparing was the hero of the shoot, so this guy took it upon himself to purchase a cube truck and convert it to a professional kitchen, he has two now and is as busy as ever! To be honest, we cannot thank him enough, it is such a luxury (compared to prepping on portable burners in the garage or on the lawn!)

These shoots take many people to run smoothly, there are the usual suspects: director, camera people, prop stylists, food stylist and all the support staff! It’s a pretty amazing thing to be a part of. We even had our own on-site caterers (called Craft Truck) who provided delicious food throughout the day; for example, shortly after 7am, there was a BLT sandwich, then a granola berry parfait, then smoked salmon on toast smeared with cream cheese and capers (that one, I couldn’t resist, the rest of the snacks, I passed on), followed by a hot lunch of grilled salmon, grilled whole chicken legs, pork tenderloin, several salads, steamed veg, potatoes, rice and beans and a variety of desserts, then around 5pm, snack sandwiches were passed around. We were definitely well fed! Coffee, juice and water were available all day long.

KitchenTruck

This is the exterior of our mobile professional kitchen. Fortunately, we were parked at the end of the driveway so we only had a short run to the set.


KitchenTruck_2


Our portable kitchen is ready for action. Sebastion was setting up the kitchen, complete with stand alone freezer, 2 glass door refrigerators, 2 full-sized ovens, 2 sinks, a bakers’ rack and A/C!


KitchenTruck_3

There were 3 food stylists for this shoot (one lead and two assistants). We were non-stop from 7am until after 5 all day!

The food on site was plentiful and we were never hungry or in need but this chilled soup would have been a lovely addition considering how sweltering hot it was that day. Let’s just say I had a lovely glow on all day, if you know what I mean!!!

This is a refreshing, chilled soup served on a hot, muggy day in the city and it’s very easy to prepare.

Chilled Apple, Cucumber and Coconut Soup

A KitchenInspirations Original Recipe

Makes 600 mL Soup

Ingredients:

  • 1 medium shallot (about 30 g), finely chopped
  • 1 Granny Smith apple (about 175 g), cubed (reserve 1/4 for garnish, as pictured)
  • 2 stalks celery (about 60 g), roughly chopped
  • 1 tsp canola oil
  • 1 cup vegetable stock (I used pea broth*)
  • 1/3 English cucumber (about 65 g), roughly chopped.
  • 2 tbsp coconut milk powder (or to taste)
  • 1/4 tsp cinnamon

Directions:

  1. Sauté chopped shallots until translucent. Add celery, apple and vegetable stock, cook until softened (about 10 minutes), . Remove from heat and add the cucumber.
  2. Using an immersion blender, blend several minutes until smooth.
  3. Chill for several hours or make a day or two in advance.
  4. Serve cold and garnish with very thinly sliced apples. For other garnishes, please see notes.

Apple Soup

A tasty and refreshing soup that is only lightly sweetened with apple flavour.

Notes:

  • The pea broth was the result of the liquid used to blanch freshly shelled peas and then I cooked the shells again, then strained the broth through a fine sieve.
  • I chose not to strain this soup through a fine sieve because after I blended it for several minutes, I didn’t mind the final texture (some apple skin and cucumber skin, you can see how minute they are in the photos).
  • The cucumber adds a piquant note, omit if you are adverse to such flavours.
  • The apple flavour is very subtle but adds a lovely sweetness and tartness to the soup. I did not add sugar, but if you like a sweeter soup, consider using a sweet apple (like Gala) or adding coconut sugar in addition to the coconut milk powder.
  • Consider garnishing with some crispy cooked bacon.
  • This soup would be elevated if you garnished it with one large scallop caramelised in butter and drizzle with the scallop butter.

Read Full Post »

GreenPea&BasilSoup_First

In my line of work, sometimes I acquire excess food from time to time — it’s just stuff that’s left over. The protocol is to offer it first to the client, then the photography staff, art director and lastly the food stylist (me). Recently, we were shooting a video ad for a popular small appliance on location in someone’s home, I had to shop and prepare about 12 recipes in advance and arrive only to do last minute plating and garnishes. It’s not the best situation for food because the food can look wilted and old very quickly, but it had to be done, so I persevered and it was done. It was an extremely professional group and the video team was equally as lovely (everyone came over to hug me after the job was done). Because the location was a private house, we had to vacate very quickly, packing up in warp speed — no time to wash anything, everything was put into bags to be washed at home. The leftover food was repackaged and everyone helped and carry everything to my car. Many of the items (everything on set) was garbage because we didn’t have proper refrigeration (like chicken wings and drumsticks that sat out at room temperature for about 4 hours) but some of the vegetables were entirely usable, including the ingredients in this recipe. The bag of frozen petite pois (small peas) had defrosted but were still very cold so they were fine and the basil was in tip top shape and so this soup was born. Peas and basil are a lovely combination and I urge you to give it a try, it really is so refreshing and moreish plus it is an absolutely gorgeous colour. You can serve this simple soup hot or cold, we had it hot for dinner with a nice dollop of goats cheese melting into the soup. Bon Appetite!

Green Pea and Basil Soup, chaud ou froid

Makes about 1 L of soup

Ingredients:

  • 750 g bag frozen petite pois (sweet peas), defrosted
  • 500 mL vegetable stock (preferably homemade like this easy, economical recipe)
  • 10-20 large basil leaves, to taste
  • 4 basil leaves, chiffonade
  • Sea salt, to taste

Directions:

  1. In a large glass container, combine the petite pois and vegetable stock with 10-20 basil leaves. Blend with an immersion blender until very smooth, taste and season accordingly.
  2. Press this liquid through a fine sieve (the pea skins are not a great texture in this soup). Serve hot or cold with a chiffonade of basil or a dollop of goats cheese.

GreenPea&BasilSoupNew

This simple yet versatile soup may be served hot or cold. Think about garnishing it with a caramelized scallop!

Notes:

  • This is a light soup, if you would like it to have more body, consider blending an avocado into it, starting with half and blend until smooth and taste for richness, blend in the second half if necessary.
  • If you are not fond of basil, try mint, it also pairs beautifully with sweet peas.
  • The beauty of this soup is its simplicity, no cooking, few ingredients.

Read Full Post »

Dumplings_First

Fibre is always a good thing to add to your diet and as we age it becomes more and more important. With the weather being chilly (because it’s February and we live in Toronto, DUH!) I’ve been craving a lot of soup, and my favourite is a broth soup. Every week I make a large batch of compost stock (well-washed vegetable trimmings) and my dinner is usually the vegetable broth with chopped vegetables but sometimes I crave something more. Recently JT was away for some councillor meetings so I was able to experiment freely without judgement and I came up with these high fibre dumplings. The egg adds the protein and the dumplings add more than 3.5 times the fibre a regular dumpling would have. They remind me of matzo balls but a tad firmer, which I prefer anyway. So if you’re trying to add a bit more fibre to your diet, give these gems a go, I think they’re pretty tasty.

HighFibreDumplings_8460

The parsley adds delicious flavour so don’t skip it.

High Fibre Soup Dumplings

A KitchenInspirations Original Recipe

Serves 2-4

Ingredients:

  • 1/4 cup all bran cereal
  • 1/4 cup all purpose unbleached flour
  • 1 tbsp flax seeds
  • 2 tbsp water
  • a good fist of parsley leaves
  • 1 extra large egg

Directions:

  1. Add all the dry ingredients and parsley to the bowl of a small food processor and pulse until mostly powder.
  2. Add the egg and 2 tablespoons water and mix thoroughly and let sit 5 minutes to allow mixture to thicken.
  3. Drop by teaspoon-full into the boiling soup and cook thoroughly (usually when they rise to the top).
  4. Serve immediately.

DumplingNutValue

Based on 2 servings

Read Full Post »

FrenchOnionSoup_First

Recently we had some good friends for Brunch and my friend Angela told me how she makes the most delicious vegetable stock from vegetable trimmings. Of course, this isn’t the first time I’d heard of this frugal stock but to be honest, I was skeptical on how good it would be — stock from trimmings? That’s bunny food! I’ve been using roast chicken carcass for soups for a few years now but I’ve never jumped into the compost bin head first to make this vegetable stock before. Angela and her husband were quite convincing on how good this stock is, so I decided to give it a try.

My first attempt was a simple stock using vidalia onion skins, garlic skins, eggplant ends, zucchini ends, celery leaves, cilantro stems and green onion ends. I made sure to wash the skins very well and tossed them into a large stock pot with enough water to cover. I tossed in a tiny bit of salt and boiled, then I reduced to a simmer for about 4 hours. WOW! I can’t tell you how good this was! For a lunch, I simply sautéed more zucchini, eggplant, onions, garlic and celery and ladled the “Compost Stock” over it and drizzled it with parmesan cheese, boy was it GOOD!

When I saw how dark and rich the onion skins made the stock, I thought: why not make a French Onion Soup from it (we’ve made French Onion Soup here and here and here before)? And that is the way this recipe came about. It’s so easy and inexpensive that I urge you to try it. You can make it vegan by omitting the cheese or just use vegan cheese (not sure how good that could be!). And if you’re looking to save a few calories, omit the croutons and the cheese.

JT tried it and could not believe it was made with onion skins and caramelized onions, no stock at all — verdict, he loved it. For this version, we saved around $4 because I usually use an organic beef stock or sometimes I even roast some beef bones which would have saved us $6.00)!

Veg FrenchOnionSoup

Would you like a bowl?

A Vegetarian French Onion Soup

A Kitchen Inspirations Original Recipe.

Makes 1.5 L (6.25 cups) of soup

Ingredients:

  • 3 large organic Vidalia onions, including skins
  • 1/4 cup white balsamic vinegar
  • 4 L (roughly 4 quarts) water
  • 2 tbsp EVOO
  • 3 bay leaves
  • 1 tsp salt
  • 100 g (3.5 oz) Gruyère cheese, grated (omit if vegan or vegetarian)
  • croutons, enough to fill 2 French Onion Soup bowls

Directions:

  1. Pre-heat oven to 250°F (121° F).
  2. Wash outer skin of the onions well. Peel onions, add skins with the bay leaves and salt to a large stock pot with 4L (4 quarts) water in it. Stir and bring to a boil then turn down and simmer for 2-3 hours.
  3. Slice onions very thinly on a mandoline (any larger bits that can’t be sliced, just add to the onion skin stock pot).
  4. Heat olive oil to a large Dutch oven and once hot (but not smoking) add onions; sweat onions until translucent and just beginning to caramelize (about 20 minutes). Add the white balsamic vinegar and stir well. Cover with a piece of parchment (as illustrated below) and bake for 2-3 hours at 250° F (121° C) or until golden and fully caramelized.
  5. When stock is a rich, dark colour strain through a fine sieve to remove skins and bits and finally through a very fine sieve to remove any fine particles (I use a reusable coffee filter). Combine stock with caramelized onions and heat through. Taste for seasonings and add salt and pepper as required.
  6. Plate in French onion soup bowls with croutons and mounds of Gruyère cheese, broil so it’s all melty and bubbly and serve hot!
  7. For a vegetarian or vegan version, omit the cheese or use vegan cheese.

parchment2

Parchment cover for the onions

Screen Shot 2015-11-25 at 1.45.35 PM

Based on 4 servings per batch without the Gruyère and croutons

Based on 4 serving per batch, without the Gruyère and crouton

Based on 4 serving per batch, without the Gruyère and crouton

Read Full Post »

CreamedLentilSoup_First
Lunch in my new freelance reality is often something simple like cauliflower florets with a homemade bean dip but these last few weeks have made me crave soup like nothing else. Often I have something frozen that I can thaw on the range or in the microwave at a moment’s notice but because I had a head cold, I totally exhausted my stash. No canned soups here, homemade is way too easy!

We always have a pantry-full of dried beans and pulses, but as usual, I forgot to soak my beans so I used the next best thing and what I’d consider “instant” — the old standby, red lentil (they are Australian! Who knew?) The red lentil cooks up quickly and has a mild earthy flavour that takes to being flavoured with other vegetables and spices. I also noticed that I was very short in other ingredients so this soup was dictated by what was on hand, a few button mushrooms, onions, garlic and about 1 celery rib. JT loved it, as did I so I was very glad I had the forethought of jotting down the ingredients as I made up a batch. I netted about 600 mL which makes for a hearty meal for two but can be served as smaller portions for four as a starter. Definitely going to bookmark this one for the future, it’s a keeper!

Creamed Lentil Soup with Warm Goats Cheese & Mushroom Relish

A Kitchen Inspirations Original Recipe.

Ingredients:

  • 1 cup dried red lentils
  • 1 celery rib, chopped
  • 1/2 sweet onion, chopped
  • 1 large clove garlic, minced
  • 1/2 tsp salt
  • 1/2 tsp black pepper
  • 1 tsp EVOO
  • 4 cups water or vegetable stock

Directions:

  1. Heat the EVOO in a small Dutch oven, add the celery, onion and garlic, sauté until soft and onions are transluscent.
  2. Add the lentils and sauté for a moment, add the water and stir well.
  3. Cook the lentils over medium heat until soft. Transfer to a glass bowl and purée until smooth and creamy with an immersion blender. Set aside while making the warm relish.
  4. Garnish with crumbled herbed goats cheese and warm csramelized mushrooms.

Ingredients for the Warm Relish:

  • Handful of button mushrooms, cubed very small
  • 1 tsp butter
  • 1 small clove garlic
  • 2 tbsp herbed goats cheese

Directions for the Warm Relish:

  1. Melt the butter in a small cast iron frying pan, add the mushrooms and sauté until caramelized. Add the garlic and sauté until fragrant. Garnish soup as indicated above.

A comforting, smooth, filling soup with some great flavours.

A comforting, creamy, filling soup with some great flavours.

Notes:

  • The herbed goats cheese was something I had on hand from another dish, it is simply softened goats cheese, finely chopped parsley, thyme and sun dried tomatoes, sea salt combined.
  • Feel free to substitute plain goats cheese, crème fraîche, sour cream or Greek yogurt.
  • I usually press a soup like this through a fine sieve but did not feel it necessary this time, it was super creamy and smooth.
  • I would have loved to garnish with some finely chopped fresh herbs but sadly my herb garden was put to rest a few weeks ago.

Screen Shot 2015-10-28 at 3.51.27 PM

Based on 4 servings, without mushroom & goats cheese relish.

Screen Shot 2015-10-28 at 3.52.48 PM

Based on 4 servings, without mushroom & goats cheese relish.

Read Full Post »

CoconutPumpkinSoup_first

Sorry guys, I’m a day late with this post…it’s been a little busy!

It’s definitely fall up here in the big smoke; the weather went from 25°-30° C (77°-86° F) to 5°-10° C (41°-50° F). That’s chilly. Mind you, it would help if I started wearing socks in my shoes, I just can’t bear that claustrophobic feeling my tootsies get all confined in socks/shoes/boots. How about you, do you dread confining your dogs in socks and shoes?

This soup came about because I bought a couple of smallish pie pumpkins for social media; I actually carved a client’s logo into one of the pumpkins! It turned out really well and I had an entire pie pumpkin left over. Then I got two more social media clients (bittersweet, story to come) who sells Caribbean food and sauces so I was dying to try their organic coconut milk! I checked my dear friend Lorraine’s blog for an easy pumpkin roasting technique and a delicious starter was born for thanksgiving dinner. This soup would be lovely with butternut squash if pumpkins aren’t in season. I suggest smallish portions (125 mL or 1/2 c) because it’s quite rich.

Coconut Pumpkin Soup

Makes about 875 mL (3.5 cups) depending on how thick you wish to have it.

Ingredients:

  • 1 small pumpkin, oven roasted
  • 1/2 onion, oven roasted
  • 2 cloves garlic, oven roasted
  • 2 tbsp coconut oil
  • 2 cups vegetable stock
  • 3/4 c coconut milk
  • 1/2 banana
  • 1/2 tsp curry powder
  • 1/4 tsp ginger
  • Pinch of nutmeg

Directions:

  1. Pre heat oven to 350° F (177° C). Prepare pumpkin as Lorraine does in this post. Lightly coat onions and garlic with the coconut oil. Roast until soft.
  2. When Pumpkin is cooked through, onions and garlic are soft, add pumpkin flesh, onions and garlic to a blender contain with the vegetable stock, coconut milk, banana, curry powder, ginger and a pinch of nutmeg. Pulse blender until completely smooth. Set aside.
  3. Minutes prior to serving, re heat soup and pulse in blender once more to ‘lighten’. Serve immediately.

CoconutPumpkinSoup_7011

The banana adds a very subtle flavour, try not to overdo it as it will overpower the soup.

Notes:

  • Sadly cottage season is over and we’ve closed it down.
  • The banana is an interesting undertone, omit if you don’t care for bananas.
  • To have a lighter soup, don’t use full fat coconut milk or reduce the amount and replace the difference with skim milk.
  • A seared scallop would be a wonderful garnish in this decadent soup.

Read Full Post »

TunaCasseroleMakeover_1This past week was International Women’s Day and I was generously invited (by my dear colleague and friend, Andrea) to the City of Brampton’s 2015 Women’s Day Event and the keynote speaker was none other than celebrity chef Anna Olson! I’ve been a long admirer of Chef Anna’s work from the very first time we dined at Inn on the Twenty in Jordan, Ontario where she and her husband Michael were the executive chefs, more than 15 years ago! These days Chef Anna works with Food Network Canada and is currently starring in Bake with Anna Olson as well as authoring cook books, managing her website, blog and social media outlets not to mention the presentation gigs. On Thursday, Chef Anna recounted her path on how she arrived at where she is today and it was inspirational! She was engaging, funny and interesting, the time just flew by. The audience of 140 were primarily comprised of entrepreneurial women and some young ladies from a local high school. Thank you Andrea for the invitation and the reminder that these networking events are worth every minute because you never know who you’ll meet and where that will lead (of course, I gave Chef Anna my contact info ;-)).

IWD_AnnaOlson

Chef Anna speaking at Lionhead Golf and Conference Centre in Brampton.

Eva_AnnaOlson

That’s me after I had my lovely new cookbook signed by Chef Anna!

Chef Anna’s primary food influence was her grandmother and as I reflected on who my primary influence was (my dear Mother, of course) I also thought about other influences I’ve had over the years, like JT’s mother. JT’s mother was a typical North American cook of that era, not overly adventurous but she made a tuna casserole in the 80’s that was a family favourite. Canned cream of mushroom soup (or cream of celery), a can of tuna, some cooked noodles, perhaps some chopped onion and the pièce de résistance: crumbled salted potato chips on top! Bake in a casserole dish until thoroughly warmed through and serve immediately. Being raised in a Hungarian home, I had never had tuna in this way (or canned tuna any other way for that matter) and having potato chips on top was such a treat. Of course, these days we don’t buy canned soups (too much sodium) nor do we indulge in potato chips, but I wanted the flavour of this retro meal so I reinvented it in a slightly healthier way. I got the thumbs up from JT. Definitely a keeper!

TunaCasserole

Tuna Casserole Makeover

A Kitcheninspirations Original Recipe!

Ingredients for Creamed Mushroom Soup (yields 300 mL):

  • 60 g little button mushrooms
  • 125 g chopped onion
  • 20 g dried wild mushroom mix (rehydrated in 375 mL (1 1/2 cups) water, reserve liquid)
  • 20 g red lentils (thickener)
  • 3 cloves garlic
  • Sea salt

Directions for the Creamed Mushroom Soup:

  1. Rehydrate the mushrooms in 375 mL of hot water (you can microwave this for a couple of minutes to get it going faster). Strain into a fine sieve (I use a dedicated coffee filter) and reserve liquid. Wash the mushrooms thoroughly. Chop mushrooms into smaller bits (allows for the really chewy parts to hydrate faster) and set aside.
  2. Cook the onions with a spray of canola oil until translucent, add garlic and stir until fragrant. Add lentils and 375 mL of mushroom broth and rehydrated mushrooms. Cook until lentils are completely cooked and mushrooms have no chewy bits, season with salt. 
  3. Pulse with an immersion blender until smooth and silky. You may push this through a fine sieve if you’d like, but I didn’t think it was necessary. Set aside 250 mL (1 cup) and freeze the rest, it’s great for soups, gravy or even a base for pizza.

Ingredients for the Tuna Casserole:

  • 120 g drained albacore tuna in water
  • 1/2 cup pearl barley
  • 150 g green beans, washed and cut into thirds (bite-sized pieces)
  • 1 cup water
  • 1/3 cup Greek yogurt
  • 1/4 cup bread crumbs
  • 1/4 cup freshly grated Parmesan cheese

Directions for the Tuna Casserole:

  1. Pre heat the oven to 350° F (176° C).
  2. In the same pot as you made the creamed mushrooms, toast the pearl barley in a little oil, add about 250 mL (1 cup) water and cook the barley until about 3/4 done (it will continue to cook in the casserole) until almost all of the water has been absorbed and what’s left is thick. The barley should still have quite a chewy texture.
  3. Combine the cleaned and cut green beans and roughly separated, drained tuna with the barley, add the creamed mushroom soup, 1 cup of water and give it a good stir. You may keep everything in your pan if it’s oven proof, I transferred it to two small oven proof casseroles that I lightly oiled.
  4. Combine the Greek yogurt, bread crumbs and Parmesan cheese and dollop on top. Bake for 30 minutes or until the internal temperature is 160°F (71° C). Serve with a small green salad.

TunaCasserole_2

This is the Greek yogurt topping before I baked it.

Notes:

  • You may, of course use canned soup and not make your own creamed mushrooms.
  • We prefer to use Albacore tuna in water, but the choice is yours.
  • Don’t like green beans? Use celery instead (I had green beans on hand).
  • We are trying to cut back so I used this recipe for four servings. JT said he could have easily eaten one small casserole on his own (even though I did serve him 3/4 of it!).
  • I have a double oven and I baked this in the top, smaller oven so I was able to get a little browning on the topping without turning on the broiler. If you bake these in a large oven, you may wish to broil the tops for colour and texture!
  • Substitute quinoa or bulgur to lower the calories and carbs a bit (makes it 5 points in WW). Leave out the Parmesan and bread crumbs to bring the WW points down even further to 4!

Screen Shot 2015-03-07 at 11.18.32 AM

Weight Watchers Points

Screen Shot 2015-03-07 at 11.15.47 AM

For fun I did the original recipe as comparison. WW points for the original recipe would have been 12!


Read Full Post »

RoastedTomatoSoup

This time of year, those of us who live in the northern hemisphere are not quite as fortunate as those who live in the southern hemisphere; I’m referring to being able to source the best produce, of course. Personally, I think tomatoes are the greatest disappointment by far (next to strawberries). More often than not, I bite into a tomato and taste nothing. Nadda. Mealy. Pasty. Nothing. This time of year, I tend to gravitate toward the best canned tomatoes, knowing that they were picked and packed at their prime. But somehow, when it comes to using the humble tomato as the main ingredient, the STAR as it were, I feel that canned just wouldn’t cut it and alternative measures must be taken.

Some of you who have been on this journey with kitcheninspirations will recall that I posted a rant and a solution about unseasonal tomatoes a few years ago (4 to be exact) and todays post is about a great use for those oven-dried tomatoes. Oven drying is a long procedure but well worth it, particularly because there is little to no effort involved. Just a few clicks on the hydro metre and you’re almost all the way to a delicious tomato recipe.

Roasted Tomato Soup

Serves 4-5 150-175 mL servings

Ingredients:

  • 1 kg (2.2 lbs) tomatoes ~ this doesn’t have to be precise (I used vine ripened)
  • 500 mL to 1 L chicken stock (or vegetable stock)
  • 6 cloves of garlic, roasted
  • 2 tbsp olive oil (or chicken stock stock)
  • 1/2 tsp salt
  • 1/2 tsp baking soda
  • 4 tbsp goats cheese, at room temperature
  • 4 tsp unflavoured yogurt

Directions:

  1. Pre-heat oven to 250° F (121° C).
  2. Remove all loose skin from each garlic clove, leaving the tight skin on. Place the cloves into a small ramekin and add about 2 tbsp olive oil and some sea salt. Cover with foil wrap and tuck into the corner of the oven. If you prefer not to bake the garlic at the same time as the tomatoes, you may roast the garlic in a 350° F (177° C) oven for 40-45 minutes or until soft.
  3. Wash and slice the tomatoes into thirds (believe me, the tomatoes lose a lot of water in the dehydration process so you must leave them THICK). Place cut side down on some paper towel for about a minute.
  4. Rub a cooling rack with a lightly oiled paper towel and place directly over a baking sheet (to catch any drippings).
  5. Arrange the tomatoes cut-side up on the prepared cooling rack and place in the centre of the pre heated oven. “Bake” for 4-5 hours until most of the moisture has been eliminated from the tomato.
  6. Once dehydrated, add all of the tomatoes and the roasted garlic (skin removed), baking soda into a heat-proof bowl and slowly add the stock. Blitz with the immersion (stick) blender until smooth, adding more chicken stock until the desired consistency has been achieved. Season with salt as desired.
  7. Push through a fine sieve and blitz once more for added creaminess.
  8. Combine the goats cheese and the yogurt and whip until fluffy. Set aside for serving.
  9. When ready to serve, heat the soup through and add a dollop of the goats cheese and yogurt into the centre. Serve piping hot.

RoastedTomatoSoup2

This thick, creamy soup is perfect for cold, snowy days. It would also be delicious chilled on a hot summers day.

Notes:

  • The addition of baking soda came from JT, he uses this trick in his delicious Chicken Cacciatore to quell the acidity of the tomatoes. It really brings out the tomatoes’ sweetness — try it instead of adding sugar!
  • I whipped the goats cheese with yogurt to make it easier to melt into the soup, we swirled it in and it was delicious.

Screen Shot 2015-01-25 at 10.05.29 AM Screen Shot 2015-01-25 at 10.06.12 AM

Read Full Post »

This past weekend was unseasonably cold at the lake.

This past weekend was unseasonably cold at the lake.

A very dear friend of mine invited me to a taping of a daytime lifestyle show called Steven & Chris last week. It was their first show of their eighth season so it was very special, that’s a long time to be on a show and what’s even more impressive is that they’ve been life partners for 22 years! My friend has been a long-time fan of the show and has been to several tapings over the years so we got the VIP treatment; we were the first to be ushered into the studio and first to be seated (front row, no less). It was truly an action packed show of which I’ll share the details after it airs, but I will share a few pics.

This is an HD camera.

This is an HD camera.

Our very excitable Audience Coordinators.They knew my friend by name!

Our very energetic Audience Coordinators.They knew my friend by name!

An ussie. Yes, it's a new word.

An ussie. Yes, it’s a new word.

Steven is the handsome devil on the left and Chris is the cutie-pie on the right.

Steven is the handsome devil on the left and Chris is the cutie-pie on the right.

Chef Michael Smith is a special guest.

Chef Michael Smith is a special guest (centre)

My dear friend invited me to another taping on September 30 when the special guest is a World Famous Chef! But I can’t say who just yet! I’m so excited. Thanks so much Angela, I really appreciate that you chose me for these exciting events!

DeconstuctedFrOnSoup-1

A caramelized, baked onion in a bed of beef stock and a Gruyere tuille

Deconstructed French Onion Soup

Serves 4

Ingredients:

  • 4 ordinary cooking onions
  • 3 cups beef stock
  • a few stems of fresh tarragon
  • 1 bay leaf
  • 1 cup grated Gruyere cheese
  • salt and pepper to taste

Directions:

  1. Please refer to this recipe on baking the onions and proceed to step 4.
  2. Lower the oven temperature to 250° F (121° C), add the beef stock, bay leaf and tarragon stems and cover the dutch oven with a lid or foil. Continue to bake for 2-3 hours or until the onions are extremely soft.
  3. To make the tuiles, line a baking sheet with parchment. Turn oven to broil, high heat. Pile 4 evenly spread circles of the grated Gruyere onto the baking sheet, about 5 cm or 2 inches apart. Broil on high until cheese is completely melted and begins to colour. Watch carefully as the cheese will burn very quickly. Remove from heat and place the parchment with cheese tuiles on a cooling rack and cool completely. When cooled, gently remove the tuiles and set aside.
  4. Discard the bay leaf. Remove onions from the beef stock and cut into the skins in quarters to reveal the soft centre. Remove the inedible onion skin. Place cut onions into the centre of a pretty bowl and ladle in a little stock. Garnish with the Gruyere tuille and the baked tarragon stems.

DeconstuctedFrOnSoup-2

It tastes just like French onion soup.

DeconstuctedFrOnSoup-3

I just can’t get enough of these tasty baked onions!

Read Full Post »

I’ve been busy :-). You already know that I’m writing social media content for a marketing company’s food related client(s) and now they’ve up’d the ante and put me on contract to write for them, every month until September! Plus last week they’ve scored yet another food related client! YAY! I’m totally loving it, but it means even less time for blogging, boo. These days my mind is filled with possible posts and brand related photography for their posts and not mine…and then last week my recipe testing gig also started up again and I’ve been working hard at testing recipes for my recipe developer client. But I’m not complaining, just letting you know that I may not be by to comment on every post you make but I do read them (in the middle of the night) so know that I’m out there thinking of you ;-).

And my food styling is still going on, last week I actually styled (not assisted) for a shoot for my old (boss, friend, neighbour, Kim) and it was fantastic! Here’s a photo of the photographer and Kim as we wait for an approval for the shot from the client (not at the shoot).

Waiting for approval.

Waiting for approval.

Temperatures in Toronto and the cottage have been on the cooler side but it’s been incredibly humid; for example one day last week we had 98% humidity! That’s what we call close, one would comment that “it feels very close today.” I’m still not complaining because it’s not -25C and it’s not snowing…yet. But it does feel close!

We had a friend over for dinner and I wanted a refreshing starter for our dinner so I came up with this tasty soup. I know I’ve already posted about a chilled melon, kiwi and prosciutto soupbefore but this one is different. For vegetarians, I suggest you use feta instead of prosciutto for the saltiness.

HoneydewSoup_3058

Chilled Honeydew Melon Soup with Crême Fraiche and Prosciutto and frozen melon balls

Serves 4

Ingredients:

  • 800 g honeydew melon
  • 1/2 cup Greek yogurt
  • 1 tbsp lime juice
  • 75 g cucumber
  • Mint to taste
  • 1 large basil leaf
  • 3 tsp Crême fraiche
  • Frozen melon balls
  • 1 slice prosciutto, crispy fried

Directions:

  1. Place all ingredients except the crême fraiche, frozen melon balls and prosciutto into your blender or immersion blender container and process until smooth.
  2. Refrigerate until ready to serve.
  3. Make tiny little melon balls with a very small melon baller like this. Place on a piece of parchment and freeze for several hours.
  4. Garnish with frozen melon balls and crumbled crispy fried prosciutto or crumbled feta.

Notes:

  • Our melon was very sweet so we didn’t need to sweeten it further, but you may use honey to taste.
  • Vegetarians should replace the prosciutto with a very salty feta to get a similar profile.
  • Vegans could get a similar profile replacing the prosciutto with chopped sun-dried olives.
  • The frozen Mellon balls were made with this tiny melon baller

HoneydewSoup_3054


Read Full Post »

I have three Indian cookbooks from which I can usually find something I want to make, perhaps with some additional guidance from a cooking site or blog. The one cookbook I bought because every single recipe had a lovely photograph! It’s relatively small 12 cm x 15 cm (5″ x 6″) which makes it even more adorable! It came with a ribbon book mark attached to the spine so you can mark the recipe you are making or the next one since it has lay-flat binding. With all these things going for it, you would think I would love this cookbook, but sadly I don’t. In fact, I have not enjoyed one of the recipes I’ve made from this book without significant changes! I should just chuck the thing but I can’t because I really like the way it looks. I know it’s silly but it is what it is.

This is a recipe I altered after having acquired a Meyer Lemon from a shoot in November and I wanted to make something with it. I puréed the soup to a smooth velvety consistency and I dressed it with a cumin yogurt drizzle with green onion slices, you could also drizzle with a flavour olive oil. The Papadams are from our trip to Chicago when Chgo John took us to his favourite ethnic stores.

Lemon Lentil Soup_1334

The earthy lentils burst with fresh, lively flavour with the lemon

Lemon Lentil Soup

Serves 2 generously (1 cup portions or 250 mL each)

Ingredients:

  • 100 g dahl or yellow lentils
  • 1 tsp fresh ginger, peel and finely chopped
  • 1 tsp fresh garlic, finely chopped
  • 1 tsp chili powder
  • 1/2 tsp turmeric
  • 1 tsp salt
  • 2-4 cups water (depending on how thick you prefer your soup)
  • 3 tbsp lemon juice
  • grated rind of one lemon
  • 1/4 cup yogurt
  • 1 tsp cumin
  • Shopped green onions as garnish
  • papadums

Directions:

  1. Rinse the lentils and cook with the ginger, garlic, chill and turmeric and 2 cups water until soft.
  2. Add the salt, lemon juice and rind and blend with an immersion blender until smooth, adding water to achieve the consistency you prefer.
  3. Press through a fine sieve and set aside.
  4. In a small frying pan add the cumin and toast until fragrant. Cool. Once cool add to the yogurt and mix well. Salt to taste. Transfer to a small plastic squeeze bottle.
  5. Reheat soup and pour into rimmed soup bowls. Begin piping the yogurt from 12 o’clock to 6 o’clock, then 2 to 7 and finally from 9 to 3. Then using a sharp knife beginning in the centre of the bowl, draw a spiral circle culminating at the outer ring (this will make the pattern). Garnish with the chopped green onions and papadums.

Print

Lemon Lentil Soup_1337

It’s super creamy and super filling

Read Full Post »

Happy New Year! Are you doing anything special? JT and I usually go out to our favourite French restaurant but this year we’re having good friends come over — we’ll be snacking tapas-style all evening. I’m really looking forward to our intimate New Year this year.

Although I didn’t make this soup for New Years Eve, I did make it several weeks ago when I needed to use up some kale and wanted a hearty and satisfying lunch. I adore soup, in fact I often say that I love it so much, Soup could be my middle name. JT is not as fond of soup as I am but he still eats without griping too much. My dear friend Kelly (Inspired Edibles) made a gorgeous and colourful version here and although I am posting it a few weeks after her recipe went live, I actually made it last month. The  Original recipe is from Gourmet, 2003, and contained chestnuts but I wanted to keep my version is little lighter in calories so I omitted the chestnuts, but I would encourage you to add them, they would definitely take this warming soup to the next level.

KaleNavyBeanSoup_1315

The kale retains its texture and the beans are creamy in contrast

Kale and Navy Bean Soup

Serves 4

Ingredients:

  • 1/2 pound dried white beans such as cannellini, Great Northern, or navy (about 1 1/4 cups), picked over and rinsed
  • 1/4 pound thinly sliced pancetta, chopped
  • 1 large onion, chopped
  • 3 garlic cloves, finely chopped
  • 3 tablespoons extra-virgin olive oil
  • 3 1/2 cups low-sodium chicken broth (28 fluid ounces)
  • 2 cups water
  • 1 piece Parmigiano-Reggiano rind (roughly 3 by 2 by 1/2 inch)
  • 1 1/2 teaspoons salt
  • 1/4 teaspoon black pepper
  • 1/2 pound cavolo nero or regular green kale, stems and centre ribs discarded and leaves cut into bite-sized pieces
  • 2 teaspoons chopped fresh thyme
  • Optional Garnish: Parmigiano-Reggiano shavings

Directions:

  1. Soak beans overnight by covering them in about two inches of water. Or you can cook the beans relatively quickly in a pressure cooker or make this soup in a slow cooker. Drain well.
  2. Sauté onion and garlic in a pinch of oil large heavy pot over moderate heat. Add the kale and sauté for 5 additional minutes. Add the beans, broth, water, cheese rind, salt and pepper and simmer uncovered, until beans are tender, 45 minutes to 1 hour (or in a slow cooker on high for 4 hours). Discard or eat the cheese rind.

KaleNavyBeanSoup_1314

A deliciously warming soup

Tip:

I usually keep all my parmesan rinds in a zip lock bag in the freezer and use them in various stews and soups because they add so much flavour. I always eat them and never discard them as the instructions indicate, they are really very tasty and I know my friend Sissi (With a Glass) would adore the texture.

Read Full Post »

I’ve been busy! And the next couple of weeks will be even busier! I’m so excited to tell you about an amazing opportunity that’s come up, I have been actually assisting with real food styling jobs. One of the recent jobs was for Food & Drink magazine assisting a prominent stylist; the next one will be on location somewhere up north for three days! The Food & Drink magazine is a gorgeous magazine produced by the Liquor Control Board of Ontario (the single largest purchaser of alcohol in the world). They have a lofty budget to produce this gorgeous, glossy magazine; I’m also booked for about 4 additional days in December with a couple of other equally talented stylists so my life has become rather exciting. But because I’m away from my computer and not able to access my phone while on set I’m sorry if I miss a comment on your blog in the next while but I hope you’ll understand.

Let me tell you about my experience so far in assisting. Sometimes it means grocery shopping; I was fortunate enough to shadow a food stylist assistant as she shopped Toronto grocery stores for some rather unique ingredients. It starts with an email list and a call with the food stylist to chat about what is needed that day. Often the groceries are perishable so we buy only for what will be used that very day. After we clearly understand what each ingredient is for, we make lists and action plans. Remember my cottage lists? Let me say that my list-making abilities will come in very handy. We began our grocery journey at around 10am at the Maple Leaf Gardens Loblaw and were on the go until 3pm non-stop, visiting no less than 8 stores to pick up about $300 of various ingredients for recipe development. You may wonder what the most unique ingredient we sourced was? It was a mediterranean salt-cured fish which is also dried called Botargo (John – From the Bartolini Kitchens, please comment on what this might be used in). It was very expensive, clocking in at $79.99 for a piece that looked no more than 150 g or 5.5 oz! We also visited a very cool Asian grocer on Cherry Street called T&T where we bought fresh Galangal (Thai Ginger) and Chinese Chives (which are long, flat leaved, grass-like greens), but they had so much more. You just know I’ll be visiting that store again in the very near future. At the St. Lawrence Market we bought soft-shelled crabs, rabbit (did you know they leave the head on so you can be sure it’s not a cat?), Chorizo (raw and cured), farro and La Bomba rice (this is the same Paela rice I recently used here)! My imagination is going wild with the possibilities for these lovely ingredients. Our job is to buy the food ONLY. There is someone else called a Prop Stylist who is responsible to source all the cool props you may see included in a recipe photo.

But shopping is only half of it, the other half of assisting is advance preparation (which I haven’t done as yet) and on-site cooking where we are actually cooking the food for the camera. On my first shoot for F&D I had figured that I would be relegated to clean-up and general prep but I actually had the opportunity to cook for the actual shots — I made pesto, browned chicken, made savoury waffles to name a few! It was more than I dreamed it would be. The job is not for everyone, but I love being in the kitchen and I found it interesting and very satisfying. Working with the photographers, their assistants, the food stylist and prop stylist on-site is an amazing experience and I am excited and very grateful to be part of it. I think I’ve unexpectedly stumbled upon my dream job :-), which is pretty incredible because I thought I LOVED what I did before!

It’s definitely fall in Toronto, and while there are barely leaves clinging to the trees, while the colour of the sky has morphed into shades of grey (not fifty, let’s not go there), while the colour of the lake is more black than blue, our slow cookers are chugging away in our cozy kitchens up in Canada, brewing secret and not so secret recipes to fend away cold and flu season with the nutrition and comfort of soup. Take a look at any website, blog or even magazine and it’s about soup. I definitely have my favourites but I also like to switch it up a bit and so I’ve developed this tasty, all be it green, Broccoli Soup, without a spot of cream in it! Of course, you can add cream if you wish to your taste, but I’ll pass thank you very much.

BrocoliSoup_1164

The polenta fries were a nice touch and a perfect colour contrast

Creamed Broccoli Soup

Ingredients:

  • 1 good-sized head of local organic broccoli, cut into even florets, woody stems removed.
  • 1/2 cup chopped sweet onion
  • 1-2 medium-sized parsnips, cut into cubes
  • 3 cloves garlic, roughly chopped
  • Water or stock to cover
  • salt and pepper to taste

Directions:

  1. Sauté the onion until translucent, add the garlic and parsnip and sauté 5 minutes longer.
  2. Add the broccoli and cover with water. Cook until all vegetables are fork tender.
  3. Using an emersion blender, blend until smooth adding water or stock to desired consistency, salt and pepper to taste. Press through a fine sieve. Serve hot with Cheddar Polenta ‘Fries’

BrocoliSoup_1165

There isn’t a spot of cream in this delightful soup

Read Full Post »

JT enjoyed a soup similar to this at the Ritz Carlton Toca in Toronto on his birthday and I told him I would replicate it as soon as the Ontario corn was available.
To be truthful, I made this very soup when our dear friends Barb and Kevin (Profiteroles and Ponytails) spent a weekend at the cottage, but I forgot to take photos and I know better than to post a recipe sans photos so I had to make it again, this time with notes and photos! The soup I made for Barb and Kevin used a combination of white corn and fresh Peaches and Cream Corn. The white corn was part of my shopping spree with Chgo John From the Bartolini Kitchens. I didn’t include the white corn in this recipe because I found it too starchy tasting and decided it didn’t enhance the soup at all, so my second attempt used only fresh Peaches and Cream Ontario Corn.
It’s creamed but there is not a spot of cream in it; the inherent texture of the corn makes it velvety smooth and you really don’t need cream at all.
Crab and corn are a match made in heaven and turns this simple soup into a meal, avocado added to anything really ups the ante! We grilled the corn on a charcoal grill to enhance the smoky flavour, but if you can’t grill it, just add it to the pot and cook the kernels a bit longer. Frozen corn also works well in a pinch, but shhhhhh — that’s our little secret!

CreamedCornSoup_0798

Creamed corn, avocado, crab and more corn. YUM!

Creamed Corn Chowder with Avocado and Crab

(makes about 3 to 4 cups depending on how thick you wish the soup to be)

Ingredients:

  • 2 cloves garlic, finely chopped
  • 1 cup Vidalia onion finely chopped
  • 2 1/2 cups charcoal grilled corn
  • 1 bacon rasher
  • 1 1/2 tsp cumin
  • 1/2 tsp smoked paprika (optional if you can’t grill the corn)
  • 1 tin crab meat with whole legs
  • 1/2 small avocado, in cubes and sprinkled with lime juice
  • juice of one lime
  • 2-3 tbsp chopped cilantro
  • 500-1,000 mL vegetable or chicken stock
  • 1-2 tbsp olive oil
  • Sea salt to taste

Directions:

  1. Grill fresh corn on a charcoal grill. Slice off kernels and reserve.
  2. Heat a pan with olive oil and sauté the bacon adding the onions and cooking until translucent, add the garlic, cumin and smoked paprika (if using).
  3. Add all the corn kernels but 1/2 cup (set aside for the garnish)
  4. Add stock and purée until smooth with an immersion blender, adding stock until desired thickness is achieved. Season with sea salt to taste.
  5. Press through a fine sieve.
  6. In a small bowl, combine drained crab, corn, cubed avocado, chopped cilantro and freshly squeezed lime juice. Season with sea salt to taste. Stir well.
  7. Ladle hot soup into bowls and garnish with a generous spoonful of the crab mixture in the centre. Serve with a grilled crostini on a deck over looking the lake. That last bit is optional, but it does enhance the experience.

CreamedCornSoup_0797

We eat out on the deck as much as possible.

CreamedCornSoup_0799

May I offer you a bowl?

We’ve been spending a lot of time at the cottage this August and I thought I’d share a few of the meals we’ve been enjoying. Cottage is for laid back times, but that doesn’t mean soup out of a can or even ready made products, for me it’s time to really enjoy having time to do things right.

PulledPorkFlatbread_0824

I made a pulled pork Tenderloin in the slow cooker and it provided a variety of meals such as pulled pork flatbread.

The pulled pork recipe can be found here.

SearedScalloponAvocPaste_0832

A wonderful hors d’œuvres of seared scallop wrapped in Prosciutto on Avocado paste smeared crostini.

Click here. for this tasty recipe.

DeconstructedCaesar_0831

A nice lunch of deconstructed Caesar Salad, with avocado and Canadian Bacon

Links can be found here and here.

MuligatwanySoup_0810

Mulligatawny Soup with Shrimps. This soup transformed itself into BBQ sauce (add vinegar and brown sugar and a dash of soy sauce), and to Shakshuka (a middle eastern tomato based egg dish).

Muligatawny recipe can be found here.
Shakshuka recipe can be found here.
I made the BBQ sauce on the fly, so there is no recipe!

Read Full Post »

Let’s take a moment to remember today.
*From Microsoft Clip art.

Have you ever had a dinner party cancellation at the last minute? We’ve not had them often but every few years it happens. This time it was friends who let us know Friday that the guy came down with a cold but should be OK if we don’t mind. I talked to him and he sounded fine so we said we’re on. But then at 9:25 on Saturday morning he called sounding very bad and very apologetic that he must cancel. You’re probably thinking that at 9:25am we should be OK, but the truth is I start kinda early. It’s my own fault but at that precise moment, I had just finished the gorgeous Cappuccino Panna Cotta I saw yesterday at Smidges, the bread was rising and the Moroccan Braised Beefwas already made and in the fridge (because we all know these stews are better the next day). Oh, and I just finished snapping the pic of this delicious soup. My diligence has screwed me today. I put out some feelers for the last minute stand in’s and came up short (we checked with neighbours and friends with no kids as baby sitters are hard to come by last minute). So now, I have a five course dinner for four ready, but no guests. Fortunately, I hadn’t yet made the hors d’œuvres (in fact, I was just about to get a cup of java and sit down with my new tapas cook book from Barcelona) nor had I set the table. I am sorry most of my blogging friends live so far away, otherwise, you would have received a call from me for sure. So tonight JT and I shall eat like kings and queens with a full five-course dinner and dessert to boot!

Have you ever had a last minute cancellation and how did you solve it?

The earthy golden beet was a nice compliment to the creamy celeriac.
Very tasty indeed.

Roasted Golden Beet Root with Caramelized Onion and Roasted Celeriac with Roasted Garlic Soup

Serves 4 (about 1 1/4 cup or 300 mL portion)

Ingredients:

  • 200 g golden beets
  • 300 g celeriac
  • 30 g garlic
  • 80 g sweet onion
  • Vegetable stock
  • Carnation Evaporated milk or cream
  • crispy fried onion for garnish (I hadn’t prepared it yet)

Directions:

  1. Peel and dice the beets and celeriac, spray with a bit of EVOO and roast separately for about 1 hour or until soft (I didn’t want to bleed the colours into each other). After about 30 minutes add enough water to cover the pan about 0.5cm or 1/4″ and continue roasting.
  2. Roast the garlic in a bit of EVOO and sea salt until soft.
  3. Slice the onion very thinly and caramelize on the stove top on a low setting using a bit of EVOO. This will take about 30 minutes.
  4. Using an immersion blender, combine the golden beats, caramelized onion and vegetable stock and purée until smooth and a consistency of creamed soup. Set aside.
  5. Using an immersion blender, combine the celery root, roasted garlic and evaporated milk and purée until smooth and a consistency of creamed soup. Set aside. Make sure ONE soup is slightly thicker than the other, this will help keep them separate in the bowl.
  6. Prior to serving, reheat both soups. Carefully pour the thicker of the two soups into half of the bowl. You can do this by tipping the bowl up a bit and use a large spoon to help keep that side clear of the other. Then, pour the thinner soup into the other side. Garnish with crispy fried onions.
  7. Cheers!

20121105-042826.jpg
We put a little crispy pancetta on top when we knew no one was looking ;)!

Read Full Post »

We adore Mexican food, not the fast food kind, but a genuine ma and pa Mexican restaurant. Sadly we have few and far between in Toronto but there are a couple of good ones. The one I love for lunch is Cucina Lucerno down by Maple Leaf Gardens and why I love it for lunch is that they make a TO DIE FOR Sopa Azteca. Full bodied, flavourful and filling, the three F’s! When I saw the link to slow cooker chicken tortilla soup on Barb’s blog (Profiteroles and Ponytails) in her weeknight survival techniques post, I was immediately drawn to it. The sound of the ingredient combo, just made me think of Sopa Azteca (cue mouth watering), which according to Rick Bayless is one and the same! Go figure!

As Yorkesgirl recommends, I BBQ’d a couple of chicken breasts with a flavourful dry rub*, and then I shredded them and ‘finished’ them off in the slow cooker for about 20 minutes. The soup is divine and is so darn easy. You can even drop the chicken breasts directly into the slow cooker and just let it cook for hours and hours, the chicken is best shredded so over cooking is not a problem!

A very tasty soup, if I do say so myself

Sopa de Tortilla

Serves 6-8

Ingredients:

  • 2 small chicken breast, BBQ’d* with dry rub (see notes below)
  • 1 can whole peeled tomatoes, crushed, low sodium
  • 300g enchilada sauce (I wouldn’t bother putting this in next time).
  • 1 onion, chopped
  • 2 cloves garlic, minced finely
  • 1 fresh green jalopeño, minced finely
  • 4 cups water
  • 2 tsp cumin
  • 2 tsp chili powder
  • 2 tsp smoked paprika
  • 1 tsp unsweetened cocoa
  • 1 bay leaf
  • 1 tbsp chopped cilantro leaves
  • 1 cup frozen corn kernels
  • 1 tsp lime juice

Directions:

  1. Place everything but the chicken into the slow cooker on high, stir. Cook for 2-3 hours and then add the frozen corn and cook five minutes and then add the shredded BBQ’d chicken* and cook for 20 minutes until thoroughly heated through.
    Or, sauté onions and garlic in a soup pot, add the jalopeño, spices, cocoa and cilantro and stir until you smell the spices. Add the canned tomatoes, enchilada, water and simmer for 20-40 minutes (longer you simmer the better the flavours).
  2. Serve with a dollop of low fat Greek yogurt, a sprinkling of cheese of your choice (I had cheddar), some green onions and of course some oven dried tortilla strips. Enjoy.

*BBQ Chicken Rub

Ingredients:

  • 1 tsp cumin
  • 1 tsp chili powder
  • 1 tsp unsweetened chocolate
  • 2 tbsp brown sugar
  • 1 tsp salt
  • 1 tsp granulated garlic (not garlic salt)
  • 1 tsp ground dehydrated onion flakes

Directions:

  1. Mix the spices together in a small bowl.
  2. Remove skin from the chicken breasts and cover with the dry rub. Grill or pan fry finishing in the oven on medium heat until chicken juices run clear (around 165° F).
  3. Tent and allow to cool for 10 minutes. Using a couple of forks, shred the chicken into bite-sized bits.

I’ve had this soup a couple of times now and still have a serving in the freezer which I’m saving for a particularly ugly day when I need some soup to cheer me up.

Read Full Post »

I knew I wanted to make a chilled soup for our dinner party last weekend because it’s been so darn hot (not complaining) and I knew I wanted something a little unexpected than the traditional vichyçoissecucumber, avocado or even gazpachio — although all worthy soups in their own right. On top of it all Barb had posted a lovely asparagus soup recipe with a herb crusted goats cheese ball that really intrigued me. What to do, what to do? Off to the internet I went to find an unusual cold soup; my first stop was Epicurious and as luck would have it, there on the summertime meal feature page on my iPhone was a roasted red pepper and tomato soup. Call it kismet, serendipity or fate, this soup and I were meant to be.

The warm goats cheese ball is a nice surprise in the cold soup

The soup is a lovely balance of sweet red peppers and the acidity and sweetness of oven roasted tomatoes (or, in our case, BBQ roasted). There is a little raw green onion and a smidgen of garlic with a delightful earthy undertone of coriander. I also wanted to incorporate Barb’s goats cheese balls but I wanted a little contrast, so I rolled the goats cheese balls in sesame seeds and lightly fried them to brown the sesame seeds but more importantly, to heat up the goats cheese ball. Yup, I did the ole’ switcheroo and made the soup cold and the balls warm. It was a lovely contrast. JTs only comment was that there could have been more soup.

Chilled Roasted Red Pepper and Tomato Soup
with Warm Sesame Crusted Goats Cheese Balls

Recipe adapted from Epicurious

Ingredients:

Serves 8 small bowls (125mL or 1/2 cup) or 4 large dinner sized bowls (250mL or 1 cup)

  • 4 red bell peppers, roasted on the BBQ (or oven), seeded and skinned
  • 3 medium plum tomatoes, cut into 1 cm thick slices and roasted on the BBQ
  • 1/4 red chili pepper, roasted on the BBQ (or oven), seeded and skinned
  • 1 green onion
  • 1 small garlic clove, finely minced
  • 1/2 teaspoon ground coriander
  • water to achieve desired thickness
  • 1 teaspoon fresh lemon juice
  • 1 1/2 teaspoons salt
  • 1/4 teaspoon sugar (check for sweetness, and omit if the soup is sweet enough)

Goats Cheese balls ingredients:

  • 10 g (about 1 1/2 tsps) goats cheese per ball (I did one per serving)
  • 1 tbsp sesame seeds per ball
  • non-stick cooking spray

Directions:

  1. Combine all of the ingredients in a large bowl and blitz with the immersion blender until smooth, adding water until the desired consistency is achieved. You can use chicken stock or vegetable stock, but it’s not necessary as there is a already a plethora of flavours going on.
  2. Strain soup through a fine sieve. Don’t skip this step as it does ensure a very velvety soup without the addition of cream or butter. Refrigerate until serving. (the soup actually gets better if made one day and served the next).
  3. Roll the goats cheese into nice round balls and coat evenly with the sesame seeds (I used black and white). Heat a cast iron pan, spray with non-stick spray and gently fry the balls at medium temperature — you want to brown the sesame seeds and heat the ball through, you don’t want to melt the ball. Brown all sides evenly.
  4. To serve, ladle the soup into bowls and carefully place one (or more) balls onto the soup. My soup was thick enough that the balls did not sink. Serve immediately.

Read Full Post »

I thought my cold was over and done with…I was left with a few sniffles, but certainly not bad considering it started in Morocco. Sunday it returned with a vengeance! It is everything a head cold is supposed to be, annoying, noisy and gross! So here I am, week 2 since we’ve been back and I’m sick as a dog, AND I have to drag my sorry butt into work because we are so busy, I cannot let my friend (boss) and clients down. Fortunately I have a wonderful husband who has totally looked after me since the sniffles returned. It’s been strictly soup and JT makes enough for me to have a lunch the next day! Tonight’s dinner was Chanterelle Mushroom Soup, a variation from Epicurious (he has kindly made a healthier version for us!) and it was so delicious, I had to write about it. This soup is a light mushroomy broth and the chanterelles give it some sweetness. If you’re really hungry, you could add some dumplings, or even egg drop noodles.

Chanterelle Mushroom Soup

Ingredients:

  • 1 tablespoon unsalted butter
  • 3/4 cup finely chopped shallots
  • 3 cups Chanterelle mushrooms coarsely chopped
  • 2 cups button mushrooms coarsely chopped
  • 1 tsp parsley
  • 1 tablespoons brandy
  • 4 cups low sodium chicken or vegetable stock

Directions:

  1. Melt butter in large pot over medium-high heat, add onions and sauté until golden.
  2. Add all mushrooms and sauté until mushrooms begin to brown lightly.
  3. Stir in stock.
  4. Add brandy, stir 30 seconds and bring soup to boil.
  5. Reduce heat; simmer uncovered 10 minutes. Season with salt and pepper and garnish with parsley.

Read Full Post »

Older Posts »