Feeds:
Posts
Comments

Archive for the ‘instant Pot’ Category


This dish comes together very quickly as long as you have everything mis en place, making it the perfect weeknight meal. The Instant Pot caramelizes the pasta with the chicken stock so that the pasta is al dente with just the right amount of bite. I have a feeling that this dish will become a staple on our weekly menu plan.

Canned tuna is a staple in most households in Spain and Italy, it doesn’t have the stigma that canned tuna has in North America. I was going to make the famous Spanish tuna and avocado salad for a dear friend but thought I’d better ask if she likes canned tuna and thank goodness I asked because her answer was adamantly not! We love it! 

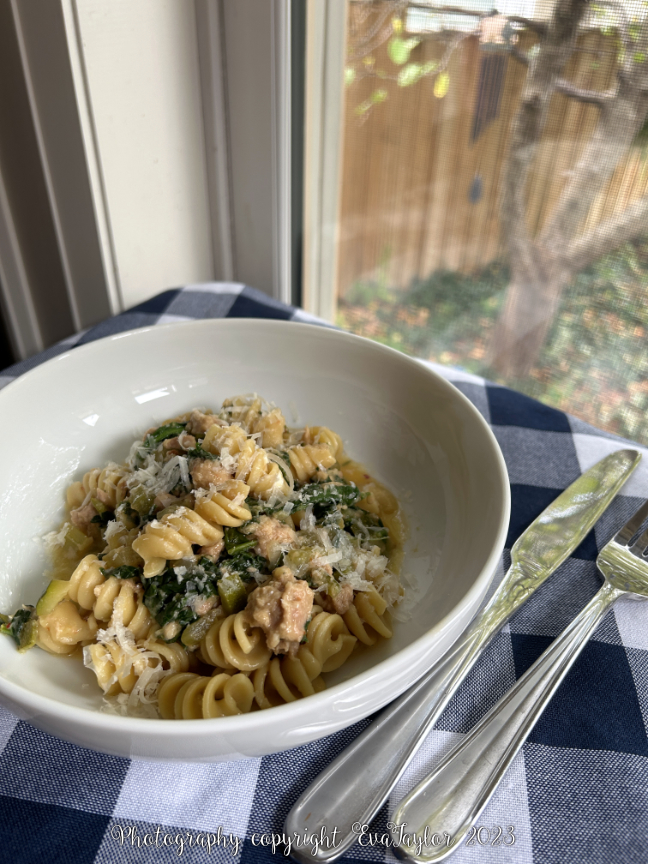
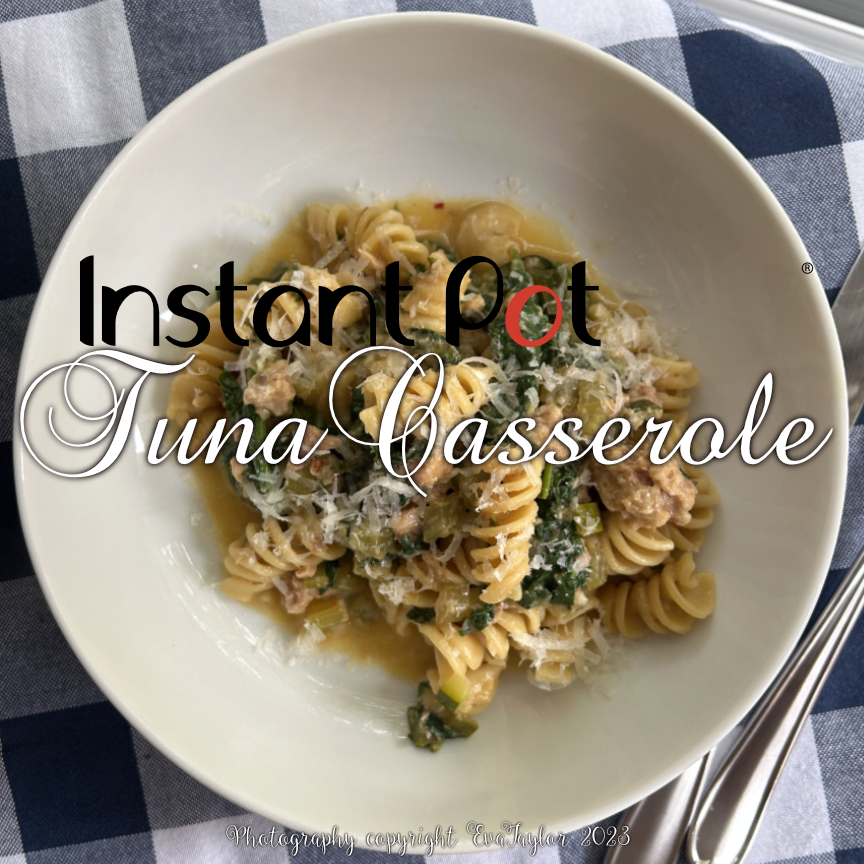
Instant Pot Tuna “Casserole”

A Kitcheninspirations original recipe

Makes enough for 2 for a light dinner.

Ingredients:

  • 15 mL EVOO
  • 1/2 small sweet onion, diced
  • 1/2 small zucchini, diced
  • 1 celery rib, diced
  • 225 mL chicken stock
  • 120 g pasta (we used rotini)
  • 1 can tuna, drained
  • handful of spinach, chopped
  • 50 g goats cheese
  • Aleppo pepper, to taste
  • Salt and pepper, to taste
  • Parmesan cheese for garnish

Directions:

  1. Set the IP on “Sauté”. Add the EVOO and heat it up. Add the onion and sauté until translucent. Add the zucchini, celery, chicken stock and pasta and give it a good stir. Cancel the “Sauté” setting.
  2. Secure the “Pressure Cook” lid on and and make sure the vent is set to “Sealing”. Set the IP to “Pressure Cook” on “High” for 5 minutes (this means 6-7 minutes to come to temperature and pressure and 5 minutes cooking time). Allow the IP to depressurize naturally for 7 minutes. After 7 minutes, press the valve down to depressurize the remaining pressure and safely remove the lid.
  3. Remove the “Pressure Cook” lid set the IP to “Sauté” on “High”, stir in the tuna and spinach and continue to stir to wilt the spinach. Once the spinach has wilted, add the goats cheese and stir to melt. Sprinkle in the Aleppo pepper. Season with salt and pepper to taste and give it a good stir..
  4. Divide the tuna casserole between two warm bowls and garnish with Parmesan cheese. Serve hot.

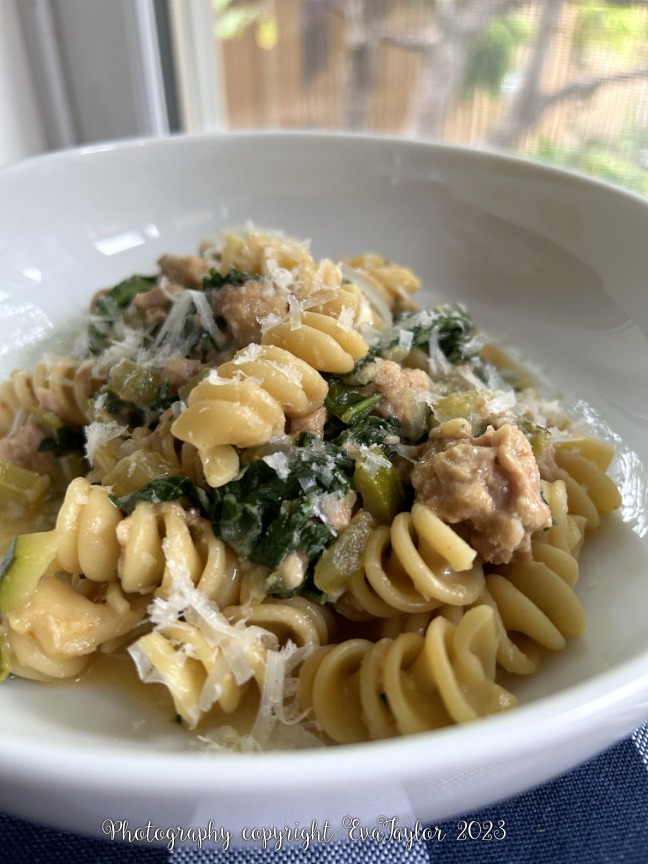
Deliciously plump noodles lightly coated in a goats cheese sauce.

Read Full Post »

Instant Pot Bobotie

  • 200 g Basmati Rice, rinsed well
  • 300 mL water
  • 2 g sea salt

Ingredients for the meat layer:

  • 15 mL olive oil
  • 1 small onion, diced
  • 15 g roasted garlic purée
  • 20 g curry powder
  • 30 mL tamarind chutney
  • 15 mL Worcestershire sauce
  • 5 g turmeric
  • 15 mL apple cider vinegar
  • 500 g lean ground beef
  • 40 g raisins, soaked in water and drained
  • 150 mL beef stock

Ingredients for the custard topping:

  • 2 large eggs
  • 80 mL mill
  • pinch of turmeric
  • pinch of sea salt
  • 2-3 bay leaves

Directions:

  1. Add the rice, water, and salt to the Instant Pot and secure the pressure cooking lid. Select Pressure Cook for 5 minutes and allow steam to escape naturally for 10 minutes. Generously butter a round casserole heat-proof dish that fits into the Instant Pot using the trivet. Fluff the rice and pour it into the prepared round casserole, patting it down flat and evenly in the dish. Set aside.
  2. Set the Instant Pot to Sauté on High, add 15 mL oil and heat the oil. Add the onions and cook until translucent and soft.
  3. Add the curry powder, salt, tamarind chutney, Worcestershire sauce, turmeric, and vinegar and mix well. Add the ground beef and sauté for a minute and mix well. Add the raisins and the beef stock. Stir well and scrape off any bits that may have stuck to the pot. Pressure Cook on Low for 4 minutes, and quick release the pressure when complete.
  4. Pour the meat mixture into the casserole with the rice and spread it out evenly. (The dish can be made in advance until this step, cooled and refrigerated. Bring to room temperature before reheating).
  5. Carefully lower the casserole dish into the Instant Pot with the trivet. Beat the eggs, milk, and turmeric and spoon over the meat mixture in the round casserole dish. Place the Bay leaves on top.
  6. Set the Air-Fryer lid and Air-Fry at 350˚ F for 15 minutes or until the custard is set and is golden brown.

A flavourful dish with a lovely custard topping and aromatic Basmati rice.

Notes:

  • Oops, I forgot to add the Bay leaves at the end.
  • Bobotie usually uses white bread soaked in milk to give the stew body but I omitted it.
  • Bobotie is usually served with rice and chutney separately but I wanted to make it a one-pot meal in the Instant Pot so I layered the rice into the casserole dish.
  • Like most stew-type meals, this will taste better the next day.
  • I made this recipe using a small casserole dish because that is what the original recipe indicated but next time, I will omit the second dish and make it directly in the Instant Pot.

Read Full Post »

Mac and cheese is a family favourite so it shows up on the meal plan a few times a year, usually when I have some leftover cheese that needs to be used up. This was not such an occasion. Ever since my friend Jeff the Chef over at Make it like a man posted his Cheeseburger Macaroni in an Instant Pot I have been obsessed with creating an authentic “oven-baked” Mac and Cheese in the Instant Pot! We just adore the caramelized edges of the noodles and the crispy panko topping contrasted against the soft-baked cheesy noodles of the center. This version is just as good. You can see from the top-down photo how the panko has toasted and crisped up, as well as some of the noodles that poke through the panko. If you want more crunch, allow more noodles to peak through the panko so that the air-fryer lid and do its magic!

This recipe is only made in the Instant Pot, I usually use 2-3 pots to make my traditional baked Mac and Cheese, one for the cheese sauce, one to cook the noodles and one for baking. So many fewer dishes! Plus, on a warm day, you needn’t heat up the kitchen with the oven. It’s win-win, in my humble opinion.

The crispy topping really adds to the Oven-Baked style.

Instant Pot Mac and Cheese

A kitcheninspirations original recipe

Makes 4 servings (just over 50 g dry pasta per serving)

Ingredients:

  • 213 g dry pasta
  • 325 mL water
  • 3 g salt
  • 100 g old cheddar
  • 50 g mozzarella
  • 125 mL milk
  • 30 g butter
  • 15 g flour
  • Good pinch of smoked paprika
  • 40 g panko
  • 20 g Parmesan
  • 2 slices crispy cooked bacon

Directions:

  1. Add the dry pasta and water to the Instant Pot and mix well, making sure the pasta is mostly submerged in the water. Put the lid on and set Pressure Cook for 5 minutes with the Pressure Release in the up position (closed).
  2. When the cycle has completed, release the steam manually; the noodles should be half-cooked and there will be a little water left in the pot. Set Instant Pot to Sauté on High and stir in butter, sprinkle in the flour and stir to mix well and cook until a roux is formed. Add the milk and stir well and cook stirring until thickened. Add the cheese and stir until melted and thickened. Stir in the bacon. Now leave on Sauté for 5 minutes, not stirring.
  3. Meanwhile, combine the Panko and Parmesan and mix well. Turn the Instant Pot off. Sprinkle the Parmesan and Panko evenly over the top. Set the Air Fryer lid on top and set to Air fry for 4 minutes at 400° F. After the time has been completed, turn off the pot and allow to rest for 5 minutes.

There is bacon in there, trust me.

Notes:

  • While the Instant Pot does create a ‘crispy’ top and somewhat crispy sides, it is not the same as a traditional oven-baked Mac and Cheese with caramelized noodles, although JT said it was quite acceptable.
  • You will need a good metal spatula to get under the caramelized noodles but the resting period should loosen them so you’re not fighting to get a serving out.
  • I generally freeze the 2 extra portions for a quick meal. Just allow it to defrost in the refrigerator and bake in a 350° F oven until warmed through.
  • The Swiss enjoy applesauce with their mac and cheese and that is how we prefer to eat ours too.

The Air-Fryer lid really helps toast up the top of this dish.

Read Full Post »

We had a long late-summer with beautiful sunny days and warm temperatures. Then it stopped. It always surprises me when temperatures drop so quickly, it’s never a slow incremental decrease, it’s a fast dive to freezing! As soon as the boiler goes on, soups get onto my menu plan. I first saw this beauty on my long-time Chicago friend John’s delicious blog and I’ve been making my rendition ever since. It’s definitely one of my favourites. In our house, it has actually taken over from restaurant Phố as restaurant Phố is far too salty and we’re all trying to cut down.

I start the stock in the morning so the aromatics have time to infuse. You can do it in the Instant Pot pressure cooking function but I like to have the warm aromas wafting through the house as the broth infuses. I usually double the batch of stock and freeze it for an even quicker meal.

An aromatic soup, flavoured with fresh herbs from the garden.

Quick Phố

Serves 2 hearty bowls

Ingredients for the stock:

  • 2 g fresh ginger, finely minced with a microplane
  • 2 star anise
  • 1 cinnamon stick
  • 5 whole cloves
  • 250 mL beef broth
  • 250 mL chicken stock
  • 250 mL water
  • salt, to taste

Ingredients for the finished soup:

  • 150 g fettuccini rice noodles
  • 200 g very thinly sliced raw beef
  • fresh cilantro, Thai basil, spring onions for garnish, chopped
  • salt and pepper to taste
  • Hoisin sauce, Sriracha sauce

Directions:

  1. Combine the ingredients for the stock in a stockpot and bring to a boil. Turn the heat down and simmer for 3-4 hours. Alternatively, you may add it to your Instant Pot and pressure cook it for 30 minutes.
  2. About 15 minutes before you are ready to serve, bring a pot of water to a boil and remove it from the heat. Add the rice noodles and allow to soak to soften 10-15 minutes.
  3. Strain the stock to remove the aromatics and return to the pot to keep warm.
  4. Strain the noodles and divide them into two large bowls, top with the thinly sliced beef and ladle the boiling soup over the beef. Garnish with fresh cilantro, Thai basil and spring onions. Serve the hoisin and sriracha sauce at the table to allow each person to garnish their own bowls.

Read Full Post »

One of the reasons I had wanted an Instant Pot was to get rid of a few of my small appliances like the slow cooker, air fryer, and rice maker! This recipe uses the instant pot for the rice as well as the chicken. To cook the rice, please see the notes below.

A KitchenInspirations Original Recipe

Serves 2

Ingredients:

  • 1 200 g chicken Breast, skinless, boneless
  • 30 g Greek yogurt, divided
  • 15 mL roasted garlic purée
  • 2 g oregano
  • 5 g flour
  • Zest of 1/2 a lemon
  • 15 mL olive oil
  • 15 g butter
  • 50 g sweet onion, finely diced
  • 125 mL water
  • 30 mL cooking Sherry
  • 1/2 a sun-dried tomato, cut into small pieces
  • 5 black olives, sliced
  • 1 artichoke heart, chopped
  • Parsley, for garnish
  • Rice for serving, see notes for IP cooking Rice

Directions:

  1. Combine the yogurt, the roasted garlic, oregano and salt and mix well. Spread half of the marinade over the chicken reserving the extra and refrigerate while prepping.
  2. Heat the olive oil & butter on the “Sauté” setting and cook the onions until translucent. Brown the chicken on both sides. Turn off the “Sauté” setting and add the chicken stock with the cooking sherry and the sun-dried tomatoes to release the fond. Put on the Pressure Cooking lid and set the vent to sealing, set the time to 5 minutes. Mix the flour and the lemon zest, into the remaining yogurt mixture. After five minutes, de-pressurize the Instant Pot and add the remaining yogurt mixture with all of the ingredients and mix well.
  3. Secure the pressure lid and vent to sealing, set to Pressure Cook for 5 additional minutes. De-pressurize carefully.
  4. After allowing the chicken to rest, slice it and lay it on a plate over rice. Drizzle the sauce over the chicken serve.

Notes:

  • Rinse 100 g (heaping 1/2 cup) of rice in cold water until it runs clear. Add to the Instant Pot. Add 100 g (about 1/2 cup) of cold water or broth to the Instant Pot, add salt and 15 g (1 tbsp) melted butter, and stir well. Secure the pressure cooker lid and turn the pressure knob to the sealing setting. Use the Pressure cook setting on high for 3 minutes, then allow the steam to release naturally (about 10 minutes). Open by pressing the knob to release any extra steam to allow the lid to easily come off. Remove from the IP and set it aside.
  • Adding the sun-dried tomatoes for the initial cook allows the tomatoes to totally soften into the sauce.

Read Full Post »

Summer dinners are often a pain because I just don’t feel like turning the oven on and heating up the kitchen, this is where the Instant Pot really comes in handy. I have the one with the air-fryer lid and it can also act as a broiler, and it’s fast! Easy clean up too. I came up with this recipe for a quick dinner (less than 20 minutes, including the rice in the Instant Pot) and JT said, you should make this again. Always a nice compliment, particularly with fish.

Asian Inspired Instant Pot broiled Cod

Ingredients:

  • 15 mL honey
  • 10 mL rice vinegar
  • 5 mL sambal oelek
  • 8 g white miso paste
  • 3 mL soy sauce
  • 5 g puréed roasted garlic
  • 3 g grated ginger
  • 5 mL toasted sesame oil
  • 20 g Wild Alaskan Cod
  • Rice, mushrooms and peas to serve on

Directions :

  1. Combine the first 8 ingredients to form a paste. Brush the paste lightly on the cod and allow to sit for an hour or so; when ready to cook, pour the remainding sauce on the top.
  2. Set the air-fryer basket into the Instant Pot, add the second shelf, and line with parchment. Set the glazed fish on top. Close with the air fryer lid and set to Air Fry for 5 minutes or until the internal temperature is 145° F.
  3. Serve on rice, mushrooms and peas.


Notes:

  • Because the air-fryer lid isn’t secured like the pressure cooker lid, I was able to attach a thermometer to the fish and have it notify my phone when it reached the temperature so it doesn’t over cook.

Read Full Post »


If it’s a really hot summer’s day and you don’t want to turn on the big oven, this is a great alternative method to roast cauliflower and it’s super easy to clean up. 

Instant Pot Roasted Garlic, Cauliflower Mash

Serves 2

Ingredients:

  • 500 g Cauliflower florets, similar size
  • 15 mL Extra Virgin Olive oil
  • 2-4 cloves garlic, unpeeled
  • Sea salt
  • 250 mL water
  • Butter, cream or chicken stock

Directions:

  1. Drizzle the oil onto the cauliflower so it covers overall. Lay the cauliflower into the air fryer basket, tuck the garlic cloves into the cauliflower. Set the air fryer lid on and choose ‘Roast’, 330° F for 15 minutes. Stir three times during the cooking process.
  2. Pour the cauliflower into the pressure cooking pot and add 1 cup of water. Set the pressure cooking lid on and setting to ‘Pressure Cooking’ for 5 minutes. Depressurize carefully or allow it naturally to depressurize.
  3. When complete, cauliflower should be very soft. Squeeze out the garlic and add to the cauliflower into a glass container. Blend with the immersion blender until smooth adding the remaining water from cooking or butter or cream or stock to achieve the desired consistency. Reheat in the microwave when ready to serve.

A fantastic low-carb alternative to mashed potatoes.

Read Full Post »