Feeds:
Posts
Comments

Archive for the ‘Instant Pot Air Fryer Lid’ Category

Instant Pot Bobotie

  • 200 g Basmati Rice, rinsed well
  • 300 mL water
  • 2 g sea salt

Ingredients for the meat layer:

  • 15 mL olive oil
  • 1 small onion, diced
  • 15 g roasted garlic purée
  • 20 g curry powder
  • 30 mL tamarind chutney
  • 15 mL Worcestershire sauce
  • 5 g turmeric
  • 15 mL apple cider vinegar
  • 500 g lean ground beef
  • 40 g raisins, soaked in water and drained
  • 150 mL beef stock

Ingredients for the custard topping:

  • 2 large eggs
  • 80 mL mill
  • pinch of turmeric
  • pinch of sea salt
  • 2-3 bay leaves

Directions:

  1. Add the rice, water, and salt to the Instant Pot and secure the pressure cooking lid. Select Pressure Cook for 5 minutes and allow steam to escape naturally for 10 minutes. Generously butter a round casserole heat-proof dish that fits into the Instant Pot using the trivet. Fluff the rice and pour it into the prepared round casserole, patting it down flat and evenly in the dish. Set aside.
  2. Set the Instant Pot to Sauté on High, add 15 mL oil and heat the oil. Add the onions and cook until translucent and soft.
  3. Add the curry powder, salt, tamarind chutney, Worcestershire sauce, turmeric, and vinegar and mix well. Add the ground beef and sauté for a minute and mix well. Add the raisins and the beef stock. Stir well and scrape off any bits that may have stuck to the pot. Pressure Cook on Low for 4 minutes, and quick release the pressure when complete.
  4. Pour the meat mixture into the casserole with the rice and spread it out evenly. (The dish can be made in advance until this step, cooled and refrigerated. Bring to room temperature before reheating).
  5. Carefully lower the casserole dish into the Instant Pot with the trivet. Beat the eggs, milk, and turmeric and spoon over the meat mixture in the round casserole dish. Place the Bay leaves on top.
  6. Set the Air-Fryer lid and Air-Fry at 350˚ F for 15 minutes or until the custard is set and is golden brown.

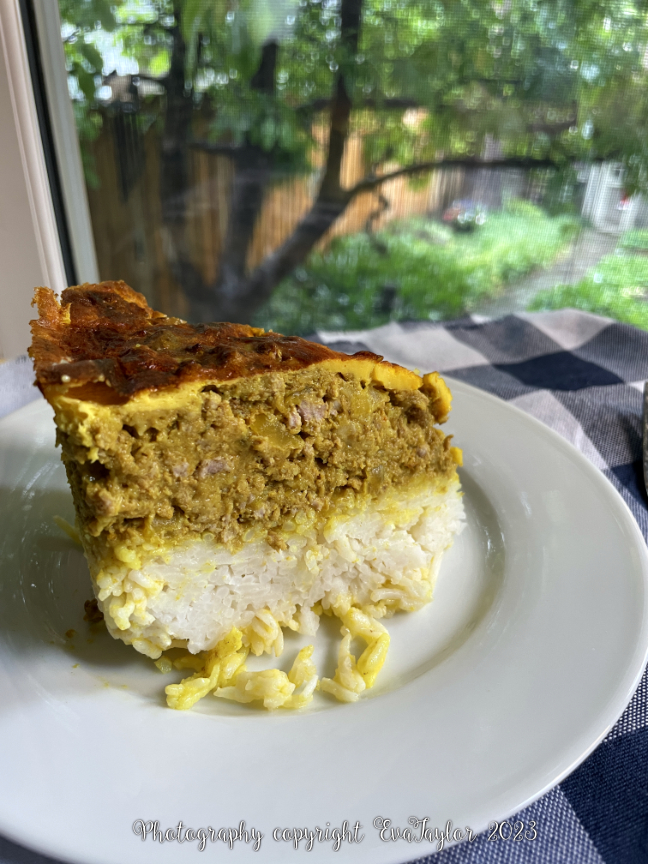
A flavourful dish with a lovely custard topping and aromatic Basmati rice.

Notes:

  • Oops, I forgot to add the Bay leaves at the end.
  • Bobotie usually uses white bread soaked in milk to give the stew body but I omitted it.
  • Bobotie is usually served with rice and chutney separately but I wanted to make it a one-pot meal in the Instant Pot so I layered the rice into the casserole dish.
  • Like most stew-type meals, this will taste better the next day.
  • I made this recipe using a small casserole dish because that is what the original recipe indicated but next time, I will omit the second dish and make it directly in the Instant Pot.

Read Full Post »

Mac and cheese is a family favourite so it shows up on the meal plan a few times a year, usually when I have some leftover cheese that needs to be used up. This was not such an occasion. Ever since my friend Jeff the Chef over at Make it like a man posted his Cheeseburger Macaroni in an Instant Pot I have been obsessed with creating an authentic “oven-baked” Mac and Cheese in the Instant Pot! We just adore the caramelized edges of the noodles and the crispy panko topping contrasted against the soft-baked cheesy noodles of the center. This version is just as good. You can see from the top-down photo how the panko has toasted and crisped up, as well as some of the noodles that poke through the panko. If you want more crunch, allow more noodles to peak through the panko so that the air-fryer lid and do its magic!

This recipe is only made in the Instant Pot, I usually use 2-3 pots to make my traditional baked Mac and Cheese, one for the cheese sauce, one to cook the noodles and one for baking. So many fewer dishes! Plus, on a warm day, you needn’t heat up the kitchen with the oven. It’s win-win, in my humble opinion.

The crispy topping really adds to the Oven-Baked style.

Instant Pot Mac and Cheese

A kitcheninspirations original recipe

Makes 4 servings (just over 50 g dry pasta per serving)

Ingredients:

  • 213 g dry pasta
  • 325 mL water
  • 3 g salt
  • 100 g old cheddar
  • 50 g mozzarella
  • 125 mL milk
  • 30 g butter
  • 15 g flour
  • Good pinch of smoked paprika
  • 40 g panko
  • 20 g Parmesan
  • 2 slices crispy cooked bacon

Directions:

  1. Add the dry pasta and water to the Instant Pot and mix well, making sure the pasta is mostly submerged in the water. Put the lid on and set Pressure Cook for 5 minutes with the Pressure Release in the up position (closed).
  2. When the cycle has completed, release the steam manually; the noodles should be half-cooked and there will be a little water left in the pot. Set Instant Pot to Sauté on High and stir in butter, sprinkle in the flour and stir to mix well and cook until a roux is formed. Add the milk and stir well and cook stirring until thickened. Add the cheese and stir until melted and thickened. Stir in the bacon. Now leave on Sauté for 5 minutes, not stirring.
  3. Meanwhile, combine the Panko and Parmesan and mix well. Turn the Instant Pot off. Sprinkle the Parmesan and Panko evenly over the top. Set the Air Fryer lid on top and set to Air fry for 4 minutes at 400° F. After the time has been completed, turn off the pot and allow to rest for 5 minutes.

There is bacon in there, trust me.

Notes:

  • While the Instant Pot does create a ‘crispy’ top and somewhat crispy sides, it is not the same as a traditional oven-baked Mac and Cheese with caramelized noodles, although JT said it was quite acceptable.
  • You will need a good metal spatula to get under the caramelized noodles but the resting period should loosen them so you’re not fighting to get a serving out.
  • I generally freeze the 2 extra portions for a quick meal. Just allow it to defrost in the refrigerator and bake in a 350° F oven until warmed through.
  • The Swiss enjoy applesauce with their mac and cheese and that is how we prefer to eat ours too.

The Air-Fryer lid really helps toast up the top of this dish.

Read Full Post »

As the weather is warming up, we are allowing ourselves to once again dream of patio days sipping on summery cocktails and enjoying the company of friends. These lazy days require some lazy snacks and I have just the tasty and healthy snack for you if you have an air fryer. I have the Instant Pot with the air fryer lid, and let me tell you, it works wonders! We don’t fry a lot so I didn’t want an appliance that just did one thing so this air fryer lid addition to my Instant Pot is the perfect solution.

These spiced chickpeas are so crispy and crunchy, they disintegrate in your mouth like a chip would and then the spice creeps up on you, just a little with tantalizing flavours of cumin, coriander, garlic and smoked paprika with a hint of heat, salt and sweetness. Just perfect for a glass of prosecco or Cava. Cheers!

Air Fried Spiced Chick Peas

Makes enough for 4 as a cocktail snack.

A KitchenInspirations Original Recipe

Ingredients:

  • 1 can 540 mL chickpeas, drained, rinsed and dried
  • 40 g cornstarch
  • 30 mL olive oil
  • 2.5 g cumin
  • 2.5 g coriander
  • 2.5 g granulated garlic
  • 2.5 g smoked paprika
  • 2.5 g sea salt
  • 15 g honey, divided

Directions

  1. Mix the cumin, coriander, garlic, paprika, and sea salt until well combined.
  2. In a large sieve, sprinkle the cornstarch evenly over the chickpeas (I did mine in two batches). Drizzle the olive oil over them and mix well.
  3. Add the chickpeas to your air fryer and fry at 400° F for 15-20 minutes, pausing halfway to stir and separate them. I air-fried the recipe in two batches as my air fryer is not huge and I only wanted one layer so they really crisp up.
  4. Confirm that the chickpeas are crispy (and not creamy in the centre) and pour them into a bowl and sprinkle with half the spice mixture. Drizzle with half of the honey and mix until well-coated. Return the chickpeas to the air fryer and fry for an additional 5 minutes (so the honey caramelizes). Pour onto a cookie sheet to cool completely. Repeat with the second batch.

Notes:

  • The spice mix is totally up to you. Just plain salt and pepper would be nice too.

Read Full Post »

Summer dinners are often a pain because I just don’t feel like turning the oven on and heating up the kitchen, this is where the Instant Pot really comes in handy. I have the one with the air-fryer lid and it can also act as a broiler, and it’s fast! Easy clean up too. I came up with this recipe for a quick dinner (less than 20 minutes, including the rice in the Instant Pot) and JT said, you should make this again. Always a nice compliment, particularly with fish.

Asian Inspired Instant Pot broiled Cod

Ingredients:

  • 15 mL honey
  • 10 mL rice vinegar
  • 5 mL sambal oelek
  • 8 g white miso paste
  • 3 mL soy sauce
  • 5 g puréed roasted garlic
  • 3 g grated ginger
  • 5 mL toasted sesame oil
  • 20 g Wild Alaskan Cod
  • Rice, mushrooms and peas to serve on

Directions :

  1. Combine the first 8 ingredients to form a paste. Brush the paste lightly on the cod and allow to sit for an hour or so; when ready to cook, pour the remainding sauce on the top.
  2. Set the air-fryer basket into the Instant Pot, add the second shelf, and line with parchment. Set the glazed fish on top. Close with the air fryer lid and set to Air Fry for 5 minutes or until the internal temperature is 145° F.
  3. Serve on rice, mushrooms and peas.


Notes:

  • Because the air-fryer lid isn’t secured like the pressure cooker lid, I was able to attach a thermometer to the fish and have it notify my phone when it reached the temperature so it doesn’t over cook.

Read Full Post »


If it’s a really hot summer’s day and you don’t want to turn on the big oven, this is a great alternative method to roast cauliflower and it’s super easy to clean up. 

Instant Pot Roasted Garlic, Cauliflower Mash

Serves 2

Ingredients:

  • 500 g Cauliflower florets, similar size
  • 15 mL Extra Virgin Olive oil
  • 2-4 cloves garlic, unpeeled
  • Sea salt
  • 250 mL water
  • Butter, cream or chicken stock

Directions:

  1. Drizzle the oil onto the cauliflower so it covers overall. Lay the cauliflower into the air fryer basket, tuck the garlic cloves into the cauliflower. Set the air fryer lid on and choose ‘Roast’, 330° F for 15 minutes. Stir three times during the cooking process.
  2. Pour the cauliflower into the pressure cooking pot and add 1 cup of water. Set the pressure cooking lid on and setting to ‘Pressure Cooking’ for 5 minutes. Depressurize carefully or allow it naturally to depressurize.
  3. When complete, cauliflower should be very soft. Squeeze out the garlic and add to the cauliflower into a glass container. Blend with the immersion blender until smooth adding the remaining water from cooking or butter or cream or stock to achieve the desired consistency. Reheat in the microwave when ready to serve.

A fantastic low-carb alternative to mashed potatoes.

Read Full Post »