Feeds:
Posts
Comments

Posts Tagged ‘almond’

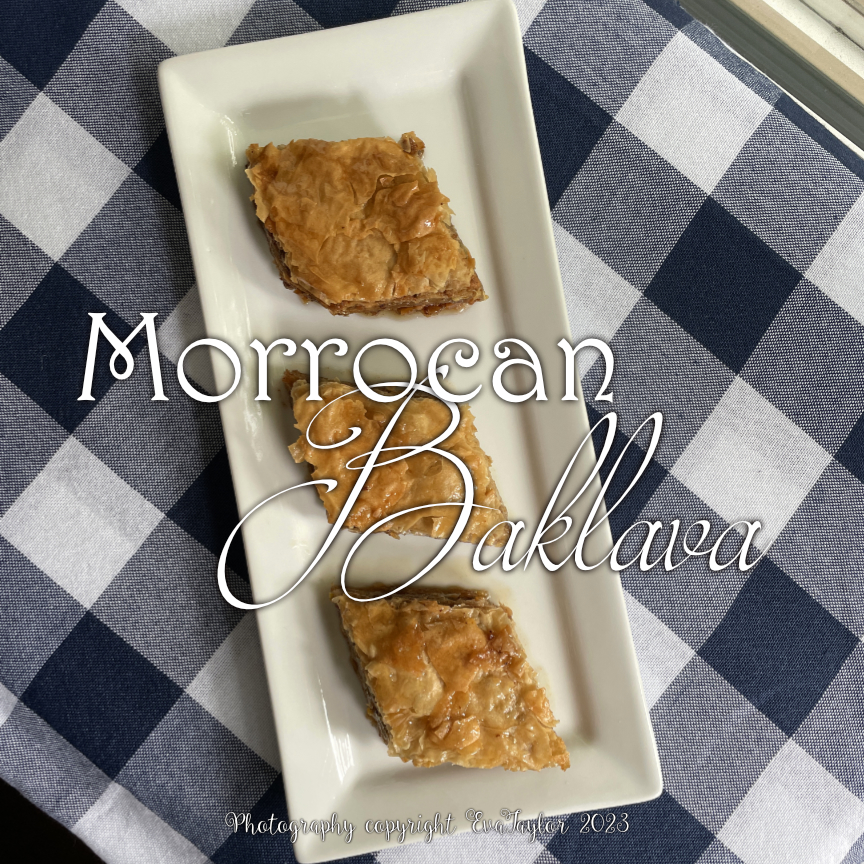
We had some dear friends over for a BBQ in late-August and we made homemade Moroccan lamb burgers with a wonderful spiced prune and nut couscous; I needed a Morrocan-style dessert so I chose this wonderful baklava recipe. To be honest, I wasn’t able to differentiate between Middle Eastern baklava and Morrocan baklava but rest assured, they are both delicious. This version has walnuts, pistachios and almonds with a syrup flavoured with orange and lemon rind, cloves and orange blossom water. It should have rose water in it as well, but I am not a fan so I skipped it. 

Metaxas (Moroccan Baklava)

For the original recipe, please click here. Makes about 33 cm x 23 cm 5 cm (12 inches x 9 inches x 2 inches) baking pan of Metaxas.

Ingredients

  • 150 g sugar
  • 150 mL water
  • rind of an orange (no white pith)
  • rind of a lemon (no white pith)
  • 5 whole cloves
  • 60 mL honey
  • 5 mL orange blossom water
  • 100 g walnuts
  • 100 g pistachios
  • 100 g lightly toasted, blanched almonds
  • 100 g sugar
  • 2.5 g ground cinnamon
  • 200 g unsalted butter, melted
  • 10 commercial phyllo dough sheets, cut in half length-wise to fit your pan

Directions:

  1. Combine the sugar, water, both orange and lemon rinds, cloves and cinnamon stick in a medium saucepan. Bring to a slow boil then turn the heat down to simmer, uncovered for 8 minutes. Remove the pan from the heat and strain to remove the spices and rinds. Stir in the honey and orange blossom water. Set aside to cool. See notes to make use of the orange and lemon rind.
  2. Preheat the oven to 300° F and toast the nuts for 12 minutes. Remove from the heat and cool. Increase the oven temperature to 350° F.
  3. In the small bowl of your food processor, combine the cooled nuts, sugar and cinnamon and pulse so they are relatively finely chopped with some larger pieces.
  4. Line a 33 cm x 23 cm 5 cm (12 inches x 9 inches x 2 inches) pan parchment and brush generously with butter.
  5. Begin by lining the bottom of the pan with one sheet of phyllo pastry and brush generously with the melted butter. Continue until you have five sheets stacked. Spread about one-third of the nut mixture over the fifth sheet evenly to the sides. Continue with the next five sheets spreading each sheet generously with the melted butter. Spread another third of the nut mixture over the tenth sheet evenly to the edges. Continue with the next five sheets as before, and spread the fifteenth sheet with the last third of the nut mixture. Finish with the last five sheets of phyllo as before, drizzling any remaining butter over the top of the last sheet.
  6. Bake in a preheated oven at 350° F for 45 minutes. Cover with foil if the top browns too quickly. Remove the pan from the oven and cut immediately. To cut the Metaxas in the traditional diamond pattern, begin by cutting a line from one corner to the opposite corner and repeat to the last corner. Then cut parallel lines to create small diamond slices. Pour the cooled syrup over the hot Metaxas. Allow to stand overnight at room temperature before serving.
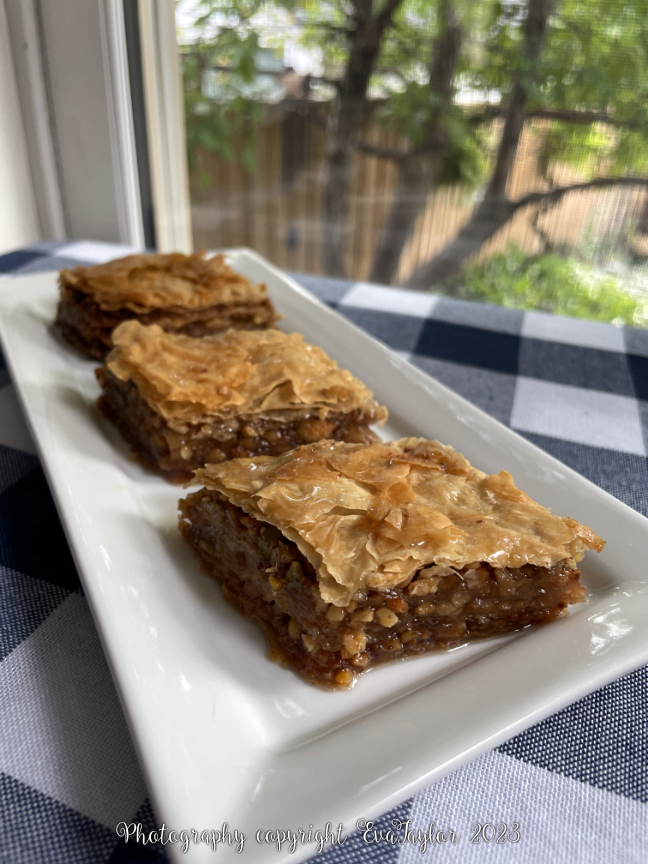
Layers of delicious nuts bathed in a luxurious syrup between crunchy sheets of phyllo.

Notes:

  • Remove and separate the orange and lemon rinds and place on a parchment-lined baking sheet. Bake for 10 minutes at 300° F until firm. Eat as a snack.

Read Full Post »

The weekend after we returned from Europe we entertained a few friends so I needed a little sweet that wasn’t too much at the end of our meal and these little bars fit the bill. They are sweet, and chewy and have a great crunch from the caramelized almonds on top. 

Almondy Butterscotch Bars

Makes one 23 cm x 33 cm (9” x 13”) pan

Ingredients:

  • 210 g all-purpose flour
  • 8 g baking powder
  • 2 g sea salt
  • 1/2 cup butter
  • 430 g brown sugar
  • 2 eggs
  • 1 1/2 tsp vanilla
  • 2/3 cup of dark chocolate chips, melted

Directions:

  1. Preheat oven to 350°F.
  2. Combine flour and baking powder, set aside.
  3. Melt butter in a medium pan and blend in sugar.
  4. Remove from heat and beat in eggs (be careful so you don’t get scrambled eggs).
  5. Add vanilla and fold in flour mixture until entirely combined.
  6. Spread evenly in a 13″ x 9″ x 2″ pan that has been well greased.
  7. Bake for 20 minutes.

Nutty topping:

  • 1/4 cup butter
  • 60 g sugar
  • 100 g corn syrup (or maple syrup or Lyles Golden Syrup)
  • 30 ml water
  • 1/4 tsp salt
  • 60 g sliced almonds

Directions:

  1. Melt butter, sugar and corn syrup in a saucepan; add water and salt and boil for 4 minutes.
  2. Stir in the almonds and immediately spread over the cooked batter. Bake for an additional 15 minutes.
  3. Allow the slab to cool completely and cut off the edges (makes for great snacks or a crust or crumble) and drizzle the chocolate on top. Allow the chocolate to set completely before you cut into bars.

Read Full Post »

This is my ‘”GO-TO” gluten-free cracker, not just because they are so tasty, but because they are super-easy to make and require very little equipment! This recipe is half of my usual recipe because I didn’t want leftovers but because the measurements are metric, it’s super-easy to double or triple. The only thing I would caution you about is that they burn very quickly because of the natural oils in ground almonds and the grapeseed oil but hopefully it won’t deter you from making them, they are worth it.

Almond Sesame Crackers (Gluten Free)

Makes 40 crackers but it depends on how thick you roll them and how large you cut them. This recipe was first posted in 2011 in Imperial measures.

Ingredients:

  • 150 g unblanched ground almonds
  • 5 g sea salt
  • 60 g sesame seeds, I like black and white versions, toasted lightly.
  • 1 egg
  • 15 mL grapeseed oil

Directions:

  1. Preheat the oven to 325° F with the rack set in the middle.
  2. Mix the first three ingredients together in a medium-sized bowl. Whisk the egg with the grapeseed oil together.
  3. Combine the egg mixture with the dry ingredients and stir until well coated and clearly mixed well.
  4. Roll between two sheets of parchment paper to just less than 1 mm thick. Cut into 4-centimetre squares leaving the crackers on the parchment (no need to separate). 
  5. Cut off the parchment that is on top and slide the cut crackers onto a baking sheet. Bake for 15-20 checking often near the end as it burns quickly. Remove the baking sheet and slide the parchment off it onto a cooling rack. Cool slightly and snap the crackers apart. Cool completely to store.

These crackers have excellent flavour and texture.

Notes:

  • Add various nuts (although they should be small) to the batter for a slightly different texture.
  • The thicker you roll your crackers the sturdier they will be, but just less than 1 mm is sturdy enough for a good thick dip.
  • These crackers are quite moreish but be careful as they are also very filling so you don’t need as many to satisfy you!
  • I reduced the baking temperature to 325° F from 350° F because I burnt the first batch!

Read Full Post »

The last time I posted about this traditional Christmas dessert was in 2011 and I didn’t even bother to decorate it with the mushrooms and pinecones, this time I went all out! This show-stopper dessert is a fabulous end to a wonderful celebratory meal so, get it on the calendar for next Christmas. Fortunately, each item can be made in several days and assembled at the last moment so you needn’t spend all day in the kitchen.

The Cake

Makes one 23 cm x 33 cm (9″ x 13″) slab rolled into a log.

Ingredients:

  • 4 large eggs, separated
  • 120 g sugar
  • 120 g AP flour
  • 5 mL vanilla
  • 5 g grated lemon zest
  • 30 g granulated sugar, for dusting the kitchen towel
  • 1/2 cup seedless raspberry jam, for spreading before you roll it.

Directions:

  1. Preheat oven to 350°F. Line a 23 cm x 33 cm (9″ x 13″) cake pan or jelly roll pan with parchment paper, carefully folding the corners. Spray with non-stick cooking spray.
  2. Separate the eggs into two medium bowls. Beat the egg whites until stiff peaks form, but not dry. Set aside.
  3. Beat the egg yolks with the sugar until pale and creamy and falls in a thick ribbon.
  4. Fold 1/3 of the egg whites into the pale egg yolk mixture.
  5. Sift about 1/3 of the flour into the egg yolk mixture, then alternate folding in with the egg whites being careful not to deflate the batter.
  6. Once all of the egg whites and flour have been folded in, the mixture will be thick. Pour it carefully into your prepared baking pan and spread it out evenly. Bake for 20-25 minutes or until your cake tester comes out clean.
  7. Lift the cake out of the pan using the parchment edges and lay onto a clean white kitchen towel sprinkled with the granulated sugar, remove the parchment. Spread the jam evenly onto the cake to all edges (if the jam is too thick, heat it up for a minute or so or add some kirsch to it). Taking the short end, begin to roll the cake up tightly. Twist the cloth ends tightly and allow it to cool completely. Store in tightly wrapped plastic until needed

Rich Chocolate Butter Cream

Ingredients:

  • 76 g unsalted butter
  • 250 g sifted icing sugar
  • 5 mL vanilla
  • 30 g unsweetened, chocolate melted and cooled.

Directions:

  1. Cream the butter until light and fluffy. Slowly add the icing sugar with about 30 mL of cold water as needed to make a fluffy cream and beat until entirely incorporated and fluffy.
  2. Slowly drizzle in the cool melted chocolate and beat well.
  3. Store in the refrigerator, and bring it to room temperature when needed.

Rubbing cocoa powder on the meringue mushrooms makes them even more authentic looking.

Meringue Mushrooms

Makes about 10 mushrooms of various sizes.

Ingredients:

  • 65 g granulated sugar
  • 30 g egg whites
  • 5 g unsweetened cocoa powder, plus more for rubbing into the finished meringues
  • Pinch of salt
  • Pinch of cream of tartar
  • 10 g dark chocolate, melted for assembly

Directions:

  1. Combine all ingredients, but the dark melted chocolate in a stand mixer bowl and beat until thick and shiny, the meringue should stand when a peak is pulled out.
  2. Bake at 200° F for approximately 2 hours (this will depend on how thick your mushroom pieces are.
  3. Allow to cool completely. When cool, rub the unsweetened cocoa powder into each cap and stem, the more varied the colour the better. Assemble the mushroom cap with the stems by ‘gluing’ the stem to the bottom of the cap with the melted, dark chocolate. Set aside in a cool, area that is not moist.

These pinecones are crunchy on the outside and soft and creamy on the inside with a good hit of real rum!

Rum Ball Pine Cones

Makes about 4 medium-sized pine cones.

Ingredients:

  • 2 pieces of fudge brownies (I used this recipe)
  • 15 g of peanut butter
  • 15 mL rum
  • 15 g cornflakes
  • 30 g dark chocolate, melted
  • 50 g almond slices, toasted

Directions:

  1. Combine all of the ingredients but the dark chocolate and almon slices in a food processor and process until it makes a nice thick dough that sticks together when shaped into a ball.
  2. Divide the dough into four equal portions and shape into a pinecone shape. Refrigerate for 15 minutes.
  3. Taking whole slices of the almonds, dipped into the dark chocolate at one end, stick each piece to the pinecone shape in a circular pattern, overlapping the last one, until the entire cone is covered. You may want to place the cones into the freezer to set each row of almonds. Store in the refrigerator in a tightly sealed container.

Bûche de Noël Assembly:

  1. Spread about 1/3 of the buttercream over the jam-filled side of the rolled cake. Re-roll it tightly. Spread the remaining buttercream over the outside of the cake, it should not be smooth, but rough like bark.
  2. Place the mushrooms strategically on the edge of the log, inter-spersing the pinecones. Sprinkle with icing sugar lightly to emulate snow. Serve at room temperature with whipped cream if desired.

Wrapping the plated cake in cellophane really makes it festive.

Notes:

  • Roughly chopped pistachios or roasted pepitas make beautiful “moss” on the log.
  • Lightly dusted icing sugar replicates a light snow nicely.


Read Full Post »

Sometimes we need a little more fibre in our diets. We’re in Spain! Woohoo! We have been here for about a month now, enjoying the sunshine and warmth. In fact, as I type this post (around the 19 of April), Toronto had some snow! Yes, my dear friends messaged me about it! But we have been watching the weather on our security cameras anyway. Snow. I haven’t worn socks in a month!

I’ve been developing this recipe for a couple of years and I think this is it. It’s a lovely combination of sweet, salty and crunchy. 

A lovely combination of sweet, salty, and crunchy.

High Fibre Granola Bars

A KitchenInspirations Original Recipe

Makes one 23 cm (9 inch) square pan

Ingredients:

  • 100 g Rolled Oats
  • 100 g Wheat Bran
  • 100 g Sunflower seeds
  • 50 g pumpkin seeds
  • 100 g sliced almonds
  • 105 g honey
  • 105 g unsalted butter, melted
  • 4 g salt

Directions:

  1. Toast everything but the honey, butter and salt at 250F for 30 minutes, stirring 3-4 times.
  2. Meanwhile, combine the honey, butter and salt and mix well.
  3. Increase the oven temperature to 350F. Transfer the oat mixture to a bowl and pour the honey mixture into it. Mix well to coat everything. Press the mixture firmly into a parchment-lined 9” x 9” baking pan and bake until golden 13-15 minutes. Cut into bars while warm. Cool on parchment. Store in the refrigerator for up to two weeks or freeze for longer.

Notes:

  • This recipe doubles very well.
  • If you don’t toast the mixture first, you’ll probably get a chewy bar instead, although I haven’t tried it yet.

Read Full Post »

We were having a friend over (outside) during lockdown (you’re permitted to responsibly socialize with one single (meaning they are single) friend, outside) and I needed a relatively quick dessert. This recipe came across my Insta feed and I was immediately taken with it. You use two whole oranges, skin, pith and all! Sounds intriguing, doesn’t it? You boil the oranges for 10 minutes three times, each time discarding the water to rinse away the bitterness. There is a lot of sugar but I didn’t reduce it like I normally do because I was concerned about the bitterness and it was fine. In fact, it was more than just fine, it was great! Not too sweet, I’d definitely make it again, in fact, I’ve made it three times! And because it is made with almond flour, you put the whole thing together in a food processor! It is super moist, orangy and delicious. And you needn’t make a syrup, like other orange cakes, because it is plenty moist from the two boiled oranges.

Gluten-Free Whole Orange Cake

For the original recipe, please click here.

Makes one 23 cm (9 inch) round cake

Ingredients:

  • 2 medium oranges, fresh whole with the rind on about 300 g each
  • 6 g baking powder
  • 6 large eggs, room temp
  • 250 g white sugar
  • 250 g almond flour

Directions:

  1. Preheat the oven to 350° F Convection. Prepare a 23 cm (9 inch) springform pan by lining the bottom with parchment and spraying the insides with non-stick spray.
  2. If you are not using organic oranges, scrub the exterior with hot water and a little soap and rinse well.
  3. Boil the whole oranges 3 times for 10 minutes, each time, changing out the water.
  4. Chop the oranges up into eighths and blitz until smooth with the Nutribullet (I was able to get the two oranges into my large Nutribullet container).
  5. Transfer to a large food processor and add the remaining ingredients, processing until fully incorporated and smooth.
  6. Pour the batter into the prepared pan and place on a cookie sheet into the preheated oven and set the timer for 60 minutes.
  7. Allow it to cool in the pan, then carefully remove and plate.

Notes:

  • I blitzed the boiled oranges in my Nutribullet and transferred them to my large food processor to complete the cake. The Nutribullet makes a very smooth paste.
  • I used a 23 cm (9 inch) springform pan, lined with parchment.
  • My oven baked it a bit quickly so check at 50 and 55 minutes for doneness with the wooden toothpick test. It won’t dry out like an ordinary cake so a little overbaking won’t kill it.
  • The cake stands on its own, no need for any garnish or cream but the author suggests serving it with a little Greek yogurt, I didn’t feel it needed it at all.
  • To make it extra special, you can pour a Belgian dark chocolate ganache over it. 100 mL Table Cream, 100 g Belgian dark chocolate chips, 45 mL white corn syrup. Heat cream to almost boiling, pour over chocolate chips, let stand a few minutes, stir until melted and stir in the corn syrup. Cool to thicken, pour over cake.


Read Full Post »

It’s definitely going to be a very different holiday season this year. We usually escape the drudgery of November by renting a house in a friends’ community in Arizona but, not this year. I’m already dreading February when we usually escape to Spain, thank you COVID19, not this year.

I usually look forward to all the holiday parties, both throwing and going to them, but not this year.

Over the last few years, I’ve slowly stopped baking my Christmas goodies to give to friends, but not this year. We deserve a treat. So friends, drop the diet and enjoy!

We usually entertain friends and family this time of year around our wood-burning fireplace in our living room, but not this year. However, we’ve adapted our outdoor space to include a natural gas heater, and equipped the sectional and chairs with electric blankets, trying to extend our entertaining capacity during these trying times. It’s been very successful at 10° C (50° F) but who knows how cosy it will be when temperatures plummet to -10° C (14° F) in January and February. I’m taking full advantage while I can.

This recipe was developed for an evening when we socially-distance-entertained friends under the warm heat trapped under the awning and cosy electric blankets.

These crackers are like biscotti because they are twice-baked. Using an electric slicer gives you excellent control and wonderfully thin slices.

Fruit and Seed Crackers

Makes 75 thinly sliced crackers

For the original recipe, please click here.

Ingredients:

  • 2 eggs, lightly whisked
  • 300 mL milk
  • 15 mL honey or agave syrup
  • 5 g salt
  • 125 g spelt or whole wheat flour
  • 200 g AP unbleached flour
  • 60 g dried cranberries
  • 70 g raw pumpkin seeds
  • 50 g sesame seeds

Directions:

  1. Prepare a small terrine pan (like this one) by lining it with parchment paper. Preheat the oven to 350° F.
  2. Combine the eggs, milk and honey and mix well.
  3. Sift the salt and flours together to combine. Stir in the fruit, nuts and seeds. Make a well in the centre and pour the egg mixture into the dried ingredients, stir to combine.
  4. Pour into the prepared pan and bake for 25-35 minutes or until a toothpick comes out clean. Reduce the oven temperature to 300° F.
  5. Tip the loaf out to cool completely and then slice as thinly as possible (I found the electric slicer did a beautiful job). Bake cracker slices until toasty and crisp, about 20-30 minutes, flip if necessary. Cool completely to store.

Notes:

  • I adapted this recipe from Chef Mimi’s blog. I used the seeds and fruit I had on hand, it’s quite versatile, so use what you have on hand.
  • I made these again in August 2021 and did not have whole wheat or spelt flour so I substituted almond flour and they turned out lovely.


Read Full Post »

We are always looking for ways to eat healthier, reduce the amount of sugar and carbs in our diet. I cook a lot of Asian flavours, particularly in the summertime, but unfortunately many of the store-bought sauces have a lot of sugar. Case in point, a popular brand begins its ingredient listing with, wait for it, SUGAR! So in an effort to be healthier, I came up with this recipe.

Low Carb Hoisin Sauce

Makes about 125 mL sauce.

Ingredients:

  • 30 mL Low Sodium Soy Sauce
  • 9 g almond flour (see notes)
  • 10 g erythritol (see notes)
  • 2.5 mL rice vinegar
  • 2.5 mL toasted sesame oil
  • 2 g white soybean paste
  • 2 g garlic
  • 15-30 mL water

Directions:

  1. Combine everything but the water in an immersion blender and blend until smooth.
  2. Transfer to a small saucepan and cook over low heat until it has thickened and darkened. Whisk in the water to the desired consistency.

Notes:

  • Instead of almond flour, you may use tahini (reduce or omit sesame oil) or smooth peanut butter.
  • Erythritol is a sugar substitute that apparently does not spike blood sugar levels. See this article.

Read Full Post »

Spring has been avoiding us in Toronto. We have had a few nice days of sunshine and relative warmth but for the most part it’s been rainy and unseasonably cold. It is depressing. If it weren’t for the gorgeous greenery exploding in anticipation of summer, you would think it is November.

I haven’t baked madeleines in a very long time and I thought the orange flavour would mentally transport us to more summer-like weather and JT loves orange and chocolate. Sadly, they were not a big hit with the construction crew but that made JT happy because he was able to keep them for himself (it’s been a bit of struggle keeping JT from munching on the treats that I’ve made for the crew, wink wink). These baked up beautifully and without that strange little bump in the centre, which is a win for me.

Orange & Almond Scented Madeleines

Ingredients:

  • 4 large eggs
  • 100 g granulated sugar
  • 1/2 tsp almond extract
  • 1/2 tsp orange extract
  • 1 1/2 tsp freshly grated orange zest (about 2 small oranges)
  • 128 g all-purpose flour
  • 48 g almond flour (finely ground blanched almonds)
  • 145 g unsalted butter, melted and cooled slightly, divided
  • 80 g semi-sweet chocolate, melted

Directions:

  1. Preheat oven to 375°F.
  2. With about 30 g of the butter, generously butter the Madeleine moulds and put it into the freezer.
  3. Melt the remainder of the butter in the microwave or small saucepan. Set aside to cool.
  4. Put about 2 tbsp of the melted butter in a frying pan and toast the almond flour (carefully, this burns quickly). Set aside to cool.
  5. In a bowl of an electric mixer, beat the whole eggs with the granulated sugar until the mixture is thick and pale and forms a ribbon when the beaters are lifted (15-20 minutes).
  6. Beat in the toasted almond flour and mix well so no lumps remain.
  7. Beat in the almond and orange extracts and the zest.
  8. Sift in the flour in 4 batches over the mixture, folding it in gently after each addition.
  9. Put about 250 mL of the batter into the cooled melted butter and incorporate well.
  10. Gently fold this butter-batter mixture into the remaining batter.
  11. Spoon the batter into twenty-four buttered Madeleine moulds and bake the Madeleines in the lower third of a preheated 375°F oven for 10 minutes, or until the edges are golden.
  12. Turn the Madeleines out on a rack, let them cool.
  13. Once cooled, dip into the chocolate if using right away, if not, Madeleines freeze well.

Read Full Post »

We may have put on a few pounds during our holidays. It’s always so difficult to stay on track while on holiday, but the plus side is that we did walk a lot, the day we visited the Alhambra in Granada we walked 11 kilometres!

Now that we are back to reality, we wanted to get back into eating fewer carbs. This used to be one of JTs favourite meals but I was a little apprehensive in making chicken cutlets without breadcrumbs and this recipe definitely does not disappoint. The almond flour crisps up beautifully and provides a wonderfully flavoured coating. I served this cutlet with cauliflower purée and cucumber salad. JT loved it.

A tasty cutlet that doesn’t dry out.

Low Carb Chicken Cutlets

A KitchenInspirations Original Recipe

Serves 2

Ingredients:

  • 200 g chicken breast
  • Pinch of dehydrated garlic powder
  • Pinch of dehydrated onion powder
  • 1 egg
  • 5 g Parmesan cheese, finely grated
  • 75 g almond flour
  • Pinch of herbes en Provence
  • Pinch of Salt
  • 30 mL grapeseed oil for frying

Directions:

  1. Portion two 100 g chicken breasts and pound thinly between sheets of plastic wrap.
  2. Combine the Parmesan cheese and almond flour, set aside.
  3. Lightly whisk the eggs with the herbs, onion, garlic and salt together and set aside.
  4. Dip the chicken breast into the egg and coat it, allow excess to drip off. Then dip it into the almond flour mixture to coat both sides. Repeat with the second breast.
  5. Heat the oil in a frying pan. Pan fry chicken both sides until the internal temperature is 171° C. Serve hot with lemon wedges.

Net carbs are only 2.8 g! Chicken Cutlets only, no sides.

Read Full Post »

We’ve been making a huge effort to cut out carbs from our diet. The one thing I have been really missing is bread. Not that we ate that much bread, but a sandwich every now and again is a nice treat so I have been trying to make carb-free bread and failing miserably until I came across a delicious keto bun at a local craft sale. It had a similar texture and crumb as flour bread, but made with almond flour and coconut flour. At the time, the lady would not share her recipe, so I made every recipe on the net trying to find her secret, sadly failing. Fast forward to a couple of weeks ago and I get an email from her out of the blue sharing her recipe! How serendipitous! It turned out that it was one of the first recipes I tried but obviously did not get it right so I had abandoned it. She had made a few adjustments to the original recipe and shared them with me, and I made further adjustments to make it my own. It’s easier to make than normal yeasted bread (really is more like quick-bread as you make it) and the result is quite surprising. It’s a lot more expensive to make this bread than it is to make regular flour bread (the recipe below is about $12 for 8 buns).

Those nooks and crannies are like real bread!

Most flour-free buns are usually eggy and super dense because of the nut flours used and the lack of leavening, but these buns are light and have a great spongy texture and fantastic crumb, they never disappoint, time after time! The original recipe had great texture but lacked the flavour that yeast imparts in real bread so I experimented and came up with this augmentation. If you don’t feel like messing with the yeast, just omit it along with the granules of sugar but keep the water the same. You will not be disappointed.

How many would you like?

The Worlds BEST Low Carb Buns

Makes 6 medium-sized buns. For the original recipe, please click here.

Ingredients:

  • 100 g Almond flour (see notes)
  • 30 g Coconut Flour
  • 33 g Psyllium Husk Powder, finely ground (see notes)
  • 10 g Baking Powder
  • 6 g Sea salt
  • 10 g Cider vinegar
  • 100 g Egg whites
  • 8 g Instant Yeast
  • a few granules of sugar
  • 280 g Boiling Water, divided
  • 1 egg yolk
  • Sesame Seeds

Directions:

  1. Preheat oven to 350° F (170° C). Prep a baking sheet by lining with parchment paper. Prepare a hand mixer ready to use and a timer.
  2. Combine the yeast with the sugar in 57 g of warm water (about 43° C or 100° F) and allow to froth.
  3. To a large bowl, add almond flour, coconut flour, psyllium husk powder, baking powder and salt and whisk to combine.
  4. Make a well in the centre of the dry ingredients and add the cider vinegar, egg whites and proofed yeast and mix on low speed, for a short time, to combine evenly.
  5. Boil the remaining water (223 g). Pour the water all at once into the almond flour mixture and blend for 30 seconds to make a smooth dough (do not over blend).
  6. Divide the dough into 6 equal portions (mine worked out to be about 94 g) and roll into a smooth ball with generously wet hands. Slightly flatten each roll so it’s more like the shape of an English muffin (don’t worry, they rise enormously).
  7. Brush each bun with the egg yolk and top with sesame seeds and bake for about 50 minutes or until the internal temperature is 95° C (200° F).
  8. Cool completely on a wire rack, before slicing. Serve toasted or plain with your favourite topping.

Notes:

  • I use Anthony’s Premium Blanched Almond Flour which may be purchased on Amazon. I have heard that the Costco Kirkland brand also works, but I haven’t tried it. I will eventually try the finely ground almond flour Bulk Barn sells because Anthony’s is pretty expensive.
  • I use psyllium husk powder from Bulk Barn, but I grind it to a super fine consistency with my coffee/spice grinder.
  • 100 g of egg whites is more or less 3 large egg whites.
  • Many of these recipes call for room temperature ingredients, I have done both room temperature and right out of the refrigerator and they resulted in more or less the same buns.
  • When working with the dough, generously wet hands are imperative for a nice smooth crust.
  • Mixing the boiling water into the batter with a hand mixer for 30 seconds ensures that it’s entirely blended but not overworked.
  • For Christmas, I received a bottle of Trader Joe’s Everything But the Bagel seasoning and it is awesome on these buns!

Nutritional Breakdown:

Per 1 piece

  • Calories: 178
  • Net Carbs: 5 g
  • Protein: 7 g
  • Fat: 12 g

Read Full Post »

Late last summer, I did some prop shopping for a prop-stylist colleague who was swamped and needed a hand. It’s a lot of work, don’t get me wrong, the shopping bit is fun but there is a lot of schlepping! And you have to be extremely organized to be able to return some of the props that weren’t used! That being said, it’s a job I don’t envy, they earn every penny and then some. While I was waiting for a store to open, I stopped into an Italian cafe for a coffee and biscotti. The coffee was fine but the biscotti was atrocious, it was soggy! Imagine that. Such an unsatisfying treat. The worst. So I had to make my own! These definitely hit the spot!

Cranberry and Almond Biscotti Revisted

Makes about 30 biscotti

Ingredients:

  • 320 g AP unbleached flour
  • 4 g baking powder
  • 3 g salt
  • 340 g sugar
  • 125 g butter, room temperature
  • 2 large eggs
  • 7 mL almond extract
  • 150 g frozen cranberries, defrosted
  • 70 g almonds, toasted

Directions:

  1. Preheat the oven to 350° F. Line a baking sheet with parchment.
  2. Combine the flour, baking powder and salt and mix well. Fold in the cranberries and almonds (I used whole)
  3. In the large bowl of your stand mixer, combine the sugar, butter, eggs and almond extract and mix for about 4 minutes.
  4. Fold in the dry ingredients until entirely combined (I did this using my whisk attachment so I didn’t break up the cranberries.
  5. Divide the batter in half and shape into relatively skinny logs on the parchment, leaving sufficient space between the two as they will spread during baking.
  6. Bake for 35 minutes or until golden.
  7. Remove logs from the oven and transfer to a cutting board. Using a serrated knife, slice each log into 1.5 cm slices. Place cut-side down on the baking sheet (reuse the original parchment) and bake for 10 minutes, flip and continue to bake for 5 more minutes or until lightly golden. Cool completely.
  8. Store in an air-tight container or freeze. Serve with coffee or tea.

You’ll need to bake these a little longer because the cranberries are moist.

Read Full Post »

JT and I have been on a huge adventure. I’ll let you in on it next week. But just before, a dear friend’s daughter flew in from Vancouver and we invited the family over for tea and strudel and this is what I made.

Apple & Cheese Strudel

A KitchenInspirations Original Recipe

Make 3 medium-sized strudels (about 30 cm or 12″ long)

To print recipe, please click here.

Ingredients:

  • 260 g ricotta
  • 100 g Icelandic or Greek yogurt
  • 35 g raisins
  • zest of 1 lemon
  • 25 g icing sugar
  • 5 mL vanilla
  • 1 egg, gently whisked
  • pinch of salt
  • 4 (~550 g) apples, peeled, cored and finely diced
  • zest and juice of 1/2 a lemon
  • 20 g brown sugar
  • 5 g cinnamon
  • 50 g almond flour, divided
  • 9 sheets of phyllo pastry
  • 45 g butter, melted
  • Icing sugar for garnish

Directions:

  1. Preheat the oven to 350° F (177° C).
  2. Line a baking sheet with parchment paper.
  3. Combine the ricotta, yogurt, raisins, lemon zest, sugar, vanilla, egg and salt and mix well. Set into the refrigerator whilst preparing the apples.
  4. Combine the apples, lemon zest and juice, brown sugar, cinnamon, 15 g almond flour and mix well.
  5. Prepare 3 sheets of phyllo pastry by brushing each sheet with the melted butter and sprinkling with almond flour, set aside. Continue with remaining 6, making stacks of three sheets.
  6. Pour 1/3 the ricotta mixture into the centre of each stack of prepared phyllo and top with 1/3 of the apple mixture. Turn in the ends and roll tightly.
  7. Brush each roll with the remaining melted butter and bake until golden, about 30-40 minutes.
  8. Serve warm sprinkled with icing sugar.

Read Full Post »

Is it a cake, fruit custard or pie?

I was invited to a BBQ at the marketing firm I work with and, of course, I couldn’t go empty handed! I spotted Lorraine’s recipe for an apple cake she made for Mr. NQN’s birthday and was immediately intrigued. Everyone loves cake and everyone loves apples (I hope) so I dove in head first and made her lovely cake. I modified the recipe to be gluten free (I didn’t know everyone at the BBQ and wanted to be safe and inclusive) and I used coconut sugar instead of superfine white sugar and increased the apple volume because I bought 5!

Thanks Lorraine for this tasty inspiration.

One of those peeler gizmos would have come in handy.

It’s really more apples than cake.

I made JT a tester.

The Imposter Apple Cake with Salted Coconut Caramel Sauce

For the original recipe on Lorraine Elliot’s beautiful blog, please click here.

Makes 1 cake, 20 cm (8 inch) diametre. Serves 6-8.

Please click here to print this recipe.

Ingredients:

  • 5 medium apples (about 750 g, I used Galas)
  • 3 eggs, room temperature
  • 100 g (2/3 cup) super fine coconut sugar
  • 150 mL (5 oz) milk
  • 30 g (2 tbsp) butter, melted and cooled
  • 120 g (3/4 cup) gluten free flour
  • 1 tsp cinnamon
  • Pinch of salt
  • 50 g (1/2 cup) slivered almonds, toasted (reserve until ready to serve).

Directions:

  1. Preheat the oven to 350° F (170° C).
  2. Line the bottom of a 20 cm (8 inch) round cake pan with parchment and spray generously with non-stick spray.
  3. Prepare a bowl with cold water and 2 tbsp lemon juice, set aside.
  4. Peel the apples and slice very thinly using a mandoline. Immerse the slices into the cold lemony water.
  5. Combine the eggs and sugar and beat until thick. Add the milk and melted butter and beat until well combined.
  6. Sift the flour, cinnamon and salt and add to the wet ingredients. Beat just until combined and lumps are gone.
  7. Drain the sliced apples and dry slightly. Fold the apple slices into the batter to coat well.
  8. Pour into the prepared pan and bake uncovered for 50-55 minutes or when a cake tester comes out clean.
  9. Cool completely before serving.
  10. Top with toasted almonds when serving.

Ingredients for Salted Caramel Sauce

Makes 200 mL (3/4 cup) caramel sauce

  • 90 g  (3/4 cup) coconut sugar
  • 1/4 tsp lemon juice
  • 5 mL (1 tsp) water
  • Good pinch of sea salt
  • 125 mL (1/2 cup) 18% cream
  • 20 g (heaping tablespoon ) butter

Directions:

  1. Heat cream and salt in a microwave proof container until very hot but not boiling, set aside.
  2. Combine coconut sugar, lemon juice and water in a microwave safe container and mix well (I used a 250 mL (2 cup) glass measuring cup).
  3. Microwave sugar mixture for 1-3 minutes in 15-second intervals (45 seconds did it for me) until sugar bubbles up but does NOT BURN, sugar crystals should be completely dissolved and you should begin to see it turn to a darker amber colour.
  4. Remove and set on a dishcloth for 30 seconds or until it reaches the colour of dark caramel.
  5. Slowly pour in the hot milk, being VERY careful as this will bubble up, whisking to incorporate.
  6. Stir well and then add the butter and stir until completely dissolved. Serve warm or at room temperature.

The caramel sauce really makes this dessert.

Notes:

  • This is not a very sweet cake and therefore, the coconut sugar caramel sauce is perfect for it.
  • Want to jazz it up even more? Add a dollop of cream fraiche or whipped cream on top.
  • The original recipe put the almonds on top of the raw batter and bake it altogether, but I found that almonds went soggy after 1 day in the refrigerator so next time I make this tasty cake, I will not add the amonds until I am ready to serve (recipe has been amended with this change).

Read Full Post »

It was somebody’s birthday last month and I wanted to bake a special birthday cake that was not too sweet or too heavy because it’s been ridiculously hot and humid in these parts. I had also just finished baking a mess of macarons so I was still in the meringue-making kinda mood. I found this recipe from Ricardo Larrivée’s of Food Network Canada and was intrigued. Years ago, a dear friend had brought a La Rocca Caramel Crunch Cake to the cottage and it was made with meringue instead of cake and I’ve never quite forgotten how moreish the texture was (think giant macaron!) so I modified Ricardo’s recipe a bit and came up with this decadent Chocolate, Chestnut, Coffee, Crunch Cake.

Decadent Chocolate, Chestnut, Coffee Crunch Cake

Makes one 20 cm (8 inch) layered cake.

Original recipe may be found here.

The Cake

Ingredients for the light cake:

  • 40 g (1/2 cup) almond flour
  • 65 g (1/2 cup) all-purpose flour
  • 30 g (1/4 cup) icing sugar
  • 2 egg whites
  • 95 g (1/2 cup) granulated sugar

Directions:

  1. Pre-heat the oven to 325° F (170° C).
  2. Cut four parchment paper circles, about 20 cm (8 inches) in diameter. Spray circles with non-stick spray.
  3. Combine almond flour, all-purpose flour and icing sugar in a bowl and mix well. Set aside.
  4. Beat egg whites until soft peaks form, then add the granulated sugar one tablespoon at a time until stiff peaks form.
  5. Add the almond flour mixture all at once and fold into the beaten egg whites, macrophage-style.
  6. Spread 2 circles with the batter right to the edge and bake for 30 minutes or until lightly golden and firm to the touch. If the batter sticks too much to your spatula, spray it with non-stick spray.
  7. Cool completely.

Ingredients for the chocolate cake:

  • 40 g (1/2 cup) almond flour
  • 65 g (1/2 cup) all-purpose flour
  • 25 g (scant 1/4 cup) icing sugar
  • 5 g (1 tbsp) cocoa, sifted
  • 2 egg whites
  • 95 g (1/2 cup) granulated sugar

Directions:

  1. Combine almond flour, all-purpose flour, cocoa powder and icing sugar in a bowl and mix well. Set aside.
  2. Beat egg whites until soft peaks form, then add the granulated sugar one tablespoon at a time until stiff peaks form.
  3. Add the almond flour mixture all at once and fold into the beaten egg whites, macronage-style.
  4. Spread 2 remaining circles with the batter right to the edge and bake for 30 minutes or until lightly golden and firm to the touch. If the batter sticks too much to your spatula, spray it with non-stick spray.
  5. Cool completely.

Chestnut filling:

Ingredients:

  • 100 g (3.5 oz) peeled chestnuts*, roasted
  • 30 mL (2 tbsp) milk or cream
  • pinch of salt

Directions:

  1. In a small, narrow container blend the chestnuts with the milk and pinch of salt with a stick blender, until smooth and creamy. Set aside.

Cake assembly:

Ingredients:

  • 125 mL (1/2 cup) Chocolate Buttercream
  • 125 mL (1/2 cup) Coffee Buttercream
  • 200 g (7 oz) Belgian chocolate wafers
  • 30 mL (2 tbsp) heavy cream

Directions:

  1. Place the chocolate layer first and spread the entire quantity of the chestnut cream on top. Add the white layer and spread the coffee buttercream on it. Add the chocolate layer again and spread the chocolate buttercream on it. Finish the cake with the white layer but place it upside-down so the smooth side is up.
  2. Melt the Belgian chocolate wafers the heavy cream to make a ganache, pour over the cake and spread out on top and sides evenly.
  3. Refrigerate. Decorate with chocolate curls. Serve chilled (it’s been extremely warm in these parts and the buttercream would melt if served at room temperature!)

Like a Macaron, this cake is best if filled a day or two before serving so that the buttercream has time to soften the meringue cake.

Notes:

  • For buttercream, I always use this recipe.
  • For roasted chestnuts, I usually buy this brand.
  • Use a serated knife to make a clean cut of the meringue.

Read Full Post »

I have seen this beautiful sauce pop up over a couple of blogs I follow, like Karen of Back Road Journal and Maureen of Orgasmic Chef and since I was making a Spanish potato omelet for an appetizer for a recent dinner party, I knew I had to pair it with this luxurious sauce. Spaniards sure know how to make beautiful raw dishes like Gazpacho, this sauce is smooth and perfectly balanced, making it an amazing addition to chicken or fish or even a simple pasta or gnocchi dish. The toasted almonds become the thickener and the olive oil emulsifies everything to a smooth, creamy sauce. I omitted the bread because I wanted to make it gluten free and because our dinner party had two kids, I went light on the smoked paprika and garlic, feel free to ramp it up if you’re in the mood.

Spanish Romesco Sauce

Makes 375 mL  (1 1/2 cups) sauce

Original recipe, please click here

Ingredients:

  • 1 large fire roasted red pepper, skin removed
  • 1 garlic clove, finely chopped
  • 1/2 cup almond flour, toasted
  • 3 Campari tomatoes (see notes)
  • 2 tbsp Red Wine vinegar
  • Pinch of smoked paprika
  • 1/2 cup extra-virgin olive oil
  • Mediterranean Sea Salt*, to taste
  • Freshly ground black pepper, to taste
  • Parsley, finely chopped

Directions:

  1. Add everything but the parsley to your immersion blender container and blend until creamy and smooth.
  2. Stir in the finely chopped parsley.
  3. Serve warm or room temperature over fish, chicken or pasta. You can even use it as a dip for raw veggies or crackers.

*This is the sea salt I used. I purchased it San José, Spain last year.

Notes:

  • You may use 1/2 cup passata if you don’t have campari tomatoes
  • I always forget the parsley so it’s not a big deal if you miss it.
  • I have also used smoked sea salt and it’s heavenly
  • I generally use roasted garlic purée which I have on hand because our stomachs can’t take raw garlic

Read Full Post »

Today is Victoria Day of the long weekend, which happens to be very important for Canadians because it is the May Two-Four Weekend: Queen Victoria’s birthday, cottage opening, garden planting, and the first outdoor BBQs and patios!! It is also the weekend that JT and I tied the knot! Yes indeed, we hitched up on the holiday Monday of a long weekend. Now, now, don’t get your knickers in a knot, the wedding ceremony started at 3pm on the holiday Monday, so people realistically could still get up to the cottage, open and get back in time for the wedding. Not everyone was happy about our decision, but it wasn’t really our fault, you see it was our first time and we had no idea how far in advance you had to book your venue for the reception (we found one venue that was taking bookings 3 years from the date), so when we found one available on the holiday Monday only 5 months after we got engaged, we went for it.

The weeks leading up to our wedding were lovely; gorgeous, warm, spring weather, three beautiful bridal showers, and the shear excitement every time a parcel arrived at the door! I had everything planned out, it would be a glorious day and everything would be perfect. I should have known things don’t always go as planned.

The night before the wedding, I tried on my dress and Mom and I decided we really didn’t love the neckline, it was far too high; fortunately, the dress was lace and I was able to trim away the bits we didn’t care for, using manicure scissors, and it worked out perfectly. I went to bed that night with my hair in rollers and I said a little prayer for my Dad who had passed in 1981 and crossed my fingers and toes that it would be a beautiful, sunny, spring day.

I awoke Monday, May 19 to a cold, dark and dreary, rainy day. I honestly thought I would be devastated but I wasn’t, I was absolutely fine. Things would go on with slight modifications. No big deal. And because the rain persisted ALL DAY, people were not that upset about having to leave the cottage early (we had a lot of cottager guests). After the ceremony, we were going to take photos in my In-Laws’ garden but since we couldn’t, we moved it inside (they had a lovely mansion), everything was just fine. The strange thing about that day was that it rained constantly, without stopping ALL DAY with the exception of the few times I stepped outside — to get into the limo from my Mom’s home, to get out of the limo at the Church, and to and from my In-Law’s home and finally to and from our reception! It stopped EVERY SINGLE TIME! I didn’t use an umbrella and I did not get wet! Thanks, Dad! We had a typical dinner for a wedding of that time (caesar salad, roast beef, Yorkshire puddings, and steamed veg) but considering the cool day, we sure could have used some soup and this soup would have been perfect. (click on the photo below for a short slide show). Please forgive me, the eighties were unforgiving style-wise!

To celebrate our 31st wedding anniversary (I was a child bride ;-)), we took a little road trip to Stratford, Ontario to see Guys and Dolls and stay overnight. Stratford is aptly named for the city in England and its primary mandate is to present Shakespearean plays but also includes a variety of Greek tragedies and Broadway-style musicals (wiki) to broaden its reach. It was a great weekend, although the weather went from 30° C (86° F) to 10° C (50° F) with high cold winds, we enjoyed walking around this pedestrian-friendly town with an excellent food scene. Here is a little slideshow of our trip.

As I mentioned, the weather turned on the morning of our trip (and our actual wedding day) and we were basically back in November! I had a huge soup craving and this one would have certainly hit the spot. I have made these grilled cheese croutons, again and again, they are excellent in a caesar salad too (use Parmesan instead of cheddar)!

Creamed Broccoli Pesto Soup with Grilled Cheese Croutons

A KitchenInspirations Original Recipe

Makes 1 L or 4 cups soup

Ingredients:

  • Extra Virgin Olive Oil
  • 100 g (1 medium size) sweet onions, chopped
  • 300 g (2 stems) broccoli, including the stems, chopped
  • 20 g (3-4 cloves) garlic, roughly chopped
  • 45 ML (3 tbsp) basil pesto (I used this recipe but used ground almonds instead of pine nuts)
  • vegetable or chicken stock

Directions:

  1. Using a splash of olive oil, caramelize the onions, about 15 minutes.
  2. Add the broccoli and garlic and cover with stock and cook until softened (about 30 minutes).
  3. Add the basil pesto and cook for an additional minute.
  4. Using an immersion blender, blend soup until very smooth, adding more stock to achieve desired thickness (I did not need to). Press through a fine sieve.
  5. Serve with Grilled Cheese croutons (recipe below).

These are crisp, cheesy croutons.

Grilled Cheese Croutons

Ingredients:

  • 1 slice of seeded bread (we like this one)
  • 30 mL (2 tbsp) Mycryo
  • 50 g (1/2 cup) shredded sharp cheddar cheese

Directions:

  1. Preheat the oven to 350° F (177° C).
  2. Cut the bread into bite-sized cubes and coat with the Mycryo. Bake, stirring often until bread has become dried croutons. Toss with the shredded cheddar and return to the oven and bake until cheese melts and caramelizes.
  3. To serve the soup, ladel soup into warm bowls and toss the grilled cheese croutons on top and serve piping hot.

If you love crispy cheese, you will love these croutons.

Read Full Post »

Swedish Apple Cake

Due to the overwhelming response on social media last Saturday, I am re-posting the recipe for this show stopper apple cake (plus I made a few changes since the first time I made it in 2013). I originally found this cake on my friend Charles’ blog, Five Euro Food (in hiatus right now), I had made it for Easter dinner for the outlaws. It was quite the success the first time, so I’m not really sure why I haven’t made it since. Way back in 2013 I had to alter the original recipe because we had diabetic and hypo-glycemic guests and you know how I hate to make two different things, so I was happy to convert Charles’ recipe to fit the circumstance. Last Saturday did not present such issues, so I revised the recipe again and liked it even better.

The recipe depends on the sweetness and flavour of the apples and I must say that the humble Macintosh really shined. As you read the recipe, you will notice that it has exactly 17 g (1 tbsp) brown sugar so don’t expect a super sweet cake, but those of you who like dessert, but not overwhelmingly sweet, will love this version. Of course, the Skor bits add sweetness and a touch of caramel flavour within the sliced apples, in the topping adds some lovely texture. Of course, you may omit them if you cannot find them (or you could buy them on Amazon).

Swedish Apple cake

This is all about the apples.

Appelkaka Remake, A Swedish Apple Cake

Makes one 16.5 cm (6.5 inch) cake, serves 4-6, depending on the slice size
To make a 23 cm (9 inch) cake, double the recipe

Ingredients:

  • 800 g (1 3/4 lb), about 8 small Macintosh Apples, peeled and thinly sliced
  • lemon juice
  • 17 g (1 tbsp) brown sugar
  • 120 g (1 1/4 cup) oats
  • 50 g (1/2 cup) almond flour or meal
  • 2 g (1 tbsp) cinnamon
  • 35 g (1/4 cup) Skor bits, divided
  • 60 g (2 tbsp) unsalted butter

Directions:

  1. Pre heat the oven to 395° F (200° C).
  2. Line a 16.5 cm (6.5 inch) spring form pan with parchment.
  3. To the small bowl of a food processor add, brown sugar, oats, almond flour, cinnamon, 1 tbsp of the Skor bits and butter; pulse until it resembles a coarse meal.
  4. Take about 1/2 of the oat mix and press firmly into the bottom of the prepared springform pan.
  5. Peel and finely slice the apples, a splash of lemon juice will prevent them from discolouring.
  6. Carefully arrange about half of the apples on the oat mixture, sprinkle with half of the remaining Skor bits, then finish layering the remaining apples and press down firmly.
  7. Sprinkle the remainder of the oat mix with the remainder of the Skor bits on top, just like a crumble.
  8. Bake for about 30-40 minutes or until the apples are luciously soft (test with a toothpick).
  9. Serve warm or at room temperature.

Notes (updated):

  • I used macintosh apples (sold in a bag) from no frills, they are the perfect baking apples.
  • Slice the apples using a mandolin, believe me, it makes it a lot quicker and far less tedious (but watch your fingers!).
  • I used large oats which were not instant, instant would probably work as they are used to absorbed the liquid the apples release.
  • If you don’t use Skor bits, try a squeeze of organic honey!

Read Full Post »

gf-tejas-dulces_first

Last week I shared with you a traditional Sevillian Cookie, the Tejas Dulces and I was so smitten with it that I had to develop a gluten-free version. There are some recipes that are not worth converting to gluten free, they simply would not work, but some, like this particular recipe, shines brighter than its glutenated counterpart! I absolutely love this recipe, to the point that I’ll probably make this one my standard.

The original tuiles we brought back from Sevilla.

The original tuiles we brought back from Sevilla.

Gluten Free Almond Tuiles of Sevilla (Tejas Dulces de Sevilla)

A KitchenInspirations Original Recipe

Makes 25 cm x 30 cm (10″ x 12″) sheet, cut to make cookies or various sizes

Ingredients:

  • 30 g (2 tbsp) unsalted butter
  • 75 g (3/4 cup) almonds, thinly sliced and toasted
  • 1 large egg, at room temperature
  • 80 g (~1/3 cup) sugar
  • 1 tsp almond flavour
  • 1 tsp pure vanilla
  • 50 g Gluten Free flour (I used this mix)
  • pinch of salt

Directions:

  1. Toast the almonds until golden. Set aside to cool.
  2. Melt the butter and set aside to cool.
  3. Beat the egg with the sugar until it reaches the ribbon stage, about 5 minutes. Beat in the flavourings and cooled butter.
  4. Sift the flour with the salt and fold into the egg mixture, cover and allow to rest at room temperature for 30 minutes.
  5. Pre-heat the oven to 265° F (130° C).
  6. Pour the entire batter onto a parchment-lined cookie sheet and spread out until it is quite thin (about 3-4 mm (about 1/8-3/16 inch) works out to about 25 cm x 30 cm (10″ x 12″). Evenly sprinkle the toasted almonds onto the batter and gently push into the batter.
  7. Bake for 45 to 50 minutes or until evenly golden, turn the pan once about halfway.
  8. While still warm, move parchment onto a cutting board and cut into uneven shapes with a pizza cutter. Transfer parchment to a cooling rack and allow to cool. Cookies will firm up as they cool.
  9. Once cooled, store in an airtight container for about a week, but they won’t last that long!

Notes:

  • I increased the flavourings to one teaspoon each because I am not a fan of the taste of gluten-free flour mix.
  • You may use a commercially prepared gluten free flour but I tested the recipe with my mix.
  • The gluten-free baked up about 10 minutes quicker because the batter spread a little further than the glutenated one!

Read Full Post »

tejas-dulces_first

Happy Halloween Everyone! Hope you all have a ghoulish night!!!

While in Europe this past September, we spent four extremely hot days in Sevilla. It’s no wonder they call Spain the “Frying pan of Europe”! It wasn’t as hot as it had been (near 50° C or 122° F) but it was hot enough for us! The sun was relentless and most locals only walk in the shade (you can tell who lives there because they hug the shadows directly beside the old buildings!). The city has covered some of its sunnier streets with canopy sails to shade the citizens and tourists, it’s that bad!

Many of the historic town streets have these sails in both Sevilla and Madrid.

Many of the historic town streets have installed these canopy sails to protect citizens and tourist from the unyielding sun, in both Sevilla and Madrid, though I did not see them in Granada.

During one of our last walks though the beautiful historic part of town, we stumbled into the area where the locals actually live. There were no tourist shops, a few restaurants, just butchers, bakers, children’s clothing stores, kitchen stores (yes, I did buy something), grocery stores and specialty shops. One such shop was a beautifully designed little cookie shop where they sold only one type of cookie in three flavours: La Tejas Dulces de Sevilla, in almond, pistachio and coconut. A young lady was handing out samples in front of the beautiful store and we couldn’t resist. In one taste, we were immediately hooked on the simple almond flavour and lovely crunchy texture and we had to buy some. Upon returning to Toronto, I hid the small package so that I could work on a recipe and perfect it for the blog. I told JT it was for the greater good, he wasn’t impressed.

The cookies are light, airy, crunchy and full of flavour; imagine a genoise batter spread paper-thin, topped with almonds and baked until golden. They are so GOOD! The recipe is relatively simple but follow the instructions to get the signature airy, crunchy texture. I think this could easily convert to a gluten free variety, stay tuned!

I must warn you, though, because these are not like the French Tuiles, these have a bit more body than a traditional French tuiles. They are really more cracker-like than a tuile or a cookie.

Scroll down to the end of this post to see pictures from this part of our trip.

tejas-dulces_2

Delicately sweet, these crispy, flavourful cookies hit the spot for an afternoon craving!


original

These are the originals we brought back from Sevilla, sadly only three left and a mess of crumbs but I’ve finessed the recipe so I can make more!

Almond Tuiles of Sevilla (Tejas Dulces de Sevilla)

A KitchenInspirations Original Recipe

Makes 25 cm x 30 cm (10″ x 12″) sheet, cut to make cookies or various sizes

Ingredients:

  • 30 g (2 tbsp) unsalted butter
  • 75 g (3/4 cup) almonds, thinly sliced and toasted
  • 1 large egg, at room temperature
  • 80 g (~1/3 cup) sugar
  • 1/2 tsp almond flavour
  • 1/2 tsp pure vanilla
  • 50 g cake and pastry flour
  • pinch of salt

Directions:

  1. Toast the almonds until golden. Set aside to cool.
  2. Melt* the butter and set aside to cool.
  3. Beat the egg with the sugar until it reaches the ribbon stage, about 5 minutes. Beat in the flavourings and cooled butter.
  4. Sift the flour with the salt and fold into the egg mixture, cover and allow to rest at room temperature for 30 minutes.
  5. Pre-heat the oven to 265° F (130° C).
  6. Pour the entire batter onto a parchment-lined cookie sheet and spread out until it is quite thin (about 3-4 mm (about 1/8-3/16 inch) works out to about 30 cm x 30 cm (12″ x 12″). Evenly sprinkle the toasted almonds onto the batter and gently push into the batter**.
  7. Bake for 45 minutes to an hour or until evenly golden, turn the pan once about halfway.
  8. While still warm, move parchment onto a cutting board and cut into uneven shapes with a pizza cutter. Transfer parchment to a cooling rack and allow to cool. Cookies will firm up as they cool.
  9. Once cooled, store in an airtight container for about a week, but they won’t last that long!

Spread batter out thinly (about 30 x 30 cm or 12 x 12 inches)

Spread batter out thinly (about 30 x 30 cm or 12 x 12 inches)


tejas-dulces_3

I made another batch but spread the batter out much thinner. They probably could have baked a little longer to get a little richer colour, but the flavour and texture is spot on.

Notes:

  • *for additional flavour, brown the butter in a frying pan until hazelnut in colour.
    ** to insure that all of the almonds are ‘stuck’ to the batter, I did a little toss of the pan quickly and that way I was able to move ‘unstuck’ almonds to a better place.
  • Add a teaspoon of lemon zest because lemon and almond go so wonderfully together!
  • Drizzle melted chocolate over the cookies once they are cool, refrigerate until set then store in an airtight container for about a week, but be warned, these won’t even last as long as the originals!

This slideshow requires JavaScript.


Read Full Post »

Beghrir_First

These tasty treats resemble English crumpets in both flavour and texture. Please click here to see my attempt at making the English treats.

Six years ago, we visited Morocco  My how time flies. During our visit, JT and I took two cooking classes, one at our Riad and the other at a very famous restaurant, Maison MK with Chef, Omar El Ouahssoussi. Both lessons had us making popular Moroccan main courses which we have made several times since our return. All of the food in Morocco is exceptional, a wonderful contrast of savory and sweet, carefully paired. Even breakfast in Morocco was something special. Breakfast always had a bit of a continental leaning but with Moroccan specialties, like this pancake. I’ll never forget the first time I tried Beghrir, on the rooftop patio of our Riad. It came with a little pitcher of syrup that tasted like honey and melted butter, you drizzle this syrup on the little cakes and the holes soak up all of the wonderfulness. I was instantly delighted with the unique texture and flavour of these interesting yeast-based pancakes and loudly declared that I would make them as soon as we returned. Yes, that was SIX years ago. We’ve made most of the dishes we learned how to make in our cooking classes but I let this one fall off my list. Better late than never, eh?

Part of my hesitation to make this wonderful pancake was the prep and rest time, some recipes rest for one and half hours! I just didn’t have the time for that, so when I found My Moroccan Food blog’s Baghrir recipe, with only 30 minute resting time, I knew it was for me! As luck would have it, I only had about half of the required semolina in my pantry so I had to improvise. I also rather liked an ingredient I saw in the New Moroccan cookbook (please see notes below) so I altered the proportions of the original recipe to include almond flour. I am going to give this a try making it gluten free and hopefully, I won’t drag it out another six years.

Beghrir, THE Moroccan Pancake

Makes about 42 little pancakes about 5-6 cm (3-3.5″) diameter.  For the original recipe, please click here.

Ingredients:

  • 120 gr of fine semolina
  • 120 g AP unbleached flour
  • 50 g almond flour
  • 1 tbsp granulated sugar
  • 1 tsp yeast
  • ½ tsp salt
  • 500 mL (2 cups) warm water
  • 2 tsp baking powder

Directions:

  1. Combine all of the ingredients in a large bowl and blend well with a stick/immersion blender. Allow to stand in a warm place for 30 minutes.
  2. After 30 minutes you should see the yeast taking action. Give the batter another blending and prepare your pan by spraying well with non-stick spray.
  3. Preheat the pan (see notes below). Using a 4.5 cm (2.75″) ice cream scoop, scoop a scant helping of batter and pour from the centre out on the hot pan. The Beghrir will cook from the bottom up, you do not flip this pancake. Cook until the batter is no longer wet. Repeat until all of the batter is gone.

Beghrir_2

These tasty Moroccan breakfast cakes are very similar in texture and flavour to English Crumpets.

Beghrir_3

The honey butter syrup makes this breakfast a treat and extremely moreish.

Notes:

  • The pan must be very hot for the batter to bubble, but not hot enough that the batter burns before it cooks, it’s a bit of a balancing act.
  • I used a well-seasoned cast iron pan (the one I use to make crêpes) so I had to keep turning the heat down so the beghrir doesn’t burn.
  • Beghrir will stick together while hot, so cool them laying out in a single layer.
  • Beghrir freezes very well. I plan to repurpose them with a little cream cheese, smoked salmon and fresh dill during the holiday season, although JT really loved them with the syrup.
  • To reheat Beghrir, steam them for a few minutes. Steaming maintains the crumpet-like texture. (updated October 15, 2016)
  • The original recipe is a synthesis of Chef Mourad Lahlou’s 2011 cookbook, New Moroccan, (page 196) and this blog. I found Chef Mourad’s recipe a tad complicated for first thing in the morning so I simply borrowed the almond flour he adds, I figured it would add texture and flavour. Next time I may try his recipe for contrast.
  • Chef Mourad used a flat indented silver dollar pancake pan (like this one) but I did not have one and I do not think it is needed, the pancakes turn out beautifully round on their own.
  • The syrup is an equal combination of butter, honey and about half the volume of water, heat gently to melt butter and whisk to combine, serve warm.

  • Beghrir can be topped with anything, try some jam, or even maple syrup, but I’ll stick to the traditional honey and butter, it’s so good!
  • Beghrir can be spelled Baghrir or Beghrir, or so says the internet.

I can’t believe I didn’t post a pic of the new table yet! This is the newly improved table, havent decided to paint the legs yet!

Read Full Post »

BananaBread_First

Summer has been very warm and humid in Toronto. Don’t get me wrong, I am not complaining because February comes all too quickly and the -25° C (-13° F) is still too fresh in my mind but I really don’t like to turn the oven on (particularly for a recipe that calls for one hour!) when it’s that hot outside (it makes the A/C work even harder). So I modified this recipe to be baked on the Barbie with ingredients I had on hand.

BananaBread_2

The top is swirled with cinnamon, but not too much to be overpowering.

Give this a light toasting to get even more flavour out of the loaf.

We’ve been spending a lot of time at the cottage this year, JT has some council meetings and we like to avoid the traditional weekend traffic so we go up Thursday and come back Tuesday or even go up Sunday and come back Friday. It’s been great, neither of us stresses about weekend traffic anymore! But having so much time at the cottage can be a bit boring, so I prefer to have projects lined up so I can amuse myself without spending a lot of time on the computer. I had been looking for a small cocktail table to set between two chairs in our living area but it had to be rustic and small and sadly I couldn’t find anything.

IMG_0028

A small table for two glasses between the chairs would be perfect.

I was inspired by rustic tables made of a cross section of a log with sticks as legs like this one:

Screen Shot 2016-08-23 at 3.32.43 PM

Inspiration table

But I was stuck on how to slice a log so that it’s perfectly even on both sides because we have limited tools. And then I found this log tea light at Winners (TJ Max) in the right diametre for a reasonable price and my little table was born.

Underside

Tea light spots will help anchor legs in place.

TableTop

Table top has just the right amount of petina.

JT and I sourced the legs in the forest, we had to make sure they were not too new or too old or had bugs in them (you know how I feel about that). I cut the legs to size in the city (I have a table saw) and then I assembled the table at the cottage while JT was at a meeting, just in time to receive our good friends for a weekend.

RusticTable_phase I

TabI hadn’t decided to paint the legs at this point.

Unfortunately, I turned around for a split second and my friend pulled the new table up to the movies on the shelf hoping to find something she hadn’t seen before and…yep…you guessed it…she thought it was a stool and sat on it! #notastool was the hashtag for the weekend. I ended up disassembling it and starting from scratch. Fortunately the table top was in tact so all I did was rebuild the legs.

BrokenTable

It’s an honest mistake.

When I perused the net for banana bread recipes, I noticed that many of them had a lot of sugar. A LOT! I was hoping for something less sweet so that it’s a bit healthier when I found Cookie and Kate’s recipe. I would have made it verbatim but then I realized that I was short of a few ingredients so I improvised. I liked the idea of whole wheat flour but I didn’t want 100% of it, so I divided the flour into 1:3/4 so the texture is a little smoother (plus I didn’t have white whole wheat flour on hand — what is that anyway?).  The bread is wonderful when it is lightly toasted and smothered with butter with a cup of tea. It will sooth away any bruises caused by using a table as a stool, that was not meant as a stool. #notastool.

BananaBread_3

Banana Bread

Original recipe, please click here. This recipe makes one generous 10 cm x 23 cm (4″x 9″) loaf

Ingredients:

  • 125 mL (1/2 cup) melted coconut oil
  • 60 mL (1/4 cup) honey
  • 60 mL (1/4 cup) milk
  • 60 mL (1/4 cup) water
  • 5 mL (1 teaspoon) vanilla extract
  • 2 eggs
  • 125 mL (1/2 cup) roughly mashed ripe bananas (about 2 smallish bananas)
  • 60 mL (1/4 cup) dates
  • 128 g (1 cup) whole wheat flour
  • 94 g (3/4 cup) AP flour
  • 1 teaspoon baking powder
  • 2.5 mL (½ teaspoon) ground cinnamon, plus more to swirl on top
  • 2.5 mL (½ teaspoon)salt
  • 70 g (½ cup) chopped almonds

Directions:

  1. Preheat the BBQ to 177 ° C (350° F) using only the front and back burners. Prepare a 10 cm x 23 cm (4″ x 9″) loaf pan by generously spraying with non-stick baking spray.
  2. In the large bowl of a food processor, add melted coconut oil, honey, milk, water, vanilla extract, eggs, bananas and dates and pulse until dates and bananas have been well incorporated into the liquid.
  3. Sift the flours, baking powder, cinnamon and salt. Add all at once to the liquid and pulse a few times to incorporate. Stir in chopped almonds.
  4. Pour into prepared pan and set into a larger pan. Place pan into the centre of the BBQ so that the elements that are on are not below the loaf pan. Bake for 50-60 minutes or until cake tester comes out clean (mine was perfect in 50 minutes).
BananaBread_4 It’s a dense bread that is perfect for breakfast or a small snack.

Read Full Post »


My Father in Law passed recently. He made his 92nd birthday two-weeks earlier. It was very sad to lose him but to be honest, the last few years have not been kind to him, he simply existed, partly by choice and partly by nature (use it or lose it). That’s all of our parents now and I must tell you that it feels weird being an orphan at my age, both JT and I were very close to each other’s parents. Since Dad lived in Toronto, we made arrangements close to home and our home was the hub, which proved to be a lovely distraction. Our dearest friends Paul and T drove up from Wisconsin to help us and console us. Paul had known JT’s Dad through business so there was a strong connection with him. My newly married nephew and his bride also stayed with us because they live about two and half hours from the city. The house was alive with action! My FIL would have LOVED it!

Everyone came to the city to be at his bedside—I know he would have loved that too, although he didn’t love attention, he loved the buzz of activity. He passed very peacefully during the early hours of the morning of May 28, he didn’t suffer long. That evening, everyone gathered at our home and we had a wonderful family dinner telling stories and being there for each other. We ate rotisserie chicken, a variety of store bought salads and some homemade cookies I had in the freezer (I didn’t have time to throw anything together). We had the visitation on June 2 and the service on the 3rd. At 12pm on the 2nd, I discovered that everyone was coming for dinner just prior to the service the very next day so I sprung into action and made a huge batch of chicken mole out of the leftover rotisserie chicken. Fortunately, I had tried this recipe before and got the thumbs up from JT, so it was an easy decision to make it again.

ChickenMole_2 We had a couple of leftovers that JT and I had for dinner later that week.

The mole sauce can be made in a slow cooker but I did it stove-top this time—I found it therapeutic to be involved in the dish, chopping, stirring and cooking. Like any saucy dish, this definitely tastes better the next day. The rotisserie chicken is an easy addition to the mole, just shred it and stir it into the cooled mole sauce, fill the corn tortillas, refrigerate overnight so the flavours can meld. It was a huge success! Everyone loved it.

JT usually orders a mole when we dine at a Mexican restaurant and I’ve always wanted to try my hand at it. Although there are many recipes handed down generations that take two to three days to make, this one can be made in about an hour. It developes the depth of flavour as it sits overnight. I would not rush it, make it a day or two ahead.

Bucket List

Chicken Mole Enchiladas

Makes 24 Enchiladas (15 cm or 6 inch corn tortillas)

For the original recipe, please click here.

Ingredients:

  • 750 mL (3 cups) sodium-free chicken stock (or vegetable stock)
  • 500 mL (2 cups) freshly squeezed orange juice (about 3 good sized oranges)
  • 30 mL (2 tbsp) EVOO
  • 570 g (1 1/4 lb) sweet onions, sliced
  • 55 g (about 1/2 cup) sliced almonds
  • 6 large garlic cloves, finely chopped
  • 8 g (4 tsp) cumin seeds
  • 8 g (4 tsp) coriander seeds
  • 4 g dried pasilla chiles, stemmed, seeded, torn into 1-inch pieces, rinsed*
  • 4 g dried ancho chiles, stemmed, seeded, torn into 1-inch pieces, rinsed*
  • 40 g (about 1/4 cup) raisins
  • 4 8 cm x 1 cm (1/2-inch) strips orange peel (orange part only)
  • 1.5 g (1 1/2 tsp) dried oregano
  • 45 g semi-sweet chocolate, chopped
  • 4 g ground cinnamon (omit if using Mexican chocolate)
  • Chopped fresh cilantro or green onions
  • 24 corn tortillas
  • 1 rotisserie chicken (or 3 left over), shredded (replace with firm tofu or beans if vegetarian)
  • 200 g (2 cups) Queso de Oaxaca or Mozzarella Cheese, grated
  • Crème fraîche, sour cream or yogurt as garnish
  • Sriracha sauce/or chipotle mayo as garnish

Directions:

  1. Heat the EVOO (Extra Virgin Olive Oil) a large Dutch oven, add the sliced onions and sweat them out.
  2. Add the almonds and toast slightly. Add the garlic and cook until they release aroma, then add the cumin, coriander, two types of chilies (*replace with 15 mL (1 tbsp) smoked paprika if you prefer less spicy food) and cook until you can smell the spices.
  3. Add the raisins, orange peel, oregano, chicken stock and orange juice. Mix well. Simmer for 30-40 minutes, stirring occasionally. If using the dry chilis, remove them and discard.
  4. Add the chocolate and cinnamon (or Mexican chocolate) and stir until chocolate has completely melted. Using an emersion blender, blitz the sauce until very smooth. Cool completely. Set aside 2 cups of sauce. Stir in the cold shredded rotisserie chicken.
  5. Fill each corn tortilla with some chicken mole and a little cheese, tuck the rolls into an oven proof pan with the rolled end secured. Repeat until there is no more mole. Pour reserved sauce over the enchiladas, sprinkle with grated cheese. Cover with foil and refrigerate overnight.
  6. 1 hour prior to sitting down to eat, preheat oven to 350° F (177° C). Bake enchiladas for 30-40 minutes or until totally heated through (inside temperature should be around 150° F (66° C) and cheese should be melted and bubbling.
  7. To serve, drizzle with Crème fraîche, sour cream or yogurt and Sriracha sauce or chipotle mayo. Sprinkle with chopped cilantro and/or green onions. Serve over Coconut Cauliflower Rice (recipe to come).
ChickenMole_3 We had these at the cottage a week or so ago. I added a little guacamole for fun. I don’t have many food style tools at the cottage so the garnish is quite rough.

Notes:

  • The enchiladas freeze well. You may wish to slip a piece of parchment between each enchiladas so you can easily separate them.
  • *If you are concerned about the dish being too spicy, omit the dried chilis and replace them with 15 mL (1 tbsp) smoked paprika.

Read Full Post »

AmarettiCookies_1

Ever since we recently had our Jura Espresso Machine serviced, we have been indulging in an espresso after lunch. We stock our coffee maker with decaffeinated espresso coffee beans so we’re not worried about being kept up at night with caffeine. Every time I have an espresso in the afternoon, I always feel like a little something to have with it, a biscotti (like this, this or this) or in most recent times, an amaretti cookie. Having just the right amount of ground almonds on hand, I decided to whip up these traditional but super easy cookies for our afternoon espresso.

Did you know that the first amaretti were made with crushed apricot kernels and almonds? You can read the story here.

They are deliciously almondy.

They are deliciously almondy.

Amaretti Cookies

Original recipe may be found here, I had to modify it because the cookies were flattening too much with the original proportions.

Makes about 44 cookies

Ingredients

  • 410 g ground almonds
  • 410 g granulated sugar
  • 4 egg whites
  • 1 tsp almond flavouring
  • 1 tsp lemon zest
  • 44 whole almonds, skin on

Directions:

  1. Pre-heat the oven to 325° F  (163° C).
  2. In small portions, add the ground almonds, granulated sugar and lemon zest to the small container of your NutriBullet and using your milling blade, grind to a fine consistency. Run through a coarse sieve to avoid the almond bits sticking together.
  3. Beat the egg whites until stiff but not dry, add the almond flavouring and mix well.
  4. Add the sugar and almond mixture to the beaten egg whites and gently combine. It should have the consistency of a thick paste.
  5. Spoon by generous teaspoons onto a parchment-lined baking sheet about 5 cm (2 inches) apart and top each cookie with a whole almond, pressed gently into it. Bake for 15-18 minutes or until golden. Allow to cool slightly on the sheet and gently remove to a wire cooling rack. Store in an air-tight container separating rows with parchment paper. Or freeze.

Read Full Post »

ChocolateAlmondCake_First

I was recently reminded of a project I completed in anticipation of family arriving from overseas. The project wasn’t imperative for their comfort or enjoyment, it was just the impetus I needed to “git ‘er done” as they say!

We’ve lived in our present home for almost 15 years, and ever since the first day we moved in, I’ve wanted curtains on both windows in our living room (or lounge) but we already had perfectly good, and totally lovely curtains on the back sliding doors. To replace perfectly good (and well made, I might add) curtains seemed excessive to me, so we lived with them. For 14+ years. Until I did some math and to my utmost delight , I discovered I could get two for the price of one, out of the generous fabric that the original curtains had. I wanted the dated tabs replaced with a more contemporary and clean look (for the sewers out there, I simply folded the tabs down, behind the top and stitched across. Pull the rod through the tabs to hang. I also added recycled toilet tissue rolls to help hold  the role). The sliding door curtains are functional and we do close them down on the very cold days, but the front ones are just for show! I am just so happy every time I look at them. Of course, I had to do the dining room next…it’s really never ending. While hemming the new dining room curtains, I started thinking about the Indonesian Spekkoek Lapis Legit cakes I made a couple of years ago (here and here), specifically about how I can change it up. My FILs birthday was in mid-May so making a cake for him was the perfect opportunity to experiment. We all love Charles’ Kladdkaka and Tuppkaka so I wondered if I could combine the two delicious cakes using the Spekkoek Lapis Legit technique. It was a huge success and the two flavours went together famously. I made the cake again for JTs birthday in June, by special request.

What project have you put off only to get it done for guests?

OldCurtains

These are the very generous old curtains

I changed the rod to something a little more in style with the Craftsman home. I’ve also fixed the hem since this photo!

Kladdkaka

Ingredients:

  • 200 g Caster Sugar
  • 140 g unbleached Flour
  • 50 g Cocoa Powder
  • 2 tsp Baking Powder
  • 2 tsp Vanilla
  • 120 g Butter
  • 2 eggs
  • 1/4 cup water

Directions:

  1. Prepare your spring-form tart pan with non-stick cooking spray. Line the bottom with parchment paper.
  2. Add the sugar, flour, cocoa powder and baking powder to the bowl of your food processor. Plus few times to incorporate evenly.
  3. In the microwave, melt the butter slowly so it doesn’t overheat. Combine the cooled melted butter, eggs, vanilla and water. Slowly pour the melted butter mixture in an even stream while processing. Mix well, scraping down the sides as required. 
  4. Lightly grease a round tin about 20cm in diametre (I used a spring form tin). Spoon the batter into the tin and smooth out to the edges (it is rather thick). Resist the urge to try this batter, it’s seriously good and you will not be able to stop.
  5. Set aside while you make the Tuppkaka layer.

Tuppkaka

Ingredients:

  • 300g Caster Sugar
  • 200g Plain Flour
  • 74g Butter
  • 2 Eggs, separated
  • 2 tsp almond flavouring
  • 1/4 cup water

Directions:

  1. Melt butter and allow to cool to room temperature.
  2. Combine the eggs with the sugar and beat well (until thick and very pale yellow). Combine the melted butter with the almond flavouring and water and and mix well.
  3. Sift in the flour and stir until entirely incorporated.

Making the layered cake:

  1. The first layer is chocolate, use about 1/2 cup of chocolate batter for the first layer.
  2. Broil for 2-4 minutes watching carefully so it doesn’t burn. Once it is set and your tester comes out clean, pour 1/2 cup of the almond batter on top and spread evenly (the heat from the chocolate will begin cooking the batter so you’ll need to work fast.
  3. Broil for 2-4 minutes until it is set and your cake tester comes out clean. Repeat alternating the flavours until you have used up both almond and chocolate batters, broiling each layer individually.
  4. Allow to cool completely before layering the ganache on the cake.

Chocolate Ganache Ingredients:

  • 114 g dark semi-sweet chocolate
  • 125 mL (1/2 cup) heavy cream

Ganache Directions:

  1. Heat cream to almost boiling, pour over chocolate and stir until melted and entirely incorporated and smooth.
  2. Pour over cake and smooth top and sides.
  3. Refrigerate until set.

Notes:

  • Set your oven rack 2nd highest from the top.
  • As the cake becomes taller you may need to reduce the broil to low so it doesn’t burn.
  • I baked the final layer in a 350°F oven for 10 minutes because it just got too close to my boiler and I was concerned it would burn.

ChocolateAlmondCake

It’s a little like eating chocolate marzipan!

ChocolateAlmondCakeCut

I still need to work on my layers but it tasted darn good!

Read Full Post »

Dope Pie is my version of Crack Pie that I made and posted at the end of September. It was unhealthy to say the least so I had an idea to make it slightly healthier and I was successful. I’ve been making these blondies since the beginning of time and the crack pie made me think of them as soon as I tasted the first bite, so with a few alterations I came up with this.

DopePie_2

It’s really just a blondie pie.

Ingredients for Crust:

  • 1 cup AP flour
  • 1/4 cup granulated sugar
  • 1/4 cup ground almonds
  • Zest of 1 lemon
  • 1/4 cup unsalted butter
  • 1 egg yolk
  • 1/2 tsp vanilla
  • 1 tbsp water

Directions for Crust:

  1. Pre-heat oven to 177° C (350°F).
  2. In a food processor, combine flour, sugar, almonds and lemon zest and pulse until mixed well.
  3. Drop in the butter bit by bit and pulse until small crumbs form.
  4. Drop in the egg yolk and vanilla and pulse until combined. Add the water in a steady stream while pulsing and mix until the dough forms a ball.
  5. Roll out dough to fit a 25 cm or 10 inch spring form tart pan. Blind bake for about 15 minutes, flattening any bubbles as they come up.

Ingredients for the Filling:

  • ¾ cup All Purpose Flour
  • 1 tsp baking powder
  • ¼ tsp salt
  • ¼ cup unsalted butter
  • 1 cup packed brown sugar
  • 1 egg, slightly beaten
  • 1 tsp vanilla

Directions for the Filling:

  1. Lower oven temperature to 150ºC (300ºF).
  2. Sift together flour, baking powder and salt together. Set aside
  3. Melt butter and brown sugar over low heat. Remove from heat.
  4. Add slightly beaten egg, be careful not to cook the egg, make sure the mixture is not too hot.
  5. Blend in dry ingredients.
  6. Pour into the partially baked crust and continue to bake for 15-20 minutes or until it has set and the top cracks a bit.

This is slightly healthier than the original recipe.

This is slightly healthier than the original recipe.

Read Full Post »

This winter we had a lot of snow. And by a lot, I’m talking over a metre (yard) high piled up on our front yard. It’s been really crazy. I’ve talked about our wonderful neighbours before and I just have to say something again. It snowed about 10cm (4 inches) overnight and by the time we had gotten up the next morning, our wonderful neighbour John had shoveled our sidewalk, all 59 feet of it and even some of our other neighbour’s sidewalk too! Isn’t that nice? As a thank you I made a batch of biscotti, a little different than this version I made last year to give them after all, I wouldn’t want to discourage such neighborly behavior!

Almond, Cranberry and Orange Biscotti

Makes about 4 dozen little cookies

Ingredients:

  • 2 cups unbleached AP Flour
  • 2 tsp baking powder
  • pinch of salt
  • 3/4 cup toasted almonds
  • 1/2 cup dried cranberries
  • 2 eggs, lightly beaten
  • 3/4 cup granulated sugar
  • 1/3 cup melted butter
  • 2 tsp vanilla extract
  • 1 tsp almond extract
  • 2 tbsp orange zest
  • 1 lightly beaten egg white
  • Plus a small amount of dark chocolate, melted with a little butter (just enough to drizzle).

    Directions:

    1. Preheat the oven to 350°F or 180°C.
    2. Toast the whole almonds on a baking sheet for 10-12 minutes. Cool completely.
    3. Combine the flour, baking powder, salt, orange zest and nuts in a medium-sized bowl.
    4. In another bowl, whisk the eggs together with the sugar, melted butter, vanilla extract and almond extract ; stir the wet ingredients into the flour/nut mixture and combine until a sticky dough forms.
    5. Transfer to a floured surface and form the dough into two narrow logs about 30 cm or 12 inches long.
    6. Place the logs onto an ungreased baking sheet and brush with the beaten egg whites.
    7. Bake for about 25 minutes. Remove from the oven and allow to rest for about 6 minutes and then slice into 1 cm or 0.5 inch thick diagonal slices. Return slices to the cookie sheet and bake again for about 15-20 minutes or until golden brown. Allow to cool.

    Read Full Post »

    As we are approaching the end of autumn and the beginning of a long cold winter, I am once again excited about… Halloween! Last year I started telling you about some spooky stories all true, and now I’m going to continue this tradition. Buckle your seat belts ladies and gents.
    JT and I bought our first house north and east of Toronto in a small bedroom community called Stouffville. It was an old farming community from the 1800’s that the city planners linked to Toronto via the GO Train (Government of Ontario Train). The small city was limited only by the fact that it wasn’t on either main water or sewage; our little city’s water was from an arteasesn well. Being limited by the water made Stouffville even more desirable because it constrained mass building which was happening in droves in similar bedroom communities (we used to call it ‘the sea of houses’ because they went on and on). Our subdivision was the last of its kind until Stouffville joined up to city water and sewage in the mid-2000’s, which made it the fastest growing community north of Toronto. But we were gone long before that.
    Although the house was brand new, it always gave me the willies! I only ever spent one night by myself in that house, I would go spend the night with my Mom or in laws when JT travelled. There were creepy noises, creeks and cracks. But the weirdest thing that happened even made skeptic JT agree that the house was strange.
    One evening after dinner I was baking in our little kitchen, JT was watching television in the adjacent family room. I was turned away from the doorway and as I turned to put something in the sink out of the corner of my eye, I saw someone poke their head into the kitchen, they were wearing red. I just figured it was JT seeing if there were any samples to be had. But then a few moments later JT actually came into the kitchen and asked me what I wanted. I said I was just about to ask him the same thing. He said he thought I just poked my head into the family room, he thought I was wearing red too! Except neither of us had red on. Super freaked out, we checked all the doors and windows and they were locked tight. Then we checked all the rooms and closets. We found nothing.
    Even though I wasn’t baking biscotti that night, I think JT and our mystery guest would have enjoyed a few tasters from this recipe.

    ChocAlmondBiscotti_0978

    There is something so civilized about eating a little biscotti with an afternoon espresso, don’t you think?


    Chocolate Almond Biscotti

    Makes 2 logs, about 48 biscotti

    Original recipe from Food Network

    I was drawn to this recipe because it doesn’t have melted butter in it. Not having butter actually makes this cookie very hard and I would recommend not biting down on it unless you have dipped it into something warm.

    Ingredients:

    • 2 c flour
    • 1 c sugar
    • 1/3 c cocoa powder
    • 1 tbsp espresso powder
    • 1 tsp baking soda
    • 1/4 tsp salt
    • 2 eggs
    • 2 egg whites
    • 1 tsp vanilla extract
    • 2/3 c whole almonds, toasted skin on
    • 1/3 c chocolate chips
    • 1 egg white for brushing

    Directions:

    1. Combine flour, sugar, cocoa powder, baking soda and salt in a stand mixer with paddle attachment.
    2. Mix together eggs, egg whites and vanilla extract.
    3. Gradually add egg mixture to flour mixture blending on low speed.
    4. Toss almonds with chocolate chips and fold into the flour mixture until combined.
    5. On a well floured surface roll dough into 2 logs, 2 inches in diameter. They will expand quite a bit.
    6. Place on a greased pan and brush with beaten egg white.
    7. Bake at 350 degrees until light golden brown, about 30-35 minutes.
    8. Allow logs to cool 15 minutes then cut into slices on the bias. Place slices on a greased sheet pan and bake in a 350 degree oven until toasted, about 15-20 minutes. Cool. Store in an airtight container.

    ChocAlmondBiscotti_0976

    Delicate flavours of the almond are accentuated by the rich, creamy chocolate. Isn’t that crema gorgeous?

    Read Full Post »

    We always really luck out with our neighbours. Our first house was in a new, bedroom community north of Toronto and JT and I bought the smallest house snuggled in between two of the larger models in the subdivision. The neighbours to the west of us built our shared fence and didn’t even ask us for a penny for it; we built our fence to the east of us with the neighbour over a weekend culminating with a great big shared BBQ. When we moved back to the city, our northern neighbours held a BBQ for us and invited the entire street so that we could meet everyone; it was wonderful. We shared a driveway with these people and more often than not, when I couldn’t find JT (who should have been doing chores), he was sitting on the neighbour’s back porch having a beer with the neighbour.
    When both our careers moved to the west side of Toronto, we made our third move; there were no parties or BBQs this time around, but there was always Biscotti! Our lovely neighbours on our north side made us delicious biscotti every Christmas. When I started living in our new reality, coffee breaks from the gruelling job search became imperative and I couldn’t help but crave ‘a little something’ with my java and that’s when I remembered our sweet neighbour’s almond biscotti. I’d never made biscotti before so it not only satisfied a craving but it also became a blog post! What more can I ask for?

    Original recipe from Eyetalian Magazine.

    Almond Biscotti (Biscotti Albani)

    Makes about 2 dozen

    Ingredients:

    • 2 c unbleached All Purpose Flour
    • 2 tsp baking powder
    • pinch of salt
    • 3/4  c  almonds
    • 2 eggs
    • 3/4 cup granulated sugar
    • 1/3 but melted butter
    • 2 tsp vanilla extract
    • 1 tsp almond extract
    • 1 1/2 tsp lemon zest
    • 1 lightly beaten egg white

    Directions:

    1. Preheat the oven to 350°F or 180°C.
    2. Combine the flour, baking powder, salt, lemon zest and nuts in a medium-sized bowl.
    3. In another bowl, whisk the eggs together with the sugar, melted butter, vanilla extract and almond extract ; stir the wet ingredients into the flour/nut mixture and combine until a sticky dough forms.
    4. Transfer to a floured surface and form the dough into two logs about 30 cm or 12 inches long (as the dough bakes, it will increase in size, so unlike what I did, I would make the logs much thinner next time).
    5. Place the logs onto an ungreased baking sheet and brush with the beaten egg whites.
    6. Bake for about 25 minutes. Remove from the oven and allow to rest for about 6 minutes and then slice into 1 cm or 0.5 inch thick diagonal slices. Return slices to the cookie sheet and bake again for about 15-20 minutes or until golden brown. Allow to cool.
    7. Serve with a beautiful espresso.

    Biscotti_IMG_0950

    We’ve had a hankering for biscotti these coolish days

    Biscotti_IMG_0948

    A perfect snack when dipped into the aromatic, creamy espresso

    Biscotti_IMG_0947

    Oh go ahead and take one please, I insist!

    Read Full Post »

    My friend Sissi from With a Glass posted this recipe late last month and I knew the moment I saw it that I had to make it. Why you ask? Well, two reasons: 1) almonds and 2) super easy. There I said it. I did not slave for hours baking these tasty treats; but if JT asks, then I’ll throw some flour on my face and spray a little ‘sweat’ on for effect and claim it took hours and hours. 😉

    Sissi went into great detail on why these wonderful, light little cakes are called Financiers (a financial person). I’ll tell you the Reader’s Digest version, but I would urge you to check out Sissi’s blog for the real deal. Apparently first baked by Nuns of the Visitation of Mary in the middle ages and were not called Financiers and had an oval shape. Sadly they were forgotten until 1890 when a Parisian pastry chef revived the recipe. His pastry shop was located in the financial district in Paris and many of his customers were from that sect, so he named these little pastries Financiers. There you have it. I did not have the lovely gold bar shaped rectangles that Sissi had, but I did have some very nice little square muffin tins. I also doubled the recipe so that I would yield 12, but in reality I should have quadrupled it, since I just baked them last night and by this morning, there were only 6 left and I didn’t even have one. We must have mice in the house ;-)!

    Note: My little cakes did not brown as nicely as Sissi’s and that is because I decided to bake them on convection (with a fan); I should have done them traditionally and they would be golden and beautiful. But I’m told they tasted darned good. If you like almonds, this one is for you. For a gluten free version, substitute the regular flour for gluten free flour.

    A pillowy texture with great almond flavour

    Financiers with Ontario Cherries

    Makes 12 5 cm x 5 cm (2″ x 2″) square cakes

    Ingredients:

    • 100 g powdered almonds (Sissi suggested that you run your almond flour through a fine sieve and this worked perfectly for me)
    • 140 g sugar
    • 100 g butter
    • 4 egg whites
    • 2 heaping tbsp flour
    • a pinch of salt
    • 12 large cherries, pitted

    Directions:

    1. Preheat the oven to 375°F (190°C)
    2. Prepare your muffin tins by spraying with non-stick cooking spray.
    3. Prepare the brown butter: heat the butter in a pan on a low heat and observe the milk solids, which will separate at the bottom. When they become light brown (hazelnut colour), put the pan aside (they will continue to brown in the pan).
    4. Combine the egg whites, sugar, almond powder, salt and the flour in a medium sized bowl (I chose a large Pyrex measuring cup so that it’s easy to pour). Gradually whisk in the butter until combined.
    5. Pour the batter into the prepared muffin tins (or other small cakes forms) 2/3 full.
    6. Place one pitted cherry in the centre of each cake.
    7. Bake for about 15 – 20 minutes until golden.
    8. Allow to cool thoroughly before taking out of the muffin tin.

    Read Full Post »

    Just a quick word about the blog…I just posted my 500th post! Woohoo!

    A week or so ago I was intrigued by a recipe at my friend Liz’s blog That Skinny Chick can Bake for Chocolate Meringue Cookies; it’s a meringue cookie for which you need not beat the egg whites. WHAT? How could this be? I had to give it a try! They were EVERY BIT AS GOOD as Liz made them out to be. EVEN BETTER some might say. So chocolatey and chewy with all the texture of a typical meringue cookie without the fuss. Please pop over to Liz’s blog to check out what all the fuss is about this cookie (plus she has some other tasty treats to ogle over).

    So that got me thinking (oh oh, this means trouble), if it worked so well for the chocolate version, I wonder if I can work it with an almond version! So I tried and it worked like a charm! The first time too! Although, I did adjust the recipe a teensy tiny bit. I think next time, I will toast the almonds so that that they give the cookie a bit more interest.

    Chewy, crunchy and very almondy

    Almond “Meringue” Cookie

    Makes about 4 dozen small cookies

    Ingredients:

    • 3 cups confectioners sugar (icing sugar)
    • 1 cup almond flour
    • 1/4 teaspoon salt
    • 2 1/2 cups sliced almonds
    • 4 egg whites (no need to beat like with a traditional meringue)
    • 1 tablespoon almond essence

    Directions:

    1. Preheat oven to 350º F. Line baking sheets with parchment and spray with non-stick cooking spray.
    2. Mix sugar, almond flour and salt in a bowl. Stir in almonds (if you are going to toast the almonds, I would allow them to cool entirely). Add egg whites and almond essence, and mix until just moistened. Do not over-mix batter. The batter should not be runny.
    3. Drop by small teaspoonfuls onto prepared baking sheets. Leave plenty of space between cookies as they spread quite a bit. I got about 12 per sheet in general.
    4. Bake until the bottoms begin to colour, about 12 minutes. Remove the parchment with the cookies from the hot tray and cool briefly before carefully moving to a cooling rack. Cookies are fragile, but I found them easily removed to a cooling rack with a large spatula. Store with parchment between layers.

    If you like almonds, this is the cookie for you!

    Norma, over at Garden to Wok had asked that I photograph my onion and garlic harvest, and I finally got around to it, sorry it’s been so late. I planted my garlic too early last fall and it sprouted and then proceeded to rot over the winter. I was so disappointed this spring when they didn’t sprout again that I pulled them out and planted more garlic and a few green onions. The garlic was planted too late and the heat, lack of rain did not help so they are a bit stunted. But I will persevere this fall and plant garlic again.

    I like the contrast on the Canadian Soapstone counters

    Read Full Post »

    We were invited over to my friend (boss and neighbour) Sunday for dinner and an unveiling of her newly renovated bathroom. It’s quite exciting, she has been wanting to renovate since she bought the house! I must admit, I am a bit jealous as our bathroom needs renovating too (dark green tiles on the WALLS? WHY? WHY? WHY? I could have lived with white, but why dark green?), but we just did all the windows and the landscaping so it will have to wait. Or if I win the lotto.

    It’s Easter Sunday and although we usually spend it with my brother’s family they have opted to head up to their cottage on Lake Rosseau in the Muskokas (you may have heard of it, Goldie Hawn had a place on this lake and Martin Short’s cottage is just down the road from him), Kim kindly invited us for dinner. Since it is Easter, I thought I would make lemony cupcakes. Now I am fully aware of my limitations; I surely do not have the patients for extravagantly decorated desserts as Lorraine, Sawsan and Charlie do (to name a few) so I selected a cupcake which was quite manageable and not overly fussy. I did have a bit of a time with the marshmallows, but that is another story. The cupcake recipe is quite spongy, so if you are looking for a dense cupcake, your in the wrong place. JT liked it well enough that he asked I hold back two (you would think it’s one for me and one for him, but sadly it isn’t, they are both for him!)

    The Peeps turned out OK, but my favourite are the little nests!

    Lemon Almond Cupcakes

    Aren't the little nest adorable?

    Original Recipe from Five Roses Flour Cookbook
    Should make 12 regular muffin tin cupcake

    Ingredients:

    • 3/4 cup all purpose flour
    • 1/2 tsp baking soda
    • 1/2 tsp salt
    • 1/3 cup butter
    • 3/4 cup sugar
    • 1-2 tbsp freshly squeezed lemon juice (depends on how lemony you would like them)
    • 1 1/2 tsp grated lemon rind
    • 1 tsp almond extract
    • 3 egg yolks, beaten lightly
    • 3 egg whites

    Directions:

    1. Pre heat oven to 350°F
    2. Sift flour, baking soda and salt together, set aside
    3. Cream butter gradually adding sugar until light and fluffy; add lemon juice, rind and beaten egg yolks and almond extract.
    4. Add dry ingredients and beat well.
    5. With a clean beater, beat the egg whites until stiff but not dry.
    6. Add about two tablespoons of the beaten egg whites into the batter and beat well (this is to loosen it up a bit).
    7. Fold in the remaining egg whites.
    8. Line your muffin tins with adorable muffin cups; fill cups about 2/3 full (I filled mine too much and only got 10 cupcakes that overflowed the cup a bit).
    9. Bake for 20-25 minutes or until a cake tester comes out clean.
    10. Cool completely on a wire rack before frosting.

    Martha Stewart Marshmallow Frosting

    This frosting is really just like Marshmallows, it even toasts up like real marshmallows. I halved the recipe because I didn’t want a lot left over and I still had a tonne left over. I’m not sure how long it will last, but I filled a zip lock baggy with it and put it in the fridge; I’m hoping to use it for the cupcakes for my family next weekend. I’ll update as soon I as I see how well it lasted.

    Ingredients:

    • 4 large egg whites
    • 1 cup sugar
    • 1/4 teaspoon cream of tartar
    • 1 1/2 tsp almond extract

    Directions:

    1. Place egg whites, sugar, and cream of tartar in the heatproof bowl of an electric mixer, set over a saucepan with simmering water. Whisk constantly until sugar is dissolved and whites are warm to the touch, 3 to 4 minutes.
    2. Transfer bowl to electric mixer fitted with the whisk attachment, and beat, starting on low speed, gradually increasing to high, until stiff, glossy peaks form, 5 to 7 minutes. Add almond extract, and mix until combined. Use immediately (or cover with plastic wrap).

    Me to JT: Hey look, I branded the chargers with the logo. JT to me: Of course you did.

    Oh wait, what’s that you ask? Why yes, it is the place card for the upcoming Titanic Centenary Party next weekend. Angela has gorgeous china that will make us all feel we are dining right on that elegant vessel. We’ll have to remember our manners at the dinner table!

    To decorate the cupcakes, you will need:

    To decorate the cupcakes was quite easy and not at all time consuming. Note: I did one test where I frosted the cupcake and then dipped the icing into the plain coconut, then I torched it with my little crème brulé torch, but the coconut caught fire before I successfully toasted the marshmallow frosting.

    Test #2 was more successful I roasted the coconut in the oven (watch carefully), then I frosted the cupcake and torched the frosting a bit to get that nice golden colour (like fire roasted marshmallows). Then, I dotted a bit more of the frosting on the roasted frosting so that the coconut will stick (it doesn’t stick to the roasted bits), then I dipped them into the oven toasted coconut. I dipped the Peeps bottoms and the eggs into a bit of the frosting so they stick to the nests.

    Read Full Post »

    This is a recipe I picked up about 20 years ago on one of those little recipe cards the Dairy Farmers of Ontario put out. It’s a very attractive butterscotch Blondy with a caramel almond topping and chocolate drizzle, really pretty! Follow the directions verbatim for the nutty topping otherwise you may end up with a hard caramel toping that is impossible to eat without a tooth breaking. Thank you Leanne for the gorgeous plates!

    A Delicious Caramel and Almond Topping

    Butterscotchy Almond Bars

    Yum!

    Ingredients:

    • 1 1/2 cups all purpose flour
    • 2 tsp baking powder
    • 1/2 cup butter
    • 2 cups packed brown sugar
    • 2 eggs
    • 1 1/2 tsp vanilla
    • 2/3 cup of dark chocolate chips, melted

    Directions:

    1. Preheat oven to 350°F.
    2. Combine flour and baking powder, set aside.
    3. Melt butter in a medium pan and blend in sugar.
    4. Remove from heat and beat in eggs (be careful so you don’t get scrambled eggs).
    5. Add vanilla and fold in flour mixture until entirely combined.
    6. Spread evenly in a 13″ x 9″ x 2″ pan that has been well greased.
    7. Bake for 20 minutes.

    Nutty topping:

    • 1/4 cup butter
    • 1/3 cup sugar
    • 1/3 cup corn syrup (or maple syrup or Lyles Golden Syrup)
    • 2 tbsp water
    • 1/4 tsp salt
    • 1 1/2 cups sliced almonds

    Directions:

    1. Melt butter, sugar and corn syrup in a saucepan; add water and salt and boil for 4 minutes.
    2. Stir in the almonds and immediately spread over the cooked batter. Bake for an additional 15 minutes.
    3. Allow the slab to cool completely and cut off the edges (makes for great snacks or a crust or crumble) and drizzle the chocolate on top. Allow the chocolate to set completely before you cut into square or bars.

    Read Full Post »

    You may recall at Maison MK we made Lamb Tajine, our guests Kevin and Barb with whom we are traveling down memory lane don’t care for Lamb; fortunately, the recipe deck from Maison MK included the same Tajine except using beef! Perfect. We decided to cook the dish the same way that we did at Maison MK, in a pressure cooker and only present in the Tajine.

    Beef Tajine

    Ingredients:

    • 1 kg stewing beef in large cubes
    • 50 g almonds with skins on.
    • 50 g prunes
    • 1 tbsp honey
    • pinch of cinnamon
    • 1 onion, chopped
    • 4 cloves garlic, finely minced
    • 1/2 cup cilantro, finely chopped
    • 1/2 cup parsley, finely chopped
    • 1 tsp 5 spices (a Moroccan blend our Chef gave us as a gift)
    • 1 tsp ginger
    • 1 large pinch saffron
    • 1 tsp turmeric (for colour)
    • 1 tsp cinnamon
    • salt and pepper to taste
    • 1-2 tbsp oil
    • 2-4 cups of water

    Directions:

    1. Add the pitted prunes to a small saucepan and cover with water. Bring to a boil and cook for about 8-10 minutes (this is to soften the prunes and not disintegrate them!)
    2. Strain the prunes and return to heat, add the honey and cook until the prunes are glazed and all of the water has evaporated. Set aside.
    3. Add the almonds to a small saucepan and cover with water. Boil for 3 minutes. Strain and cool immediately with cold water. Remove skins; the skins should come off very easily.  Our Chef deep fried the almonds but we roasted them in a 375°F oven for 5-10 minutes.
    4. In a very hot pressure cooker with a bit of oil, brown the meat on all sides, set aside.
    5. Add a bit more of the oil and cook the onions until a little brown. Turn down the heat and add the garlic and stir until you can smell it. Return the beef to the pan.
    6. Add the ginger, saffron and turmeric and 1 cup of water. Stir well. Put the pressure cooker lid on and cook on a medium level flame for 10 minutes.
    7. Give the meat a stir and add 1-2 cups of water and cook with the pressure cooker lid on for another 40 minutes. Check to see how the meat is, after about 40 minutes it should be tender enough that you don’t need a knife to cut it. There should be enough ‘gravy’ to serve with the meat.
    8. Add salt and cinnamon and stir well. Stir in the cilantro and parsley. Serve in a tajine with couscous.

    The beef turned out incredibly well, falling apart, no need for a knife! How do you like the tip of the hat to the 1970’s propping? What is that in the background? A bedspread? or is it curtains? Not sure either — I was just having a little fun!

    Beef Tajine with Prunes and Almonds

    This is the tajine that Hayat gave us as a gift!

    Our new tajine

    Read Full Post »