Feeds:
Posts
Comments

Posts Tagged ‘home-made’

White Minestrone

A Kitcheninspirations original recipe

Makes 2.4 L hearty soup

Ingredients:

  • 15 mL olive oil
  • 1 leek, chopped
  • 1.5 L stock (see notes)
  • 15 g butter
  • 4 stalks celery, diced
  • 2 zucchini, diced
  • 6 medium cremini mushrooms, diced
  • Handful of spinach, roughly chopped
  • 540 mL can of white beans, drained and rinsed
  • 1 g oregano
  • cocktail bocconcini, chopped
  • Basil, chiffonade

Directions:

  1. Heat the olive oil in a stock pot. Add the leeks and wilt. Add the vegetable stock and corn broth and cook the leeks until they are falling apart.
  2. Blitz with your best blender until smooth and creamy. Push through a fine sieve into a large glass measuring cup and set aside, discard the pulp.
  3. Add the butter and melt, add the celery, zucchini and mushrooms and sauté until fork tender. Add the spinach and oregano and cook until the spinach has wilted. Add the white beans
  4. Serve hot in small cups garnished with a sprinkle of the bocconcini and the chiffonade of basil.

Notes:

  • I used a combination of corn broth and vegetable stock which gave the soup a beautiful flavour.

Read Full Post »

We had some dear friends over for a BBQ in late-August and we made homemade Moroccan lamb burgers with a wonderful spiced prune and nut couscous; I needed a Morrocan-style dessert so I chose this wonderful baklava recipe. To be honest, I wasn’t able to differentiate between Middle Eastern baklava and Morrocan baklava but rest assured, they are both delicious. This version has walnuts, pistachios and almonds with a syrup flavoured with orange and lemon rind, cloves and orange blossom water. It should have rose water in it as well, but I am not a fan so I skipped it. 

Metaxas (Moroccan Baklava)

For the original recipe, please click here. Makes about 33 cm x 23 cm 5 cm (12 inches x 9 inches x 2 inches) baking pan of Metaxas.

Ingredients

  • 150 g sugar
  • 150 mL water
  • rind of an orange (no white pith)
  • rind of a lemon (no white pith)
  • 5 whole cloves
  • 60 mL honey
  • 5 mL orange blossom water
  • 100 g walnuts
  • 100 g pistachios
  • 100 g lightly toasted, blanched almonds
  • 100 g sugar
  • 2.5 g ground cinnamon
  • 200 g unsalted butter, melted
  • 10 commercial phyllo dough sheets, cut in half length-wise to fit your pan

Directions:

  1. Combine the sugar, water, both orange and lemon rinds, cloves and cinnamon stick in a medium saucepan. Bring to a slow boil then turn the heat down to simmer, uncovered for 8 minutes. Remove the pan from the heat and strain to remove the spices and rinds. Stir in the honey and orange blossom water. Set aside to cool. See notes to make use of the orange and lemon rind.
  2. Preheat the oven to 300° F and toast the nuts for 12 minutes. Remove from the heat and cool. Increase the oven temperature to 350° F.
  3. In the small bowl of your food processor, combine the cooled nuts, sugar and cinnamon and pulse so they are relatively finely chopped with some larger pieces.
  4. Line a 33 cm x 23 cm 5 cm (12 inches x 9 inches x 2 inches) pan parchment and brush generously with butter.
  5. Begin by lining the bottom of the pan with one sheet of phyllo pastry and brush generously with the melted butter. Continue until you have five sheets stacked. Spread about one-third of the nut mixture over the fifth sheet evenly to the sides. Continue with the next five sheets spreading each sheet generously with the melted butter. Spread another third of the nut mixture over the tenth sheet evenly to the edges. Continue with the next five sheets as before, and spread the fifteenth sheet with the last third of the nut mixture. Finish with the last five sheets of phyllo as before, drizzling any remaining butter over the top of the last sheet.
  6. Bake in a preheated oven at 350° F for 45 minutes. Cover with foil if the top browns too quickly. Remove the pan from the oven and cut immediately. To cut the Metaxas in the traditional diamond pattern, begin by cutting a line from one corner to the opposite corner and repeat to the last corner. Then cut parallel lines to create small diamond slices. Pour the cooled syrup over the hot Metaxas. Allow to stand overnight at room temperature before serving.

Layers of delicious nuts bathed in a luxurious syrup between crunchy sheets of phyllo.

Notes:

  • Remove and separate the orange and lemon rinds and place on a parchment-lined baking sheet. Bake for 10 minutes at 300° F until firm. Eat as a snack.

Read Full Post »

Potato Buns

As 2023 summer came to an end, we started to panic to get in as many BBQs as possible. And what better to BBQ than burgers? A few years ago, we discovered a wonderfully light burger bun made with sweet potatoes! Because who wants a heavy, overpowering bun? I had some leftover mashed potatoes from a recent dinner party and decided to turn them into these buns! What a great way to utilize leftovers! These were plain, ordinary whipped potatoes made with cream and butter and a little salt. They turned into the most delicious, light buns.

You’ll notice that there is also one egg and some melted butter in this recipe that allows the dough to have that gorgeous brioche structure without being heavy. These are truly the best burger buns.

These are sturdy enough to hold a burger with condiments but they are light enough that they won’t fill you up too much

Potato Buns

Makes  about 11 buns, about 65 g each (unbaked) with a tiny “tester” bun left over.

Ingredients:

  • 454 g leftover mashed potatoes
  • 65 g all-purpose flour
  • 125 mL warm water
  • 8 g quick-rising yeast
  • 1 large egg
  • 45 mL unsalted butter, melted
  • 10 mL honey
  • 7 g sea salt, finely ground
  • 240 g bread flour, or slightly more as needed

Egg wash:

  • 1 egg
  • 1 teaspoon water
  • 1 tablespoon sesame seeds, or to taste

Directions:

  1. In a bowl, mix together the 65 g flour, warm water, and yeast, and whisk until smooth.
  2. When the yeast mixture is frothy (about 10 minutes), pour it into the large bowl of your stand mixer fitted with the creamer paddle. Add the mashed potato, the egg, the melted butter, the honey, and the sea salt and mix until well incorporated. Switch the paddle to the kneading hook and add the 240 g of flour in batches. Knead 4 minutes. If the dough is still too sticky, add an additional 30 g of flour and knead until the dough is soft, elastic, and shiny (about 8 minutes). Stop and allow the dough to rest for 15 minutes. Once rested, knead again with the dough hook for an additional 10 minutes.
  3. Turn the dough out into a well-oiled bowl and cover. Allow to rise until double in size (about 1 hour).
  4. After it has doubled in size, turn the dough out onto a lightly floured surface and stretch and fold a few times. Measure out the dough into 10 equal portions (about 65 g each, with one tiny “tester”) and roll each portion into a smooth ball. Allow to rest for 45 minutes or until doubled in size on a covered baking sheet.
  5. Preheat your oven to 400° F. Combine the remaining egg, and water and mix well. Brush each bun with the egg mixture and sprinkle each with sesame seeds.
  6. Bake in a hot oven until golden or when the internal temperature is 200° F (about 15 minutes).

Would you like one or two burgers?

Read Full Post »

At our favourite Chinese Dim Sum place, they serve the most incredible green beans — they have such a lovely crunch to them. I wanted to replicate the recipe at home. I won’t make them often because they are fried, but they are a nice treat once in a while.

Ingredients:

  • French Green Beans, washed, dried and trimmed
  • Peanut oil
  • 1 clove garlic, finely minced
  • Sea salt
  • Sesame seeds

Directions:

  1. Add about 1 cm of high flashpoint oil, like peanut oil to a frying pan or wok. Heat until about 300° F.
  2. In smaller batches, fry the green beans until the skin puckers, set them onto a layer of paper towel to absorb the excess oil. Work through the batches until you have fried all the beans. At this point, you may set them aside until you are ready to serve them.
  3. Pour off most of the oil and fry the garlic lightly (not brown), then return the beans to the hot pan and fry until thoroughly warmed. 
  4. Serve hot garnished with sea salt and sesame seeds.

These are best served fresh but I have had success in storing them for a few days in the fridge and just pan-frying them until warm.

Read Full Post »

We’ve fallen in love with Vietnamese food. Banh Mi in particular. This Vietnamese/French delicacy is packed with flavour that a typical sandwich simply cannot compete with.

The sandwich begins with a fantastic bun that feels light (as in weight) and doesn’t have a rough, mouth tearing crust, but a fine, thin one. The crumb needs to be a little chewy with a hint of sweetness. It bounces back slowly if imprinted with a finger. It needs to contain some wet and heavy fillings so it needs good structure. The bun will make or break this delicious sandwich.

The fillings are equally as important. Our favourite sandwich is lightly smeared with butter on both sides (this waterproofs the spongy bread). Then there’s a good smear of paté, layered with a protein (usually in the form of a cold cut), topped with a sweet and sour carrot/daikon pickle, a decent squirt of mayonnaise, finished with thinly sliced cucumber and a good handful of cilantro. It is a work of art. But don’t admire it too long as it’s best consumed shortly after assembly. Sure, you can get grocery-store banh mi that was assembled earlier that day and wrapped in plastic wrap, but there is no comparison.

We had some roast beef leftover from a Sunday dinner that I sliced thinly for our first foray into this special sandwich. I made my own pickled carrot. The rest is carefully selected, good quality, store-bought ingredients.

Always use sterylized jars with new lid inserts.

Check out your local Vietnamese restaurants for this delicacy, if it’s your first time. But be sure to read the reviews because a bad banh mi will ruin your experience.

Pickled Carrot

Makes about 500 mL pickled carrot

Ingredients:

  • 450 g carrot, peeled, cut into strips 1 mm square and 5 cm long (I had about a half a parsnip so it went right in!)
  • 50 g sugar
  • 30 g sea salt
  • 1 L water
  • 200 mL white vinegar

Directions:

  1. Combine the sugar, salt, water, vinegar, and heat gently to melt the sugar and salt. Pour over the carrot and fill a sterilized mason jar with the carrot and warm liquid.
  2. Allow to cool then refrigerate. May be consumed right away for about a month or so.

Read Full Post »

I have been meaning to create a recipe for a vegetarian Bolognese sauce forever, not because we’re vegetarians but because it’s good to mix it up with a vegetarian meal every so often. JT always asks me what’s for dinner with bated breath so he could look forward to it; when he asked about that day, he looked slightly disappointed. He actually said he was lowering his expectations so he wouldn’t be disappointed because he adores Bolognese and couldn’t imagine a mushroom version would/could be better. Boy was he wrong! Dinner was pretty silent that night, mostly because he couldn’t shovel the food in fast enough! After he finished he said that it was significantly better than he thought it would be. That’s one for the good guys.

If you’re vegetarian or vegan and you’ve been missing the rich, flavourful meaty bolognese, this recipe is for you. The mouth-feel is similar, particularly if you don’t pulverize the mushrooms and walnuts too much. But it’s the slow and low cooking that brings out all of the flavours.

Mushroom Bolognese

Serves 2 generously

Ingredients:

  • 30 mL EVOO
  • 1/2 carrot, finely diced
  • 1/2 celery rib, finely diced
  • 1/2 shallot, finely diced
  • 1 large portobello mushroom cap, finely chopped
  • 2 white mushrooms, finely chopped
  • 50 g walnuts, chopped
  • 125 mL milk or cream
  • 125 mL white wine
  • 10 mL puréed roasted garlic
  • 250 mL passata of San Marzano tomatoes
  • 15 mL tomato paste
  • 15 mL Hungarian Sweet Paprika Paste
  • Pinch of baking soda (see notes)
  • Pinch of sweet smoked paprika
  • Sea salt to taste
  • Pepper to taste
  • Parmigiana

Directions:

  1. Heat the oil in a small, enamel skillet. Add the carrots, celery and shallot and cook until semi-soft.
  2. Add the mushrooms and walnuts and cook until most of the mushroom liquid has evaporated. Add the milk or cream and cook until it has evaporated. Do the same with the wine.
  3. Add the remaining ingredients and stir until well combined. Season with salt and pepper to taste.
  4. Pour into a slow cooker or crockpot and set to high and cook for 2-3 hours.
  5. Serve on al dente (homemade) pasta of choice garnished with freshly grated parmigiana.

Notes:

  • I used portobello and white mushrooms because that is what I had on hand, a mixture of wild mushrooms would be delicious too.
  • Baking soda chemically changes the PH of things, tomatoes become much less acidic (I even throw a pinch into my coffee, it literally changes coffee from acidic to alkaline!), I prefer to use baking soda than to add sugar, which many do.
  • I used a slow cooker because our stove is gas and I prefer not to have an open flame on for a few hours. If you don’t care or have an electric stove, feel free to simmer in the same pot on the stove but do simmer.
  • I’m not sure how non-dairy milk will flavour the dish so if you’re vegan, omit the milk or cream.
  • I used walnuts because I like their meaty texture and earthy flavour, pecans would be a good alternative.
  • I whipped together the pasta using 1 egg and as much flour that it can absorb, then I ran it through the Kitchenaid pasta maker from 1 to 7. Then I hand cut the pasta into irregular widths and lengths. The fresh pasta is really worth the effort, it’s so much lighter than store-bought dry pasta.

Read Full Post »

PlumButter_First

Small Italian plums would have been perfect for those delicious Plum Dumplings my cousin and I made in June, sadly they were not around then. When I spied them at my green grocer a week or so ago, I knew I couldn’t resist so I picked up a small container knowing full well they would be converted to something delicious. While Plum Dumplings are a great childhood memory, they are not the type of thing we eat on a regular basis so I decided on Plum Butter, another thick jam made without the use of pectin. Making jam or Lekvár is so easy, I’m astonished that I hadn’t done it more often in the past; perhaps it was the fear of making more than we could consume! Well, fear not my dear readers because this recipe makes a few small jars so we’ll be in great shape over the cold winter months.

plum butter, plum jam, szilvas lelvár

We enjoyed the delicious plum butter on homemade bread!

Plum Butter

Makes 370 mL thick jam

Ingredients:

  • 630 g plums (a small container)
  • 255 g sugar
  • 60 mL water
  • 1 tsp cinnamon

Directions:

  1. Cut plums in half and remove stone. Put plums into a heavy bottom pan and add water and sugar. Set over medium heat and cook until softened.
  2. Add cinnamon and cook for 30-40 minutes until thickened, testing often with the freezer method.
  3. Once the butter has thickened, pour into sterilized mason jars and follow canning best practice instructions.

Notes:

  • I left the peel in for texture, you may run the mixture through a fine sieve if you prefer no peel.
  • The plums cook down to a very creamy texture so there is no need to purée or press through a food mill, unless you wish to.

plum jam, plum butter, szilvás lekvár

It’s far too chilly to enjoy the plum butter outside now!

Read Full Post »

HomeMadePhyllo_First

Growing up, one of our family favourites was Rétes (Hungarian Strudel) and my dear Mom made Hungarian delicacies like Káposztás Rétes (Savoury Cabbage Strudel) and Túrós Rétes (sweet Cottage Cheese Strudel) and even sometimes but not often, Almás Rétes (Apple Strudel). Mom’s favourite was Káposztás Rétes (Cabbage Strudel) and although as kids we couldn’t stand it, I often find myself craving the savoury flavours of this treat.

My dear Mom always told stories as she was cooking or baking, stories about food, of course! The one story that has resonated with me all these years is that Grandma (Nagymama) made her own Rétes dough! The story goes that Nagymama laid a clean, white sheet on the dining room table, dusted it with flour and stretched and stretched and stretched her homemade dough until you could read newsprint through it. I always imagined an enormous dough (like this) on the table! Mom never made strudel dough that I recall, by the time she was a homemaker, ready made, frozen dough was already available and so much easier than making it yourself. I have used ready made Phyllo more times than I can count on all my fingers and toes, but I’d never made it myself. So you can well imagine why homemade phyllo dough is on my bucket list.

Recently, we invited dear friends to the cottage and I thought homemade Baklava would be a lovely dessert over the weekend and a great excuse to make homemade phyllo dough. I chose Baklava because if the Phyllo didn’t work out as well, the syrup would ‘hide’ its flaws, unlike Rétes. The recipe I followed is here (why reinvent the wheel?) but I can tell you right now that using the pasta maker is not nearly as satisfying as rolling by hand. A marble rolling pin (or something really heavy) would be helpful…I had a rolling pin made by one of my dear Mom’s friends many years ago and I paid the price by bruising my palms and fingers!

Bucket List

Homemade Phyllo Dough

This recipe makes 25 sheets approx. 25 cm x  41 cm (10″ x 16″)

I allowed the dough to rest overnight.

The recipe instructions indicate to take the dough to #9 on the pasta maker (mine is a KitchenAid Stand Mixer with attachments) but I recommend to take it to #8 and do the rest by hand. I also tried rolling it entirely by hand (see photos below – only took about 12 minutes each) and it wasn’t as difficult as I had anticipated but it did bruise my hands badly). Between each number of stretching the dough by pasta machine, keep rubbing a little flour to both sides of the flattened dough, this is how the correct texture is achieved. Believe me, you will know when you feel it.

I also found that rolling the dough through each pass on the pasta maker a couple of times instead of just once results in a finer dough.

Baklava

Yields:

  • 17 (4-sheet) baklavas
  • 11 (2-sheet) baklavas
  • 4 left over sheets (freeze for later).

Ingredients:

  • 21 sheets of phyllo dough
  • 120 g hazelnuts
  • 200 g almonds
  • 2 tbsp brown sugar
  • 1/2 cup sugar
  • 1 tbsp cinnamon
  • 1/8 ground cloves
  • 1/2 cup butter, melted

Directions:

  1. Roast both nuts on 163° C (325° F) for 18 minutes or until most of the skins have separated from the hazelnuts (almonds may or may not separate).
  2. Using a clean tea towel, rub the hot nuts until most of the skins come off. Separate skins from nuts.
  3. Chop both hazelnuts and almonds roughly and combine with sugar, cinnamon and cloves. Set aside.

Syrup Ingredients:

  • 1/2 cup butter
  • 2/3 cup water
  • 1 cup honey
  • 4 tbsp fresh lemon juice

Directions:

  1. Combine  first three ingredients in a small saucepan and bring to a boil. Boil for 2 minutes, remove from heat and add lemon juice. Stir well, set aside.

Baklava assembly:

  1. Preheat the oven to 163° C (325° F).
  2. Divide the dough into 40 g dough portions.
  3. Lightly flour a large, clean surface and roll out to approximately 25 cm x 41 cm or 10″ x 16″ sheets. Continue to roll all of the dough like this until you have rolled it all out. Cover with a lightly damp cloth and a jelly roll pan to protect it from drying out.
  4. Take one sheet of phyllo and lay it length-wise in front of you. Brush generously with the melted butter. Sprinkle 3/4 cup of the nut mixture per sheet. Continue for 2-3 sheets.
  5. Taking the long end, begin to roll the phyllo tightly. Brush the finished roll with melted butter.
  6. Cut into 5 cm or 2.5″ lengths (or smaller equal lengths). Place cut side up into a lightly buttered pan, it doesn’t matter if they touch. Continue until all the dough and nut mixture is exhausted.
  7. Bake for approximately 45-50 minutes.
  8. Allow to cool completely and then pour the syrup over The rolls and allow to rest for a few hours.

Phyllo40g

I found that 40 g made the perfect sheet size.

Phyllo_1

A relatively damp and somewhat elastic dough (not nearly as elastic as pizza dough)

Phyllo_2

You can roll to 9 in your pasta maker, but honestly I did not find rolling by hand difficult.

Phyllo_3

OK. By saying “I did not find the rolling difficult”, what I meant was “not difficult as I was rolling” but the next day, my palms were bruised from the shear pressure I had to put onto the rolling pin. You may wish to roll with a marble rolling pin.

Phyllo_4

For some reason, my Nagymama (grandma) always said the dough has to be thin enough to read a newspaper through it, I figured a nut panel would suffice!

Phyllo_5

This is one of the rolls of Baklava.

Phyllo_6

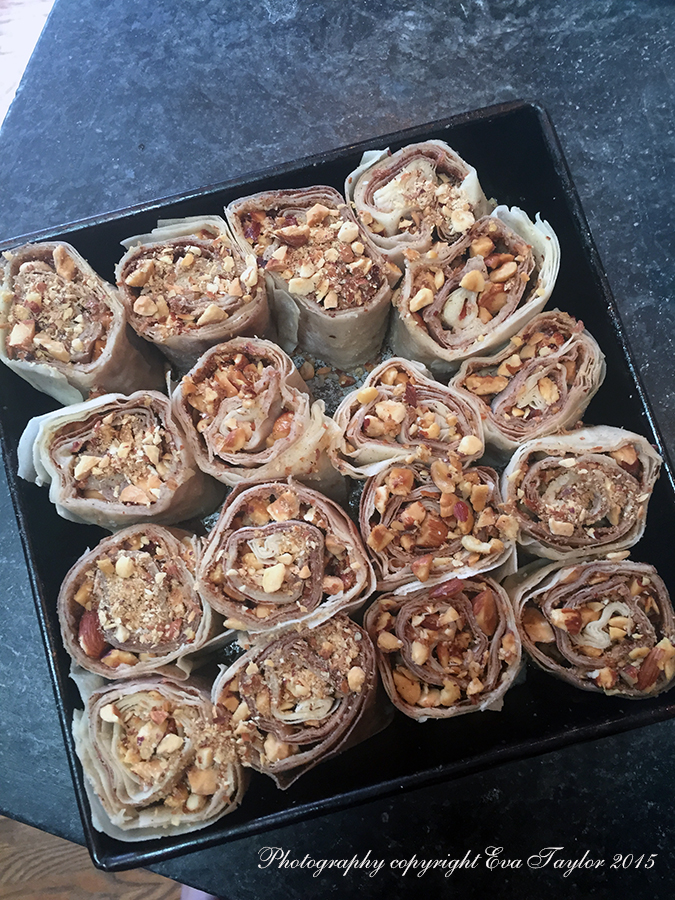
Cut rolls into 16-17 equal lengths and place into a greased pan. It’s OK if they touch because the dough has been greased sufficiently so they won’t stick.

Baklava_Beauty

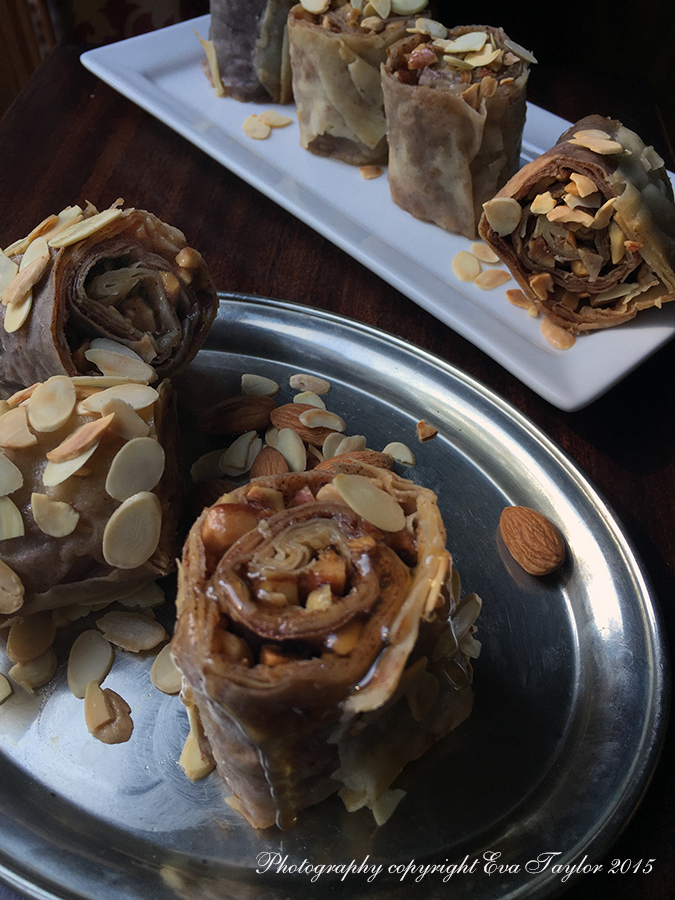
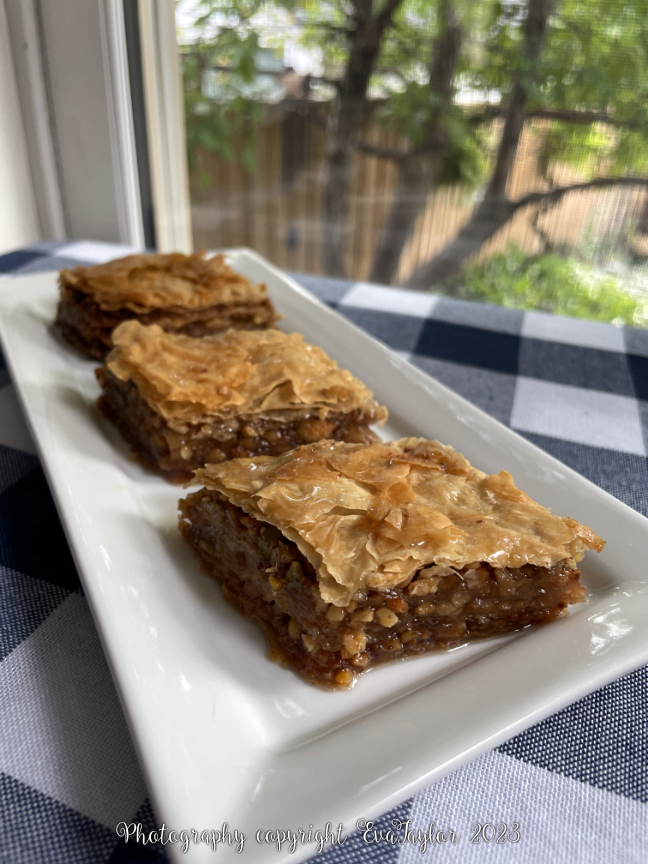
The finished product, with a little extra honey drizzled on. PS, that silver tray comes from my Dad’s side of the family, it’s probably over 100 years old!


Notes:

This is quite a damp dough and it’s a bit sticky but don’t worry, you’ll be stretching and rolling additional flour into it to give it the correct wet/dry ratio.

The dough only becomes difficult to work with (breaking, cracking) when it dries out; make sure you have a lightly damp tea towel to cover any rolls or sheets. I also used a 10″ x 16″ jelly roll pan to cover it.

In hindsight, I should have used only 2 or 3 (not 4) sheets per roll. Next time I think I’ll sprinkle the nut mixture on each sheet and not just the end — I have adjusted the recipe above.

I was 100% sure I would not be making this recipe again because it’s so inexpensive to buy ready made, but in reviewing the ingredient list I may have to resort to making it myself as there is one or two ingredients that gross me out.

Read Full Post »

This is an absolute favourite of our household, but to be honest the gravy is usually laden with butter and ghee which is really bad for you, so I prefer to make my own so that it’s healthier. The Makhani gravy is from this recipe, but as I mentioned in the menu post, I had to add a little sweetness (I used Agave Nectar) to counter the very acidic tomatoes — I suspect that the full butter and cream of the original recipe would do the same, so if you choose to go full fat on this baby, omit the agave. There I said it.

The paneer is a soft unripened cheese made similarly to Ricotta, but instead of leaving it loose, you press it into a rectangular shape to be cut into cubes. Easy.

A delicious, rich tasting tomato gravy with gently firm paneer

Paneer Makhani

This is the original recipe I just doubled the quantity

Serves 4-6 as a part of several dishes

Ingredients:

  • 4 liter Fresh whole milk
  • 4-6 tbsp lemon juice

Directions:

  1. Heat the milk in the deep and heavy bottom pan at medium heat (this is really important, otherwise you will need to spend at least a half hour trying to clean the burnt milk off the bottom). Allow it come to a gentle boil and stay there for a minute. Make sure the milk is not vigorously boiling (also important, see note above). If it does, immediately reduce the heat and bring the milk back to gentle boil. But if you do burn your enamel pan, I have a great tip at the end.
  2. Add two tablespoons of lemon juice and quickly stir it in (because I had doubled the recipe, it took a bit longer to develop). At this point, you will start to see small curdles in the milk but no whey. Add another tablespoon or two of juice and again stir it in. The curdles will increase and you will slowly begin to see the yellowish whey. Add the last tablespoon of juice and with this, you should be able to see a clear yellowish whey separating from the curdles, switch of the gas immediately at this point. Depending on the acidity of the juice, the amount of juice you require may differ. Start with one tablespoon at a time till you achieve the results.
  3. You could save the whey, and if you do: Line another pan with double layered cheesecloth. Make sure the cheesecloth is long enough to be bundled up and hanged later. Run the whey through the cloth which will collect all the curdles. Set the whey aside.
  4. Wash the curdles in the cheese cloth, by running it through cold water to remove the lemon taste.
  5. Tie up the cheesecloth in a tight bundle and let it drain for about 30 minutes. Then place weight on the cheese to get it to be flatter and drain out extra moisture. I wanted a nice block of cheese so I pressed the contents of the cheese cloth into a square cake pan about 20 cm (8 inch). Then I took the still wrapped cheese and placed it between two cutting boards and put a heavy pot on top for 1-2 hours.You don’t want to add too much weight for too long as it can drain out way too much moisture from the cheese making it hard and crumbly. Your cheese should have a slightly elastic texture so when you lightly press your finger into it, it will bounce back.
  6. Wrap it and store it in the fridge for up to a week.
  7. Reheat very slowly in the microwave for 30 second spurts until too warm to touch. Add to the makhani gravy at the last minute (I didn’t want my paneer to fall apart).

TIP: if you happen to burn the milk to the bottom of your pan, try this handy tip, cover burnt area with a good thick layer of table salt, add a bit of water and heat but don’t hard boil. Using a silicon scraper, see if it comes off. If it doesn’t, do the same but instead of water, use lemon juice and this time bring to a soft boil. Using a silicon scraper, peel away the burnt layer. Voilà!

Read Full Post »

We had good friends over for dinner on Saturday night and I wanted to make a light, healthy dinner which we could all feel good about. The couple recently down-sized about 22.6 kg (50lbs) combined total weight and I sure did not want to make them feel bad with a heavy meal. Plus it’s been ridiculously hot in Toronto, with high humidity so a heavy meal isn’t even appealing. I also planned the meal so that we had little kitchen time, other than plating and serving. We served family style to allow each individual to have as much or as little as desired.

Over the following few days, I will document the recipes that I served; here is the menu to give you a little taste:

Cocktails: Home made Ginger Ale (recipe below. I was inspired by The Cook’s Sister with this recipe)

Hors D’œuvres: Bite-sized Caprese Salad with EVOO and Himalayan pink salt.

Appetizer: Chilled Roasted Red Pepper and Tomato Soup with Warm Sesame Encrusted Goats Cheese Balls (Barb at Profiteroles and Ponytails gave me the idea for this recipe, but I did the ol’ switcheroo and made the soup cold and the balls warm)(insert all goats cheese ball jokes here 😉 )

Intermisso: Lemongrass and Thai Basil Granita

Main: Susur Lee’s Singapore Slaw (aka 19 ingredients slaw) with Thai Marinated BBQ Steak (steak prepared as per Lorraine at Not Quite Nigella)

Dessert: Armenian Nutmeg Cake with Hazelnut Frozen Yogurt and Caramel Drizzle (the Armenian Nutmeg Cake was reinvented from a previous post)

Late night snack: Fresh Ontario Strawberries and Cantaloupe bites

Our guests last week were on a sabbatical from drinking alcohol so I wanted to make a special cocktail for the evening, I came across this recipe from The Cook’s Sister recently and bookmarked it for the occasion. I changed it up only to reflect the time I had to spend on the recipe, otherwise it was pretty similar. The ginger was strong enough to be refreshing and the added sugar made it just sweet enough to cut the heat from using fresh ginger. I really enjoyed it, it was a refreshing summer beverage. Of course, you can add booze to it to make it that much more interesting: gin, vodka, amber rum or whiskey seem to be preferred choices to add to ginger ale on the net.

A refreshing cocktail that aids in digestion! What more could you want?

Home made Ginger Ale

Original recipe can be found here

Ingredients:

  • 2 cups water
  • 1/4 cup freshly grated ginger (you will notice this is significantly less than the original recipe, but because it’s grated, it seems to infuse the water with enough flavour)
  • 2-4 tbsp Demerara sugar
  • 1 liter San Pelegrino (this is a lightly carbonated natural spring water)
  • 1 lime, cut into eights

Directions:

  1. To prepare the syrup, place the water, ginger, sugar into a small saucepan and bring to a boil. I allowed it to boil for about 10 minutes to concentrate the flavours and reduce a bit.
  2. Remove from heat, cover with a lid and allow to cool completely. Refrigerate over night.
  3. When ready to serve, strain the ginger bits out of the syrup, pressing as much of the ginger juice out as possible.
  4. To serve, add 4 tbsp (or to taste) of the syrup to each glass mixing in the San Pelegrino. Serve with lime wedges and garnish with mint. Individuals can add as much freshly squeezed lime juice as desired.
  5. Cheers!

Read Full Post »

My latest endeavour was the home made Ricotta from my BB (blogging buddy) John, and it was a huge success; even so, we had left-overs. We’re having our nephew Brian over for Sunday dinner and I thought it would work perfectly in a little hors d’œuvres of whole wheat-flax pan cakes with ricotta and chives and a little lightly pan fried chicken and turkey, spinach feta sausage (another left over from our little brunch on Saturday).

Pass the canapés, please.

Ricotta and Sausage Pancakes

Makes about 14 little pan cakes

Ingredients:

  • 1/2 cup Home-made ricotta (or store bought, but the home made is so darn easy)
  • 1 tbsp finely chopped chives
  • 14 sausage slices, very thinly sliced
  • 3 tbsp whole wheat flour
  • 2 tbsp ground flax seeds
  • 1/2 cup soda water
  • 3 tbsp egg whites
  • Pinch of salt

Directions:

  1. Mix the chives into the ricotta and set aside.
  2. Mix well together WW flour, flax seeds, egg whites, soda and salt. If it’s really runny, set aside for 2-5 minutes (you want a slightly thicker mixture than crèpe batter).
  3. Heat a large cast iron pan and spray lightly with a non-stick cooking spray.
  4. Drop small spoonfuls of the batter onto the hot pan so that they each form a 5cm or 2 inch little round. Cook both sides until golden. Repeat until the mixture has been all used up.
  5. In the same hot pan, spray another little squirt of non-stick cooking spray and sauté each side of the thinly sliced sausage until golden and slightly curled.
  6. Top each little pan cake with a dollop of the home-made ricotta and one slice of the sausage.
  7. Enjoy with a martini.

Canapé Anyone?

And a new friend…

Meet Brown Squirrel.

As many of you already know, my favourite pet in the whole world was my dearest little bunny, Dustie. Sadly she passed away about 7 years ago at the age of 10, and the impact of her friendship has prevented me from trying to find another pet, any pet. Until I met brown squirrel. The strange thing about brown squirrel is that she is the same golden colouring as my Dustie, and that this type of colouring on squirrels in the Toronto area is not common (we have mainly black, some grey and a couple of white squirrels). Brown squirrel is not really a pet, but she has become a ‘friend’. I wonder if she’s on FB?

Now it’s not just the colouring on Brown Squirrel that makes her special, she is a lot tamer than the other squirrels in the hood. She will come when she is called (she’ll even cross the road when we call out to her; she doesn’t look both ways (she IS a squirrel) but we do!). She responds to munching noises (my Dustie did that too!). She’ll even come right up to you and eat from your hand (although I wouldn’t recommend it, after all, she is still a wild animal). We always have to remember to close the front door because she would follow you in (never happened but I sure wouldn’t want to chance it). Brown Squirrel comes to the house every morning for her treats. I snapped this photo from the dining room window through the screen (hence the weird overall colour); normally we wouldn’t feed her on our front porch, but it was darn chilly at 7:30 that morning, and we only had PJs on!

Read Full Post »

Hello everyone! Christmas Baking is over for the time being and I am quite happy with the results; there is a lovely variety of old and new favourites and I am excited about putting my gift boxes together for our friends and family. I still have a dessert to bake for Christmas Eve which we usually enjoy at my brother’s house (it will likely be a bûche de noël because that is what my family has done for years, and I just saw Charles’ at Five Euro Food which made me very excited to make it again!).

Here is a little synopsis of my Christmas baking over the years (not that I only started in 2007, but that is when I started to blog!).

In 2007 we had our Renovation party so I didn’t specifically do the cookie gift boxes because we hosted about 50 friends and family at our renovation unveiling party and I catered the entire event (I had serving help which was great!).

I designed these invitations for our Renovation Unveiling Party in 2007

In 2008 I made 11 items but I didn’t take a photo of them 😦

In 2009 I made only 9 items but I bought lovely ceramic casserole dishes to package the cookies in as gifts.

In 2010 JT had a health setback and I just didn’t do much baking at all (he’s ALL GOOD now).

And here we are in 2011 and my list of cookies with links are:

I was able to find these really cute cookie boxes at the dollar store! I line them with parchment paper.

Holy Bat Man, that's a lot of cookies!

I package each cookie box in a zip-lock bag and freeze it until we see the people that I prepared it for!

Your cookie box is ready, when can you come over to pick them up?

I wanted to mention some of my blogging friends cookie recipes which I am certain are equally, if not better tasting then my own.

Katherine at Rufus’ Food and Spirits Guide has mastered the perfect Macaroon. And check out Ann’s Cooking Healthy for Me Coconut Macaroons that she baked from her well loved Better Home New Cook Book. And then of course, there is Barb’s Coconut Pyramids at Profiteroles and Ponytails which are just so darn adorable. And pop by Jessica’s site Kitchenbelleicious for a truly lovely Espresso Crinkle Cookie that just looks like it would melt in your mouth. And then there is fellow Torontonian Divya at Flavour Fiesta’s healthier Choc Coco Truffles with Cherries. There are so many great cookie recipes out there and so little time to try them all — that’s why I love reading all the wonderful blogs, I can try ALL of your cookies in a virtual sense and not gain an ounce! The beauty of technology.

How many cookies did you bake this year, and did you bake any special needs cookies?

Read Full Post »