Feeds:
Posts
Comments

Posts Tagged ‘Kale’

KaleWrappedMiniQuiche_First

Happy Holiday! Today is a civic holiday here in Ontario and we’re enjoying it!

graphics-snoopy-743815

In effort of trying to eat healthier, I decided to cook out of the lovely new cookbook by Tosca Reno, The Eat-Clean Diet. Of course, I wouldn’t be doing the blog justice if I just copied the recipes so I’ve changed them up a bit so if you’re looking for the exact recipe, you’ll have to buy the book!

This is a delightful combination of flavours and textures and the kale works beautifully as a wrapper! I’m definitely going to make this one again, although I can’t help but think how tasty bacon would be in it!

KaleWrappedMiniQuiche

The kale within the quiche softens up beautifully but the kale sticking out of the quiche crisps up like kale chips!

Kale-Wrapped Mini Quiches

Makes 6 mini-quiches. Original recipe from Tosca Reno’s The Eat-Clean Diet, Vegetarian Cookbook

Ingredients:

  • 12 large kale leaves, stems and ribs removed.
  • 1 small sweet potato, peeled and cubed
  • 1 cup cauliflower florets
  • 3 shallots, thinly sliced
  • 1 tsp olive oil
  • 2 eggs, large
  • 5 egg whites
  • 1 cup 1% milk
  • 2 tbsp Cilantro pesto (see notes)

Directions:

  1. Preheat oven to 375° F and roast the sweet potato, cauliflower and shallots for 30 minutes or until cooked through.
  2. Lightly spray a 6 tin large muffin pan with olive oil and line each cavity with 2 kale leaves, having the curly bits stick out a little over the top. Spray very lightly with olive oil.
  3. Into each kale lined cup, divide the roasted sweet potato, shallots and cauliflower evenly.
  4. Meanwhile, combine the eggs, egg whites and milk with the Cilantro Pesto (recipe found on page 52) and whisk well.
  5. Pour the egg mixture into each muffin cup evenly. Bake at 375° for 30 minutes. If the kale begins to darken early, cover with parchment and then foil to protect it.
  6. Allow the quiches to sit for 5 minutes before removing from the muffin cups. I used a silicon muffin pan like this one, which made plating very easy.

Notes:

  • Tosca roasts the kale in a 350° F oven first to soften it. I experimented  without this step and it worked just fine (it was 30° C 86° F With high humidity and I didn’t want the oven on more than I had to).
  • If you don’t like cilantro, use regular pesto but the nutrition will be different.
  • The cilantro pesto contains only two tablespoons of oil and no cheese making this by far, the healthiest pesto on this blog.

KaleWrappedQuiche_Nut

Kale Wrapped Mini Quiches, Serving size is 1 quiche

CilantroPesto_Nut

Cilantro Pesto, Makes 1 cup and this is for 2 tablespoons


Read Full Post »


KaleChips_first

A few years ago we purchased a reasonably priced (read cheap) awning for our cocktail patio; I never loved the fabric, it was a pinkish/beige stripe that weathered into a more horrible pinkish colour over the years, but it was about 1/10th the price of one of those swanky awnings that you can order with custom fabric, so I compromised. It wasn’t bad enough that the colour sucked when it was new, it sucked even more over the years and the birds loved to bathe in the water that collected in the divot when it was closed and they also loved to peck little bugs that drowned. Sadly, their pecking caused many tears and eventually the awning looked so tattered and torn that we hadn’t unrolled it in two years!

Old Awning

This was the last time we unrolled the awning at my benchmark birthday party a couple of years ago. That’s my lovely SIL, Wendy. The colour just gets better and better.

Fast forward to 2015 and my cousin and his lovely wife are coming for a visit from Europe in June. What is better than an actual deadline to get those nagging projects completed? So we are in fix it mode! The list is long.

Last year, I priced replacing the fabric with an awning company and discovered that it’s still out of reach (I’d rather spend the cash on a vacation than an awning!) so I checked Youtube and found a really good video on how to remove and replace the awning fabric (click here for the video) and even though our awning is a different manufacturer, the basics are the same. So off I went to purchase 11 m or 12 yards of fabric! And specialty thread (nylon in case you are interested), a specialty sewing machine foot and of course heavy duty leather sewing machine needles! If you’re interested, I can post instructions on how to sew the awning, but it’s a cooking blog so I won’t bore you with it now.

The worst part of sewing this type of project is finding the space to accommodate the enormous volume of fabric (3.2 m x 3.4 m or 125″ x 135″ finished size) so I ended up sewing it on the dining room table and pinning and cutting on the wood floors in our bedroom. Sewing on the dining room table and that I can see the awning from my kitchen window is my reason for using this post in Celia’s In My Kitchen series.

PinningAwning

I had to fold the fabric in half because that’s all the room I had!

It didn’t take me long to make the awning but I had to wait 3 days to install it because it was raining and hailing (in April)! The installation went smoothly but you really do need two people to help feed the ends into the hardware. JT was great and we got it working in less than an hour! Now we wait for summer. Hopefully!

Awning3

This is the view from my kitchen window. I guess I could have opened the window and removed the screen for the pic.

Awning1

We chose a light grey fabric.

Awning2

The awning actually extends all the way to the far end of the deck but it was too windy and I didn’t want to risk issues.

A couple of weekends ago, we had amazing weather and JT and I enjoyed lunch on the patio. I had a lovely bunch of fresh kale and I wanted to try something different so I baked Kale Chips! I know it’s been done to death, but these things were actually really tasty and if you’re looking for a healthy snack, I would suggest you try and bake some of these. I used Charles’ recipe which you can find here, the only thing I did differently is that I dressed the chips in some grated parmesan and sea salt. They didn’t last long.

KaleChips3

The olive oil gives them a gorgeous sheen and helps maintain the bright green colour.

Kale Chips

Ingredients:

  • 400 g Curly Kale
  • 2 tbsps Olive Oil
  • 1 tsp Sea Salt
  • 1/2 cup fine grated Parmesan Cheese

Directions:

  1. Pre heat the oven to 93° C (200°F )(I used my convection (fan) setting).
  2. Wash kale and remove thick ribs. Cut into bite-sized pieces keeping in mind that they will shrink to about half their raw size.
  3. Drizzle olive oil over kale and toss to coat evenly. I gave them a quick, light massage.
  4. Spread on a cookie sheet so they are on one layer and not over lapping. Bake for 15-20 minutes tossing occasionally until crisp. Sprinkle cheese over hot kale and toss to coat.
  5. Serve immediately.
KaleChips2

They were crispy and very tasty.

Read Full Post »

Hello loyal readers, I do hope you are all well and adjusting to climate changes you are  experiencing (spring-ish for us Northern Hemispherers, fall-ish for those down under!). Cottage season has begun for Canadians, starting with what we call the May 2-4 (two-four) weekend which happened to be last weekend, even though it wasn’t May 24rth! Therefore list season has begun. Since last Saturday, I have made no less than 5 lists believe it or not. Once it goes on the list, I can safely delete it from my memory, so don’t bother asking me about it, check the list! Why 5? We needed a menu plan for last weekend: List 1, then there is the shopping list for said menu plan, List 2. Then we get to the cottage and almost as soon as the front door is opened for the first time of the season, a third list has begun: List 3, things we need to bring/buy for the next time. And then there is the next time, List 4 is the new menu plan and then List 5 the new shopping list and of course, list 6 (to come) is the list of things we need to bring/buy for the next time around! Such fun.

Sunset2014_2779

Being the suck that I am, this was taken in the screened in porch because the bugs were BRUTAL. Believe it or not, even JT put on a bug shirt for the first time EVER.

You also may have realized that I failed to post on Thursday, and sadly for the time being I’ve decided to reduce my blog posts to once per week, I hope you don’t mind. It’s still a joy for me and I want to keep it that way; plus my marketing freelance gig writing for social media has upped the anti and I’ve been contracted until September, god forbid I run out of words. Good news is that it’s steady, bad news is that I’m using up my Data plan like it was going out of style. But I’m not complaining, I’m loving the projects and the people I’m working with so all is good in the new reality!

Now you have probably been wondering why there hasn’t been an Ebelskiver post in a while. I know, I asked myself the same question…and if you’re interested in the other posts, please click here, and here and here. Remember that I have my dear friend Barb (from Profiteroles and Ponytails — she’s on a bit of a break, so busy!) to thank for that gorgeous cast iron Ebelskiver pan, so I can’t let it go unused.

BaconEbelskivers_2664

I’m getting much better at making perfectly spherical Ebelskivers.

Bacon, Feta, Kale and Onion Ebelskivers with a Yogurt a Dill Sauce

Makes about 17 Ebelskivers (I used 5 Ebelskivers for breakfast and froze the remainder for another time — guess who had 3)

Filling Ingredients:

  • 140 g onions
  • 60 g bacon (should have been 80!)
  • 60 g feta
  • 100 g kale (or mixed spinach and kale)
  • 1 tsp lemon zest
  • 1 tbsp EVOO

Filling Directions:

  1. Heat the EVOO and cook the bacon until crispy. Set aside. If there is more than one teaspoon of bacon grease left in the pan, remove excess (or not, it’s your arteries!). Cook the onions until soft and translucent, add the greens and wilt. Set aside to cool completely. In the meantime make the batter.

Basic Ebelskiver Batter Ingredients:

  • 1 1/2 cups all-purpose flour
  • 1 teaspoon sugar
  • 1/2 teaspoon baking powder
  • 2 large eggs, separated
  • 1 cup milk
  • 1 tbsp unsalted butter, melted and slightly cooled
  • 1/2 tsp salt

Directions:

  1. In a large bowl, whisk together the flour, sugar, baking powder and salt, set aside.
  2. In a small bowl, lightly whisk the egg yolk until thick and pale, then whisk in the milk and melted butter. Add the yolk mixture to the flour mixture and, using a wooden spoon, stir until well blended. The batter will be lumpy.
  3. In a clean bowl, using an electric mixer on high speed, beat the egg whites until stiff, but not dry, peaks form. Using a spatula, fold about one-third of the egg whites into the batter to lighten it, then fold in the rest just until no white streaks remain.
  4. Fold the cooled wilted greens, onions, bacon and crumbled feta and mix thoroughly.

Ebelskiver cooking directions:

  1. Preheat oven to 325°F.
  2. Spray the ebelskiver pan with a good squirt of non-stick spray and place over medium heat. Add about 1/4 cup batter to each round as soon as the pan is quite hot. Maintain the heat at medium, you don’t want to burn the ebelskiver edges before the insides get a chance to cook.
  3. Cook until the bottoms of the pancakes are lightly browned and crisp, 3-5 minutes. Using a fork, gently push the ebelskiver until it entirely turns around in the pan and the uncooked portion is now facing the bottom.
  4. Transfer the finished spheres to a platter and finish baking in the oven while you repeat to finish the batter (about 15-20 minutes).

Yogurt Dill Sauce

Enough for two servings

Ingredients:

  • 1 cup non-fat yogurt, well stirred
  • 1 tsp butter
  • 1 tbsp flour
  • 2 tbsp dill

Directions:

  1. In a small sauce pan melt the butter and add the flour. Cook the flour but don’t brown it. Add the yogurt and stir.
  2. Remove from heat and stir in the dill.
  3. Serve warm over the Ebelskivers.
BaconEbelskivers_2667

I was surprised and thrilled that the feta stayed whole and did not melt into the batter, it was so tasty.

Read Full Post »

Happy New Year! Are you doing anything special? JT and I usually go out to our favourite French restaurant but this year we’re having good friends come over — we’ll be snacking tapas-style all evening. I’m really looking forward to our intimate New Year this year.

Although I didn’t make this soup for New Years Eve, I did make it several weeks ago when I needed to use up some kale and wanted a hearty and satisfying lunch. I adore soup, in fact I often say that I love it so much, Soup could be my middle name. JT is not as fond of soup as I am but he still eats without griping too much. My dear friend Kelly (Inspired Edibles) made a gorgeous and colourful version here and although I am posting it a few weeks after her recipe went live, I actually made it last month. The  Original recipe is from Gourmet, 2003, and contained chestnuts but I wanted to keep my version is little lighter in calories so I omitted the chestnuts, but I would encourage you to add them, they would definitely take this warming soup to the next level.

KaleNavyBeanSoup_1315

The kale retains its texture and the beans are creamy in contrast

Kale and Navy Bean Soup

Serves 4

Ingredients:

  • 1/2 pound dried white beans such as cannellini, Great Northern, or navy (about 1 1/4 cups), picked over and rinsed
  • 1/4 pound thinly sliced pancetta, chopped
  • 1 large onion, chopped
  • 3 garlic cloves, finely chopped
  • 3 tablespoons extra-virgin olive oil
  • 3 1/2 cups low-sodium chicken broth (28 fluid ounces)
  • 2 cups water
  • 1 piece Parmigiano-Reggiano rind (roughly 3 by 2 by 1/2 inch)
  • 1 1/2 teaspoons salt
  • 1/4 teaspoon black pepper
  • 1/2 pound cavolo nero or regular green kale, stems and centre ribs discarded and leaves cut into bite-sized pieces
  • 2 teaspoons chopped fresh thyme
  • Optional Garnish: Parmigiano-Reggiano shavings

Directions:

  1. Soak beans overnight by covering them in about two inches of water. Or you can cook the beans relatively quickly in a pressure cooker or make this soup in a slow cooker. Drain well.
  2. Sauté onion and garlic in a pinch of oil large heavy pot over moderate heat. Add the kale and sauté for 5 additional minutes. Add the beans, broth, water, cheese rind, salt and pepper and simmer uncovered, until beans are tender, 45 minutes to 1 hour (or in a slow cooker on high for 4 hours). Discard or eat the cheese rind.
KaleNavyBeanSoup_1314

A deliciously warming soup

Tip:

I usually keep all my parmesan rinds in a zip lock bag in the freezer and use them in various stews and soups because they add so much flavour. I always eat them and never discard them as the instructions indicate, they are really very tasty and I know my friend Sissi (With a Glass) would adore the texture.

Read Full Post »

Hello everyone! I am so sorry I was not able to post last week but I was booked the entire week for food styling assisting! I can’t believe it has taken off so well; of course, I take nothing for granted and keep pounding the pavement for my next job. Many of you have been interested in what this new position for me entails, well let me tell you. I met with the food stylist on Monday morning and we went over the recipes and shopping list. Of course, being the type of person I am, I had asked him to send me the list the week before because I wanted to prepare myself and practice if need be. Well, there was a need, BIG TIME! Of all the things to be prepping that week was CANDY! Now I’ve had some experience with candy making, but few and far between. I know some of the basic rules but I haven’t made a lot of candy. But the prepping wasn’t all of it, there was shopping to be done.

I had touched on shopping in a previous post so I’ll keep it brief this time; it’s gruelling. It’s about buying the most beautiful fruit/vegetable when it isn’t even in season! Next time you’re at the market, take a look at off season fruits/vegetables, the pickings are slim and what’s there isn’t even pretty. So it’s dragging your butt all over the city to buy the perfect beet is exhausting. But I do love grocery stores, so it’s not as bad as it sounds.

The shoot last week was on location, which for this particular situation meant it was at a home. Sounds like fun? Think again. The downtown home is chosen for the shot, and nothing else, particularly not the kitchen. Small, unknown (appliances); it’s a challenge. And then there was the parking issue — there was NO parking, hence the $30 ticket kindly left on my windshield by some thoughtful parking police person (thank you by the way)! But it went well and we’ll all see the results next year.

I also wanted to thank you for your kind wishes and your encouragement, it’s not easy starting out something new, but to do it at my age is even scarier; your encouragement and kind words have been paramount in my confidence and I can’t thank you enough. I would also like to thank you for not ostracizing me for failing to comment recently, I’ve been swamped and I’m just trying to get my balance back. I’m reading your blogs, I just haven’t been able to comment on my phone (usually reading in the middle of the night!), so I thank you.

Now back to the usual programming…

We were finally able to get into Gusto, a very popular restaurant on Portland in Toronto, but just. We decided that waiting in line for dinner was not our bag so we thought lunch might be more forgiving. We scored the last table on a recent visit with my niece (a newly graduated lawyer) and her botanist beau! You may recall that I got a bit ahead of myself and made their famous Kale Salad site unseen or palate tested! It turned out that I had it pretty close but their version was a tad sweeter — I have modified my recipe.

The restaurant itself is a very cool, contemporary warehouse design. Lots of super hard surfaces makes it very noisy and I suspect I wouldn’t like it as well at night because it was reasonably noisy at brunch when there isn’t as much boozing. Our server was friendly and attentive without being over bearing and was knowledgeable about the food. The courses were brought out with reasonable timing which made it an event instead of a rushed meal that some places offer. There was absolutely no attempt to rush us from our table and the place was packed.

I was happy to sees that the salad was served in a similar Christmas tree shape that I served our's in as so many of you commented. :-)

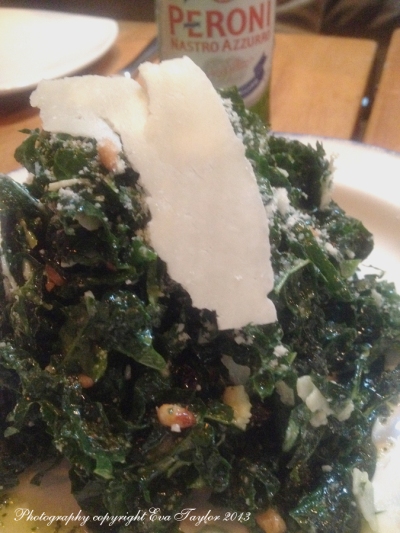
I was happy to see that the salad was served in a similar Christmas tree shape that I served our’s in as so many of you commented. 🙂

I thought I had taken photos of the other dishes we all ordered, but sadly they are no where to be found so I shall review only the Kale Salad which we ordered for the table and the Popilo which was my lunch dish.

The Kavolo Nero ($13.95)  was macerated with lemon juice and honey decorated with toasted pine nuts (the short Italian kind), Pecorino cheese and currents. Since I’ve tasted the real thing I have increased the honey a touch in my recipe and have switched up the currents for either dried cranberries or dried sour cherries. Parmesan can also be substituted for the Pecornino.

GustoPolipo_1175

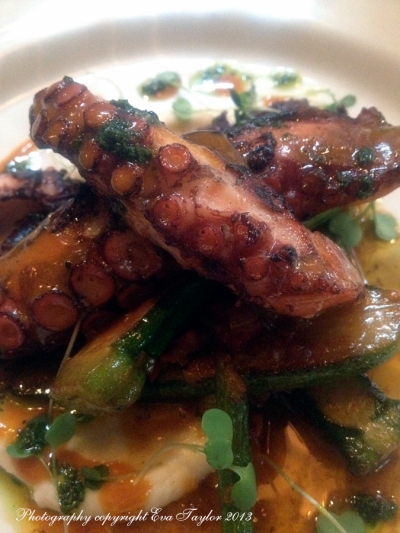
Tender Grilled Octapus

The Polipo ($14.50) was a char-grilled octopus with an olive tapinade and a celery root cream with baby zucchini, chorizo all harmonized with a delightful sherry smoked paprika vinaigrette. It was wonderful and my mouth is still watering as I type this review. It was a decent portion as were all the other dishes at our table.

Overall rating of Gusto 101 (in my opinion): Decor 3.5/5, service 4/5, food 4/5, Value 4/5, Noise: 1.75/5 (1 being very noisy, and 5 being very quiet).

Disclaimer: We purchased our meals for full price and my opinions just that, my opinions.

Gusto 101

101 Portland Street, Toronto
eat@gusto101.com
General inquiries: 416-504-9669

Mon: 11:30 am – 10:00 pm
Tue: 11:30 am – 11:00 pm
Wed: 11:30 am – 11:00 pm
Thu: 11:30 am – 1:00 am
Fri: 11:30 am – 1:00 am
Sat: 11:00 am – 1:00 am
Sun: 11:00 am – 10:00 pm

Read Full Post »

Has this ever happened to you: you hear about something for the first time and then you keep hearing about it again and again? It’s happened to me recently and it’s the absolute, lip smacking, deliciously tantalizing Kale Salad by renowned chef and restauranteur of Gusto 101, Daniel Mezzolo. My friend Kim (old boss, neighbour) mentioned this salad a while back and I’ve seen it come up more and more often which has made me want to taste said salad, however, that is much more difficult than one would think. You see, Gusto 101 takes reservations only until 6pm and then it’s a free for all. We’ve driven by many times around 7 or 8 and there is always quite the line-up outside, waiting for a table. Now, I know I’ve mentioned this before, but I just don’t like to line up. I figure if I am about to spend upwards of $80 for a meal, I shouldn’t have to wait in line to do so. But this is the reality if one needs to try this salad, and I really, really needed to try it.

I searched the net and found this helpful video on making this healthy salad, but alas there was no recipe for the dressing…so I looked further and found several versions all based on similar ingredients. My friend Celi from The kitchen’s garden just competed her September Home Grown challenge during which time she only allowed herself to eat what she grew on her little farmie! By the end of the challenge she mentioned that she was quite tired of eating the same old things. So when I finally hunkered down and made a decent effort to make the Kale Salad, I immediately thought of Celi. I know I’m a little late for the challenge, but it’s definitely a good recipe and I hope you have a chance to try it before the snow falls.

KaleSalad_1012

It’s a melt in your mouth salad

What makes this salad unique is the finely cut curly kale and how the lemon juice in the dressing acts to ‘cook’ the kale as it sits (like a ceviche would cook the seafood!). It’s a wonderful balance of sour, sweet and salty. I added a couple of slices of crispy cooked Serrano ham, but that is easily omitted if you wish to make it vegetarian.

Cavolo Nero (Kale Salad)

Serves 2

Ingredients:

  • 4 cups finely chopped kale
  • 2 tbsp raisins or dried cranberries or dried sour cherries
  • 2 tbsp toasted pine nuts or toasted sunflower seeds
  • 1/4 cup freshly squeezed lemon juice
  • 2 tbsp honey
  • 1 tbsp EVOO
  • pinch of salt
  • 2 slices of Serrano ham, baked or fried until crisp and crumbled (omit for vegetarian)
  • 1/4 c + 2 tbsp of freshly grated Parmesan Cheese or Pecorino
  • 1 tbsp fresh basil
  • 1 tbsp EVOO
  • pinch of salt

Directions:

  1. About 20-30 minutes before serving, combine the lemon juice, honey, Extra Virgin Olive Oil and salt and mix well in a large unreactive bowl (not metal).  Add the finely cut kale and toss to coat evenly. Set aside for a minimum of 20 minutes (I did 30 minutes) tossing a few times over the 30 minutes. (an update October 16: I made this salad at my brother’s cottage last weekend and I suspect the kale was older and tougher so 30 minutes wasn’t enough time to macerate, please keep this in mind when making the salad. Just as baby kale will take less time than the 30 minutes because it is not has tough).
  2. Muddle the fresh basil in 1 tablespoon of olive oil, with a pinch of salt. Set aside. I’ve made this lovely salad without the basil oil without missing it.
  3. Just before serving, add the raisins, pine nuts, crispy serano ham and 1/4 cup of grated parmesan cheese to the dressed kale and toss well. Divide the kale between two plates.
  4. Drizzle the basil olive oil on the plate and garnish with 1 tablespoon of grated parmesan cheese over each plate. Serve immediately.
KaleSalad_1009

Perfectly balanced sweet, sour and salty

KaleSalad_1010

A perfect salad for a hot summer’s day. Where did it go, anyway?

EarlyFallColours_0991

The fall colours were just starting when I took these photos in late September.

FallColours2013_0990

The cottage colours happen a bit earlier than the city colours.

SunsetSept2013_0992

The sun also moves to the far left during the fall. We see more of the sunset during the summer months.

Read Full Post »