We’re celebrating Canadian Thanksgiving this weekend and JT and I traditionally head up to my brother’s cottage in the Muskoka’s. We’ve had all sorts of weather during this weekend over the years, from swimming in Lake Rosseau to a little snow. But what ever the weather, there is always lots of food, reconnecting with family and lots of wine. We wish you all a very happy Canadian Thanksgiving and safe travels. Remember, it’s never smart to drink and drive (Hungary has a Zero tolerance rate and France is 0.5!) Just choose a DD and give them lots of dessert instead! Happy holidays friends.
For this post, I’ve had to change my plan and divide Lyon and Paris into two posts so that I don’t bore you too much. I also figured out how to add a slide show (boy, that was painful!) but it’s done. So if you have a moment, please visit with us in Lyon.
This slideshow requires JavaScript.
A little history of why we chose Lyon; it is said to the Gastronomic Capital of France. I’ve read that there are over 30 Michelin star restaurants in the city. The people clearly love food and since we do too we thought it would be a perfect match. And it was…for the most part. We had read that we must experience the traditional Bouchon in Lyon and I’ve read many blogs advising that, so it seemed like a good idea at the time. Unfortunately Bouchon’s are generally small places and serve only a fixed menu of three to four courses, and unless you reserve well in advance you simply cannot get in (they only cook for the number of seats in the restaurant, and there is only one seating!). I simply cannot eat three to four courses and feel good, so we decided to just go to a bistro specializing in the cuisine of Lyon and order one course. We did this on night one, the day before our trip to Geneva to meet our friend Ted and his partner Ji. I ordered the andouillette of Lyon (warning…this may be offensive to the ultra sensitive) it is a ‘sausage’ of various ofal particularly some kind of tripe. Now I can eat practically anything, but this dish had an odor (Charles described his experience that he thought someone left the W/C door open, but now I’m getting ahead of myself) I thought it smelled of barn yard, very earthy and very strong. I didn’t take a photo as the lighting was really bad (and I’d rather not be reminded of the experience). It was served in a cream sauce (very rich) and a gratin of potatoes (quite yummy). I could barely eat it, but I persevered and had about a quarter (JT finished the rest). I did not have a good night that night and didn’t recover until lunch the following day! JT had smaller, more traditional sausages that reminded me of bratwurst, without a heavy sauce. Neither were high on my favourite list. But we were entertained for the most part by a street entertainer who was quite funny mimicking people and making rude balloon objects! We figured he could take 100E per set, and given an evening, he probably does 3-4 sets in different neighbourhoods.
Also, you can bet a tomato will taste like a tomato in France. They still care.
Note: if you click on the first photo in the gallery below, it will enlarge and you can click through them like a gallery!
Sorry, but it doesn’t work on your iPhone.
-

-
The view from our room toward the Rhone River
-

-
Opposite view from our room toward La République. The room was nothing special!
-

-
This was the beginning of La République, a wide pedestrian area through the city. These fountains were close to our hotel.
-

-
A lovely carousal near our hotel on La République
-

-
A marketing plan released too early! Surprise!
-

-
Our first meal in Lyon, a lite Niçoise Salad, a little too light on the tuna!
-

-
Walking around Lyon. This is Place des Cordeliers
-

-
The Rhone River
-

-
JT and his cane…prevented further injury. Today he has almost fully recovered!
-

-
The public pools are in the distance, with the towers
-

-
It’s really a lovely city
-

-
Our real Lyonnaise dinner. I ordered the Andouillette; I would caution against it.
-

-
Bag of wine anyone?
-

-
This is where we picked up the bus tour
-

-
Touring around Lyon
-

-
This is my lunch.
-

-
This is JTs lunch. We all know which one is healthier!
-

-
Bartholdi Fountain. There is smoke coming out of the horse’s nostrils and water from their mouths!
-

-
This is trompe L’œill is of all the famous people of Lyon. A company called CitéCréation’s are responsible for the lovely murals all over Lyon.
-

-
Another pretty shot
-

-
It ended up being a nice sunny day.
-

-
More historic buildings along the river
-

-
Beautiful skyline 1
-

-
Beautiful skyline 2
-
-
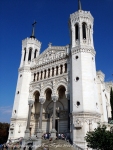
Basilica of Notre-Dame de Fourvière
-

-
It was warm enough to sit on top in the double-decker bus
-

-
On Place des Terreau (city square), this is Lyon’s City Hall
-
-
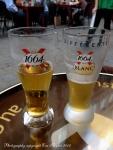
We may have had an adult libation or two. For the sake of Jed and Greg, of course!
-

-
Another great Caprese salad. On La République.
-

-
Someone may have chosen a slightly over dressed chicken Caesar. Don’t you hate it when that happens?
-

-
Palais de la Bourse or Palais du Commerce viewed from our table at the restaurant. On La République
-

-
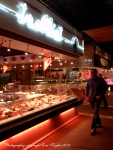
The exterior of the Paul Bocuse Market
-
-
Some of the shops
-

-
We were there a little after 4pm and most of the vendors had shut down, but there were some beautiful examples anyway
-

-
Presentation. You can buy ready made Caprese Salads in beautiful containers. It’s a little hard to see.
-

-
La boulangerie
-

-
Glazed Fruit look like jewels.
-

-
Les Armures, the oldest hotel/restuarant in Geneva. I may have even sat in the very seat George Clooney sat!
-

-
Our good friend Teddy and his partner Ji. We had a lovely day in Geneva
-

-
Lake Geneva with the Jet d’Eau
-

-
C.E.R.N Laboratories The Particle building. They apparently invented the internet!
-

-
C.E.R.N. Laboratories, the particle exhibit.
-

-
Our cooking class with Chef Jean-Marc Villard
-

-
Chef and I in the garden
-

-
The fig tree absolutely exploding with figs ready to eat!
-

-
If it were warm enough, we would have dine outside!
-

-
The lovely brick BBQ
-

-
This is his professional kitchen, he has a private kitchen upstairs!
-

-
The dining area
-

-
Chef Villard and JT examining the soup
-

-
JT chopping green olives for the sauce
-

-
Chef Villard searing the Monkfish wrapped in bacon. YUM!
-

-
Monkfish with a green olive sauce, fingerling potatoes seared in olive oil and the seared scallops (for the soup)
-

-
Enjoying a little hors d’œuvres and a glass of wine.
-

-
This is only the photo I took of the Clafoutis, it was pear, chocolate with a glorious caramel sauce. I can hardly wait to make this again!
-

-
Pumpkin soup scented with vanilla with EVOO sautéed trumpet mushrooms and seared scallops with hazelnut oil drizzle. OMG, this was amazing!
-

-
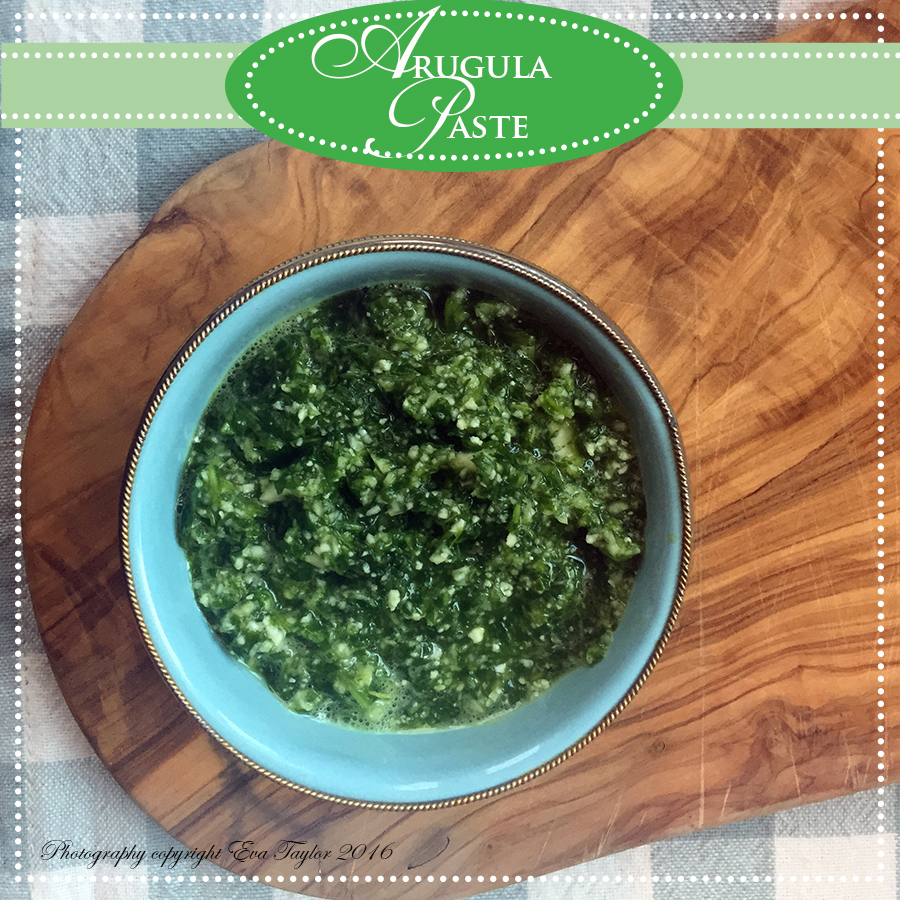
Our main course: Monkfish wrapped in bacon with a green olive veal stock sauce, fingerling potatoes sautéed in EVOO and snap peas with arugula (rocket) pesto. It was DELICIOUS!
-

-
Mme. Villard patiently waiting for my photo to be done!
-

-
Winemakers notes: “The color is a brilliant light straw. Aromas of intense acacia, yellow peaches and exotic fruits. On the palate the wine is very elegant and harmonious. Its freshness allows the fruit to fully develop. A seductive wine to be enjoyed with appetizers and hors d’oeuvres”.
Geneva trip 1:
We made arrangements to meet up with our good friend Ted whom we haven’t seen for at least 10 years. He and his partner Ji traveled by train from outside Zurich to make this possible. We enjoyed a wonderful lunch in Geneva’s oldest restaurant/hotel in the historic district. I may have even sat in the same chair as George Clooney; check out their guest book. Geneva is a beautiful city whose population is manly made up of people from somewhere else; there are many company head offices in Geneva as well. We had hoped to meet up with other blogger in Geneva too, but sadly she had to travel for work on the date we could make it. We shall have to return one day.
Geneva trips 2:
We had booked a tour at C.E.R.N laboratories so that we could see what all the fuss was about. This was a very bad weather day; traveling on the highways, it rained so heavily that at times we were unable to see the hood of the car! The tour itself was lead by a physicist and was interesting but we both felt that since we were in Lyon for such a short time, this little side trip could have been avoided without much loss. Plus it was a gorgeous day in Lyon which we missed entirely! And we had to rush back for our cooking class! Not-withstanding the tolls which over the two days were in excess of 100E! Oh well. Live and learn.
Upon our return to Lyon we tried to return the car with the tank empty but they would have charged us 175E to fill it themselves so we opted to find a station and fill it ourselves for 52E. It took over an hour (mainly waiting for people to fill their cars) and return…only minutes to spare for our cooking class. Chef Villard was ready for us waiting in the lobby of our hotel! I barely had time to change and freshen up!
Cooking Class with Chef Jean-Marc Villard

Winemakers notes: “The color is a brilliant light straw. Aromas of intense acacia, yellow peaches and exotic fruits. On the palate the wine is very elegant and harmonious. Its freshness allows the fruit to fully develop. A seductive wine to be enjoyed with appetizers and hors d’oeuvres”.
Our cooking class was amazing and I would definitely recommend it. Chef Villard is fluent in English and is a kind instructor. His kitchen in tidy and calm, but then again there were only two of us. I shall list the menu, but as you can well imagine, I shall be blogging about it in future blog posts! Chef Villard kindly created a little hors d’œuvres of sausages wrapped in home-made brioche (he served the meal with a lovely local wine made with a Viognier grape), we then had a wonderful creamed pumpkin soup fragranced with vanilla bean, drizzled with hazelnut oil (OMG, you MUST smell this!) and served with three seared scallops. Chef Villard mentioned that it depends where you are in France with the fat is that they use…not everyone cooks with butter! Our main course was a Monkfish wrapped in bacon with a delightful veal sauce with green olives (the sweetness of the veal stock and the saltiness of the olives really went well with the fish, and the bacon wrapping was not too salty at all), with olive oil sautéed fingerling potatoes and some lovely snap peas with an arugula (rocket) pesto. For dessert we made a pear and chocolate clafoutis with a glorious caramel sauce. Yes, this will be a dinner for several friends over the next month or so. Of course, I will try to make it marginally healthier (although for a French Chef, he didn’t use as much cream as I thought he might!). This was a very enjoyable dinner. If you are in Lyon, you must try to get into one of his classes, you will not be disappointed. We ate with Chef and Mme Villard and chatted as if we were long-time friends. It was a very enjoyable evening.
We’re off to Paris next on the TGV! See you soon.
Read Full Post »


 Canadian Thanksgiving was October 10th, about a month earlier than American Thanksgiving. We do everything pretty much the same as Americans, except that we are not as much into American football. Thanksgiving to Canadians means family getting together and enjoying the company, the food, and the gorgeous fall colours, not so much sports. This year was a quiet Thanksgiving because we usually celebrate with my cousins’ family but my cousin and her hubby were in Europe so we only had the adult kiddos over for dinner. We love cranberry like the next guy but I always seem to have a tonne left over as I did this year. So I decided to reinvent them into Liz’s dreamy Crumble Bars. JT is in charge of making the cranberry sauce and he usually only adds about half the sugar on the package recipe but since the kids were coming over, I asked him to make it a bit sweeter so he used 3/4 of the recommended sugar. The sauce was still reasonably tart which made it a perfect topping for these sweet pastry bars. I dare say, one of my favourites. So if you have cranberry sauce left over, give these a try, you won’t be disappointed.


 Happy Valentine’s Day!

