Feeds:
Posts
Comments

Archive for September, 2014

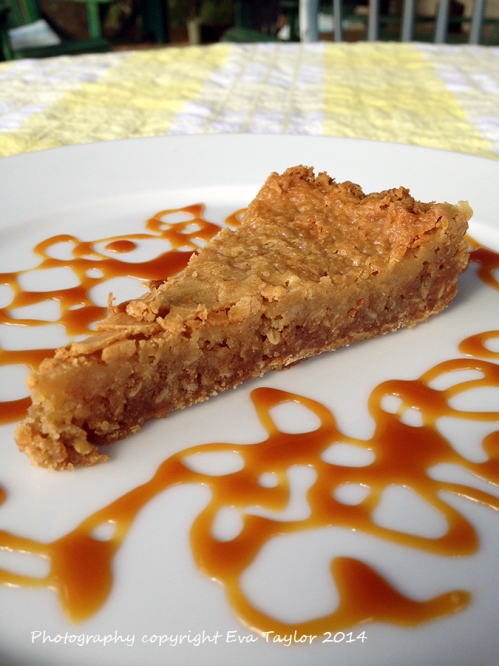
CrackPie_Blog1

I forgot to take powdered sugar to the cottage to decorate the top.

It’s not what you think. At the very least, it’s not the crack that Toronto has become famous for (didn’t you know?). It’s the other crack that Chef David Chang and Christina Tosi’s Milkbar in NYC that has this crack elevated to the highest of honors, it’s Crack Pie. If you have never heard of Crack Pie, it’s a decadent combination of butter, sugars (brown and white), eggs and oats. It’s incredibly rich and moreish. But I warn you, a slice of this pie will cost you dearly (and I’m not even going to talk about the $44 price tag for whole pie sold at Milkbar in NYC). Is it worth it? The calories and the time to make it? I’ll let you be the judge. If you ask me if I’ll make it again, I’m going to say probably not. It’s not that it wasn’t good, that it was, but there are a lot of other desserts that are equally as good without being as caloric (Bon Appetite’s recipe details the nutritional facts as: 1 slice (a pie serves 12 people) 350.8 Calories,  53.8 g Fat (21.0 g Saturated Fat)). Some of my dear readers will swoon over this recipe and some will be appalled because it’s not something that generally fits into this blog. To those who are appalled I apologize, it’s not often I make something so outlandishly bad for you. To those who swoon, tread lightly, it is as dangerous as the illegal kind (crack, that is!)

I cannot take credit for this pie on my radar because it was my dear fellow blogger Lorraine, over at Not Quite Nigella who introduced me to it in June last year. It was part of the Daring Bakers Challenge (I do not participate) but I saw it pop up all over the place in the blogs I follow. I filed this recipe in a spot I file many recipes that are not as healthy, most likely never to be made, but we were at a fund raiser for one of the Photographer’s wives who was doing a hike to Machu Picchu to raise money for breast cancer research and awareness and one of the food stylists made Crack Pie (she made it in a slab and cut it into tiny squares). I knew I had to try it. JT loved it, so when we had my nephew over for dinner in late August, I took the plunge and made it.

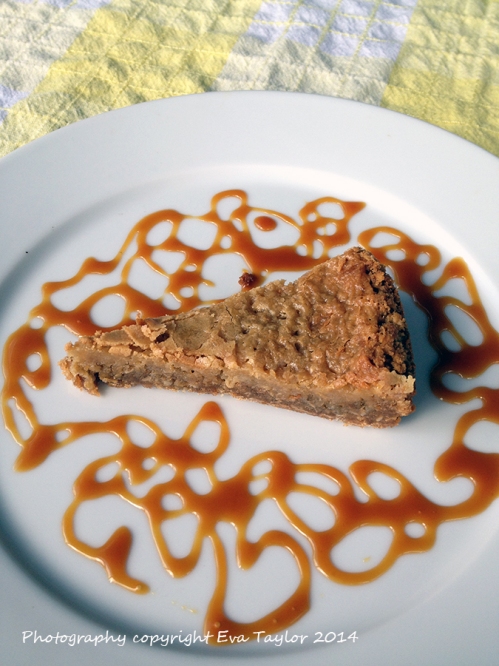
CrackPie_Blog2

If I had to describe this pie, it’s like a decadent blondie.

Momofuku’s Crack Pie

Makes 1 pie about 25 cm diameter

Ingredients for Oat Cookie Crust:

  • 9 tbsp unsalted butter at room temperature, divided (6 & 3 tbsp)
  • 5 1/2 tbsp packed light brown sugar, divided (4 & 1½ tbsp)
  • 2 tbsp white sugar
  • 1 large egg
  • 3/4 cup plus 2 tablespoons old-fashioned oats
  • 1/2 cup all-purpose flour
  • 1/8 tsp baking powder
  • 1/8 teaspoon baking soda
  • 1/4 tsp salt

Directions for oatmeal cookie crust:

  1. Pre-heat the oven to 350° F (180° C). Line a 13″ x 9″ sheet with parchment and spray lightly with cooking spray.
  2. Using a mixer, beat  6 tbsp butter with 4 tbsp brown sugar and white sugar until light and fluffy (about 2-3 minutes).
  3. Add the egg and beat again until pale and fluffy, about 1 minute.
  4. Fold in the oats, flour, baking powder, baking soda, and salt and stir until well blended.
  5. Turn out the oat mixture into prepared baking pan and press out evenly to edges of pan or close enough.
  6. Bake until lightly golden about 18 minutes.
  7. Lift parchment with cookie onto a wire rack and cool completely, about an hour.
  8. Once cool, crumble the cookie into a large bowl and add the remaining 3 tbsp (45 gm) butter and 1-1/2 tbsp brown sugar and mix well until the mixture is moist and will stick together when pressed between your fingers (think graham cracker crust).
  9. Pour the cookie crust mixture to a 25 cm spring-form pan and press into the bottom and sides using your fingers and/or anything that will press it firmly. Set aside.

Ingredients for filling:

  • 3/4 cup white sugar
  • 1/2 cup packed light brown sugar
  • 1 tbsp dry milk powder
  • 1/4 tsp salt
  • 1/2 cup unsalted butter, melted and cooled slightly
  • 6 1/2 tbsp table cream (recipe called for whipping cream but I had table cream on hand so I used it instead)
  • 4 large egg yolks
  • 1 tsp pure vanilla extract
  • (Powdered sugar for dusting) – I forgot

Directions for filling:

  1. Preheat to  350° F (180° C). Spray a 25 cm spring-form pan with baking spray.
  2. Whisk sugars, milk powder, and salt together in a medium bowl and add melted butter and whisk until blended.
  3. Add the cream, egg yolks and vanilla and whisk until well blended.
  4. Pour the filling into the crust.
  5. Bake for 30 minutes (filling might bubble up) then reduce oven temperature to 325° F (160°C) and continue to bake until filling is golden on top and set around edges (20 minutes longer).
  6. Cool pie completely on a wire rack. Chill uncovered overnight. Carefully glide a knife around the edges to loosen and remove the sides of the spring-form pan and slide the sides off. Position on a serving plate.
  7. Sift powdered sugar lightly over top of pie. Cut pie into thin wedges. Serve cold with a drizzle of caramel and a dollop of whipped cream.
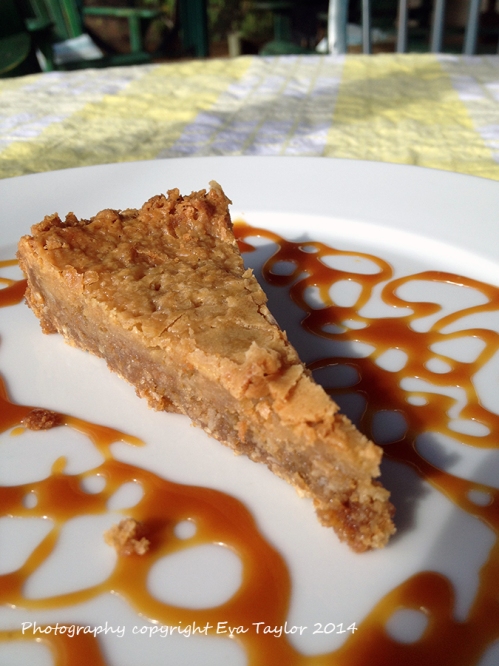
CrackPie_Blog3

Would you like some crack with that?

Read Full Post »

Many years ago my family lived in an apartment building on the second floor and my parents became friends with the couple across the hall who had three kids. They were from Chile and the husband/dad worked for Motorola and was transferred to Canada (I believe he was an electrical engineer but I can’t be sure because I was only 8). The kids were, Edward, Malu and Christina; my brother fell in love with Christina (the youngest) and asked for her hand in marriage — they were 6 years old. Edward was my age but we were never interested in each other, after all, he was a creepy boy and I was certain he had couties! Malu was a year younger than I and we became friends. We were family friends for several years…7 or 8 I believe, and one day we came home to find that they had moved out without a single word or forwarding address. We haven’t seen them since. How weird is that? Have you ever had such a strange experience?

My dear Mom was always ready to try anything and when the opportunity arose, she would arrange to swap dinners with her Chilean friend. Mom also did that with an Indian friend and a Jamaican friend! This was our introduction to the family love of food. My Mom’s Chilean friend made us Empanadas which are a South American meat patty, often changed up from country to country by the spices added and the type of meat used. Last year when we were in D.C., we had Empanadas at a great little Spanish restaurant and they put their own twist into this delicious patty…they added soft cheese! Boy was it good. It was deep fried and the casing was soft and crispy and the centre filled with wonderfully spiced ground meat and a delicious soft cheese. When I realized that in my 7 years of blogging, I have never posted an Empanada recipe I decided that it was darn time! Shame on me because they are so easy to make and freeze very well. Pop a couple into the oven or microwave and you’ve got a delightful snack or appetizer or light lunch.

A couple of weeks ago, our lovely neighbours invited us for a tapas cocktail afternoon and she made a version of Empanada that got my attention (with chorizo) but for this recipe I shall post my dear Mom’s traditional Chilean friend version for the  filling. To be honest, I never really liked Mom’s recipe for the pastry so I made my neighbours pastry recipe instead and I think it’s pretty darn perfect. The pastry is a cross between bread dough and pie crust; the exterior is firm but the texture when you bite into it has some elasticity so the patty doesn’t fall apart. This time I made small one-bite sized patties and a slightly larger 3-4 bite luncheon patties. I hope you enjoy them as much as we do.

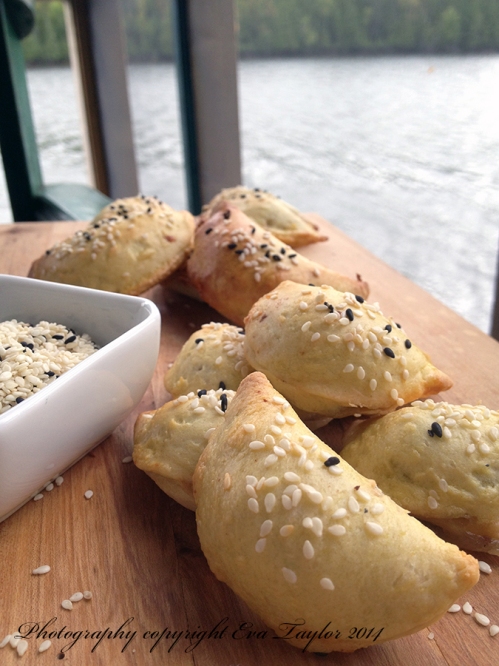
Empanadas2 It’s an optical illusion, the front ones are about half the size of the back ones!

Empanadas

Updated July 2022

Makes about 48  mini 5cm (2 inch) Empanadas AND 32 larger 15 cm (3.5 inch)

Ingredients, filling:

  • 454 g ground meat (could be mixed veal with pork and beef)
  • 3 medium onions, finely chopped
  • 1 cup chopped black olives
  • 1 cup of golden raisins
  • 2 tbsp cumin
  • 1 tbsp paprika (sweet or smoked)
  • Salt to taste (but be careful because the olives are quite salty)
  • 1 ball of fresh mozzarella or Manchego, cut into 1 cm (1/2 inch pieces)

Directions, filling:

  1. Heat oil in a large dutch oven. Cook onions until soft.
  2. Add the spices and heat until you can JUST smell them.
  3. Braise the meat until completely cooked, add the raisins. and the chopped black olives.
  4. Allow to cool completely before filling dough.

Ingredients, dough:

  • 6 cups all purpose flour
  • 4 eggs
  • 1/2 cup milk
  • 1/2 cup olive oil
  • 4 tsp baking powder
  • 4 tsp salt
  • 1 egg beaten with about 1/4 cup water
  • 1 cup sesame seeds for garnish

Directions, dough:

  1. Pre heat oven to 350°F.
  2. Combine all dough ingredients until it forms a soft dough (kitchenaid is fine).
  3. Roll out dough to about 1mm thick (I used the #3 setting on my pasta maker) and cut with a round cookie cutter (small 1 bite size should be no larger than 5 cm or 2 inches and larger luncheon versions should be about 15 cm or 3.5 inches).
  4. Brush some of the egg wash all around the edge of each circle. Into the centre of each dough circle, add about 1‐2 tbsp meat mixture, making sure you have some raisins and olives in each circle. Add one square of cheese per round.
  5. Fold dough over filling so it is a crescent and seal the edges.
  6. Place on a cookie sheet lined with parchment paper. Brush each crescent top with the egg wash for shine and sprinkle with sesame seeds or Parmesan cheese.
  7. Bake for 20-25 minutes or until lightly golden. Serve warm and enjoy with a bit of jam or compote or mustard.
    They are pretty darn tasty. They are pretty darn tasty.

Notes:

  • These freeze very well, just pop them into a zip-lock baggy and freeze, use one at a time or as needed.
  • The recipe may be successfully halved or quartered.
  • If you don’t like black olives, leave them out, same with raisins but you will miss the salty and sweet combination.
  • We used fresh mozzarella because we could not find Manchego cheese. Regular mozzarella may be too hard so I would avoid it.
  • In hindsight, the cheese almost completely melted out of the empanada, so next time I doubt I’ll add it.
  • May 2017 update to recipe;
    • I increased the liquid measurement in the dough by 1/4 cup each.
    • JT wanted larger empanadas, so I used #1 on the pasta maker and a 10 cm (4 inch) diametre cookie cutter to make more luncheon-sized versions. We got about 35 out of the batch, but had a bit of the meat mix left over.

Read Full Post »

This past weekend was unseasonably cold at the lake.

This past weekend was unseasonably cold at the lake.

A very dear friend of mine invited me to a taping of a daytime lifestyle show called Steven & Chris last week. It was their first show of their eighth season so it was very special, that’s a long time to be on a show and what’s even more impressive is that they’ve been life partners for 22 years! My friend has been a long-time fan of the show and has been to several tapings over the years so we got the VIP treatment; we were the first to be ushered into the studio and first to be seated (front row, no less). It was truly an action packed show of which I’ll share the details after it airs, but I will share a few pics.

This is an HD camera.

This is an HD camera.

Our very excitable Audience Coordinators.They knew my friend by name!

Our very energetic Audience Coordinators.They knew my friend by name!

An ussie. Yes, it's a new word.

An ussie. Yes, it’s a new word.

Steven is the handsome devil on the left and Chris is the cutie-pie on the right.

Steven is the handsome devil on the left and Chris is the cutie-pie on the right.

Chef Michael Smith is a special guest.

Chef Michael Smith is a special guest (centre)

My dear friend invited me to another taping on September 30 when the special guest is a World Famous Chef! But I can’t say who just yet! I’m so excited. Thanks so much Angela, I really appreciate that you chose me for these exciting events!

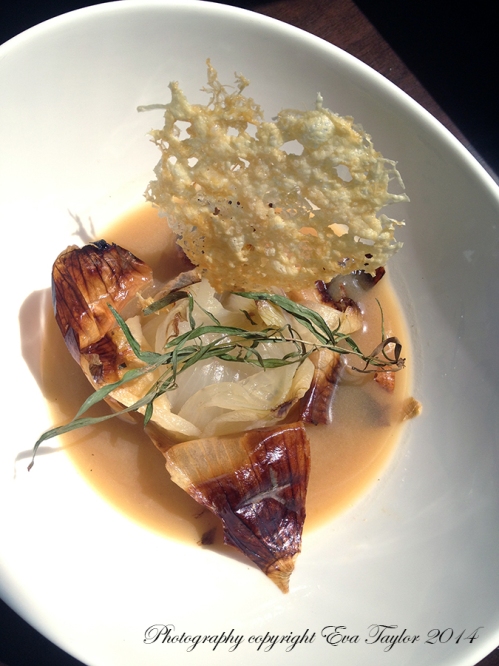
DeconstuctedFrOnSoup-1

A caramelized, baked onion in a bed of beef stock and a Gruyere tuille

Deconstructed French Onion Soup

Serves 4

Ingredients:

  • 4 ordinary cooking onions
  • 3 cups beef stock
  • a few stems of fresh tarragon
  • 1 bay leaf
  • 1 cup grated Gruyere cheese
  • salt and pepper to taste

Directions:

  1. Please refer to this recipe on baking the onions and proceed to step 4.
  2. Lower the oven temperature to 250° F (121° C), add the beef stock, bay leaf and tarragon stems and cover the dutch oven with a lid or foil. Continue to bake for 2-3 hours or until the onions are extremely soft.
  3. To make the tuiles, line a baking sheet with parchment. Turn oven to broil, high heat. Pile 4 evenly spread circles of the grated Gruyere onto the baking sheet, about 5 cm or 2 inches apart. Broil on high until cheese is completely melted and begins to colour. Watch carefully as the cheese will burn very quickly. Remove from heat and place the parchment with cheese tuiles on a cooling rack and cool completely. When cooled, gently remove the tuiles and set aside.
  4. Discard the bay leaf. Remove onions from the beef stock and cut into the skins in quarters to reveal the soft centre. Remove the inedible onion skin. Place cut onions into the centre of a pretty bowl and ladle in a little stock. Garnish with the Gruyere tuille and the baked tarragon stems.
DeconstuctedFrOnSoup-2

It tastes just like French onion soup.

DeconstuctedFrOnSoup-3

I just can’t get enough of these tasty baked onions!

Read Full Post »


A nice thick soup to help keep ourselves cool over the summer.

A nice thick soup to help keep ourselves cool over the summer.

Recently we had a half a watermelon left over from a weekend and I needed some space in the fridge for a styling gig so I had to do something with the watermelon, pronto! Summer was still in full swing so something cool and refreshing was on my mind. I’ve been seeing a lot of almond milk on the blog-o-sphere so I thought I’d like to get in on the band wagon and incorporate it into this soup. The almond meal adds some lovely texture and a subtle almond flavour, so I beefed it up with a small splash of pure almond essence. The yogurt make it very creamy and the basil and mint flavourings are just subtle background flavours. A sophisticated soup for a warm cottage evening.

This soup has body.

This soup has body.

Chilled Watermelon Gazpacho Scented with Almond, Basil and Mint

Serves 4 as appetizers

Ingredients:

  • 1.5 kg water melon
  • 1/4 cup almond flour
  • 1/4 tsp pure almond essence
  • 1/2 cup yogurt
  • 1 tbsp chopped basil
  • 1 tsp chopped mint
  • Salt to taste

Directions:

  1. Chop watermelon into a large bowl, add the almond flour, essence, yogurt and herbs. Blend until very smooth. Set aside in the fridge for 2-4 hours so the almond flour has time to absorb some liquid and thicken the soup.
  2. Blend again and press through a fine sieve. Serve chilled garnished with pomegranate seeds or more mint.

A brighter Watermelon Gazpacho can be found here.

Read Full Post »

September ALREADY? WTF? Where on earth did this summer go? Good luck to all the mini humans going back to school!

I thought I’d share a little info about a food photo shoot that some of you may not know. It’s actually quite amazing at how many people this industry employs — so next time you see a food commercial, ad or packaging with a food photo, consider this (I’ve really simplified this complex process):

A designer designs the packaging or advertising prior to the photo shoot. There are many layers in the design phase and several people involved but it boils down to the art director and client who dictates the look and feel of the photo. The Food Stylist is involved in the design phase if there needs to be special ‘recipes’ or plating requirements (like I was involved in coming up with 8-10 ideas for the products we were shooting last week).

Once a design is established, the Art Director creates a “Pre-Pro” which details the props and “recipes” that will be photographed. The “Pre-Pro” is approved by the client and distributed to:

  • The Prop Stylist (this person is an expert in props, where to find them, rent them or buy them). A prop is anything that may be used in the photo, such as fabric, plates, noise (background items that are out of focus) and cutlery. Props are generally reserved for the photograph and not used in the preparation of the food. Depending on the photo shoot complexity, the Prop Stylist may be required to stay on set to select the exact props to be used in each shot. If they don’t stay, the Art Director makes that decision.
  • The Food Stylist (this person is an expert in food, how to get the best out of food so that the consumer recognizes instantly the message the Art Director and client wishes to convey). The food stylist buys the components to make the ‘recipe’ happen. Contrasting colours and textures are paramount. The Food Stylist may have an assistant depending on the complexity and budget of the shoot.
  • The Photographer (this person is the expert in photography, understands light whether natural or man-made and even how to make man-made light look natural because they have more control over it). The photographer will prepare the lighting set up required to execute the art director’s wishes. The Photographer may have an assistant depending on the complexity and budget of the shoot. And sometimes the Photographer brings a tasty breakfast.
  • The Client: The Boss. The client knows the intricacies of the product and what they feel is important to convey in the photo. The client approves the shot before we move on to the next one. Sometimes the client is off site, but that adds a layer of time to the shoot and we all know that food generally doesn’t last long on set. Things dry out, melt and don’t look appealing. We always prefer the client to be on set.

Shoot day starts early and is busy from the get-go. Photographer, Prop Stylist and Food Stylist are usually the first to arrive. There is a lot of shlepping, but it’s generally a very generous group and everyone helps get everything organized. Of course, the behind the scenes studio team sets everything in motion the day before, food, snacks, coffee/tea, water are all provided generally — the one thing for sure, there is ALWAYS A LOT of food!

Once everything and everyone is set up, we begin to work getting things ready for the first shot (as a Food Stylist, I also keep in mind all of the shots for that day to see if I can consolidate any tasks that will save a bit of time in the long run). The Art Director I recently worked with enjoys shooting with natural light, but that can be challenging since natural light changes all the time so the photographer is constantly tweaking the settings and extra lighting to make the shot perfect.

In terms of food styling, there are many tricks of the trade and the stylists I’ve worked with have been incredibly generous with their advice, but as with anything else, I still have a lot to learn. Apparently, wearing comfortable shoes is something I haven’t learned…but I am trying ;-). I have a couple of pairs of stylish yet comfortable shoes but I still gravitate to stylish over comfort. One of these days, I’ll learn, it’s generally a very long day where the only time I sit is for about 30 minutes at lunch!

So I hope you’ve gained a little appreciation for the energy, people and time involved for food photography; after all, that strawberry on the front of the cereal package was carefully chosen over hundreds of strawberries, deliberated over (with such phrases as “it’s not doing it for me”, or “is it just me..,?”, and “do you see a face in that?”) intentionally placed and oiled for shine and to catch a little sparkle! Who knew?

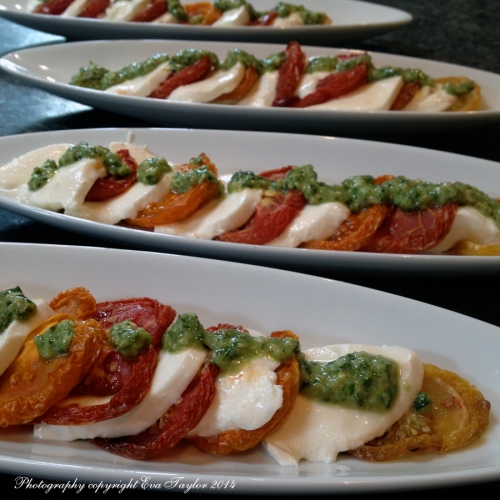
CapreseSalad_3580

A delicious combination of flavours.

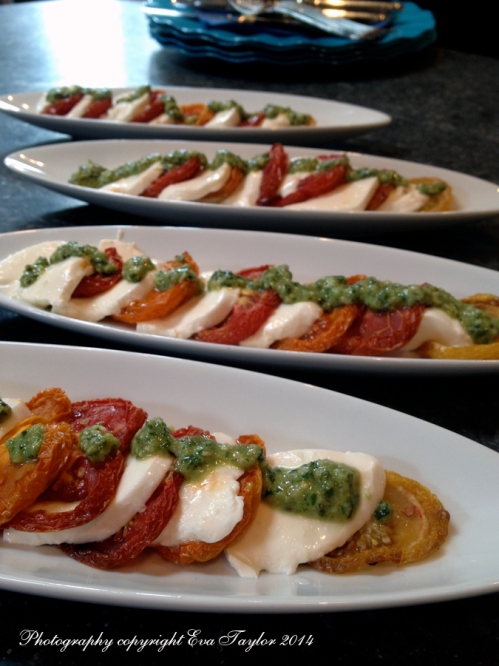
Recently we had my GF BFF and her hubby for brunch and I wanted to serve something that just screamed SUMMER! And for me, there is nothing that screams summer than a Caprese Salad. We searched for a local farmers market but sadly missed the boat because we were too late getting there so I was stuck with grocery store tomatoes. I bought the best, vine ripened variety but was still disappointed. They lacked that great, summer tomato flavour. So I decided to oven roast them to concentrate the flavours and we were not disappointed!

Caprese Salad with a Twist

Serves 4

Ingredients:

Directions:

  1. Alternately layer the sliced Bufala Mozzarella with the tomatoes on a plate.
  2. Combine the home made pesto with the white balsamic until a drizzle-able consistency is achieved. Drizzle over the tomatoes and mozzarella. Serve at room temperature.
  3. Enjoy.
CapreseSalad_3578

A nice, summer salad.

Notes:

  • I would not substitute sun-dried tomatoes for oven dried tomatoes because they are much stronger in flavour and will over power the subtle flavour of the bufala mozzarella.
  • Bocconcini may be substituted for the Bufala Mozzarella but it is a harder cheese with a slightly stronger flavour.
  • Burrata cheese is a beautiful substitute but you wouldn’t want to cut it because all that delicious cream will pour out. Serve a small Burrata and surround it with the tomato slices and drizzle the pesto over everything.

Read Full Post »