Feeds:
Posts
Comments

Archive for February, 2013

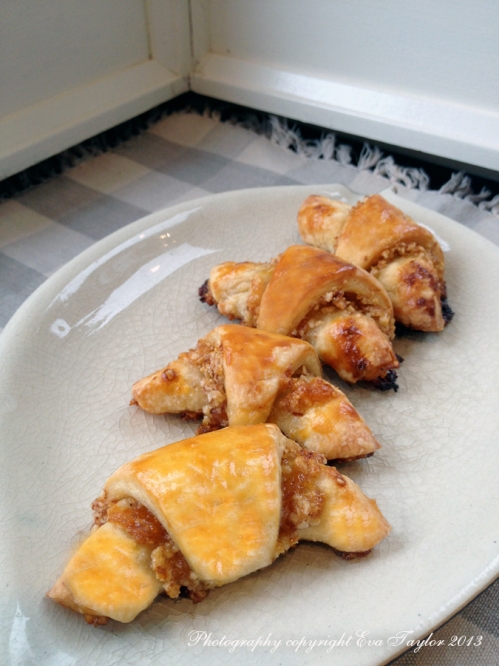
My lovely friend Zsuzsa blogged about this cottage cheese dough and I knew I had to try it. It truly makes a wonderfully flaky pastry and I encourage you to try it. I made these with almonds as a friend’s daughter is allergic to walnuts and it was incredible. I have another tub of cottage cheese in the fridge waiting to be made into another batch. By the way, I used fat free cottage cheese and it worked out remarkably. I also made half of the dough.

Rugelach

Please see Zsusza’s recipe here.

Better than Croissant dough, because it's not that bad for you

Better than Croissant dough, because it’s not that bad for you

Makes 24 small Rugelach

Ingredients:

  • 1/2 cup small-curd cottage cheese (I used fat free)
  • 1 cup unsifted flour
  • pinch of salt
  • 1/2 cup cold unsalted butter, cut into 1/4-inch pieces

Directions:

  1. Spoon the cottage cheese into a sieve over a bowl lined with a unbleached coffee filter; drain for at least 2 hours, or overnight
  2. Remove 1/2 cup of the cheese for the dough; reserve the rest for another use.
  3. Pulse the flour and salt just to combine in a food processor (this is why you need not sift it). Add the butter to the flour pulsing on and off until the butter seems to disappear into the mixture.
  4. Add the cottage cheese in bits to the mixture pulsing to combine until it becomes a relatively loose dough ball.
  5. Divide the dough into four equal portions and shape each into a flat disc and wrap each in plastic wrap. Refrigerate for at least 4 hours.

Rugelach Ingredients:

  • 1 batch of cottage cheese dough
  • 1/4 cup strained apricot jam
  • 2 tbsp sugar
  • 1 cup finely chopped almonds
  • 1 egg yolk for glazing

Rugelach Directions:

  1. Pre-heat the oven to 350°F
  2. Once the dough is refrigerated and cooled, lightly flour your rolling area. Roll each portion into a circle about 25 cm or 8 inches in diameter. Cut into 6ths like a pie.
  3. Combine the chopped almonds with 2 tbsp sugar.
  4. Brush the dough with 1/4 of the apricot jam, sprinkle 1/4 of the almond sugar mixture on top. Starting with the wide end, roll each 6th into a little crescent, pinch the ends a bit and turn into each other. Brush with the whisked egg yolk.
  5. Line two large baking sheets with parchment paper (you will thank me because the jam will melt out and make a darn mess on your baking sheet). Bake 20-25 minutes until golded. store in an air tight container. These freeze particularly well. Serve either warm or at room temperature.

Read Full Post »

If you’ve been following along, you will know by now that we have very good friends, Paul and T, who live in Illinois with whom we visit, travel, laugh (and laugh and laugh), eat and drink and recently, they kindly paid us a long overdue visit. It’s always a challenge to come up with things to do since we’ve been hanging out with each other for around 20 years — we’ve done most things in the GTA that had to be done. Now, I know it’s not always necessary to plan a weekend with such good friends, but it’s nice to do a little something special, particularly since it’s the only time JT and I get to be tourists in our own city.

We decided to visit Casa Loma, a real castle in the heart of Toronto. Built by Sir Henry Pellatt and Lady Mary Pellatt for $3.5 million dollars around 1911. Now that is a lot of money even now, can you imagine how much that was in 1911? Sadly, the Pellatt’s only lived in the Castle for 10 years, when their financial empire crumbled and they were forced to auction off the castle and belongings. In 1924 they moved to their farm in King township, and shortly after Lady Mary passed away of heart problems (likely caused by anxiety and stress of their financial downfall). The castle was fitted with the most modern conveniences, like indoor toilets, electricity and telephones; when the entire city of Toronto had 3,000 telephones, the Pallett’s castle had 50! Even the servants quarters were grandly equipped (by the standards of the day) with heated rooms, electricity and indoor washrooms (it reminded me of Downton Abbey). It took 300 men three years to build it. Quite the property.

In 1925 they tried to convert it to a luxury hotel, but even that didn’t pan out; the rooms were never completed, only the common areas had been re-purposed where they held many high-end social events and dances. In 1937 the Kiwanis Club of West Toronto took over the building and began the tedious task of renovating and refurnishing the rooms as Sir and Lady Pallett would have had it furnished. Today, only some of the furnishings are from the Pallett’s estate, many of them are just ‘of the time’. You can book your wedding or special event at the castle, but 27 years ago, the waiting list was three years long, so plan ahead!

Casa Loma is situated in Forest Hill, an exclusive neighbourhood in Toronto, even today. The area is also quite lovely to experience and I strongly suggest that you check it out if you are visiting Toronto.

A few practical notes and we’ll get to the good stuff:

  • With the self-guided audio tour, it will take you about 2-3 hours to go through the castle, we had a moderate pace and completed the tour, even the garages, stables and potting shed in a little over 2 hours.
  • There is an elevator but it must be operated by staff, the stairs are so much more practical, and they will allow your tour to flow better (not having to back-track on yourself to get to the lift).
  • It’s not heated well, so you’ll need your jacket in the winter (I wore boots and my toes were chilled). I walked around with my jacket buttoned up (and I usually start sweating as soon as I think about going inside — Eastern European and all!).
  • Little one’s are not discouraged, but there is little for them to be amused with. Unless you are going for a specific kids program, they will be bored.
  • There is a cafeteria on site, but Yorkville is very close by with so many better options.
  • Ladies, take a purse that can be hung on your shoulder, your hands will be occupied with the listening device, the map and perhaps a camera (and for me, a tissue for my sniffling nose, yes, I still have it! Grrr!).
  • Not a cheap experience, adult entry is around $20; check on line, you may be able to find discount coupons. If you plan on doing more than one attraction a Toronto Attractions City Pass may be the way to go.

The Good Stuff (you’ll see that I didn’t take many photos (I kept my gloves on) so you’ll have to visit to see it all):

IMG_3944_BLOG

The main entrance. As you can see we have another dreary grey day in Toronto

The Great Hall just after the entrance.

The Great Hall just after the entrance. The giant organ is that shadow in the photo.

IMG_3953_BLOG

The Great Hall another view; you can see the scale of this room by the chairs. The gorgeous window in the previous photo is just on the right of this photo. This room also had an enormous organ (which sat in the large window in the second photo), the enormous pipes are behind me taking the shot.

IMG_3952_BLOG

Sir Henry’s drawing room

IMG_3951_BLOG

The Drawing Room; the sofa in the foreground is facing the fireplace from the previous photo.

IMG_3950_BLOG

Incredible views from one of the towers. This shot reminds me of Paris from the Arc de Triomphe looking toward La Défence

DSCN1537_BLOG

OK, maybe it’s just La Défence that reminds me of our new condo.

IMG_3949_BLOG

Great view of our city.

IMG_3948_BLOG

The towers are accessed only by metal and wood spiral stairs, which can be a bit confining at times. It’s best to do this in low season as there are only one set of stairs so it would get quite congested in high season.

IMG_3954_BLOG

This is the smoking room, no ladies please

The stables

The stables. What’s cool about the stables, garages and potting shed is that they are accessed by a 500 metre tunnel, 5 metres under ground. Sir Henry fought with the city to have a busy road detoured so that his servants didn’t have to cross to access the outer buildings, and was constantly declined, so he built a tunnel. Obviously a different snack bracket than I.

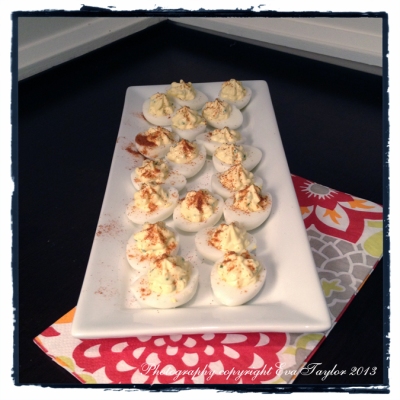
We had very special deviled eggs for our hor d'œuvres that evening.

We had very special deviled eggs for our hor d’œuvres that evening.

And that concludes our visit to Casa Loma, I hope you have a chance to see it when you come to Toronto.

Read Full Post »
I had meant to post this around Super Bowl 2013 but as luck would have it, I didn’t get it all together and hence the later post. But fear not, these babies are good enough to serve any old time, and not just for Super Bowl! And the best part is that they freeze perfectly, so make up the entire batch, and toss into a zippy locky baggie and freeze, now you’re ready to entertain any old time. The second best part is that they are not deep fried. I used my silicon cake pop pan to make these slightly smaller than a mini-muffin, but you can use a mini muffin pan with success but it will make fewer corn dogs.

Mini Corn Dogs

I saw the photos on Google here, but I based the recipe on Fred’s not here Corn Bread. Use your favourite cornbread recipe instead.

Just one or two bites each

Just one or two bites each

Makes 51 small corn dogs (in the half shape of a cake pop)

Ingredients:

  • 3/4 cup medium ground corn meal
  • 3/4 cup all purpose flour
  • 1/4 cup granulated sugar
  • 3/4 tsp baking powder
  • 1/2 tsp salt
  • 1 egg
  • 3/4 cup milk
  • 1/8 cup vegetable oil
  • 1/4 cup finely chopped leeks
  • 3/4 cup shredded sharp cheddar cheese
  • 5 regular hot dogs (I used Yves vegetarian dogs because I was serving them to a vegetarian)

Directions:

  1. Pre heat oven to 400°F. I used my silicon cake pop pan to make these slightly smaller than a mini-muffin. But you can use a mini muffin pan with success but it will make fewer corn dogs.
  2. Sift cornmeal, flour, sugar, baking powder and salt in a bowl.
  3. Blend eggs, milk and oil in another bowl.
  4. Stir wet ingredients into dry.
  5. Fold in the shredded cheese and onion.
  6. Cut up the hot dogs into 1-1.5cm slices (I got about 8 or so out of each dog)
  7. Spoon molds about 3/4 full and insert one dog so that it sinks in but doesn’t get covered on top.
  8. Bake for 15-20 minutes or until firm and golden.
  9. Serve warm with a honey mustard dipping sauce or ketchup (I’ve been meaning to make this one, from Sissi or this one from John but haven’t gotten around to it).

Read Full Post »

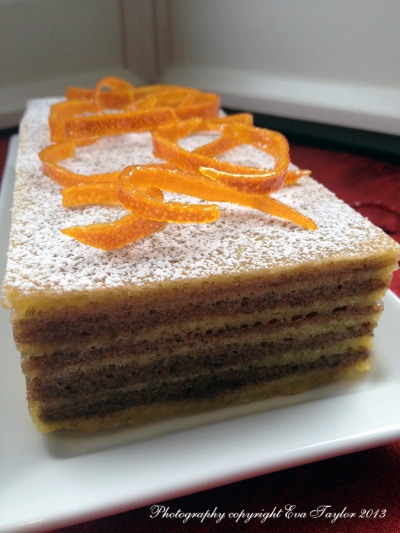
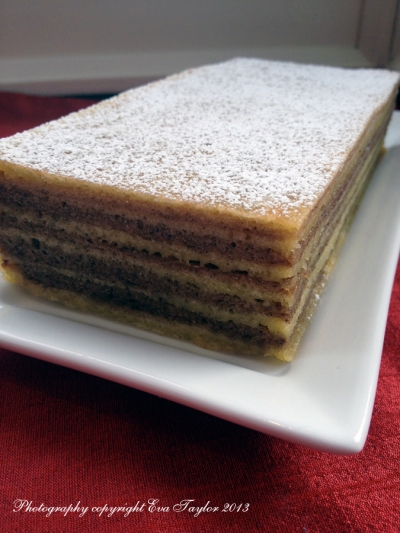
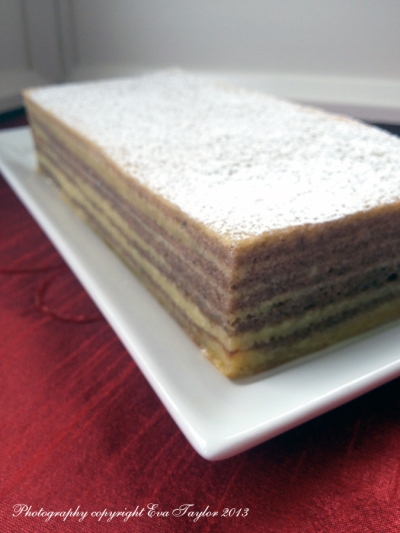
A mildly spiced layered cake

A mildly spiced layered cake

My friend Genie (Bunny. Eats. Design) in New Zealand very kindly invited me to participate in a new forum called Our Growing Edge which will be held monthly. It’s content will be defined by our cooking bucket list, so to speak — things that we want to conquer or need to conquer and upon our success (or failure!) we will create a post and link it to her page for the month. This is rather exciting because we all have our arch nemesis in cooking. Please click on over to Genie’s lovely blog (particularly on Tofu Tuesday’s when she showcases her most adorable flop eared bunny).

our-growing-edge-badge

In early January, my friend Sam (Sweet Samsations) posted a recipe for an Indonesian cake I had never heard of, which is not rare in this very large world of ours, but what caught my eye was the huge quantity of eggs used in this cake, Sweet Samsations uses 30 – THIRTY; I even found one that used 45 eggs! I just can’t imagine buying that many eggs for one recipe. But it is a beloved cake that’s for sure so I knew I had to look around and find a recipe with a more reasonable egg content because I HAD to make it. Fast forward to late January when Genie asked me to participate in Our Growing Edge, I knew what I wanted to make: Indonesian Spekkoek Lapis Legit. Now to find the time to bake it because it’s quite labourious as you bake each layer individually over the other in the same pan.

I landed on Food Network’s Emeril Lagasse’s recipe (didn’t make sense to me either) because his cake only used 12 eggs, and 12 is easily divided into two; I found my recipe, only 6 eggs! I did a quick assessment of the baking container that Emeril’s recipe used and determined that if I halved his recipe it would fit snugly into my 4″ x 6.7″ loaf pan. I didn’t get as many layers as I had hoped, but it still looked nice and it still had good flavour. Emeril suggests to decorate with powered sugar, and I added candied orange peel as garnish. I will serve it with the orange syrup that was the left over from candying the peel.

Indonesian Spekkoek Lapis Legit (Thousand-Layer Spice Cake)

Serves 4-6 depending on how thick you slice it

Ingredients:

  • 1 tsp ground nutmeg
  • 1 tsp ground cinnamon
  • 1 tsp ground allspice
  • 1 tsp ground mace
  • 1 tsp ground ginger
  • 1 tsp anise extract
  • 170 g (1 1/2 sticks) unsalted butter, softened
  • 1/2 cup granulated sugar
  • 1/2 tsp pure vanilla extract
  • 1/4 tsp salt
  • 6 large eggs, separated
  • 2/3 cups all-purpose flour
  • 2 tbsp confectioners’ sugar
  • Candied orange peel as garnish

Directions:

  1. Preheat the broiler (I have this range with two ovens, I used the larger oven with the rack in the lower middle so it’s not too close to the broiler).
  2. Butter the bottom and sides of a 4″ x 6.7″ loaf pan and line with buttered parchment paper. I left enough of the parchment to go past the top of the pan, so I could use it to lift the cake out when it was done.
  3. Combine the nutmeg, cinnamon, allspice, mace and ginger and set aside.
  4. Weigh your empty bowl, write down the measurement. In this bowl, cream the softened butter, 1/4 cup of sugar, vanilla, and salt. Add the egg yolks one at a time and beat until smooth. Fold the flour into the batter with a rubber spatula.
  5. In a clean bowl with clean beaters, beat the egg whites with the remaining 1/4 cup of sugar until stiff and shiny but not dry. Fold the whites into the egg yolk mixture, being careful not to over-mix. Divide the batter between 2 bowls. Add combined spices to 1 bowl and stir well.
  6. Weigh your bowl with the cake batter. Subtract this new weight from the old weight so you know how much your batter weighs and divide in half. Put your second bowl on a scale that can tare and zero it out. Pour half the batter into this bowl (you can see exactly when you reach half on the scale).
  7. Mix the spices into the second batter along with the anise extract.
  8. Pour 4-6 tablespoons of the batter into the bottom of the pan and spread out evenly. Sammy suggests to pre-heat the pan, which I didn’t do, but I suspect it makes spreading the batter much easier since my subsequent layers spread easier on the hot layer.
  9. Bake in a hot broiler for 2 minutes. Watch carefully.
  10. Pour 4-6 tablespoons of the spiced batter, spreading it over the first layer to form a thin second layer. Place the pan under the preheated broiler for 2 minutes, or until the layer is firm and very lightly browned. Continue until you have exhausted both batters. Emeril noted that the cake typically has between 12 and 15 layers — I ended up with 10, not bad for a first timer!
  11. Allow  the cake cool on a wire rack, turn out onto a cutting board and even up the sides by cutting clean new edges.
  12. Sprinkle with confectioners’ sugar and garnish with candied orange rind.
  13. Slice thinly and serve warm or at room temperature with additional orange syrup, if you so desire.
IMG_4167_BLOG

I should have made the layers much thinner

It's quite a show stopper!

It’s quite a show stopper!

My notes:

  • It’s a mildly spiced cake with a predominant butter flavour, I think I might increase the spices a bit more if I make it again because I thought it tasted a bit greasy.
  • The butter really does need to be soft so it makes a lovely smooth batter.
  • Many Indonesian bakers suggest to press down each layer after you bake it, although I did that, mine bounced right back.
  • It’s a very rich cake so you needn’t cut large pieces.
  • Next time I may try chocolate and vanilla layers or even vanilla and espresso flavour!

Read Full Post »

MM900356605

Happy Valentines Day! I can’t believe it’s the middle of February! And on top of it, it’s Valentine’s Day — do you have something wonderful planned for your partner? Or do you wait for the weekend?

We had our good friends Rae and Mon over for dinner a couple of weeks ago and I made this new rendition of the clafoutis we made in Lyon; I dare say I like this one a touch more, or at least it hit my taste buds perfectly. The warming spices of the cinnamon go well with the apple and the pudding. I will surely make this again.

Apple Cinnamon Clafoutis

Makes 6 Claffoutis about 10cm or 4 inches in diametre

Ingredients:

  • 2 eggs
  • 1 egg yolk
  • 80 g granulated sugar
  • 40 g all purposes unbleached white flour
  • 100 mL Carnation Evaporated Milk (or cream)
  • 150 mL milk (I used skim)
  • 1 tsp vanilla
  • 1/2 tsp lemon jest
  • 2 ripe sugar crisp apples

Cinnamon Slurry:

  • 2 tbsp butter, melted
  • 1 tsp cinnamon
  • 2 tbsp brown sugar

Directions:

  1. Pre-heat oven to 175° C (350° F).
  2. Butter the pans and dust with sugar until sides and bottom are totally coated.
  3. Combine the melted butter, cinnamon and brown sugar into a slurry. Pour into a squeeze container like this. Set aside.
  4. In a bowl, mix the sugar and flour well. Make a well in the centre and slowly pour the cream with the vanilla and lemon zest combined into the flour and then add the milk. Add the lightly beaten whole eggs and yolk and mix delicately until all of the flour and sugar are combined.
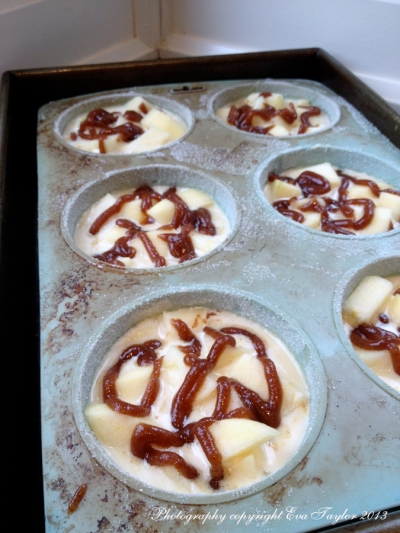
  5. Peel and cut up the apples into smallish cubes (1 cm or 0.5 inch), divide evenly in the 6 pans. Pour the pudding mix in about 1/2 way into each cavity and squeeze a pattern of the brown sugar cinnamon slurry on top; add the remaining pudding mix and squeeze a bit more of the slurry onto each one.
  6. Bake for about 45-60 minutes or until firmly set. Cool in pans and remove carefully.
    Set aside.
IMG_4053_BLOG

Pipe the Slurry over each pudding (I actually snuck a layer in between)

This time I made the microwave caramel sauce, if you want more, follow Tracey’s recipe.

Salted Caramel Sauce:

Makes just enough sauce to scantly decorate the clafoutis (there is enough sugar in the clafoutis without the sauce, it’s just lovely to decorate)

Ingredients:

  • 1/2 cup sugar
  • 1 tbsp corn syrup
  • 1 tbsp water
  • splash of lemon juice
  • 1/4 cup hot heavy cream
  • 1/2 tablespoon unsalted butter
  • 1 tsp sea salt

Directions:

  1. Combine the sugar, corn syrup, water and lemon juice together in a 2-cup microwave-safe measuring cup.
  2. Microwave until the caramel is just barely starting to take on some color, 4-6 minutes (depending on your microwave).
  3. Remove from the microwave and allow to sit. Don’t be tempted to keep reheating the caramel in the microwave until it is darker, it will become darker on its own.
  4. Combine the warm cream/milk with the salt.
  5. Slowly add the warm cream/milk and stir until well combined (be careful, it’s very hot still). Add the butter and stir until melted. Cool completely.

Assembly:

  1. Warm the clafoutis in the oven for about 10 minutes.
  2. On a large rimmed plate, pour the caramel sauce into the centre and spread out evenly.
  3. Carefully place one clafoutis into the centre of the sauce and serve warm.
IMG_4075_BLOG

There is a similar ratio of apples to pudding in this romantic dessert. The caramel was meant for the dessert, not your partner’s…

IMG_4078_BLOG

The slurry caramelizes within the clafoutis in the pan and the incredible flavour of cinnamon and brown sugar are woven throughout the pudding. Oh my.

Read Full Post »

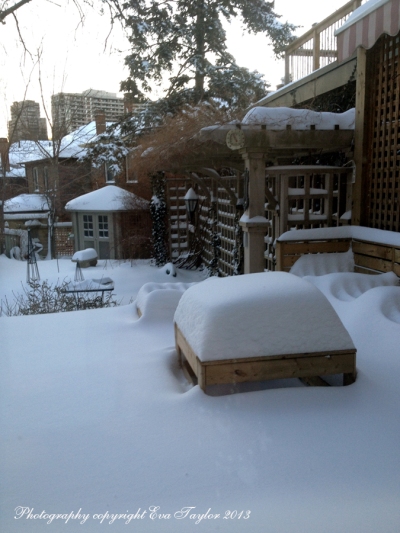
The Eastern Seaboard got dumped on again by Nimo and Toronto wasn’t spared this time. A total of 30cm (12inches) covered the city over 28 hours! Could have been worse. Here are a few shots for your enjoyment. Hope you were spared the carnage!

The view from the office

The view from the office

IMG_4125_JPG

View of the backyard, the morning after


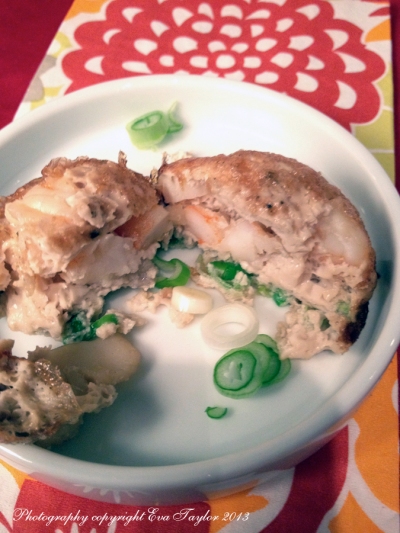
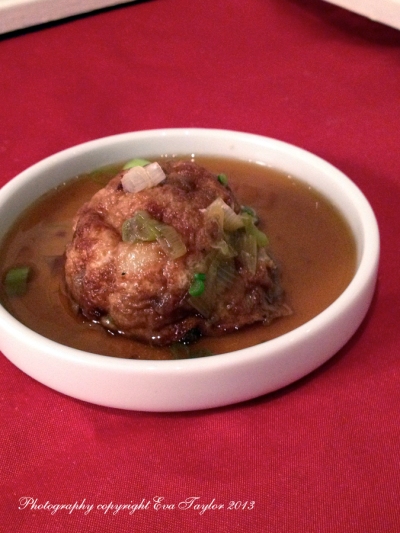
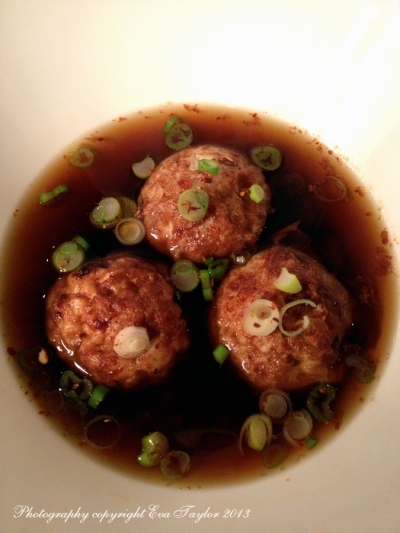
My dear friend Norma (at Garden to Wok) reminded me of a recipe I wanted to try. Norma posted Egg Foo Yung in April last year and I was so struck by it that I made it shortly after, with much success! Norma kindly suggested that next time I try it in the ebelskiver pan that Barb posted about. As you know, this Christmas Santa Barb generously bought me very own Ebelskiver pan and even though I’ve been giving it (and my arms, since it is cast iron) a good workout, I decided it was time to expand the horizons of the humble Ebelskiver pan. Last week, I needed dinner and thought, what an opportunity! So, I pulled out the pan and made Eggelskiver.

IMG_3983_BLOG

Very nicely shaped Eggs in this delightfully light broth

I followed the original recipe exactly, with the exception of the cooking time, since these were a bit thicker, they needed a little oven time (350°F) for about 12 minutes until the egg and seafood are cooked through. Because the round part is at the bottom, they get a gorgeous golden colour without having to flip so don’t bother! I put a few chili flakes onto the soup as garnish.

IMG_3985_BLOG

This casualty was just as tasty as it’s perfect cousins. I thought it was a good opportunity to show the texture. Sweet shrimp and scallops really rounded out the dish (no pun intended; OK, the pun was intended).

I will definitely make this again, thanks Norma for the suggestion, I almost like these better than the original!

IMG_3987_BLOG

I like the size of these balls, you could have one or all four.

Read Full Post »
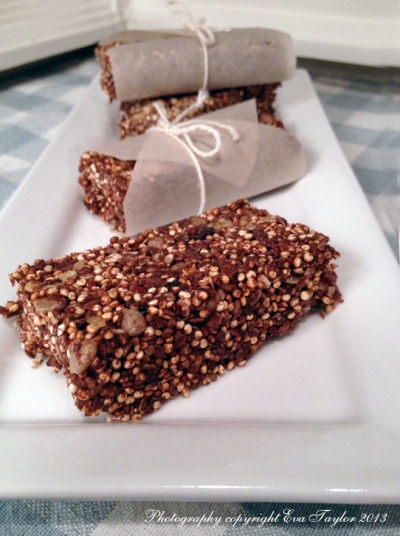
With JTs job, he sometimes misses lunch or dinner, so I went to our local health food stores to pick up some healthy energy bars. I was shocked! The high protein versions could run as high as $5 EACH! That’s absolutely crazy, and they are not even that “good” for you. So instead I bought some quinoa (sorry indigenous people of Peru), sunflower seeds, flax seeds, dark chocolate, dried cherries and agave and came home to search for a tasty recipe. My inspiration came from this recipe in Epicurious but it was purely Barb (from Profiteroles and Ponytails) that inspired the Quinoa addition to this treat, thank you Barb!

I toasted the quinoa so that it popped like pop corn; toasting brings out the nuttiness (hmmm, that’s a coincidence, when I’m toasted I become nuttier too ;-)!) and makes them nicely crunchy and not too jaw breaking.

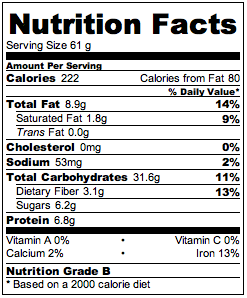
Note that I updated the nutritional facts because someone asked about calories. Check out the tool I used here.

A delicious healthy snack or meal replacement

A delicious healthy snack or meal replacement

Quinoa Energy Bars

Makes one pan 10″ x 13″ (25cm x 33cm), cut into 20 bars

Ingredients:

  • 2 cups toasted quinoa (or you could buy the commercially puffed quinoa, which is like puffed rice)
  • 1 cup unsalted sunflower seeds, slightly roasted in a frying pan
  • 2 cups uncooked oatmeal, old-fashioned or instant
  • 1/4 cup partly ground flax seeds
  • 1/2 cup dried cherries or other dried fruit
  • 3/4 cup crunchy peanut butter, organic, just peanuts
  • 1/2 cup packed brown sugar
  • 1/2 cup agave syrup or honey
  • 1/2 cup dark chocolate chips
  • 1/2 cup water

Directions:

  1. Pre-heat the oven to 121° C or 250° F.
  2. Prepare a 10″ x 13″ pan by lining it with parchment paper, enough to have the sides come up as ‘handles’.
  3. Add the quinoa to a hot dutch oven (you will need the high sides) and stir as the quinoa pops. Keep stirring so it doesn’t scorch. This volume will take about 10-12 minutes. The quinoa pops like corn, but not nearly as aggressively, but you do need the high sides of the pan, otherwise you’ll be chasing the quinoa all over the place!
  4. In the same pan, slightly roast the sunflower seeds. Combine with the puffed quinoa, oatmeal, flax and cherries. Set aside.
  5. In a micro-wave proof bowl, add the peanut butter, brown sugar, agave syrup and chocolate chips and microwave on a low setting until chocolate and sugar have melted . Add the water and stir well.
  6. Pour into the dry ingredients and mix well (I used a very large bowl with a wooden spoon). You want to make sure that everything is coated with the wet ingredients.
  7. Pour the combines ingredients into the prepared pan and press evenly into all corners (I used a glass as a rolling pin). Bake for about 20 minutes.
  8. Allow to cool about 10 minutes, carefully remove from the pan with the parchment handles onto a cutting board and cut into 20 slices. Allow to cool completely before storing in an air tight container in the freezer.

Notes: depending on how dry your house is, you may need to adjust the wet ingredients as the final product can be a bit crumbly (so say the comments on Epicurious). That’s why I added the water and baked it out. Mine came out nice and tight and even after freezing wasn’t crumbly.

Screen Shot 2014-01-27 at 12.29.17 PM

Read Full Post »
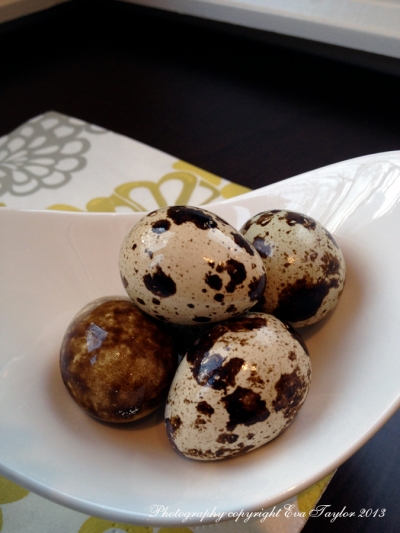
I had to post this again, because, OMG, aren’t they just the cutest? I’m talking about the teeny, tiny quail eggs. We were in Yorkville with Paul and T and I stopped into Pustateri’s (very high end expensive grocery store) to pick up some quail eggs to make tiny deviled eggs. I wanted a small egg because we were going out for dinner and I didn’t want a big, heavy hors d’œuvres to fill us up.

IMG_4018_BLOG

Aren’t they cute?

To see my original recipe, click here. I made 18 servings, and I only eyeballed the ingredients and had too much filling left over, I would suggest 1 tablespoon of mayo per four whole eggs, and you can eyeball the volume to make sure you’ll have enough and not too little. The quail eggs have a tougher membrane on the outside, so it actually makes it easier to peel than a normal egg.

Deviled Quail Eggs, a little hors d’œuvres

Makes 18 deviled eggs

Ingredients:

  • 9 quail eggs
  • 2.5 tbsp mayonnaise
  • 1 heaping tbsp Dijon mustard
  • salt to taste
  • Paprika to garnish

Directions:

  1. Put your desired quantity of quail eggs into a saucepan and fill with cold water to 2.5 cm or 1 inch over the height of the eggs. Bring to a boil and keep on a moderate boil for 5 minutes.
  2. In the meantime, prepare a bowl of cold water with lots of ice. Once the five minutes are done, strain the eggs and put them immediately into the ice bath. Let sit for 5-10 minutes, these will cool down very quickly because they are so small.
  3. Peel each egg, rinse off remaining shells. With a wet knife, cut each in half length-wise. Remove the yolk into a bowl, set whites aside.
  4. Add the mayo and Dijon to the egg yolks and whisk until it is smooth and totally combined.
  5. With your largest rosette maker in your icing piper, pipe into each egg cavity to fill. Garnish with a sprinkling of paprika.
  6. Refrigerate until ready to serve.
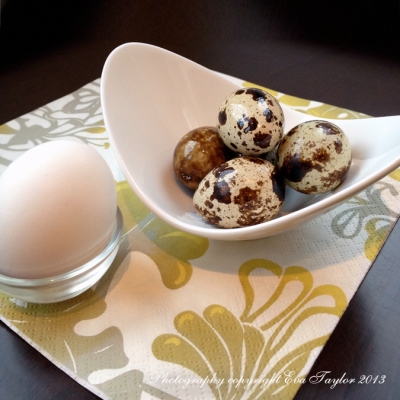
IMG_4020_BLOG

You can see the size difference to a Canada Grade A large egg on the left.

We had very special deviled eggs for our hor d'œuvres that evening.

I was going to system out the paprika mess on the back left egg, but then I decided to leave it real!

Read Full Post »