Feeds:
Posts
Comments

Archive for December, 2012

I must apologize, we were away for a couple of days after Christmas so I haven’t been as attentive with responding to comments and commenting; thanks for understanding.

This salad has become a staple in our home and would have been a great alternative to the Paella for our progressive dinner. I had trouble finding the authentic Lentilles du Puy until I spotted them in our Superstore for a fraction of the cost, but they are from Alberta! I read that the soil conditions are similar to that of Du Puys in France, 500g for about $2.75. I have yet to taste them to compare to the French lentils, but as soon as I do, I will update this post.

You have Charles at Five Euro Food to thank for this post. On my last entry for Lentilles du Puy, he mentioned he goes for lunch to a small bistro and they serve this salad with a poached egg on top. Here is his comment verbatim, it was so inspiring: “Hi Eva, this is one of my absolute favourite lentil dishes – the place I eat it serves it with small cubes of raw carrot which provide a lovely texture and… the pièce de résistance on top… a soft poached egg. Seriously, you HAVE to try that. Cracking open the egg so the yolk runs out over the lentils… it’s so lovely!” Of course, you just knew I HAD to have it. And at a risk of making JT SICK TO DEATH of this salad, I made it again (Luv you JT). Unfortunately, the photos are at night so they are crap, but you can certainly see the most deliciousness of the cracked yolk flowing over the lentils…it was very delicious and highly recommended.

PS. This time, I even added the small cubes of carrot to be sure I had the same experience. Thanks again Charles.

Poached Egg on Lentilles du Puy Salad with a Dijon Mustard Vinaigrette

What an AMAZING idea Charles, thanks so much!

Serves 4-6

Ingredients:

  • 1 cup lentilles du Puy (French green lentils) picked over and rinsed
  • 3 cups water (the original recipe has 6 cups but you have to drain the remaining water)
  • 1 onion, finely chopped
  • 3 pancetta slices, chopped (about 3-4 table spoons)
  • 1 garlic clove, finely minced
  • 1/4 teaspoon dried thyme
  • 2 fresh flat-leafed parsley sprigs plus 1/2 cup leaves, finely chopped
  • 1 red bell pepper, finely diced (about 3/4 cup)
  • 1 yellow bell pepper, finely diced (about 3/4 cup)
  • 1 carrot, finely diced (about 3/4 cup)
  • 4-6 poached eggs

For vinaigrette

  • 2 tbsp white-wine vinegar
  • 1 tbsp white balsamic vinegar
  • 1 1/2 tbsp Dijon mustard, or to taste
  • 1-2 tbsp cup EVOO
  • 1 bunch arugula, coarse stems discarded, washed well and spun dry

Directions:

  1. In a heavy saucepan render the pancetta to a crispy consistency. Remove pancetta and add the onions and sweat until transparent. Add the garlic, type and parsley sprigs (reserve the leaves). Cook for about 1 minute.
  2. Add the lentils and sauté for another minute, add the water all at once and simmer, covered, 20 minutes. Stir in bells peppers and simmer mixture, covered, until lentils are tender, about 10 minutes. Lentils may be made 2 days ahead and kept covered and chilled. Reheat lentils before proceeding with recipe.

Directions for vinaigrette:

  1. Transfer 2 tablespoons lentil-cooking liquid to a medium bowl and whisk in vinegars, mustard, and salt and pepper to taste. Add oil in a stream, whisking, and whisk dressing until emulsified.
  2. Drain lentils (if required, I didn’t have to) well in a sieve and discard parsley sprigs. Toss lentils with chopped parsley and vinaigrette and season with salt and pepper.
  3. Just before serving, arrange arugula decoratively around salad, or serve without as is pictured below.

The wonderful yolk breaks into the most luxurious sauce over the tangy lentilles, it is quite a lovely flavour and texture experience

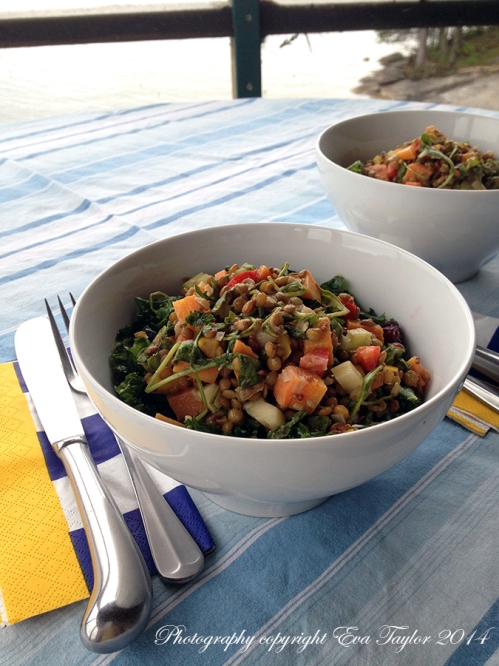
LentilsDuPuys-1

I retook this picture because I really didn’t like the light in the earlier ones. I also folded in baby Arugula into this version and laid it on a Kale salad.

Read Full Post »

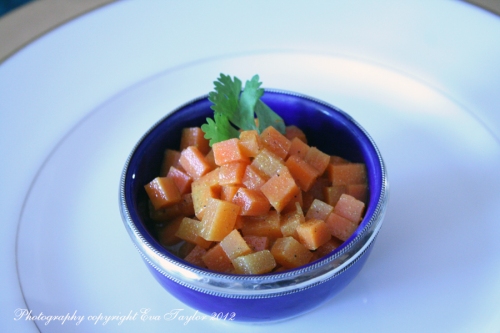
The same restaurant that I mentioned in a previous post, Bombay Palace serves a pickled carrot that I just can’t get enough of. It’s sweet, tangy and crunchy and delicious. Their version is very red because they put food colouring into it, I omitted the colouring.

Lightly crunchy and packed full of flavour

Carrot Pickle

Original recipe from here, but I changed it up.

Serves 4-6

Ingredients:

  • 1 medium carrot, about 200 g cut into cubes
  • 1/2 tbsp mustard powder
  • 1/4 tsp chili powder
  • a pinch each ground cloves and cardamom
  • 1 tsp salt
  • 1/2 cup rice vinegar
  • 1/4 cup olive oil

Directions:

  1. Blanche the carrots and stop the cooking in an ice bath. Drain well.
  2. Mix remaining ingredients in a seal-able container, add the carrot and refrigerate for 1-2 days.
  3. To serve, drain and rinse.

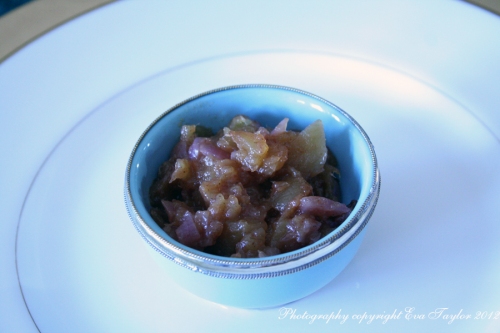
Sweet Mango Chutney

Ingredients:

  • Mango, not too ripe
  • 1/4 cup chopped red onion
  • 1 clove garlic, finely minced
  • 1 tbsp freshly grated ginger
  • 1/2 tsp ground cinnamon
  • pinch of ground cloves
  • 1/2 tsp salt
  • 1/2 cup cider vinegar
  • 1/4 tsp chili paste
  • water

Directions:

  1. Peel and seed the mangos and chop into 5-10 mm cubes.
  2. Place all ingredients into a non-aluminum saucepan and bring to a boil, reduce heat and simmer for 1 hour or until fruit and onion is very soft. Lightly mash with a fork. Allow to cool and place in a clean glass jar. Store in the refrigerator

Read Full Post »

We’re off on a little break, so if I don’t comment on your blog right away, please know I still love reading your blog and will be back as soon as I can.
Inspiration comes from anywhere but the places I seem to be getting my inspiration are the wonderful blogs I read. Liz over at That Skinny Chick can Bake made this incredibly beautiful Lemon Cream Dessert with the Secret Recipe Club; I was immediately smitten. Plus I needed a nice light dessert for the finalé of our Indian Feast. Now we’d all like to eat like Liz and look like her, but sadly, that is not my world, so I had to take her beautiful dessert as inspiration and find a ‘lighter’ version and I found it at Serious Eats — It’s a Greek Yogurt Lemon Mousse!

It’s an easy dessert to make and the egg whites are cooked over a bain marie, as if you were making Italian Meringue! I didn’t change a thing!

Now you’ll see in the last picture that the texture was described as spray foam insulation, but tasting way better. It’s definitely a firm mousse with very good lemon flavour! I will book mark this recipe for the future!

We got these adorable little pots in Paris; yogurt came in them, the company was celebrating their anniversary and packaged their product in these gorgeous pots

You see, I wasn’t fibbing! This is one of our breakfasts in our Paris apartment

The texture was described as resembling spray foam insulation, but tasting WAY better! Thx Gordon P XO

Read Full Post »

ChristmasDay

My Christmas baking list was altered somewhat because I just couldn’t get it all done with the small diversions I subjected myself to. This is what I had intended on baking:

Here is this 2012′s round up:

Plates ready to be delivered

Plates ready to be delivered. May I send you one too?

Here’s what actually went down:

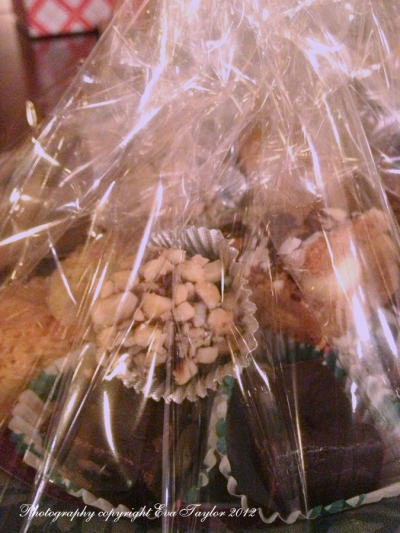
Very festive little parcels

Very festive little parcels

Card with legend

Read Full Post »

Christmas Wishes

Clipart from Microsoft Clip Art Gallery

I’ve never made fudge. There. I said it. I love fudge, but have never made it and when I saw Katherine’s (Rufus’ Food and Spirits Guide) recipe for his mother’s back of the bag fudge, I had to try it and with pure luck, I had everything in my pantry! The recipe came together very easily and the taste was wonderful, and great creamy texture (very much like ganache). Our tin of Sweetened Condensed milk was a slightly different weight than what the recipe called for so I had to adjust all the ingredients accordingly, plus I didn’t have butterscotch morsels so I used chocolate chips as the flavour. Kudos Katherine another great recipe to add to my Christmas baking collection!

Chocolate Peanut Fudge

Original recipe by Katherine at Rufus’ Food and Spirits Guide

Melt in your mouth, fudge-o-licious

Melt in your mouth, fudge-o-licious

Makes one 23 cm (9 inch) square pan, about  2 cm (0.8″) thick

Ingredients:

  • 3/4 cup sugar
  • 20 g unsalted butter
  • 300 mL Sweetened Condensed Milk
  • dash salt
  • 300 g chocolate chips
  • 155 g marshmallows
  • 1 tsp vanilla
  • 100 g peanuts (unsalted, skin off)

Directions:

  1. Line your square pan with parchment paper (it’ll make it easier to lift it out of the pan to cut it).
  2. In a heavy bottomed pot over medium heat, bring sugar, butter, sweetened condensed milk and salt to a boil, stirring constantly. Lower heat if it starts to brown too quickly.
  3. Remove from heat and add chocolate, marshmallows and vanilla; stir until smooth and marshmallows have entirely melted. Add peanuts and stir to combine.
  4. Pour into prepared pan and let set. Refrigerate once cool. The fudge should take a few hours to set.
  5. Cut into smallish square.
Delicious Chocolate Peanut Fudge

Delicious Chocolate Peanut Fudge

Read Full Post »

I promised a new take on the ma’amoul cookie, this one dates back to my Fannie Farmer Cookbook, first published in 1896, my version in it’s 12th edition. I first made this cookie in 2009 and have been keeping my eyes open for a new and updated version. I love the shape the ma’amoul brings to this old favourite and I love how the oatmeal adds a bit of texture to this delicious filled cookie. I would be leading you astray if I said this was an easily formed cookie, and I had to keep wetting my hands to make the dough pliable and not brittle around the sweet date paste, but once I got the hang of it, it went like clockwork.

Oatmeal Date Filled Ma’amouls

Still the same cookie, just in ma'amoul's clothing!

Still the same cookie, just in ma’amoul’s clothing!

Makes about 24 cookies

Ingredients for the Date Paste:

  • 1 cup pitted dates
  • 1/2 cup sugar
  • 1/2 cup water

Ingredients for the Dough:

  • 1/2 cup butter
  • 1/2 cup packed brown sugar
  • 1 1/2 cups flour
  • 1/4 tsp baking soda
  • 1/2 tsp salt
  • 1 1/4 cups oatmeal, pulsed for 2-4 minutes in a food processor

Directions:

  1. Preheat oven to 350°F.
  2. In a small saucepan, put the dates, sugar and water and gently cook until thick and smooth. Set aside and allow to cool completely.
  3. Cream the butter and add the brown sugar, mix well.
  4. Sift flour, baking soda and salt and add to the butter sugar mixture.
  5. Add the pulsed oatmeal, mixing thoroughly and adding 2-4 tbsp water to make a dough that can be rolled.
  6. Refrigerate for 15 minutes.
  7. Make 23 g balls of the dough. Gently press each ball into the palm of your hand so that it covers the entire palm (you’ll need the extra to fold up and cover the paste). Add about 1 teaspoon of the date paste into the centre and bring all the sides up to close in the paste. Place the ball of fill dough into the ma’amoul mold and gently press in. Tap firmly to release. Repeat until all the dough is used.
  8. Bake at 350°F for 15-20 minutes or until lightly golden. Allow to cool and enjoy!
The difference is that this is not a shortbread crust, it's an oatmeal cookie.

The difference is that this is not a shortbread crust, it’s an oatmeal cookie.
And that concludes the Christmas Baking 2012 Series. I hope you enjoyed it.

Read Full Post »

This time of year the blogosphere is chuck full of tempting recipes and creative ideas, the trick is to try to manage what you want to bake with what you can bake, given your time constraints. Last week, Kelly over at Inspired Edibles (a fellow Canadian) made up a very interesting vegan ‘brownie’ and although her’s looked delightful, I was inspired to make something a wee bit different, dare I say festive, plus it wasn’t necessary for me to keep it 100% vegan.

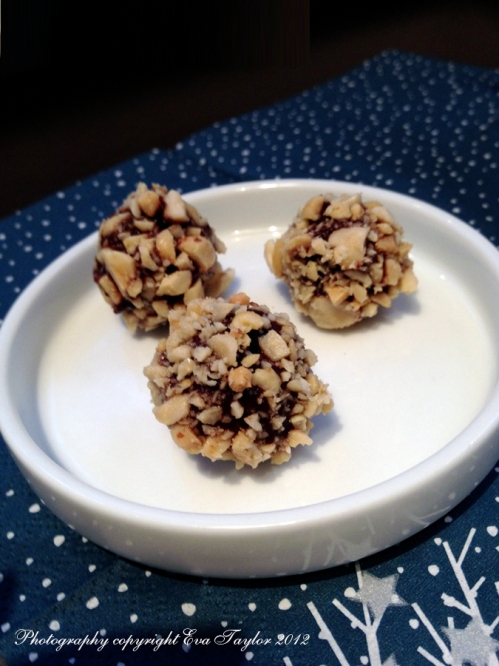
These are surprisingly good. I have a high tolerance for healthy (or healthier foods) but JT does not; if it doesn’t taste as good as it’s full fat/sugar cousin, he will want no part of it. But I kid you not, these passed even the strictest taste test: the JT taste test. So Kelly, I hope you don’t mind, here is a slight variation on your wonderful recipe, my dried fruit hazelnut truffles, thank you kindly for the inspiration. I used hazelnut butter and hazelnut essence because hazelnuts and chocolate are a winning combo in this household.

IMG_3694_BLOG

The smooth, sweet centre is nicely contrasted by the rich chocolate and crunchy peanuts.

Dried Fruit Truffles

Adapted from Inspired Edibles’ Vegan Brownies

Makes 50-60 pieces

Fruit Paste Ingredients:

  • ½ c dried prunes
  • ½ c dates
  • 1 cup dried blueberries (I couldn’t find cherries)
  • 1 c almond flour
  • 3 tbsp hazelnut butter
  • ¼ c unsweetened coco powder
  • 1 tsp hazelnut essence (or more depending on how strong it is)

Chocolate Coating Ingredients:

  • 1 cup semi-sweet and milk chocolate chips
  • 2 tbsp unsalted butter
  • 1 tsp hazelnut essence (or more depending on how strong it is)
  • 1 ½ cup coarsely chopped peanuts

Fruit Paste Directions:

  1. Combine all the ingredients for the fruit paste in a food processor and process until smooth. Make 1-1.5cm balls of the paste, set aside.
  2. Melt the two chocolates and butter in a saucepan over low heat, dip the balls one by one into the hot chocolate and roll in the chopped peanuts to coat. Refrigerate to set. Serve at room temperature.
Don't let these little delights fool you, they are darned tasty!

Don’t let these little delights fool you, they are darned tasty!

Read Full Post »

I’m sure I’m not the only one. In fact, I’ve seen it many times on-line, mainly when I’ve been sulking around the net after hours. I even know of a few professional photographers guilty of it, but not during work hours. It really snuck up on me quite innocently. I uploaded it on my iPhone after I saw someone using it on Facebook. I thought, WHAT? How could that be? I was sure you could only achieve that look professionally. That is, what I mean to say, is that only a professional could achieve that look. But there it is on Facebook, and it’s more than just professionals doing it.

Of course, I am referring to Instagram, that incredible quirky photo app that can take photo, apply an effect and store it on various platforms. But if you’re sneaky like me, you might even use that shot for your blog. There I said it, yes, I have been guilty of using this app on my iPhone for some of my blog photos. And have received some very lovely compliments on some of those shots. Not that I’m saying I don’t like to use my lovely Canon Rebel, but it is a pain to get it all set up with the tripod and setting the aperture, blah, blah, blah…when all I have to do is reach over and shoot. Yep, that’s all I do. Sometimes I don’t even bother with lighting (the Naan shots, the Chicken Soup Shots to name a couple). Until now. Instagram was acquired by Facebook last April, and you know that can only mean trouble, with a capital T. So December 18 they posted an updated to their privacy policy which basically said that any photo posted on Instagram (and there is no other way to use it) belongs to them and they can sell it. REALLY? Sell. my. own. photos? I think not. But then later that same day, after a lot, and I mean A LOT of backlash they backtracked and took it all back. But it’s only a matter of time and frankly, I’m not sticking around for it. So I found a great app called Camera Awesome, it’s free and they won’t steal your photos — yet anyway, and it has A LOT more features than Instagram. Given, some of these features are for purchase, but they are only 99¢ so they are not bank breaking. The best features are the selected focus and exposure that operate independently to each other (unlike the iPhone camera). Also, it has some really cool features to change the sharpness, vibrance, temperature and contrast, so you don’t need to export and open in Photoshop. I also found an app that can super impose text over the existing photo, so I can copyright it direct from my iPhone. I’ll never have to fire up the iMac again. So now you know my dirty little secret, I hope I can trust you not to tell. 😉

Do you sometimes cheat and use your iPhone for the shot, and if so, what apps do you use to help you make them stand out?

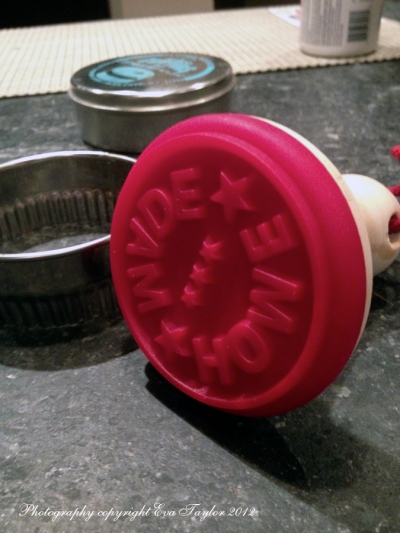
My friend, boss, neighbour Kim and I exchange a small token gift every year and this year she got me something I had my eye on from over at Angie’s lovely blog, this beautiful cookie stamp! I couldn’t believe it, I was very excited to give it a go.

This stamp makes a lovely cookie

This stamp makes a lovely cookie. iPhone Photo.

I made the recipe that came with the stamp. Big mistake. It was way too buttery and the indentations all but melted into a flat, round cookie. I was disheartened. But then I remembered I had a batch of chocolate marshmallow fondant left over from cake pops I made a previous week, so I had an idea! The cookies had good texture and great flavour, you just couldn’t make out the stamp, so I rolled out the fondant to about 1 mm thick and pressed the stamp into it, cut it with a similarly sized cookie cutter and applied it to each cookie after it had cooled completely. SUCCESS! I’m tempted to make another batch because this one might have been sampled over.

So if you want to make cookies like this, just bake up a batch of your favourite shortbread or sugar cookies. You can buy the stamp at Chapters or Indigo or on line. The fondant is a very easy recipe from my dear friend Sawsan’s blog, Chef in Disguise. I simply added about 1/2 cup of sifted unsweetened cocoa powder to the finished fondant and kneaded it well to distribute evenly. It was very easy and very tasty!

They chocolate fondant covered cookies turned out better than expected.

They chocolate fondant covered cookies turned out better than expected. Instagram photo on my iPhone

Or you can head over to Ilan’s blog and bake up this recipe; Ilan is an amazing baker and blogger. Just make sure you leave out the leavening as he suggests so that your formed cookie doesn’t lose it’s shape.

A nice, old fashioned gingerbread cookie. And there is no question that they are 'Home Made'

A nice, old fashioned gingerbread cookie. And there is no question that they are ‘Home Made’. Camera Awesome Photo on my iPhone but I hadn’t figured out how to select focus with it yet!

Read Full Post »

I’d like to apologize, this post was so unprofessional; when I left it last night, everything was done and it was timed to release this morning, as all my posts do. But for some reason, while eating my grapefruit and blueberries this morning, I decided to check it again on my phone and discovered a small typo at the beginning of the post, so I fixed it; unbenounced to me, I hadn’t refreshed the post on the phone to sync with the server, so what I actually did was update an older post, thereby overriding the actual post. ARGHHHHHHH! When I finally saw Norma‘s tongue in cheek comment later that morning, I realized my extreme faux pas. That’s what I get for using multiple devices to update my blog. I shall be ever more careful in the future, thanks Norma for calling me out. My punishment (well, other than mortal embarrassment), is to have to retype the entire post with the exception of the intro below. Now I’ll go stand in the corner.

I know there are many of you who, how shall I say this delicately, can’t stand to be in the same room as coconut, but here chez kitcheninspirations we love the stuff; the taste, texture, colour, aroma (makes me think of a beach vacation), we LOVE it! So this will not be the last coconutty thing we make, and unfortunately, you won’t be able to leave it out as it’s such an integral part of the recipe. So fasten your seat belts and prepare yourself for a chewy, lemony treat!

Chewy Lemon Squares

Chewy and lemony, I've never made this one with frosting and we have never missed it

Chewy and lemony, I’ve never made this one with frosting and we have never missed it

From Company’s Coming Squares by Jean Pare.

Makes 1 pan 9″ x 9″

First Layer Ingredients:

  • 1 1/2 c all purpose flour
  • 1/4 c granulated sugar
  • 1/2 c butter

First Layer Directions:

  1. Preheat oven to 350°F.
  2. Crumble flour, sugar and butter until mealy (you can save time and pulse this in a food processor, metal; blades)
  3. Press into ungreased 9×9 inch pan. Bake for 20 minutes.

Second Layer Ingredients:

  • 2 eggs
  • 1/4 cup lemon juice
  • 1 c granulated sugar
  • 2 tbsp all purpose flour
  • 1/2 tsp baking powder
  • 1 1/2 cups flaked, unsweetened coconut
  • 1/4 tsp salt
  • 1 tsp lemon essence

Second Layer Directions:

  1. Beat eggs slightly. Stir in the rest of the ingredients.
  2. Spread over shortbread base. Bake at 350°F for additional 30 minutes, until set in the centre and golden in colour.
  3. Cool and cut into squares, or bars.

Read Full Post »

I got off to a slow start this year due mainly to the fact that my cold just didn’t want to give up, even though I was doing everything right, like my Chicken Soup, Kelly’s delicious alcohol free Hot Toddy and lots of ginger tea with honey. And I still have a slightly lower octave voice but I’m feeling a lot better!

My Hungarian blogging buddy Zsuzsa suggested I post a list of my baking again this year, so here you go, my friend! I will also snap a few photos and post recipes in the days to come. Previously posted recipes are linked back, unless the photos were gross, in which case, I redid them and posted them again with a little twist!

Here is this 2012’s round up:

Now I bet you’re wondering where on earth did I get this gorgeous cookie mold; my dear friend Barb of Profiteroles and Ponytails was lovely to give it to me as a gift last June (shame on me for taking six months to make these gorgeous cookies with them). I know some of the bloggers (Betsy’s recipe, Sawsan’s recipe to name a couple) I follow have posted some very tantalizing recipes for ma’amouls, but I lacked their ingredients so I needed to find a recipe for which I had everything in my pantry. Plus these shortbread cookies have a lot, and I mean a lot of fat in them, so I searched and searched for a slightly lighter version. I made Bethany’s recipe with minor alterations and I also halved the quantity not knowing if we would love them. The dough is melt in your mouth shortbread dough, but it’s also a bit crumbly. The filling is lovely with the right amount of spice; before you jump to conclusions about the powdered sugar, I read somewhere that the date filled cookie is never sprinkled with powdered sugar . I will make these again, and I you’ll see how I’ve changed them up.

Ma’amouls

Please click here for original recipe, Bethany gives some great instructions.

IMG_3635_BLOG

Apparently the traditional ma’amoules are not dusted with powdered sugar.

Dough Ingredients:

  • 425 g semolina
  • 100 g potato starch
  • 225 g of butter, melted
  • 125 mL orange blossom water (I substituted water with a few drops of orange essence)
  • 100 g of caster sugar
  • 1 tsp ground green cardamom
  • 1 ma’amoul mold

Date Filling Ingredients:

  • 125 g dates, pitted
  • 1/8 teaspoon nutmeg
  • 25 g of almond flour
IMG_3634_BLOG

I was lucky that mine did not crack. Picture perfect.

Directions:

  1. Combine the semolina, farina, cardamom, sugar and butter together.
  2. Slowly add the orange water a tablespoon at a time, kneading it into a soft sticky dough (it shouldn’t stick to your fingers). Cover the dough and let it sit 2 hours.
  3. Prepare the filling while the dough rests. Add all the ingredients to a food processor container and process until smooth
  4. After it has rested, knead dough one more time and then divide into two or three even balls. Roll out each ball into a rope with a thickness of 2.5 to 3 cm. Cut to about 2.5-3 cm and roll into a ball.
  5. Flatten the dough using the palm of your hand on the counter and spoon a small size ball of filling into the centre. Lift up all sides and form into a nice round ball. It was suggested to roll this in some additional semolina before you press it into the mold, but it was greasy enough and the mold released it quite quickly.
  6. Bake in a preheated oven 200° C / 400° F until the sides are slightly brown in color. It will vary depending on oven — I baked mine for 20 minutes. Cool and serve.

No one will kick you out of bed for leaving crumbs!

Read Full Post »

So tragic

In light of the tragedy in Connecticut, Kitcheninspirations is not posting today. My heartfelt condolences go to the families.

Read Full Post »

Indian Dinner Party: Naan

Revised April 23, 2018, added weight measurements.

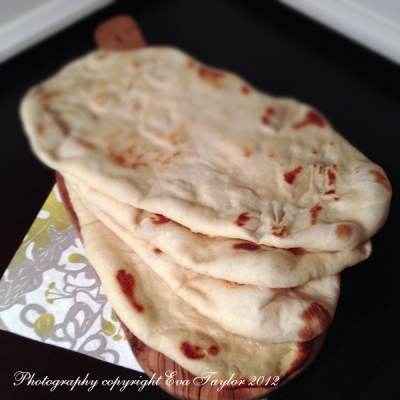
I have searched high and low for a good Naan recipe and much to my chagrin, I have never found one that was quite what I was looking for. I thought I had found them on occasion, but not quite. That is, until now. I found the Evil Shananigans and it seems that the author Kelly was in the same spot I had been in for so many years. Thank goodness that Kelly did all the work and came up with this fabulous recipe. The only thing I did was reduce the quantity as I didn’t need quite as many and I added 1 level tablespoon of milk powder. Why milk powder you ask? I read somewhere that it adds to the elasticity of the dough and I wanted a chewy dough and it worked wonders! Quite possibly the best Naan ever, I kid you not.

I used an inverted cast iron dutch oven in my gas BBQ to try to replicate the tandoor oven, and by George, I think I got it! The baking method really allowed the dough to bake slowly over indirect heat, maintaining the elasticity and also allowing some parts to crisp up. Dare I say, genius? I hope you’ll bring me down to earth, so I don’t get too comfortable tooting my own horn, even if it is once in a while.

Chewy and crispy at the same time

Chewy and crispy at the same time

Naan

Makes 4 109 g servings

Ingredients:

  • 245 g (1 3/4 cups) all-purpose flour
  • 5 g (1/2 tsp) salt
  • 2 g (1/4 tsp) dry active yeast
  • 3/4 cup milk, heated to 110F
  • 2 g (1/2 tsp) sugar
  • 5 g (1 tbsp) milk powder

Directions:

  1. Warm the milk to about 44° C or 110° F and dissolve the yeast and sugar. Allow to bubble up (about 5 minutes).
  2. Combine the flour, milk powder and salt in the bowl of your stand mixer and add the activated yeast. Kneed for 5 minutes until the dough is smooth and elastic (dough is rather tacky).
  3. Cover with plastic wrap and allow to rest for two hours in a warm place.
  4. Once rested, turn out the dough and divide into four equal portions (I measured mine to be about 109 g each). Make each portion into a ball and allow to rest 30 minutes.
  5. Roll out each ball into thin flat sheets (you’ll need a little flour so it doesn’t stick (15 cm x 30 cm) and then cover with a towel and allow to rest another 30 minutes. You can rub a little olive oil on top so it doesn’t dry out.
  6. Pre-heat your BBQ with an inverted cast iron dutch oven to the highest temperature. (I used an inverted cast pan to replicate the tandoor oven).
  7. One by one, drape each naan sheet over the ‘oven’ and bake until golden and slightly puffy (don’t worry, they will deflate).
  8. Keep warm in parchment wrapped in foil in an oven or serve immediately.
The most delicious naan yet

The most delicious naan yet

Read Full Post »

There is another Indian Restaurant in Toronto that we really like, and you’ve probably heard of it because it’s in all the major cities around the world, it’s called Bombay Palace on Jarvis Street. We usually go there for lunch and there are two particular things I love, the carrot pickle and the Aloo Papri Chaat (described as a sweet Medley of crispy wafers chickpeas, potatoes with yogurt-mint chutney dressing). I tried to find as close a recipe as possible to this tangy, sweet and crunchy side, and this one was pretty darn close. I had to make a few changes due to unavailable ingredients, but to be honest, the flavour didn’t suffer for it. I must warn you, it does take a lot of steps.

Aloo Papri Chaat

A delicious mix of sweet and tangy flavours with the crunchy texture of the wafers

Serves 4-6 as a side dish

Ingredients:

  • 1/2 cup all purpose flour
  • 1/4 cup Semolina flour
  • 1 teaspoon tamarind paste
  • 7-8 teaspoon sugar
  • 1/2 teaspoon red chili powder
  • 1 dried apricot
  • 1 small cooked potato, cubed
  • 100 g chick peas
  • 1/2 cup low fat yogurt (if using Greek yogurt, you will need to add milk to achieve the right consistency)
  • 1 chopped green chili
  • 1/2 teaspoon Chaat Masala (see spice mix below)
  • Salt
  • 1 cup peanut oil for frying

Directions:

  1. Make a soft dough with the flour and semolina by adding a little bit of water at a time.
  2. Roll the dough out into a rectangle and cut into bite-sized squares.
  3. Heat the oil to fry the squares and fry them until they puff a little and are golden. Drain oil off and set aside.

Directions for the Tamarind Chutney:

  1. In a small heavy bottom sauce pan, add the tamarind paste and the apricot. Add about 1 cup of hot water to it and heat to a boil until the tamarind paste dissolves and the apricot is mushy. Blend well with an immersion blender. Strain out any hard bits from the tamarind paste.
  2. Add the sugar, chili powder and mix well. Boil until all of the water evaporates and you are left with a thick rich paste.

Ingredients for the Chaat Masala:

Note: the original recipe for Chaat Masala called for Mango Powder which I did not have, and therefore I substituted the apricot into the tamarind mix to replicate the sweet and tangy flavour of the mango powder.

  • 1 tbsp coriander
  • 1 tsp cumin
  • 1/8 tsp cayenne
  • 1/4 tsp ginger
  • 1/2 tsp paprika
  • 1/4 tsp black salt

Directions for the Chaat Masala:

  1. Put all ingredients into a bowl and mix well. If some of the spices are seeds, you will need to grind them well.

Directions for the Yogurt Sauce and assembly:

  1. Whip the yogurt with a whisk until thin and runny (or if it’s Greek Yogurt, add a little milk),
  2. Add  the cubed potatoes, chopped green chili, the chickpeas and a teaspoon or two of the tamarind and mix well (being careful not to break up the potatoes).
  3. Add the bite sized Papri (wafers) and mix gently to coat.
  4. Garnish with Coriander leaves and finely chopped green onions.

A quick shot of the actual serving dish at the dinner party, the lighting sucks as it was already night

Read Full Post »

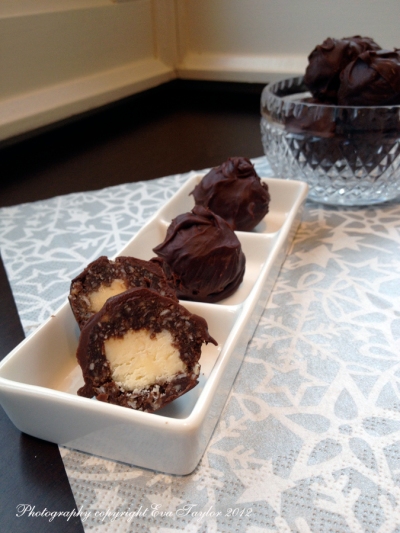
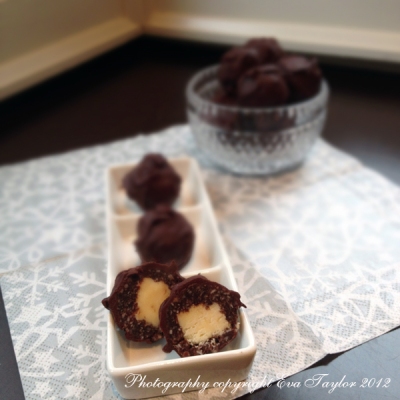
I posted a quick picture of this recipe on Facebook and Pinterest and received overwhelming response so instead of putting it in-line with my Christmas 2012 baking, I thought I would interrupt regular programming and post the recipe today. I did a search and found that I might indeed be the first person to make these all-time Canadian favourites into a truffle instead of their normal bar form. Every year JT asks me to make this bar, which personally I find just too sweet. I got to thinking a smaller, bite sized version might be the answer I was looking for so I came up with this idea and only had to marginally modify an existing recipe. I hope you enjoy it. And if you make them, please do let me know how it worked out.

Almost as teeth tingly as the regular Nanaimo Bars

Not nearly as teeth tingly as regular Nanaimo Bars

Nanaimo Truffles

For the original recipe, please click here.

Makes about 36 truffles

Inside Layer Ingredients:

  • ¼ cup unsalted butter, room temperature
  • 1 tbsp vanilla custard powder
  • 1 cup icing sugar

Inside Layer Directions:

  1. Cream butter, custard powder and icing sugar together well. Scoop out about 1 tsp and roll into a ball. Freeze for 30 minutes.

Second Layer Ingredients:

  • ½ cup unsalted butter
  • ¼ cup sugar
  • 5 tbsp cocoa
  • 1 egg beaten
  • 1 ¼ c graham wafer crumbs
  • ½ c finely ground almond flour
  • 1 cup coconut
  • 1/4 cup corn syrup (spray your measuring cup with non-stick spray and it will slide right out)

Second Layer Directions:

  • Melt first 3 ingredients in top of double boiler. Add egg and stir to cook and thicken. Remove from heat.
  • Stir in graham crumbs, coconut, almond flour and the corn syrup. Set aside.

Assembly Directions:

  1. Take about 1 packed tbsp of the second layer (crumb layer) in the palm of your hand and press to flatten to a large circle about 2mm thick.
  2. Put one custard ball into the centre and wrap the circle around the custard so that it totally covers it. Squeeze the crumb layer to form a tidy ball. Repeat until you have made all of the balls. Freeze for 30-60 minutes.

Chocolate Layer Ingredients:

  • 1 cup semi-sweet chocolate chips
  • 4 tbsp unsalted butter

Chocolate Layer Directions:

  1. Melt chocolate and butter over low heat and mix well. Without allowing the chocolate mixture to cool down, take a frozen ball and carefully stick a toothpick or skewer into it and dip into the melted chocolate to cover. Remove the stick and allow the chocolate to set on parchment paper (you could dip a finger into the chocolate to hide the hole, or not). The frozen balls will help set the chocolate faster. Store in refrigerator. Allow the balls to come back up to room temperature to serve.
IMG_3649_BLOG

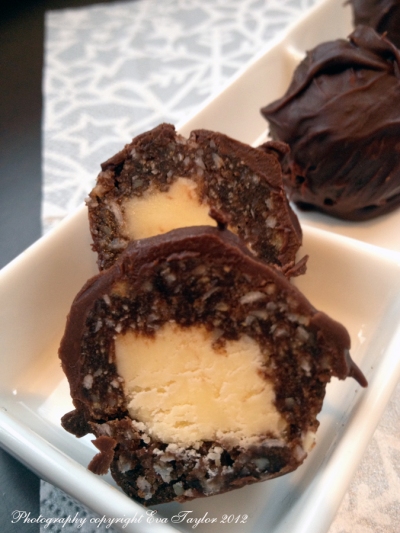
The centre is creamy and smooth which is a nice texture to the outside

IMG_3651_BLOG

Yum.

;

Read Full Post »

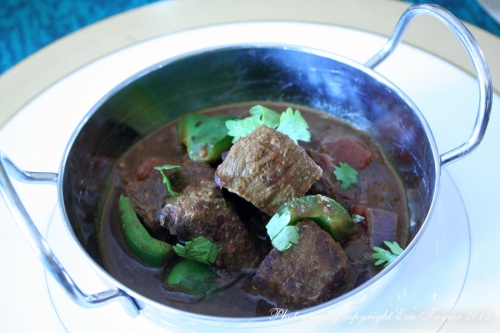
We have an Indian restaurant just north of where we live in BWV called North of Bombay. It’s a lovely place, nicely decorated in a contemporary style, close enough to walk (about 20 minutes) and the food is very good and it’s never crowded and the service has been very good. But for some reason, we ALWAYS order takeout or delivery. Indian is like that for us. And they have a crappy wine list. But they have the most delicious Beef Bhuna that we’ve ever had so that is the recipe I was trying to replicate for our Indian themed dinner party. Their menu describes it as Eye of round cubes cooked with fresh onions,green pepper, ginger, coriander, tomatoes, herbs & spices. So when I was searching the net, those were the key ingredients I was looking for. The recipe below is loosely based on this recipe but I changed it to replicate the flavours of North of Bombay’s Beef Bhuna. I also changed up the technique because I wanted to cook it slow and low as per Bœuff Bourguignon.

Beef Bhuna

Tender beef cubes drenched in a mildly spicy, fragrant, flavourful gravy

Serves 4-6 as part of a bigger menu

Ingredients:

  • 400 g eye of round beef, cut into 2.5 cm or 1 inch cubes
  • 1 Green Pepper, cut into similar size squares as the beef
  • 1 red onion, finely chopped
  • 2 tsp of mild curry powder
  • 1 tsp of Chilli Powder
  • 1 tsp Garam Masala
  • 1 tsp cayenne pepper (omit if you find this too hot)
  • a pinch of ground cardamon
  • 1/2 tsp coriander
  • 4 cloves garlic, finely minced
  • 2 tbsp fresh ginger, finely minced
  • 1+ cup water
  • 1/2 cup beef stock
  • 1/4 cup cilantro leaves, roughly chopped
  • 1/4 cup chopped green onions

Directions:

  1. Pre-heat oven to 300° F.
  2. In an oven-proof pan (like Le Creuset’s dutch oven) sear the beef in about 1-2 tbsp high flash point oil (like peanut or canola). Remove from pan. De-glaze with a 1/2 cup of beef stock, pour over the meat.
  3. Add finely chopped onions and cook well (I saw Madhur Jaffrey on Martha Stewart once and she said that Indian cooking doesn’t sweat the onions, but they cook the onions dark, but not burned).
  4. Add the curry, chilli, cayenne, cardamon and coriander and cook JUST until you can smell it. Add the garlic, fresh ginger and garam masala give a quick stir. Now add the water and combine well. Return the beef to the pan and give it a good stir. Cover and bake in the 300° F oven for 2-3 hours or until beef is fork tender. Check frequently and add water as required; you don’t want it soupy, just a nice light gravy. About 30 minutes to serving, add the green pepper — you don’t want the green pepper soft and mushy.
  5. Serve hot garnished with cilantro leaves and green onions with Basmati rice and Naan.


Read Full Post »

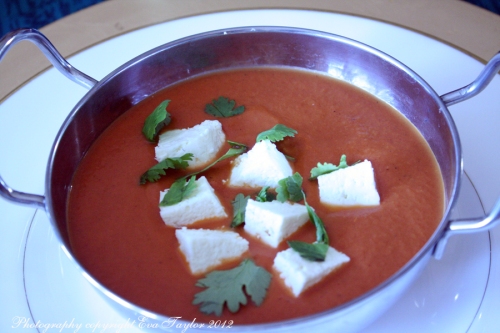
This is an absolute favourite of our household, but to be honest the gravy is usually laden with butter and ghee which is really bad for you, so I prefer to make my own so that it’s healthier. The Makhani gravy is from this recipe, but as I mentioned in the menu post, I had to add a little sweetness (I used Agave Nectar) to counter the very acidic tomatoes — I suspect that the full butter and cream of the original recipe would do the same, so if you choose to go full fat on this baby, omit the agave. There I said it.

The paneer is a soft unripened cheese made similarly to Ricotta, but instead of leaving it loose, you press it into a rectangular shape to be cut into cubes. Easy.

A delicious, rich tasting tomato gravy with gently firm paneer

Paneer Makhani

This is the original recipe I just doubled the quantity

Serves 4-6 as a part of several dishes

Ingredients:

  • 4 liter Fresh whole milk
  • 4-6 tbsp lemon juice

Directions:

  1. Heat the milk in the deep and heavy bottom pan at medium heat (this is really important, otherwise you will need to spend at least a half hour trying to clean the burnt milk off the bottom). Allow it come to a gentle boil and stay there for a minute. Make sure the milk is not vigorously boiling (also important, see note above). If it does, immediately reduce the heat and bring the milk back to gentle boil. But if you do burn your enamel pan, I have a great tip at the end.
  2. Add two tablespoons of lemon juice and quickly stir it in (because I had doubled the recipe, it took a bit longer to develop). At this point, you will start to see small curdles in the milk but no whey. Add another tablespoon or two of juice and again stir it in. The curdles will increase and you will slowly begin to see the yellowish whey. Add the last tablespoon of juice and with this, you should be able to see a clear yellowish whey separating from the curdles, switch of the gas immediately at this point. Depending on the acidity of the juice, the amount of juice you require may differ. Start with one tablespoon at a time till you achieve the results.
  3. You could save the whey, and if you do: Line another pan with double layered cheesecloth. Make sure the cheesecloth is long enough to be bundled up and hanged later. Run the whey through the cloth which will collect all the curdles. Set the whey aside.
  4. Wash the curdles in the cheese cloth, by running it through cold water to remove the lemon taste.
  5. Tie up the cheesecloth in a tight bundle and let it drain for about 30 minutes. Then place weight on the cheese to get it to be flatter and drain out extra moisture. I wanted a nice block of cheese so I pressed the contents of the cheese cloth into a square cake pan about 20 cm (8 inch). Then I took the still wrapped cheese and placed it between two cutting boards and put a heavy pot on top for 1-2 hours.You don’t want to add too much weight for too long as it can drain out way too much moisture from the cheese making it hard and crumbly. Your cheese should have a slightly elastic texture so when you lightly press your finger into it, it will bounce back.
  6. Wrap it and store it in the fridge for up to a week.
  7. Reheat very slowly in the microwave for 30 second spurts until too warm to touch. Add to the makhani gravy at the last minute (I didn’t want my paneer to fall apart).

TIP: if you happen to burn the milk to the bottom of your pan, try this handy tip, cover burnt area with a good thick layer of table salt, add a bit of water and heat but don’t hard boil. Using a silicon scraper, see if it comes off. If it doesn’t, do the same but instead of water, use lemon juice and this time bring to a soft boil. Using a silicon scraper, peel away the burnt layer. Voilà!

Read Full Post »

I am very excited to tell you that THIS post will tip this blog over the 100,000 views! I can hardly believe it. My humble little blog from Bloor West Village. Go figure. I was going to do some sort of prize, but I have no idea how to measure who my 100,000 visit was. So I’ll have to think of something else. WOOO HOOO!

20121204-154841.jpg

Oh Christmas Tree

We decorated the tree a few days after we got it home. Now I know it’s probably a lot larger than many cultures, but for Canadians this tree is small; even by our standards it’s a wee bit puny, we had to put it up on a table to get the height we needed! But I’m OK with that, because that just gives us more room for presents!

These delicious little bites were baked, believe it or not, and you will be surprised at how soft and chewy the centre is and how crispy the exterior becomes when you reheat. I don’t think I will deep fry my bhajis ever again.

Baked Onion Bhajis

Don’t be fooled by their size, they pack a big punch of flavour

original recipe from BBC. Makes about 24 mini bhajis.

Ingredients:

  • 2 large eggs
  • 1 Vidalia onion very thinly sliced
  • 120 g/4 oz all-purpose flour
  • 1 tsp ground coriander
  • 1 tsp cumin
  • non stick cooking spray

Directions:

  1. Pre-heat the oven to 400°F. Pre-heat a 12 or 24 mini muffin tin.
  2. Beat the eggs and add the finely chopped onion rings, mix well.
  3. Combine the flour, ground coriander and cumin and stir well. Add to the egg, onion mixture and stir well to combine.
  4. Generously spray the mini muffin tin, add about 1 tbsp of the batter per cavity. Bake for 7-10 minutes, then flip each bhaji so that it browns evenly on both sides and bake for another 7-10 minutes.
  5. Remove from the oven and allow to cool completely. To serve, pre-heat oven to 350°F and place bhajis onto a cookie sheet and heat for about 10-12 minutes, crisping up the exterior.
  6. Serve immediately with some onion chutney or tamarind chutney.

Read Full Post »

Dinner Party Menu: India

The other day my new friend Trang nominated me for the Liebster award. Thank you Trang.

liebster-award-21

You must be getting a sense that we love themed dinner parties. I love everything about it, researching the food, experimenting, cooking and decorating. We had the “King and Queen” 😉 of themed dinner parties over for dinner recently (remember Titanic Anniversary Dinner and Truman Capotes Black and White?) and as one of only two couples from our group who love Indian food as much as we do, we decided to have Indian night. All the food is home-made, of course, but don’t worry, I didn’t spend all day in the kitchen; what’s great about Indian food is that it’s down-to-earth home-cooking at its best and stews are often better tasting the second day, so I was able to prepare much of the feast in advance. This post will show the menu and the photos but the recipes will come one by one, so that I can find them in the future.

This was staged, we actually had A LOT more food than that!

Hors D’œuvres:

  • Baked Onion Bhajis — I’m excited about this recipe because I did a little experiment and figured out a way to bake them instead of deep frying them and they worked out GREAT!
  • Appetizer: Mulligatawny Soup — I prepared this soup similarly to the link to my original recipe, except that I omitted the proteins as the rest of the meal is rather heavy and I didn’t want to be full after the first course! I also puréed about 1/4 of the soup so that the broth is thicker and creamier, but left the majority as chunks.

Mains:

  • Paneer Makhani — this is a rich and delicious tomato gravy with home made unripened, pressed cheese. I used this Makhani recipe but I had to add about 2 tbsp Agave Nectar as the tomatoes were extremely acidic. I suspect that this acidity would be reduced if I had used full cream and butter of the original recipe, but then that wouldn’t be me, would it now?
  • Beef Bhuna — a tasty beef stew with a deliciously flavourful gravy
  • Basmiti Rice
  • Aloo Papri Chaat — a very flavourful and texture filled cold side dish with a yogurt sauce and chick peas

Condiments:

  • Carrot Pickle — a lightly spicy, crunchy pickle to cleans the palate
  • Mango Chutney — I wanted a mango chutney that wasn’t full of sugar

Bread

  • Naan — a delicious chewy Indian bread, baked on the outside of their tandoori ovens, stay tune for my experiment!

Dessert:

  • Light Lemon Mousse — this is where I skipped Indian and went straight to light and satisfying. I checked with our guests and similar to our tastes they find Indian desserts a little too sweet so I improvised. Plus I wanted to use the gorgeous little cups we bought our yogurt in while in Paris.

Read Full Post »

It’s that time of year again, cold and flu season. For the most part, I can pretty well ward off any cold or flu I come across with my evil powers (just kidding) but this one bugger finally got me late last week. I’d been plagued with a sore throat since a week ago Monday, but no coughing or sneezing or any other symptoms, until Saturday. My voice is now three octaves lower and a little raspier…dare I say sexy? Well, if it wasn’t for the sneezing and coughing, perhaps. But not so much ;-)!

We went Christmas tree chopping on Sunday (you may recall we did this last year too), I probably shouldn’t have gone, but I really, really, really wanted to. And it was cold, and slightly snowing. We snapped a few pics but the weather wasn’t great and I paid for it the following day. I stayed home and nursed my achy body. And with great timing, my friend Kelly up in Ottawa at Inspired Edibles created a alcohol free (I know, what was I thinking?) hot toddy that sincerely HIT THE SPOT. I will make this my go to winter drink when I feel a cold coming on. You can actually taste the healing properties (and heating properties ;-)!) I’m not going to post the recipe because I made it just as Kelly suggested (except I didn’t have star anise, so I used cloves instead) and her pictures are better anyway. Please do yourself a favour and try this drink. It is seriously yummy and it works!

Lightly snowing made it picture perfect for tree cutting
No, we don’t just walk into a forest to chop down our tree, we actually to go a tree farm!

We chose another smallish tree, but this one has a lot more girth (but Mum’s the word when the tree asks if it looks fat all dressed up!)

We’ll decorate it tomorrow night! (Weird glow is from the iPhone 4 flash)

When we arrived home that evening, I just felt like soup, so I made just what the doctor ordered, chicken noodle soup. This is a variation of Nigella’s Cold Cure Soup as I wanted something a little simpler than her version. And I only put 1/4 of a fresh lemon into it as I have found that more than that can make the soup bitter tasting, particularly when your taste buds are a bit off with a cold.

Cold Cure Chicken Noodle Soup

Serves 4 generous portions

A gorgeous mix of carrots, parsnips and onions garnished with parsley and green onion. There are glass noodles hiding in there too!

Ingredients:

  • 2 bone in, skinless chicken breasts (about 400-450 g)
  • 1 medium carrot, cut into large chunks
  • 1 medium parsnip, cut into large chunks (reserve the tops)
  • 1 medium onion, roughly chopped
  • 4-5 cloves of garlic, smashed but left whole (so you can remove them)
  • 1/4 lemon
  • 1 tsp canola oil
  • Water
  • Salt to taste
  • Glass noodles
  • Parsley to garnish
  • Green onion to garnish
This is the instagram photo

Directions:

  1. If the chicken still has some fat on it, remove all fat (you’ll thank me later so your soup isn’t a large puddle of grease!). Sear the chicken breasts, meat side down until lightly browned.
  2. Add onion, carrots, parsnips, garlic and the lemon. Stir for a moment. Fill the pot with water to cover all of the chicken and vegetables.
  3. Wash and tie the parsnips tops, add to the soup pot. Cover and simmer until chicken is tender and cooked through (I found that 1 hour 30 minutes was good for our chicken, but you should definitely check the internal temperature) You don’t want to cook it too long so that the vegetables are not mushy!
  4. Remove chicken and allow to rest for about 5-7 minutes (covered). Taste and salt stock to your preference.
  5. In the meantime, soak the glass noodles according to directions.
  6. Strain the soup through a fine sieve, reserving the carrot, parsnip and onions. Discard the parsnip tops, garlic and lemon.
  7. Cut the carrot and parsnips into small bite size sticks.
  8. De-bone the chicken and tear into small bite-size pieces.
  9. Into four bowls, add even amounts of the noodles, vegetables and chicken and cover with the hot stock.
  10. Serve immediately garnished with parsley and green onions.

On an unrelated note, my blog is fast approaching our 100,000 visitor! I’m hoping we can reach that goal before the new year. I might even do a give away! Stay tuned.

Read Full Post »