La Carihuela is a cute beachside neighbourhood in Torremolinos where we spent our first six days in Spain. We decided to begin wintering there because we have friends there and it is slightly warmer than San José. It also has a lovely pedestrian promenade surrounded by many of restaurants and shops. Although it is rather touristy, you can find good, reasonably priced grocery stores and some cute local shops not far from the promenade. We had a marvellous time with our friends Andy and Mark touring their favourite spots, often walking more than 20,000 steps!
A little reprieve from walking and walking
Lunch in Torremolinos
Our Spanish Gang
Our Spanish Gang
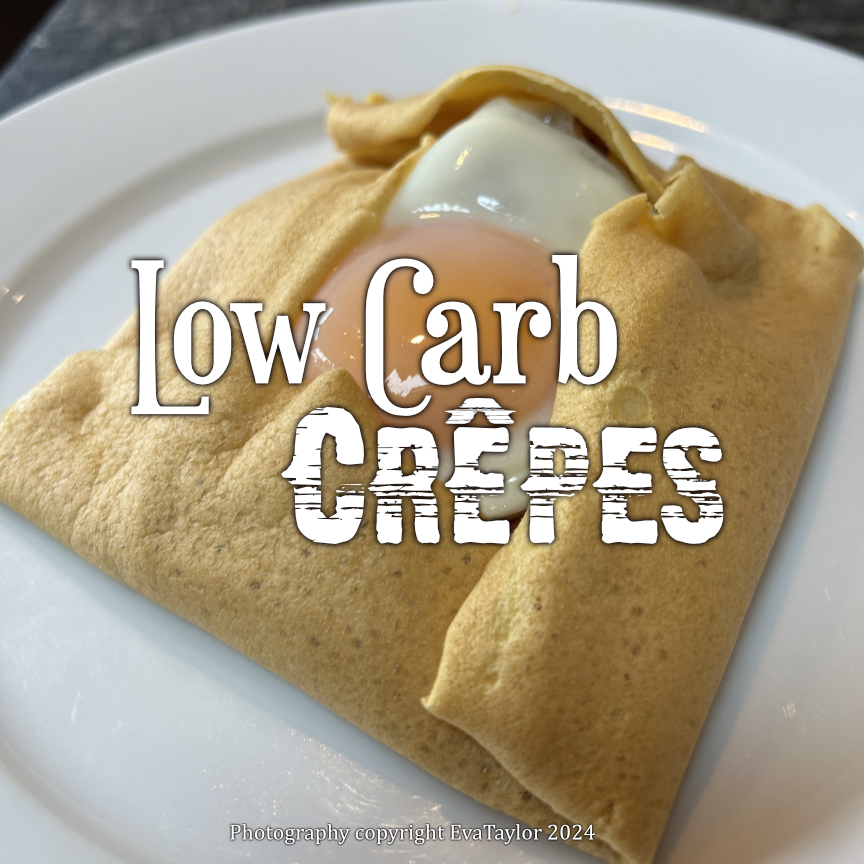
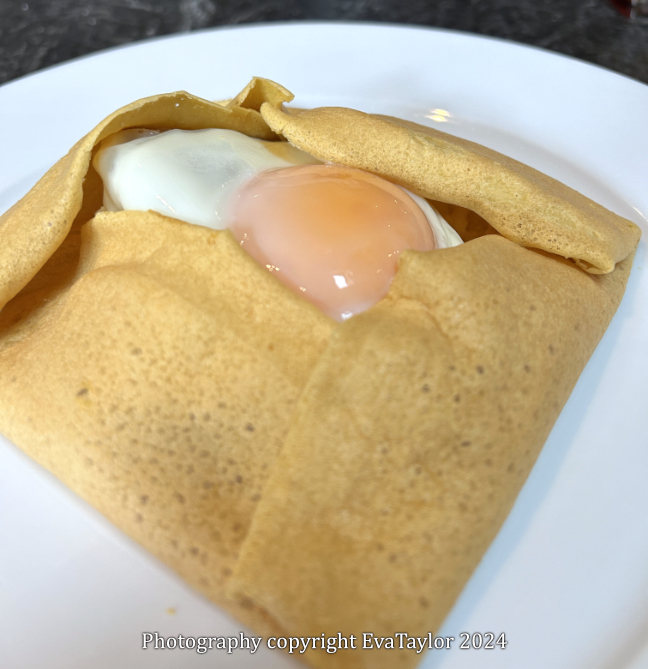
Spain does not have the variety of ethnic restaurants as Toronto does, so some of our ethnic fav’s had to be put on hold, like crêpes. Crêpes are one of my all-time favourites! They are so versatile from sweet to savoury, but to be perfectly honest, I prefer savoury. And the Croque Madame Crêpes surely hit the spot. These low-carb crêpes are the closest to the real thing I have found. You should not make the batter too far in advance like the traditional crêpe as the lupin flour absorbs too much of the liquid ingredients, ten minutes is just about perfect. These crêpes are a bit more delicate than standard crêpes, you’ll want to use a good non-stick pan lightly oiled on medium to low heat.
Low-Carb Crêpes
Makes 2 crêpes, to make more just multiply the ingredients by the number of crêpes you require.
Ingredients:
2 eggs
45 mL soda water (or more)
2 tbsp oat fibre
2 tbsp lupin flour
2 tbsp vital wheat gluten
Salt
Directions:
Combine all of the ingredients in the jar of your blender (I used an immersion blender) and blend until smooth. Allow to sit at room temperature for a maximum of 10 minutes. The batter should coat the back of a spoor lightly, if it’s too thick, add a bit more soda water and blend again. Use immediately.
Use a good non-stick pan lightly oiled on medium to low heat to cook these crêpes. Cook them until the edges shrink away from the pan, and flip and cook another minute longer. Cover cooked crêpes with a clean tea towel until you are ready to serve them (they dry out rather quickly so if you want to keep them warm, cover with a damp tea towel).
Some of you may have noticed that I haven’t been as present in the blogging sphere in February and March, and that is because we spent the month of February and some of March, wintering in Spain this year, and then we enjoyed some adventure. The first part of our trip was in La Carihuela in the Torremolinos neighbourhood of Malaga. We met up with friends for 6 days and soaked in the sunshine. Then, we rented a car and zipped off to my Cousin Lucy’s flat in San José where we spent three weeks, enjoying the sunshine. We had booked a couple of days in Alicante and then we zipped back to Malaga for 11 days, this time we rented a flat in the old centre of Malaga and visited with our friends and their friends, in La Carihuela. From Malaga, we flew to Istanbul, Turkey for a Viking Cruise to Greece. I will do a more detailed post on our Viking experience in the coming weeks. This was our first cruise in 38 years (our honeymoon was a cruise) ! After we landed in Athens, the culmination of our cruise, we flew to London for 4 days and then to Dublin for 3 days and arrived home for the last of winter weather on March 27. It was definitely a whirlwind trip with old friends and new friends and we hope to recreate it again in the coming year.
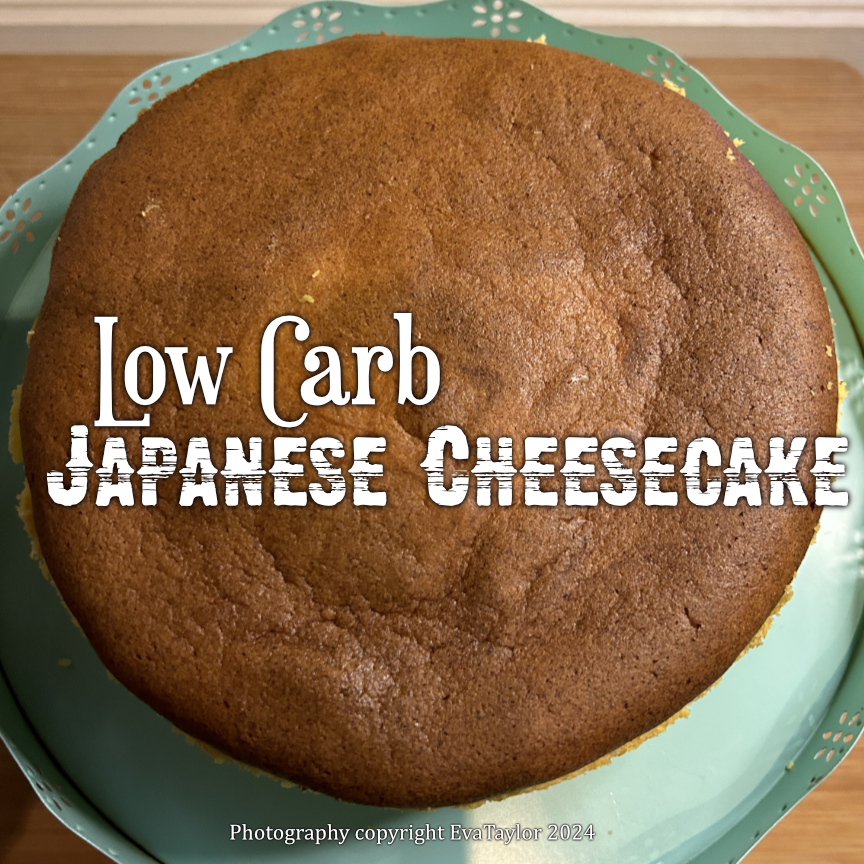
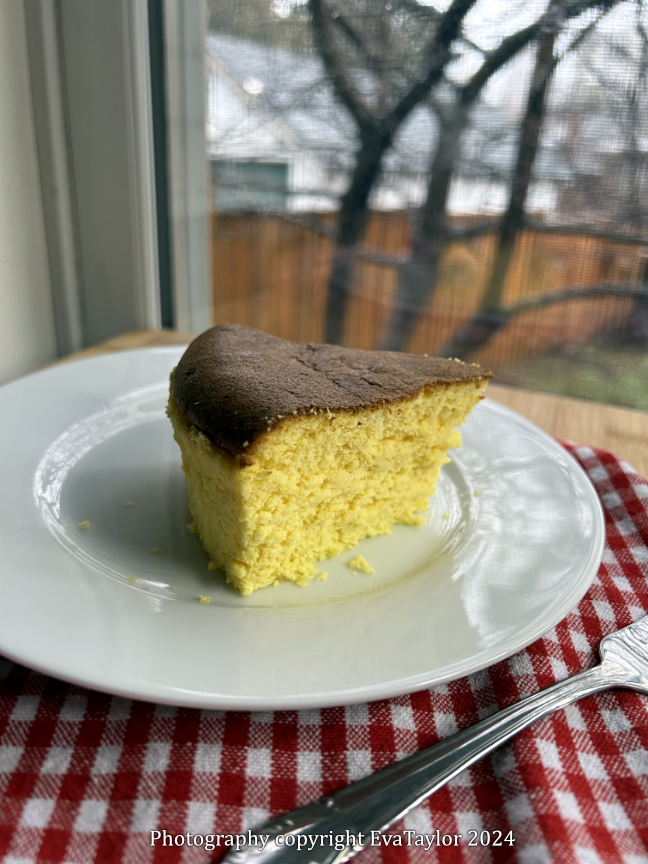
Unfortunately for us, Basque Cheesecake is from the Basque region in Spain, in the far north. Of course, you can find cheesecake everywhere in Spain, but is it authentic Basque Cheesecake? Basque Cheesecake is a slightly burnt, crustless cheesecake. Who needs crust on a cheesecake? I first made the crustless Basque Cheesecake in December 2022 and to be honest, I didn’t miss the crust. Yes, it does add texture but honestly, who needs (or wants) the extra calories? Plus, graham cracker crumbs of late are absolutely awful, they have a strong chemical odour which is definitely a downer for me. Next comes the Japanese Cheesecake. Japanese Cheesecake is also a crustless cheesecake but it is also a lot less dense than the Basque Cheesecake which for me is a plus. You could put a fruit couli on top for colour, but it doesn’t really need it. It’s quite lovely on its own.
unsalted butter (for greasing the pan and parchment paper)
150 g cream cheese
30 g unsalted butter
150 ml heavy (whipping) cream (¾ cup + 4 tsp, to be precise)
100 g Erythritol (for the cream cheese mixture)
3 large eggs
40 g cake flour (I used 20 g lupin flour 20 g vital wheat gluten)
1/4 lemon (for the zest)
15 ml lemon juice (from ½ large lemon)
Directions:
Preheat the oven to 350° F. Prepare your springform pan by lining the bottom with parchment and then rubbing butter on the bottom and the sides. Line the bottom of the exterior with 2 layers of foil (to prevent water leaking into the cake because it will bake in a bain marie). Take a larger pan than the springform pan and fill it halfway with water. Place in the oven to warm.
In the top bowl of a double boiler (or make-shift bain marie) place the cream cheese, butter, heavy cream, and sugar into the bowl and simmer over low heat until everything melts and is cohesive. Separate the eggs and set the egg whites aside in the refrigerator.
Remove the bowl from the heat and whisk in the three egg yolks, one at a time until fully combined.
Sift the flour into the cheese mixture and whisk until fully combined. Pour the mixture through a fine sieve pressing through as much as possible, discarding the larger bits. Set aside.
Beat the egg whites into stiff but not dry peaks. Fold the beaten egg whites into the cheese mixture.
Pour the mixture into the prepared pan. Turn the heat down to 325° F. Set the cheesecake mixture into the ban marie and bake for 70-75 minutes. Lower the temperature to 300° F for an additional 10 minutes to give the top a beautiful golden colour. Turn the heat off and open the door slightly. Allow the cheesecake to cool completely in the oven. The cheesecake will shrink and become denser as it cools.
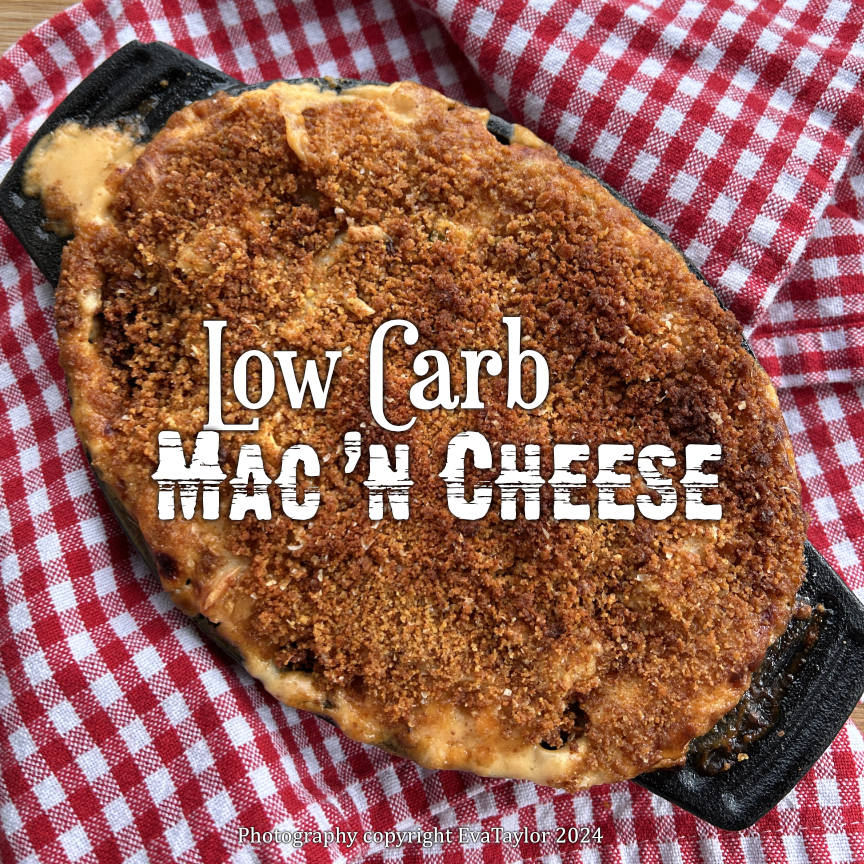
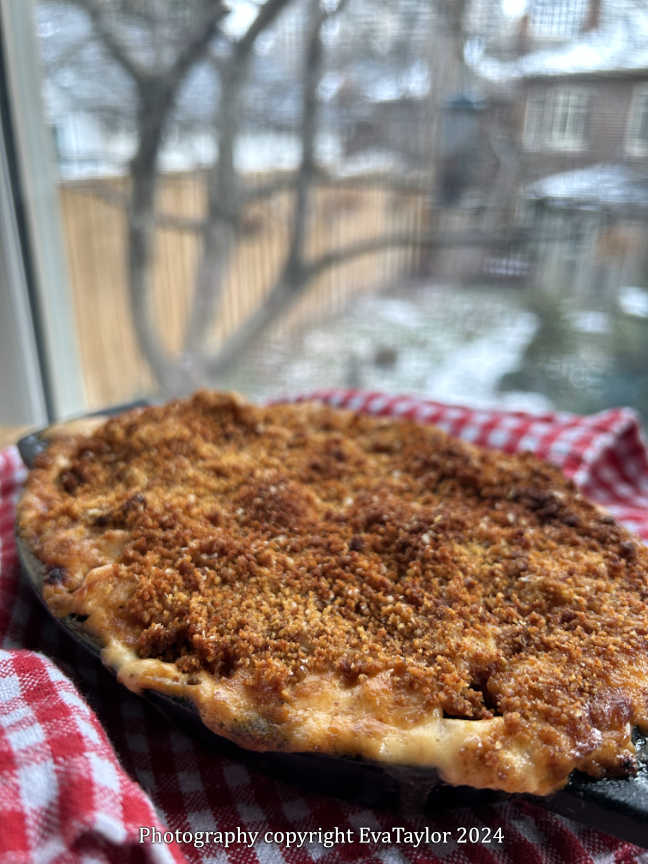
When one is on a low-carb diet, one misses the old favourites like Mac ‘n Cheese. We particularly LOVE the way the cheese caramelizes on the noodles at the edge of the baking dish so they become crispy and slightly chewy. Most low-carb bread crumbs end up being almond flour which really makes the dish very heavy, I solved that problem by using my low-carb bread, toasted and pulsed into breadcrumbs. If you didn’t know this was low-carb, you wouldn’t have had a clue.
The noodles really maintain their shape and the sauce sticks to it nicely.
Classic Low-Carb Mac ‘n Cheese
A Kitcheninspirations original recipe
Serves 2
Ingredients:
100 mL milk, chicken stock, or water
60 g cream cheese
60 g Cheddar, grated
30 g Gruyère, grated
30 g Mozzarella, grated
1 slice of bacon, cooked until crispy
1 scallion, thinly sliced
92 g low-carb Garganelli, uncooked and dry
30 g Parmesan Cheese, grated, divided
30 g low-carb bread crumbs
10 g butter, also a little to coat the pan
Directions:
Preheat the oven to 350° F. Prepare an oven-safe dish by buttering the inside all-over and sprinkling about half the Parmesan cheese all over the bottom.
Begin to heat the milk very slowly over low heat. Add the cream cheese, cheddar and gruyère and continue to heat until totally melted and incorporated smoothly into the milk. Take it off the heat and fold in the Mozzarella, bacon, and scallions.
Add the warm cheese sauce to the uncooked pasta and stir it so the sauce penetrates all of the hollows of the Garganelli. Pour the coated pasta into the prepared oven-safe dish.
Combine the remaining Parmesan cheese with the bread crumbs and butter and mix until crumbly. Top the pasta with the grated cheese mixture.
Bake for 30-45 minutes or until the pasta has cooked through and has begun to caramelize on the bakeware.
Fresh out of the oven, the cheese was still bubbling!
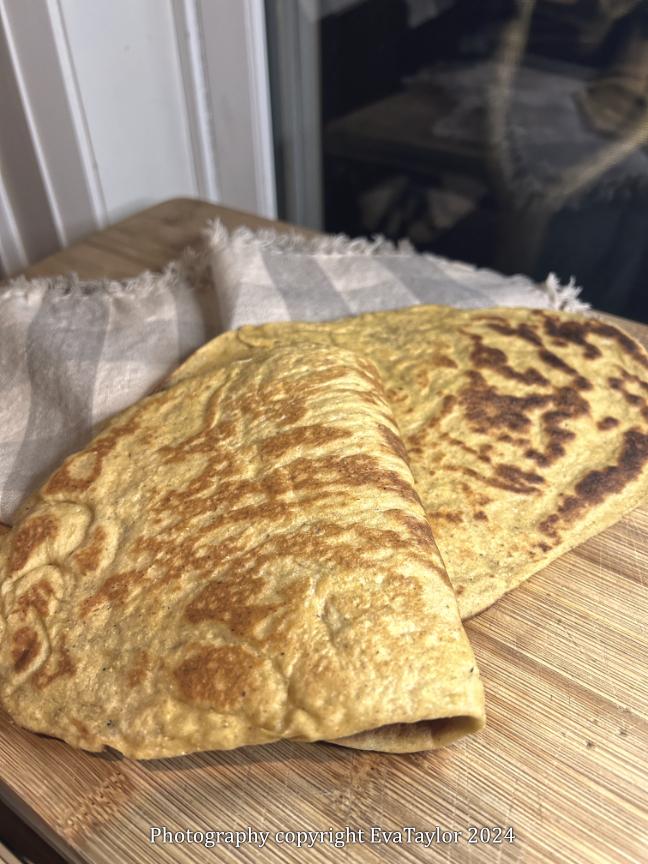
Stop right now! You have to make this if you are doing a low-carb diet. This is literally the best low-carb flatbread I have ever created. They’re fabulously chewy and springy. They fold perfectly to cradle the kebab and resist cracking or breaking apart.
This flatbread has been a long and difficult journey. JT has had to endure some pretty bad flat bread samples. True, it’s pretty easy to make a flatbread that is thin and holds your kebab, but the difficulty lies in the chewy and springy texture that the original flatbread has. It’s mandatory for flatbread. This recipe has it all.
Low-Carb Flatbread
A Kitcheninspirations original recipe
Makes 8 flatbreads
Ingredients:
320 g water, about 60° F
2 g sugar
8 g instant yeast
80 g Lupin Flour
170 g Vital Wheat Gluten
38 g Oat Fibre
30 g psyllium husk, ground
48 g Erythritol
8 g Sea Salt
20 g baking powder
Directions:
Combine the water, and yeast and set aside to allow the yeast to bloom.
In the large bowl of your stand mixer, combine the erythritol with vital wheat gluten, oat fibre, lupin flour, psyllium husk, and salt, and stir to mix well.
Once the yeast has become foamy, add it to the flour mixture and knead with the cookie dough paddle until the dough has come together. Allow to rest for 5 minutes. Sprinkle the salt and baking powder onto the dough and continue to knead for 15 minutes. Form the dough into a ball with your hands and cover to rest for 30 minutes.
Once rested, divide the dough into 8 equal portions, roll out each piece into an oval, rub with EVOO and allow to rest for 10 minutes covered with a clean kitchen towel.
Preheat a cast iron pan on medium heat. Cook each flatbread until golden, flip and continue until all have been cooked. Freeze in an airtight container/bag. Defrost in the refrigerator and reheat, slightly dampened with water on each side.
The kebabs fit into this flatbread perfectly.
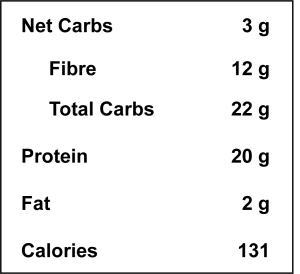
Low-Carb Flat Bread Nutrition for 1 flatbread
Notes:
The sugar gets completely eaten by the yeast, although I have included it in the nutitional ingredients.
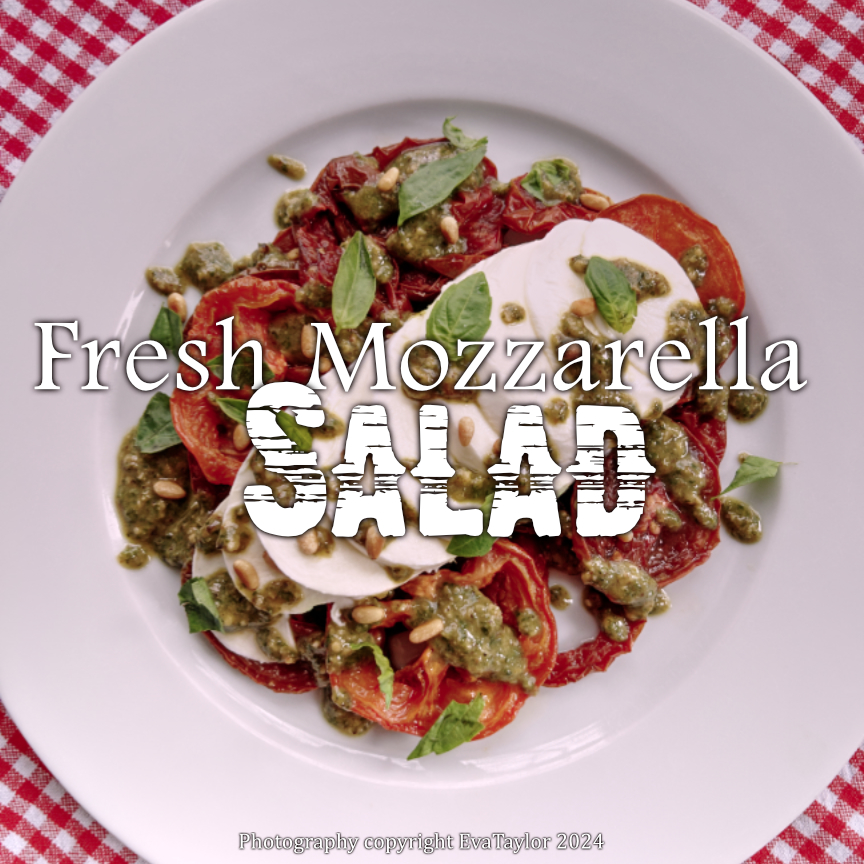
This is an update of a salad I used to enjoy at one of favourite Italian restaurants in Yorkville. Unfortunately, they took it off the menu so I had to remake it at home.
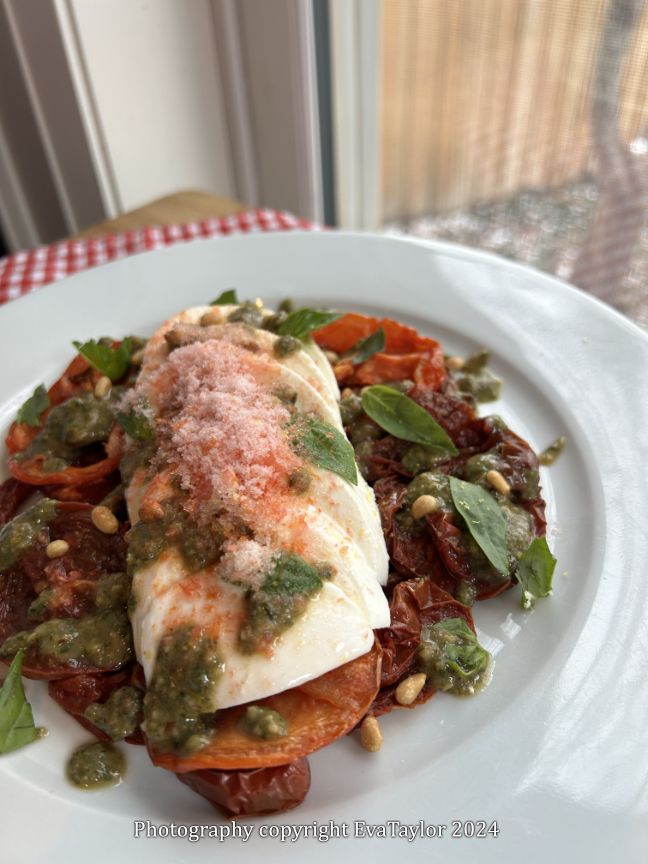
They roasted the tomato slices in their wood-fired pizza ovens because Toronto tomatoes are brutal, particularly in the winter. I don’t have a wood-fired pizza oven, so I air-fried them with my Instant Pot Air-Fryer lid. You don’t want the tomatoes completely dehydrated, just enough to condense the flavour so it actually tastes like a tomato. Top the slices with a fresh mozzarella or better yet, a burrata and dollop homemade pesto mixed with a little prosecco vinegar and sprinkle some toasted Italian (or Spanish, as I had) pinenuts over the dish. Presto, you have a memorable appetizer.
The tomatoes really pop when you remove some of the moisture, a perfect foil for the rich fresh mozzarella
Fresh Mozzarella Salad
Serves 2-4
Ingredients:
4-6 tomatoes, sliced in half, deseeded and air-fried
1 Fresh Mozzarella or Burrata
60 mL Pesto
30 mL Prosecco vinegar
15 g pinenuts, toasted
1 lemon, zested
Fresh basil leaves
Directions:
With everything at room temperature, lay the dehydrated/roasted tomatoes on the plate(s) and add the sliced mozzarella on top.
Combine the pesto with prosecco vinegar and drizzle on top of the tomatoes and mozzarella. Sprinkle the lemon zest on top and garnish with the toasted pinenut and torn fresh basil leaves.
I wanted to try the newest rage, grated frozen tomato over the fresh mozzarella and although it was enjoyable, it isn’t practical if serving more than 4 people and it’s hot outside, the frozen tomato will melt too quickly.
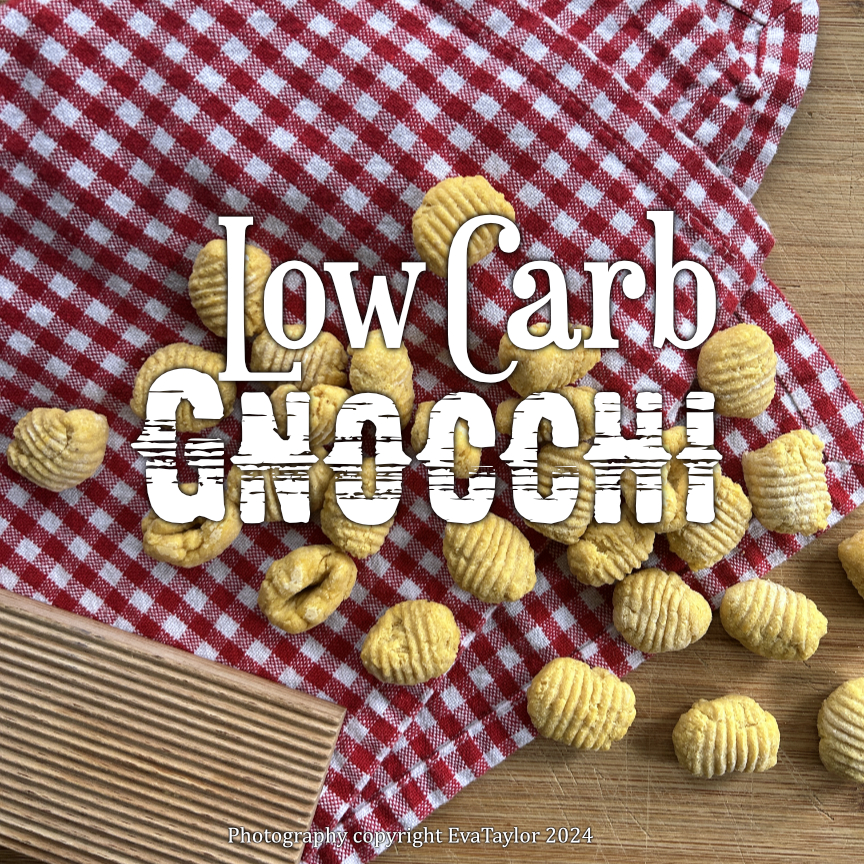
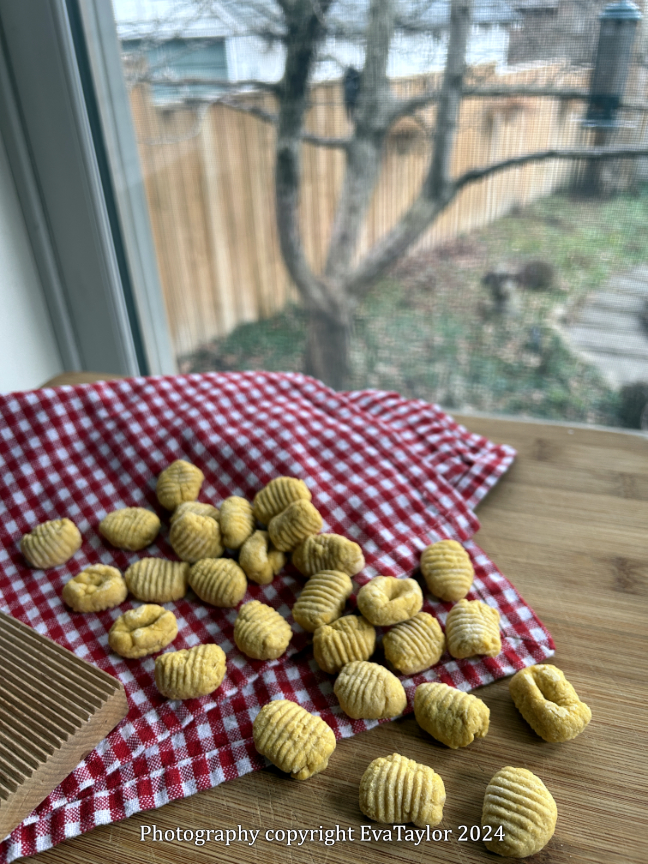
Well, our journey through low-carb cuisine has not been bad, as attested by JT. I have been slowly converting many of our high-carb recipes to low-carb versions and it’s been rather fun. My latest creation is low-carb gnocchi. It has the chewiness and puffiness that regular flour gnocchi have without the carb-load. JT was impressed.
They are predicting our first really heavy snowstorm for this afternoon. Glad I made a few of these tasty morsels.
Low-Carb Cauliflour, Vital Wheat Gluten and Lupin Flour Gnocchi
A Kitcheninspirations original recipe
This recipe makes 246 g of gnocchi dough about 50 gnocchi. 2-4 servings
Ingredients:
115 g cauliflower mash (see notes)
57.5 g Vital Wheat Gluten
57.5 Lupin Flour
10 g Parmesan Cheese, finely grated
11.5 g egg, beaten
To fry:
15 mL EVOO or butter
Directions:
Combine everything in the large bowl of your food processor and process with the plastic blade until entirely combined (the dough may not come together in a ball, but you will be able to form it into a ball).
Pour it onto a lightly floured* surface and form it into a ball. then divide it into smaller pieces to make into a roll. I weighed mine so they would be more accurate but you don’t have to.
Cook into boiling water immediately or freeze on a baking tray so they don’t touch each other.
Cooking is similar to regular gnocchi, they sink when they are raw and float when they are done.
If you’ve cooked them and wish to crisp them, heat a frying pan with the EVOO or butter and fry each gnocchi so they are golden and crisp on each side.
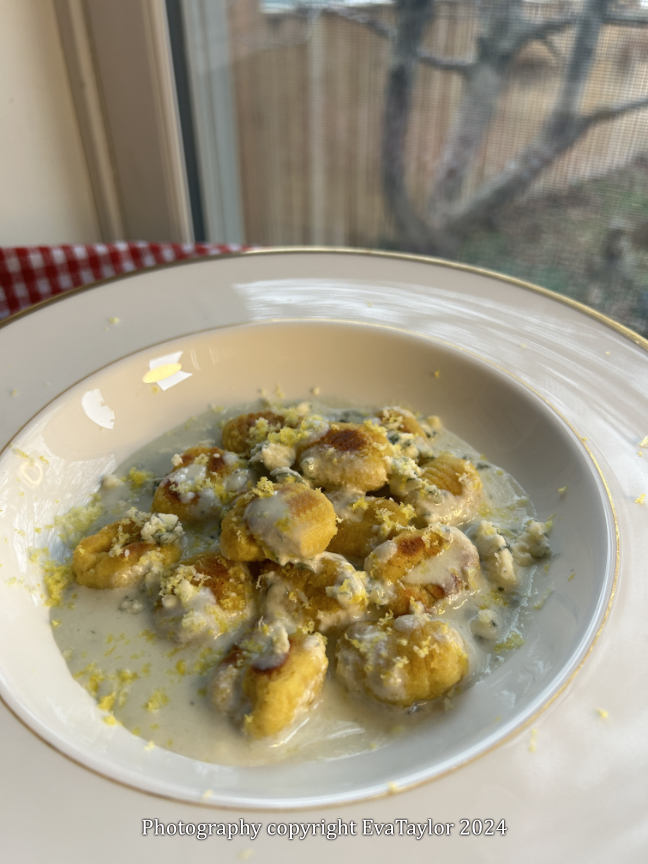
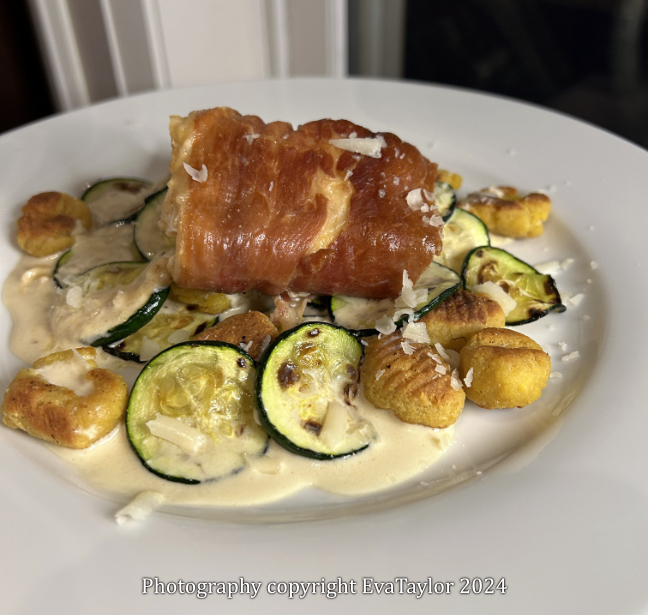
Low-Carb Gnocchi in a creamy Gorgonzola Sauce sprinkled with lemon zest to freshen it up.
This is a dinner I made with Cod wrapped in Serrano Ham and had gnocchi as a side.
Notes:
Cauliflower mash is simply roasted cauliflower with a little EVOO until soft and blended with an immersion blender until smooth, I usually have leftovers so I made gnocchi with the leftovers.
*Use Lupin flour or vital wheat gluten to dust your work surface.
These are best fresh but do freeze well. I detected a slight change in texture while JT did not.
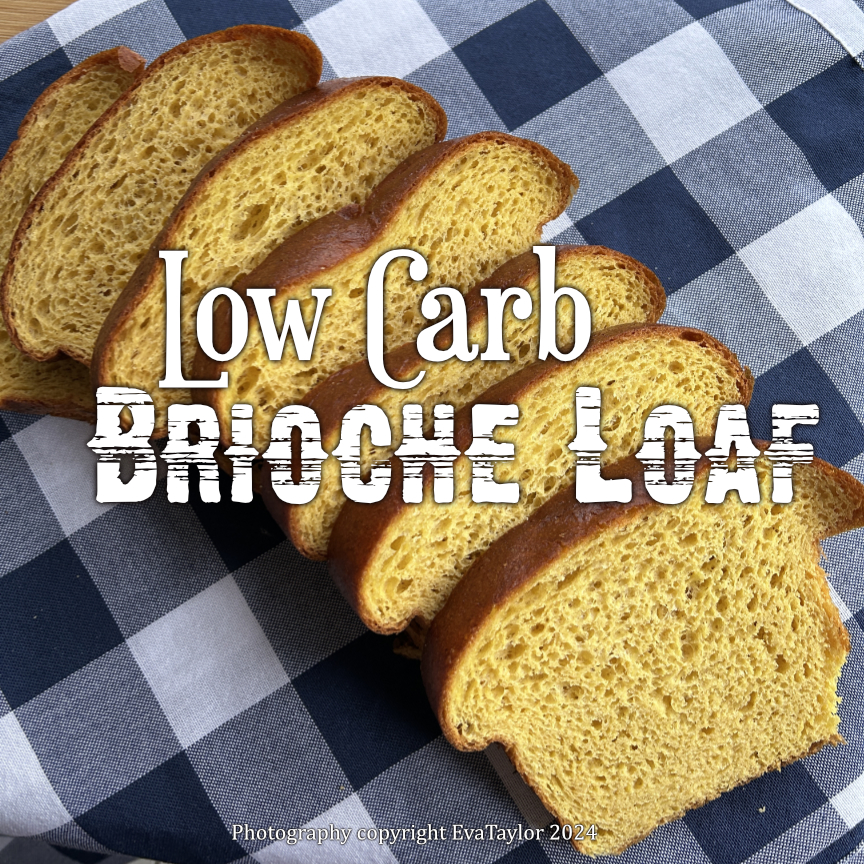
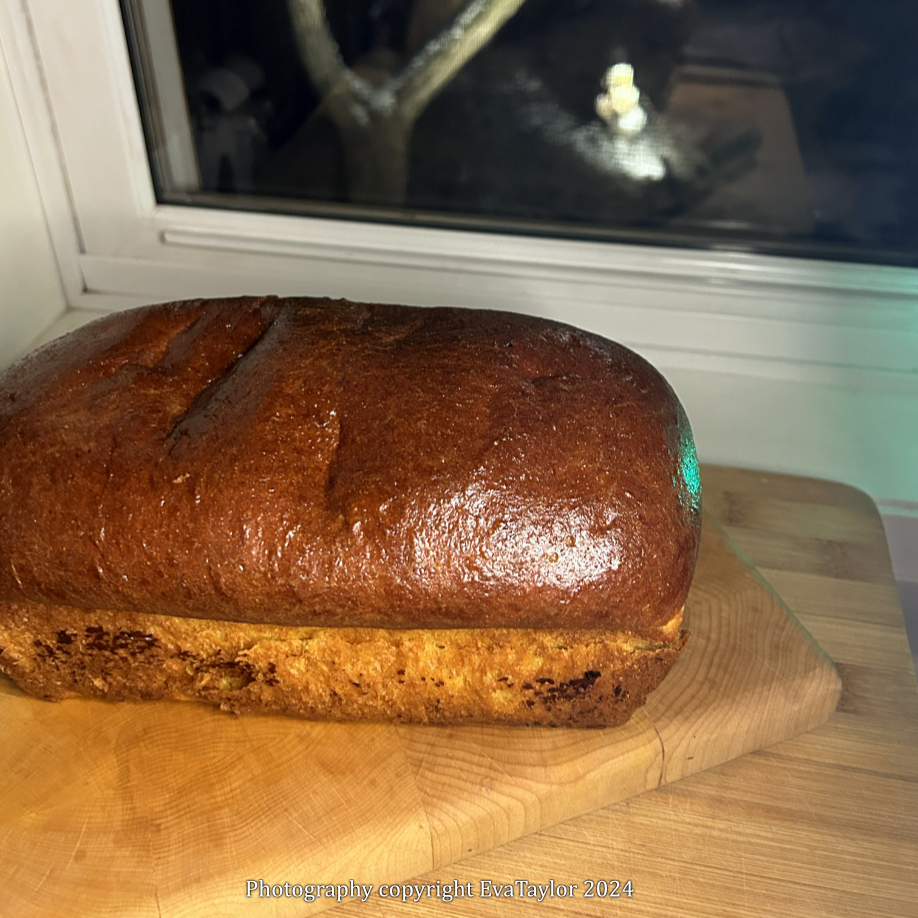
When we do a low-carb diet, one of the major food groups we miss incredibly is bread. Not that we eat a lot of bread (our favourite German seedy loaf lasts over a month) but we do like the occasional grilled cheese, and specialty sandwich. This low-carb brioche hits the spot; it’s slightly chewy and very springy and it’s fantastic toasted. The Lupin flour gives it a slightly nutty flavour and because there’s a lot of fibre, it has a little bit of a whole wheat texture that’s not too much, perfectly acceptable for the lower carb count. I usually bake it in a regular loaf pan but I can hardly wait to make this recipe in a Pullman pan (on my birthday list😉)
Low-Carb Brioche Bread
Makes 1 Brioche Loaf
Ingredients:
236 g water, about 60° F
7 g instant yeast
2 large eggs, room temperature
80 g Lupin Flour
170 g Vital Wheat Gluten
38 g Oat Fibre
48 g Erythritol
3.5 g Sea Salt
30 g unsalted butter, room temperature
1 egg, beaten for egg wash
Directions:
Combine the water, and yeast and set aside to allow the yeast to bloom.
In the large bowl of your stand mixer, combine the erythritol with vital wheat gluten, oat fibre, lupin flour and salt and stir to mix well.
Once the yeast has become foamy, add the eggs and whisk to combine. Add it to the flour mixture with the butter and knead to combine, then continue kneading for 5 minutes. Form the dough into a ball with your hands and cover to rest for 30 minutes.
Once rested, form the dough into a loaf and set inside a buttered loaf pan. Allow to rise covered with a clean cloth for 30-60 minutes or until doubled in bulk.
Preheat the oven 350° F, convection or fan setting. Once the dough has risen, brush with the egg washbake and bake for 20-30 minutes or until the internal temperature is 200° F.
Ah, the gorgeous winter darkness.
This is a grilled cheese I made with the bread. It was delicious.
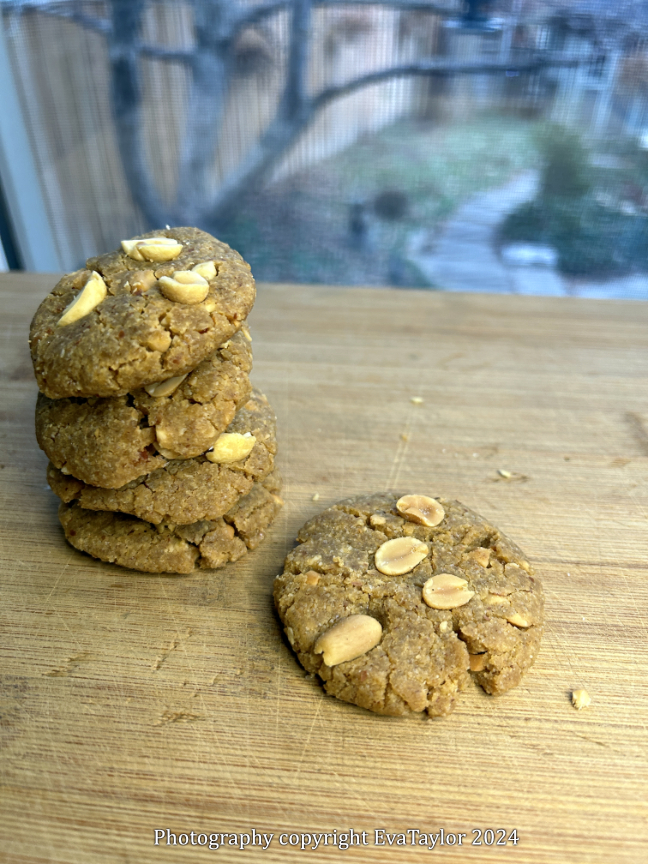
Still on our quest to lose a few nasty pounds but we (ahem, JT🤣) needed a bit of a treat so I converted this old favourite into a low-carb cookie. The flavours are bang on and they really satisfied our cravings for a treat.
Low-Carb, Gluten-Free Crunchy Peanut Butter Cookies
Makes about 17 cookies
Ingredients:
260 g crunchy, natural peanut butter
100 g erythritol
1 egg
5 mL vanilla
3 g salt
20 g salted peanuts
Directions:
Preheat the oven to 350° F. Line a baking sheet with parchment paper.
Combine all of the ingredients in a bowl except the salted peanuts. Mix with a hand mixer so that everything is well combined.
Portion out 25 g of the cookie dough and press into your palm to form a circle about 5 cm or 2.5 inches in diameter. Lay each cookie on the parchment-lined baking tray about 5 cm or 2.5 inches apart. Bake for 10-15 minutes. Allow to cool on the cookie sheet.
I first began making these delectable dishes in 2019 after seeing them on my friend’s blog (in hiatus at the moment). But now that we are doing a low-carb diet I still wanted to make them so I came up with this alternate recipe. The flavours are still there but the carb quotient is far less. We enjoy a variety of ethnic foods so this version will be on our menu plan.
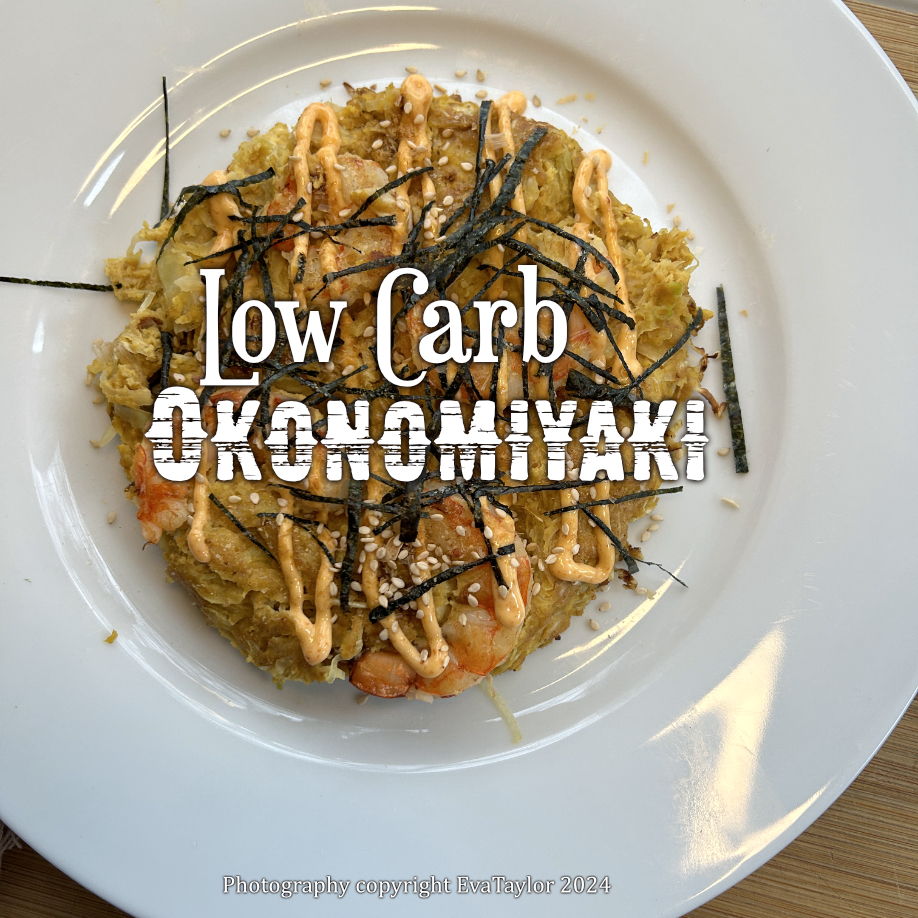
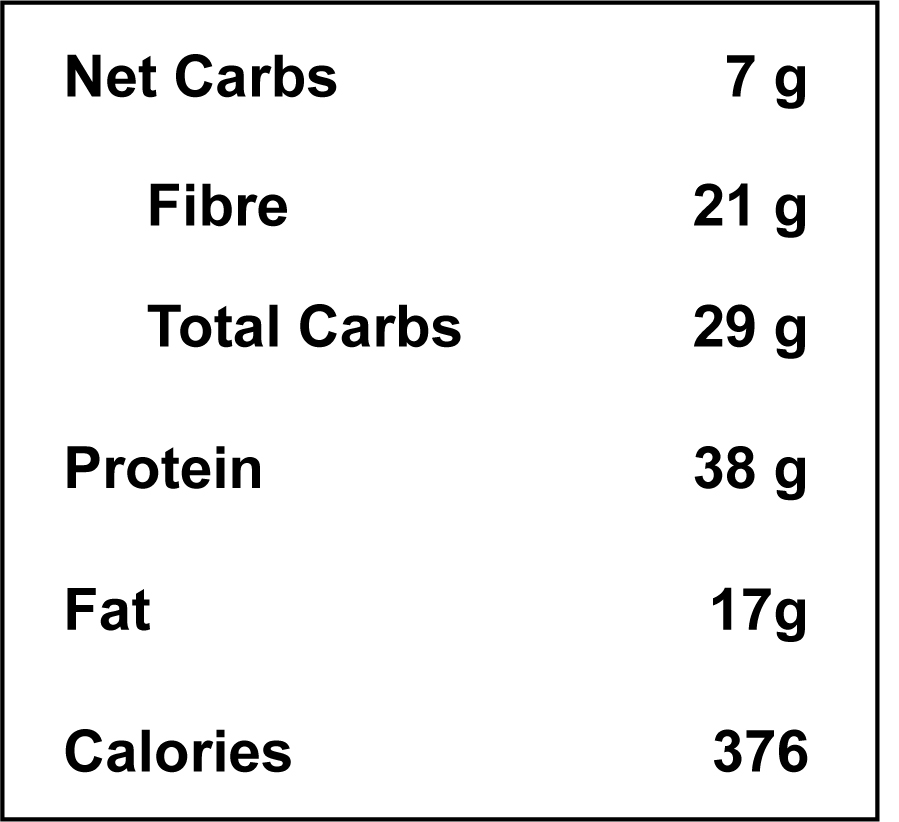
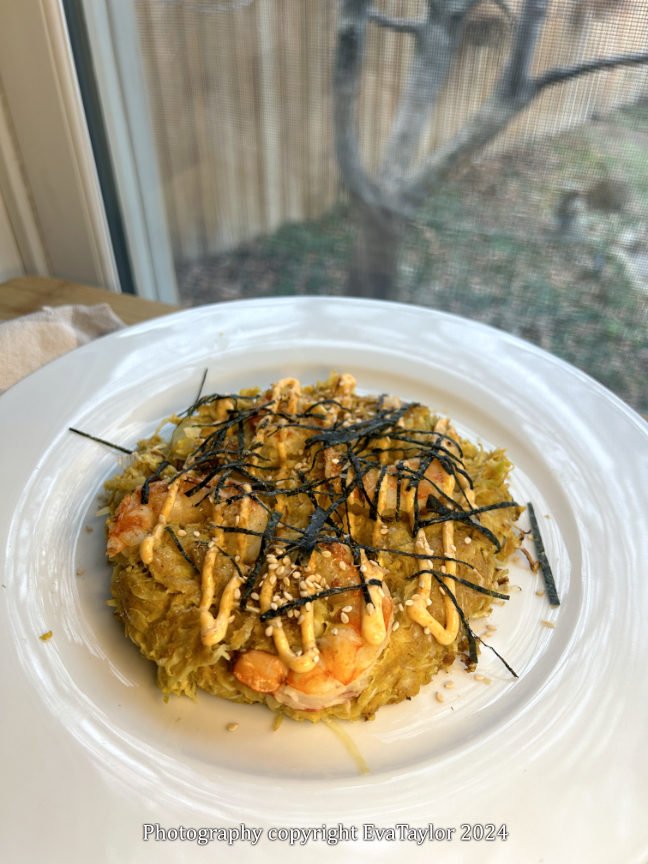
Low-Carb Okonomiyaki (Savoury Japanese Pancake)
Serves 2
Ingredients:
15 g butter, room temperature
15 g cream cheese, room temperature
30 g lupin flour
15 g flaxmeal
2.5 g baking powder
1 g salt
1 large egg
15 mL water
15 mL soy sauce
10 g monk fruit/ Erythritol
200 g cabbage, finely shredded
30 g Parmesan cheese, shredded
100 g shrimp, peeled and deveined
Directions:
Combine all of the ingredients but the shredded cabbage and Parmesan cheese and mix well.
Add the shredded cabbage to the cheese mixture, and mix well to coat evenly.
Preheat a cast iron or nonstick skillet to medium heat. Line the bottom of the pan with a parchment circle that is larger than the pancake. Sprinkle the cheese on the parchment and allow it to melt and begin to render. Then evenly distribute the cabbage mixture over the cheese, nestle the shrimp into the cabbage evenly. Cook, covered for 5-7 minutes.
Flip and cook and additional 5-7 minutes or until the shrimp are cooked. You may need to flip one more time to crisp up the cheese on the bottom.
Serve hot with a drizzle of mayo, a sprinkle of bonito flakes, toasted sesame seeds and julienned nori.
Notes:
I used the cheese to help crisp up the bottom crust and it worked out well.
To make it easier to flip, place a piece of parchment under the pancake so you can easily lift and flip it.
The winter light has finally hit us and it ain’t pretty.
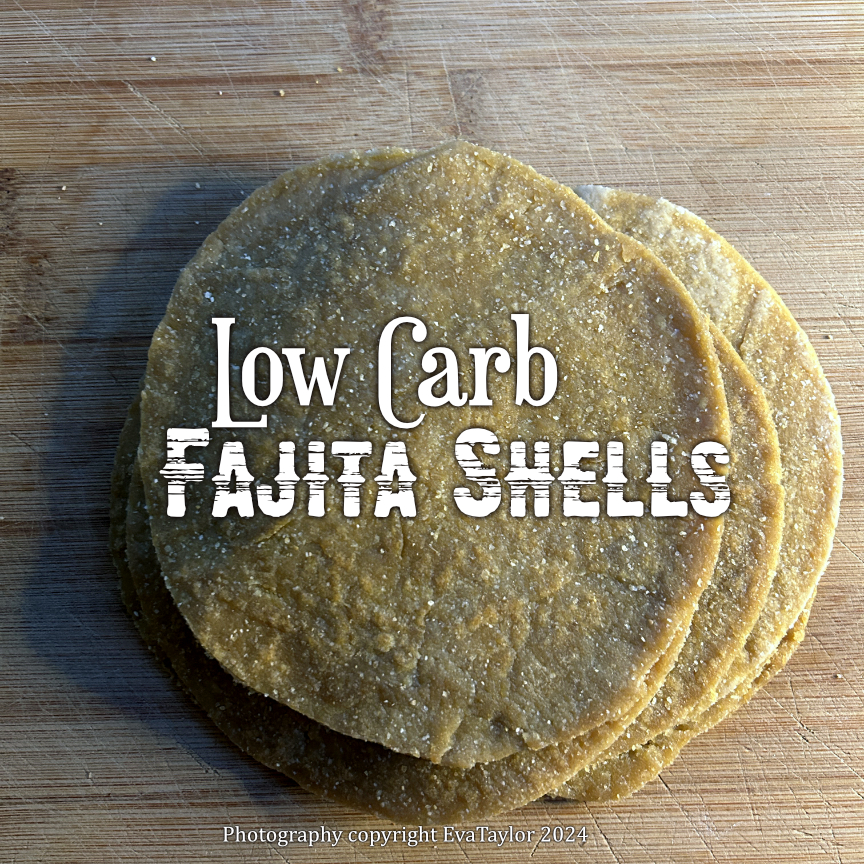
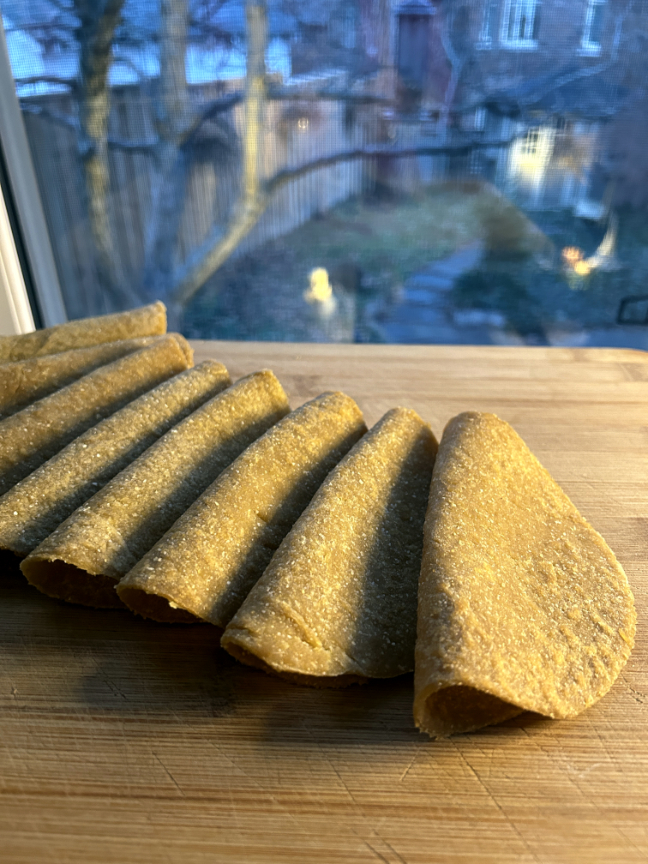
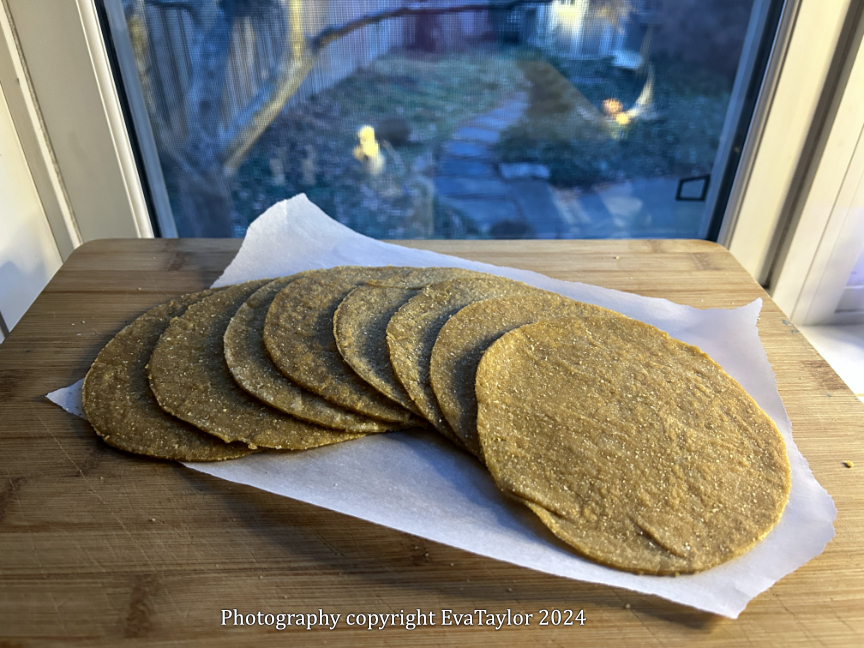
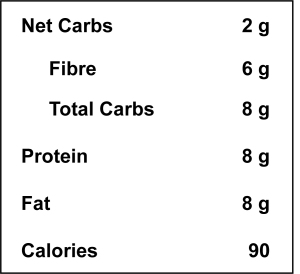
I can honestly tell you that Vital Wheat Gluten and Lupin Flour are a game changer for my low-carb world. The vital wheat gluten gives you the strength and resilience of bread flour and the lupin flour gives a bit of a whole wheat feel and because it’s so high in fibre, it really lowers the net carbs in recipes. I have made a few breads using almond flour but I just find they are far too heavy for my taste. The Lupin Flour and Vital Wheat Gluten are the perfect combo. I found this recipe on Reddit here but I kept losing it, so I thought I would do a post about it so that I can find it whenever I need fajita shells.
These have the same chewy texture that white flour tortillas have with some extra fiber for texture. JT loved them.
Low-Carb Fajita Shells
Makes 8 small fajita shells (about 12 cm (5 inch) diameter
Ingredients:
77 g vital wheat gluten,
32 g oat fibre
25 g lupin flour
15 g coconut flour
2.5 g baking powder
4 g salt
0.75 g xanthan gum
105 g warm water (more or less as needed)
32 g olive oil
Olive oil cooking spray
Directions:
Add all of the ingredients to the large bowl of your stand mixer, and using the scraper paddle, start mixing everything together. Continue with the scraper paddle for 5 minutes. The dough should be slightly sticky but should come away cleanly from the bowl.
Collect the dough and press it into a nice round ball. Wrap the dough in plastic wrap and allow it to rest for 20 minutes at room temperature. This allows the vital gluten to relax so it is easier to roll.
Divide the dough into 4 equal portions and roll out to about 3 mm thick or as close as you can. Run each piece through the pasta maker attachment from “0” to “4” so each ball becomes one long piece of dough. Cut the dough into 12 cm circles using a cookie cutter or a knife and a plate as your form. Re-use the leftover dough to make more fajita shells.
Heat a cast iron pan to medium heat (325° F), spray the pan with the cooking spray, and cook each side for about one minute or less, until they are golden brown. Use immediately or freeze layered with parchment paper. Defrost in the refrigerator, overnight and gently heat to use.
Notes:
I like using the scraper paddle for lupin flour dough, it seems to work the dough better than the hook.
To cut perfect circles for my fajita shells, I use an inverted bowl that has the same diameter as my pasta maker has width, that way I get the largest fajita shell I can from the sheets.
This dough is very difficult to roll out, that is why I used my pasta maker attachment but it does leach oil when it is pressed through so have a cloth under the pasta maker to control the mess.
Firstly, I must apologize to my regular followers as I haven’t been able to comment on their blogs in the last week, I was taken down by the stomach flu that is going around and it was brutal! I could barely get out of bed for five days. I’m recovering but it takes time to reintroduce foods into your diet that won’t shock the system.
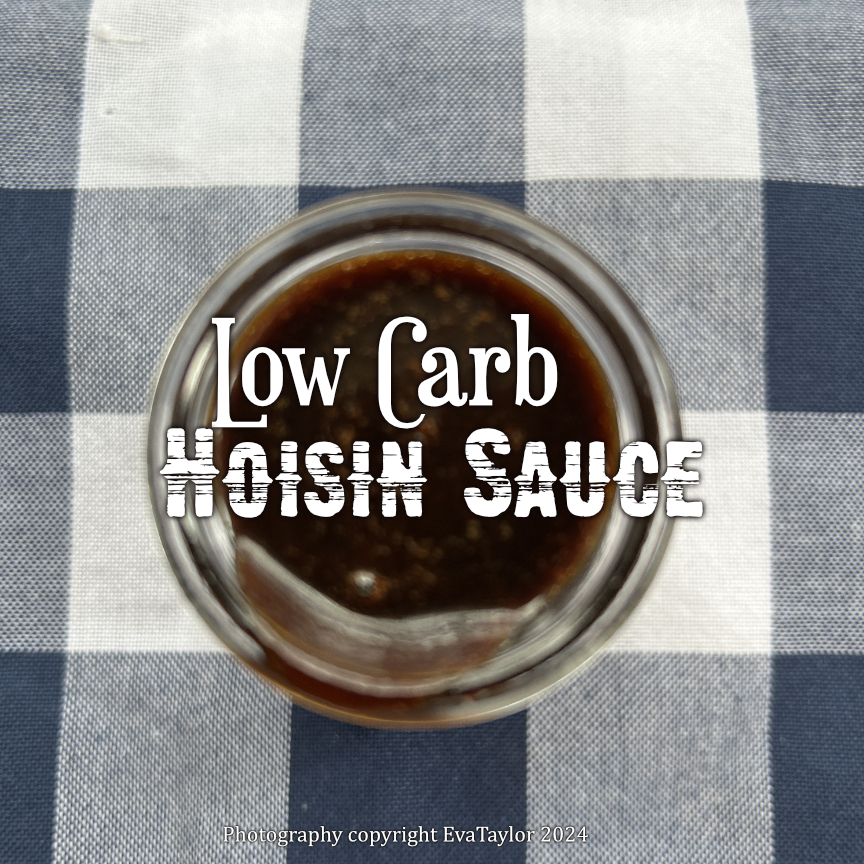
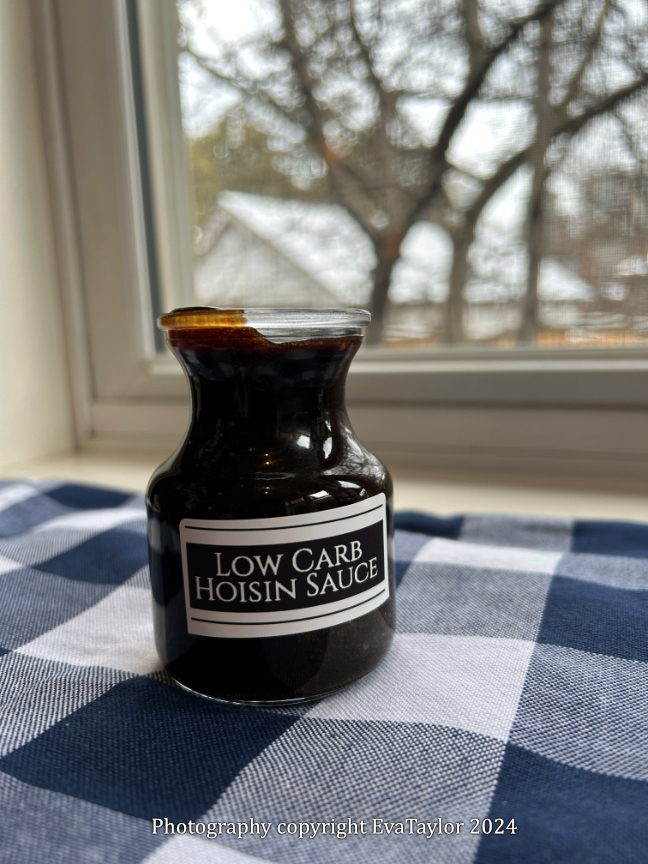
We are planning an epic adventure in 2024 and for that we need to get in shape so we are cutting back the carbs, cutting out the alcohol and bumping up the exercise. I will adapt as many of our favourite recipes on our journey and I started with this beloved sauce. This recipe isn’t as sweet as traditional hoisin sauce but it definitely has a good punch of umami and the best part is that 15 mL has 2 g net carbs, compared to 44 g! That’s a win-win for me.
It’s super salty but not as sweet as traditional Hoisin Sauce.
Low-Carb Hoisin Sauce
A Kitcheninspirations original recipe
Makes about 150 mL sauce
Ingredients:
200 mL low sodium soy sauce
30 g erythritol
20 g roasted garlic purée
12 g molasses
5 g white miso paste
10 g tahini
Directions:
Combine everything but the tahini in a small saucepan and mix well. Bring to a boil and reduce to about 150 mL.
Using an immersion blender, blend in the tahini. Pour through a fine sieve into a sterilized jar.
Notes:
The sauce will thicken when cool.
Use as a marinade for chicken or pork or as garnish for phõ as you would regular hoisin sauce.
This is one of my Go-To omelettes. It’s not nearly as fussy as a traditional French omelette so it’s easy and relatively quick to put together. And did I mention that it’s delicious? The cheese caramelizes on the bottom of the omelette so that it becomes this incredibly delicious crust, like the end of a fondu! Also, there isn’t much technique involved so it’s super easy to execute.
This is one of those crusty videos that the kids are doing these days. It turned out fantastic!
Crusty Cheese Omelette
Serves 1 or 2, depending on how hungry you are!
Ingredients:
60 g cheese, grated (see notes)
2 large eggs, room temperature
30 g Greek yogurt
Salt and Pepper
Directions:
Sprinkle the cheese in a small non-stick pan and set the heat to medium. Melt the cheese slowly (do not allow it to caramelize at this point).
Combine the eggs, yogurt, salt and pepper and whisk until smooth. Once the cheese has begun to render and bubbling a little, carefully pour the egg mixture over the cheese so that it sits on top of the cheese. Cover and cook until the top of the omelette has set at the top. Remove the pan from the heat (turn it off) and allow it to sit covered for a few minutes (the omelette should come away from the pan at the edges and easily slide out).
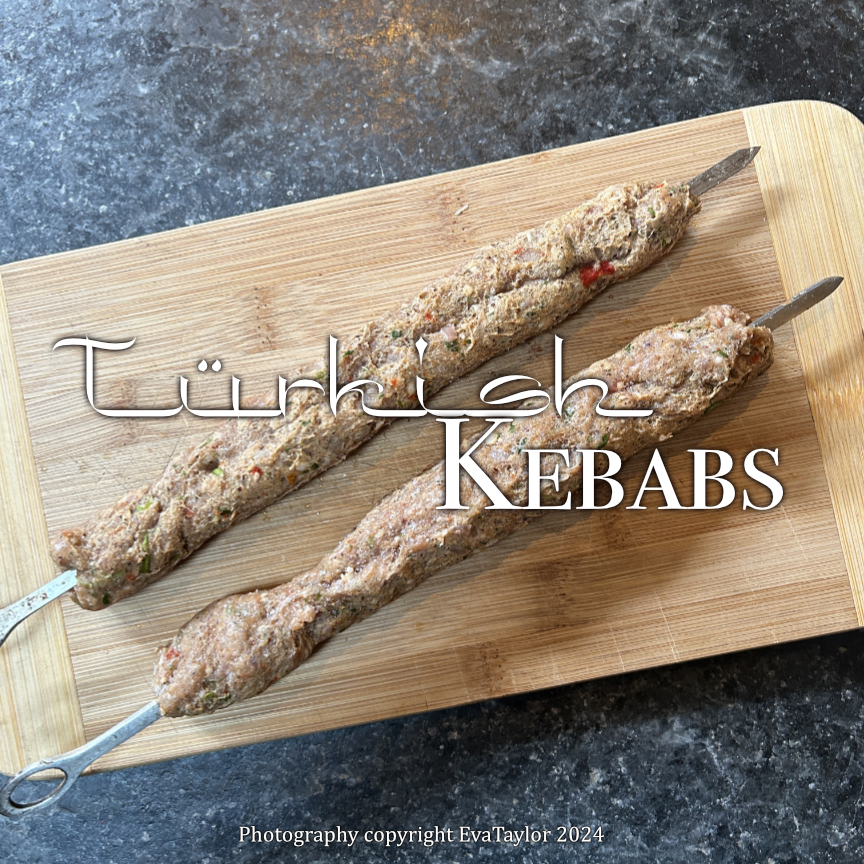
I have been struggling to get a good photo of these kebobs since our return to Toronto in December last year. The lighting is brutal. I did get some specialty lighting for this instance but it’s not exactly what I had hoped for, it still has that fake lighting tinge. So I am stuck with winter lighting for my photos.
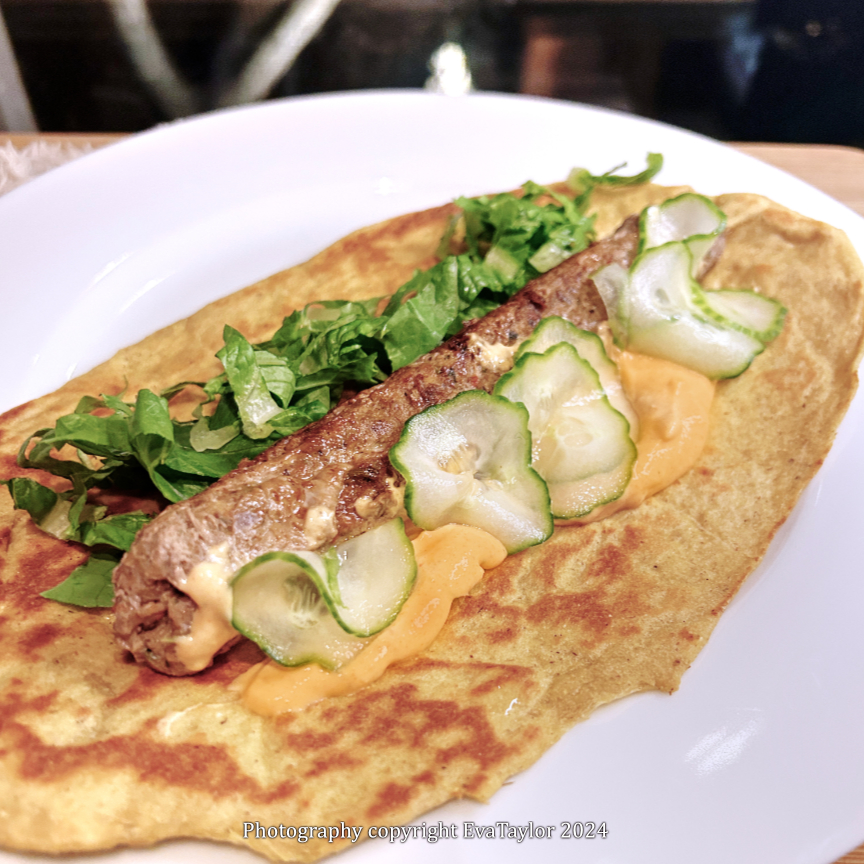
This recipe came about from a trip to a local Türkish restaurant where we ordered these wonderful kebabs. They are packed with flavour and the toppings don’t hurt. In Türkiye, they would serve this with pickled onions but we find them too strong so I made pickled cucumbers and a tasty yogurt harissa sauce. It was a wonderful meal.
When I am in Türkiye, I will be purchasing the authentic Türkish kebab skewers which are actually about 2.5 cm or 1 inch wide, as well as a kebab press as I hope to make these for the freezer in large quantities. Türkish kebabs should not touch the grill, they should cook above the grill, soaking up the smoke from the grill but without caramelizing the meat. The flat wide skewers allow you to pile on the meat with all the inclusions and not have bits fall off into the fire.
I should have put the meat in front, but because my skewers are not wide enough, we had to rest the kebabs on the grill to cook. And if I am being completely honest, we were too hungry. They are sooo darn good.
1 roasted pepper, skinned, seeded and roughly chopped
1 sweet onion, roughly chopped
10 g roasted garlic purée
1/2 bunch of cilantro, stems, and leaves
1.5 g salt
1.5 g black pepper
10 g sumac
5 g ground coriander
2 g ground cumin
1.5 g sweet paprika
Directions:
Add all of the ingredients into the large bowl of your food processor and process until smooth and all of the ingredients are evenly chopped and distributed in the meat mixture.
Form 100 g of the meat mixture around each kabab skewer and rest of a flat surface. Use immediately or freeze individually on a flat surface.
Cook on a grill at 350° F until the internal temperature is 160° F.
Serve with unleavened flatbread and a pickled cucumber with a harissa yogurt sauce.
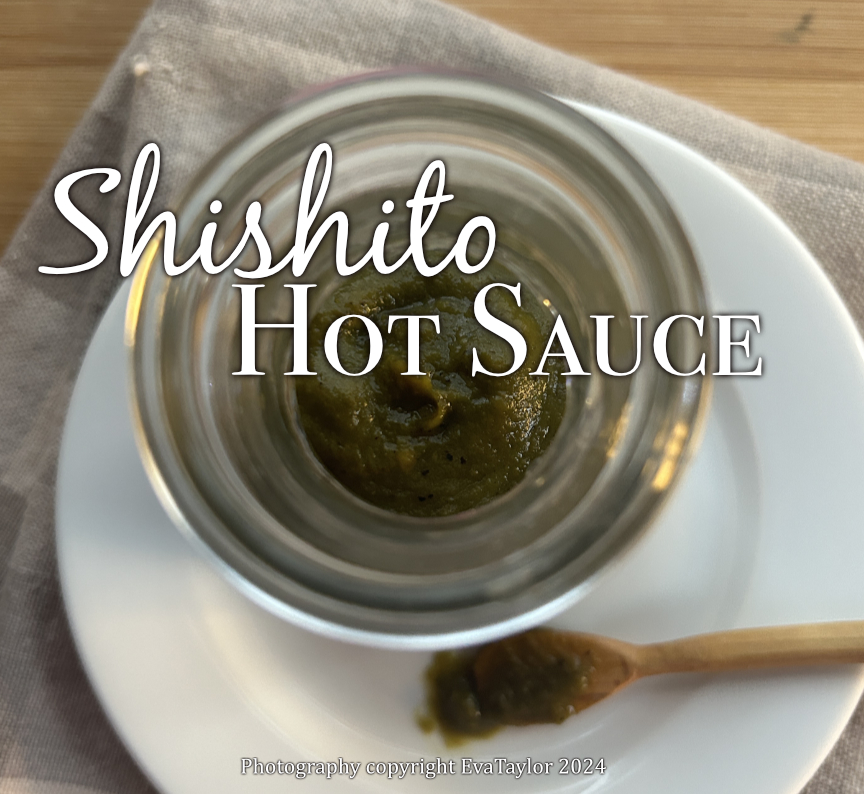
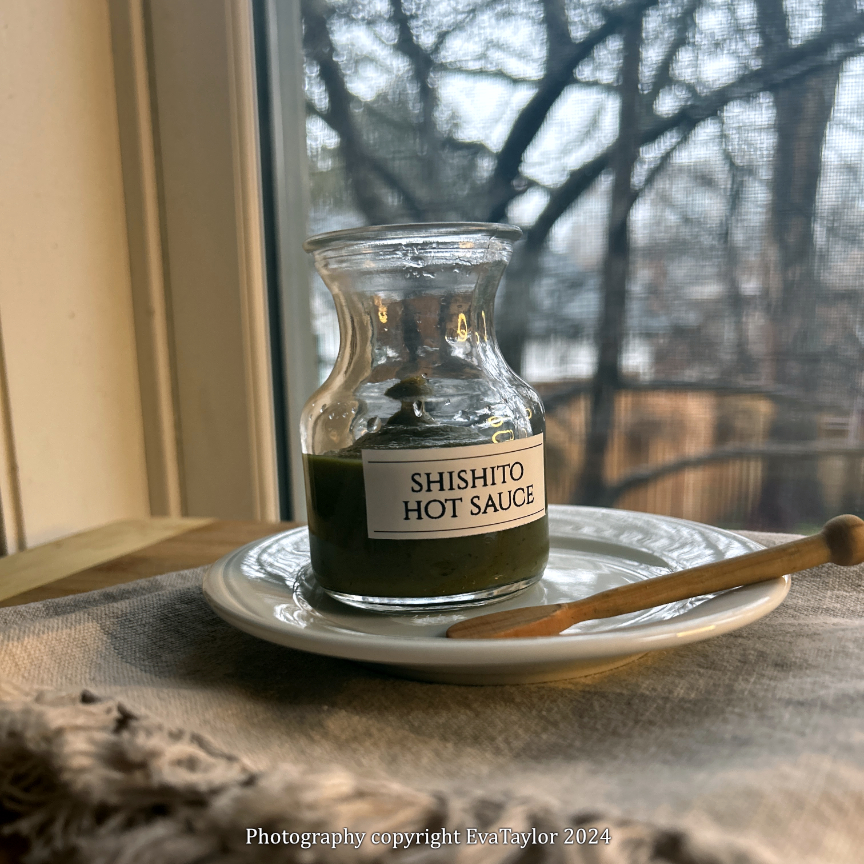
Just before Christmas, we entertained some dear friends and one of the appetizers I made was a favourite: blistered Shishito Peppers. The peppers are sweet and sometimes hot little bites. On the average, you might get one in ten too hot to eat. Unfortunately, this package wasn’t average and the peppers were outrageously hot! The one JT consumed had him running into the kitchen for a glass of milk to sooth his burning mouth (hehehehehe)! Needless to say, we had leftovers! I whipped up this easy hot sauce to avoid tossing them. I removed the seeds and veins to avoid extreme heat, and the sauce still packs a punch. It tastes green, slightly sweet with the heat that comes from behind and surprises you, but it’s manageable.
The heat kinda creeps up on you, so use sparingly.
Shishito Hot Sauce
A Kitcheninspirations original recipe
Makes about 200 mL sauce (but it depends on how much water you add and how much you cook it down)
Ingredients:
200 g Shishito peppers, blistered
20 g brown sugar
5 g roasted garlic purée (or finely minced raw garlic)
3 g salt
Water
Directions:
Split shishito peppers lengthwise and scrape out as many seeds as you can.
Place seeded peppers into the Magic Bullet container. Continue until all peppers have been seeded.
Add the sugar, garlic, salt and about 100 mL water to the peppers and blend until smooth, adding water to make a nice sauce. Taste and season as necessary.
Cook the sauce down to about 3/4 of the original volume. Strain through a fine sieve into a sterilized container. Cool, cover tightly and refrigerate until needed. This sauce will last about 2 weeks in the refrigerator or you can freeze.
Merry Christmas! Hope everyone is having a wonderful time.
We spent the month of November in Arizona again, although it might be our last time this time. But we say that. Every. Single. Time. We see our dear American friends and get in a load of sunshine to boot! The weather was beautiful and slightly warmer than last year, we had high twenties (celsius) most of the daytime and mid-teens at night. Perfect for leaving the windows open for sleeping.
We did a lot of walking and hiking. The National Parks have beautiful trails that are reasonably priced and there are many free parks too. We fed our resident bunny and, inadvertently fed our resident Road Runner (sadly a bird crashed into our window and he died on impact and fortunately, the road runner didn’t mind and he scooped up the bird and took him home for a late Thanksgiving Dinner!) At least, we did not have to deal with it.
This slideshow requires JavaScript.
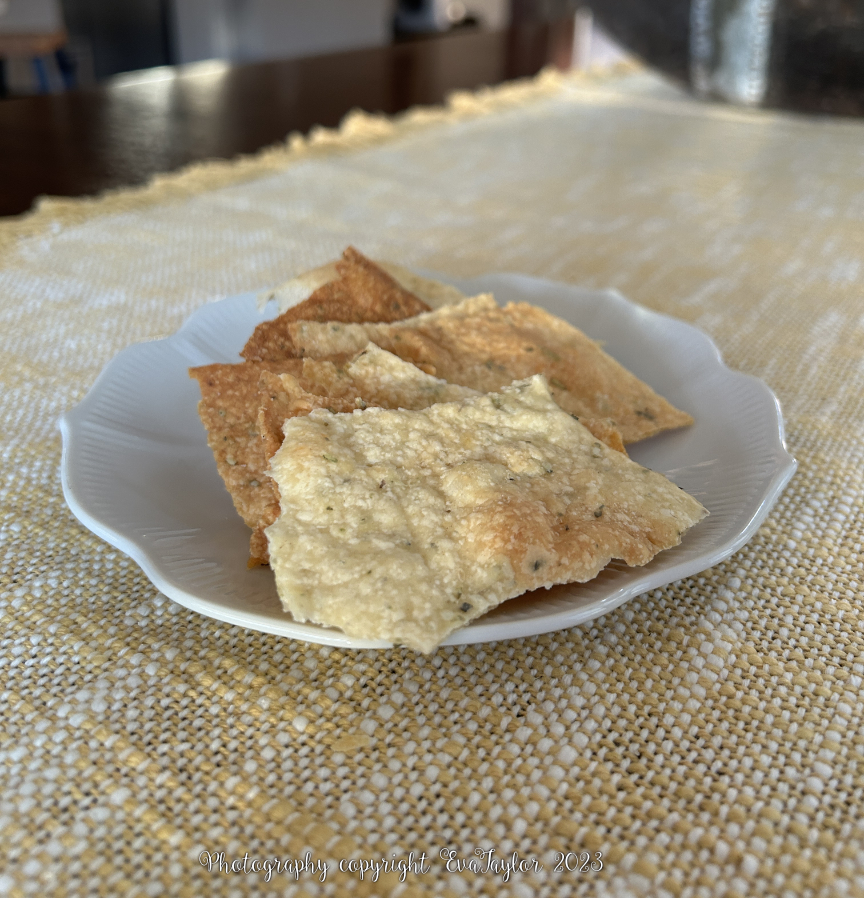
Of course, we always have a party at the end to use up pantry ingredients and this time was no different, I came up with this recipe to use flour, oil, cheese, and herbs.
The oven was gas and baked rather unevenly.
Pantry Clean Out Crackers
A Kitcheninspirations original recipe
This recipe makes about 2 sheets approximately 25 cm x 38 cm (10 x 15 inches)
Ingredients:
125 g “00” flour
40 g cheese, finely grated
30 mL olive oil
80 mL water
Pinch of salt
3-6 g dried herbs
Directions:
Mix all of the ingredients together in a bowl.
Transfer to a clean surface and knead by hand until the dough becomes smooth and everything is evenly distributed. Rest the dough for 20 minutes.
Preheat the oven to 350° F. Line a baking sheet with parchment.
Roll out the dough into a thin sheet about the size of the baking sheet. Transfer to the parchment lined baking sheet and bake for xx minutes or until lightly browned and crisp.
Cool and break into chip-sized fragments. Serve with your favourite dip.
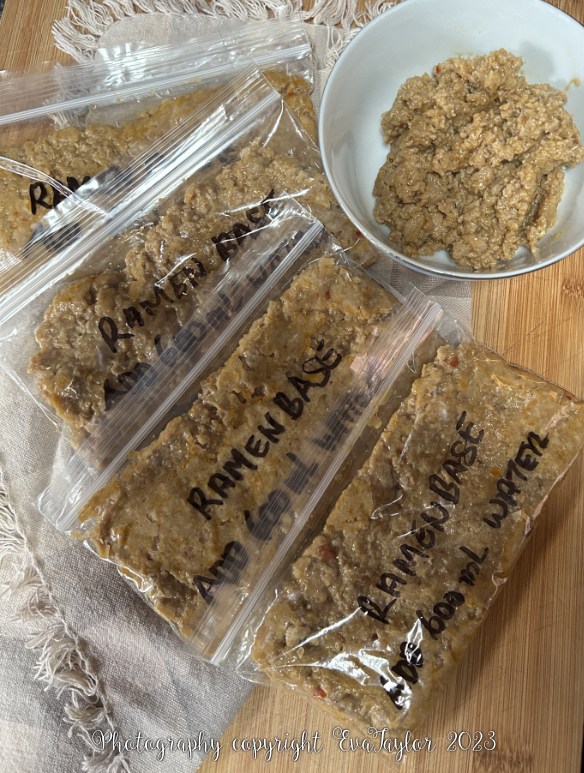
We adore Ramen soup, we have it a few times a month during the cold weather. I used to freeze the actual Ramen soup but since I have downsized my freezer, I am always on the lookout for a more compact way of freezing dishes so I developed this batch Ramen soup base.
This batch Ramen soup base recipe is based on Just One Cookbook’s Miso Ramen recipe; my version gives you 10 single-serve dishes! Batch cooking saves a lot of time for quick meals in the future and it’s not difficult; I’ve figured out a way to freeze only the soup base without the bulk of the liquid! You simply defrost the Ramen base, add your liquid, then you bring it to a boil and you’re done! Easy peasy!
Of course, Ramen is all about the inclusions, roasted chicken, roasted pork etc., and to make it even easier, how about using shredded rotisserie chicken or as I have done below, leftover shredded rib meat! I like to prepare my Ramen egg the night before so it has time to take in the flavours of the marinade but it also works about an hour before you serve. Other inclusions could be grilled corn, peas, edamame, green onions or mushrooms, many of these veggies I have in the freezer ready for use. This time I used ready-made Ramen noodles but if you have the time, whip up a batch of homemade Ramen noodles and dry them out in small batches, and store in an air-tight container for a quick Ramen lunch.
Just pop one of these into a soup pan and add water, boil and you’re done!
Batch Miso Ramen Soup Base
Makes 562 g soup base (enough base for 10, 2-servings of Miso Ramen Soups)
Heat the roasted sesame oil in a large frying pan. Add the pork and shallots and cook until the pork is no longer pink.
Combine the sake, roasted garlic paste, ginger, white sesame seeds, doubangjiang and sugar and mix well. Add this to the cooked pork mixture and mix it into the pork so it is evenly distributed. Cook until the sugar is dissolved.
Combine the bouillon and the miso and mix well. Add this to the pork mixture and stir well until it is evenly distributed in the pork.
Remove the pork mixture from the heat and spread the mixture onto a sheet to cool completely. Once cool, divide the mixture into 10 even single-portion servings and freeze individually. I froze 9 and used one for our meal that evening.
Preparing the Miso Ramen Soup from the soup base:
Remove 1 packet from the freezer and defrost overnight in the refrigerator OR add 600 mL water (see notes) into a soup pot and drop the frozen packet into the water; heat until defrosted completely and hot. Taste for seasoning; the original recipe had additional salt but I find bouillon and Miso salty enough so I don’t add any extra but it’s up to you.
Cook the Ramen noodles as per packet. Add either 1 packet of cooked noodles per bowl (I usually do half a packet per bowl) and top with inclusions of your choice; pictured below is shredded leftover rib meat, half a Ramen egg, grilled corn, green onions and cooked mushrooms. Serve hot.
Ramen Egg directions:
Bring a small pot of water to a soft boil (water should be deep enough to mostly cover the egg). Carefully place the egg (see notes) into the water and set your timer for exactly 7 minutes. Once the 7 minutes is done, remove the egg and place it in an ice bath to immediately stop the cooking process.
Peel the egg.
Add 15 mL soy sauce and 15 mL mirin to a small cup, add the peeled egg and fill the cup with water just enough to cover the egg, stir. Place a spoon on the egg to hold it down in the liquid and refrigerate overnight or at least one hour before serving, left on the counter. Allow the egg to come to room temperature if you have refrigerated it overnight. Cut the egg in half and serve a half per serving.
Notes:
I usually add the raw pork tenderloin with the shallots to my small food processor and I process it until it is finely chopped.
You can use plain water, but I usually use whatever stock I have on hand; today’s soup was made from leftover whey and corn cob broth both adding a lovely depth of flavour to the soup. I also added half a piece of dried kombu into the stock as it defrosted overnight. I removed the kombu before serving.
I was only able to find spicy doubanjiang but I do not find 10 mL overwhelming in 10 portions of soup base but you may use more or less as is your taste.
I use Chef Michael Smith’s handy tip for keeping fresh ginger on hand all the time. He washes the root and allows it to dry, then he simply freezes it in a little zip-lock bag. You can use a fine micro plane to grate the frozen ginger, no need to peel as the peel pulls away from the frozen ginger as you grate it, or it may grate so finely, you won’t even notice it.
To get the hard-boiled egg to peel cleanly, give the raw egg a good tap on each end on the counter until you hear a distinct click (don’t tap to break the shell). That click is the outer membrane coming loose from the shell, it will make it much easier to peel.
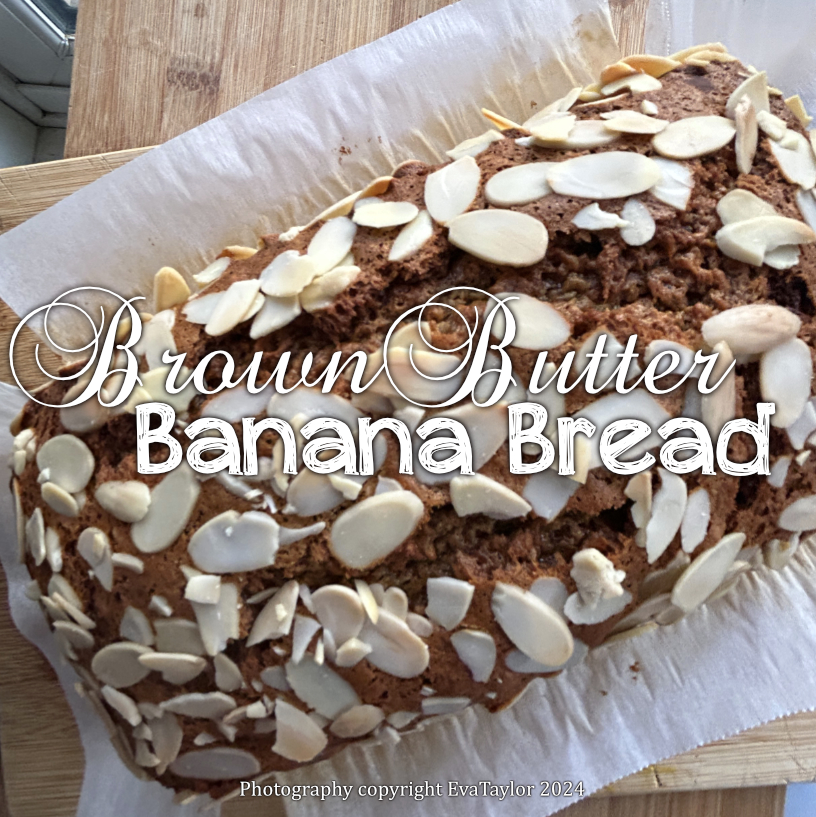
About a week before Christmas, I had lunch with my cousin. I met her at her gorgeous new home in Don Mills. I noticed she had several overly ripe bananas sitting on her counter so I asked what she planned to do with them. She said she already had 16 in her freezer so I suggested I would take three off her hands, and thus was born the following brown butter banana bread!
Nutty brown butter with the flavour and moistness of bananas!
Brown Butter Banana Bread
A Kitcheninspirations original recipe
Makes 1 loaf about 21 cm x 11 cm (~8.25 inches x 4.5 inches)
Ingredients:
113 g butter, melted, browned and cooled
150 g light brown sugar
100 g granulated sugar
2 large eggs, combined and whisked
330 g ripe bananas, mashed
280 g all purpose flour
7 g baking soda
3 g salt
2 g nutmeg
Sliced almonds for sprinkling on top
Directions:
Preheat the oven to 325° F on the convection setting. Prepare a small loaf pan by lining it with parchment paper.
In the small bowl of your food processor, combine the melted, brown butter with the two sugars, process well.
Combine the whisked eggs with the mashed bananas and add it to the sugar mixture while processing. Set aside.
Whisk together the flour, baking soda, salt and nutmeg. Pour the banana mixture into the flour mixture and whisk until no longer lumpy.
Pour it into the prepared pan and sprinkle with the almonds. Bake for 70-80 minutes or until a wooden tester comes out clean. Cool in the pan on a towel on the counter.
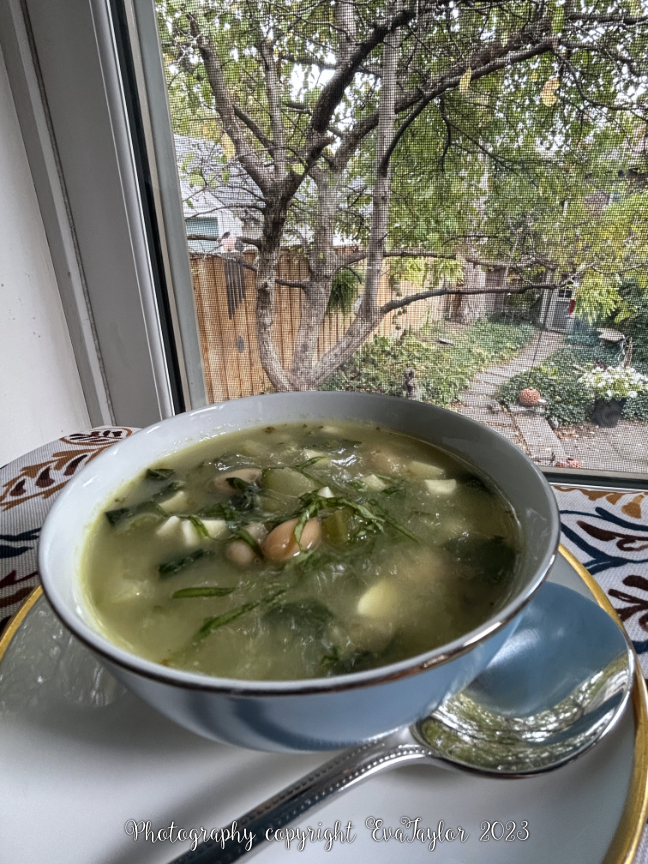
Heat the olive oil in a stock pot. Add the leeks and wilt. Add the vegetable stock and corn broth and cook the leeks until they are falling apart.
Blitz with your best blender until smooth and creamy. Push through a fine sieve into a large glass measuring cup and set aside, discard the pulp.
Add the butter and melt, add the celery, zucchini and mushrooms and sauté until fork tender. Add the spinach and oregano and cook until the spinach has wilted. Add the white beans
Serve hot in small cups garnished with a sprinkle of the bocconcini and the chiffonade of basil.
Notes:
I used a combination of corn broth and vegetable stock which gave the soup a beautiful flavour.
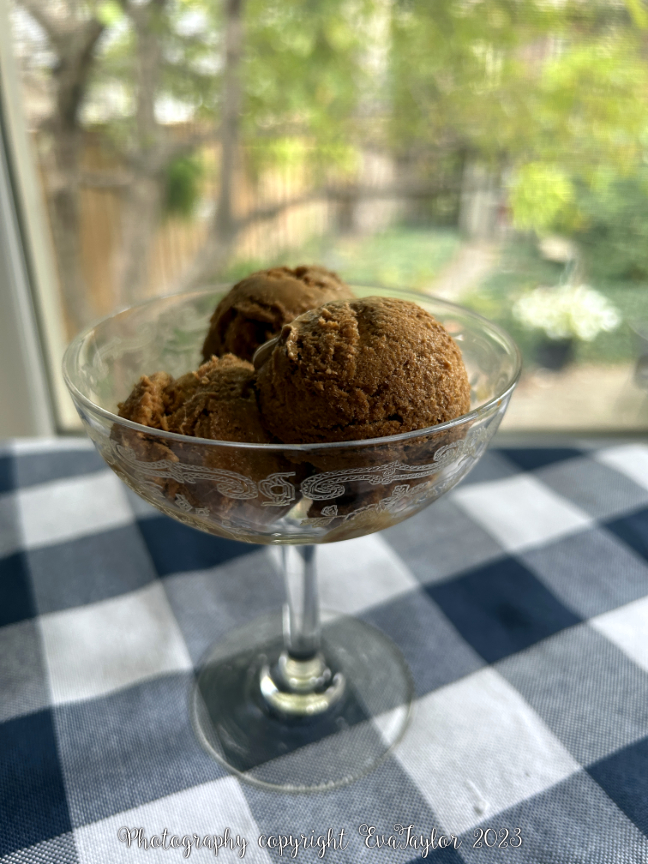
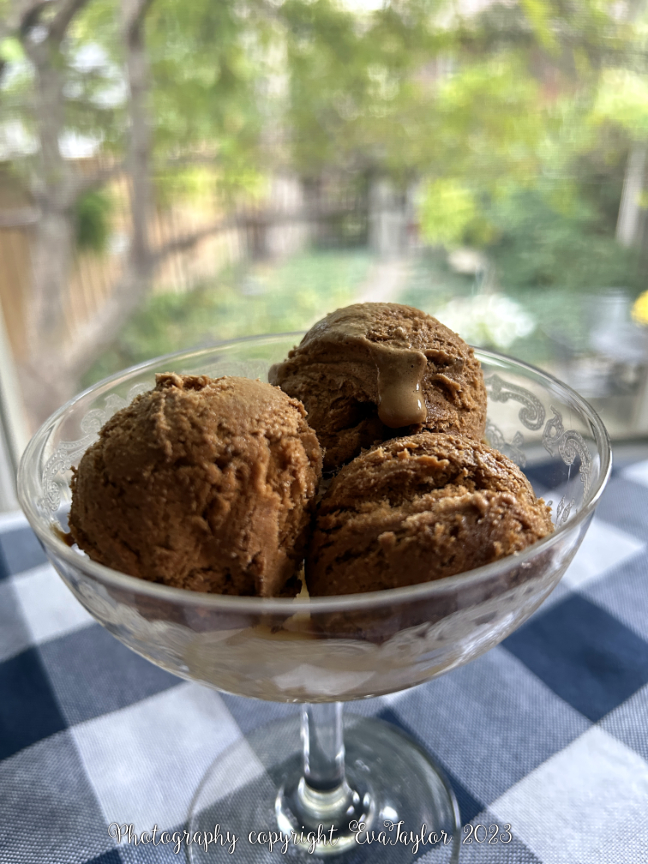
Have you seen the reels of a tablespoon of instant coffee, a tablespoon of sugar and 1 tablespoon of water and they whip it until it is light and creamy like mousse (it’s pretty incredible)? That is Dalgona from Macau, a topping they put on steamed milk. Then, I saw a guy on an Instagram Reel make ice cream from whipped Carnation Evaporated Milk following a recipe from the 1940’s so I figured why not try it with the famous Dolgona Whipped Coffee. We have friends coming for brunch and they are coffee aficionados so I thought the Dalgona Ice Cream might be a nice change for them. The whipped Carnation Evaporated Milk is much lighter than regular ice cream, it’s more like a frozen mousse. I tried it with Erythritol and unfortunately, it never really dissolved so the ice cream was grainy, definitely not the texture I was looking for. As with Dalgona, it is quite coffee-forward so if you’re not in love with coffee flavour, this recipe is not for you.
It’s like eating an espresso.
Dalgona Ice Cream
A Kitcheninspirations original recipe
Makes about 2.5 litres Ice Cream
Ingredients:
20 g instant espresso coffee
60 g sugar (more if you prefer a sweeter coffee)
30 g hot water
250 mL Carnation Evaporated Milk
Directions:
Combine the instant coffee, sugar and hot water in a small bowl and whip until pale in colour and thickened to stand on its own, similar to whipped cream. Set aside.
In the small bowl (2.8 litres or 3 quart) of your KitchenAid stand mixer add the Carnation Evaporated Milk and beat until thickened like whipped cream. Add the thickened coffee cream you prepared in step 1. Beat until entirely incorporated and thickened.
Pour into a freezer-proof container with a tightly sealing lid, even out the mousse with an offset spatula and seal the lid on tightly. Freeze for 12 hours or until frozen like ice cream.
Serve by scooping out spheres of the frozen Dalgona. Serve immediately.
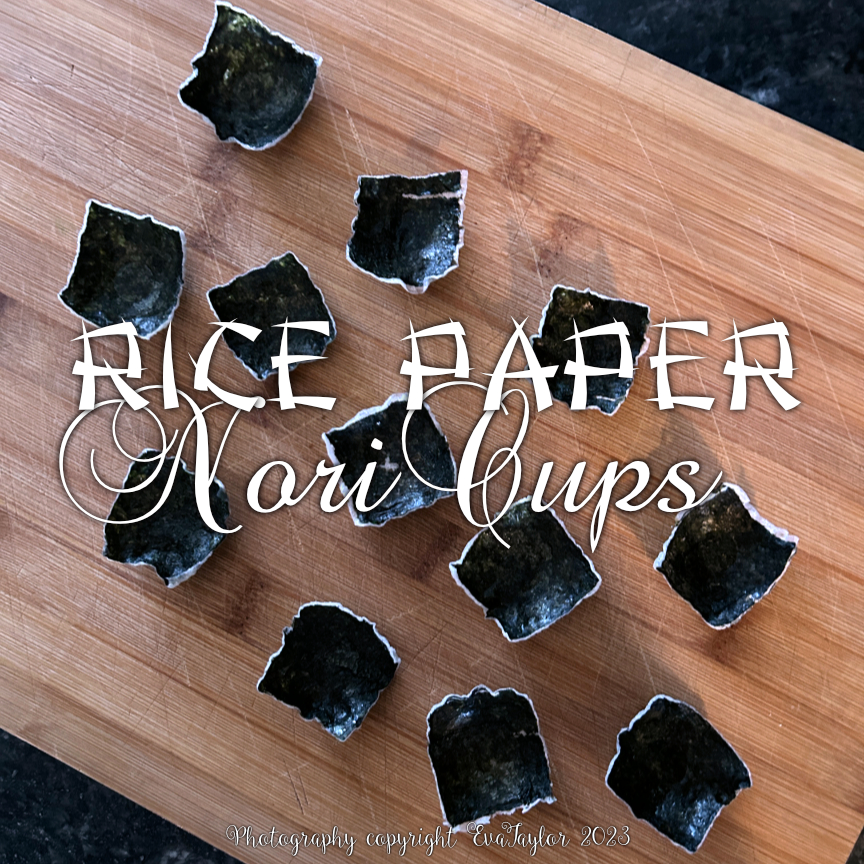
You will recall my post about rice paper chips a few weeks ago, these rice paper nori bowls are a logical extension. I needed something to hold some poké salmon mix I was going to serve as quick little bites during cocktails and I thought of this version. The rice paper becomes crispy as does the nori but both will soften up depending on how long your filling sits inside. For simplicity, I used this for my poké filling and it worked out beautifully.
These little bite-sized are flavourful morsels.
Rice Paper Nori Cups
A Kitcheninspirations original recipe
Makes about 16 bite-sized nori cups
Ingredients:
1 sheet square rice paper
1 sheet nori
Directions:
Wet the nori on both sides and shake off excess water. Lay the nori onto the rice paper right to the edge (my nori was a little smaller than the rice paper, I just cut strips to fill in the edges so there is no waste). Roll the nori with a small rolling pin to make sure there are no air bubbles.
Lightly oil the exterior of four microwave-proof pinch bowls (these will give the nori shape). Lay them open-side-down on a microwave-proof plate.
Cut the nori into 16 squares. Lay one square nori-side down onto the outside of the pinch bowls and microwave for 30-40 seconds or until the rice paper has cooked and the squares are shaped like a bowl. Allow them to cool for a minute and then remove them from the bowls and set them open-side-up on a plate. Continue until you have cooked all the squares. Allow the Rice paper nori bowls to cool completely before you fill them with your favourite filling but don’t do it too soon as the moisture may soften the cups.
Notes:
You can make them as large or as small as you wish. The only thing to keep in mind is that they will shrink about 40% of their original size.
You can fill them with dips, cream cheese, deconstructed California rolls, and Steak Tartare, the possibilities are endless.
There are many recipes online but they shallow fry them, I chose to microwave my cups. If you shallow fry them, you would have to figure out how to get them into a cup shape.
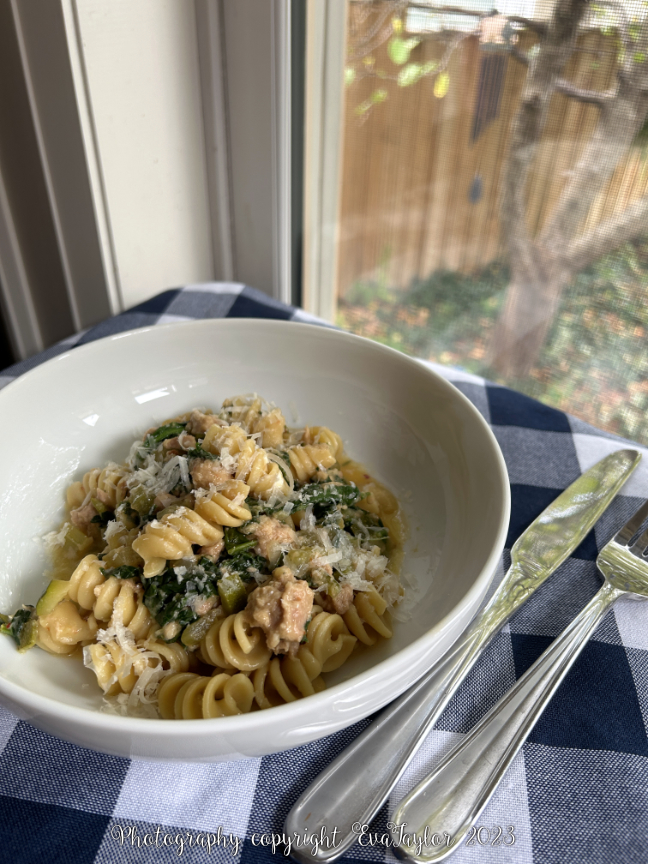
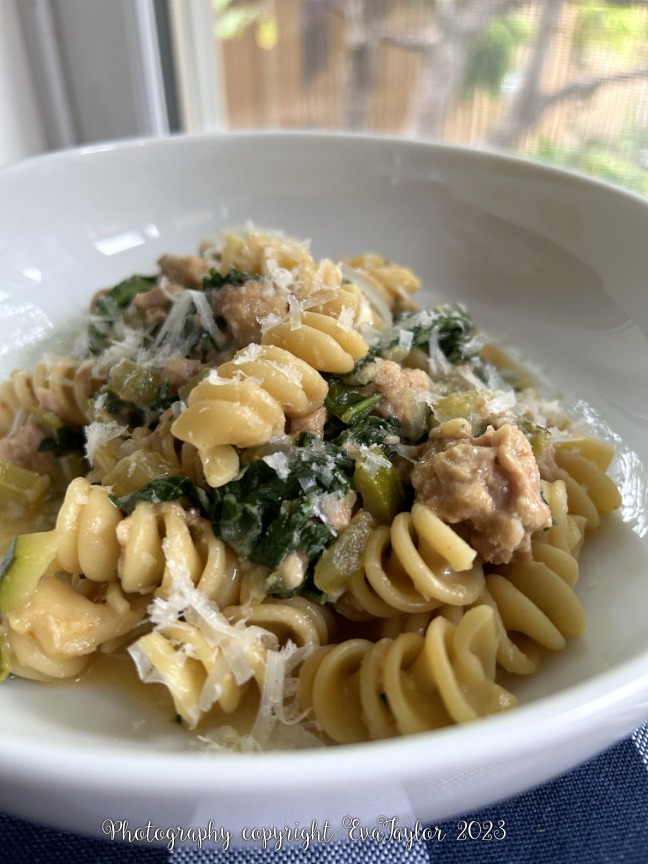
This dish comes together very quickly as long as you have everything mis en place, making it the perfect weeknight meal. The Instant Pot caramelizes the pasta with the chicken stock so that the pasta is al dente with just the right amount of bite. I have a feeling that this dish will become a staple on our weekly menu plan.
Canned tuna is a staple in most households in Spain and Italy, it doesn’t have the stigma that canned tuna has in North America. I was going to make the famous Spanish tuna and avocado salad for a dear friend but thought I’d better ask if she likes canned tuna and thank goodness I asked because her answer was adamantly not! We love it!
Instant Pot Tuna “Casserole”
A Kitcheninspirations original recipe
Makes enough for 2 for a light dinner.
Ingredients:
15 mL EVOO
1/2 small sweet onion, diced
1/2 small zucchini, diced
1 celery rib, diced
225 mL chicken stock
120 g pasta (we used rotini)
1 can tuna, drained
handful of spinach, chopped
50 g goats cheese
Aleppo pepper, to taste
Salt and pepper, to taste
Parmesan cheese for garnish
Directions:
Set the IP on “Sauté”. Add the EVOO and heat it up. Add the onion and sauté until translucent. Add the zucchini, celery, chicken stock and pasta and give it a good stir. Cancel the “Sauté” setting.
Secure the “Pressure Cook” lid on and and make sure the vent is set to “Sealing”. Set the IP to “Pressure Cook” on “High” for 5 minutes (this means 6-7 minutes to come to temperature and pressure and 5 minutes cooking time). Allow the IP to depressurize naturally for 7 minutes. After 7 minutes, press the valve down to depressurize the remaining pressure and safely remove the lid.
Remove the “Pressure Cook” lid set the IP to “Sauté” on “High”, stir in the tuna and spinach and continue to stir to wilt the spinach. Once the spinach has wilted, add the goats cheese and stir to melt. Sprinkle in the Aleppo pepper. Season with salt and pepper to taste and give it a good stir..
Divide the tuna casserole between two warm bowls and garnish with Parmesan cheese. Serve hot.
Deliciously plump noodles lightly coated in a goats cheese sauce.
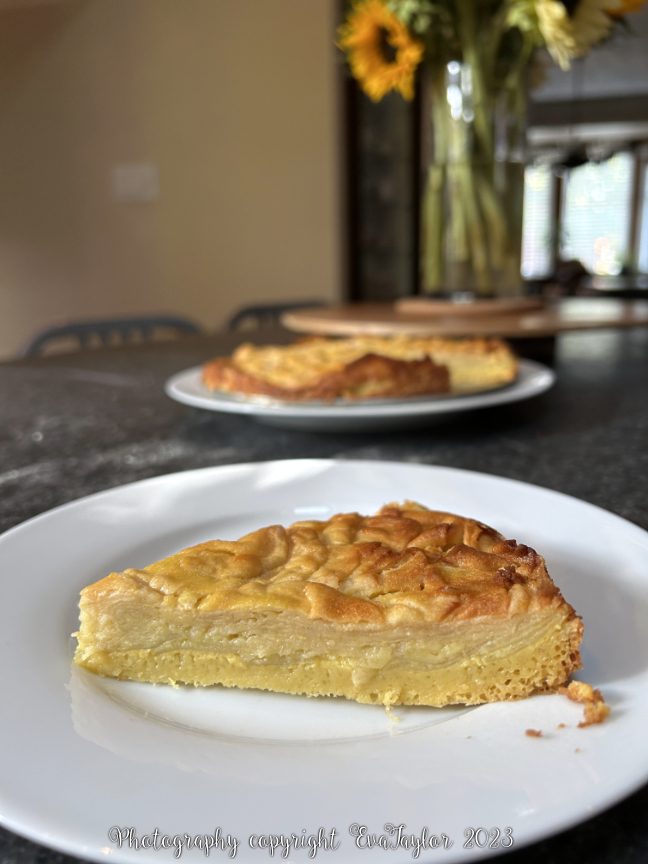
We were having friends over just before they went away for a quick holiday and I needed a dessert. These friends love fruit-filled desserts so when I came across this interesting Italian recipe, I thought, why not? I was ready to make my Normandy Apple Tart but to be honest, it’s a lot of work (pastry, custard, apples, topping) so when I saw how easy this recipe is, it was a no-brainer. There are sooo many versions online and so many different methods but I like the method below, it works well and it’s not a lot of work. You can mix it by hand, but it just makes it easier if you use the stand mixer.
Balzano Apple Cake
Makes one 23 cm (9 inch) round apple cake
Ingredients:
2 large eggs
95 g Erythritol
125 mL milk
65 g unsalted butter, melted and cooled
15 mL pure vanilla extract
60 g flour
8 g baking powder
4 g salt
4 McIntosh apples, peeled and thinly sliced
Directions:
Preheat the oven to 350° F.
Prepare a 23 cm springform round pan by lining it with parchment and generously buttering it all over.
Beat the eggs and sugar until they reach the ribbon stage, and beat in the vanilla.
Combine the melted butter with the milk, then pour the milk mixture into the batter and beat well.
In a separate bowl, whisk the dry ingredients together and fold them into the wet ingredients. Gently stir in the apples. Pour the mixture into the prepared pan and bake for 55-60 minutes or until a wooden cake tester comes out clean.
Serve at room temperature.
The batter turns into a wonderful, velvety custard interlaced between the thinly sliced apples.
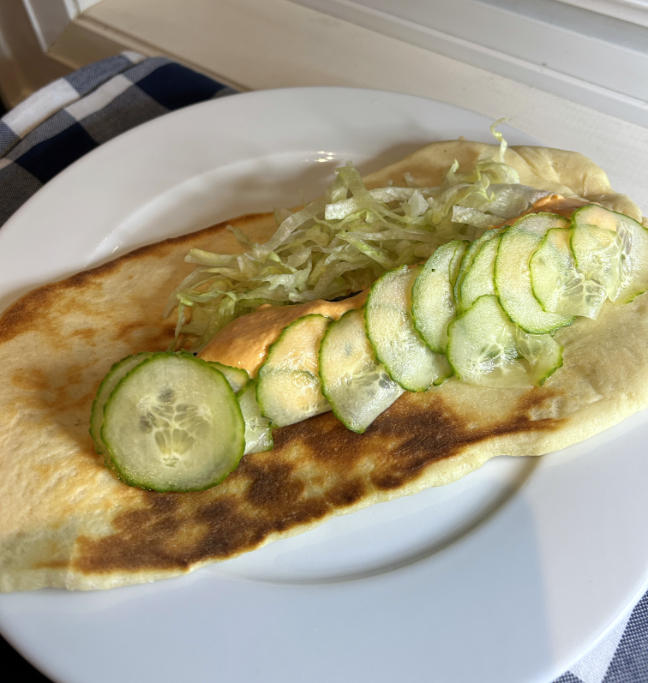
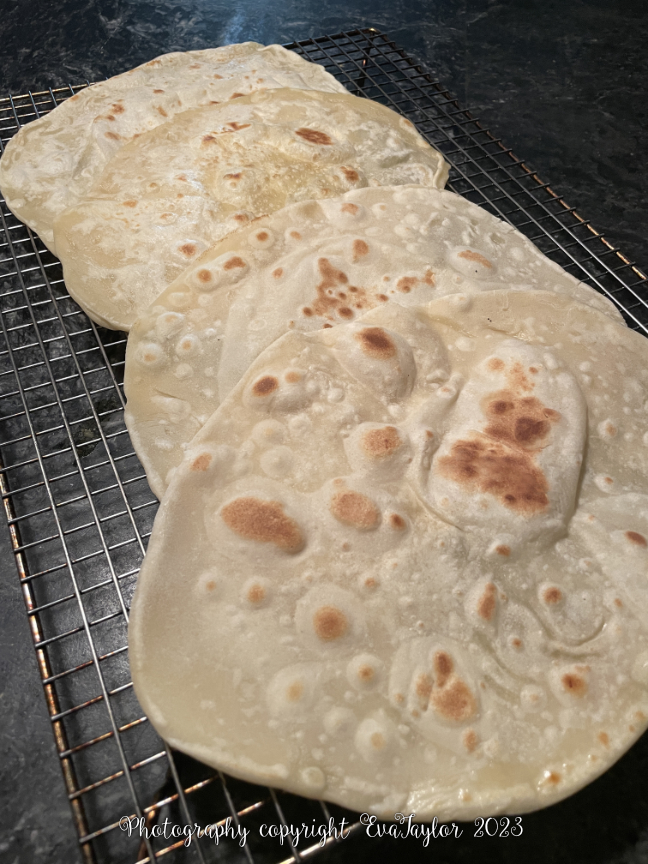
Part of our escape from winter next year will be going on a luxury cruise from Istanbul, Turkey to Athens, Greece. I wanted to become more familiar with Turkish food so we went to a Turkish restaurant and loved it so much I thought we should experiment with a few recipes. I made these lavash to go with Adana Kabobs (lamb and beef kabobs) for dinner one night. To say it was a success is an understatement, they were extremely delicious! I can’t wait to try this in Turkey next year.
Soft and chewy, the perfect texture to wrap a brightly-flavoured Turkish kabab.
Unleavened Turkish Lavash
Makes 6 small-medium-sized lavash
This is a combination of several recipes.
Ingredients:
250 g bread flour
4 g salt
100 g water
15 g Greek yogurt
30 g EVOO
Directions:
Combine flour and salt in the bowl of your stand mixer and give it a quick mix.
In another container, mix the water, yogurt, and oil. While the mixer is on low speed, pour in the wet yogurt mixture. Mix until the yogurt mixture is entirely combined with the flour. Allow to sit for 10 minutes.
After 10 minutes, continue to knead the dough until no longer sticky and is firm and smooth (10-15 minutes).
Allow the dough to rest for 30 minutes.
Divide the dough into six equal portions and roll out each one to an oval or a circle adding flour as necessary, if sticky.
Using a cast iron frying pan, on medium-high heat, cook each lavash until golden but not hard.
Serve warm with kabobs.
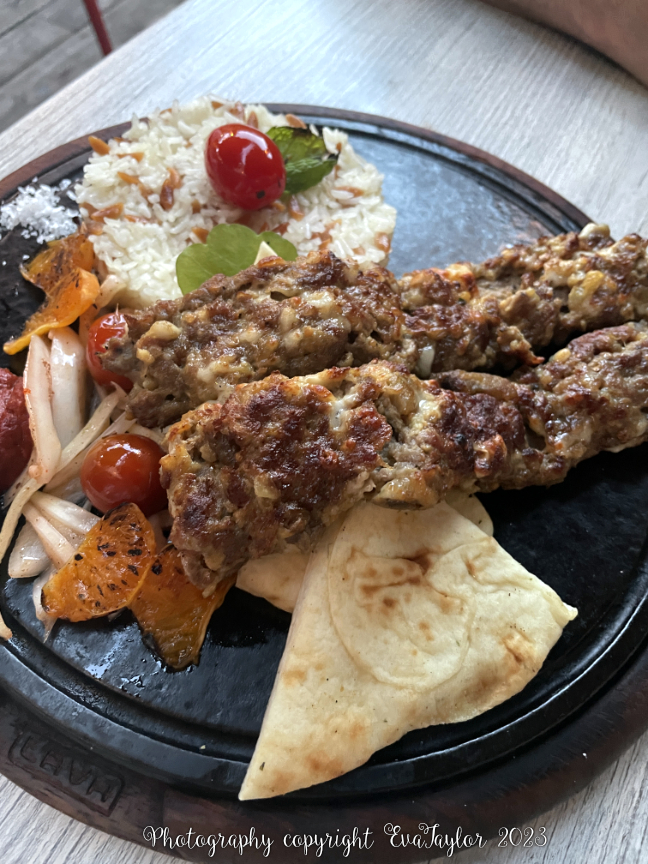
These are the kababs we had in a restaurant. I am hoping to get the appropriate kabab skewers in Turkey next year!
Notes:
Freeze lavash in a ziplock bag with most of the air removed. To reheat, slightly dampened from frozen on a medium-heat frying pan.
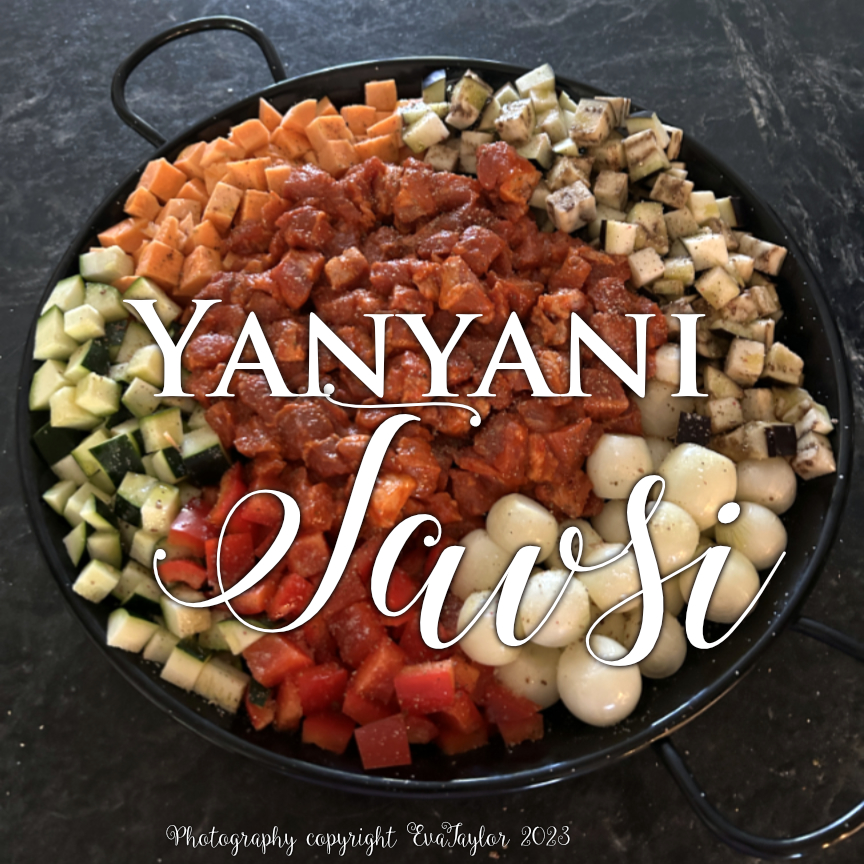
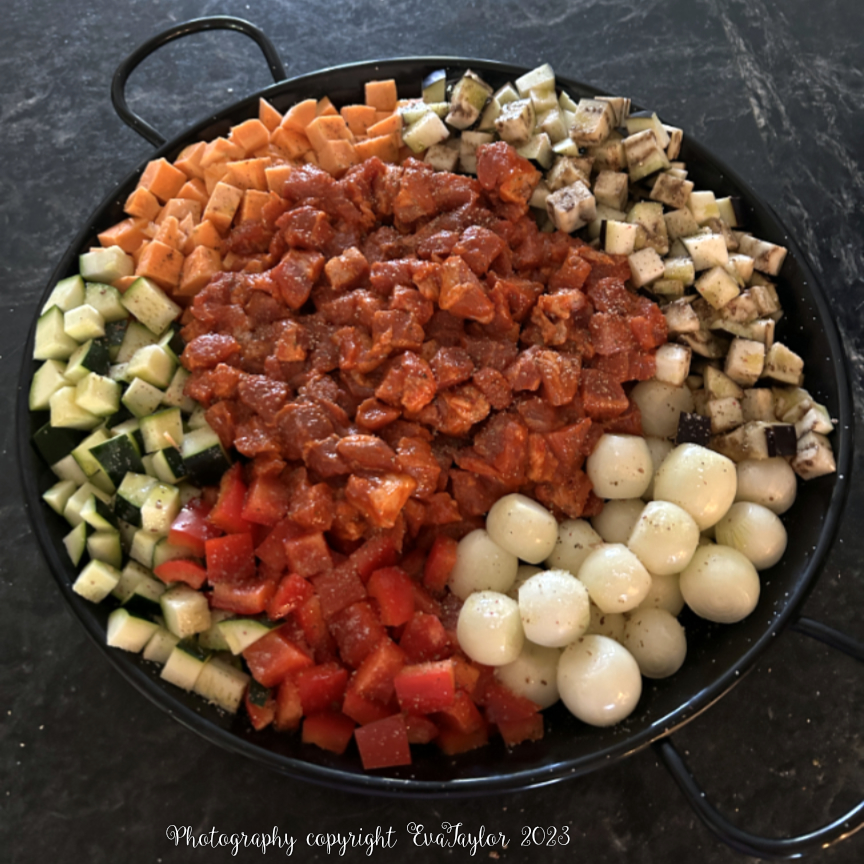
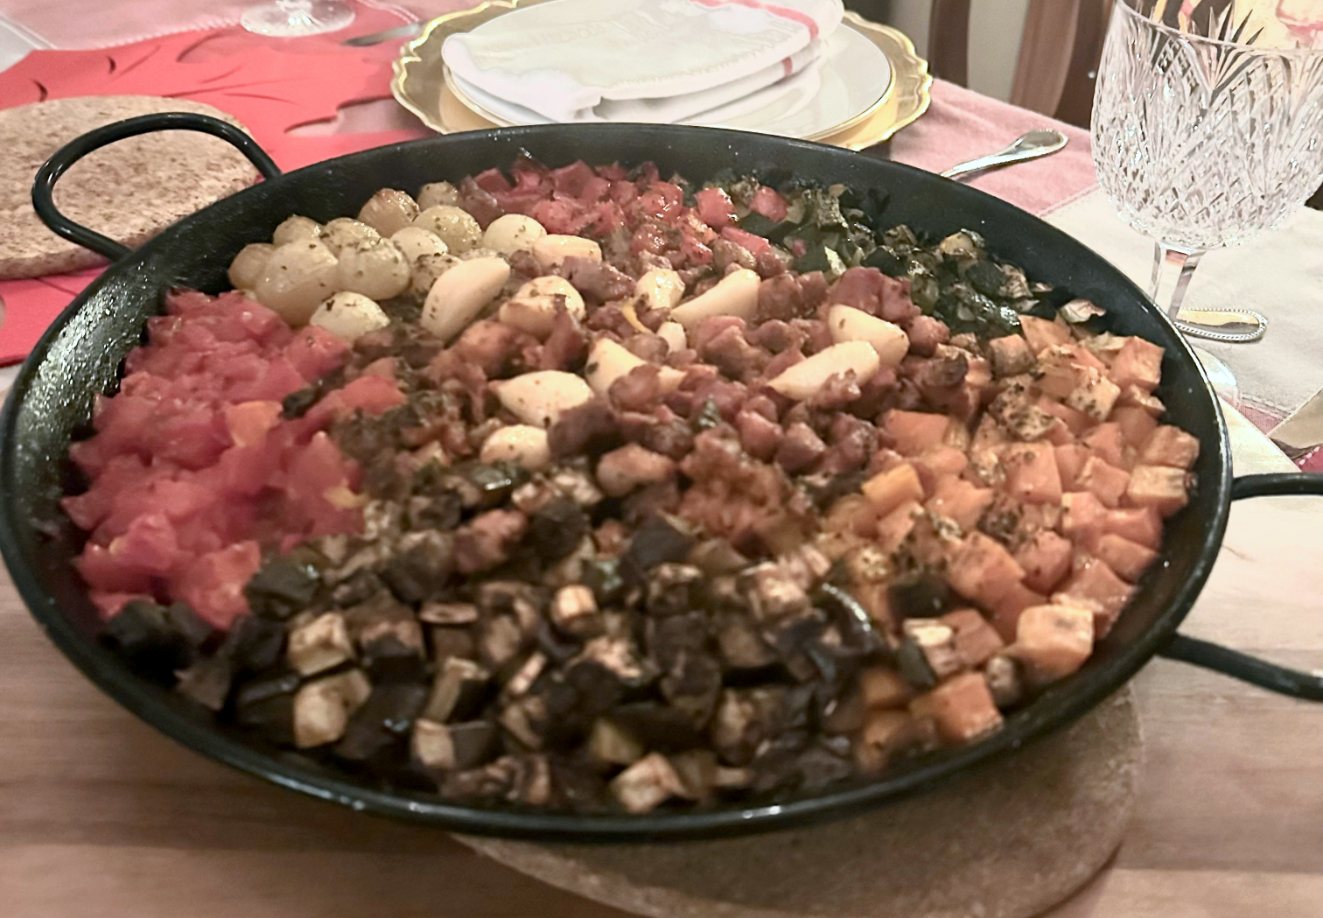
As you know, we at Kitcheninspirations have become obsessed with Turkish recipes because we are planning our trip to Turkey next year. We really want to get the flavour of the country and from what we have sampled, we absolutely LOVE the flavours! This recipe came across my Instagram and I was immediately smitten. It is a perfect sharing meal, the round pan is filled with highly seasoned meat, with each vegetable surrounding the meat in its own quadrant. It is beautiful and perfect for a long dinner party filled with great conversation. The original recipe uses lamb but our guests don’t eat lamb so I substituted pork. You’ll need a fattier meat so that the flavours can develop in the pan juices. I can guarantee that this is absolutely worth the effort. I used my large Paella pan (about 33 cm or 13-inch diameter) and it worked out well but if you have a large, deep-dish pizza pan, it’s more like the original in this video.
It seems like a lot but it really is not. Four of us nearly polished it off in one sitting. I had enough leftovers for one, but I stretched it into two by adding more vegetables.
1 kg boneless lamb or pork shoulder/neck fillet, cut into tiny pieces
1 head of garlic (about 10-12 cloves), peeled and left whole
1 1/2 teaspoon sea salt flakes
3/4 teaspoon coarse black pepper
1 bag pearl onions, peeled
1 zucchini, chopped into 2 cm pieces
1 medium eggplant, chopped into 2 cm pieces
1 red bell pepper, cored and chopped into 2cm pieces
1 medium sweet potatoes, peeled and chopped into 2cm cubes
3 tomatoes, peeled and chopped into 2 cm pieces
2 Bay leaves
salt and pepper
Directions:
Combine 30 mL olive oil, Turkish sweet red pepper paste, milk, paprika, smoked paprika, and Aleppo pepper flakes in the base of a large medium-high-sized ovenproof pan (similar to a deep dish pizza pan or a paella pan). Add the meat and the whole garlic and massage the spice mix into the meat, allow to marinate while you prep the veg (about 60 minutes or a maximum of 4 hours). Once the meat has marinated, season it with salt and pepper.
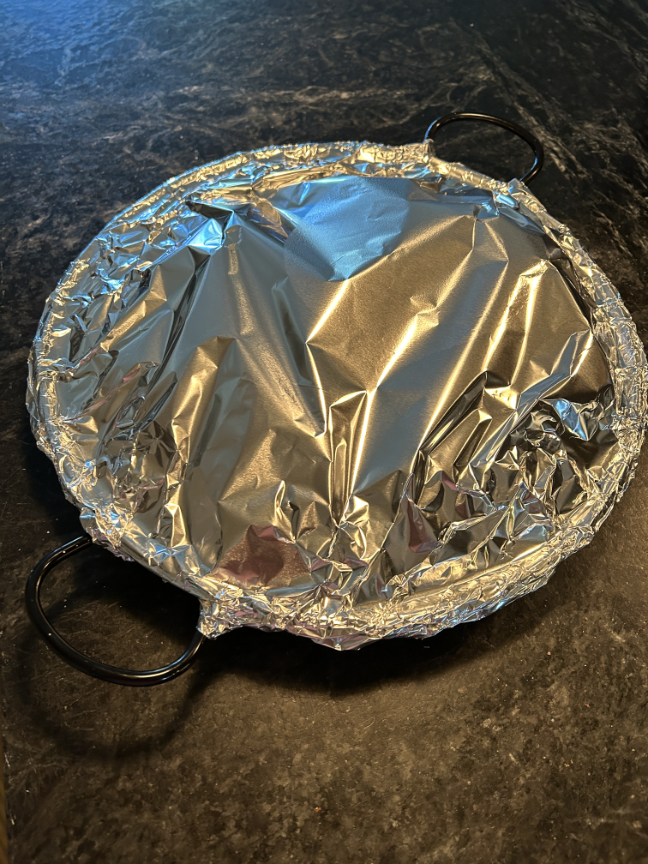
Push the meat into the centre of the pan and place each veg in its own quadrant around the meat (remember, this is a “side by side” dish). Once all of the veg are placed around the meat, brush them with the remaining 15 mL of olive oil and sprinkle with the oregano and place the bay leaves into the meat. Cover the pan with parchment and wrap it tightly with foil and place it into your oven for one hour at 350° F convection (with fan).
Once the hour has lapsed, remove the pan from the oven and increase the oven temperature to 425° F. Remove the parchment and foil carefully from the pan and baste the vegetables with the juices from the meat (using a large spoon, press the meat down gently to fill up the spoon with the delicious pan juices and baste). Once you have basted all of the vegetables, return the pan to the 425° F oven for 30 minutes (trying to crisp the veggies a bit).
Serve with any type of flatbread or lavash or mayasiz bazlama (yeast-free Turkish flatbreads).
The vegetables really cook down, as does the meat. It wasn’t nearly as greasy as I thought it would be, the meat let off a lot of juices for the vegetables to cook in nicely.
Lay a piece of parchment over the top and then secure it with heavy-duty foil and wrap the foil tightly around the pan.
*I didn’t have Turkish sweet red pepper paste on hand so I used my Hungarian Sweet Red Pepper Paste. You can bet that it’s on my list for Turkey!
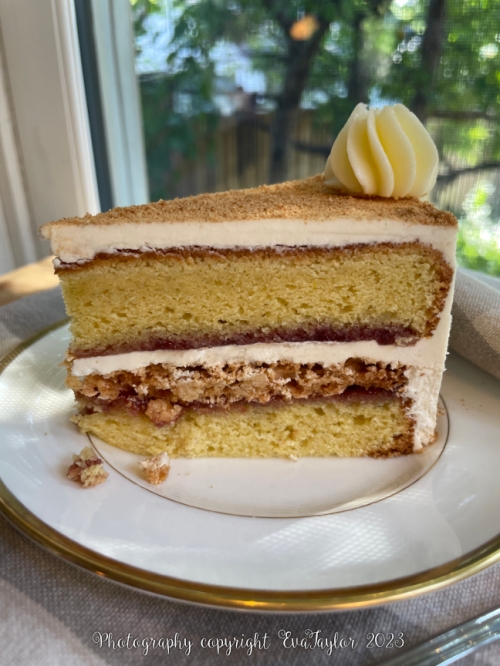
It was my SIL’s 70th birthday last month and she came down to stay with us one night. We took her out for dinner and came home to have this celebratory cake. When I asked her what type of cake she would like for her special birthday, she asked for vanilla. You know I couldn’t just do vanilla, so I pulled out all the stops and created this masterpiece. The cake layers come from Recipe Tin Eats and while the method for this cake is slightly odd the result is pretty darn good. I’ve simplified her method and cut the recipe in half (because we prefer small desserts).
The crunch in this cake comes from a layer of almond meringue that is baked until crispy and when assembled in the cake, with a layer of buttercream and seedless raspberry jam, it results in a crunchy and chewy texture, similar to macarons. It is really wonderful.
Vanilla Almond Crunch Cake
Makes one 18 cm (7 inch) cake that may serve 8-10 people.
Ingredients for the cake:
150 g AP flour
7 g baking powder
pinch of salt
58 g unsalted butter, melted and cooled
125 mL milk
10 mL pure vanilla extract
1 vanilla bean pod
10 mL unflavoured oil
2 large eggs, room temp
150 g granulated sugar
125 mL seedless raspberry jam (for assembly)
Directions:
Prepare an 18 cm (7 inch) spring-form pan by lining the bottom with parchment and brushing the bottom and sides with quick-release mixture (see notes below).
Preheat the oven to 350° F.
Sift the flour, baking powder and salt together into a bowl and set aside.
Scrape out the vanilla seeds from the pod and set it aside.
In a microwave-proof container, melt the butter with the milk but do not boil the milk, add the oil and vanilla pod (not seeds at this point). Cool completely. Remove the vanilla pod and discard. Add the vanilla extract and vanilla bean seeds and mix well to separate all of the seeds (I found a quick blitz with my immersion blender did the trick). Set aside.
Combine the eggs and the sugar and beat on medium speed for 7-10 minutes until light and fluffy and doubled in size.
Slowly add the flour on 1 or 2 speed until you have incorporated all of the dry ingredients. Scoop out a couple of spoonfuls of the batter, add it to the milk and butter mixture, and whisk well. Pour this mixture into the batter and beat for a minute or less until entirely incorporated. Pour the batter into the prepared pan and tap vigorously on the counter to help remove air bubbles. Bake for 30 minutes or until a wooden cake tester comes out clean. Cool completely before completing the cake.
Ingredients for the crunchy layer:
50 g egg white
100 g sugar
2.5 mL almond extract
20 g ground almonds, toasted
16 g AP flour
Directions for the crunchy layer:
Preheat the oven to 325° F.
Beat the egg whites until soft peaks form. Add the sugar and beat until it is stiff and shiny. Beat in the almond extract.
Combine the ground almonds and flour and mix well, fold in small portions into the beaten egg whites until completely incorporated.
Spread a circle of the meringue the diameter of the cake on a piece of parchment and bake for 30-45 minutes at 325° F until golden and firm to the touch. Cool completely.
The quantity in the recipe is perfect for lightly coating the cake including a crumb coat, but if you want extra decor, I would add an extra 50 g of butter and 25 g of icing sugar. If you wish to pipe rosettes on top, separate about 125 mL buttercream and beat in 2.5 mL almond extract.
Assembly:
Allow the cake to cool completely. Insert toothpicks around the cake at the height halfway point. Using a serrated knife, cut directly above the toothpicks all the way around.
Lay the first layer of the cake on the cake stand protected with parchment paper. Heat the seedless raspberry jam so that it’s liquid and spread half of it on the cut side of the cake layer. Add the meringue layer directly on top and spread about 250 mL of the buttercream across the meringue surface evenly.
Spread the other half of the raspberry jam over the cut side of the cake and lay it over the buttercream raspberry side down.
Spread a thin layer of the buttercream over the entire cake and refrigerate, covered for a few hours or overnight.
Spread the remaining buttercream over the entire surface of the cake to even it out. If you wish to pipe rosettes as decoration, please see the note under the buttercream recipe link.
If you have excess meringue, pulse it in a spice grinder to a relatively fine powder. Decorate the cake with it as desired. Using the remaining 125 mL buttercream, dot the top of the cake with rosettes as desired. Cake may be refrigerated but I would suggest bringing it to room temperature to serve it.
Notes:
Quick-release mixture: 2.5 mL vegetable shortening, 2.5 mL vegetable oil and 2.5 g AP flour. Mix all the ingredients together so it is homogeneous and brush onto the cake pan surface.
If you are planning on eating the cake a day after you bake it, you may use stabilized whipped cream instead of buttercream. But if the cake needs longevity, then use buttercream.
My Crunchy layer ended up spreading out a bit more than the diameter of the cake, so I cut off the excess and ground it up and used it as texture and decoration on the cake.
The cake may be made in several steps over a couple of days to limit the amount of time in the kitchen at once. Day 1, bake the cake. Wrap the cake in plastic and freeze. Bake the meringue layer. Day 2, make the buttercream. Set aside at room temperature. Day 3 Assemble the cake and add the buttercream.
I am not a professional baker and I don’t have the patience to decorate a cake with much more than what I did with this one, just sayin’.
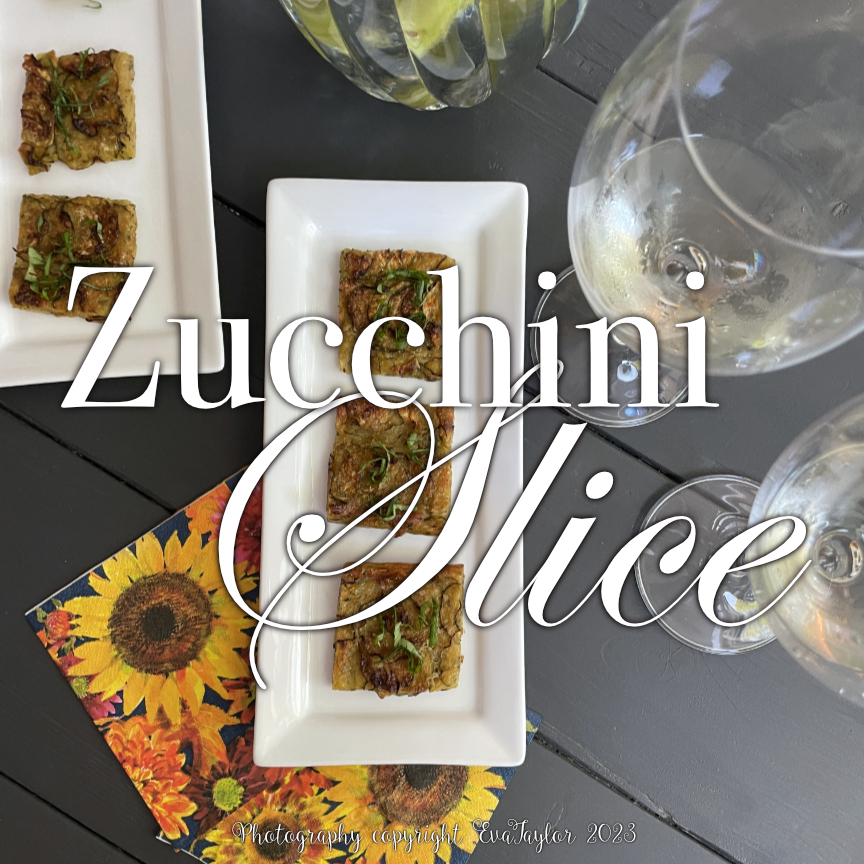
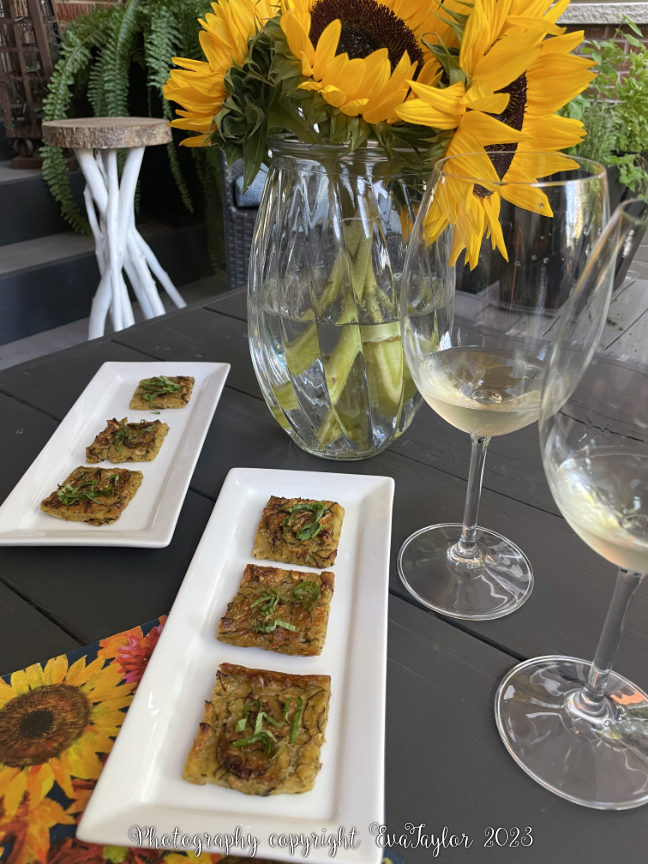
I am always on the lookout for easy, freezable appetizer recipes and this zucchini slice hit the spot. The funny story is that the recipe came into my sight on Instagram, it was one of those reels that pop up, it’s no one I was particularly following and as quickly as it came into my sight, it disappeared even quicker! It was late at night so I completely forgot to save it. But I never thought that would be a problem because as soon as I click on something, it comes up so frequently, that I get completely tired of it and wish I had never clicked. Until I tried to find that recipe! It disappeared off the face of the earth. Completely gone. Not even a Google search led me back to it. WTF! I searched for a few days, hoping it would grace my feed but no luck. And I had several zucchinis ready to use so I improvised. This is not the real Italian version of Scarpaccia, you can find that here.
A delicious slice of baked zucchini in a thin cakey base.
Zucchini Slice
A Kitcheninspirations original recipe
Makes 35 cm x 50 cm pan
Ingredients:
700 g zucchini, shredded
3 shallots, thinly sliced
10 g salt
Zucchini water and extra water as needed
150 g All Purpose flour, unbleached
40 g cornmeal
30 mL olive oil, plus more for drizzling
Pepper to taste
Parmesan Cheese, freshly grated
Directions:
I shredded 1/2 of the zucchini, and thinly sliced the remainder. Combine the shredded zucchini and the shallots and sprinkle with half of the salt. Sprinkle the other half of the salt over the zucchini slices. Set aside in a fine sieve over a bowl overnight. Save the liquid that the salt extracts.
Preheat the oven to 380° F.
Squeeze any remaining liquid from the shredded zucchini in cheesecloth into the zucchini liquid bowl. Combine the flour, cornmeal and olive oil in a large bowl and mix to create a relatively liquid batter, adding water as needed. Add the pepper and mix in the grated zucchini well.
Line a large roasting pan (about 35 cm x 50 cm) with parchment and drizzle with olive oil. Turn in the zucchini batter and press into the length and width evenly (I used another sheet of parchment and rolled the zucchini out evenly). Add the zucchini slices to the top. Drizzle with olive oil.
Bake the zucchini for 45 minutes, then sprinkle freshly grated Parmesan cheese over the top and finish baking for an additional 15 minutes or until the bottom becomes crispy.
Notes:
I found that many recipes online had egg in the batter, but just as many did not and because I wanted it crispy, I decided to try it without egg.
My version is less cakey because it does not have egg in the batter.
Drizzling the parchment with olive oil before pressing the zucchini batter into the pan, allows it to crisp up nicely.
Dehydrating the zucchini overnight creates a much drier zucchini so it can crisp up nicely.
Sprinkling with Parmesan does not seem to be original in Italian recipes.
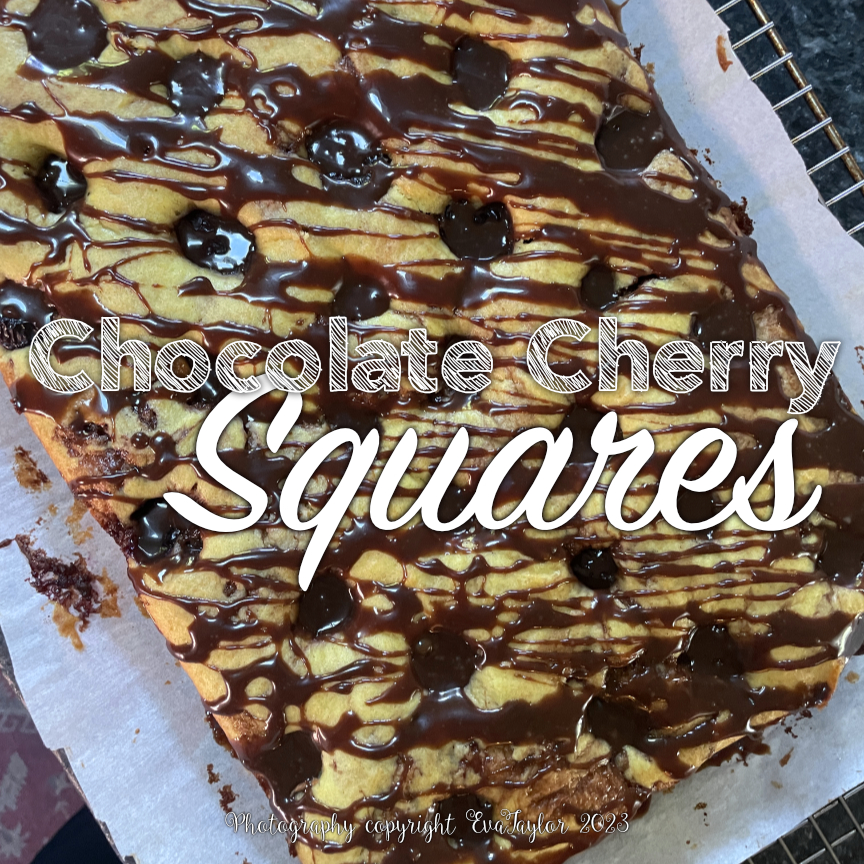
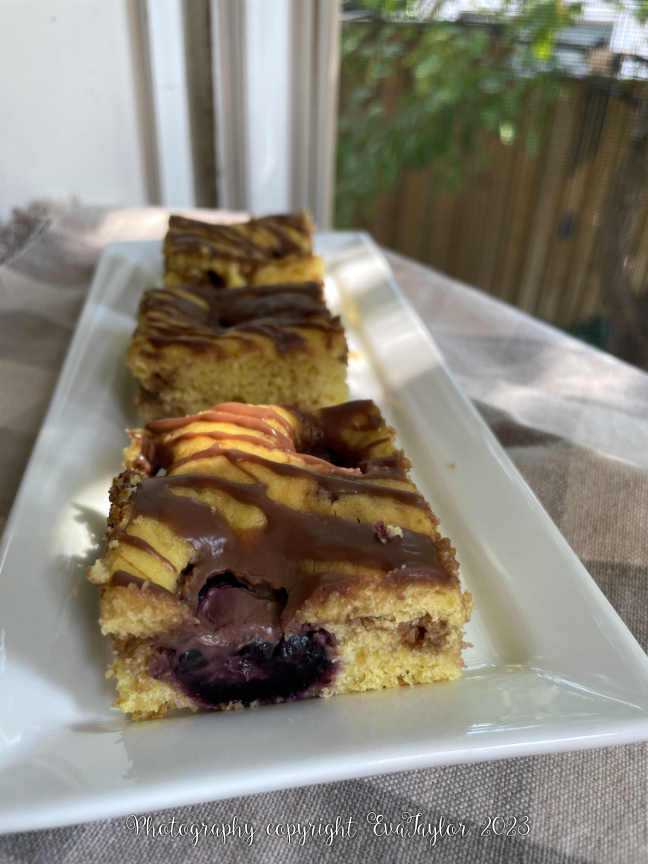
My dear friend/neighbour invited us for dinner one night and I offered to bring dessert. I spotted some frozen cherries at our grocery store and picked them up thinking they would be a good ingredient for dessert in a pinch, not thinking that pinch would be sooner than later. I’ve made these squares before, without the chocolate ribbons so I wanted to update the recipe, and because, as JT said, “What could possibly be wrong with cherries and chocolate?” You be the judge.
Chocolate Cherry Squares
A Kitcheninspirations original recipe
Makes one pan 23 cm x 33 cm (9” x 13”) about 20 squares
Ingredients:
300 g frozen cherries, defrosted and drained
3 eggs separated
120 g unsalted butter (room temperature)
125 g caster sugar
250 g flour
25 g baking powder
½ tsp salt
1 tsp vanilla
125 mL cream
150 g Belgian milk chocolate
50 mL cream
Directions:
Grease and flour 9” x 13” x 2” baking pan (22cm x 33cm x 5cm).
Preheat oven to 350° F (175°C)
Heat the cream until almost boiling and pour over the chocolate and stir until entirely melted. Allow to cool.
Whip the egg whites until stiff but not dry (should be able to stand in a peak) – no need to wash the beater if you do it in this order, if you cream the yolks first, then you must wash the beater and dry thoroughly).
Cream the egg yolks with butter and sugar until light and fluffy (should be a lighter shade of yellow).
Sift flour, baking powder and salt – dry ingredients.
Alternating dry ingredients with the milk, fold into egg yolk mixture.
Gently fold beaten egg whites into the mixture.
Spoon about half of the batter into greased pan. Note the batter is quite thick, you will have to spread it into the cake pan with an offset spatula. Drizzle the milk chocolate ganache over the batter and spoon the remaining batter on top, speading evenly with the offset spatula.
Dot with the cherries throughout (you may want to give each cherry a squeeze as you dot so ensure there are no pits!).
Bake in preheated oven for about 20 to 30 minutes (test with a toothpick to make sure it’s done).
Cool in the pan (don’t cut until it is entirely cool otherwise it will become ‘bacony’ or szalonás, as the Hungarians put it).
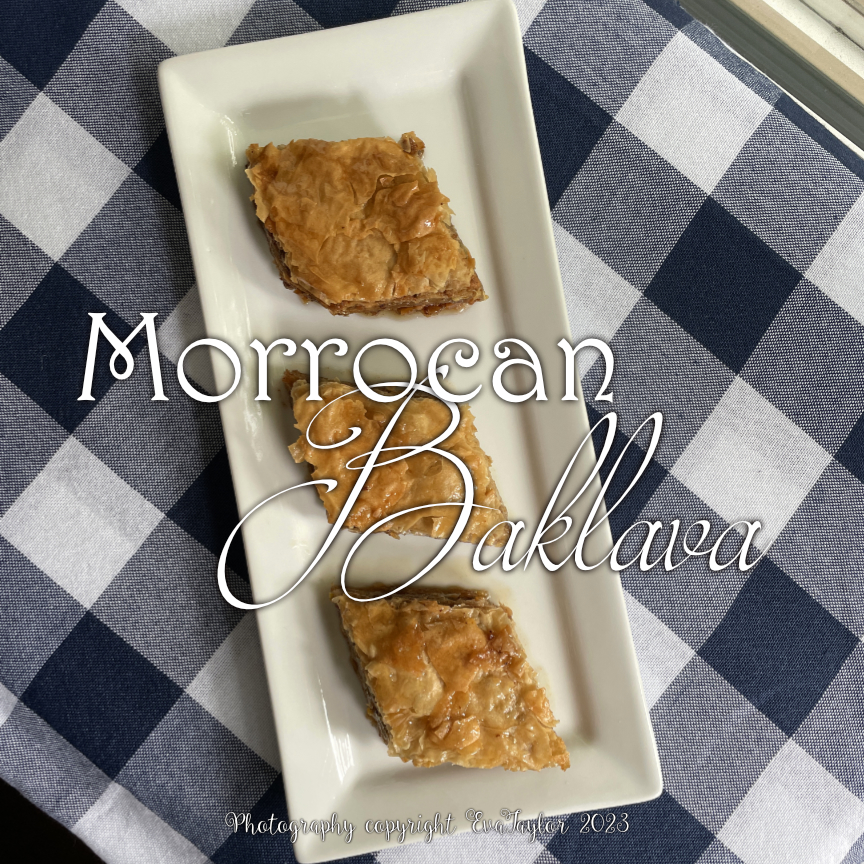
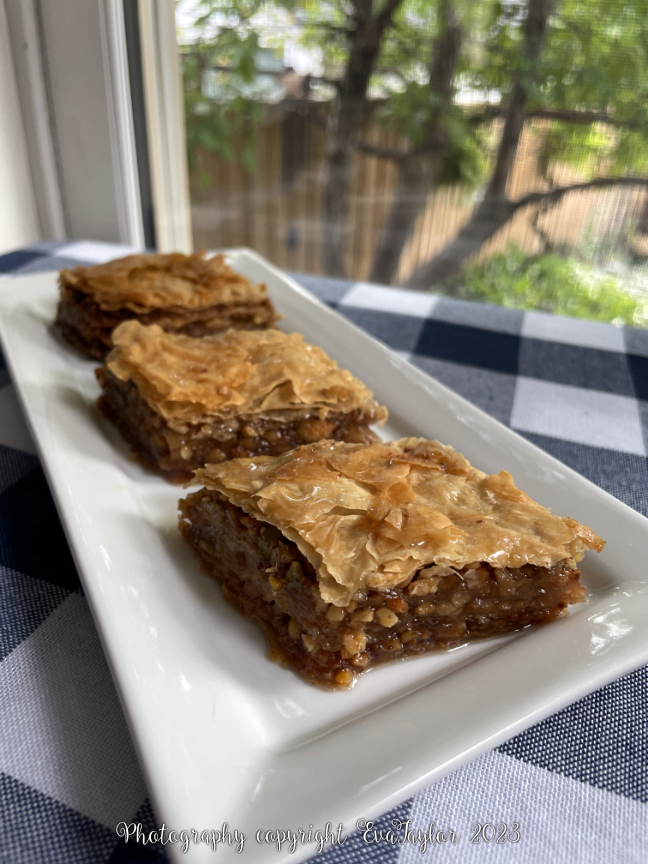
We had some dear friends over for a BBQ in late-August and we made homemade Moroccan lamb burgers with a wonderful spiced prune and nut couscous; I needed a Morrocan-style dessert so I chose this wonderful baklava recipe. To be honest, I wasn’t able to differentiate between Middle Eastern baklava and Morrocan baklava but rest assured, they are both delicious. This version has walnuts, pistachios and almonds with a syrup flavoured with orange and lemon rind, cloves and orange blossom water. It should have rose water in it as well, but I am not a fan so I skipped it.
Metaxas (Moroccan Baklava)
For the original recipe, please click here. Makes about 33 cm x 23 cm 5 cm (12 inches x 9 inches x 2 inches) baking pan of Metaxas.
Ingredients
150 g sugar
150 mL water
rind of an orange (no white pith)
rind of a lemon (no white pith)
5 whole cloves
60 mL honey
5 mL orange blossom water
100 g walnuts
100 g pistachios
100 g lightly toasted, blanched almonds
100 g sugar
2.5 g ground cinnamon
200 g unsalted butter, melted
10 commercial phyllo dough sheets, cut in half length-wise to fit your pan
Directions:
Combine the sugar, water, both orange and lemon rinds, cloves and cinnamon stick in a medium saucepan. Bring to a slow boil then turn the heat down to simmer, uncovered for 8 minutes. Remove the pan from the heat and strain to remove the spices and rinds. Stir in the honey and orange blossom water. Set aside to cool. See notes to make use of the orange and lemon rind.
Preheat the oven to 300° F and toast the nuts for 12 minutes. Remove from the heat and cool. Increase the oven temperature to 350° F.
In the small bowl of your food processor, combine the cooled nuts, sugar and cinnamon and pulse so they are relatively finely chopped with some larger pieces.
Line a 33 cm x 23 cm 5 cm (12 inches x 9 inches x 2 inches) pan parchment and brush generously with butter.
Begin by lining the bottom of the pan with one sheet of phyllo pastry and brush generously with the melted butter. Continue until you have five sheets stacked. Spread about one-third of the nut mixture over the fifth sheet evenly to the sides. Continue with the next five sheets spreading each sheet generously with the melted butter. Spread another third of the nut mixture over the tenth sheet evenly to the edges. Continue with the next five sheets as before, and spread the fifteenth sheet with the last third of the nut mixture. Finish with the last five sheets of phyllo as before, drizzling any remaining butter over the top of the last sheet.
Bake in a preheated oven at 350° F for 45 minutes. Cover with foil if the top browns too quickly. Remove the pan from the oven and cut immediately. To cut the Metaxas in the traditional diamond pattern, begin by cutting a line from one corner to the opposite corner and repeat to the last corner. Then cut parallel lines to create small diamond slices. Pour the cooled syrup over the hot Metaxas. Allow to stand overnight at room temperature before serving.
Layers of delicious nuts bathed in a luxurious syrup between crunchy sheets of phyllo.
Notes:
Remove and separate the orange and lemon rinds and place on a parchment-lined baking sheet. Bake for 10 minutes at 300° F until firm. Eat as a snack.
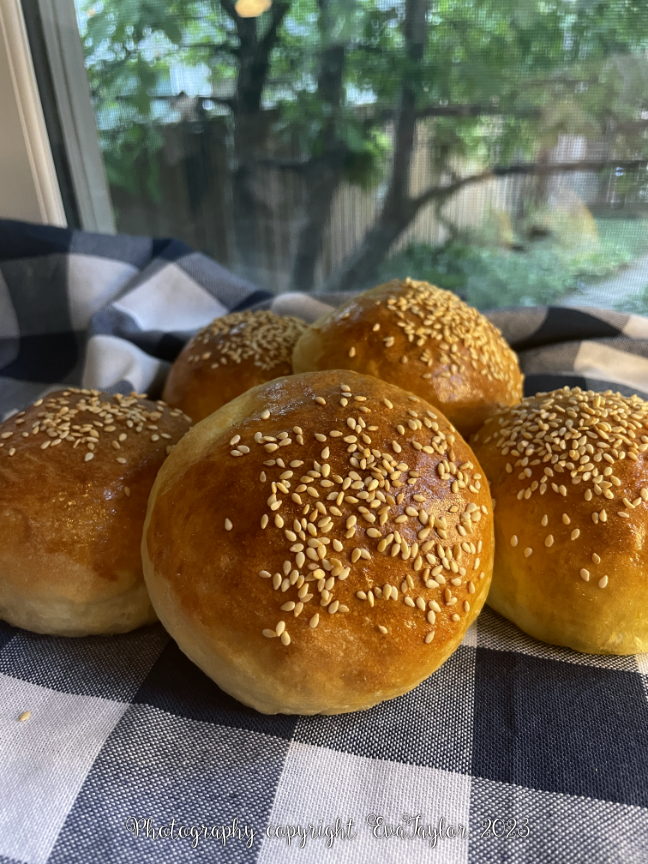
As 2023 summer came to an end, we started to panic to get in as many BBQs as possible. And what better to BBQ than burgers? A few years ago, we discovered a wonderfully light burger bun made with sweet potatoes! Because who wants a heavy, overpowering bun? I had some leftover mashed potatoes from a recent dinner party and decided to turn them into these buns! What a great way to utilize leftovers! These were plain, ordinary whipped potatoes made with cream and butter and a little salt. They turned into the most delicious, light buns.
You’ll notice that there is also one egg and some melted butter in this recipe that allows the dough to have that gorgeous brioche structure without being heavy. These are truly the best burger buns.
These are sturdy enough to hold a burger with condiments but they are light enough that they won’t fill you up too much
Potato Buns
Makes about 11 buns, about 65 g each (unbaked) with a tiny “tester” bun left over.
Ingredients:
454 g leftover mashed potatoes
65 g all-purpose flour
125 mL warm water
8 g quick-rising yeast
1 large egg
45 mL unsalted butter, melted
10 mL honey
7 g sea salt, finely ground
240 g bread flour, or slightly more as needed
Egg wash:
1 egg
1 teaspoon water
1 tablespoon sesame seeds, or to taste
Directions:
In a bowl, mix together the 65 g flour, warm water, and yeast, and whisk until smooth.
When the yeast mixture is frothy (about 10 minutes), pour it into the large bowl of your stand mixer fitted with the creamer paddle. Add the mashed potato, the egg, the melted butter, the honey, and the sea salt and mix until well incorporated. Switch the paddle to the kneading hook and add the 240 g of flour in batches. Knead 4 minutes. If the dough is still too sticky, add an additional 30 g of flour and knead until the dough is soft, elastic, and shiny (about 8 minutes). Stop and allow the dough to rest for 15 minutes. Once rested, knead again with the dough hook for an additional 10 minutes.
Turn the dough out into a well-oiled bowl and cover. Allow to rise until double in size (about 1 hour).
After it has doubled in size, turn the dough out onto a lightly floured surface and stretch and fold a few times. Measure out the dough into 10 equal portions (about 65 g each, with one tiny “tester”) and roll each portion into a smooth ball. Allow to rest for 45 minutes or until doubled in size on a covered baking sheet.
Preheat your oven to 400° F. Combine the remaining egg, and water and mix well. Brush each bun with the egg mixture and sprinkle each with sesame seeds.
Bake in a hot oven until golden or when the internal temperature is 200° F (about 15 minutes).
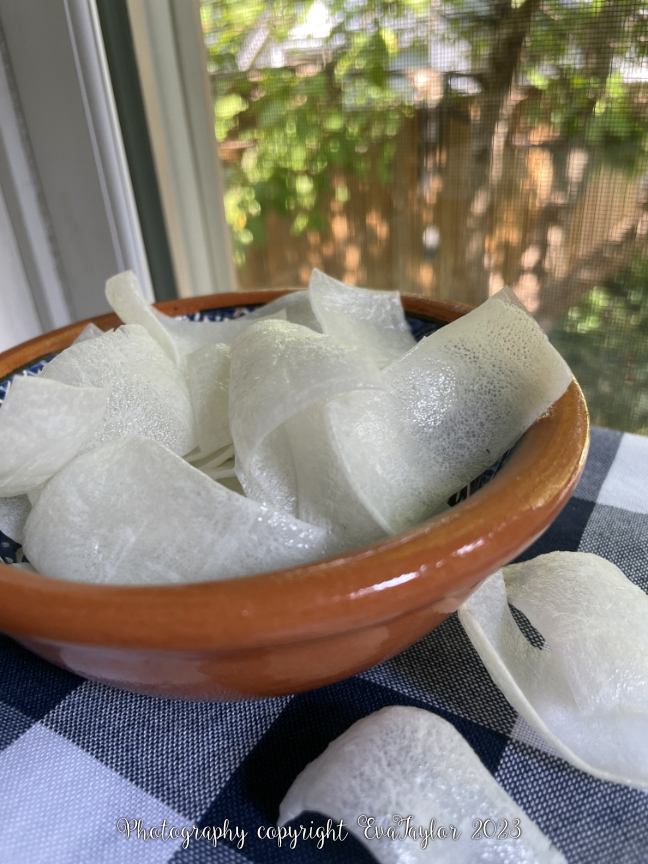
Talk about an easy recipe. And they satisfy the crunch aspect of snacks! Plus they’re not unhealthy! And I usually have a packet of rice paper in my pantry! All winners in my books.
I developed this “recipe” in response to an air-fryer version I saw on my Instagram feed; their version took too long to “fry” and was too fiddly. These Rice paper chips remind me of the mystery shrimp chips you get at Thai restaurants, they’re super crispy and melt-in-your-mouth, just like shrimp chips. But they are not deep-fried! They are microwaved!
Each sheet makes about 36 chips, less than .30g of carbs per chip! Easy AND Healthy? Where do I sign up?
I used square rice paper sheets that are made for Fresh Rolls. They need to be fresh and not brittle so they cut cleanly, but you could snap them into irregular shapes if they’re not fresh (I’m unsure that they’ll all microwave at the same rate though).
Using large kitchen shears, cut each sheet into six even strips, then cut each strip into six even rectangles. Place on a piece of parchment paper (no need to carefully place them, they don’t stick together) and microwave for 30-40 seconds on high. Immediately pour finished chips into a bowl and season with sea salt. Done!
Easy peasy. You can thank me later.
These melt in your mouth without sticking to your teeth (like some rice paper chips do)
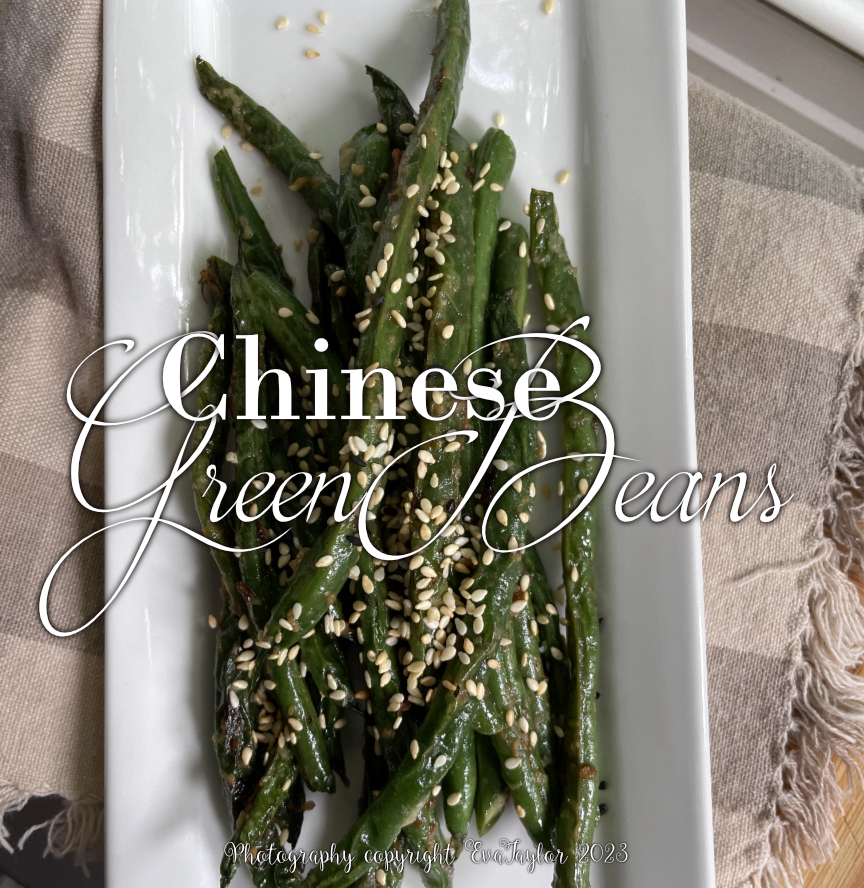
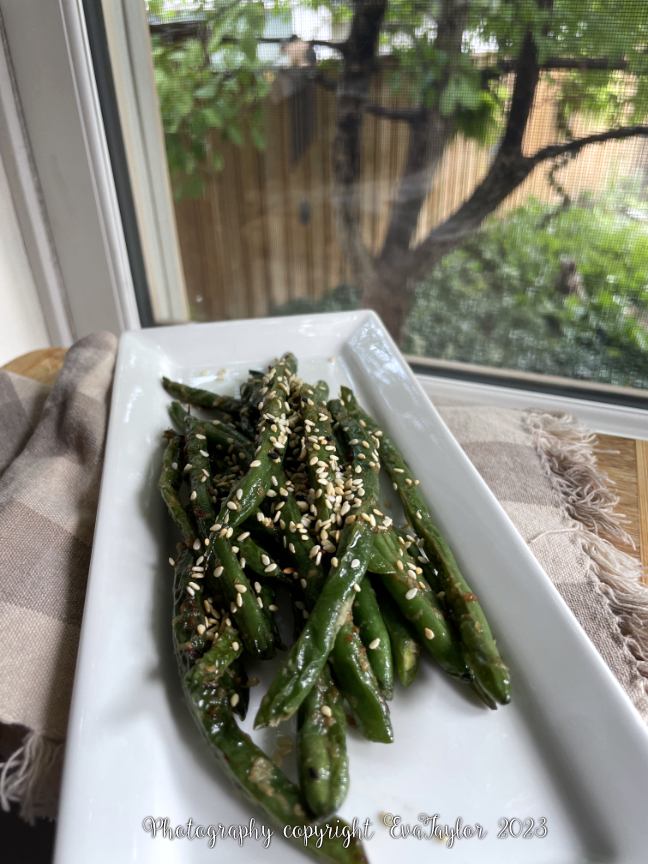
At our favourite Chinese Dim Sum place, they serve the most incredible green beans — they have such a lovely crunch to them. I wanted to replicate the recipe at home. I won’t make them often because they are fried, but they are a nice treat once in a while.
Ingredients:
French Green Beans, washed, dried and trimmed
Peanut oil
1 clove garlic, finely minced
Sea salt
Sesame seeds
Directions:
Add about 1 cm of high flashpoint oil, like peanut oil to a frying pan or wok. Heat until about 300° F.
In smaller batches, fry the green beans until the skin puckers, set them onto a layer of paper towel to absorb the excess oil. Work through the batches until you have fried all the beans. At this point, you may set them aside until you are ready to serve them.
Pour off most of the oil and fry the garlic lightly (not brown), then return the beans to the hot pan and fry until thoroughly warmed.
Serve hot garnished with sea salt and sesame seeds.
These are best served fresh but I have had success in storing them for a few days in the fridge and just pan-frying them until warm.
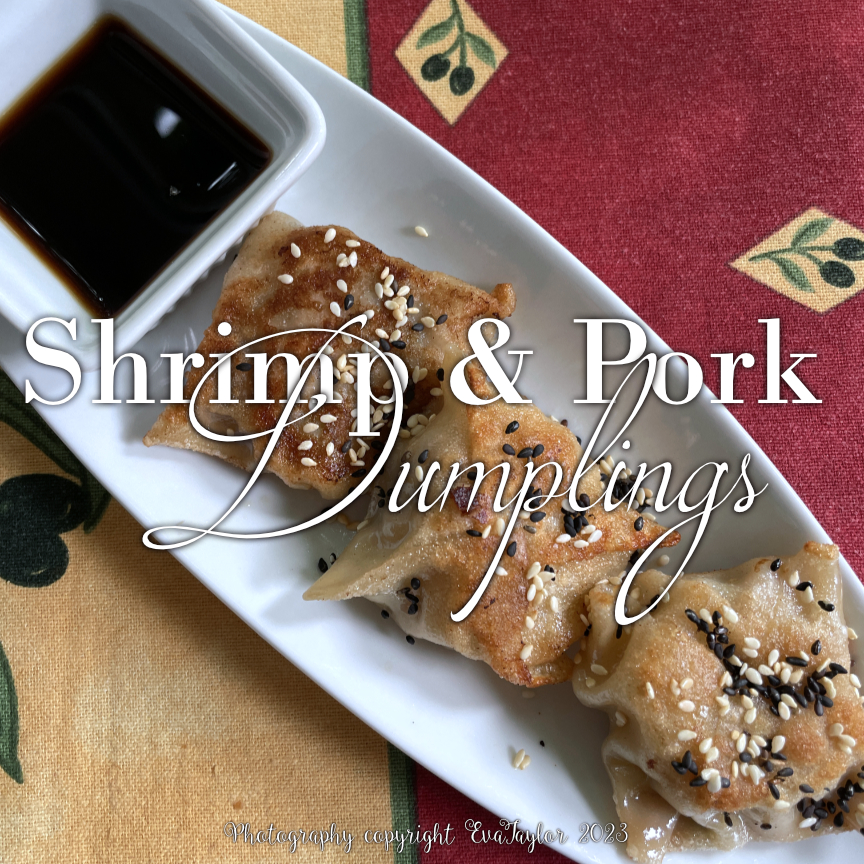
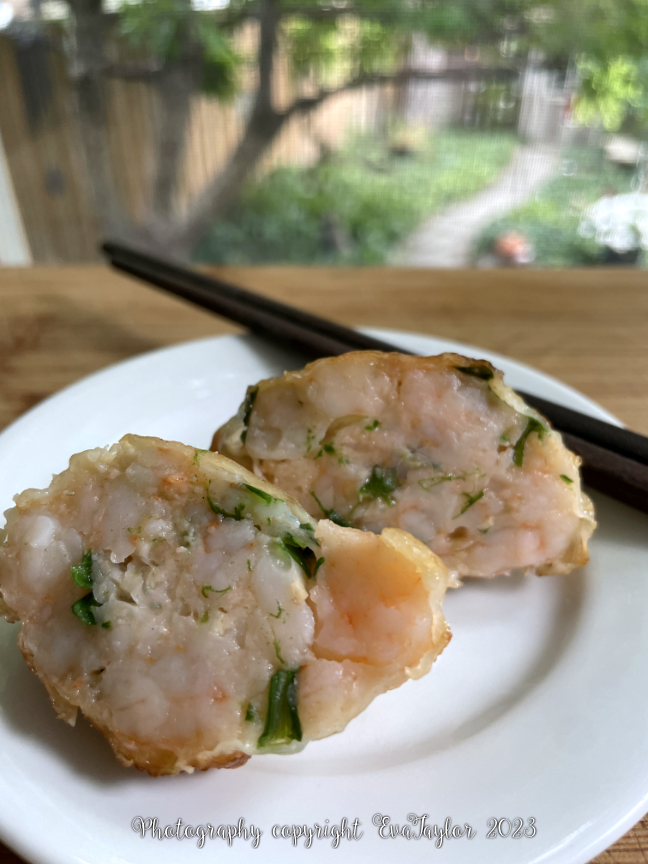
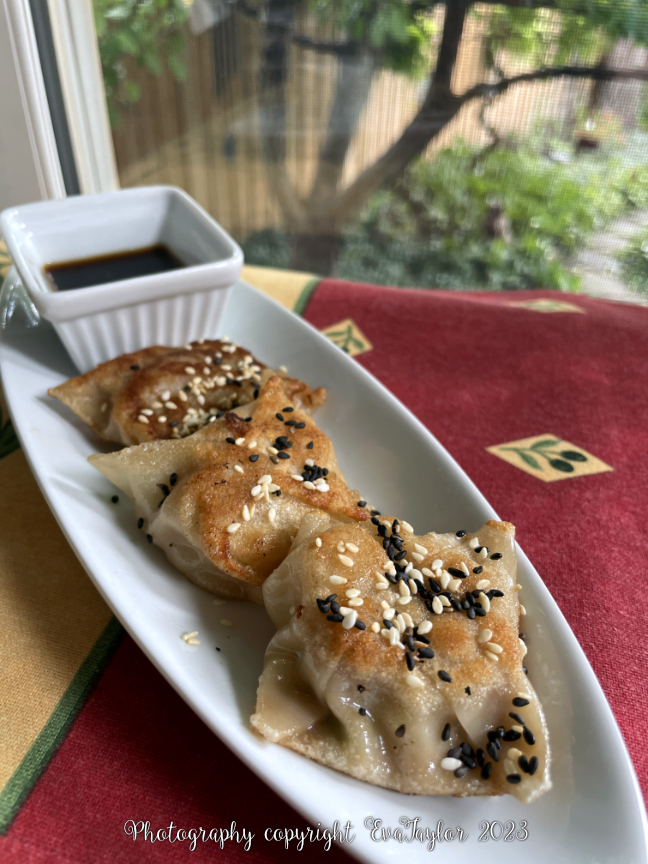
Our dear friends, Andy and Mark invite us to Dim Sum every so often on Sundays. We really look forward to it because many of the dishes are new to us and I haven’t quite figured out how to make them…yet. This shrimp and meat dumpling is a real favourite, they are chuck full of chunky pieces of shrimp in a flavourful mixture of pork.
This is an example from the restaurant. I reheated using my Instant Pot Air Fryer.
I love that they are pan-fried and oh, so crispy on each side, tender and flavourful on the inside. These really hit the spot and freeze very well. They freeze well and it is so easy to pull out a few, steam them up and pan fry in a pinch. I love having a selection of appi’s available in my freezer for last minute additions to a dinner party.
This is an example from the restaurant.
Shrimp & Pork Pan-fried Dumplings
A Kitcheninspirations original recipe
Makes 18 dumplings
Ingredients for dumpling filling:
18 won ton wrappers
175 g pork, finely minced
175 g shrimp, peeled, deveined and roughly chopped
35 g green onions, coarsely chopped
15 g ginger, finely chopped
15 g roasted garlic purée
30 g flour
5 g sugar
15 mL sesame oil
15 mL soy sauce
25 mL egg whites
45 mL high flash-point oil, like peanut oil
Directions:
Combine the pork, shrimp and green onions and mix well.
Combine the ginger, roasted garlic, flour, sesame oil, soy sauce and egg whites and mix well.
Add the ginger mixture to the pork and shrimp and mix well.
Wet all four sides of the square won ton wrappers and place 15 mL of the shrimp mixture into the centre, bring each side up to the centre, and seal to each other.
They may be frozen at this stage.
When ready to serve, steam the dumplings for 7 minutes or until an internal temperature of 165 is reached. Continue until you have steamed all of the dumplings.
Heat the peanut oil in a frying pan and add the dumplings to sear the each side until crispy. Serve warm with the sauce below.
Ingredients for the Dipping Sauce:
15 mL soy sauce
15 mL seasoned rice vinegar
5 g puréed roasted garlic
5 g grated fresh ginger
5 mL toasted sesame oil
5 mL honey
1 green onions, minced
Directions for the Dipping Sauce:
Combine all of the ingredients and mix well. Serve with hot dumplings.
Notes:
The filling for dumplings are not pre-cooked, so you really need to make sure that steaming them cooks the proteins through.
I was pinched for time, otherwise, I would have made my own dumpling wrappers. You can find the recipe here.
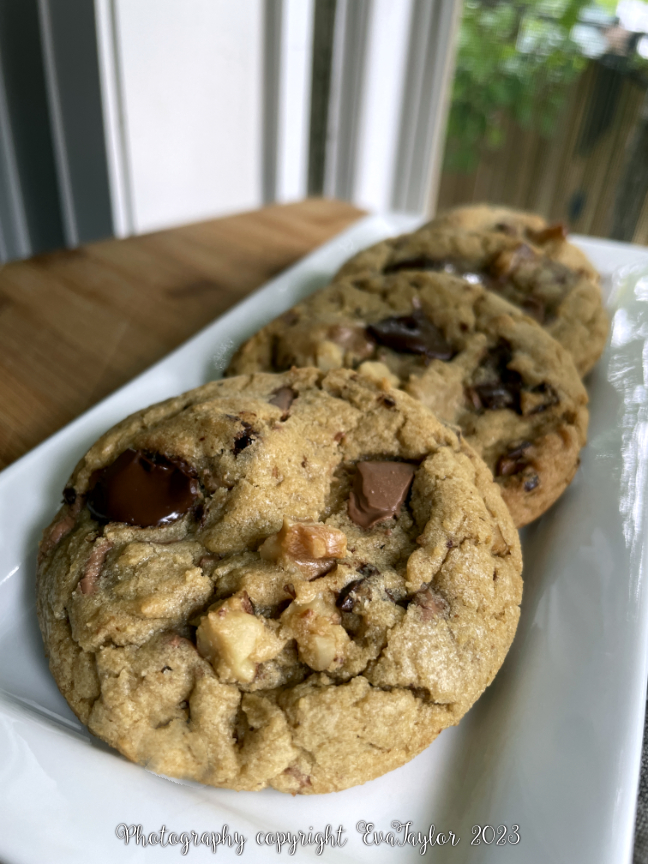
I have been using brown butter in place of melted butter for many years, particularly in sauces and some baked goods, but I hadn’t thought to use it in cookies! And as usual, I have been inundated with a lot of brown butter cookie recipes (has Google and Meta figured out how to read my mind?). Unfortunately, they all seemed quite time-consuming: chilling the browned butter, chilling the batter etc., that is until I found this lovely recipe in Southern Living. Of course, I had to change it to weight measures, and, I never have salted butter on hand, so I upped the salt a tiny bit (from 5 g to 6 g) to compensate.
Brown butter is ridiculously easy to prepare, just melt the butter on medium heat and simmer it until the milk solids turn golden. That’s it. It really takes simple things to the next level. I love it in Béchamel sauce, whether I’m using it with roasted puréed garlic or just on its own. If your recipe contains melted butter, next time, take it to the next level and brown it.
It has a sophisticated, background flavour.
Brown Butter Belgium Chocolate Chunk Cookies
(the famous BBB-CCC)
240 g milk and semisweet Belgium chocolate disks, roughly chopped
115 g walnuts, chopped and toasted
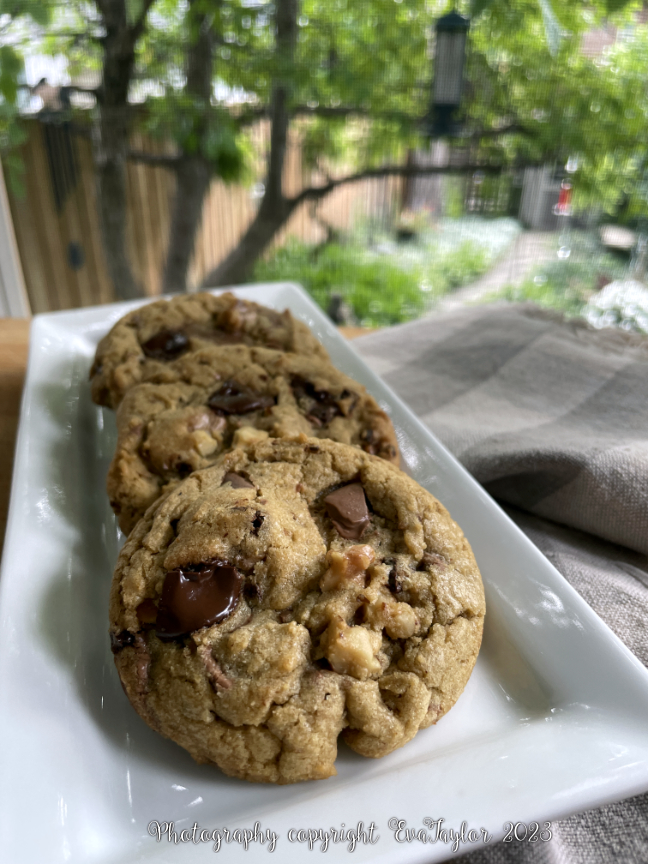
Directions:
Melt the butter in a light-coloured saucepan and simmer until the milk solids have turned golden. Pour into a small flat baking sheet with sides and cool to room temperature and refrigerate until solid (I did this the day before). When you are ready to make the cookies, remove the butter from the fridge and bring the butter to room temperature.
Combine the sugars in the large bowl of your stand mixer fitted with the scraper paddle. Scrape the butter into the sugars and beat until light and fluffy. Add the eggs one at a time and beat well, add the vanilla and beat well until incorporated. Combine the flour, baking soda and salt and mix well. Add to the cookie batter and mix just until the flour is entirely incorporated. Fold in the chocolate chunks and walnuts.
If baking them now, preheat the oven to 350° F. Line a cookie sheet with parchment and portion out 30g of batter about 5 cm apart on the pan (a scant medium Ice Cream Scoop ~ 4.5 cm in diametre). You can freeze the cookie balls at this point and bake them up individually as needed.
If baking now, bake the cookies for 10-12 minutes or until lightly golden on the bottom. If they baked-up irregularly, use a large glass to coax them into a rounder shape. Allow to cool completely on a wire rack.
The perfectly round shape comes from coaxing the just-out-of-the-oven cookies with a large, round, drinking glass.
Notes:
I like to freeze unbaked cookie balls so that we can be deliberate about how many cookies we really want after a meal, that way you bake only the number you want and if you want more, you have to really think about it.
Baking cookies from frozen will take a few extra minutes (12-14 minutes) but once they defrost in the oven, they bake up rather quickly so be diligent.
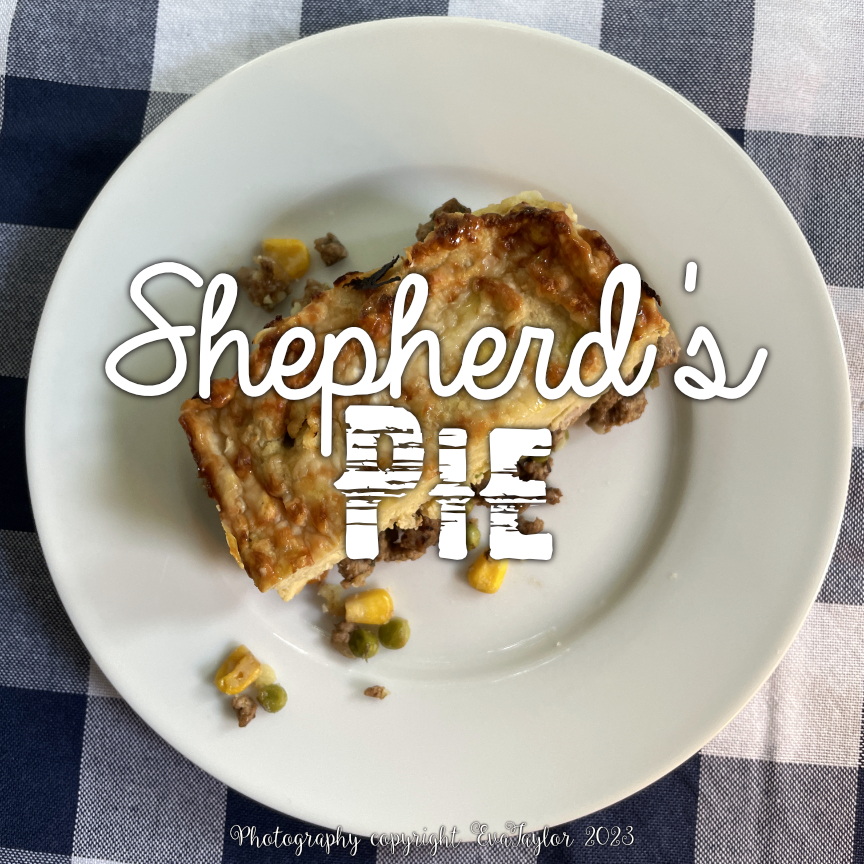
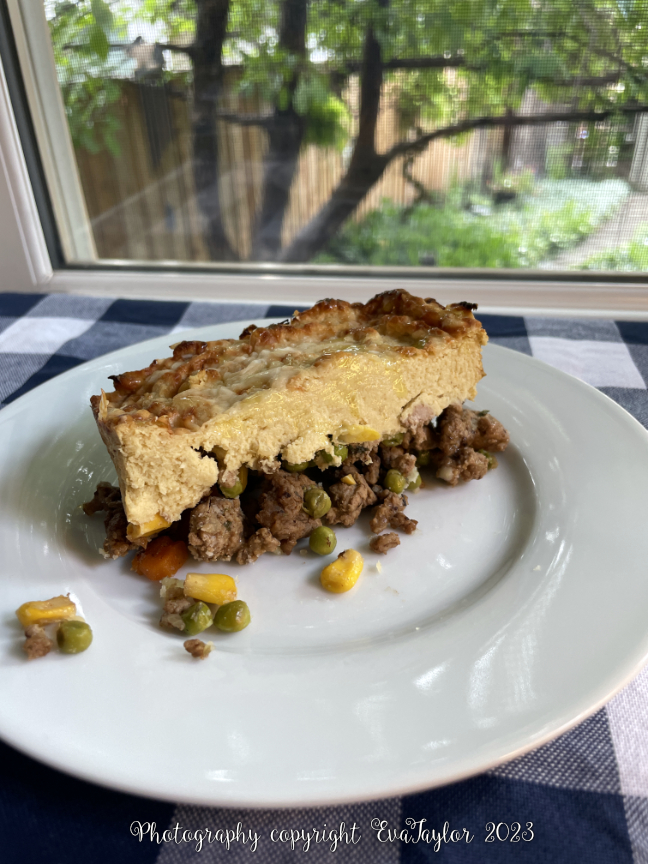
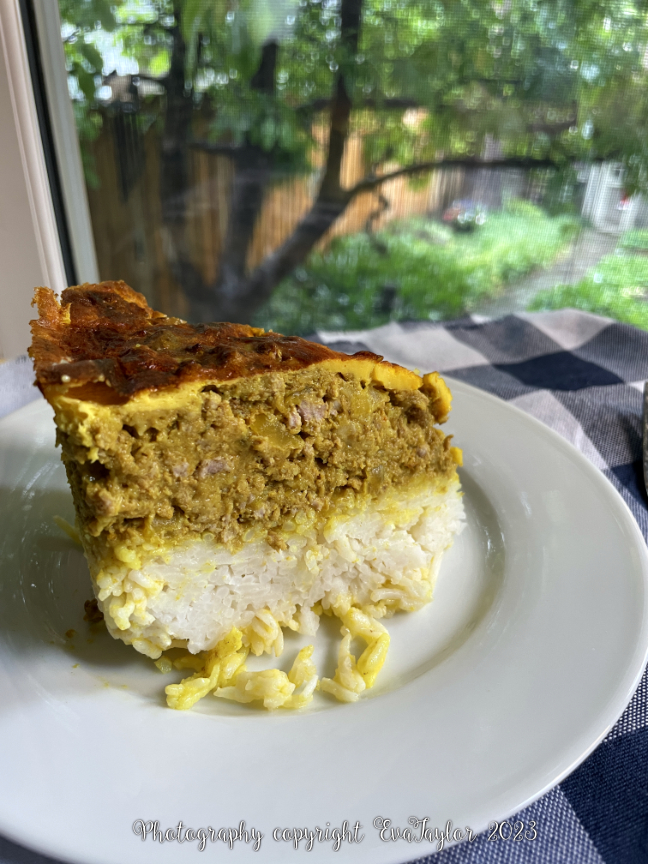
A few years ago, JT suggested he take on making lunches and dinners on Tuesdays and Thursdays. I have to admit, it really takes the pressure off. Being responsible for creating a menu plan every WEEK, AND making lunches and dinners every DAY is a lot, so I really appreciate that he does two days. JT likes to be original and will research recipes and put his take on them. This one was a real winner, Shepherd’s Pie, using lamb and Cauliflower Mash instead of beef and potatoes. The cauliflower mash lends a wonderful sweetness to the dish and the lamb gives it a wonderful earthy flavour.
Updated Shepherd’s Pie
A Kitcheninspirations original recipe
Makes one 21 cm x 11 cm (~8.25″ x 4.5″) loaf pan or 4 servings
Ingredients:
1/2 head of cauliflower, cut into florets and roasted with olive oil until very soft
15 g butter
30 g grated Parmesan cheese, plus more for sprinkling
1 egg
30 mL olive oil
50 g sweet onion, finely chopped
300 g ground lamb
100 g mixed vegetables, carrots, corn, peas 1 medium onion, chopped (about 1 1/2 cups)
30 mL beef broth or more, depending on how moist the lamb is
5 mL Worcestershire sauce
Salt and Pepper to taste
Directions:
Purée the cauliflower with the butter, and Parmesan cheese, season with salt and pepper to taste. Add the egg and purée until entirely incorporated. Set aside.
Preheat the oven to 400° F.
Sweat the onions in the olive oil until translucent, add the ground lamb and cook until no longer pink. Add the mixed vegetables and mix into the lamb well.
Combine the beef broth and Worcestershire sauce and mix into the lamb and vegetable mixture. Season with salt and pepper to taste. You may need a bit more broth if your lamb is dry. Our lam was moist enough so we just used what the recipe calls for.
Line a loaf pan with parchment paper (makes it easier to lift out to cut and serve) and add the lamb mixture first, pressing down firmly. Top with the cauliflower mixture, being careful not to leave any holes, and smooth out the top. Sprinkle with some additional grated Parmesan cheese.
Bake the shepherd’s pie for 30-40 minutes or until it is warmed through, vegetables are soft and the top is golden.
Notes:
The pie may be refrigerated or frozen after Step 5 or baked right away as per Step 6.
To make life easier, purchase frozen diced veg instead of fresh, it will also reduce the baking time.
The Parmesan and the egg firm up the roasted cauliflower mash and give it extra body.
I thought this might need a sauce, but it really doesn’t.
I came across this recipe on my Instagram feed and was immediately smitten. We are not big potato eaters but we do like a delicious potato recipe when we feel like some spuds and I can attest that this is one delicious high-class spud recipe. It will be a bit more effort than mashed potatoes but believe me, it’s worth it. Plus there is the “WOW” factor. I served up these golden medallions aside a couple of Waygu beef tenderloins a friend gifted us for JT’s birthday. These potatoes are absolutely delicious, think bœuff bourguignon potatoes that have caramelized nicely on all sides, they are crispy and creamy at the same time. And, you can make them in advance and finish them about 15 minutes before you’re ready to serve.
Serves 2 (to serve more people, simply multiply the ingredient below)
Ingredients:
4 small yellow potatoes
15 mL peanut oil
40 g unsalted butter
125 mL red wine
125 mL chicken stock
125 mL beef stock
15 mL roasted garlic purée
Pinch of salt
Directions:
Peel and cut the potatoes into large scallop-sized rounds (about 3cm in diameter). It’s important that they are relatively even in size to each other so they cook evenly.
Brown each side in a frying pan with the hot peanut oil on medium heat. Add a pinch of salt.
Add the butter and allow it to melt. Then increase the heat to just over medium and add the red wine, boil it off so it has almost evaporated, flipping the potatoes about halfway through and basting them with the red wine. You don’t want the liquid in a rip-roaring boil, just a fine rumble.
Combine the chicken, beef stocks and roasted garlic and add about one-third of it to the pan. Lower the heat to medium and continue to cook until almost all of the liquid has evaporated, basting occasionally. Add the next third and cook until almost all of the liquid has evaporated, basting occasionally (to make ahead, cook the potatoes until this step leaving the addition of the final third of the liquid to reheat and finish cooking just before serving) and finally, add the last third, flipping the potatoes and basting occasionally, so that the potatoes are very soft but still maintain their shape and the cooking liquid is almost entirely evaporated (keep an eye on it at this point so it doesn’t burn). You should be able to easily cut through the potatoes.
Allow the potatoes to cool for a few minutes and serve.
Browning up the top and bottom before the fondant process.
Notes:
You may be tempted to serve a ‘normal’ serving of potatoes but these are extremely rich so two or three medallions per serving are perfect.
The dish takes quite some time to caramelize so set aside about an hour to make a batch.
The original recipe bakes the potatoes in the oven but I found mine caramelized much better on my induction cooktop as I am able to have very fine control over the heat.
Add the rice, water, and salt to the Instant Pot and secure the pressure cooking lid. Select Pressure Cook for 5 minutes and allow steam to escape naturally for 10 minutes. Generously butter a round casserole heat-proof dish that fits into the Instant Pot using the trivet. Fluff the rice and pour it into the prepared round casserole, patting it down flat and evenly in the dish. Set aside.
Set the Instant Pot to Sauté on High, add 15 mL oil and heat the oil. Add the onions and cook until translucent and soft.
Add the curry powder, salt, tamarind chutney, Worcestershire sauce, turmeric, and vinegar and mix well. Add the ground beef and sauté for a minute and mix well. Add the raisins and the beef stock. Stir well and scrape off any bits that may have stuck to the pot. Pressure Cook on Low for 4 minutes, and quick release the pressure when complete.
Pour the meat mixture into the casserole with the rice and spread it out evenly. (The dish can be made in advance until this step, cooled and refrigerated. Bring to room temperature before reheating).
Carefully lower the casserole dish into the Instant Pot with the trivet. Beat the eggs, milk, and turmeric and spoon over the meat mixture in the round casserole dish. Place the Bay leaves on top.
Set the Air-Fryer lid and Air-Fryat 350˚ F for 15 minutes or until the custard is set and is golden brown.
A flavourful dish with a lovely custard topping and aromatic Basmati rice.
Notes:
Oops, I forgot to add the Bay leaves at the end.
Bobotie usually uses white bread soaked in milk to give the stew body but I omitted it.
Bobotie is usually served with rice and chutney separately but I wanted to make it a one-pot meal in the Instant Pot so I layered the rice into the casserole dish.
Like most stew-type meals, this will taste better the next day.
I made this recipe using a small casserole dish because that is what the original recipe indicated but next time, I will omit the second dish and make it directly in the Instant Pot.
We had dear friends come up from America to stay with us as a layover to help mitigate a long, long travel day and I needed a quick and easy breakfast that we could grab before heading out for a busy day and these did the trick. They freeze well which makes them perfect for a quick grab-and-go snack, just pop them into a microwave and zap them until defrosted and slightly warmed.
They freeze well and defrost quickly in the microwave.
Apple Cranberry Bran Muffins
A Kitcheninspirations Original Recipe. Makes 12 good-sized muffins.
Ingredients:
150 mL 2% milk
400 g peeled and shredded apple (about 3 apples)
100 g bran buds
50 g cranberries, roughly chopped and rehydrated in hot water for 10 minutes
3 eggs, beaten
70 g plain Greek yogurt
300 g All Purpose Flour
60 g brown sugar
15 g baking powder
2 g salt
5 g cinnamon
60 g walnuts, chopped
Directions:
Preheat oven to 375° F (190° C). Brush the muffin cups generously with the Secret Release Formula (see notes). Set aside.
Combine the milk, eggs and yogurt and mix well. Layer this liquid with the bran buds, apple and cranberries making sure bran buds are covered in the wet ingredients, and set aside for 20 minutes. In another bowl, combine flour, brown sugar, baking powder, salt, cinnamon and walnuts and set aside.
Stir the bran bud mixture well after 20 minutes of soaking. Fold the flour mixture into the bran bud mixture until just combined.
Divide batter into 12 muffin cups evenly and bake for 20-25 minutes or until toothpick comes clean.
The apples give them the moisture that oil normally does in muffin recipes.
Notes:
Secret Release Formula: 3 mL unflavoured oil, 15 g vegetable shortening and 15 g flour. Mix well and brush baking tin generously.
I will try a recipe without the brown sugar next time but it only adds 19 calories and 5 g carb
We had some dear friends over for a BBQ and I thought I would like to serve potato chips knowing how much they love them but I wanted to treat them to guilt-free chips that are not fried! These little devils are cooked in the Microwave and boy are they good. The secret is to soak them in cold salted water with a little acid, I used vinegar but you could use lemon or lime juice to help prevent oxidization. The salted water actually seasons them so you needn’t add salt after they are cooked (it wouldn’t stick to the chip anyway like it does when they are hot out of the deep fryer).
Unfried Potato Chips (Crisps)
Serves about 3-6 people
Ingredients:
3 good size white or red skin potatoes (large diameter)
30 g sea salt (more if you prefer a saltier chip)
100 mL white vinegar (to prevent oxidation and add a little flavour)
2-3 L very cold water for soaking
Directions:
Wash the potatoes skins well.
Dissolve the sea salt in very cold water (I used an immersion blender to help dissolve the salt). Pour into a large bowl of very cold water, add the vinegar and stir.
Cut the potatoes in half diagonally; then, using a wafer-thin mandolin slicer, slice from the cut end of each potato, tossing the cut slices into the cold salt water bath and allow them to sit in the bath for 5-10 minutes.
Remove slices from the water and lay them in one in a single layer on a clean linen cloth (allow to sit for 15 minutes, this will help with cooking them).
You may spray them with some good quality EVOO or leave them plain like I did.
Lay a layer of clean, unprinted paper towel in the microwave and layer potato slices on the paper towel so they do not touch each other. Microwave on 100% for 2 minutes or until some get a bit of colour. Open the microwave door and allow the hot humid air to escape for at least 1-2 minutes (it will allow the machine to cool down). Then cook for an additional minute on high, if needed, watching carefully as they burn quite easily. I found the slices I placed in the centre of the turntable cooked faster than the outside slices so I moved my larger slices into the centre. The slices will continue to cook a little after you remove them so don’t worry if they are a wee bit wobbly, but they shouldn’t be overly wobbly, they will crisp up.
Remove the slices from the paper towel and cool completely before putting them into an air-tight container. Repeat until all of the slices are “fried”.
When totally cool, store chips in an air tight container.
To make the rosemary-infused olive oil, simmer the rosemary and olive oil for 15 minutes. Set aside to cool completely. Strain well. Top up with more olive oil to make 50 g. Then add the salt and stir well.
Combine the yeast and the flour in the large bowl for your stand mixer and fit with the dough paddle. Run the paddle for 15 seconds to combine.
Keeping the paddle on the lowest setting, slowly spray about two-thirds of the water into the flour, allowing the flour to absorb the water as you spray. Allow it to rest for 10 minutes and then add the strained olive oil and salt mixture very slowly into the dough and mix well. I switched my dough paddle to the scrapper paddle to make sure the oil incorporated well. You will need to speed up the paddle speed to fully incorporate the oil. Then finish spraying the remaining water to make a soft, sticky dough.
Turn off the machine and allow it to rest for another 5 minutes. Then continue to knead the dough on high speed until it pulls away from the bowl and the bowl is pretty clean. The dough is still sticky and soft but not as sticky as before.
Add a little more water to the spray bottle and spray a little water on the counter, the spatula, and your hands and flip the dough out onto the board. Using your hands stretch the dough for a few minutes to develop the gluten. Allow the dough to rest for a couple of minutes. When rested, work the dough again by pulling, stretching and folding it adding the 5 g of fresh rosemary as you stretch and fold. When the dough becomes smooth and the rosemary is well incorporated, make it into a smooth ball, cover it with a little more olive oil and allow it to rest covered with a bowl for 1-2 hours.
When ready to bake your focaccia, stretch the ball into a lightly oiled 23-cm x 33-cm pan right to the edges. If it bounces back, allow the dough to rest a little while longer. Once stretched, make indentations with your fingers or with the end of a wooden spoon and decorate with additional rosemary leaves. Drizzle more olive oil on top, sprinkle with flaked Malden sea salt, and allow to rest while you preheat your oven to 400° F.
Bake the focaccia for 20 minutes or until an instant-read thermometer reads 200° F in its thickest part.
Drizzle some EVOO on top just before putting it into the oven.