Happy Easter everyone! Hope you all had a lovely weekend. In Canada we have Good Friday as a holiday. Some things like the LCBO are closed on Sunday as well. Saturday will be a busy day, so better get there early to stock up for the family dinner!
My earliest memory of eating Hungarian Lecsó was when I was about 8 or 9 years old and my father made it for us. We were a typical Eastern European family in that the father virtually never cooked, that was ‘woman’s work’ but my Dad did step up on the occasion that my dear Mom had to go into the hospital and have an operation. I don’t remember much else about this time except that Dad cooked lecsó. One other thing, my 6 or 7 year old brother was beside himself with worry when our parents told us that Mom was going to be away in the hospital for a few days, and through tears a great degree of anxiety he asked, “Who will cook for us?” Our obsession with food runs deep.
Circa 1974 Edward’s Gardens in Toronto. Dad, my little brother and I. Mom was taking the photo. What the heck is going on with my hair????
My experience has been that Lecsó is to Hungarians what Lasagna is to Americans or Bangers and Mash are to the English, it’s a fairly common staple. It’s easy enough to put together and it’s comforting and satisfying without being overly filling. The Hungarians generally use a Hungarian green pepper which is more like a Cubanelle, longer and lighter in colour with a more subtle flavour than the green peppers we are accustomed to in North America. I switched up this dish by using colourful red, yellow and orange peppers (capsicums) and Vidalia Onions which are much sweeter.
The traditional protein accompaniment in our household was Debreceni Kolbász which is like a thick hot dog, named after the city in which it was made. Most Hungarian sausages are coarsely ground pork seasoned heavily with paprika and garlic where as a Debreceni is subtly seasoned very finely ground pork that has the texture that resembles what you would know as a hot dog. The only difference from North American hot dogs and Hungarian Debreceni is that Debreceni has a very distinct ‘pop’ as you bite through the casing. I haven’t had a Debreceni in many years for the same reasons I haven’t had a hot dog — they are just too unhealthy to be worth it for me. I made poached Cod to eat with this dish and it was exceptional.
A delicious and warming brothy sauce with cooked peppers, onions and tomatoes.
Hungarian Lecsó
Serves 4
Ingredients:
2 red peppers, sliced
2 orange peppers, sliced
2 yellow peppers, sliced
2 large tomatoes, chopped (peeled and seeds removed)
1 medium sized Vidalia onion, finely sliced
200 mL home made tomato sauce
1/2 tsp paprika (sweet or hot)
1/4 tsp smoked paprika (sweet or hot)
salt and pepper to taste
parsley for garnish
Directions:
In a light spray of olive oil, cook the onions until translucent.
Add the sliced peppers and tomatoes and cook until very slightly softened.
Add the tomato sauce and seasonings and cook for about 10 minutes on a medium temperature.
Spice it up a notch by adding some hot peppers to the mix.
Notes:
Hungarians traditionally use lard as the fat which adds flavour but is extremely unhealthy so I add a pinch of smoked paprika which also adds to the depth of flavour that the debreceni would bring.
Traditionally the peppers are cooked until limp but I prefer a little texture to my lecsó so I don’t cook them as much.
Like most stewy dishes this is a lot better the second day.
Consider adding a poached egg to this dish (Hungarians might eat this with scrambled eggs).
Sour cream or yogurt are also used as a garnish to this dish.
Cubanelle peppers come in both hot and sweet varieties and look virtually identical. You will want to make sure you buy the right one and not make the same mistake we did for a meal we served at the cottage several years ago — that was a rude awakening!
I always knew that my blogging would someday parlay into something more but did I ever hope it would be two-fold? Never in a million years! First it was food styling (which I’m still doing) and as luck would have it, I recently reconnected with a colleague and a new opportunity was born: I’ve been social media content! How cool is that? I’ve been very fortunate to have been given this opportunity and I thank my lucky stars every minute! And I thought I was just lucky in love! So if you need food related social media content, I’m your gal! Email me at evataylor at bell dot net and we’ll ‘talk’!
I know you’re scrolling ahead to see these photos so let me take the suspense out: they were taken on the morning of April 15, 2014 — I kid you NOT! I was hoping to be yearning for light, salad-ie dishes by now but sadly the weather is STILL not cooperating. Yes, we did have a couple of exceptionally warmish days last weekend but for the most part it’s still soup and stew weather. And like my rebellious feet I am holding out and silently switching gears to a more summery palate!
I took this photo in High Park on my morning walk. Yes indeed it’s pretty…if it were December! Not April 15 for sure.
It was cold enough that the snow stayed all day.
It really is rather beautiful.
As I’m sure most of you operate with similar intentions, I cruise blogs particularly when inspiration evades me and this recipe was no different; it was inspired by the lovely Sawsan’s beautiful Sushi Salad. I must confess that I didn’t record or photograph the first attempt of this creation which was a huge mistake (or was it?) so we actually had this tasty dish two nights in a row! And if it were up to me, it would have been three or four!
The volumes are ball-park, use what you like, omit what you don’t! Easy. If you have celery add it, if you don’t, no worries. The beauty of this dish is the crunch and variety of each and every bite.
Sawsan used ‘cauliflower’ rice but the cauliflower was not nice the day I wanted to make this dish so I substituted Napa cabbage. Since we were having this as a dinner course, I added a marinated BBQ’d pork tenderloin as our protein but chicken or fish would be an excellent substitution.
The avocado adds a certain je ne said quo is, but may be omitted if you’re watching calories.
Asian Inspired Crunchy Spring Salad
Serves 2 as a dinner portion. Please click here for the original recipe.
Ingredients for the pork and marinade:
200 g pork tenderloin
1 tbsp soy sauce
2 tbsp lime juice
1 tbsp finely chopped garlic
1 tbsp grated ginger
1/4 cup mirin
1 tsp toasted sesame oil
1 tbsp hoisin sauce
Directions for the pork and marinade:
Remove all fat and silver skin from the tenderloin. Stab it a few times with a fork, all the way around.
Combine the ingredients for the marinade and roll the prepared tenderloin in it to cover. Let rest in the fridge for a minimum of 20 minutes or overnight.
Ingredients for the dressing:
1 tsp soy sauce
1/4 cup rice vinegar
1 tbsp grated ginger
1 tbsp toasted sesame oil
Directions for the dressing:
Combine all ingredients and mix well. Set aside. (may be prepared the day before)
Ingredients for the salad:
(as suggestions, if you dislike something omit it and if you love something, by all means add more!)
5-6 cups of finely sliced Napa cabbage
1 cup cucumber, cubed
1/2 avocado, cubed
1/2 red pepper, cubed
1/2 medium sized red beet (raw, peeled and julienned)
2 green onions finely chopped
a good bunch of cilantro, finely chopped
1 tbsp toasted sesame seeds
Directions for the salad:
BBQ the tenderloin until the internal temperature reads 71° C or 160°F at its thickest part. Allow to rest for 10 minutes before slicing.
Lay a generous bed of the finely sliced Napa cabbage on each plate.
Sprinkle the cubed cucumber, avocado and red pepper along the outer edge of the base. Add the julienned beets to the centre so it just peeks outside the ring (the beets discolour the Napa so I didn’t want it to bleed all over it).
Garnish with the green onions and cilantro.
After the pork rests for 10 minutes, slice into thin slices. Lay 100 g sliced pork onto each plate and garnish with the dressing and the toasted sesame seeds.
The abundance of colour was no mistake…perfect for a dreary, wet spring day.
The ice is melting. Thank God! We are so over winter. This past weekend was warm enough to walk outside in a light jacket and no hat (ok, I did start out wearing gloves, but took them off). The ground is defrosting and the air smelled like my childhood spring; do you remember that wet mud, musty smell? I don’t know about other ladies in our hemisphere but I’ve stopped wearing socks! There I said it. My poor dogs are so sick of being all locked up and claustrophobic in socks and boots that they needed to be liberated! Yes, they may still get a bit chilled at times, but I don’t care! I’m done. And sadly the start of this week is back down to 2C (xxF) so this soup post is not entirely outside of expectation even though it was made about a month ago.
This soup was a last minute St. Paddy’s Day effort to make something green for dinner and I dare say it turned out even better than expected, so here it is on the blog for posterity and for me so I remember to make it again (it was that good)! It’s so creamy and smooth you’d never guess there is no cream in it!
The smooth creamy texture makes you think it’s much more sinful than it is!
It’s a nice thick vegetable soup without cream or any type of starch in it. The beautiful green colour comes from purée-ing raw baby spinach leaves into the warm broccoli soup and blitzing it for about two to three minutes to get the creamy consistency you see, I didn’t even push it through a fine sieve. There is no butter nor cream but you can add a pinch if you’d like.
The garnish is oven dried baby spinach leaves which I was hoping to make into a post on their own, but alas they were far too delicate and did not make the test! But they do make a gorgeous garnish, n’est pas?
Broccoli and Spinach Soup
Serves 2-4
Ingredients:
1 bunch broccoli florets, including stems
1 Vidalia onion, roughly chopped
6-8 medium cloves garlic, roughly chopped
3-4 cups water or stock
salt and white pepper to taste
2 handfuls of baby spinach leaves, raw
Directions:
Sauté the onion and garlic in a quick spray of non-stock or olive oil, adding water as needed until they are translucent. Add the broccoli florets and stems and cook stirring often until they are very tender. Add a couple of cups of water or stock and simmer for about 15 minutes.
Pour contents into a heat proof beaker and purée using your immersion blender (or you may do this step in a regular glass blender). Purée for a minute or so and then add the raw baby spinach and purée for another 2-3 minutes until very smooth. Salt and pepper to taste. Add more water or stock if you feel it’s too thick.
Serve warm garnished with dried spinach leaves*.
Notes:
To oven dry spinach leaves: Pre-heat the oven to the lowest temperature, mine is 170°F. Take the largest leaves from the package of baby spinach and lay over a dry cooling rack making sure they do not overlap. Place in the warm oven and watch for 15-20 minutes until they are completely dry and crispy. This would also work wonderfully with basil leaves. This is a great alternative to deep frying them.
The bright green colour is attributed to the raw spinach that’s been puréed into the cooked broccoli soup. Do you think I have a thing for green?
Spring has been slowly emerging, taking its dear sweet time, but today, it’s finally going to be 17°C (62.6°F). Even on Tuesday, the sun was shining and it was actually warm enough to sit outside in the sun with a cup of hot coffee. We’re cautiously hopeful for spring, although there is still some ice in our backyard believe it or not. Stubborn ice that just won’t give up. One of our radio stations has a repeating ad that goes something like this: “April, you have just one job: melt the GD ice so spring can finally show up.” Seriously, just one job! Can it be THAT hard? Yes, we are frustrated! But at least it’s starting…
I’m beginning to think about summer foods, lighter fare and this is a quick and delicious recipe I came up with for lunch about a month ago; I think it may have even been snowing at the time (a month ago). The bright, fresh flavours contrasted against the peppery arugula will make a sensational meal on a super hot, humid day (soon, please be soon). Definitely making this lovely dish for the cottage, it’ll be perfect for eating on the dock, wearing shorts and a light T!
A delightful combination of shrimps and scallops cooked in lime juice
Shrimp and Scallop Ceviche
Makes 1 small serving (to make a meal of it, increase the weight of shrimp and scallop to 100 g in total).
Ingredients:
30 g shrimp*, cubed rather small
20 g scallop*, cubed rather small (similar size to shrimp)
1 tbsp lime juice
1/4 tsp non-calorie sweetener of your choice
1 tbsp cilantro, minced
1 green onion, minced
1 stalk celery, cubed
5 cm (2 inches) English cucumber, cubed
1/4 apple (or Jicama)
5 cm (2 inches) English cucumber, cubed
100 g Arugula
Directions:
Combine the lime juice and the non-calorie sweetener of your choice and mix well.
Make sure you cube your seafood into equal sized cubes so that they ‘cook’ at the same rate. Combine the cubed shrimp, scallop, cilantro and green onion with lime dressing and toss well. Set aside in the refrigerator for 30 minutes to one hour.
When the seafood has become opaque, add the celery, cucumber and apple and toss well. Serve over arugula or lettuce of choice
The apple adds the sweetness that the jicama would have.
*’cooking’ seafood in citrus does not kill off any parasites, so you should be very careful with the choice of seafood — it should be fresh, or boil in water until done and prepare the salad just prior to serving.
I found this clever idea in the latest LCBO magazine. My vases were a little smaller than the idea in the magazine so some of my tulips had to stick out at the top.
Recently, we hosted a dinner party for guests who were doing Weight Watchers and because I don’t like to sabotage anyone’s journey to a healthy weight I decided to make the entire meal WW friendly and that meant putting my thinking cap on. Now I don’t know about you, but I adore guacamole, it’s so creamy, fresh and tangy and it really enhances a few dishes as a condiment but may also be used as a wonderful dip with fresh vegetables!
Now I know what many of you will say, “but wait, avocados are a good fat” and while that is very true, it’s all about balance and budget so if you can save a little here you can spend it there (perhaps on an extra glass of vino?), is all I’m saying!
Before I even searched on line, I had the idea of creating a mockamole from spinach. Why spinach? I chose spinach because #1 it’s a gorgeous green and you can purée it smooth uncooked and #2 it fits well into the WW point system. Once I determined what my basic ingredients would be, I started to search “mockamole” on the net and found that the majority of them are made with green peas. Now green peas are quite healthy but when I did the nutritional calculation using peas, my 1 tablespoon mockamole resulted in 1 WW point whereas my spinach mockamole resulted in 0 points for 1 tablespoon. So that was it.
Guacamole is a simple yet flavourful combination of ingredients and other than subbing out the avocado, I kept it pretty true to form. I used 4 tablespoons of cooked puréed navy beans as my ‘creamy’ ingredient and it worked out great. I loved the bright green colour as well as the bright flavours in this recipe. JT said it was an excellent substitute for real guacamole! It’s quite garlic-y so if it’s date night, you may wish to tone it down a notch or make sure your partner has some too ;-)!
May I interest you in a little dip?
Mockamole (Spinach ‘guacamole’)
Makes about 3/4 cup.
Ingredients:
100 g fresh spinach (may be frozen)
4 tbsp navy bean paste (see notes)
1 clove garlic, finely minced
1 tbsp (15 mL) lime juice
1 tbsp cilantro, chopped
1 tbsp green onion, finely chopped
Cilantro or parsley for garnish
Chopped tomatoes (optional)
Directions:
If using frozen spinach, wring out well. If using fresh spinach, wash and dry well.
Combine the spinach, navy bean paste, garlic, lime juice and cilantro in a small food processor and process until very smooth (I found my immersion blender did this beautifully). Fold in chopped tomatoes if you are adding them.
Add chopped green onion and garnish with a sprig of cilantro. Serve with cucumber slices, celery sticks or cauliflower florets or use in a meal that requires guacamole as a condiment.
Choose vegetables that hold onto the dip like a spoon!
The cooked puréed beans give this dip its creamy texture.
Who are you calling “dip”?
1 tbsp serving
1 tbsp serving.
Notes:
Navy bean purée: I usually make up a batch of plain navy beans for thickening soups, sauces and gravies and then freeze for later use. Cook navy beans in water without salt. Purée and press through a fine sieve. Allow to cool completely and put 1 tbsp portions into an ice cube tray (specifically for savoury things) and freeze. Once frozen, take each cube and put it into a larger ziplock bag and that way you have a creamy gluten-free thickening agent for future recipes.
If you add too much liquid to the puréed spinach mix, strain for a couple of hours in a coffee filter reserved for savoury things before serving.
To blanch spinach quickly, add spinach to a heat proof bowl with about 1/2 cup water and nuke for about 2-4 minutes until soft. Rince with cold water and wring out well.
This winter we had a lot of snow. And by a lot, I’m talking over a metre (yard) high piled up on our front yard. It’s been really crazy. I’ve talked about our wonderful neighbours before and I just have to say something again. It snowed about 10cm (4 inches) overnight and by the time we had gotten up the next morning, our wonderful neighbour John had shoveled our sidewalk, all 59 feet of it and even some of our other neighbour’s sidewalk too! Isn’t that nice? As a thank you I made a batch of biscotti, a little different than this version I made last year to give them after all, I wouldn’t want to discourage such neighborly behavior!
Almond, Cranberry and Orange Biscotti
Makes about 4 dozen little cookies
Ingredients:
2 cups unbleached AP Flour
2 tsp baking powder
pinch of salt
3/4 cup toasted almonds
1/2 cup dried cranberries
2 eggs, lightly beaten
3/4 cup granulated sugar
1/3 cup melted butter
2 tsp vanilla extract
1 tsp almond extract
2 tbsp orange zest
1 lightly beaten egg white
Plus a small amount of dark chocolate, melted with a little butter (just enough to drizzle).
Directions:
Preheat the oven to 350°F or 180°C.
Toast the whole almonds on a baking sheet for 10-12 minutes. Cool completely.
Combine the flour, baking powder, salt, orange zest and nuts in a medium-sized bowl.
In another bowl, whisk the eggs together with the sugar, melted butter, vanilla extract and almond extract ; stir the wet ingredients into the flour/nut mixture and combine until a sticky dough forms.
Transfer to a floured surface and form the dough into two narrow logs about 30 cm or 12 inches long.
Place the logs onto an ungreased baking sheet and brush with the beaten egg whites.
Bake for about 25 minutes. Remove from the oven and allow to rest for about 6 minutes and then slice into 1 cm or 0.5 inch thick diagonal slices. Return slices to the cookie sheet and bake again for about 15-20 minutes or until golden brown. Allow to cool.
My best friend from University recently had an operation so I made two different kinds of soups and some gluten free cheese scones for her and her family so she needn’t bother with cooking during the first few days of recovery. The scones were a success and even JT couldn’t tell that they were gluten free. The first batch I made to give to my friend, they were true to this recipe and I used Bob’s Red Mill Gluten Free Flour which is mainly Chick Pea flour. I don’t particularly care for chick pea flour because it’s dense and has a particular smell, so I flavoured the first recipe strongly with a little sugar and some orange rind (orange and cheese go very well together!). The second time I made the recipe below and I didn’t need to add sugar nor the orange rind because I used a gluten free flour mix that I blended myself and I increased the gluten free baking powder because I wanted a flakier and a bigger rise out of them — it worked. I’ve put them in the freezer for the next time I see her because she has decided to recover in Florida, lucky duck.
These scones rose nicely and had a very flaky texture.
Gluten Free Flour Mix
Ingredients:
6 parts brown rice flour
3 parts yellow corn flour (not meal)
1 part tapioca flour
Directions:
Combine all of the ingredients above and mix well.
Use as required in gluten free recipes.
I challenge you to taste that they are indeed gluten free.
Gluten Free Cheese Scones
Makes 12 scones about 5.5 cm (2 inches diameter)
Ingredients:
1 cup all-purpose gluten-free flour, plus more for sprinkling (for this recipe, I used 1 tbsp and 1 tsp in the ratios above to yield 1+ cups of gluten free flour)
1 tsp xanthan gum
3 tbsp nonfat dry milk powder
1 tbsp gluten free baking powder
1/4 tsp salt
1 tsp yellow mustard powder
20 g unsalted butter, frozen and grated (please see tip)
85 g + 2 tbsps sharp cheddar cheese, grated, frozen (please see tip)
1 tbsp Dijon mustard
75 mL milk, chilled (plus 2 tbsp more for brushing)
Directions:
Combine the dry ingredients and whisk until well mixed.
Sprinkle the frozen cheese into the flour and mix. Sprinkle the frozen grated butter and cut into the flour using a pastry blender.
Combine the milk and the dijon mustard and mix well.
Create a well in the centre of the dry ingredients and pour in the milk and mix until it’s combined.
Sprinkle a bit of gluten free flour on your work surface and roll out the dough to about 1 cm or 1/2 inch thick. Fold the dough over as you would fold a letter to go into a #10 envelope. I did this twice. You don’t want to over work the dough because then the butter will begin to melt and it won’t be as flaky. Using a bit more gluten free flour, roll out the dough to 2 cm or 3/4 inch thick. Cut with your desired cookie cutter (I used a 5.5 cm (around 2 inches) fluted round).
Brush tops with the additional milk and sprinkle a pinch more of grated cheese on each top.
Bake on a Silpat sheet or parchment for 16 minutes or until cheese not the tops is melted and a little browned (you may wish to broil for a minute).
Serve warm with butter.
The butter just melts into the layers of deliciousness.
Tips:
I always buy my butter on sale and cut it into 1/2 cup portions and freeze. Grating frozen butter for pastries is the best way to keep the pastry flaky and light.
I also buy my baking cheddar on sale and grate it into a zip lock bag and freeze. If you take it out and separate the gratings as it freezes, you will have frozen cheddar flakes that are easily measured for baking and cooking.
Everyone has a favourite corn bread recipe, this one is mine. It came from an 80’s trendy restaurant called Fred’s Not Here in the theatre district in Toronto. I qualify that it was trendy in the 80’s because although it is still around, I haven’t been to it since the 80’s so I’m not certain it’s ‘trendy’ any more. I do know that the particular strip that this and many other restaurants reside on are fighting for their lives from being re-zoned and torn down to be made into condos. Like Toronto needs more condos; apparently we have the most condos under construction in all of North America, more than New York, Chicago and Boston, believe it or not. Even if you don’t believe that, surely you must believe that this is absolutely the best corn bread recipe EVER! It’s got great texture (thank you cheddar cheese), a slight sweetness and heat. What more can you want?
Originally posted on this blog in 2009 here, I found this recipe in the Toronto Star in the section that people wrote in and asked the Star to print a recipe from a specific restaurant. It wasn’t me who wrote in, obviously someone else also thought it was the best cornbread ever, so you needn’t take my word for it. I still have the original printed recipe. But I’ve immortalized it for you here and reposted it below because the original photo sucked. These are better.
Fred’s Not Here Jalapeño Corn Bread
Makes about 26 small corn-shaped corn breads. I have altered the original recipe, so if you’d prefer the actual Fred’s Not Here version, please click to my original post here.
OK, you caught me, I didn’t have jalopeños, I only had hot Thai Chilies!
Sunday was my dear Dad’s birthday, he would have been 91, Happy Birthday Dad!
Mom and Dad 1959
What does your grocery shopping map look like? Ours is called the Golden Horseshoe which means we shop the outer edge. Here in Canada it usually means that we enter the store in the vegetable section, round over through the deli/specialty cheese then bakery then fish/meats and finish off in dairy.
We don’t do a whole lot in the aisles. Recently I did a couple of assisting jobs that took me deep into un chartered territory: the middle aisles! I had to pick up groceries for a Canadian lifestyle TV show for two segments and I have to admit that it was an eye opener! What I found enormously frustrating was that a number of items that could be in more than one spot. Even the staff didn’t know for sure. Gluten free is a great example because a number of GF products are also organic, so now you’ve hot two completely opposite locations for the same product. Or if it’s flour and it’s a national brand, it could be in the normal baking section on the same shelf as the regular glutenated versions! Yes, it’s frustrating. What does your grocery store layout look like and do you shop the aisles?
I was making polenta the other day and as I was stirring the polenta and it began to thicken I was suddenly reminded of Pâte à Choux just after you add the flour to the butter and water mixture, and the idea came to me so I spent the following day developing a gluten free Pâte à Choux that you could not tell was Gluten Free. I must tell you, this is it. Many Gluten Free recipes just don’t cut it for me, it’s either the weird flour smell (garbonzo bean flour), taste or the crumbly texture, so you know this recipe must have checked positive on all of these points.
My first attempt used superfine corn meal (I blitzed it in a coffee grinder a few times) and even though it puffed up as well as the glutenated version it was just too corn mealy (think corn muffin texture even though the corn meal was superfine) the texture wasn’t right at all and so the experimentation began. Perhaps if I had used corn flour instead of meal, it would have been a different story, but I’ll leave that for another time.
This is the 100% cornmeal version, it’s just too corny, if you’ll pardon the pun.
After some research I decided a pastry made only with cornmeal was not the answer so I went searching for home made gluten free flour recipes so I didn’t have to waste time hunting down a GF flour in the grocery store. Many of them had similar ingredients but I was limited to what I had at home and the volume of each ingredient I had on hand which determined my home-made GF flour recipe; a combination of 6 parts superfine corn meal, 3 parts potato starch and 1 part tapioca flour was the result and I’m rather pleased how it worked out in this recipe. The texture and mouth feel of these choux resemble the texture and mouth feel of the glutenated choux cheese pastries that we know and love! I was so happy because my BFF is gluten intolerant and my brother has chosen to omit gluten from his diet to manage an illness. The last time I asked him if he wanted me to make a gluten free item for him he said it’s just not worth it. He’ll surely change his mind with these.
I tried making these the quick and easy way that my normal food processor choux is made (like this) but did not have as good luck with them, they were not as elastic as a good choux should be, so I reverted to the old fashioned way with the hand mixer and it worked out perfectly.
Gluten Free Cheese Choux Pastry
Makes 25, 4 cm or 1.5 inch puffs
As the three bears put it, “this one is just right”
Ingredients:
65 mL soda water
30 g unsalted butter
1/4 tsp salt
40 g gluten free flour*
1/4 tsp zanthan gum (see notes)
1/4 tsp gluten free baking powder
1 egg
30 g grated sharp cheddar cheese
Directions:
Preheat the oven to 200° C/400° F.
Combine the gluten free flour, zanthan gum and gluten free baking powder and stir well.
In a saucepan with high sides, melt the butter into the water with the salt over medium heat. Add the flour mix all at once and cook this mixture until it clears away from the sides of the pan.
Remove from heat. Using a hand held mixer, whip this mixture for about a minute. Add the egg and beat for about 2 minutes, add the cheese and beat the pastry until it is elastic and smooth.
Prepare a baking sheet by measuring a piece of parchment to cover it, soak the parchment in running water and squeeze out excess water. Smooth the wet parchment over the baking sheet. (see notes)
Using a pastry bag with a 2 cm (3/4 inch) nozzle, pipe very small rounds (see note) onto a the prepared baking sheet.
Bake for 15-20 minutes or until lightly browned.
Serve warm or freeze once cooled and reheat in a warm oven at 177° C/350° F for 12-15 minutes from frozen.
*Gluten Free Flour Recipe
Makes about 120 g of flour, enough for 3 batches if these puffs
Ingredients:
6 tbsp superfine corn meal
3 tbsp potato starch
1 tbsp tapioca starch
Directions:
Mix well until combined. Store in an air tight container until required.
Notes:
Zanthan Gum is used as a binder in gluten free baking, if you omit it your baking may end up crumbly. It is also used as a thickener but I’ve never tried it that way. It has no perceivable smell or taste. The general consensus is that you add 1 tsp Zanthan Gum to 1 cup GF Flour so that is how I determined how much to add in my recipe.
I found that piping about 2 cm or 3/4 inch balls onto the damp parchment and slicing it from the piping tip made the task very quick and quite neat. It also regulated the size of the rounds so that they were more or less equal.
I used soda water because I thought it might make an airier pastry, not sure if it helped or not but that’s my story and I’m sticking to it.
Years ago I had read a recipe for choux that the author lightly wets the baking sheet in order to create a humid environment which helped the choux puff up even more. It was so long ago, I don’t know where I read it but my wetting and wringing the parchment is different enough.
The outside is crisp while the inside is soft and airy like it is supposed to be.
My good friend Barb (Profiteroles and Ponytails) and I recently took a Sushi making workshop at Wabora Sushi in the Thompson Hotel on Wellington Street in Toronto, we got the deal on Groupon for $40 ($100 regular price) so I thought I would share my experience with you.
Wabora offers a blend of Japanese and Korean foods with some of the well-known North American Asian dishes (From the About page on their website). The restaurant is dimly lit and decorated in a contemporary Asian style. It’s reasonably comfortable and offers enough soft surfaces which help absorb the lively conversations. Because this was a sushi making workshop we all sat at the back of the restaurant nearest to the sushi kitchen. When the workshop began, the lights at the back of the restaurant were made brighter so we could see what we were doing (a little too bright, perhaps!)
The $40 Canadian did not include $5.20 tax so we had to pay that when we arrived. Beverages need to be purchased and if you are hungry enough you may even wish to purchase additional things off the menu (I had a glass of wine for $15). We were taught to make two decent-sized rolls which worked out to about 8 pieces each. It was reasonably filling which gave me the opportunity to take four of the pieces home with me so JT could try it too.
My first impression was that there were a lot of people, in fact so many people that there were not enough work stations for the entire group to prepare the sushi at once, so we had to do it in two groups, Group A and Group B. The tables were nicely laid out with all of the required materials and food and the surfaces were clean. We were provided with disposable plastic gloves to wear during the preparation which were cumbersome and far too large which made some of the steps a little more difficult than they had to be. There were two sushi chefs who demonstrated at each end of the long tables before groups were called up to execute. The restaurant manager provided commentary for the demonstrations and it was easy to understand. My only complaint for the demonstration component was that there were too many people gathered around and it was difficult to see exactly what the chefs were doing (there were taller people standing in front of me). The commentary was helpful even if it was difficult to see.
The chefs remained available to help where they saw necessary and answer some questions. One thing that surprised me was that the standard size sushi sheets are cut in half so that they are rectangles and not squares. We were instructed to put the rice on the rough side so that it sticks better.
This is a chicken teriyaki roll with Grilled chicken breast, cucumber, Japanese pickled carrot (gobo), avocado, omelette pieces and seaweed garnished with blonde miso sauce and teriyaki sauce.
The Chicken Teriyaki roll was certainly a new twist on the California Rolls that use surimi (imitation crab). We started with the seaweed, rough side up with the longest side facing us. We added the sushi rice (which was cooked and cooled Japanese rice with the addition of rice vinegar and sugar) and were told to spread it out evenly on the sheet to three sides, leaving one long side without rice for about 1 cm (0.5 inch). Then we added the chicken, avocado, cucumber, pickled carrot and omelette horizontally onto the long end, being careful not to over stuff. The chicken I had was a little dry and if I were to make this at home, I would definitely leave the chicken slightly thicker to avoid drying out. We rolled the seaweed up from the long end and finished it off by shaping it with a plastic covered sushi bamboo mat, tapping the ends in. We then cut the roll into eight even slices and plated them. We drizzled white miso and teriyaki sauces over the plate. The garnish of the white miso and the teriyaki sauces complimented each other well, but I would definitely not call this sushi. Roll #1 was disappointing.
Roll #2 was called a Spicy Salmon roll and it was made ‘inside out’ meaning that the rice was on the outside of the roll. For this roll, we began with the seaweed rough side up with the shortest side facing us. We added the rice and spread it out evenly to every side, then we flipped the sea weed over so that the rice was facing down on the table. We added shredded surimi (imitation crab), avocado and cucumber to the short end and rolled it up tight. Then we covered the roll with a piece of plastic wrap and we shaped the roll using an uncovered bamboo sushi mat, tapping the ends in. Then we removed the plastic wrap and added the mixture of the ‘secret recipe’ of spicy raw salmon to the top. Then another sheet of plastic wrap was draped over the roll and we shaped it again using the bamboo matt. Leaving the plastic on the roll, we cut cut the roll into 8 even slices using a dipped sushi knife. Then we removed the plastic, plated the rolls and drizzled a spicy mayo on the top and then crispy-fried potato strings. The spicy salmon had a wonderful taste and texture but I was disappointed that the recipe for it was secret, I thought it was a workshop on how to make sushi?
Spicy Salmon Roll with crispy fried potato strings
This one was definitely more flavourful and full of texture.
I had a really good time with Barb and it was lovely to catch up. The sushi making workshop was OK value for $40 and had I paid $100 I would have been enormously disappointed — it’s definitely not worth $100 to make two rolls, particularly since neither used that expensive ingredients. I would definitely like to come back to Wabora and sample more of their dishes in the future and leave the sushi making to the experts.
Overall rating of Sushi Making Workshop in Wabora (in my opinion): Decor 3/5, service 3/5, food 3/5, Value 2/5, Noise: 2.5/5 (1 being very noisy, and 5 being very quiet).
Disclaimer: We purchased the workshop and wine ourselves and my opinions just that, my opinions.
Wabora Toronto
550 Wellington St. W
Toronto, ON M5V 1H5
(416) 777-9901
I’m sure you’ve heard that the North East has been experiencing one of the worst winters ever and the yoyo temperatures Toronto has been experiencing for example, last Thursday it was -15°C (5°F) with a wind chill that made it feel more like -27°C (-16.6°F) and to make matters worse, last Wednesday we received about 20 cm (8 inches) of snow; you know the really heavy, wet kind? Made it really fun to shovel…NOT!
One of our elite political comedy hosts Rick Mercer had this skit on his show last Monday, I found it very funny so I thought I’d share it with you.
You could say I’m really late for Valentine’s day, or really early. I prefer the later. And as I said before, don’t limit yourself to one day to serve heart-shaped foods!
I’ve posted about these delightful cheese puffs previously (please click here and here) but when I saw Lorraine’s (Not Quite Nigella) heart shaped Pâte à Choux post here I knew I had to try to make them as small bite-sized hors d’œuvres! They were rather easy to make and even though they were a very tiny bit fussy to shape, it wasn’t as bad as I had thought it might be. Of course, you get fewer from one batch of pastry but it’s absolutely worth the extra effort with the ooooh’s and ahhhh’s! I took these to a lovely girls night in but you can make them in advance and freeze them in an air tight container and then pull them out one at a time as needed! I stuffed mine with a slightly modified version of this Hungarian Korozot recipe, but you needn’t stuff them at all because they are rather tasty on their own too!
It’s never too late to say I love you with heart shaped cheese puffs
Heart Shaped Cheese Choux Pastry
Makes about 18 heart shaped puffs about 4 cm or 1.5 inches in diameter.
Ingredients:
1 cup water
1/4 cup butter
1/2 tsp salt
1 cup all purpose flour
3 eggs
1 cup grated Sharp Cheddar Cheese
Directions:
Preheat oven to 200° C 400° F. Take a piece of parchment the size of your baking pan and saturate it with water, wring out so it’s still wet but not dripping wet. Flatten on the baking sheet. Set aside until you are ready to pipe the pastry.
Place water, butter and salt in a medium saucepan and bring to a boil over medium heat.
Remove from heat and add flour, and stir until combined.
Return to heat and stir cooking the flour mixture until it comes away from the sides of the pan and is a shiny ball. I find the heat of the pan is enough, I generally don’t put the flame back on.
Place in a food processor with plastic blades and process for 15 seconds (give or take).
Add eggs and process for 40 seconds (err on the longer side of give or take).
Add cheese and process for another 5-10 seconds until smooth.
Take a piece of parchment the size of the baking pan and wet it thoroughly under the running tap. Scrunch it up and wring out the excess water. Flatten it out onto your ready baking sheet.
Transfer the pastry to a pastry bag fitted with a thick nozzle about 1 cm or 0.5 inches in diameter. Begin on the left bump of the heart and pipe one side, then without lifting the tip, pipe the right side of the heart. You may wish to smooth out the top with a slightly wet knife. To get the heart shapes defined enough, exaggerate the top bumps of the heart, other wise it will fill in as it bakes. Or you could use a heart shaped mould sprayed a bit with non-stick spray like Brooks did in this post on his lovely blog Cakewalkr. I just came across Brooks’ blog quite by accident but I am so glad I did, can’t wait to try this method!
Bake for 20-25 minutes, until golden brown.
Serve warm or room temperature. Fill with your choice of delicious fillings!
Surprisingly easy to make.
These tasty Pâte à Choux are tasty even without any fillings
Based on 2 Korozot stuffed hearts per serving
Based on two heart-shaped cheese puffs, not stuffed per serving.
I made these beautiful, heart shaped hors d’œuvres for Valentines day and I thought I’d share the simple recipe with you because making heart shaped hors d’œuvres shouldn’t be reserved for one day of the year! The fussiest thing about this recipe is cutting out the heart shapes from the smoked salmon. But you needn’t fuss at all, just piece the smoked salmon on the rice and cut out easy rectangles using a sharp knife! I ended up using a knife along the outer edge of a heart-shaped cookie cutter and assembling the salmon on top of the cut rice. Want to make it even easier? You can also purchase ready-made wasabi mayo.
Choose a heart-shaped cookie cutter that is one bite.
Smoked Salmon Sushi Hearts
Makes about 16 bite-sized hearts, but it will depend on size of your hearts
Ingredients:
1 cup sushi rice, cooked to package directions
1 tbsp seasoned rice vinegar
100 g smoked salmon
2 tbsp mayonnaise
1 tsp wasabi paste, or to taste
Directions:
Mix the rice vinegar into the hot rice and set aside to cool completely.
Line a 25 cm or 10 inch square cake pan with plastic wrap overhanging two opposing sides. Press the cooled cooked rice evenly into the pan. Refrigerate for 30 minutes to set in shape.
In the meantime, combine the mayonnaise and wasabi paste and mix throughly. Refrigerate.
Take the plastic wrap overhanging sides and lift the rice out of the pan onto a cutting board. Remove plastic wrap.
On another cutting board, take a slice of smoked salmon and press your heart shaped cookie cutter into it, if it doesn’t cut through completely, use a sharp knife to cleanly cut the heart shape using the cookie cutter as your guide. Repeat as many times as you have smoked salmon. Remember that you can piece together a large enough block of smoked salmon to cut more hearts out.
Once you have exhausted the smoked salmon, cut as many hearts out from the rice as you have salmon hearts; you can also reuse the left over rice bits to make additional rice hearts. Assemble by placing the smoked salmon heart directly on top of the rice heart, lining up as best you can.
Dot a single dot of the wasabi mayo in the centre of the heart. Serve immediately, or refrigerate covered with plastic wrap so that the rice doesn’t dry out.
The wasabi mayo is a lovely bit of heat
Directions for Rectangles:
Mix the rice vinegar into the hot rice and set aside to cool completely.
Line a 25 cm or 10 inch square cake pan with plastic wrap overhanging two opposing sides. Press the cooled cooked rice evenly into the pan. Refrigerate for 30 minutes to set in shape.
In the meantime, combine the mayonnaise and wasabi paste and mix throughly.
Take individual sheets of smoked salmon and piece it on top of the rice while still in the pan, overlapping slightly so that there aren’t any holes. Refrigerate until ready to serve.
Take the plastic wrap overhanging sides and lift the rice out of the pan onto a cutting board. Remove plastic wrap.
Using a ruler or straight edge, cut even rectangles and dot each one with the wasabi mayo (you may need additional wasabi mayo for this)
My friend Susan made these for a pot luck dinner we had in November last year. I liked them so much I knew I had to make them sometime!
The little hearts are very festive, but you needn’t reserve them for Valentine’s Day.
I always like to serve a salad, particularly when we have a reasonably heavy meal so I came up with this easy Caribbean inspired slaw recipe that hit the spot perfectly when I served it with the Trinidadian Chicken Curry Roti; the coconut cream helped subdue the slight heat from the curry and it was very fresh and delicious. I based the recipe on this slaw that was inspired by Toronto Chef and Food Network Canada celebrity, Susur Lee. Keep the wet and dry ingredients separate until just before serving so that the slaw doesn’t get too sloppy and wet; wet ingredients would be the cucumber and the mango which may be stored together. The beauty of this slaw is the uniformity of each component, so take your time in grating, slicing and chopping.
The coconut milk in the dressing helped subdue the heat from the curry.
Caribbean Inspired Slaw
Makes about 8 cups of slaw
Ingredients:
2 (about 2 cups) carrots, grated
1/2 (give or take 3 cups) savoy cabbage, shredded
1 green onion, finely sliced
1/2 (about 1 cup) English cucumber, grated
1 mango, grated
1/2 cup cilantro, finely chopped
1/2 cup grated unsweetened coconut
1/4 cup coconut cream
1/2 tsp tamarind concentrate
2 tbsp lime juice
1 tbsp honey
Directions:
Combine the shredded cabbage with the green onion, grated carrots, cilantro and grated coconut, toss well to combine. Refrigerate until serving.
Combine the grated cucumber and mango and toss well to combine. Refrigerate until serving.
For the dressing, combine the coconut cream, tamarind, lime juice and honey and mix well. Refrigerate until serving.
When ready to serve, combine the cabbage mixture with the cucumber mixture and toss well to combine. Add the dressing and toss well to combine. Garnish with additional grated coconut and cilantro. Serve immediately.
A wonderful combination of crunch and soft sweet fruits and vegetables.
Did you have pancakes on Tuesday? Pancakes are traditionally served on shrove Tuesday, not sure why but because we love the ‘cakes of pan’ we had these beauties for dinner Tuesday night. Thank you Sissi.
In early February, mid-February, late-February and now early March, we have been going through a bit of a deep chill which always makes us crave hearty, spicy foods. We invited my nephew, niece and her beau to dinner last month and I wanted to serve something new, for them and for me (I’ve never made this before!) so I turned to the hearty West Indian Rôti, always comforting with it’s warm flavours and great textures.
I chose Chef Marcus Samuelson’s Trinidadian Chicken Roti recipe, with some very minor alterations. I also used this recipe* for my Jamaican Curry powder; I actually liked the second one because I was able to make as much or as little as needed — I used 1 teaspoon as my single measure for the ratios which made more than enough for 4 tablespoons! You may also buy Jamaican Curry Spice ready made from the store.
There is absolutely nothing stopping you from omitting the chicken and using vegetable broth instead of chicken broth to make this entirely vegetarian, you can even add tofu but the chickpeas are likely filling enough.
Below is the calorie count for one of the Rôti’s served at our favourite takeout place. After the success of this recipe, I suspect that rôti will not be bought take out ever again! For the record, I always cut my rôti in half and shared it with someone else!
A perfectly seasoned and slightly spicy Chicken, chickpea and kale roti
Trinidadian Chicken Rôti
Makes 8 servings. Please see Chef Marcus Samuelson’s original recipe here. Make the curry a day in advance because it will taste better!
Ingredients:
1 cup dried sprouted chickpeas**, rehydrated over night (or low sodium can of cooked chickpeas)
3+ cups chicken stock
Quick spray of non-stick spray
1 large red onion, finely sliced
3 cloves of garlic, minced
1 medium Chinese egg plant, cubed
2 generous cups kale, chopped
1 tbsp vinegar
4 tbsp Jamaican curry powder*
1/2 tsp cumin
salt, to taste
800 g chicken breasts, no bone, no skin, cut into even chunks
1/4 cup white wine
Directions:
Add the sprouted chickpeas and stock to a slow cooker and set on high for 4 hours.
Spray a large dutch oven with non-stick spray and sweat the onions until translucent on medium heat.
Add the garlic, eggplant and kale and sauté for about 3 minutes. Add the Jamaican curry powder, cumin and salt and pepper and stir until fragrant. Add the vinegar and give it a good stir. Using a silicon spatula, scrap this mixture into the slow cooker and give it a good stir. Cook on high for 4-6 hours.
About 1 hour before serving, reheat the dutch oven and sear the chicken pieces in the spice laden dutch oven. Add the chicken to the curry in the Dutch oven. Deglaze the pan with the white wine and add to the curry.
Give the curry a good stir and reset the timer and heat to Low for 1 additional hour.
You may need to add a bit more more stock if the curry is too thick because you want a lot of gravy.
Serve with Roti bread.
Delicious!
** I tried sprouting my chickpeas for the first time on my friend Norma’s suggestion, not sure it made much of a difference the taste but it was fun to do.
Nutrional Facts for the Curry Nutrional Facts for the Roti Bread
Do you love West Indian food? We do, particularly West Indian Rôti and fortunately there are a couple of really great places to get takeout near our home, but I’ve always wondered how to make them at home. Believe it or not, it was surprisingly easy and not very time consuming at all. In fact, I probably spent more time searching techniques to make the Rôti than actually making the roti! And the curry was just popped into the slow cooker and cooked all day with little to no attention! Can you believe it?
The following few posts are of West Indian Curried Chicken Rôti, I hope you give it a try, it was incredibly tasty!
It’s not that difficult to make, it’s more about technique than anything else.
I finally settled on Chef Marcus Samuelson’s Trinidadian Chicken Rôti and I even made his roti bread, but to be honest I wasn’t entirely happy with it. My rôti from Chef Samuelson’s recipe did not turn out soft and pliable nor did it have the layers that our local rôti joint makes so I went back to the drawing board and found this recipe and very good video tutorial and my first attempt worked out perfectly! It’s definitely not as calorie conscious as I would normally like, but then again we won’t be indulging too often and I bet it’s a bit healthier than the takeout version!
As it turns out, the rôti is more or less a laminated dough, which means you add some kind of grease and fold the rolled dough to create the layers. The recipe I used was made with white flour but I altered it a bit with whole wheat and it really didn’t change the mouth feel or texture, I also reduced the oil for laminating quite a bit. I’m definitely going to incorporate this wonderful dish into our Cottage Repertoire!
It’s kind of a cross between a Naan and a Crêpe
West Indian Rôti Bread
Makes 2 30 cm (12 inch) rôti breads. Please click here for original recipe.
Ingredients:
1 cup AP flour
1/4 cup whole wheat flour
1/2 tsp vegetable shortening
1 tsp baking powder
1/2 cup water
1/8 cup vegetable oil
1 tbsp unsalted butter
Directions:
Combine the flours, shortening and baking powder in a large bowl. Rub the shortening into the flours well.
Add 1/2 cup water a little at a time until the dough comes together (it should be relatively soft and shaggy but not sticky).
Cover with a damp cloth and allow to rest for 30 minutes to 1 hour.
Combine the vegetable oil and butter and melt in a microwave. It’s OK to use this if it is warm, but not boiling.
Divide the rested dough into two evenly sized balls. With a little flour on the work surface, roll out each dough to about 30 cm or 12 inches in diameter (it will be very thin).
Using a pastry brush, brush the vegetable oil and butter combo on the circle (I used a relatively light touch and it still worked out beautifully!).
Using the technique described in this video, slice a single cut into the circle from the edge to the centre. Begin folding a triangle, going all the way around the circle.
Then flip the cone up so the point is downward. From the wider end on top, pull the outer sides into the roll to seal it. Then flip it again so the pointy end is up, and using your forefinger and middle finger press the point down into the roll. Repeat for the second circle. The video is excellent, so if you have time, please watch it.
Cover these laminated balls with a damp paper towel and allow to rest 30 minutes to 1 hour.
Once rested, lightly flour your work surface and roll out the laminated dough to about 30 cm or 12 inches in diameter. In the meantime, using a large flat cast iron pan, heat to medium heat.
Cook the first side for about 2 minutes, and then flip. Brush the top side with some of the remaining oil butter mixture, then flip and brush the second side. The instructions were quite explicit not to brush the bread first, you must cook the first side before brushing.
Repeat cooking for the second roti.
Store in an airtight container or zip lock bag so it doesn’t dry out.
This is the roti with Chef Samuelson’s slightly modified Chicken Curry.
Recently I had a couple of encounters, not the alien kind but the kind of encounters that you don’t expect after 30 plus years! We were meeting a friend up on Bloor at our local pub for dinner one night and this gentleman stops me on the street and calls me by name. He was so happy to see me but I had no idea who he was; it turns out that he was in my grade school way back before dinosaurs and he recognized me! I didn’t recognize him because he was a very skinny and short kid with a crazy ‘fro and he became quite a tall and portly adult with close cropped hair.
Later that same week we ventured to our local Home Show to walk around and day-dream about our next renovation when this woman approaches and asks if I had gone to U of T (University of Toronto) and as soon as I looked at her I recognized her from way back in the mid 80’s! Two totally unexpected encounters in one week. Has this ever happened to you? I’d love to hear about it.
I was trying to find a way to use the wasabi pearls without being too predictable and this salad was the perfect solution! The lightly dressed salad plays up the subtle sweet and sour Asian flavours in the cucumber pickle combined with the luxuriously creamy soft poached egg yolk. The cucumber pickle was so tasty, I would have it on its own too!
I’m still at odds about the use of the other two pearls, so if you have any ideas, I’d love to hear about them.
A refreshing Asian flavoured salad
Cucumber Ribbon Pickle and Poached Egg Salad with Wasabi Pearls
Serves 2 as a light meal or 4 as a starter
Ingredients for the salad:
4 handfuls of mixed greens (I used spinach and arugula)
20 grape tomatoes cut in half
1 tbsp cilantro, roughly chopped
1 tbsp green onion, roughly chopped
1 heaped tbsp wasabi pearls (click here for recipe)
1 cup English cucumbers, sliced into very thin ribbons (see note)
1 soft boiled egg per serving
Ingredients for the dressing:
1/4 cup rice wine vinegar
1/4 cup water
1 tsp toasted sesame oil
1/2 tsp soy sauce
Directions for the cucumber pickle:
Combine all of the ingredients for the dressing and heat either in the microwave or stove top until just about boiling. Pour over the cucumber ribbons in a non-reactive container and allow to sit for 15 to 30 minutes.
Directions for the salad:
Put equal amounts of the mixed greens into each of two or four bowls, top with equal amounts of the cucumber pickle (reserve the dressing) and tomatoes.
Add one poached egg per bowl and garnish with the chopped green onion and cilantro.
Distribute even amounts of the wasabi pearls into each bowl and drizzle with a tablespoon or two of the dressing into each bowl.
Serve immediately.
The pale green wasabi pearls are a burst of flavour
Breaking into the yolk to make a delicious, creamy dressing
No, they are not some weird green fish eggs, they are wasabi pearls!
I just needed a bit of colour on a dreary winter’s day
Tips:
Use your vegetable peeler to make paper thin cucumber ribbons.
Don’t peel the cucumber to give it some substance.
Today is my dear Mother’s birthday; were she alive, she would have been 78 years young!
Happy Birthday Mom (21 in this photo), I miss you.
Several years ago we dined at Diego, a lovely Mexican restaurant in the MGM Hotel in Las Vegas and I had a wonderful Ceviche that I have not been able to forget. It was an unusual combination of coconut milk and lime juice that just hit my taste buds perfectly. I adore ceviche and order it whenever I see it on a good restaurant’s menu and have not had the pleasure of these flavours together in one since. So, I thought I’d take a stab at it and create an opportunity to use one of my pearls in the process! Clever, don’t you think?
I’ve made ceviche before, the non-cheater kind but I wanted to put this together quickly for an hors d’œuvres recently and I didn’t feel like waiting for the acid to ‘cook’ the shrimp so I came up with this ‘cheater’ version. You can make the ceviche the old fashioned way, but this really worked out well!
I would have liked to add cubed avocado to this dish but sadly forgot to put it on my shopping list! I’ll remember next time, this is a very quick and tasty recipe.
It’s also rather coincidental in this cyber world how we all post about similar things so I can’t go without mentioning my dear Australian Blogging friend Lorraine who just last week posted this gorgeous recipe about real ceviche. Great minds think alike…please don’t finish the last part of this saying, it kinda bursts my bubble!
It’s just as tasty and doesn’t take long to make.
Cheater Shrimp Ceviche
Makes ~200 mL Ceviche (slightly more than 3/4 cup), or 8 single serve Chinese Spoons
Ingredients:
1 tbsp coconut milk powder
1 tsp fresh ginger, grated finely
1 tbsp rosa’s lime cordial
2 tbsp lime juice
80 g cooked cocktail shrimp, chopped
3-4 slices of English Cucumber (0.5 cm or 1/4″ thick) cubed
1 celery rib, cubed
1/4 cup avocado, cubed
1 tbsp cilantro, chopped
1 tbsp green onion, chopped
1 tsp smoked paprika pearls
Directions:
Combine the coconut milk powder, finely grated ginger, lime cordial and lime juice in a measuring cup and blend until smooth with a stick blender.
Combine the chopped shrimp, cubed English cucumber, avocado (if I had some) and celery with the cilantro and green onion, toss with the coconut milk dressing to coat evenly.
Serve immediately garnished with the smoked paprika pearls.
Are you an experimental cook? What I mean by that is, do you instinctively gravitate toward unusual recipes, perhaps ones that push you out of your comfort zone? Using ingredients and techniques that are new to you and perhaps don’t always work out the first, second or even third time you try it? You may have guessed that I am, to a fault. Like a dog with a bone. I won’t stop until I get it right and even then, I may likely never make that recipe ever again! You will wonder why and to that I say, why not? I simple check it off my list and move on. This might be such a recipe.
I cannot recall where or when was the first time I saw Balsamic Pearls or caviar but I do recall being instantly smitten, my only problem was that I was not able to find the jelling ingredient Agar Agar, until recently! And I found it in the most unlikely place, my local health food store! It was an arm and leg to purchase, but fortunately it’s a big enough bag that I can make several batches.
What reminded me of these little gems was one of my shopping trips for Food Styling Assisting at a very fancy (read expensive) organic food store in north Toronto called Harvest Wagon; they temptingly have the most gorgeous display of vinegars and oils directly beside the cash desk…no time to even give it a second thought, unless you look at the prices! I suspect people who shop there really don’t look at the prices anyway! It is there that I spotted the balsamic pearls and it was there and then I decided that I HAD to make them!
My dear friend and Inspiration of All Asian foods, Sissy from With a Glass has used Agar Agar for many desserts she allures us with over the years. It is a seaweed based jelling agent that does not liquify when heated up (unless it’s boiled); unlike gelatine which melts (like in my French Onion Soup Pillows).
Pre-directions for all flavours:
At least 30 minutes (but not overnight) before you wish to start making your pearls, fill a tall, thin glass with vegetable oil and put into the freezer to cool. It’s best to have a tall glass so that when you drop the pearls into it, the pearls have a long way to fall through the super cooled oil before they hit the bottom. This is very important because if the pearls don’t have sufficient time to cool down, they will fall to a puddle at the bottom of the glass. Trust me. You can strain the oil and reuse it, so don’t worry about tossing it.
Slightly larger than caviar, these tiny Balsamic pearls pack a lot of flavour.
Balsamic Pearls
Makes a generous table spoon or more of tangy balsamic pearls.
Ingredients:
2 tbsp water
3 tbsp balsamic vinegar (not glaze)
1 tsp agar agar
1-2 cups of vegetable oil in a tall glass
Directions for balsamic pearls:
In a small saucepan mix the water with the balsamic vinegar then add the agar agar and place on medium to medium low heat, stirring constantly until it comes to a boil.
Cook this mixture on a very gentle boil for 4 minutes, stirring often.
When the 4 minutes are up, remove the pan from heat and allow the liquid to cool to about 50° C (122° F), but try not to let it fall below 41° C (105°F), if it does, you can reheat, stirring constantly until it melts again.
Remove the chilling oil from the freezer and place in a comfortable working area. Using the culinary syringe, draw up the balsamic liquid (try to get most of it), and drop by single droplets into the chilled oil. They will sit slightly suspended on the surface and then fall gently through the chilled oil to the bottom. If the pearls are cooled enough, they will have set and be beautiful little pearly jewels, if they did not set you will have a puddle at the bottom of the glass; strain the puddle out, put the oil back in the freezer and re-melt the puddle in the saucepan.
When you have used up the liquid, strain the pearls out of the oil into a fine sieve and rinse with cold water. It’s best to store the pearls in the liquid that they were originally made from, so top off the storage jar with balsamic vinegar.
These Wasabi pearls are not as green as I had hoped.
Wasabi Pearls
Makes a generous table spoon or more of wasabi pearls.
Ingredients:
1/4 cup water
1 tsp agar agar
1 tsp wasabi paste (the powder does not work well in this case)
1-2 cups of vegetable oil in a tall glass
Directions for wasabi pearls:
In a small saucepan mix the water with the agar agar and place on medium to medium low heat, stirring constantly until it comes to a boil.
Add the wasabi paste and mix well (try not to breath too close, it’s a very strong and stinging smell).
Cook this mixture on a very gentle boil for 4 minutes, stirring often.
When the 4 minutes are up, remove the pan from heat and allow the liquid to cool to about 50° C (122° F), but try not to let it fall below 41° C (105°F), if it does, you can reheat, stirring constantly until it melts again.
Remove the chilling oil from the freezer and place in a comfortable working area. Using the culinary syringe, draw up the wasabi liquid (try to get most of it), and drop by single droplets into the chilled oil. They will sit slightly suspended on the surface and then fall gently through the chilled oil to the bottom. If the pearls are cooled enough, they will have set and be beautiful little pearly jewels, if they did not set, you will have a puddle at the bottom of the glass; strain the puddle out, put the oil back in the freezer and re-melt the puddle in the saucepan.
When you have used up the liquid, strain the pearls out of the oil into a fine sieve and rinse with cold water. It’s best to store the pearls in the liquid that they were originally made so mix a scant teaspoon of the wasabi paste with water and store the pearls in it.
A lovely sweet flavoured pearl.
Pomegranate Pearls
Makes a generous table spoon or more of pomegranate pearls.
Ingredients:
1/4 cup pure pomegranate juice (don’t use syrup here)
1 tsp agar agar
1-2 cups of vegetable oil in a tall glass
Directions for pomegranate pearls:
In a small saucepan mix the pomegranate juice with the agar agar and place on medium to medium low heat, stirring constantly until it comes to a boil.
Cook this mixture on a very gentle boil for 4 minutes, stirring often.
When the 4 minutes are up, remove the pan from heat and allow the liquid to cool to about 50° C (122° F), but try not to let it fall below 41° C (105°F), if it does, you can reheat, stirring constantly until it melts again.
Remove the chilling oil from the freezer and place in a comfortable working area. Using the culinary syringe, draw up the pomegranate liquid (try to get most of it), and drop by single droplets into the chilled oil. They will sit slightly suspended on the surface and then fall gently through the chilled oil to the bottom. If the pearls are cooled enough, they will have set and be beautiful little pearly jewels, if they did not set you will have a puddle at the bottom of the glass; strain the puddle out, put the oil back in the freezer and re-melt the puddle in the saucepan.
When you have used up the liquid, strain the pearls out of the oil into a fine sieve and rinse with cold water. It’s best to store the pearls in the liquid that they were originally made from, so use pomegranate juice.
These smoked paprika pearls are very smoky indeed. I wish I had given them a bit of heat.
Smoked Paprika Pearls
Makes 2 table spoons or more of smoked paprika pearls.
Ingredients:
1/4 cup water
1 tbsp red pepper paste (I used sweet)
3/4 tsp liquid mesquite smoke
1 tsp agar agar
1-2 cups of vegetable oil in a tall glass
Directions for smoked paprika pearls:
In a small saucepan mix the water with red pepper paste and smoke, then add the agar agar and place on medium to medium low heat, stirring constantly until it comes to a boil.
Cook this mixture on a very gentle boil for 4 minutes, stirring often.
When the 4 minutes are up, remove the pan from heat and allow the liquid to cool to about 50° C (122° F), but try not to let it fall below 41° C (105°F), if it does, you can reheat, stirring constantly until it melts again.
Remove the chilling oil from the freezer and place in a comfortable working area. Using the culinary syringe, draw up the red pepper liquid (try to get most of it), and drop by single droplets into the chilled oil. They will sit slightly suspended on the surface and then fall gently through the chilled oil to the bottom. If the pearls are cooled enough, they will have set and be beautiful little pearly jewels, if they did not set you will have a puddle at the bottom of the glass; strain the puddle out, put the oil back in the freezer and re-melt the puddle in the saucepan.
When you have used up the liquid, strain the pearls out of the oil into a fine sieve and rinse with cold water. It’s best to store the pearls in the liquid that they were originally made from, so mix a small amount of water and smoke (2 tbsp water and splash of liquid smoke).
Tips:
I used Mitoku, Kanten Flakes (Agar); the package instructions indicate that 1 tablespoon will set 1 cup of liquid. As fyi, I also tried 2 tsp of Agar Agar into 1/4 cup liquid and found the pearls way too stiff, reducing the Agar Agar to 1 tsp worked out perfectly.
The Agar Agar binds with your liquid only when it is added to a boiling liquid and for the pearls to cool sufficiently you must wait until the temperature falls to 50° C (122° F) and then you must act quickly because it starts to set at 41° C (105°F) so there isn’t much time to drop the little droplets (it sets at room temperature, refrigeration is not required). Work in small batches so that your liquid doesn’t set before you have time to use it up to make the pearls.
I used a culinary syringe, but an icing bag fitted with a very small end could work too, although I did not try it.
Not every liquid can be turned into pearls because there are other things to consider which are far beyond my chemical knowledge so if you are interested in turning something not listed here into pearls, I would do some research.
It’s important to follow the directions closely otherwise your experiment will fail, I tested each one to make sure it works. This was my third attempt with Balsamic, second attempt with wasabi and on from there with the other flavours.
Don’t drop too large pearls because they won’t have time to set in the oil. My best pearls were about 2 mm (1/8 inch) in diametre, ones that ended up being about 5 mm (1/4 inch) became deformed because they didn’t have time to set as a pearl.
My glass was was 12 cm (4.5 inches) high with about 10 cm (4 inches) of oil, so if you have a taller glass with more oil, your pearls can be larger.
Aren’t you curious about how I plan to use these little pearls?
My friend and fellow bunny lover Genie from over at Bunny, Eats, Design suggested I post this in Our Growing Edge, a monthly blogging event to encourage us to try new food related things. Kindra from California Cavegirl Kindra is the host for this month’s event. If you have a blog and you are eating or cooking something new this month, click here to join.
JT and I were sipping wine in the living room by a roaring fire, we were discussing the Christmas “Do-Over” dinner that we decided to host in January. I had just done all the shopping for the menu and then JT mentions that his family are not much stuffing lovers. THAT in itself is blasphemous, but what made it worse is that I had just done all the shopping. Did I mention that I had just done all the shopping? I had bought a lot of mushrooms. A LOT. And they weren’t cheap so they were not going to be omitted from the dinner!
So instead of making a stuffing of mushrooms and chestnuts I created a pilaff! And what a success it was; the earthy mushroom flavours with the slightly chewy texture of the wild rice and the sweet chestnuts and brown rice complimented each other so well, I decided to blog about it so I don’t forget to make it next time. This recipe is really just a combination of suggestions, so if you don’t like something, omit it and add a bit of something else. Even the volumes of everything are a suggestion, so put on your recipe developer hat and make this pilaff your own!
Another great thing is that you can make it the day before so you’re not in a panic the day that 6 people descend on you!
Even my Nephew who is not fond of mushrooms had a generous helping!
Wild Mushroom Rice Pilaff with Chestnuts and Cognac
Serves 8-10 as part of two other side dishes.
Ingredients:
500 g – 1 kg wild mushrooms (I used 1 Portobello, ~5 cremini, ~12 shitaki, ~1 large bunch oyster), chopped roughly
300 g (3.5 oz) roasted chestnuts, peeled and chopped roughly
1/4 cup pancetta, diced rather small
1/2 sweet onion (about 1 cup), chopped finely
1 clove garlic
1/3 cup wild rice (cooked, as per directions)
1/4 cup sweet brown rice (cooked, as per directions)
1/4 cup cognac or brandy
1 tbsp unsalted butter
1/4 tsp thyme
Directions:
In a very hot Dutch oven, cook pancetta until crispy, remove and drain on paper towel and set aside. You may use the pancetta grease to cook in, but it you’d rather be a touch healthier, wipe out the pan and spray with a little non-stick cooking spray.
Cook onions until translucent. Add garlic and continue to cook until fragrant. Deglaze the pan with the cognac. Add the butter to the hot pan and once melted add the chopped mushrooms. Cook with the top off until the mushrooms are no longer chewy.
Stir in the pancetta, chestnuts and cooked rice until well blended. Spray non-stock cooking spray in a decorative casserole dish which can be put into the oven and pour the mushrooms and rice into it. Don’t pack it down.
If you are making this the day before, allow to cool completely and refrigerate. When you are ready to serve, remove the pilaff from the fridge and allow to come to room temperature.
Pre-heat the oven to 150°C (300°F) and reheat for 20-30 minutes. Serve hot.
The chestnuts are such a sweet and creamy surprise!
Tips:
You may ‘chop’ the mushrooms in a food processor to save time, but be careful not to chop too finely. I did not use this method because I wanted larger, identifiable mushroom pieces.
You may also use barley, wheat berries or any other sturdy grain instead of wild rice.
Cooking sherry may be substituted for the cognac or brandy, but I prefer cognac with mushrooms.
I like to buy already peeled and roasted chestnuts like these, but you can roast and peel your own.
To add another layer of texture and flavour, add 1/2 cup of chopped roasted pecans.
Are you tired of the same old vegetables served at holiday gatherings? I know I am. This recipe is a perfect new take on the traditional Brussels Sprouts and best of all, they are so easy to prepare! My lovely SIL Wendy makes a version of this tasty treat every year at Thanksgiving (it may be because I always ask her to), but I’ve never made it at home! So for our Christmas “Do-Over” last month I decided to give it a go. Make it vegetarian by using vegetable broth instead of chicken broth and omit the pancetta, but you may need to add a bit extra salt.
We had a Christmas “Do-Over” because JT’s 90 year old father wasn’t well enough to travel to Peterborough where JT’s sister kindly hosted the dinner since we weren’t sure we would have power. This tasty side dish is easy to eat and fast to prepare, what more could you want? Oh, yes, it’s tasty too.
Aren’t Brussels Sprouts just very tiny cabbages?
Shredded Brussels Sprouts with Pancetta and White Balsamic Vinegar
Serves 8-10 as part of two other side dishes.
Ingredients:
500 g (about 14 cups) washed Brussels sprouts, shredded
50 g (about 1/2 cup) pancetta, finely chopped
1/2 (about 1 cup) sweet onion, finely sliced
1 clove garlic, minced finely
50 mL (about 1/4 cup) white balsamic vinegar, or to taste
100 mL (about 1/2 cup) chicken stock
Directions:
In a large dutch oven, crisp the pancetta to golden. Remove with a slotted spoon to a paper towel, set aside.
Add the onion and cook until translucent, then add the garlic and cook until fragrant. Deglaze the pan with the white balsamic and chicken stock. Add the shredded Brussels sprouts and sauté until slightly wilted. Stir in the pancetta. Serve hot.
You’ll never think the same way about Brussels sprouts.
We had some very cold weather in December and I know some of my dear readers are experiencing some very hot weather — I can’t say which I prefer more, but at least one can put a few more layers on in the cold, not much you can take off after you’ve taken it all off in the heat (or maybe that was a vision we didn’t need!). To help combat the chill over the holidays, I made a big batch of beef barley soup which we had for a lunch and then froze the remainder for quickie servings in the future; it’s always easier to eat healthful if you are armed with healthy food.
A thick soup flavoured with lots of mushrooms and chunks of beef
Slow Cooker Beef Barley Soup
Serves 4-6
Ingredients:
1/2 cup sweet onions, finely chopped
1 cup or 3 stalks celery, cubed
3 cloves garlic finely minced
1 cup pearl barley
1 L Low Sodium beef stock
5-7 dried “fa goo” Chinese mushrooms, sliced (hydrated but save the liquid and strain it through a fine sieve)
1 bay leaf
1 tsp thyme
1 1″ sprig of rosemary, finely chopped
400 g cubed beef (relatively small)
1 1/4 cup sherry
1-2 tsp canola oil
Salt and Pepper to taste.
water, if necessary
Directions:
Allow the beef cubes to come to room temperature. Preheat the slow cooker on high.
Add 1-2 tsp canola oil to a hot cast iron dutch oven and brown the beef on all sides. Add to the slow cooker pot.
In the same dutch oven, cook the onions until translucent, then add the garlic until fragrant. Stir in the pearl barley and toast for a few moments. Pour into the slow cooker with the beef. Add the beef stock to the slow cooker and give it a good stir.
Deglaze the dutch oven with the sherry and add it to the slow cooker and add the bay leaf, thyme and finely chopped rosemary. Cook for 4-6 hours on low temperature or 3-4 hours on high.
For the final hour, add the sliced hydrated mushrooms and the strained mushroom stock and give it a good stir.
After the final hour, test the barley for doneness and soup for thickness, should you want a slightly less thick soup, add more water.
Remove the bay leaf. Season with salt and pepper and serve with a dollop of fat free Greek Yogurt and a sprig of rosemary.
Cool leftovers completely and pour into plastic containers for freezing.
A nice dollop of fat free Greek Yogurt is always a nice addition. Of course the crostini with brie never hurts either!
Although December and January were very cold, in late January and early February we were bombarded with snow. A lot of snow, all at once. I know other parts of the world get snow, but this is a lot for us, particularly those of us living in the city with smaller lots which means we have a really hard time finding the space to shovel the snow off the sidewalks and driveways! Enjoy the photos below and just be grateful you didn’t have to shovel it.
This snow mound is just about 1 metre high (39″)
You can see how high the snow is piled from our gorgeous little tree!
These are our Rose of Sharon ‘trees’. They are about 3 metres (10 feet) tall, but they just look like shrubs with the snow piled up to their canopy!
Flash back to November 2013, please recall our Indian extravaganza thank you dinner I made for our very generous neighbours. As you know, I’m not a huge fan of Indian desserts (remember this one?) so when I planned the dinner party I knew right away that I wanted to make a version of Chai Crème Brûlée. Sadly it’s winter in these parts which means it gets dark anywhere from 4:30, so I wasn’t able to take a decent photo until I was able to remake this tasty dessert and shoot it in daylight!
I served with two spoons so you can have a taste too!
Chai Crème Brûlé
Serves 1 (slightly more than 1/2 cup serving); just multiply by the number of people you need to feed to get your amounts
Ingredients:
1/2 cup of whole milk or cream per person
1.5-2 tsp sugar per person
1 black tea bag
1 cinnamon stick
2 star anise
3 green cardamon pods, smashed gently.
1 egg yolk per person
1-2 tbsp per person of sugar to brûlée
Directions:
Preheat oven to 135°C or 275°F.
Infuse the milk with the Chai spices: combine milk or cream, sugar, black tea bag, cinnamon stick, star anise and cardamon in a small pot and heat until just under boiling, simmer for 15 minutes. Set aside to cool with a lid on the pot (or refrigerate overnight, which is what I did). Strain to remove all the bits, discard strained pieces.
Once cooled, whisk the infused milk, egg yolks in a vessel with a pouring spout.
Pour this mixture into ramekins. My ramekins were about 2/3 of a cup each. Place ramekins into a roasting pan with 5cm sides, put the pan into the pre-heated oven. Pour enough water around the ramekins to reach up just over half way on the side of the ramekins (it’s much easier to do this once the pan is in the oven so you’re not balancing the custard and the water on your way to the oven).
Bake for 30-45 minutes to an hour or so. You’ll know they’re done when you can stick a knife in one and it comes out clean. Remove the ramekins from the baking pan, set them on the counter allow them cool. (The deeper your custard is the longer it will need to bake).
Sprinkle a thin layer of sugar on the top of each. Make sure it’s a THIN layer, but also make sure it completely covers the custard. Now torch it! Garnish with Whipped cream if you’d like (for the dinner party, I infused the whipping cream with a hot cinnamon stick which I heated for 1 minute on high in the microwave. I refrigerated the whipping cream and hot cinnamon stick until serving and then I removed the stick and whipped the cream).
Tips:
To save some time, just use a prepared Chai teabag.
Don’t squeeze the tea bag, it will be bitter.
I know you want to dig in!
The chai flavours really go well with the creamy crème brûlée
My nephew Brian came for dinner in late January and it was a bitterly cold day so I thought starting out with a soup would be welcome. I’ve always enjoyed Italian Wedding Soup but recently had a very bad version while shopping in Buffalo which has jaundiced me from ordering it again at a restaurant, surprisingly it was in an Italian restaurant, but it was a chain, so I should have known better.
I have updated the traditional recipe using some unusual ingredients, I hope you’ll give it a try and let me know what you think. I ground my own beef and pork but you can easily buy already ground meat (extra lean of course). You’ll be surprised that I used puffed quinoa in the meatballs because I didn’t want to use bread crumbs or panko! Pretty clever don’t you think? I also used kale instead of the traditional spinach because I like the way kale holds up in a soup. Israeli couscous was my clever substitution for the pasta, it’s still pasta but I really liked the look of the balls in the soup.
A flavourful broth with a variety of textures make this soup a welcome addition to my soup repertoire.
Italian Wedding Soup, my way
Serves 6-8
Ingredients:
1/4 cup sweet onions, finely chopped
1.5 g each of lean beef and pork
1/3 cup puffed quinoa
1/4 cup freshly grated Parmesan cheese
1/4 tsp freshly chopped oregano
1/4 tsp each nutmeg, salt and freshly ground pepper (I use a mix of mainly white, s little black and a little red)
1 clove garlic, finely minced
1 large egg, lightly beaten
1 cup Israeli Couscous
1 1/2 L (about 1 1/2 qt) Home-made or Low Sodium Chicken stock
1/2 (about 1 1/2 cups) large sweet onion, finely chopped
2 cloves garlic, finely minced
1/2 bunch kale (about 4 cups) finely chopped
2 medium carrots (about 2-2 1/2 cups), cubed
2 celery ribs (about 1 cup), cubed
3 tsp canola oil
Salt and Pepper to taste
water, if necessary
1 good size Parmesan rind
Directions:
In a large, chilled metal bowl, combine the onion, beef and pork, puffed quinoa, parmesan cheese, oregano, nutmeg, salt and pepper and the lightly beaten egg. Shape into smallish meatballs and set on a cookie sheet and refrigerate for 30 minutes to an hour.
Pre heat the oven to 177° C 350°F. Heat a skillet with 1 tsp canola oil and fry each meatball to brown all sides in two batches. Use the second tsp of canola oil for the second batch. Replace on cookie sheet lined with clean parchment and bake the meatballs until done (about 30 minutes).
Cook the Israeli Couscous as per package directions to al dente. Set aside.
Pre heat a large soup pot with 1 tsp canola oil, sauté the sweet onion until translucent, add the garlic and sauté until fragrant. Add the chopped kale, carrots and celery and stir for about 4 minutes.
Cover with chicken stock and top off with additional water if desired. Salt and pepper to taste. Add the Parmesan rind.
Bring to a boil and cook until vegetables have reached their desired consistency, I like a very slight crunch so that they are not mushy in the soup. Add the couscous and baked meatballs just before serving to heat through.
Remove theParmesan rind and eat.
Serve garnished with shaved Parmesan cheese.
The shaved Parmesan adds a delicate saltiness to this delicious soup.
Tips:
If you are making this soup to freeze, I would recommend freezing the meatballs and the Israeli couscous in separate bags to the soup and adding to heat just at serving. I kept a batch in the fridge with the couscous and meatballs and they got mushy in two days.
Several years ago we dined in a lovely bistro in the heart of the financial district downtown Toronto called Forte Bistro and Lounge. JT had read about Chef Greg Argent in one of our foodie magazines and he knew right away we had to experience his cooking! Sadly, the restaurant is no longer around but the delicious memories of Chef Argent’s cuisine still lingers on.
A delightful combination of rich broth and caramelized onions in a perfectly bite-sized pillow.
One such dish was the unique French Onion Soup Dumplings ($11): a tender pasta dumpling filled with braised veal broth and gruyère cheese; what made this tasty dumpling so unusual was the surprise of the explosion of veal glacé that would fill you mouth with flavour after biting into the tender pasta, immediately reminding you of French Onion Soup! I have tried many times to recreate this wonderful dish without success and then Chef Argent revealed his ‘secret’ when I asked how he does it. Today I will share with you the secret of the tasty, unassuming little dumpling, but you must swear never to speak of it again! Although the recipe is laborious, I urge you to make a batch to serve as an amuse bouche or little hors d’œuvres at your next Super Bowl party (you may freeze uncooked dumplings on a parchment lined sheet lightly dusted with flour and then put them into a zip-lock bag), you will not only thank me for the wonderful compliments your lucky guests bestow upon you, you may even wish to send me gifts! 😉
3 g (a scant teaspoon) powdered gelatine (agar agar will not work here)
1 cup caramelized onions (please click here for a great recipe)
Home made pasta dough or 60 square won ton wrappers (for a great pasta dough recipe, please check out Chicago John’s kitchen)
Gruyère cheese to garnish
Directions for the broth:
Preheat oven to 350°F 177°C. Put a 11.5 cm x 21.5 cm (4 1/2″ x 8 1/2″) metal loaf pan into the freezer.
Sear the beef bones well on high heat. Remove from pan and set aside. Deglaze the pan with 1 tbsp cooking sherry or port. Add the onions to the pan and sauté for a minute or so on the residual heat from searing. Spread the onions out evenly on the bottom of the pan. Return the beef bones to the pan and nestle into the onions, add the merlot salt, bay leaf and 300 mL water. Cover with tin foil and roast in the oven for about 1 hour, checking occasionally to make sure the water hasn’t evaporated, top up as needed.
Remove pan from oven and remove tin foil. Add an additional 200 mL water and boil on the stove top until liquid is reduced to about 150 mL (about 5 oz). Strain through a fine sieve and press as much liquid out of the cooked onions as possible.
Set aside about 60 mL (1/4 cup) of the stock and cool. Keep the remainder stock on a soft boil.
Stir the gelatine into the cooled stock until melted. Add the boiling stock and stir well. Allow to cool to room temperature and pour into the super cooled loaf pan. Refrigerate until set.
You can develop a little assembly line to speed up the process!
An unexpected, rich, delicious broth explodes in your mouth when you bite into each pillow.
Directions for assembling the pillows:
Roll out the pasta dough to #4 thickness on the Kitchenaid Pasta roller (less than 1 mm or 0.125 inch). Using a 6-7cm (2.5″ -2.75″) oval cookie cutter, cut out the ovals to make both sides of the pillows.
Remove the jelled broth from the fridge and cut into 0.5-1cm (0.25″-0.5″) rectangles.
Onto each oval, more or less centred, add one jelled broth rectangle and about 1/4 tsp caramelized onion. Wet your finger and run a wet bead along the outer edge of the pasta oval. Turn up both sides of the oval and squeeze the edges together to bind — you don’t want these pillows to burst open when boiling.
Lightly flour a parchment lined baking sheet and add each finished pillow to it so as not to touch each other. Freeze and bag frozen pillows into a zip lock bag or container. Use as many as needed.
Bring an appropriate amount of salted water to a boil. Add frozen pillows and boil until they float to the surface. Remove with a slotted spoon onto a clean dish cloth to drain off water. Present on a Chinese soup spoon and garnish with a small amount of finely grated gruyère cheese. Brûlée the cheese until it is golden and crispy. Serve immediately.
The Brûléed Gruyère cheese taste just like the burnt bits on a French Onion soup bowl.
Last fall we had my lovely niece and her beaux for the weekend; Laura recently graduated from Western University with her degree in Law and she is articling in Toronto. I wanted to make a traditional Hungarian dinner because they had never had Hungarian food. I had intended to follow the recipe verbatim, but I just couldn’t help myself and did end up changing it a slight bit. The result was wonderful and JT thought I finally got it right, the way he remembered my dear Mom to make this tasty dish. The original recipe is from Ilona Horváth’s “The Traditional Hungarian Kitchen” cookbook, published originally in 1996.
Although this recipe takes 2-3 days to prepare, there is little kitchen time as most of it is in the marinade. The finishing is relatively easy. The original recipe was made entirely in a dutch oven but I’ve modified it to a slow cooker because I was not able to be at home the day we wanted to have it. The gravy is a tangy, creamy gravy balanced with the addition of caramelized sugar, but it is NOT SWEET. The julienned carrots and parsnips add texture and natural sweetness. The meat comes out fork tender and you really don’t even need a knife to eat it.
The tangy gravy goes perfectly with the sweet carrots and parsnips. Sorry the photo is so hot, it was night when I shot this.
Vadas Hus; Hungarian Wild Meat revisited
Serves 4-6. This recipe takes 2-3 days to prepare.
Ingredients:
800 g (1 3/4lb) eye of round or good stewing beef, whole
50 g bacon (pancetta works)
2 tbsp canola oil (the Hungarians would use lard here)
2 tbsp all purpose flour
10 g (scant tablespoon) sugar
1 tsp white vinegar
2 tsp dijon mustard
3/4 Non-fat Greek yogurt (or sour cream)
100 g (about 1 cup) julienned carrots
100 g (about 1 cup) julienned parsnips
1-2 tbsp cold water
Ingredients for the marinade:
50 g (about 1/2 cup) grated carrots
50 g (about 1/2 cup) grated parsnips
1 small onion chopped roughly
1 L (about 4 cups) water
5-6 black peppercorns
2 bay leaves
salt to taste
2 tsp white vinegar
Directions:
Tidy up the meat by removing any excess fat and membranes. Allow to come to room temperature.
To prepare the marinade, cook the carrots, parsnips and onion in 1 L water with black pepper, bay leaves and salt until half cooked. Add the vinegar and cool to room temperature. Pour over the meat and refrigerate 2-3 days turning every so often. Remove the black peppercorns.
Remove the meat from the marinade and dry completely, bring to room temperature. In a large dutch oven, heat the canola oil and cook the bacon and reserve, add the meat to the bacon oil and sear each side well.
In the meantime, pre heat the slow cooker on high and add the original marinade, reserved bacon and bay leaves. Once it is warm add the seared beef and cook until beef is tender (3-4 hours) turning often.
Remove the meat from the slow cooker and allow to rest. Discard the bay leaves. Strain the vegetables from the slow cooker (reserve the liquid) and add to the dutch oven, sprinkle with flour and fry to brown lightly. Slowly add the reserved marinade liquid and stir to thicken.
In a small sauce pan, melt the sugar until it is golden in colour (not dark) and then mix with a couple of tablespoons of cold water, pour into the thickened vegetables in the dutch oven. Simmer for 5 minutes and add the remaining 2 tsp vinegar and Dijon mustard. Purée the entire gravy adding the yogurt or sour cream with an immersion blender until very smooth. You can run this through a fine sieve for a very smooth gravy. Keep warm.
Boil the remaining julienned carrots and parsnips until cooked but there is still a slight bite to them. Strain and keep warm.
Slice the meat into 1 cm or 1/2″ slices and plate over the puréed gravy, top with the julienne parsnips and carrots. Garnish with flat leaf parsley.
I have three Indian cookbooks from which I can usually find something I want to make, perhaps with some additional guidance from a cooking site or blog. The one cookbook I bought because every single recipe had a lovely photograph! It’s relatively small 12 cm x 15 cm (5″ x 6″) which makes it even more adorable! It came with a ribbon book mark attached to the spine so you can mark the recipe you are making or the next one since it has lay-flat binding. With all these things going for it, you would think I would love this cookbook, but sadly I don’t. In fact, I have not enjoyed one of the recipes I’ve made from this book without significant changes! I should just chuck the thing but I can’t because I really like the way it looks. I know it’s silly but it is what it is.
This is a recipe I altered after having acquired a Meyer Lemon from a shoot in November and I wanted to make something with it. I puréed the soup to a smooth velvety consistency and I dressed it with a cumin yogurt drizzle with green onion slices, you could also drizzle with a flavour olive oil. The Papadams are from our trip to Chicago when Chgo John took us to his favourite ethnic stores.
The earthy lentils burst with fresh, lively flavour with the lemon
Lemon Lentil Soup
Serves 2 generously (1 cup portions or 250 mL each)
Ingredients:
100 g dahl or yellow lentils
1 tsp fresh ginger, peel and finely chopped
1 tsp fresh garlic, finely chopped
1 tsp chili powder
1/2 tsp turmeric
1 tsp salt
2-4 cups water (depending on how thick you prefer your soup)
3 tbsp lemon juice
grated rind of one lemon
1/4 cup yogurt
1 tsp cumin
Shopped green onions as garnish
papadums
Directions:
Rinse the lentils and cook with the ginger, garlic, chill and turmeric and 2 cups water until soft.
Add the salt, lemon juice and rind and blend with an immersion blender until smooth, adding water to achieve the consistency you prefer.
Press through a fine sieve and set aside.
In a small frying pan add the cumin and toast until fragrant. Cool. Once cool add to the yogurt and mix well. Salt to taste. Transfer to a small plastic squeeze bottle.
Reheat soup and pour into rimmed soup bowls. Begin piping the yogurt from 12 o’clock to 6 o’clock, then 2 to 7 and finally from 9 to 3. Then using a sharp knife beginning in the centre of the bowl, draw a spiral circle culminating at the outer ring (this will make the pattern). Garnish with the chopped green onions and papadums.
In our neighbourhood, Bloor West Village we have an abundance (some might even say too many) of specific retailers and services in about 1 km (0.62 mile) length:
36 dentists
11 optometrists/eye glass dispensaries
42 hair/nail salons
6 green grocers
8 Pubs/Gastro Pubs/Sports Bars
5 Japanese/Thai restaurants!
So when Sushi 2Go opened a restaurant in the Village we were surprised! Sushi 2Go is a relatively small chain of Japanese Restaurants all over the GTA, in fact there is another one about a kilometre (0.62 miles) away. There are a few high-end Japanese restaurants in the GTA but most are quick, luncheon-type places and Sushi 2Go is no different. I’m not saying you can’t have a nice dinner there, it’s just pretty simple with typical ambiance. We had lunch there a few weeks before Christmas and even though we’ve been back again, I found it a little expensive for what it was.
The restaurant is contemporarily decorated with a few Japanese touches. The sushi kitchen is toward the back and there are about 10-15 tables, not huge by any stretch. Both times we’ve been there, there were only 2 other people dining in, although there were takeout orders being fulfilled and picked up.
I ordered the Tempura Udon Noodle in hot soup with tempura ($14.95). It was quite flavourful and the tempura was plentiful, I even took most of the tempura home for another meal.
JT ordered the Sushi & Tempura Bento Box ($17.95) which was comprised of 7 pieces of nigiri, 3 california roll & tempura. It was also very tasty but $18 for lunch doesn’t sit well with me. Next time we’re going to share the Tempura Udon Soup (JT will have the tempura and I’ll have the Udon!)
Overall rating of Sushi 2Go (in my opinion): Decor 3/5, service 3.5/5, food 4/5, Value 2/5, Noise: 5/5 (1 being very noisy, and 5 being very quiet).
Disclaimer: We purchased our meals for full price and my opinions just that, my opinions.
Sushi 2 Go Bloor West Village
Sushi2Go
2370 Bloor St. West
Tel 416-762-0505
Monday to Thursday 11:30 am – 10:00 pm
Friday and Saturday 11:30 am – 11:00 pm
Sunday 12:00 pm – 9:00 pm
Monday Closed
My parent’s home was always filled with the wonderful and delicious aromas of baked goods. My Mom always made bread and these were the days before bread machines! She would start the process shortly after dinner, making the bread for the following days. Mostly she would bake it when we kids had already gone to bed teasing our senses as we drifted off to sleep, but on occasion it would be in the oven while we were still up, the gorgeous aroma of home made-bread wafting throughout the house. Sometimes we could have a warm slice slathered with butter, but most often not. During the holidays my Mom made the most special bread, chocolate brioche! I can’t even begin to describe the incredible aroma that it made throughout the house. Now that bread was always cut into the night it was baked! I’ve not had this type of bread outside our home before but years ago at a Club Med in Mexico — I think the chef must have been French. It was such a delicious surprise when they served the chocolate brioche for breakfast most days.
I baked these brioche braids for New Year’s Day breakfast, it was to be a feast of delicacies, but plans changed and we had it toasted with butter. And now I have a loaf in the freezer taunting me. Against better judgement, it will likely be defrosted and eaten toasted or lightly warmed with sweet butter dripping from its crispy edges…slice after slice until there is no more. But the memory will remain.
Please excuse the winter evening photos, no matter what I do in Photoshop, they just cannot be helped.
Baked and now cooling.
it’s irresistible, like me ;-)!
Chocolate Brioche
Makes 3 relatively good sized braids. Original recipe was modified from Baking with Julia.
Ingredients for the dough:
1 1/2 tbsp dry yeast
1/2 cup tepid water (80°F to 90°F)
1/3 cup granulated sugar + a pinch, divided
1/2 cup unsalted butter, cut into smallish cubes
1 cup whole milk
2 1/2 tsp salt
4 large eggs, room temperature
6 – 6 1/2 cups all purpose, unbleached flour
2 tbsp skim milk powder
1/4 cup unsweetened cocoa powder
1/4 cup icing sugar
non-stick cooking spray or 2 tbsp melted butter
Ingredients for the glaze:
1 large egg
1 tbsp cold water or heavy cream
Directions:
Spray two large mixing bowls with non-stick cooking spray, or rub with butter and set aside.
Whisk the yeast into the water with a pinch of sugar in a measuring cup and allow to bubble up, about 5 minutes.
Heat the milk with 1/3 cup granulated sugar and the cubed butter until warm to touch and the butter has entirely melted. Stir in the salt until melted. Allow this mixture to cool to 110°F.
Pour the milk mixture into the large stand mixer bowl attached with a whisk and add the eggs one at a time, add the milk powder, mixing well to combine. You should have about 4 cups of liquid. Divide into two portions of about 2 cups each and set one portion aside.
Add 2 1/2 cups of flour to the portion at hand and beat on low with your cookie dough paddle for about 3 minutes or until it comes together. Now switch to the bread dough paddle and add as much flour as needed (I was able to add another cup), kneading on medium low speed to make a soft dough that is clean off the sides of the bowl. Now knead for 8-10 minutes until smooth and elastic. Transfer to one of the bowls that has been spray with non-stick cooking spray or rubbed with melted butter. Cover with plastic wrap and place in a warm dark place to double in size (1 or 1 1/2 hours).
Sift 2 cups of flour with the unsweetened cocoa and icing sugar. Retrieve the second portion of the liquid and add the sifted flour, cocoa and icing sugar and beat on low for about 3 minutes or until it comes together. Add as much flour as needed (I was able to add another cup), kneading on medium low speed to make a soft dough that is clean off the sides of the bowl. Now knead for 8-10 minutes until smooth and elastic. Transfer to the other bowl that has been spray with non-stick cooking spray or rubbed with melted butter. Cover with plastic wrap and place in a warm dark place to double in size (1 or 1 1/2 hours).
When dough has doubled in size (both the chocolate and the plain versions) punch down and deflate them. Cover again and allow to rise until doubled in size (about 45 minutes to 1 hour).
Line a large baking sheet with parchment. Divide the plain, white dough in 4 equal portions (I find a scale very helpful) and roll into approximately 16″ lengths. Divide the chocolate dough into 5 equal portions. For 2 of the 3 loaves, take two chocolate portions and one plain portion, for one of the braids take 2 plain portions and one chocolate portion. Braid from the centre to each end, fixing each end well beneath the braid to make a nice neat end. Place on lined baking sheet and allow to rest for 40 minutes.
Preheat the oven to 375° F. Combine the egg and cold water or heavy cream and mix well. Brush each braid with the glaze and bake for 20 minutes. Remove from the oven and brush the expansion joints of the braid and return to bake for an additional 15 to 20 minutes. If they brown too quickly, cover browning parts with a little piece of foil.
Cool before slicing. This can be frozen in an air tight plastic bag for about 1 month. Stale slices of this bread makes excellent French toast or Bread Pudding!
I was fortunate enough to be introduced to a recipe developer by a colleague from my previous position and as it turned out they needed a Recipe Tester right away! How serendipitous is that? And cool. The experience is amazing! I know I’ve talked about what it is to be a recipe tester briefly so here is a more detailed synopsis. And no, I won’t be posting any of those recipes here.
You read the recipe thoroughly with a highlighter in hand and highlight any discrepancies or things you need clarified. You ask the Recipe Developer questions re your highlights. The recipe is hashed out. Now switch to a different coloured pen. Start your stop watch, you need to time how long it takes you to prep (mise en place) and cook the ingredients. Follow the recipe to a “T” making notes along the way, there is no “a little this and a little that” when you’re testing! Once you have finished cooking the recipe, stop the stop watch and make a note of the time it took. Baking time is noted separately than the prep and cooking time; there is always a bake time on the recipe but you need to confirm that it’s accurate, one of the recipes I recently tested had to have its bake time doubled!
When the recipe has finished cooking or baking, you review it for appearance, texture and taste (yes, you have to taste the recipe!). Sometimes you are required to take a volume measurement of a product after its cooked for reference. Usually there is more than one recipe tester and the results are accumulated and assessed by the recipe developer. The finished recipes are usually for your consumption but sometimes they are just not your taste so your neighbours get lucky! My recent testing was baking sweets and I divided the bounty up between two friends who were very happy to receive the food!
Just before Christmas my Recipe Developer asked me to participate in a client tasting; I had to shop for the product, prep about 1/2 day on a few recipes and then finish cooking the recipes on the day of the tasting. We had 10 recipes in total. We cooked each recipe to its full volume and then spooned out small portions for tasting, I kept the tasting portions warm while the previous portion was discussed and evaluated. Each recipe was discussed for about 10-20 minutes and the discussion resulted in approved recipes with minor changes or complete revisions. The full portions are prepared to show the size the recipe yields for a family dinner. It’s actually quite an interesting process. Photos of the tested recipes are only used as reference. When the recipes are finally approved, the client will hire a photographer, a prop stylist, a food stylist and hopefully a food stylist assistant ;-)! The food stylist will prepare the final approved recipe and make it pretty for the photo.
I suspect that when you develop a recipe for your blog you work in much the same way that a recipe tester would work. It really needs to be buttoned down otherwise there may be disappointment if someone tries to make the recipe and it doesn’t work out. I really appreciate the detailed photos some bloggers do to show each and every step but I decided at the beginning of my blog that my photos would be only of the final product.
When I started blogging I came to realize how undisciplined I have been cooking, a little of this, a little of that; blogging makes you button down really well, measure, measure, measure and write it down — it has been a great starting point for my recipe testing. I am going to be doing more recipe testing in the new year!
But now, back to what we really eat! I’ve been making a lot of soups lately and this soup came together beautifully; the nutty roasted garlic and the earthy and sweet mushrooms were a great combination. I don’t think I would change a thing but I won’t mind if you do!
The cognac butter really made the soup
Roasted Garlic Mushroom Soup with Cognac
Ingredients:
Makes 4 servings, about 250 mL each
35 g or 1 1/2 cups of dried mushrooms (I used Chinese Mushrooms with the crackle-like tops and Chinese Black Fungus)
2 cups water
About 1/4 cup of puréed roasted garlic (1 head)
3-4 tbsp EVOO
Pinch of sea salt
1 tbsp unsalted butter
85 g or 1/2 cup finely chopped shallots
200 g (2 cups) Fresh Cremini and Shitaki Mushrooms, finely chopped
2 cups water
2 fresh thyme branches
1 tsp lemon zest
Salt and Pepper to taste
1 tbsp unsalted butter
2 tsp cognac
2-4 fresh finely sliced Cremini and Shitaki mushrooms for garnish.
Directions:
Rehydrate the dried mushrooms in 2 cups of boiling water (about 2-4 hours). Drain through a fine sieve and reserve the drained liquid. Chop mushrooms finely.
Roast 1 head of garlic in a small ramekin with about 4 tbsp EVOO and sea salt, about 45 minutes at 350°F. Cool and remove the softened cloves and the olive oil and set aside.
Sauté the shallots in the butter until soft. Add the all of fresh mushrooms and rehydrated mushrooms to the shallots and cook until soft.
Add the reserved rehydrating liquid and 2 additional cups of water. Add the thyme and lemon zest and bring to a boil.
Using your immersion blender, blend until very smooth, add the roasted garlic cloves and roasting EVOO. You may wish to press it through a fine sieve so that it is silky smooth. Set aside until you are ready to serve.
When ready to serve, reheat the velvety smooth soup.
Melt 1 tbsp butter in a frying pan, add the remaining sliced Cremini and Shitaki and sauté until soft. Remove from heat and add the 2 tsp cognac and stir well.
Serve the hot soup in a warmed rimmed soup bowl, garnished with the softened mushrooms and drizzled with the cognac butter.
I’ve noticed lately that most of our grocery stores are now carrying a variety of extraordinary breads, from focaccia made from an authentic Italian recipe that uses an enormous volume of olive oil to various egg, grain and nut breads; recently I’ve also noticed something I hadn’t seen before, a very beautiful Pretzel Bread! Now pretzel bread has a chewy texture and a salty finish on its chewy crust. It’s a lovely dense bread (if you love egg bread than you will love pretzel bread) that works well as hamburger buns and sandwiches! We’re going to use it for a cheese fondu! I’ve also seen this type of boule used as a soup bowl…perhaps another time!
I scanned the internet for a recipe and came across one from Fleischmann’s yeast that I rather liked, so I made it the first time verbatim and then the second time I made a few adjustments because I wasn’t entirely happy with the first result. There just wasn’t enough liquid to soak up the flour they claimed to need no matter how much I kneaded! My first dough was a little stiff. With some minor adjustments I present to you the slightly modified recipe but please pop on over to the original recipe here.
This is the first batch I made, the bread was not soft enough to open too much. The finished texture was OK though.
Originally, pretzel bread is boiled in a water and Food Grade Lye solution, but that just seemed a little too dangerous for my taste so I opted to use baking soda instead. Many recipes range for a few tablespoons to 3/4 cup of baking soda which is the most I’ve seen on-line. I’ve even seen some recipes bake the baking soda, but that seemed like too much work! The baking soda or lye creates Maillard reaction which causes the proteins and the sugars react in a certain way that allows the bread to brown at high temperatures much more easily than by just baking; boiling it first gives this bread its signature chewy crust. This bread turned a most beautiful reddish brown colour that normal baking would not have resulted! I was very pleased indeed! The dough comes together very easily and doesn’t take an exorbitant amount of time. Proofing is just 1 hour! Baking is even less! The results are worth the effort. I must warn you though, it’s a good workout if you don’t have a stand mixer, the recipe says to knead for 8-10 minutes and they are not kidding!
Second attempt: The boules are not huge, so plan on having two on hand for a dinner party.
Prep Time: 20 minutes
Proofing Time: 60 minutes
Boiling Time: per loaf, 2 minutes
Baking Time: 25 to 27 minutes
Makes: 2 (18 cm or 7-inch) loaves or 8 rolls (I will make the rolls for soup bowls another time). For slider buns, form 50 g balls of dough to make 19 buns.
Ingredients for Dough:
1 1/2 to 1 3/4 cups milk (I increased the milk because the original dough was too tough and not soft as indicated in the instructions, but it will change depending on how humid the day is)
2 tablespoons unsalted butter
2 tablespoons brown sugar
1 tbsp bread machine yeast (I prefer to use this because it dissolves faster)
2 teaspoons salt
3 to 3 1/2 cups all-purpose flour (I found 3 cups in the winter months was enough to produce a soft, sticky dough)
Ingredients for the Boiling Solution:
2.8 L or 3 quarts water
3/4 cup baking soda
Ingredients for the Egg Wash:
1 egg
1 teaspoon water
Directions:
Warm the milk and butter to 37.7°C – 43°C (100°F-110°F); the butter will not completely melt.
In the large mixing bowl of your stand mixer, combine the warm milk with room temperature yeast and brown sugar. Stir in the salt and 2 cups flour and beat for 3 minutes (I used my cookie dough blade on my stand mixer, the first time I tried the whisk attachment and it was too sticky).
Gradually add enough of the remaining flour to make a soft dough (I added 1 additional cup, 3 cups in total).
Knead for 8-10 minutes in your stand mixer using the dough hook until smooth and elastic.
Place the dough in a greased bowl, cover and let rise for 1 hour or until doubled in size.
Preheat oven to 204°C (400°F)
Combine boiling solution and bring to a boil.
Punch the dough down and divide into 2 equal portions.
Form each portion into a tight, smooth ball (this will be the shape of your final bread, so if you want more of an oval roll, shape accordingly).
Boil each portion in the solution for a total of 2 minutes; start with the top side down and then flipping it over after 1 minute, top side up.
Remove the dough portions from the pot using a slotted spoon and place on a greased baking sheet (I lined my sheet with parchment). Allow to dry off for a bit (a minute or so).
Brush with the egg wash and cut a cross in the top, make sure you insert blade about 2 mm (1/8″) into the dough.
Bake for 15 minutes at 204°C (400°F), then reduce the temperature to 177°C (350°F) and bake an additional 8-10 minutes until the loaves are evenly browned, you want a nice dark reddish-brown colour and the bread sounds hollow when tapped.
Remove from pan and cool on a wire rack.
May I cut you a slice or two? A delightful chewy texture.
I posted this in January’s Growing Edge group post. Please check it out here.
Happy Monday everyone! I don’t know about you, but despite all of the weather related issues we had at the beginning of the holidays, they turned out to be lovely. And with temperatures plummeting to the high minus teens, it’s rather wonderful to have power back! I believe that now power has been restored to everyone in Toronto, thank goodness!
2013 was a year of change in a good way. I celebrated a benchmark birthday (I still can’t believe I’m THAT old!). My almost ten years of working with my dear friend came to an end and I decided to embark on a new career path in food! Little did I know that way back in 2007 when I began blogging it would eventually redirect my career path! I’m really pumped about 2014 and all of the opportunities it will bring! Happy New Year indeed!
As you WordPress users are already aware, WP sends us a synopsis of the stats at the end of every year. Even though i see my stats day to day, this synopsis still surprises me! My humble little blog was viewed 51,000 times in 2013, can you believe it! And for whatever reason December 24th garnered a healthy 728 views (I still can’t figure out why!). Here’s a quick review.
I would like to take this opportunity to thank you for your support and kind words, without you this blog would be a meaningless collection of recipes floating about in cyberspace. Thank you for you support and encouragement, I can’t express how much it means to me.
May 2014 bring you all joy, health and all the best wishes!
On Monday you may have noticed two posts went live at the same time; it wasn’t supposed to happen, but it did! Doesn’t matter how many times I checked it! Sigh.
Happy New Year dear readers. I hope you enjoyed bringing in 2014 with gusto and good eats! We entertained long time friends over a quiet trivia-filled evening. We served Tapas style food in the living room in front of our ever-so-quickly drying out Christmas tree and wood fire in the fireplace. This was the menu:
• Roasted Red Pepper & Feta Roll-ups
• Lobster Tails with Drawn Garlic Butter
• Smoked Salmon Mousse in Cucumber Cups
• California “Sushi” Slice (recipe below)
• Cheese Plate, Cranberry Sauce, Chestnut, Mushrooms & Cognac Pâté
• Fruit plate of grapes, strawberries and chocolate.
In early December we hosted a pot luck dinner party with our Trivial Pursuit Cottage friends. The three couples brought various components for a delicious meal and we thoroughly enjoyed everything; there was a delightful butternut squash soup, our contribution of the Guinness Stew with butter biscuits and last but not least, an enormous and decadent baked raspberry cheesecake! It was totally delicious and gluttonous. The hors d’œuvres was a beautifully presented smoke salmon sushi square with wasabi mayo and capers which really made me want to recreate it for New Years Eve. Because I’m already using smoked salmon for another tapa, I decided to reinvent it. It’s easy to assemble and the presentation has a lot of bang for the buck, and it tastes lovely too!
The small amount of wasabi really packs a punch in the mayo.
thinly sliced English cucumbers (use a mandolin to get thin even slices, mine worked out to 5 slices and I had cucumber left over)
1 tsp wasabi (or to taste)
1/4 cup Mayo
2 tbsp toasted white and black sesame seeds
Directions:
Line an 8″ x 8″ (20cm x 20cm) square baking pan with plastic wrap so that two opposing sides come up over the sides of the pan a bit (to be used as handles to lift out of the pan).
Cook the sushi rice according to directions. Add 1 tbsp seasoned rice wine vinegar and mix well. Allow to cool and then press an even layer of cooked sushi rice into the bottom.
Sprinkle evenly with the sesame seeds.
In a small bowl, add the ripe avocado and I tsp lemon juice (to prevent browning) and mash with a fork. To the mashed avocado add roughly torn surimi and mix well (you don’t want huge chunks, but smallish bite-sized bits) and spread this onto the seaweed layer evenly.
Cut the seaweed into strips about 2.5 cm (1 inch) wide then pile the strips into a neat pile and cut into smallish strips (I did this because it can be difficult to bite cleanly into it) and spread an even layer over the rice.
Top with the thinly sliced cucumber and refrigerate covered with plastic wrap until firm.
Meanwhile mix the wasabi and mayo well, set aside (add to a small plastic squeeze bottle). Arrange the sliced cucs on a couple of folded sheets of paper towel to dry them a bit (~5 minutes).
Once the squares are firm, remove from fridge, lift out of the pan using the plastic wrap and slice into even slices or squares. Remove plastic wrap and plate. Dot with wasabi mayo and serve immediately. Refrigerate leftovers, may be kept one day before rice hardens too much or made one day in advance.
The little bits of seaweed make it easier to eat than if it was a sheet.
Happy New Year! Are you doing anything special? JT and I usually go out to our favourite French restaurant but this year we’re having good friends come over — we’ll be snacking tapas-style all evening. I’m really looking forward to our intimate New Year this year.
Although I didn’t make this soup for New Years Eve, I did make it several weeks ago when I needed to use up some kale and wanted a hearty and satisfying lunch. I adore soup, in fact I often say that I love it so much, Soup could be my middle name. JT is not as fond of soup as I am but he still eats without griping too much. My dear friend Kelly (Inspired Edibles) made a gorgeous and colourful version here and although I am posting it a few weeks after her recipe went live, I actually made it last month. The Original recipe is from Gourmet, 2003, and contained chestnuts but I wanted to keep my version is little lighter in calories so I omitted the chestnuts, but I would encourage you to add them, they would definitely take this warming soup to the next level.
The kale retains its texture and the beans are creamy in contrast
Kale and Navy Bean Soup
Serves 4
Ingredients:
1/2 pound dried white beans such as cannellini, Great Northern, or navy (about 1 1/4 cups), picked over and rinsed
1 piece Parmigiano-Reggiano rind (roughly 3 by 2 by 1/2 inch)
1 1/2 teaspoons salt
1/4 teaspoon black pepper
1/2 pound cavolo nero or regular green kale, stems and centre ribs discarded and leaves cut into bite-sized pieces
2 teaspoons chopped fresh thyme
Optional Garnish: Parmigiano-Reggiano shavings
Directions:
Soak beans overnight by covering them in about two inches of water. Or you can cook the beans relatively quickly in a pressure cooker or make this soup in a slow cooker. Drain well.
Sauté onion and garlic in a pinch of oil large heavy pot over moderate heat. Add the kale and sauté for 5 additional minutes. Add the beans, broth, water, cheese rind, salt and pepper and simmer uncovered, until beans are tender, 45 minutes to 1 hour (or in a slow cooker on high for 4 hours). Discard or eat the cheese rind.
A deliciously warming soup
Tip:
I usually keep all my parmesan rinds in a zip lock bag in the freezer and use them in various stews and soups because they add so much flavour. I always eat them and never discard them as the instructions indicate, they are really very tasty and I know my friend Sissi (With a Glass) would adore the texture.
We’re knee-deep in that frenzied holiday season when there are parties, unscheduled drop-ins and quick festive glasses of vino. I never like to drink on an empty stomach so I like to stock the freezer with hors d’œuvres that can be made up in bulk and pulled out in a pinch. One of my favourites is the Devil on Horseback or bacon wrapped dates that I first came across from a Tapa’s cookbook from a friend about 8 years ago and finally blogged about it here. I needed to stock up so when I recently saw naturally smoked bacon (low sodium) on sale at my grocer, I asked JT to pick me up a couple of packs so I had them in the fridge ready to be made into the little devils. Fast forward to my second food styling assisting job, I assisted for a breakfast sandwich and there was a lot of bacon. Probably close to a hundred pounds? OK, I may be exaggerating but there was a lot of bacon left over and I was kindly given some of it! So now I needed to figure out what to do with so much bacon and then it hit me, I knew exactly what that was!
I first came across Bacon Jam at Lorraine’s lovely blog Not Quite Nigella in 2009 and it’s been sitting in my data bank since. I usually don’t have an excess of bacon lying around so the bacon I was given from the job was very welcomed indeed. JT was ecstatic, like most men, he adores bacon. So I made bacon jam. I didn’t have everything Lorraine’s recipe required plus I needed something that I could leave all day to cook on its own, so I found good old Martha Stewart’s Slow Cooker Bacon Jam.
Cooking down the bacon; the aromas enticed dogs and neighbourhood men to walk in zombie-like fashion towards the house!
There was an overwhelming aroma of bacon for days.
Thick, sweet and salty all at once. Who knew bacon could taste THAT good?
There are a few precautions one must take with bacon jam. Contrary to what you would think, it is highly susceptible to salmonella which is a very dangerous bacteria. You may have heard that this past summer our Canadian National Exhibition’s Cronut Burger (poor refrigeration) lead to the contamination by Staphylococcus aureus toxin poisoning of their bacon jam! Go figure. You would think that with ALL the preservatives in bacon it wouldn’t be an issue, but it was. In further reading it seems that garlic increases this issue even more. So, my words of caution is that you MUST refrigerate your bacon jam and not even keep it in a processed jar outside of refrigeration. I even went a step further and froze any extra I wasn’t able to eat in a short time frame.
Bacon Jam
Makes 4 small jars
Ingredients:
1 1/2 pounds sliced bacon, cut crosswise into 1-inch pieces
2 medium yellow onions, diced small
3 garlic cloves, smashed and peeled
1/2 cup cider vinegar
1/2 cup packed dark-brown sugar
1/4 cup pure maple syrup
3/4 cup brewed coffee
Directions:
Cook bacon over medium-high, stirring occasionally, until fat is rendered and bacon is lightly browned, about 20 minutes.
Transfer the bacon to paper towels to drain. Reserve 1 tablespoon of fat from the bacon skillet, discard the remainder.
Add onions and garlic, and cook until onions are translucent, about 6 minutes. Add vinegar, brown sugar, maple syrup, and coffee and bring to a boil, stirring and scraping up browned bits from skillet with a wooden spoon, about 2 minutes. Add bacon and stir to combine.
Transfer mixture to a 6-quart slow cooker and cook on high, uncovered, until liquid is syrupy, 3 1/2 to 4 hours. Transfer to a food processor; pulse until coarsely chopped. Allow to cool slightly then refrigerate in airtight containers, up to 4 weeks (see caveat above).
I may have gotten carried away with the photos. But is it Bacon dog gamn it!
Last one, promise.
The jam is slightly sweet, tangy and a perfect accompaniment to cheese or pâté. Add it to your charcuterie platter for New Year’s Eve celebrations. I might have even added it to scrambled eggs once or even a sandwich. Be creative. Where would you add such a decadent jam?
Hello everyone! I do hope you are enjoying the holidays. As you may have heard on the news Toronto was savagely hit with an ice storm last weekend and over half a million homes were left without power, some still don’t have power. I am very pleased to report that our power was only out for about 28 hours so it wasn’t that bad. We did have to rejig our Christmas plans as we were to host festivities on Christmas Day and not knowing how quickly the power would be restored we made arrangements to have it at JT’s sister’s place in Peterborough (the power company had indicated it may be 5 days!). My nephew Brian kindly offered us his apartment for warmth which was great because I had to prepare a few things to take for Christmas Eve’s dinner and Christmas Day dinner. It made me realize how fragile we are and how dependant we are on power, particularly in the winter. Fortunately, we didn’t lose food, we put refrigerator things to keep cool outside and the freezer was cold enough and full enough to maintain the frosty temperature (thanks to Norma Garden to Wok, who kindly suggested to put buckets of ice into it if it wasn’t chuck full).
The house temperature fell to around 10°C (50°F) so we turned the water off and put antifreeze in the traps and toilets. We didn’t have to do anything with our hot water rads, apparently they are good until the temperature falls below freezing for a couple of days. Of course, that’s just a wild guess and I am so glad we didn’t have to find out the hard way. Many of our dear friends reached out to us and offered a warm place to stay, which was incredibly generous, THANK YOU! We are indeed very lucky to be surrounded by such a wonderful group. Merry Christmas indeed.
As the holiday season continues and we are partying with gusto, I wanted to pass along a recipe I developed after Barb and I were introduced to a very novel hors d’œuvres at the KPMG Clara Hughes event in November. This hors d’œuvres was so unique and delicious I had wanted to try to recreate it for cocktails with Barb and her family on Christmas Eve, a tradition we’ve been enjoying for many years, but unfortunately we were one household of a 250,000 left without power for a few day after the ice storm last weekend so I put it off. It’s not complicated but it does require technique so you may wish to practice a bit before you serve it up at your party. You will need a slab of ice, easily made using a cookie sheet or roasting pan, or more authentically a good amount of freshly fallen, CLEAN snow. In the city, our snow is not very clean, so I opted for the slab of ice.
The sweet candied Maple Syrup provides a wonderful contrast to sharp cheese such as blue, extra old cheddar or even Parmesan (any double or triple cream cheeses will be too soft to do this with)..
Maple Cheese Popsicles
Serves 4-6
Ingredients:
1 slab of ice (or shaved ice*), made using a cookie sheet or rectangular roasting pan (you will need to make this 2 days or more in advance). Add sprigs of Christmas tree trimmings and bright red cranberries for a festive feel. I lined a 10″ x 13″ x 2″ roasting pan with plastic wrap to help me lift the ice out of the pan.
An accurate candy thermometer.
1/2 cup pure maple syrup (any colour will do, but we used Amber).
A variety of cheeses (such as blue, extra old cheddar or even Parmesan) cut into 1 cm x 2 (1/2 inch x 1 inch) rectangles.
tooth picks.
Directions:
Prepare everything in advance:
Bring the cheese to room temperature, place one tooth pick into each and set the little soldiers aside.
Prepare a lovely serving dish by lightly spraying it with non-stick spray. You will set the maple cheese popsicles onto this dish and if it’s not sprayed, the maple candy will stick to it (at least that was my experience).
To keep the maple syrup from setting up as you prepare these delightful bites, fill a cake pan deep enough to hold boiling water about half way to three-quarter the way up the small sauce pan sides. Place it directly at your work station.
Place a dish cloth at your work station and put the slab of ice on it (decorate the edges with Christmas tree clippings or add cranberries and greenery to the ice when you make it so that it’s very festive. You may remove the pan or leave the ice it in, it’s up to you).
Now you are ready to begin cooking the maple syrup:
When all of your guests have arrived, put the maple syrup into a heavy bottomed very small sauce pan (mine was ~1 cup (250mL) volume) and insert the candy thermometer, cook on medium to medium-high heat until it reaches 240° F (116° C) which is about 8-10 minutes depending on how cold your maple syrup was to begin with. Watch the syrup carefully as once it hits 250° F (121° C) it will begin to crystallize and it will be ruined for this application, but you can use it in coffee or tea, so don’t discard.
When the maple syrup has reached 240° F (116° C), remove it immediately from the heat and place the sauce pan into the bath with the boiling water.
Using a dry spoon which holds about 1 tsp, drizzle the maple syrup in a lace-like rectangular pattern on the ice slab long enough to roll the cheese in once. Almost immediately after you finish drizzling, using one of the prepared cheese bites on a tooth pick, begin at one end and roll up the maple candy around the cheese. Either hand it to a guest or place it on the prepared serving platter.
Repeat until you have used up all of the cheese. If your kitchen is chilly, you may wish to replace the boiling water bath about half way through so that the syrup doesn’t set up.
These photos were from the second trial, the first trial didn’t work out!
Although these aren’t as lacy as I would have liked, they did turn out better than I expected.
It takes a bit of practice to get the technique right.
The maple candy starts to melt, that’s why it’s good to spray your serving dish with non-stick spray. I made these about 30 minutes ahead and stored them in the fridge and they still melted a bit.
Notes:
If you forgot to make your slab of ice, you can take about 10 ice cubes and in a good strong blender or food processor, pulse until you achieve a reasonable amount of shaved ice without big bits. The shaved ice will melt faster therefore it is a good idea to have more ice on hand to refill the shaved ice container. You will need to continue to work so have your kitchen helper shave more ice, or prepare it in advance and store it in the freezer on another cookie sheet or flat platter.
I prefer blue cheese as the pairing with the sweet maple syrup, but some people don’t like blue, so have some cheddar on hand.
Fry up some thick cut bacon that is cut into 1 cm x 2 (1/2 inch x 1 inch) rectangles and wrap the maple around it as an alternative option.
Merry Christmas everyone, I do hope you are all enjoying the season of giving! Christmas wouldn’t be Christmas without my traditional baking and I like to change it up every so often and so I’ve added a couple of new items to my existing Christmas Repertoire and one is Sponge Toffee. I began my Christmas baking at the end of November anticipating that I will be busy with the food styling assisting and I am SO GLAD I did because I have BEEN BUSY! I’m ready to take bookings for the new year, so if you need a passionate, determined assistant or recipe tester, please give me a shout.
2013 Christmas Baking Round Up
I made 9 different goodies this year.
I know the Anzac Biscuit is made only during certain times in Australia, but this delicious oat cookie has become a fast favourite in our home so I like to make the treat for the holidays. And it wouldn’t feel like Christmas without Date Filled Oatmeal Cookies. I also like to include a few Gluten Free options, Mexican Macaroons (which I made using almond flour instead of white flour). Milk and Dark Chocolate Chunk with Cranberries are a favourite recipe from my friend Barb (Profiteroles and Ponytails) and this year I added dried cranberries to the batch to make them a little more festive. And last but not least, the delightful Chocolate Crinkle Kisses that really embrace the festive season with the lovely candy cane kiss! I even snuck in some wonderfully easy truffles because I was given 4 kgs of chocolate chunks from a photoshoot, so I really needed recipes that used a lot of chocolate. The truffles are with Chocolate, Chocolate Orange and Chocolate Coconut truffle flavours. I just realized I have not posted this recipe before so I will remedy it over the holidays, they are really easy to whip up. I hope you enjoyed the round up, stay tuned for a few more festive recipes over the holidays.
Make sure your baking soda is fresh otherwise it won’t puff up properly!
Sponge toffee is a favourite of mine since my childhood. I remember my Mom buying us a brick and eating it slowly over the course of a day or two. It’s quite decadent and I am so happy to have made it because it brings back so many wonderful childhood memories. This is a simple recipe and you could easily fancy it up by dipping one end into cooled melted chocolate just like that famous chocolate bar! I’ve kept this recipe simple without any extra flavourings, but you can go ahead and add a little vanilla or other extracts to jazz it up.
It’s very easy but you need two essential things: 1. an accurate candy thermometer and 2. FRESH baking soda (bicarbonate of soda). Prepping all the ingredients and equipment is also necessary because once the candy starts to cook, you will need to focus your attention to it.
Sponge Toffee
Makes about 10″ x 12″ x 1.5-2″ thick block. I googled a number of recipes and videos to help make this toffee.
Ingredients:
1 c granulated sugar
1 c golden corn syrup
1 tbsp baking soda
Directions:
Prepare a baking sheet by spraying it with non-stick cooking spray and lining it with parchment paper. Set aside.
Mix together the sugar and corn syrup in a large heavy bottomed pan with an accurate candy thermometer attached. Put the pan onto medium heat and stir until the sugar dissolves (about 4 minutes).
Cook this syrup until it reaches 300° F (about 10-15 minutes). Your syrup will turn golden.
When it reaches 300° F, remove it from the heat and sprinkle on the baking soda (I found it to distribute more evenly by using a fine sieve), mix gently with a wooden spoon being careful not to over mix because it WILL deflate. This mixture will bubble up a great deal and that’s why you need a large pot.
Gently turn out the bubbling candy onto the prepared cookie sheet and allow it to spread itself; DO NOT push it around, just leave it. The beauty will be the variety of thicknesses. Allow it to cool and harden.
When it’s cool, remove the hard sheet to a cutting board and using the tip of a knife, allow the toffee to break apart in inconsistent shards. Alternate finishes: Dip one end into melted chocolate (slightly cooled).
Store in an airtight container and enjoy responsibly.
I picked up some tamarind paste when we visited Chgo John (from the Bartolini Kitchens) last summer and he took us to his favourite Asian shops. I’m sure this paste can be purchased in any number of Asian stores in Toronto, but the romance of bringing back an exotic ingredient was just too strong to ignore. Everytime I use this paste (and any number of other amazing ingredients I procured during that visit) I think fondly of our visit with John that day.
If you haven’t tried tamarind, I strongly urge you to do so, it is quite a flavour experience unlike anything else you’ve ever tried.
The tamarind paste was used as a sauce for the onion bhajis I made for the recent Indian feast for our neighbours.
Tangy, sour and sweet all at once.
Tamarind Chutney for Onion Bhajis
Makes about 1/3 cup
1 teaspoon concentrated tamarind paste
2-4 tsp sugar
1/2 tsp red chili powder
3 dried apricots (original recipe called for papaya powder which I did not have)
1 cup water
Directions:
In a small heavy bottom sauce pan, add the tamarind paste, apricot and sugar. Add about 1 cup of hot water to it and heat to a boil until the tamarind paste dissolves and the apricot is mushy. Blend well with an immersion blender. Strain out any hard bits from the tamarind paste.
Add chili powder and mix well. Boil until all of the water evaporates and you are left with a thick rich sauce.
Allow me to digress dear readers; it was the late 1980’s and we were all newlyweds, excited to begin our lives in our new homes. Part of this excitement was the possibility of entertaining, and yes I do mean all grown up, playing house! I moved directly from my parents home into our marriage home so the thought of entertaining in our new house was exhilerating! We routinely rotated dinner parties so each of the new home-makers could enjoy the entertaining aspect of our new lives.
This dip has the perfect combination of flavours
Fast forward to a couple of weeks ago, I assisted for a Christmas magazine shoot (for 2014) and there was a seafood dip recipe that I had to make. It contained copious amounts of expensive seafood (to be honest, I don’t know anyone who would be willing to spend that kind of money on a dip! $20 lobster, $45 canned lump crab and $10 shrimp, granted you only needed 3oz of each to make that dip) but it reminded me of a delicious warm crab that one of our friends made in the late 80’s! I remember asking her for a copy of the recipe which she clipped out of the Toronto Star (our local newspaper).
We were absolutely smitten the first time we tried the original warm crab dip. The dip has crab meat, cream cheese, onion, dill and horseradish, the combination is fantastic! So when I brought home some leftover crab meat I knew I wanted to make it for the 2013 entertaining season. Imagine my HORROR when I looked for the photocopied recipe and all I could find is this corner:
This is the only part of the recipe I could find!
In total panic, I posted a plea on Facebook to all my friends to see if someone else had this wonderful recipe, but sadly I was out of luck. Thank you, by the way for your wonderful suggestions — you definitely had my mouth watering but I was on a mission for my particular recipe. So I put on my recipe developer hat and got to work trying to replicate this recipe from two decades ago and by George, I think I got it! I’ve used the decadent Jumbo Lump Crab meat because it’s what I had, but plain ordinary canned crabmeat works equally well, you just don’t get the giant lumps but the flavour is the same. I’m posting the recipe in the measurements I developed but you can half it easily. I like to freeze these types of baked dips in plastic lined smallish ramekins so that if I have unexpected company I can easily unwrap the plastic and pop it frozen into the specific ramekin and bake. If you bake the dip frozen, make sure to allow extra time to defrost while baking.
Warm Crab Dip
The almonds give it extra texture
Makes about 1 1/2 cups dip
Ingredients:
3/4 c Extra Smooth Ricotta Cheese
1/2 cup Cream Cheese, room temperature
1 tsp dill (dried is fine)
2 tsp horseradish (the original recipe called for horseradish cream, but I never had horseradish cream on hand)
2 tbsp red onion or shallot, finely chopped
2 tbsp milk
1/2 tsp salt
150 g crab meat (canned is perfectly fine here). It’s about 1/2 cup, or one can give or take.
1/4 c sliced almonds
Directions:
Combine the ricotta, cream cheese, dill, horseradish, red onion and milk and mix well.
Fold in the crab meat; if using lump make sure you leave some chunks but it’s not entirely necessary, I just prefer the way it looks.
Season with salt.
If you are making this for the future, line three half-cup ramekins with plastic wrap (like this).
Divide the mixed dip into the three ramekins pressing into the ramekin so it will retain the shape. Try not to have too many folds so that the plastic comes off easily. Carefully twist the plastic wrap to seal. Place the ramekins in the freezer. Once the dip has frozen to the ramekin shape, remove the frozen dip and label it and return the shaped dip to the freezer until needed. Put your ramekins away.
About 30-40 minutes before serving, pre-heat the oven to 375° F. Remove plastic wrap from the frozen dip and pop the shaped dip into the original ramekin you used to freeze it. Place on a cookie sheet (it may boil over depending on how full your ramekin was) and bake for 30-40 minutes or until dip is bubbling in the centre.
Remove the baked dip and sprinkle with almonds. Return to the oven and broil for a couple of minutes until the almonds are toasted. Serve with crostini, crackers or even sliced cucumbers.
This is an exciting week for me! I’m doing some recipe testing. Yes, that sounds exactly like it is — we test recipes developed by trained chefs (or home economists) to make sure the instructions work, the tastes work and it’s basically fool proof. It’s another skill I want on my resumé and through some lovely and generous connections in the biz, I was hired for this job! How cool is that? I cook, I love to cook, and now I get paid to cook!!! I’m really over the top on this one. Thank you lucky stars!
The holiday season is upon us and like you, I am on the lookout for some very tasty and elegant hors d’œuvres to serve at get-togethers. I posted photos of this deliciously easy hors d’œuvres in 2009 but I thought it was lovely enough to post again. The first time I saw this was on Food Network Canada but I can’t recall the chef or the name of the show (a search turned up neither). The recipe, which really isn’t a recipe, is so easy and so incredibly tasty you and your guests will wonder how you lived without this incredible treat. I know figs can be expensive this time of year in North America, but it’s well worth it; it’s an incredible combo of salty, sweet, tangy, savoury, chewy and creamy all in one.
A delightful combination of salty, sweet, earthy and tangy.
Fresh Figs with Goats Cheese, Proscuitto and Arugula
Ingredients:
1 large fig will make 4-6 pieces, so count on 1 fig per person. Serves 4
1 large fig, per person
1 tbsp goats cheese, at room temperature
4-6 stems of beautiful specimens of baby arugula
1 slice of prosciutto, sliced into 4 (1 1/2 slices of prosciutto, sliced into 6)
Directions:
Gently clean the figs and slice into 4 or 6 portions (this will depend entirely on the girth of your figs, remember you want them one-bite sized).
Gently spread a thinnish layer of goats cheese over each slice of the prosciutto (that has been sliced into portions already(
Add one beautiful, fresh stem of baby arugula to one end of the goat cheese covered slice of prosciutto, then add a fig wedge and begin to roll up.
Present on a platter or store in an air tight container until ready to serve. I would let them get to room temperature for serving as the goats cheese and figs will be MUCH tastier.
Watch them vanish like magic.
It’s worth the ridiculous prices of figs off season
Hello everyone! I am so sorry I was not able to post last week but I was booked the entire week for food styling assisting! I can’t believe it has taken off so well; of course, I take nothing for granted and keep pounding the pavement for my next job. Many of you have been interested in what this new position for me entails, well let me tell you. I met with the food stylist on Monday morning and we went over the recipes and shopping list. Of course, being the type of person I am, I had asked him to send me the list the week before because I wanted to prepare myself and practice if need be. Well, there was a need, BIG TIME! Of all the things to be prepping that week was CANDY! Now I’ve had some experience with candy making, but few and far between. I know some of the basic rules but I haven’t made a lot of candy. But the prepping wasn’t all of it, there was shopping to be done.
I had touched on shopping in a previous post so I’ll keep it brief this time; it’s gruelling. It’s about buying the most beautiful fruit/vegetable when it isn’t even in season! Next time you’re at the market, take a look at off season fruits/vegetables, the pickings are slim and what’s there isn’t even pretty. So it’s dragging your butt all over the city to buy the perfect beet is exhausting. But I do love grocery stores, so it’s not as bad as it sounds.
The shoot last week was on location, which for this particular situation meant it was at a home. Sounds like fun? Think again. The downtown home is chosen for the shot, and nothing else, particularly not the kitchen. Small, unknown (appliances); it’s a challenge. And then there was the parking issue — there was NO parking, hence the $30 ticket kindly left on my windshield by some thoughtful parking police person (thank you by the way)! But it went well and we’ll all see the results next year.
I also wanted to thank you for your kind wishes and your encouragement, it’s not easy starting out something new, but to do it at my age is even scarier; your encouragement and kind words have been paramount in my confidence and I can’t thank you enough. I would also like to thank you for not ostracizing me for failing to comment recently, I’ve been swamped and I’m just trying to get my balance back. I’m reading your blogs, I just haven’t been able to comment on my phone (usually reading in the middle of the night!), so I thank you.
Now back to the usual programming…
We were finally able to get into Gusto, a very popular restaurant on Portland in Toronto, but just. We decided that waiting in line for dinner was not our bag so we thought lunch might be more forgiving. We scored the last table on a recent visit with my niece (a newly graduated lawyer) and her botanist beau! You may recall that I got a bit ahead of myself and made their famous Kale Salad site unseen or palate tested! It turned out that I had it pretty close but their version was a tad sweeter — I have modified my recipe.
The restaurant itself is a very cool, contemporary warehouse design. Lots of super hard surfaces makes it very noisy and I suspect I wouldn’t like it as well at night because it was reasonably noisy at brunch when there isn’t as much boozing. Our server was friendly and attentive without being over bearing and was knowledgeable about the food. The courses were brought out with reasonable timing which made it an event instead of a rushed meal that some places offer. There was absolutely no attempt to rush us from our table and the place was packed.
I was happy to see that the salad was served in a similar Christmas tree shape that I served our’s in as so many of you commented. 🙂
I thought I had taken photos of the other dishes we all ordered, but sadly they are no where to be found so I shall review only the Kale Salad which we ordered for the table and the Popilo which was my lunch dish.
The Kavolo Nero ($13.95) was macerated with lemon juice and honey decorated with toasted pine nuts (the short Italian kind), Pecorino cheese and currents. Since I’ve tasted the real thing I have increased the honey a touch in my recipe and have switched up the currents for either dried cranberries or dried sour cherries. Parmesan can also be substituted for the Pecornino.
Tender Grilled Octapus
The Polipo ($14.50) was a char-grilled octopus with an olive tapinade and a celery root cream with baby zucchini, chorizo all harmonized with a delightful sherry smoked paprika vinaigrette. It was wonderful and my mouth is still watering as I type this review. It was a decent portion as were all the other dishes at our table.
Overall rating of Gusto 101 (in my opinion): Decor 3.5/5, service 4/5, food 4/5, Value 4/5, Noise: 1.75/5 (1 being very noisy, and 5 being very quiet).
Disclaimer: We purchased our meals for full price and my opinions just that, my opinions.
Gusto 101
101 Portland Street, Toronto
eat@gusto101.com
General inquiries: 416-504-9669
Mon: 11:30 am – 10:00 pm
Tue: 11:30 am – 11:00 pm
Wed: 11:30 am – 11:00 pm
Thu: 11:30 am – 1:00 am
Fri: 11:30 am – 1:00 am
Sat: 11:00 am – 1:00 am
Sun: 11:00 am – 10:00 pm


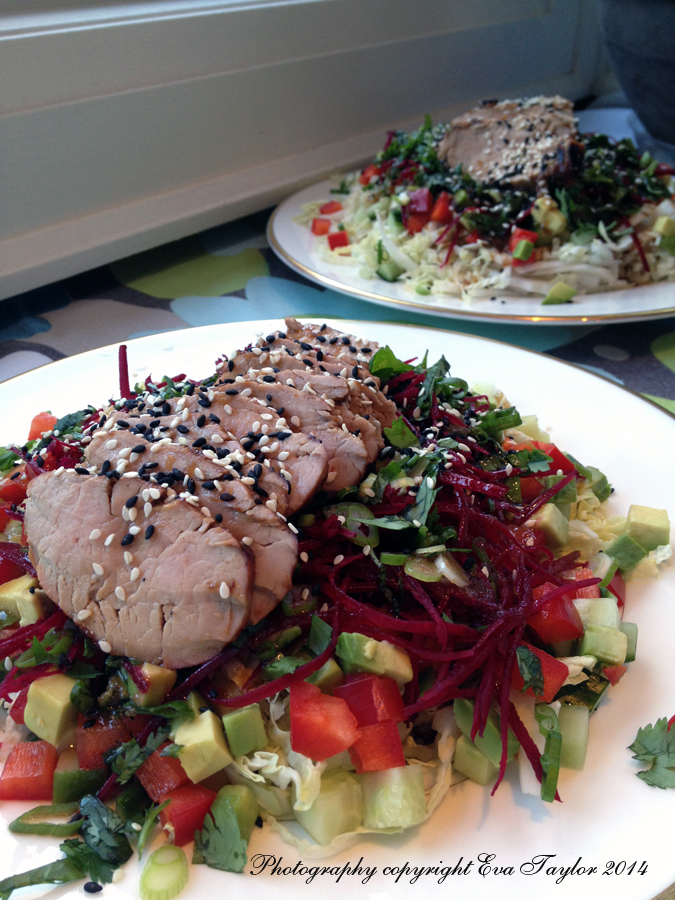
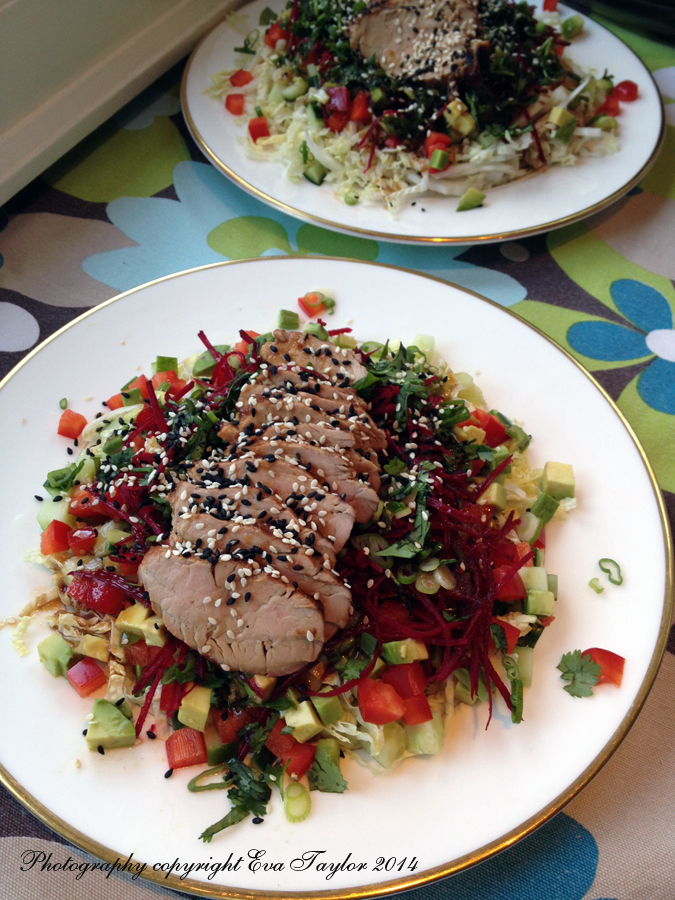


2013 a year in review
January 6, 2014 by Eva Taylor
Happy Monday everyone! I don’t know about you, but despite all of the weather related issues we had at the beginning of the holidays, they turned out to be lovely. And with temperatures plummeting to the high minus teens, it’s rather wonderful to have power back! I believe that now power has been restored to everyone in Toronto, thank goodness!
2013 was a year of change in a good way. I celebrated a benchmark birthday (I still can’t believe I’m THAT old!). My almost ten years of working with my dear friend came to an end and I decided to embark on a new career path in food! Little did I know that way back in 2007 when I began blogging it would eventually redirect my career path! I’m really pumped about 2014 and all of the opportunities it will bring! Happy New Year indeed!
As you WordPress users are already aware, WP sends us a synopsis of the stats at the end of every year. Even though i see my stats day to day, this synopsis still surprises me! My humble little blog was viewed 51,000 times in 2013, can you believe it! And for whatever reason December 24th garnered a healthy 728 views (I still can’t figure out why!). Here’s a quick review.
The five most popular posts were:
The lovely ladies and gentlemen who were my top five commenters:
I would like to take this opportunity to thank you for your support and kind words, without you this blog would be a meaningless collection of recipes floating about in cyberspace. Thank you for you support and encouragement, I can’t express how much it means to me.
May 2014 bring you all joy, health and all the best wishes!
Share the love :
Posted in Cool Stuff, Weather, Yearly Synopsis | Tagged commenters, Comments, popular, searches, top five | 34 Comments »