Cottage season is almost over and we’re heading right into the holidays: Canadian Thanksgiving, Halloween, American Thanksgiving and then Christmas! My how time flies. This “recipe” has become a “go to” recipe for brunches and lunches at the cottage where refrigerator space is at a premium and standard grocery items are difficult to find (to say the least). It’s the perfect recipe to reinvent ‘leftovers.” For the last couple of years, whenever I make a one pot rice dish like Paella, Jumbalaya, Risotto or even a pasta dish like JT’s Mediterranean Pasta, I ALWAYs make 2 extra servings. The trick is to set aside the two extra servings so that you’re not even tempted to finish off every last bite and lick the plate clean ;-p! The two extra servings combined with eggs and a little flavouring bake up into the most delicious dish, you will be tempted to make the recipe just to rebake it for brunch the following day! And the best part is that it freezes very well, so even if there is only two dining on leftovers, freeze the rest cut into single portions in a ziplock bag, ready for a quick lunch or a fancy brunch.
On some mornings the lake is so very still.
Bits of the seafood, chicken and chorizo dot the delicious egg bake.
Paella Bake
A KitchenInspirations Original Recipe
Serves 8
Ingredients:
4 cups leftover Paella (this or this) or Mediterranean Pasta (this or this) or even Risotto.
Preheat the oven to 350° F (177° C). Prepare a square baking pan with perpendicular sides (some square cake pans have angled sides). Line with parchment so that it extends up two of the sides. Spray lightly with nonstick spray.
Combine eggs and La Bomba and whisk well. Fold gently into the leftover paella being careful not to squish the rice into a mushy mess.
Pour into the prepared pan and jiggle around making sure that the proteins are distributed evenly. Bake for 45-50 minutes or until cake tester comes out clean.
Cool slightly and cut into 8 portions with a very sharp knife. Serve with lemon slices and a light salad.
Would you care for a slice? Our Paellas are always full of flavour. Red sky at night, sailors’ delight! Cocktails inside the screen-in porch, so peaceful.
A couple of years after JT and I tied the knot we went to Europe together, it was a combination business and pleasure trip. As the business part of our trip, we went to Modena, Italy to see a piece of equipment that JT’s soap-making family business purchased. As you may or may not know, Italy is well known for its soap making equipment. And a little known fact 😉 Modena is the epicentre of balsamic vinegar.
The Italians take their balsamics very seriously, think of the French and champagne. The special thing about the thick, rich vinegar is that it’s aged for several years in a variety of barrels; it is this very aging process that gives this unique condiment its sweet and piquant flavour, rich and luxurious colour and thick, viscous texture.
We drove up from Florence where we were staying a few days during the middle of our trip; it’s a scenic 2 hour drive through the lush Italian countryside. The Italians had been making soap equipment for hundreds of years and at that time, they were some of the best. JTs family already had several Italian pieces in their factory and although they had purchased some pieces from Italy before, this particular machine was a first-time purchase from this vendor, so a visit from ‘the customer’ was a big deal. We met with Mr. Borghi the English speaking Italian representative of the equipment maker. The machine itself was over six figures so you can imagine our surprise when we were taken to a humble rural garage where a few men were busy hand crafting the machine! A very tall, broad, heavily bearded gentleman approached us with visible excitement. He was wearing mechanics coveralls and his hands were covered in machine grease, he didn’t speak a word of English so Mr. Borghi had to translate for us. We had a short tour of the garage (really just one large room) and then we were invited to lunch.
We ate an enormous meal at a humble, family run local restaurant; each dish was prepared with love and respect to its origins. I don’t recall much of the meal (it was 27 years ago!) except that it was lively with conversation and it was my very first introduction to balsamic vinegar. When our host discovered that I had never had balsamic before, he insisted I order a steak that was garnished with 100 year old balsamic table side (and no, they did not leave the bottle), the waiter ceremoniously poured a few drops of the liquid gold onto my perfectly cooked steak. Everyone (yes, everyone in the packed little restaurant) stopped and watched as I carefully cut into the juicy steak and took my first bite. At the time I thought it was odd, after all it’s only vinegar with a dark, thick, chocolate syrup-like colour. But as soon as it hit my tongue I understood how truly special that moment was. The earthy, salty flavour of the rare cook steak against the thick, sweet, pungent and complexly flavoured vinegar was something I had never experienced before, I was in heaven! As my ‘audience’ waited with baited breath, I knew my face revealed the reaction they were hoping for: pure, unadulterated bliss – words were not needed. Then the restaurant resumed the animated conversation and clatter of cutlery against the plates. As an after lunch digestive, our gracious hosts poured some delicious, luciously thick and ice cold limoncello. What a treat that was.
After lunch our lovely translator, Mr. Borghi insisted that he buy me a bottle of balsamic to remember the experience, so in the parking lot after a long and deliciously filling meal, a plan was hatched. We would follow Mr. Borghi a short distance to a reputable shop where he would pop in, buy the vinegar, say our farewells and we would continue our drive to Florence. The “short drive” turned into 45 minutes and was in the completeopposite direction to Florence which meant our two hour trip was now three and a half. Poor JT. But I had a prized possession: my very first four leaf balsamic vinegar!
I suspect that Italians feel the same way about Limincello and that the process to make it is as revered as the final product itself. Limincello was, of course, invented in Sorrento, Italy some 600 km south of Modena. And although this recipe claims to be originally Italian, this particular version is not. However, I was truly intrigued by the process and it had to be made. Sadly I was not able to source Meyer Lemons (see notes) as the recipe suggests but I did go the extra mile to purchase organic lemons for the main reason suggested in the article: the alcohol evaporates in the enclosed glass, macerating the lemon skin and then falling back to the bottom of the jar as flavoured liquid so you don’t want pesticides contaminating your Limoncello.
Suspended Organic Lemons ready to do their job.
I wondered what the macerated lemons would look and taste like: they were quite pale and had a very strong vodka lemon flavour that was surprisingly unpleasant. I chucked them.
After 4 weeks, the vodka took on a slightly yellowish colour. The gorgeous bottle is from our lovely neighbours.
Limoncello Recipe
Please click here for the “best limoncello recipe you’ve ever tasted”
I followed the recipe with the exception of the organic Meyer lemons, I used ordinary organic lemons.
I also made a simple syrup using the same weight of raw sugar as water and dissolved it by simply stirring for a few minutes and not boiling. Next time I’ll use ordinary sugar but I’ll do the same process, I wasn’t pleased with the amber colour of the simple syrup and its negative effect on the colour of the limoncello, although when poured into a small glass, it was pretty yellow.
I must admit I was pretty pleased with the outcome. Except for the cost. In Ontario, a 750 mL of Skyy vodka is $38.75, the organic lemons were $3.00 and the raw sugar was $4.00. A bottle of commercial limoncello is $18.35.
I served the ice cold limoncello in antique glasses on my dear Mom’s needlepoint tray that she made in school.
Notes:
I did buy as lovely Meyer Lemon tree that presently has about 15 little lemons growing on it!
I read David Lebovitz’s recipe for No-Recipe Cherry Jam and loved it from the start because it was just ratios! Usually I have to take down recipes to suit the volume or quantity of ingredients I have on hand and David’s recipe made it super easy, plus I liked his first direction: “1. Wear something red.”
David suggests to cook the cherries and measure the volume and then add 3/4 of it in sugar (apparently the sugar is required so that it doesn’t spoil, otherwise I would have reduced it).
350 g fresh Ontario cherries (you can use any old cherries, but I thought I’d give our Province a plug!)
400 mL cherry juice (I had some left over from cherry squares I made a few weeks ago)
375 mL sugar
zest and juice of 1 fresh lemon
Directions:
“Put on something red.”*
Pit all of the cherries and chop about 2/3 of the cherries into smaller pieces and the remainder into halves.
Cook the cherries and cherry juice in a non-reactive pot. David suggests a slightly larger pot because the juices bubble up. Put a plate in the freezer (this will help you determine when the jam is done).
Add the lemon juice and zest (I used a peeler to peel large slices of lemon so that I could remove them after). Continue to cook until the cherries are soft (about 20 minutes).
Once cooked, measure the volume you have, including the juice. I netted 500 mL so 3/4 of that is 375 mL sugar. Stir in the sugar and continue to cook on higher heat until the bubbling diminishes and the jam congeals when a drop is put on the super cold plate and returned to the freezer for a moment. Be careful not to overcook the jam it will caramelize the sugar and it will taste terrible! It’s best to test often (David suggests it’s better to test often than to overcook the jam). My volume took 20-25 minutes to the perfect viscosity. Remove from heat.
David suggest to add a bit of kirschwasser, but I was all out so I added a tiny drop of almond extract as he advised. Stir well.
Cool to room temperature and bottle as you would normally. He suggests this jam will keep in the fridge for several months.
Growing up, one of our family favourites was Rétes (Hungarian Strudel) and my dear Mom made Hungarian delicacies like Káposztás Rétes (Savoury Cabbage Strudel) and Túrós Rétes (sweet Cottage Cheese Strudel) and even sometimes but not often, Almás Rétes (Apple Strudel). Mom’s favourite was Káposztás Rétes (Cabbage Strudel) and although as kids we couldn’t stand it, I often find myself craving the savoury flavours of this treat.
My dear Mom always told stories as she was cooking or baking, stories about food, of course! The one story that has resonated with me all these years is that Grandma (Nagymama) made her own Rétes dough! The story goes that Nagymama laid a clean, white sheet on the dining room table, dusted it with flour and stretched and stretched and stretched her homemade dough until you could read newsprint through it. I always imagined an enormous dough (like this) on the table! Mom never made strudel dough that I recall, by the time she was a homemaker, ready made, frozen dough was already available and so much easier than making it yourself. I have used ready made Phyllo more times than I can count on all my fingers and toes, but I’d never made it myself. So you can well imagine why homemade phyllo dough is on my bucket list.
Recently, we invited dear friends to the cottage and I thought homemade Baklava would be a lovely dessert over the weekend and a great excuse to make homemade phyllo dough. I chose Baklava because if the Phyllo didn’t work out as well, the syrup would ‘hide’ its flaws, unlike Rétes. The recipe I followed is here (why reinvent the wheel?) but I can tell you right now that using the pasta maker is not nearly as satisfying as rolling by hand. A marble rolling pin (or something really heavy) would be helpful…I had a rolling pin made by one of my dear Mom’s friends many years ago and I paid the price by bruising my palms and fingers!
Homemade Phyllo Dough
This recipe makes 25 sheets approx. 25 cm x 41 cm (10″ x 16″)
I allowed the dough to rest overnight.
The recipe instructions indicate to take the dough to #9 on the pasta maker (mine is a KitchenAid Stand Mixer with attachments) but I recommend to take it to #8 and do the rest by hand. I also tried rolling it entirely by hand (see photos below – only took about 12 minutes each) and it wasn’t as difficult as I had anticipated but it did bruise my hands badly). Between each number of stretching the dough by pasta machine, keep rubbing a little flour to both sides of the flattened dough, this is how the correct texture is achieved. Believe me, you will know when you feel it.
I also found that rolling the dough through each pass on the pasta maker a couple of times instead of just once results in a finer dough.
Baklava
Yields:
17 (4-sheet) baklavas
11 (2-sheet) baklavas
4 left over sheets (freeze for later).
Ingredients:
21 sheets of phyllo dough
120 g hazelnuts
200 g almonds
2 tbsp brown sugar
1/2 cup sugar
1 tbsp cinnamon
1/8 ground cloves
1/2 cup butter, melted
Directions:
Roast both nuts on 163° C (325° F) for 18 minutes or until most of the skins have separated from the hazelnuts (almonds may or may not separate).
Using a clean tea towel, rub the hot nuts until most of the skins come off. Separate skins from nuts.
Chop both hazelnuts and almonds roughly and combine with sugar, cinnamon and cloves. Set aside.
Syrup Ingredients:
1/2 cup butter
2/3 cup water
1 cup honey
4 tbsp fresh lemon juice
Directions:
Combine first three ingredients in a small saucepan and bring to a boil. Boil for 2 minutes, remove from heat and add lemon juice. Stir well, set aside.
Baklava assembly:
Preheat the oven to 163° C (325° F).
Divide the dough into 40 g dough portions.
Lightly flour a large, clean surface and roll out to approximately 25 cm x 41 cm or 10″ x 16″ sheets. Continue to roll all of the dough like this until you have rolled it all out. Cover with a lightly damp cloth and a jelly roll pan to protect it from drying out.
Take one sheet of phyllo and lay it length-wise in front of you. Brush generously with the melted butter. Sprinkle 3/4 cup of the nut mixture per sheet. Continue for 2-3 sheets.
Taking the long end, begin to roll the phyllo tightly. Brush the finished roll with melted butter.
Cut into 5 cm or 2.5″ lengths (or smaller equal lengths). Place cut side up into a lightly buttered pan, it doesn’t matter if they touch. Continue until all the dough and nut mixture is exhausted.
Bake for approximately 45-50 minutes.
Allow to cool completely and then pour the syrup over The rolls and allow to rest for a few hours.
I found that 40 g made the perfect sheet size.
A relatively damp and somewhat elastic dough (not nearly as elastic as pizza dough)
You can roll to 9 in your pasta maker, but honestly I did not find rolling by hand difficult.
OK. By saying “I did not find the rolling difficult”, what I meant was “not difficult as I was rolling” but the next day, my palms were bruised from the shear pressure I had to put onto the rolling pin. You may wish to roll with a marble rolling pin.
For some reason, my Nagymama (grandma) always said the dough has to be thin enough to read a newspaper through it, I figured a nut panel would suffice!
This is one of the rolls of Baklava.
Cut rolls into 16-17 equal lengths and place into a greased pan. It’s OK if they touch because the dough has been greased sufficiently so they won’t stick.
The finished product, with a little extra honey drizzled on. PS, that silver tray comes from my Dad’s side of the family, it’s probably over 100 years old!
Notes:
This is quite a damp dough and it’s a bit sticky but don’t worry, you’ll be stretching and rolling additional flour into it to give it the correct wet/dry ratio.
The dough only becomes difficult to work with (breaking, cracking) when it dries out; make sure you have a lightly damp tea towel to cover any rolls or sheets. I also used a 10″ x 16″ jelly roll pan to cover it.
In hindsight, I should have used only 2 or 3 (not 4) sheets per roll. Next time I think I’ll sprinkle the nut mixture on each sheet and not just the end — I have adjusted the recipe above.
I was 100% sure I would not be making this recipe again because it’s so inexpensive to buy ready made, but in reviewing the ingredient list I may have to resort to making it myself as there is one or two ingredients that gross me out.
I hesitate to call this a recipe because it really is just one ingredient and it’s so easy, I almost didn’t put it on the blog. But then I thought it’s a lovely garnish that is quite underrated. And it’s NOT FRIED!
As you are aware, we’re going through the Tosca Reno Eat-Clean Vegetarian Cookbook and I made Roasted Spaghetti Squash with Hazelnuts and Crispy Sage (page 192) and was fully intending on frying the sage leaves (in 1 tbsp olive oil) when it dawned on me that I could nuke them, the way I nuked thinly sliced potatoes to make potato chips. Yes, indeed.
It was a success! They literally melt in your mouth; although they are rather tasty, they do lose a bit of their perfume which is not a bad thing as I sometimes find sage a little overpowering.
The time spent in the microwave will depend on your machine, each one is different. I found 2 minutes with the amount in the photo was just perfect.
Wash sage leaves and dry well. arrange on a folded paper towel so that they do not overlap. Microwave for 1-2 minutes or until crispy. I found that the little ones crisped up a lot faster than the larger, thicker ones but they were all lovely and crispy.
Last week I had the pleasure of meeting Lorraine Elliott of Not Quite Nigella, in Toronto. We’ve been following each other for four years now and when we met in person it was like we’d known one another for ever. I wanted to do something special with her so I contacted an acquaintance who produces several Food Network Canada shows and she made it happen – we spent the morning on the set of Chopped Canada, Season 3. But you’ll just have to wait to hear all about it in the new year (don’t worry, it’ll be here before you know it!).
Eva & Lorraine behind the scenes!
Lorraine was in Toronto with the Canadian Tourism Commission and made a special request to come to Toronto to meet me! I was flattered beyond belief. For Lunch, we met up with my dear friend Barb (Profiteroles & Ponytales) and a new friend, Trudy Bloem, a Personal Chef from Ottawa (the DIL of a lovely neighbour) at one of my favourite Italian restaurants, Bar Mercurio. We shared a number of tasty dishes that I’m sure Lorraine will blog about. The CTC sure kept her busy and she saw many of the Food significant parts of TO, but not everything so I’ve invited her back! And one of these days, we’ll travel to Australia to visit her (and Charlie, Maureen & Liz)!
Lorraine wasn’t the first positive experience with an Aussie I’ve ever had, after all there was the “gravy boat incident”.
About 12 or 13 years ago, I was trying to finish off some stray pieces to our wedding China. I checked our local supplier and as I suspected it was unaffordable, so I checked eBay. I’ve purchased many things over the years from eBay and my experiences have always been exceptional. I found the exact gravy boat, you guessed it, in Australia. It was a young couple recently married and for some strange reason were given a gravy boat to a set that they didn’t want, so she was selling it for a very reasonable price on eBay. I contacted her to make sure she would ship it to Canada and she said she would. She was not registered on PayPal so she asked for a money order. No problem, but I needed an address. She gave me an address and off we went to get a money order. We don’t often need money orders so we were inexperienced (this will make sense later in the story). The money order was mailed and we waited. And waited. Weeks went by and the girl didn’t receive it. I called the post office and asked how long a letter from Toronto should take to travel to Australia and they said six to eight weeks. So we waited in the meantime corresponding with said girl almost weekly. At 10 weeks she still hadn’t received the money order but she was tired of the game so she said she would mail the gravy boat to me anyway and hope to receive the money order. I felt bad about it, so we got another money order but when we went to cancel the first one, we discovered that we had included the receipt in the original envelope so we couldn’t cancel it (read inexperienced)! I bit the bullet and got another money order anyway (still marginally cheaper than buying the gravy boat in Toronto). I wanted to make sure I had her correct address so I asked her to confirm. You guessed it, she had given me the wrong address the first time (sweet girl but…) so the new money order was mailed and within a week the gravy boat arrived! Then two days later the girl wrote to say the second money order arrived and that she would destroy the first one if it ever arrived. I’m not kidding you, a day later we received back the first money order (with receipt) marked “unknown address, return to sender”! This drama took over three months! We were able to get a refund with the original money order, I got a deal on the gravy boat and a great story out of it! Do you have any cool stories like this? Share in the comments.
If I were serving this avocado hollandaise at home, I would have definitely used the Australian gravy boat, but I served it at the cottage for a tasty vegetarian breakfast!
It’s still quite buggy in Canada’s north so we were well prepared with our bug shirts!
Vegan Avocado ‘Hollandaise’ Sauce
Makes about 3/4 cup of ‘hollandaise’ sauce
Ingredients:
2 small very ripe avocados
1/2-3/4 cup water
2 tbsp lemon juice
1 tsp white vinegar
1 tbsp Dijon mustard
salt and pepper to taste
Directions:
Purée everything together until very smooth adding water until desired consistency is achieved, season with salt and pepper.
Serve warm or room temperature.
Notes:
This is a much ‘lighter’ feeling sauce than the traditional eggyolk-butter-based version.
I didn’t want to add more lemon juice as I feared it might make the sauce bitter so instead I added a teaspoon of white vinegar and a tablespoon of Dijon, it was a flavourful sauce.
Add only as much water to the sauce to achieve the consistency that you want. I wanted mine pourable and I almost used the entire 3/4 cup, just a hair less.
I served this on Asparagus and Spinach bennies one weekend.
This is 1/4 of the total yield of sauce
This is traditional Hollandaise Sauce made with 4 eggs and 1/2 cup of unsalted butter. Although the calories are fewer than the avocado version, take a look at the fat and cholesterol!
Happy Holiday! Today is a civic holiday here in Ontario and we’re enjoying it!
In effort of trying to eat healthier, I decided to cook out of the lovely new cookbook by Tosca Reno, The Eat-Clean Diet. Of course, I wouldn’t be doing the blog justice if I just copied the recipes so I’ve changed them up a bit so if you’re looking for the exact recipe, you’ll have to buy the book!
This is a delightful combination of flavours and textures and the kale works beautifully as a wrapper! I’m definitely going to make this one again, although I can’t help but think how tasty bacon would be in it!
The kale within the quiche softens up beautifully but the kale sticking out of the quiche crisps up like kale chips!
Preheat oven to 375° F and roast the sweet potato, cauliflower and shallots for 30 minutes or until cooked through.
Lightly spray a 6 tin large muffin pan with olive oil and line each cavity with 2 kale leaves, having the curly bits stick out a little over the top. Spray very lightly with olive oil.
Into each kale lined cup, divide the roasted sweet potato, shallots and cauliflower evenly.
Meanwhile, combine the eggs, egg whites and milk with the Cilantro Pesto (recipe found on page 52) and whisk well.
Pour the egg mixture into each muffin cup evenly. Bake at 375° for 30 minutes. If the kale begins to darken early, cover with parchment and then foil to protect it.
Allow the quiches to sit for 5 minutes before removing from the muffin cups. I used a silicon muffin pan like this one, which made plating very easy.
Notes:
Tosca roasts the kale in a 350° F oven first to soften it. I experimented without this step and it worked just fine (it was 30° C 86° F With high humidity and I didn’t want the oven on more than I had to).
If you don’t like cilantro, use regular pesto but the nutrition will be different.
The cilantro pesto contains only two tablespoons of oil and no cheese making this by far, the healthiest pesto on this blog.
Kale Wrapped Mini Quiches, Serving size is 1 quiche
Cilantro Pesto, Makes 1 cup and this is for 2 tablespoons
Isn’t it funny how the universe works? Some things seem like they are way to coincidental and happen for a reason. I’m fatalistic that way. Case in point: recently I assisted (yes, I’m still assisting because I’d rather be working than not, so if I have free time on my calendar, I’ll assist) a lovely stylist for a print shoot at an amazing house up in Caledon Hills. This house is 15,000 square feet (1,400 square metres!), indoor pool, outdoor pool, fitness gym, billiards room and the list goes on. The custom kitchen with a massive stove, a walk-in pantry (with huge side-by-side fridge freezer like this) was just fantastic to work in! A bit grand for lil ol’ me but gorgeous none-the-less. Around 7:30-8 the owner came home and sat in the kitchen to have a bit of dinner from the craft table. We started chatting while I was grilling chicken breasts and it turns out that she is a recipe developer and cookbook author! In fact, she is a fitness guru (and gorgeous and amazingly fit), you may have heard of her…Tosca Reno!!!! How cool is that??? She gave me a copy of her Eat-Clean Diet® recipe book, autographed and all! I gave her my contact info and am hoping to have the honour and privilege of working with her sometime soon. But that’s just half the story.
Fast forward to the following Wednesday and I’m down-town for my weekly meeting (and very generous birthday lunch, thanks KiK gang!) and I’m telling Andrea, one of the partners my amazing story and lo and behold, that very Saturday (the day after I was assisting in Caledon Hills) Andrea bumped into a woman in Caledon carrying boxes and some boxes fell and Andrea went over to help, so who was the woman? Tosca Reno!!! Andrea recognized her immediately because she has followed her on Facebook and just loves her Eat-Clean Diet® program. Coincidence? I think not!
So what does this story have to do with this post? I’m getting to it…As we are in the heat of the summer, enjoying every bit of the 35° C (with 90%+ humidity) we’re trying to eat lighter (plus losing a few pounds wouldn’t hurt either) and in light of my new, delicious Eat-Clean Diet® cookbook, I decided to make a wonderful wheat berry tabbouleh. For me, a tabbouleh is always a combination of my favourite things, so this recipe is quite unique to my tastes, but feel free to amend to your own specific tastes. True tabbouleh aficionados will baulk at my recipe saying it’s not authentic tabbouleh and that’s just fine with me…call it whatever you wish, but I hope you make it and I hope you enjoy it.
Would you like a bowl?
Wheat Berry Tabbouleh with Shrimp
A KitchenInspirations Original Recipe
Serves 4-6
Ingredients:
1 cup wheat berries, rinsed and sorted through
3 cups low sodium chicken stock, or water
20-30 shrimp (21-30 per pound, 5 per person)
1 ripe avocado
1/2 cup each fresh or frozen corn and peas
1/2 cup quartered grape tomatoes
1/4 cup finely diced red onion
1/4 cup chopped green onion
1/4 cup roughly chopped fresh parsley
1 tbsp roughly chopped mint
1 lemon
1 clove garlic
1 tbsp olive oil
Direction:
Bring wheat berries to a boil and then simmer for about an hour.
Meanwhile, put the diced red onion into a small bowl of very cold water (this mellows the pungency of the onion).
Cut the avocado into smallish cubes and set into a bowl. Squeeze one lemon and add the finely chopped garlic and olive oil and stir well. Pour over the avocado.
Combine the corn, peas, green onion and tomatoes and set aside.
Grill the shrimp until opaque, set aside.
Once the wheat berries are cooked, add the avocado and corn mixture and stir well. Season with salt and pepper to taste. Gently stir in the shrimp and the finely chopped herbs.
Serve warm or at room temperature.
This is truly a delicious and filling meal.
We were lucky enough to have a couple of events for the PanAm games right in our neighbourhood so JT and I took a short walk down to see one of them, The Women’s Road Cycling in High Park. We took Gold and Bronze in this gruelling race (I say gruelling because I was dripping sweat just standing in the heat, I can’t imagine how hot it was for the athletes!).
I made this short film of our experience, it was amazing being there in such a positive crowd!
I was testing a rice cooker recently and one of the recipes was Risotto on a specific setting on the machine. To say it was challenging is an understatement but after 6 tests and tweaks we finally came up with a recipe I was rather happy with. And the neighbours were also happy, one can only eat so much risotto! The last test was the best and JT and I had it for supper but it made so much that I had enough left over to make Arancini di Riso, Italian Rice Balls and boy were they delicious!
Everyone has a favourite risotto recipe so I won’t reinvent the wheel, you just need to have some risotto made and cooled (I spread it out onto a parchment lined baking sheet and covered it with plastic wrap in the fridge overnight). The risotto should be able to be formed into a ball, so if your risotto is a little dry, you may want to add a bit of liquid to allow it to stick together in a spherical shape.
Baking at 400° F gives you the crispy crust that you expect from deep frying, except you didn’t!
Arancini di Riso (Rice Balls)
My mushroom risotto recipe yielded 8 cups (give or take 2 L) but we ate about 3 cups in for dinner, so I estimate that the remainder 5 cups (1.25 L) made 22-24 balls
Ingredients:
5 cups risotto
1 1/2 cups bread crumbs
1/2 cup AP unbleached flour
3 eggs
1 cup shredded mozzarella (or 22-24 1 cm or 1/2 inch cubes)
Fresh basil and Parmesan for garnish
Directions:
Spread risotto onto a parchment-lined baking sheet and cover with plastic wrap, refrigerate until entirely cooled (overnight).
Add bread crumbs to a shallow bowl and the flour to another shallow bowl. Lightly beat the eggs with a splash of water and pour into a third shallow bowl.
Make golf-ball sized balls of the cooled risotto and squeeze a good pinch (or one cube) of cheese into the centre — cover the cheese entirely with the risotto otherwise it will leak out. Continue until you have used up all the risotto.
Coat each ball in flour, then roll into the eggs and repeat the flour and egg mixture (this will make the balls as crispy as if they had been deep-fried). After the final roll in the egg wash, roll each ball in the bread crumbs to coat well . Set onto a parchment lined baking sheet and freeze for future use.
To bake from frozen pre-heat the oven to 400° F. Spray Arancini and the baking sheet with olive oil. Bake for 30 minutes or until golden and warmed through; turn often so it bakes evenly.
Serve with a chunky salsa or tomato sauce.
The cheese melts on the inside and becomes deliciously gooey!
We had our dear friends Paul and T up from the US this past weekend (hence the tardiness of this post), here are a few pics!
We might have had a few of these!
Paddleboating on a very warm day.
Our lake apparently has good fishing.
Figgy finally made us a couple of figs.
Sadly they were not as sweet as I had hoped. I’m sure I just need to fertilize.
Things are heating up in Toronto! And I’m not talking about temperature, although temperatures are pretty hot too! On Friday we began hosting the Pan Am Games (and ParaPan Am) which is a really big deal. At last count, Canadians are holding the most medals (yay, Go Canada Go!) with 24 in total with 10 GOLD! The U.S. is in close second with 19 total and 7 Gold! The last five years have been leading up to the next 2 months, with revitalization and new construction. We built new stadiums, tracks, pools and revitalized a number of venues across the city, including repaving all of the roads in High Park!
The opening ceremonies were held in the Pan Am Ceremonies Venue on Friday (formerly the Rogers Centre) with internationally renowned Cirque de Soleil delivering a once in a life-time show with their usual fanfare, culminating with Donovan Bailey base jumping from the summit of the CN tower! And, if that wasn’t enough, the CN Tower had the most amazing fireworks!
The Pan Am games have only been on since Friday and we’ve already had some shenanigans in our fair city. We had a guy use mannequins to access the HOV lanes (high occupancy vehicle lanes where you have to have 3+ in the car) during the games. The Brazilian Men’s Cycling team thought they’d use the Don Valley Parkway (a major north/south highway in Toronto) as their practice venue on Sunday morning! No one was hurt and they were escorted to safer ground as cyclists are not permitted on our highways. Then, totally unrelated, a dead racoon was memorialized on a quiet downtown Toronto residential street as Animal Services failed to pick up the little guy for over 12 hours! Yes, we’ve had some entertainment indeed!
And if all of that isn’t excitement enough, we have some very special friends coming on Friday and I’m cooking up a storm in anticipation! Then the following week I will have an extra special surprise, but you’ll have to wait and see who that is.
This little recipe was born out of the need to use up a couple of apples, I wanted a healthier muffin without the normal oil component so I created this moist, tasty and generously-sized muffin.
A moist and tasty muffin
Evenly portioned into 12 muffin cups
Apple Streusel Muffins
A Kitcheninspirations Original Recipe. Makes 12 good-sized muffins.
Ingredients:
1 cup milk
1 1/2 cup peeled and shredded apple
1/2 cup chopped dates
1 cup bran buds
3 eggs, beaten
2 cups All Purpose Flour
1/4 cup brown sugar
3 tsp baking powder
Pinch of salt
1 tsp cinnamon
Pinch of nutmeg
Ingredients for Streusel Topping:
1/4 cup oatmeal
1 tbsp butter
1 tbsp brown sugar
1 tsp cinnamon
Directions:
Preheat oven to 375° F (190° C). Butter and flour 12 muffin cups. Set aside.
Layer the milk, bran buds, apple and dates making sure bran buds are covered in the wet ingredients, set aside for 5 minutes. In another bowl, combine flour, brown sugar, baking powder, salt, cinnamon and nutmeg and set aside.
Prepare the streusel topping by combining all ingredients and rubbing in butter until crumbly. Set aside.
Add beaten eggs to the bran bud mixture and stir well. Fold the flour mixture into the bran bud mixture until just combined.
Divide batter into 12 muffin cups evenly. Top with streusel topping and bake for 20-25 minutes or until cake tester comes clean.
Hot out of the oven on a day that was 27° C (81° F)
It’s delicious with a little butter.
Calorie count is per one muffin
Several months ago, I was asked to style a commercial for the Steven and Chris show. Chef Daniel Mezzolo is the famous executive chef from Gusto 101 (please recall the lovely Kale Salad I reinvented). We worked after the show taped so I had a 3pm call time and it didn’t end until well after 11pm that night. It was a long day but it was a blast, I hope you enjoy this short clip.
I recently read on a blog (which I can not find for the life of me, but if it was you, kindly mention it with a link in the comments) a rant about restaurant service where wait staff remove empty dishes from the table before everyone has finished eating. This is a HUGE issue in Toronto, particularly with the roadhouse-style (3 star or less) establishments. It is a disgusting trait, particularly when there are ONLY TWO people dining. Because JT inhales eats much quicker than I, I am often left eating at the table while his plate is cleared away. Just because restaurants here only pay servers minimum wage, it doesn’t mean that there shouldn’t be training! UGH.
I mention this trend because on a recent dinner with neighbours (progressive dinner folks) at a fairly well reviewed French restaurant in our historic Distillery District they actually went one step further. It wasn’t a busy night but service was slow and we were through a bottle of wine before our first course even arrived; eventually we casually ate our appetizers and chatted up a storm so when they removed the dishes I got up for a quick bio break. I ordered my favourite bistro dish, Table Side Wellington Country Beef Tartar which is prepared in front of the guest. Can you guess what’s coming next? The server actually PREPARED MY DISH WITHOUT ME BEING THERE! OMG, did that really happen? Oh yes, it did. I was so aghast, I was speechless! So now, several weeks later I am ranting on my blog. Shame on you, French restaurant in theDistillery District, the remainder of the experience wasn’t even worth mentioning (OK, I will say the steak frites came in pieces (what? did they gather up the leftovers from other plates?) AND it was over-cooked). Strike that place off my list.
It is no secret that Hungarians love food and we love to cook; so while my cousin and his lovely wife, Éva were visiting, I asked her to show me how to make a traditional, light Hungarian supper called Szilvásgombóc (Plum Dumplings). I’ve read many a blog that this dish is NOT a dessert and the Hungarians are quite adamant about it. When I was a child, we had this dish during plum season but I can’t recall if it was a main or a dessert. I have never made it on my own so I was happy to have Éva make it while I watched. It is delicately sweet and seasoned generously with toasted bread crumbs and cinnamon. We always had it with sour cream so my presentation included Greek Yogurt, but Éva always had it plain with extra cinnamon or with some lekvár (thick jam).
We made the dish at the cottage, so I wasn’t able to document the weights and measures and I still have some in the freezer so I won’t be making it any time soon. For an experienced cook, like most of my followers, it is a recipe made by feel (similar to making Italian Gnocchi), but I will reference Ilona Horvath’s recipe from The Traditional Hungarian Kitchen published in 1996 and 2000. It is an excellent cookbook translated and worked into North American cooking standards and according to my dear Mom, good, old fashioned Hungarian recipes.
Below, I present my dear Mother’s recipe from her Mother’s cookbook that she brought with her on her escape from Hungary in 1956, Az Ínyesmester Ezer Új Receptje published by Athenaeum, 1935. It is a well-loved, faded copy and the recipe for szilvásgombóc in the book is entirely by feel (no measurements documented!).
That’s a recipe for Roquefort Dressing written in my Mom’s handwriting in Hungarian.
Magyar Szilvásgombóc (Hungarian Plum Dumplings)
Makes about 24 gombóc
Ingredients:
12 sweet plums (the small Italian ones are best, we were not able to find them so we cut them in half)
Boiled potatoes (we used 5 medium-sized yukon gold potatoes)
All purpose flour
1 egg
4 tbsp cinnamon, divided
3/4 cup of unseasoned bread crumbs (we made our own from whole wheat bread)
2-3 tbsp sugar
Directions:
While boiling the peeled potatoes, wash, pit and cut the plums in half and season with 2 tbsp of cinnamon, set aside.
Rice potatoes while still warm (Éva made a point of this). Beat the egg by hand and combine it with the riced potatoes.
Slowly add flour to the potato and egg mixture to make a soft dough.
Using about two tablespoons of dough, press out to about 1 cm thick in the palm of your hand (about the size of the palm of your hand), add a quarter of a plum to the centre and cover entirely with the dough, pinching the seams shut.
Boil water with a pinch of salt. Boil plum dumpling until done (they should float to the top, just like gnocchi).
Meanwhile, in a large frying pan, toast the breadcrumbs until golden and while still warm, add the sugar and mix gently until the sugar has melted and caramelized. It should not be a sopping mess. Turn off the heat. Add the remaining 2 tbsp cinnamon and mix well. Roll each cooked dumpling in the bread crumbs and plate.
Serve warm or cold, with or without yogurt or sour cream
This plate survived two bombings during the second world war.
Notes:
We tested one plum ball first to make sure it didn’t fall apart during boiling and decided it was a bit too soft and we added more flour.
The old cookbook describes a good plum dumpling dough to be thinly wrapped around the plum, a fine and light texture, somewhat pillowy (not chewy). “A jó szilvásgombóc téstája vékony, finom és könnyu, sőt omlós.”
I wish we had tasted the plums because they had very little taste and we should have seasoned them with a touch sugar to bring out their plum taste. This dish should not be sickly sweet, it is delicately sweet.
Ilona Horváth adds lard to the dough but we did not.
My relatives LOVE cinnamon so the proportions may be a bit much for the average person, add according to your own personal taste. Cinnamon in Europe is the real McCoy and is a lot stronger than our Cassia. Too much cinnamon may make the dish bitter!
We had a grand 2-week visit with my Hungarian relatives, enjoying the many things that Toronto has to offer. During the annual street party, our dear neighbour (one of whom we do the Progressive dinners with) asked us all over to their place for a BBQ. I made dessert. I chose to remake the Martha Stewart Apple Cake that I previously posted here. It was so well received that My cousin asked for the recipe, so I will post this recipe in Hungarian for my kin in Budapest (English will follow).
Egy nagyon jó két hétes nyaralás volt a magyar rokonokal. Meglátogatunk mindent ami van Torontoba. Az este amikor az utca ünneplés volt, a kedves szomszéd (akikval közül csináljuk Progresszív vacsorákat) meg hivtak minket egy grillezésre. Én csináltam a desszertet. Úgy döntöttem, hogy meg csinálmon a Martha Stewart almás süteményét, amit korábban irtam rola itt. Annyira szereték, hogy az unokatestvérem kérte a receptet, így én hozzászólom a receptet magyarul (English recipe to follow).
A tasty combo of cake and apples with a good dose of cinnamon. Egy finom torta almával és egy jó adag fahéjjel.
Egy reczept csinál egy 23 cm kerék tepsit ami 8 – 10 cm magas, vagy két 20 cm kerék tepsit de csak 5 cm magas.
Hozzávalók:
szukor meghinteni a tepsit
195 g liszt
12 g sütőpor
5 g só
7 g fahéj puder, plusz egy kicsi a tepsinek és a pite tetejére
85 g vaj, olvaszva
170 g barna cukor, plusz egy kicsi a pite tetejére
125 mL tej
2 tojás, szobahőmérség
2 nagy alma, hámozott és vékonyra szeletelve
30 g vaj, plusz egy kicsi a tepsinek és a pite tetejére kis csipetkékb
Utasítás:
A sütőt előmelegítjük 200 °C-ra.
Ki vajazuk a tepsit egy kis vajal és meghintjük cukorral.
A liszthez hozzáadjuk a sütőport, a sót, és a fahéj pudert és alaposan keverjük össze.
Egy másik tálban jól megkeverük egy habverővel az olvasztott vajat, a barna cukrot, a tejet, és a tojást.
Lassan a vaj keveréket a liszt keveréketel hozá adjuk és osze keverjük.
Öntsük a tésztát az előkészített tepsibe és az almát egyenként rendezzük körbe szorokan amíg elfogy (ugy mint a kép).
A pite tetejét meghintjük egy kis barna cukral és fahéjjal es kis csipetke vajjal.
Sütjük amíg a teteje arany szinu és a gyümölcs meg van fóve, körülbelül 40-50 perc, vagy amíg a sütemény teszter (tiszta fogpiszkáló) a tészta közepének jön ki tisztan.
Perfect for dessert or afternoon tea. Egy tökéletes desszert, vagy délutáni cávéval.
Makes one 9″ deep spring-form pan cake or two 8″ slightly shallower round cakes.
Ingredients:
sugar for dusting pan
195 g flour
12 g baking powder
5 gsalt
7 g cinnamon
85 g butter, unsalted and melted, plus a bit more for the pan and cake top
170 g dark brown sugar, packed
125 mL milk (I used skim)
2 large eggs, room temperature
2 large apples, peeled, cored and sliced into 2 mm sliced wedges
Directions:
Preheat oven to 375° F. Butter a 9″ springform pan and line the bottom with parchment. Sprinkle with sugar and shake the pan to coat.
In a large bowl, whisk together flour, baking powder, salt and cinnamon.
In a medium sized bowl, whisk together melted butter, brown sugar, milk and eggs.
Slowly fold the butter mixture into the flour mixture, just stirring until blended.
Spoon the batter mixture into the prepared springform pan, smooth the top evenly.
Arrange the apple slices in a circle closely together in the cake batter. Then press each piece of fruit gently down into the batter.
Sprinkle over with the 2 tbsp brown sugar and cinnamon. Top the brown sugar by dotting the remaining 1 tablespoon of butter over.
Bake until top is golden and the fruit has softened, about 35-50 minutes in a convection oven (fan oven for my European friends), or until a cake tester inserted in the centre comes out clean.
I was recently reminded of a project I completed in anticipation of family arriving from overseas. The project wasn’t imperative for their comfort or enjoyment, it was just the impetus I needed to “git ‘er done” as they say!
We’ve lived in our present home for almost 15 years, and ever since the first day we moved in, I’ve wanted curtains on both windows in our living room (or lounge) but we already had perfectly good, and totally lovely curtains on the back sliding doors. To replace perfectly good (and well made, I might add) curtains seemed excessive to me, so we lived with them. For 14+ years. Until I did some math and to my utmost delight , I discovered I could get two for the price of one, out of the generous fabric that the original curtains had. I wanted the dated tabs replaced with a more contemporary and clean look (for the sewers out there, I simply folded the tabs down, behind the top and stitched across. Pull the rod through the tabs to hang. I also added recycled toilet tissue rolls to help hold the role). The sliding door curtains are functional and we do close them down on the very cold days, but the front ones are just for show! I am just so happy every time I look at them. Of course, I had to do the dining room next…it’s really never ending. While hemming the new dining room curtains, I started thinking about the Indonesian Spekkoek Lapis Legit cakes I made a couple of years ago (here and here), specifically about how I can change it up. My FILs birthday was in mid-May so making a cake for him was the perfect opportunity to experiment. We all love Charles’ Kladdkaka and Tuppkaka so I wondered if I could combine the two delicious cakes using the Spekkoek Lapis Legit technique. It was a huge success and the two flavours went together famously. I made the cake again for JTs birthday in June, by special request.
What project have you put off only to get it done for guests?
These are the very generous old curtains
I changed the rod to something a little more in style with the Craftsman home. I’ve also fixed the hem since this photo!
Kladdkaka
Ingredients:
200 g Caster Sugar
140 g unbleached Flour
50 g Cocoa Powder
2 tsp Baking Powder
2 tsp Vanilla
120 g Butter
2 eggs
1/4 cup water
Directions:
Prepare your spring-form tart pan with non-stick cooking spray. Line the bottom with parchment paper.
Add the sugar, flour, cocoa powder and baking powder to the bowl of your food processor. Plus few times to incorporate evenly.
In the microwave, melt the butter slowly so it doesn’t overheat. Combine the cooled melted butter, eggs, vanilla and water. Slowly pour the melted butter mixture in an even stream while processing. Mix well, scraping down the sides as required.
Lightly grease a round tin about 20cm in diametre (I used a spring form tin). Spoon the batter into the tin and smooth out to the edges (it is rather thick). Resist the urge to try this batter, it’s seriously good and you will not be able to stop.
Set aside while you make the Tuppkaka layer.
Tuppkaka
Ingredients:
300g Caster Sugar
200g Plain Flour
74g Butter
2 Eggs, separated
2 tsp almond flavouring
1/4 cup water
Directions:
Melt butter and allow to cool to room temperature.
Combine the eggs with the sugar and beat well (until thick and very pale yellow). Combine the melted butter with the almond flavouring and water and and mix well.
Sift in the flour and stir until entirely incorporated.
Making the layered cake:
The first layer is chocolate, use about 1/2 cup of chocolate batter for the first layer.
Broil for 2-4 minutes watching carefully so it doesn’t burn. Once it is set and your tester comes out clean, pour 1/2 cup of the almond batter on top and spread evenly (the heat from the chocolate will begin cooking the batter so you’ll need to work fast.
Broil for 2-4 minutes until it is set and your cake tester comes out clean. Repeat alternating the flavours until you have used up both almond and chocolate batters, broiling each layer individually.
Allow to cool completely before layering the ganache on the cake.
Chocolate Ganache Ingredients:
114 g dark semi-sweet chocolate
125 mL (1/2 cup) heavy cream
Ganache Directions:
Heat cream to almost boiling, pour over chocolate and stir until melted and entirely incorporated and smooth.
Pour over cake and smooth top and sides.
Refrigerate until set.
Notes:
Set your oven rack 2nd highest from the top.
As the cake becomes taller you may need to reduce the broil to low so it doesn’t burn.
I baked the final layer in a 350°F oven for 10 minutes because it just got too close to my boiler and I was concerned it would burn.
It’s a little like eating chocolate marzipan!
I still need to work on my layers but it tasted darn good!
A couple of weeks ago my kitchen had all sorts of half used leftover vegetables from a testing I did for my recipe testing lady. They were for recipes that called for specific volumes of vegetables (such as, 1 cup) instead of the quantity of vegetables (such as 1 medium carrot). I always find those recipes a bit odd because I am left with bits and pieces that lay around for weeks without any specific purpose. Indeed, I could have thrown them into a soup or stew but I wasn’t making either of those things. Then I saw my lovely friend Lorraine’s Roasted Vegetable Hummus recipes and thought “GENIUS”! What a great way to use up bits and pieces of leftover veg. Thank you Lorraine, truly a great idea (ps, it was darn delicious too!).
Because this recipe was created to use up leftover vegetables, feel free to modify the quantity or variety to what you have on hand. This would also work beautifully if you had leftover roasted veg from a dinner. Hummus is an easy Middle Eastern dip/spread and the seasonings should be to your personal taste; we love the traditional flavours so I’ve kept it pretty much the same with the exception of substituting tahini with toasted sesame oil because that’s what I had (you can use peanut butter too, I know, GASP!!!).
It turned out that The Hungarians had never tried sweet potatoes (not sure if it’s a veg not available in Budapest or they were never introduced to it) but it was a grand success as a dip AND as a roasted vegetable side for our roast chicken dinner one night.
Sweet Potato and Carrot Hummus
makes about 1 cup, depending on the size of your vegetables
Ingredients:
1 medium sweet potato, peeled and cut into equal sized cubes
2 medium carrots, peeled and cut into equal sized cubes
1 large clove of garlic, whole
3 tbsp EVOO, divided
1/4 tsp sea salt
1 tbsp each, cumin and coriander
2 tbsp lemon juice
2 tbsp water or vegetable stock
2 tbsp smoked sesame oil
toasted sesame seeds for garnish
Directions:
Pre-heat oven to 190° C (375° F).
Add sweet potato and carrot cubes to a large roasting pan and drizzle with 1 tbsp olive oil.
Add garlic (peel and all) to a small ramekin, top off with 2 tbsp olive oil and and water. Season with sea salt. Cover with foil and tuck into a corner of the roasting pan.
Roast vegetables for about 35 minutes or until very tender, try not to brown the vegetables so that the dip colour remains vibrant.
Scrape vegetables from roasting pan into a glass bowl, squeeze the garlic out from its skin and pour the liquid from the garlic into the glass bowl with the sweet potato and carrot.
Toast the cumin and coriander until fragrant, add to the glass bowl along with the remainder of the ingredients (with the exception of the sesame seeds). Purée until smooth, season with salt and pepper, if desired. For an ultra smooth dip, press through a fine sieve. Garnish with toasted sesame seeds. Serve at room temperature with bread, crackers or crisp vegetables.
It’s creamy and naturally sweet.
My dear friend Genie of Bunny, Eats, Design suggested I submit this post to our growing edge for June, themed Picnic, hosted by Maddie from Supper Lovin’
The Hungarians have arrived and the “to do” list is finally complete! Just in the nick of time too. We decided to start their visit off with a little welcome party but we all know it’s just my excuse to cook and feed my kin!!! I was fortunate enough to score a sizeable number of vine ripened tomatoes so I decided to make barbeque sauce because JT made a special request for Pulled Pork. The sauce turned out perfectly, sweet, piquant and zesty — cooking it with the pork tenderloin for 5 hours made the flavours all the more richer and balanced the vinegar very nicely. Like any low and slow cooked meal, I made the pulled pork a day in advance because we all know it tastes better the next day!
I’ve geared up a couple of posts for the following weeks, but I may be AWOL depending on how busy things get, so if I miss to comment on your blog or I don’t post, I apologize in advance. Thanks for understanding.
Barbeque Sauce
Makes 1.25 L (42 oz)
Ingredients:
200 g onions, coarsely chopped
50 g garlic, finely chopped
125 mL white vinegar
1.2 kg tomatoes, chopped
30 mL tomato paste
125 mL molasses
50 g sundried tomatoes (not in oil)
1/2 tsp salt
1/2 cup packed brown sugar
1 tsp smoked paprika
1 tbsp of each sweet paprika, cumin, coriander and cocoa powder
Directions:
In a splash of canola oil, sauté onions and garlic until translucent, add dry spices and stir until fragrant.
Add remaining ingredients and stir well. Simmer for one hour or until dark and thickened.
Purée until smooth and press through a fine sieve.
May be kept in the refrigerator for 3-4 days or freeze for 3 months.
Last Thursday, my very first client blog post went live! Don’t worry, it’s under my own name — and the reason it is, is because of my blog! I have always known that this humble project of love would somehow weave a path to earn its keep, I just wasn’t sure how…until now.
The post has four adaptations of my favourite tapas recipes, so please pop over to my very first blog post at the client’s site, and leave a comment, I’d love to hear from you!
You must be thinking, “why on earth would I want to bake a cake in a rice cooker?” There are a few reasons I can easily think of:
Maybe your oven is in use and you need dessert.
Perhaps it’s 40°C inside and you don’t want any more heat in the house.
Because you can.
I am usually not one who purchases a one trick pony but I received my rice cooker as a gift from my SIL one Christmas many years ago and to be honest it really does make the best rice ever (The Best, Jerry, The Best). But I really do hate the thought of an appliance that only does one thing, taking up space in my already over-crowded kitchen. I’ve seen these rice-cooker cake recipes in the blog-o-sphere for quite some time and have been intrigued by them to the point of almost making one, but never got around to it. But recently I saw something that renewed my interest and during one of our city weekends, I got down to experimenting.
I chose a traditional Génoise batter and apples (because I had an apple in the fridge!). My first experiment was a double portion of the batter, using 4 eggs. Needless to say, it overflowed so I reduced the ingredients by half. Also, for my first experiment I carefully laid thinly sliced apples in a floral pattern in the base of the rice cooker, but the cooking process disrupted the beautiful design so I altered my process. The cake is sponge-like, light and airy. It’s got a very nice texture that would work beautifully with a Crème Anglais or a dollop of whipped cream or vanilla ice cream. Also, I kept the brown sugar caramel volumes the same as the larger overflowing recipe because even though the cake is delicious, it would be even more delicious with some of the melted butter and brown sugar drizzled throughout it.
So next time it’s 1000 degrees and you don’t want the oven on, this 15 minute cake cooked in the rice cooker is for you.
Rice Cooker Sticky Toffee Apple Cake
The brown sugar caramelized into a delicious toffee.
An Original KitchenInspirations Recipe
Serves 4-6
Ingredients:
2 large eggs, separated
60 g sugar
1 tsp vanilla
60 g all purpose flour
1 tsp cinnamon
pinch of salt
1 royal gala apple, cubed
112 g brown sugar
40 g butter, melted
1 tbsp heavy cream
Directions:
Combine the melted butter and heavy cream with the brown sugar, pour about half into rice cooker and spread out evenly in the bottom of the pan.
Arrange half of the cubed apples in the brown sugar pushing down to spread the brown sugar out.
Sift the dry ingredients together, set aside.
Beat the egg whites until stiff peaks form. Set aside.
Beat the egg yolks with the sugar until pale and creamy and falls in a thick ribbon.
Fold in 1/3 of the egg whites into the egg yolk mixture.
Sift about 1/3 of the flour into the egg yolk mixture, then fold in the remainder alternately with the egg whites, being careful not to deflate the batter.
Once all of the egg whites and flour have been folded in, carefully pour about half the batter into your prepared rice cooker bowl and spread out evenly over the apples and brown sugar. Top with remaining apples and then drizzle the remaining brown sugar mixture over the apples. Finish by spreading the remaining cake batter on the previous layer. Close the lid.
Bake for 7-8 minutes on the cook setting (mine defaulted to “keep warm” after 8 minutes). Continue on “keep warm” for about 5 minutes and then press the “cook setting” again. Mine reverted back to “keep warm” after 4 minutes. Continue on “keep warm” until your cake tester comes out clean.
Carefully remove the rice cooker bowl and allow to cool for 5 minutes. Turn onto a decorative plate. Serve with vanilla ice cream or whipped cream.
There is nothing like the push of having extended stay visitors to open your eyes to see all the deficiencies in your home. Case in point, several years ago I filled a few cracks on one of my kitchen walls and then I painted over the patches but since the rest of the wall was about 4 years old, the paint dried a slightly different colour and the wall looked patchy in certain lights. It was on my to do list f o r e v e r! So a couple of weeks ago, after I filled in a few new cracks, bought a new can of paint (when did paint become SO expensive?) I finally repainted the entire wall. A fresh coat of paint really freshens up a room. Of course, once I started filling in cracks all over the house and painting, there was no stopping me…it turned into a two-day project. But then it’s another thing off the list.
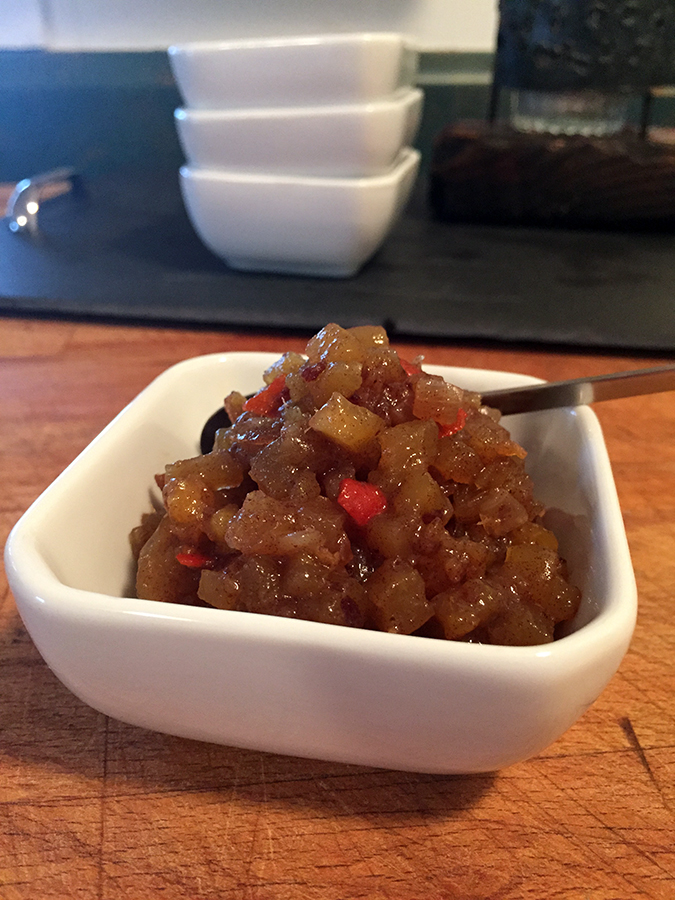
Recently we had James, a long-time college friend of JTs over for an Indian dinner and I made my new favourite Jamie Oliver Chicken Tikka Masala recipe along with Palek Paneer, the best Naan ever and a few condiments, pickled carrot and this delightful Apple Chutney. I am certain that James, who is a renovator, was too polite to say anything about my patchy walls but I kept the lighting low anyway!
What are some of the nagging to do’s on your home maintenance list?
Combine all the ingredients in a heavy bottom sauce pan and cook on medium heat until onions have caramelized and the sauce is thick but still have texture.
1 cup dried red kidney beans, soaked overnight in water
250 g sweet onions, chopped
25 g garlic, finely chopped
300 mL tomato sauce
2 tbsp tomato paste
500 mL water and or chicken stock
900 g ground turkey breast
1 1/2 tbsp cumin
1 tbsp coriander
1/2 tsp smoked paprika
1/2 tsp chili
1/2 tsp sea salt
5 g dried ancho chili (seeds and veins removed)
1 tbsp unsweetened cocoa
30 mL tequila (a nice smokey one)
Garnish:
1 ripe avocado, sliced thinly
10 tbsp Greek Yogurt (approx 150 mL)
10 tbsp mozzarella cheese
handful of Cilantro, or to taste
3-4 Green onions, finely chopped
1 red chili pepper, finely sliced
Directions:
Pre-heat slow cooker on high. Rinse beans and add to the slow cooker along with the onions, garlic, tomato sauce, tomato paste and the water and/or stock and give it a good stir.
Brown the turkey meat in a very hot cast iron pan in batches. Add the browned turkey and juices into the slow cooker in batches. Once you have browned all of the turkey, remove the pan from the heat and deglaze the pan with the tequila, scraping off all the delicious turkey bits from the pan. Add this liquid into the slow cooker.
Give the chili a good stir. Cook on high for 4-5 hours or until the beans are fork tender. If the chili is too liquidy, then remove the lid for the final hour of cooking.
Serve hot garnished with sliced avocado, a tablespoon of yogurt or sour cream, cilantro, chopped green onion, shredded mozzarella cheese and finely sliced peppers.
Based on 10 Servings
It’s heavy on the points but high on flavour.
A delicious Mexican Flavoured Chili
Ladies Night May 2015
I should have set up the tri-pod for an all in shot.
Spring has finally sprung in Toronto and our weather is finally behaving as it should; the greenery is no longer terrified to show itself and many have already begun their journey into Summer 2015 — the saucer magnolias are spectacular in the hood. The Japanese Cherry blossoms in High Park are still tucked away but a few days of warmth and sunshine should remedy that and they’ll be in full bloom in no time. We had our first drinks on the back patio on Friday and we celebrated with some tasty bites.
Now about these bites, I came upon this discovery quite by accident…I was exploring a recipe for bacon-wrapped mushrooms I saw on Greg’s lovely blog (BTW, exceptional recipe) using King mushrooms and as I was cutting into them, I couldn’t help but think they looked a lot like scallops. So a few days later, I dug out an old favourite recipe I posted in 2008, Grilled Scallop Bruschetta with Avocado Paste — The King mushrooms made a wonderful substitution for the scallops but sadly I didn’t have any of our favourite avocado paste (I freeze it in ice cube trays and then put them into plastic baggies for quick hors d’œuvres). It’s a classy hors d’œuvres for a summer cocktail party that I hope you will give a try. For a vegan version, you can omit the parmesan cheese from the pesto or serve it over the avocado paste as I had intended. The King mushrooms not only look like scallops but cooked well, they even have a lovely scallop-like texture.
King Mushroom “Scallops” on Pesto Crostinis
a Kitcheninspirations Original Recipe
Serves 2
Ingredients:
2 thick King Mushrooms
2 tbsp of your favourite sugary vinegar, or a sauce with a high percentage of sugar (for caramelization) (I used a Baco Noir & Blueberry Balsamic)
Wipe/wash the king mushrooms and dry off well. Cut into 4 thick slices. Marinate the slices in the vinegar for 5-10 minutes. Reserve marinating vinegar.
Toast the bread on both sides and slather with 1 tsp of the pesto on each. Set aside.
Heat a cast iron frying pan until very hot add the oil and heat up. Drop each slice of mushroom onto the hot pan and lower the temperature to medium. You want to cook the mushroom while developing a beautiful caramelization on each side.
Add one slice of cooked mushroom to each avocado slathered crostini. Add the marinating vinegar to deglaze the pan and thicken by cooking it down (shouldn’t take long). Drizzle the pan juices onto each crostini, sprinkle with a little sea salt. Serve immediately.
A few years ago we purchased a reasonably priced (read cheap) awning for our cocktail patio; I never loved the fabric, it was a pinkish/beige stripe that weathered into a more horrible pinkish colour over the years, but it was about 1/10th the price of one of those swanky awnings that you can order with custom fabric, so I compromised. It wasn’t bad enough that the colour sucked when it was new, it sucked even more over the years and the birds loved to bathe in the water that collected in the divot when it was closed and they also loved to peck little bugs that drowned. Sadly, their pecking caused many tears and eventually the awning looked so tattered and torn that we hadn’t unrolled it in two years!
This was the last time we unrolled the awning at my benchmark birthday party a couple of years ago. That’s my lovely SIL, Wendy. The colour just gets better and better.
Fast forward to 2015 and my cousin and his lovely wife are coming for a visit from Europe in June. What is better than an actual deadline to get those nagging projects completed? So we are in fix it mode! The list is long.
Last year, I priced replacing the fabric with an awning company and discovered that it’s still out of reach (I’d rather spend the cash on a vacation than an awning!) so I checked Youtube and found a really good video on how to remove and replace the awning fabric (click here for the video) and even though our awning is a different manufacturer, the basics are the same. So off I went to purchase 11 m or 12 yards of fabric! And specialty thread (nylon in case you are interested), a specialty sewing machine foot and of course heavy duty leather sewing machine needles! If you’re interested, I can post instructions on how to sew the awning, but it’s a cooking blog so I won’t bore you with it now.
The worst part of sewing this type of project is finding the space to accommodate the enormous volume of fabric (3.2 m x 3.4 m or 125″ x 135″ finished size) so I ended up sewing it on the dining room table and pinning and cutting on the wood floors in our bedroom. Sewing on the dining room table and that I can see the awning from my kitchen window is my reason for using this post in Celia’s In My Kitchen series.
I had to fold the fabric in half because that’s all the room I had!
It didn’t take me long to make the awning but I had to wait 3 days to install it because it was raining and hailing (in April)! The installation went smoothly but you really do need two people to help feed the ends into the hardware. JT was great and we got it working in less than an hour! Now we wait for summer. Hopefully!
This is the view from my kitchen window. I guess I could have opened the window and removed the screen for the pic.
We chose a light grey fabric.
The awning actually extends all the way to the far end of the deck but it was too windy and I didn’t want to risk issues.
A couple of weekends ago, we had amazing weather and JT and I enjoyed lunch on the patio. I had a lovely bunch of fresh kale and I wanted to try something different so I baked Kale Chips! I know it’s been done to death, but these things were actually really tasty and if you’re looking for a healthy snack, I would suggest you try and bake some of these. I used Charles’ recipe which you can find here, the only thing I did differently is that I dressed the chips in some grated parmesan and sea salt. They didn’t last long.
The olive oil gives them a gorgeous sheen and helps maintain the bright green colour.
Kale Chips
Ingredients:
400 g Curly Kale
2 tbsps Olive Oil
1 tsp Sea Salt
1/2 cup fine grated Parmesan Cheese
Directions:
Pre heat the oven to 93° C (200°F )(I used my convection (fan) setting).
Wash kale and remove thick ribs. Cut into bite-sized pieces keeping in mind that they will shrink to about half their raw size.
Drizzle olive oil over kale and toss to coat evenly. I gave them a quick, light massage.
Spread on a cookie sheet so they are on one layer and not over lapping. Bake for 15-20 minutes tossing occasionally until crisp. Sprinkle cheese over hot kale and toss to coat.
Summer is coming. That’s what I’m told, I hardly believe them though. But with the warmer weather on the horizon (possibly as far away as Europe) I have again begun to think about lighter dishes. Fish seems to be a four-letter word, not for me, of course, I love the stuff. But some people in this household don’t love it as much as I do, so selling it on the plate becomes a thing. I simply broiled this tilapia, seasoned with salt and pepper and wanted a little something tasty to dress it up and my Mango Salsa recipe was born. Like many savoury recipes on this blog, I urge you to make it your own, volumes are simply suggestions — you hate cucumber, omit it! Hate mango, try pineapple instead! It’s pretty darn tasty and quite easy to prepare — I like my salsa cubed into even little cubes, but you may like yours another way…GO FOR IT!
Tilapia with Mango Salsa
Serves 2
Ingredients:
1/2 cup ripe mango, cut into small cubes
1/2 cup cucumber, cut into small cubes
1/2 cup red pepper, cut into small cubes
1/4 cup cilantro, chopped
1/4 cup white balsamic vinegar
salt and pepper to taste
200 g of cooked white fish (we used Tilapia but cod, halibut or monkfish would also work well)
a few handfuls of massaged kale (my dear friend Kelly at Inspired Edibles shares a very compelling story about getting intimate with your food, 50 Shades of Green-style!)
Directions:
Combine the mango, cucumber, red pepper, cilantro and mix well. Pour the white balsamic into the mix and stir to combine, season to taste.
Serve over broiled white fish on top of massaged kale leaves. Enjoy!
Notes:
This salsa would be lovely on BBQ chicken breast or even a steak if you’re feeling like red meat.
A mix of greens would be fine instead of the massaged kale but I love kale so I use it where I can.
Has spring arrived where you are? It sure hasn’t over here, in fact there is very little sign of it. Yes, we can be grateful that the snow has finally melted and that it hasn’t snowed in any measurable quantity for a few days, but these temperatures are killing us. Since I’ve begun my morning walks through High Park again (8km most mornings) it’s been so cold that I’m still wearing my long down-filled coat, hat, gloves and a balaclava around my neck at the ready when the howling wind rudely slaps my face. I’m ready for spring. With these cold temperatures, I’m still craving warming foods like my dear friend Sissi’s Dried Apricot and Chili Jelly. If you don’t know Sissi, she is an experienced cook with a passion for the Far East. Her recipes are uncomplicated and her writing style is elegant and beautiful and that’s something because English isn’t even her first language! I’m always drawn to Sissi’s recipes because she combines flavours that hit my palette perfectly. And she enjoys similar foods and textures that I do. Please visit Sissi’s blog for the original recipe because she has generously provided more details than I am providing.
Sweet Chili Sauce with Dried Apricots
Makes 250 mL sweet chili sauce
Ingredients:
175 g dried apricots
150 mL +100 ml cider vinegar
100 g red Thai chili peppers
200 g sugar
50 mL water
1/2 teaspoon salt
1/2 package pectin in powder (25 g)
Directions:
Bring 150 mL vinegar to a boil and add the apricots to soak for 30 minutes.
To a small food processor, add the hot peppers (discard the stalks and seeds) and the soaked apricots and pulse to chop reasonably finely.
Combine the remaining ingredients (including the additional 50 mL vinegar) and boil 20 minutes,stirring constantly.
Sprinkle the pectin over the surface and cook 10 more minutes, mixing well.
Transfer the hot jelly into the sterilised jar or jars and cover with lid(s). Allow the jar to cool and refrigerate. If your jars are smaller (I used one 250 mL jar) you will want to process them as you would any canning project. I popped my single jar into the fridge and will use over the next month or so (or I will freeze for later use).
This is a very hot sauce.
Notes:
I had intended on reducing the sugar but believe me, it NEEDS the sweetness because these peppers are HOT!
This is an excellent condiment but use conservatively as it is VERY HOT.
We had another Progressive Dinner a short time ago and because it was in such close proximity to Mardi Gras, we decided it would be a perfect theme! JT and I had dessert so I experimented with King’s Cake, a brioche style pastry roll with pecans and sugar, decorated with yellow, green and purple sanding sugars, but honestly it tasted like breakfast to me and not dessert (sorry Southerners), so back to the drawing board I went. JT suggested Mississippi Mud Pie and after a little research I agreed. Definitely decadent enough for a Mardi Gras dessert and it can be classed up, restaurant style. I found a delightful warm chocolate tart recipe on Anna Olson’s website and altered it a bit to include some of the warm spices reminiscent of King’s Cake. OK, I am fully aware that mud pie is usually made from ice cream and whipped cream, but hey, I’m taking artistic licence!
This was our 9th progressive dinner, we’ve been having them since 2012! It’s the BEST group of neighbours and everyone gives it their all to make the evening fantastic, which often lasts until the wee hours of the morning…
Here is the menu from this time around, everything was incredibly DELICIOUS!
House #1 Appetizers:
Spicy Cajun Shrimp
Fried Andouille Sausage
Crab Cakes
House #2 Main Course:
Blackened Chicken Thighs
Corn Maque Choux
Rice and Beans
House #3 Dessert:
Bourbon Street Mud Pie with Bourbon Whipped Cream
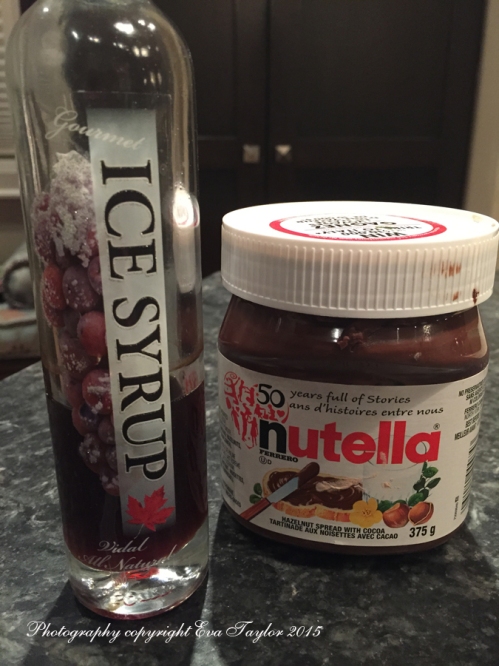
Limoncello
Late night snack: homemade potato chips with sour cream (Greek yogurt) and onion dip
It’s a tasty, chocolate tart.
Bourbon Street Mud Pie
Makes 8 servings of 10 cm or 4 inch mini tarts. Original recipe can be found here.
Ingredients for the pastry:
1/2 cup unsalted butter, at room temperature
80 g icing sugar, sifted
3 large egg yolks
160 g cake & pastry flour
24 g Dutch Process cocoa powder
20 g cornstarch
1/4 tsp salt
1 tsp bourbon
Directions for the pastry:
Cream the icing sugar and butter until smooth, then add the yolks and bourbon all at once and beat until fully encorporated.
Sift the dry ingredients (flour, cocoa powder, cornstarch and salt) into the butter mixture and stir by hand until evenly combined. The dough is much looser than most pastries. Shape the dough into a disc, wrap and freeze for 30 minutes.
Roll out the dough between two sheets of parchment until just less than 2mm (¼” thick). Cut circles of the pastry to line eight 10 cm (4-inch) fluted tart shells with a removable bottom, pressing the dough into the shells and trimming away any excess. If the dough softens, just pop it back into the freezer to harden up for a few minutes. Prick the pastry with a fork. Chill the tart shells for at least 20 minutes.
Preheat the oven to 350°F. Place the chilled tart shells onto a baking sheet and bake them for about 15-18minutes, until you see that the pastry has an even, dull finish. Allow to cool while preparing the filling.
Ingredients for the filling:
3 large egg separated
112 g sugar, divided
1 tsp finely grated orange zest
1 tsp cinnamon
1 tsp vanilla extract
12 g Dutch Process cocoa powder, sifted
86 g bittersweet chocolate, melted (but still warm)
30 bourbon
Directions for the filling:
Whip the remaining 3 egg whites until foamy then slowly add ¼ cup of the sugar and continue whipping on high speed until the whites hold a soft peak. Set aside.
Whip the 3 egg yolks with the remaining ¼ cup (112 g) of sugar, the vanilla and orange zest until pale and thick. Fold in the egg whites and gently whisk in the cocoa powder, melted chocolate and bourbon. You may refrigerate this overnight (I did for 1 night and 1 full day and it was fine).
Pour the filling into the cooled tart shells and bake for about 8-12 minutes at 350°F until the tarts just begin to lose their shine around the edges, but the centre is still dark and glossy. Allow the tarts to cool 2 minutes, before carefully removing them from their shells to serve warm or allow to come to room temperature. Serve with whipped cream.
You may have noticed that this one has ganache on top…we determined was a bit excessive as it’s a very chocolatey tarte.
This was my first try for a friend’s dinner but it turned out way too rich.
Whether you’re gluten intolerant, just want to cut back or perhaps you have friends who are — this is a perfect sauce to have in your back pocket. Toss it on some pasta, zucchini ‘pasta’ or dress up some steamed cauliflower, you’ll be surprised at how good it is! I’m using my tried and true lentil purée for the thickener and boy does it thicken! And the cheese creams up with it perfectly — I used cheddar, but you can use whatever cheese you prefer. You’ll have to watch this sauce because it thickens very quickly and can become too thick when it cools down, so serve it hot. I hope you love this sauce as much as I do.
Gluten Free Cheddar Cheese Sauce
Ingredients:
1/2 cup cooked puréed lentils
1/2 cup skim milk
60 g grated sharp cheddar cheese
1/4-1/2 tsp salt to taste
Pinch of cayenne pepper (optional)
Directions:
Cook milk and puréed lentils until smooth, thick and creamy.
Add cheese and stir until smooth and melted.
Season with salt, pepper and cayenne to taste.
This is a really creamy sauce
Serving suggestions:
Serve over cooked macaroni garnish with Parmesan and broil for a minute until cheese is melted and bubbly. Garnish with chopped green onions and enjoy!
Pour over steamed broccoli or cauliflower.
Use as a base on pizza.
Make this into cheddar soup (although that would be very decadent!)
Do you have any St. Patrick’s Day traditions? Years and years ago, my friend Barb (Profiteroles and Ponytails, on hiatus right now) used to drag us and a bunch of her buddies to some Irish pub uptown. It became quite the tradition, each year a different venu, drinking beer and getting silly (and by getting silly, I am specifically referring to the particularly exuberant cheers when we smashed our beer glasses and broke a few!). When she moved out west, we just stopped celebrating. Then about 6 years ago (actually, 6 years and 2 weeks), my dear friend and colleague Andy and his partner Mark opened an Irish Pub in Leslieville called The Roy Public House (named after Mark’s dad who passed a few years earlier) and ever since we’ve been celebrating this holiday with a beer or two there (I might add, with mature calmness!). I just love heading over to the east end of Toronto, the pub is always filled with locals and friends and it’s a great spot to catch up over a pint. The food is pretty tasty too, the Cobb Salad and the Half Pound Beef Dip are a couple of our favourites. If you’re ever in the big smoke, you MUST drop by and have a pint and grab a bite. This particular St. Patrick’s Day will be no different…sometime tomorrow afternoon we’ll pop over to The Roy and raise a glass or two in honour of St. Patrick.
Have you ever had a recipe in your head for months and months? This Irish inspired soup was something I had at a rather unassuming Irish pub in Barrie last fall…we were heading up to my brother’s cottage for Thanksgiving and our normal Sushi lunch place, just off the highway had unexpectedly closed down so we needed a new place, fast. We had been running late and were very hungry so we literally stopped at the first place we found in old downtown and what luck that we did. They have a chef who insists on house-made menu items and the Guinness Onion Soup is one of her specialties so I had to try it. It actually floored me on how delicious it was! The Guinness caramelizes the onions beautifully and brings a rich (not bitter) flavour to the soup — dare I say, even better than the traditional French Onion Soup. I had this soup in my head all winter long and knew eventually a recipe needed to be developed so what better time to develop it than for St. Patrick’s Day. Other than a little slicing, it’s a pretty easy recipe, I even made my own no knead bread (because JT was up at Limerick Township doing his Councillor duties!).
The recipe makes 1.75 L and it’s totally freezable (or you can have it for three lunches and three dinners like we did — I liked the soup THAT much).
The broth is a bit richer than traditional French Onion Soup
Guinness Onion Soup with Cheddar and Croutons
Makes 1.75 L (depending on how much you boil it down)
Ingredients:
650 g sweet onions, finely sliced
200 g leeks, finely sliced
440 mL Guinness draft
Quick spray of canola oil
3 bay leaves
1/4 cup unpasteurized Apple Cider Vinegar 1 L beef stock
1/4 to 1/2 cup grated old cheddar per serving
Salt to taste
Directions:
Sweat the onions and leeks in a large oven proof Dutch oven until translucent and have begun to caramelize (about 30 minutes).
Pre-heat oven to 300° F (149° C)
Add the Guinness and apple cider vinegar and bring to a boil. Add bay leaves and give it a stir.
Cover with a loosely cut piece of parchment with a hole in the centre like the illustration and place in oven until onions are richly caramelized and Guinness has cooked down about 30-45 minutes.
Remove from the oven and add 1 L of beef stock and bring back to a boil on the stove, taste and season now (keeping in mind that the cheddar will also add some saltiness).
Create large homemade croutons from a couple of slices of no knead bread (cut into 2-3 cm (1″) cubes and toss with a little canola oil, toast until crispy all over.
Ladle about 1 cup of soup into each pre-warmed bowl with a generous serving of cooked onions. Add broth to cover and sprinkle some grated cheddar over the onions. Add a few croutons and add more cheddar. Broil on high until cheese melts and is bubbly. Serve immediately, don’t stop to take photos.
Notes:
There are a lot of onions in this version because I was looking for a hearty soup.
Notice I didn’t do the calorie calculation, there are some things we just don’t need to know.
The vinegar adds a little bite and bit of sweetness, if you don’t like my Onion Confit then omit it or add less (or even substitute a good, rich balsamic vinegar).
This past week was International Women’s Day and I was generously invited (by my dear colleague and friend, Andrea) to the City of Brampton’s 2015 Women’s Day Event and the keynote speaker was none other than celebrity chef Anna Olson! I’ve been a long admirer of Chef Anna’s work from the very first time we dined at Inn on the Twenty in Jordan, Ontario where she and her husband Michael were the executive chefs, more than 15 years ago! These days Chef Anna works with Food Network Canada and is currently starring in Bake with Anna Olson as well as authoring cook books, managing her website, blog and social media outlets not to mention the presentation gigs. On Thursday, Chef Anna recounted her path on how she arrived at where she is today and it was inspirational! She was engaging, funny and interesting, the time just flew by. The audience of 140 were primarily comprised of entrepreneurial women and some young ladies from a local high school. Thank you Andrea for the invitation and the reminder that these networking events are worth every minute because you never know who you’ll meet and where that will lead (of course, I gave Chef Anna my contact info ;-)).
Chef Anna speaking at Lionhead Golf and Conference Centre in Brampton.
That’s me after I had my lovely new cookbook signed by Chef Anna!
Chef Anna’s primary food influence was her grandmother and as I reflected on who my primary influence was (my dear Mother, of course) I also thought about other influences I’ve had over the years, like JT’s mother. JT’s mother was a typical North American cook of that era, not overly adventurous but she made a tuna casserole in the 80’s that was a family favourite. Canned cream of mushroom soup (or cream of celery), a can of tuna, some cooked noodles, perhaps some chopped onion and the pièce de résistance: crumbled salted potato chips on top! Bake in a casserole dish until thoroughly warmed through and serve immediately. Being raised in a Hungarian home, I had never had tuna in this way (or canned tuna any other way for that matter) and having potato chips on top was such a treat. Of course, these days we don’t buy canned soups (too much sodium) nor do we indulge in potato chips, but I wanted the flavour of this retro meal so I reinvented it in a slightly healthier way. I got the thumbs up from JT. Definitely a keeper!
Tuna Casserole Makeover
A Kitcheninspirations Original Recipe!
Ingredients for Creamed Mushroom Soup (yields 300 mL):
60 g little button mushrooms
125 g chopped onion
20 g dried wild mushroom mix (rehydrated in 375 mL (1 1/2 cups) water, reserve liquid)
20 g red lentils (thickener)
3 cloves garlic
Sea salt
Directions for the Creamed Mushroom Soup:
Rehydrate the mushrooms in 375 mL of hot water (you can microwave this for a couple of minutes to get it going faster). Strain into a fine sieve (I use a dedicated coffee filter) and reserve liquid. Wash the mushrooms thoroughly. Chop mushrooms into smaller bits (allows for the really chewy parts to hydrate faster) and set aside.
Cook the onions with a spray of canola oil until translucent, add garlic and stir until fragrant. Add lentils and 375 mL of mushroom broth and rehydrated mushrooms. Cook until lentils are completely cooked and mushrooms have no chewy bits, season with salt.
Pulse with an immersion blender until smooth and silky. You may push this through a fine sieve if you’d like, but I didn’t think it was necessary. Set aside 250 mL (1 cup) and freeze the rest, it’s great for soups, gravy or even a base for pizza.
Ingredients for the Tuna Casserole:
120 g drained albacore tuna in water
1/2 cup pearl barley
150 g green beans, washed and cut into thirds (bite-sized pieces)
1 cup water
1/3 cup Greek yogurt
1/4 cup bread crumbs
1/4 cup freshly grated Parmesan cheese
Directions for the Tuna Casserole:
Pre heat the oven to 350° F (176° C).
In the same pot as you made the creamed mushrooms, toast the pearl barley in a little oil, add about 250 mL (1 cup) water and cook the barley until about 3/4 done (it will continue to cook in the casserole) until almost all of the water has been absorbed and what’s left is thick. The barley should still have quite a chewy texture.
Combine the cleaned and cut green beans and roughly separated, drained tuna with the barley, add the creamed mushroom soup, 1 cup of water and give it a good stir. You may keep everything in your pan if it’s oven proof, I transferred it to two small oven proof casseroles that I lightly oiled.
Combine the Greek yogurt, bread crumbs and Parmesan cheese and dollop on top. Bake for 30 minutes or until the internal temperature is 160°F (71° C). Serve with a small green salad.
This is the Greek yogurt topping before I baked it.
Notes:
You may, of course use canned soup and not make your own creamed mushrooms.
We prefer to use Albacore tuna in water, but the choice is yours.
Don’t like green beans? Use celery instead (I had green beans on hand).
We are trying to cut back so I used this recipe for four servings. JT said he could have easily eaten one small casserole on his own (even though I did serve him 3/4 of it!).
I have a double oven and I baked this in the top, smaller oven so I was able to get a little browning on the topping without turning on the broiler. If you bake these in a large oven, you may wish to broil the tops for colour and texture!
Substitute quinoa or bulgur to lower the calories and carbs a bit (makes it 5 points in WW). Leave out the Parmesan and bread crumbs to bring the WW points down even further to 4!
Weight Watchers Points
For fun I did the original recipe as comparison. WW points for the original recipe would have been 12!
Recently, we had brunch at a relatively new Mexican Restaurant in the Distillery District. El Catrin is what I would call a contemporary Mexican restaurant, it’s not the run-of-the-mill antiqued hub caps, large neon flickering signs, rusty metal or garish tiles no, El Catrin has taken all the familiar elements of Mexican design and incorporated them into a contemporary style that is clean, fun and unquestionably Mexican. The striking two-story mural painted by artist Oscar Flores spans the entire width of the grand cathedral-like space and its subject matter and colours awaken your senses as soon as you set foot inside, preparing you for the sensation you had hoped for. There is a wall of hand painted skulls strategically lit giving the space an aura of macabre (click here for more interior photos). The lighting is tasteful incorporating oversized barrel shades with lace-like cut outs and the inside of the shades are painted yellow which cast a beautiful warm glow over diners. Although the space is enormous, it’s warm and inviting and not as loud as I would have expected.
It’s a tastefully decorated Mexican Restaurant
It was not busy when we dined there so our experience may not be normal because I understand that this is quite the happening place at night. Our server was friendly and attentive. We started with the guacamole but it was a misunderstanding that it was ordered. I thought the waitress had asked us if we wanted ‘drinks to start’ with but infact she had said “guacamole to start?” (I guess it was noisier than I thought). JT heard it right and just about fell off his chair when I said “yes”. When the guacamole arrived the truth came out. Usually when it’s just the two of us, we don’t order guacamole because it fills us up too much and we overeat. Not with standing, we ate the entire order and thank god they didn’t offer to replenish the chips because we would have polished them off too. I don’t know about you, but I find guacamole in restaurants quite expensive and this one was no different ($11 for the small). It was a traditional recipe and the waitress brought it out in a mortar and pestle and finished squashing the avocados and doing the final mix at the table. We ordered the plain version made with avocado, tomato, onion, fresh cilantro and serrano chili but for an extra $9, you could order a version with Crickets. Yes, you read that correctly. Definitely not my cup of tea, but go ahead and order if you dare.
We ordered two smallish plates of soup and a salad; I adored my choice, Sopa de Tortilla ($8), a tomato and chili broth bursting with flavour served with crispy corn tortillas, avocado chunks, queso cotjia garnished with crema fresca and lime. JT was not as thrilled with his choice, Ensalada Tomatillo ($8) which had onion, fresh cilantro, radish, serrano chili, fresh cheese dressed with a flavourful tequila lime vinaigrette — I tried it and liked it a lot, I think the tomatillos threw him a bit. We both chose soft tacos (me flour and JT corn) and our plan had been to eat only one or two of the three tacos and save the rest, but it was so good, neither of us could stop (we had popcorn for dinner that night!). JT’s Pollo Con Mole ($15) made from pulled chicken cooked in a light mole, crema fresca, cotija cheese, xni-pec, toasted sesame seeds nestled comfortably on a fresh corn tortilla. JT said the mole was good but not nearly as rich as some of the other moles he has experienced. I had the Gobernador ($15) which had succulent and perfectly cooked lobster and shrimp stuffed into a soft and tender flour tortilla with black bean purée garnished chipotle aioli; I was pleasantly surprised with the quantity of lobster in this dish. The plates were full of the bright flavours associated with Mexican cuisine and were absolutely delicious. I have to say that the quantity wasn’t nearly as generous as some of the other Mexican restaurants in Toronto that we have been to, but having said that, we still did not have room for dessert :-).
Sopa de Tortilla $8 Canadian. This soup was very tasty
Ensalada de tomatillo $8 Canadian. I enjoyed this salad and would consider ordering it even though JT wasn’t a fan.
JT’s Pollo con Mole $15 Canadian
This is my Gobernador $15, it has a decent amount of lobster
In more pleasant weather (we were there when it was -20°C (-4°F)) there is an interior courtyard patio, lit with similar barrel shades as the inside, there are also several heat lamps as well as a gorgeous gas fire pit burning in the centre; will have to come back in the summer as I love a patio that is no where near a road.
The fire pit gives an amazing ambiance, even in the winter!
Overall rating of El Catrin: Decor 4.5/5, service 3.5/5, food 4/5, Value 3/5, Noise: 3.5/5 (1 being very noisy, and 5 being very quiet).
Disclaimer: We purchased our meals for full price and my opinions just that, my opinions.
El Catrin Destileria
18 Tank House Lane in The Historic Distillery District
55 Mill St. Toronto (street address).
Several years ago I posted a few no knead bread recipes (here, here and here) and over the years we (read JT) have continued to make this mindless, easy, delicious and beautiful artisan looking bread so I thought it would be good to revisit the post and update with new images. You may recall that this was JTs baby and to this day, he is the maker of this tasty bread. I also wish to add a caveat that this bread is CRAZY EASY to make so, all you yeast doubters (you know who you are) I strongly encourage you to make this bread. Seriously, you can’t fail!
We made this batch for Valentine’s Day to be served with the meatless balls and boy was it successful — our dinner guests loved it so much they asked for the recipe and then they made it the very next day! How cool is that?
This is our friend’s bread, pictured in their spankin’ new kitchen!
I don’t know what happened to the recipe but it disappeared. I have included it now. I must give a shout-out to A-Boleyn from Live Journal, who asked some questions which lead me to discover that the recipe went AWOL.
No Knead Bread
No Knead Bread Ingredients:
375 g (3 cups) all purpose, unbleached flour
2 tsp salt
1/4 tsp bread machine yeast
1/4 tsp red wine vinegar
380 mL (1 2/3 cup) warm water
Directions:
Combine flour, yeast and salt in a large bowl, mix with a wooden spoon.
In a measuring cup, add the red wine vinegar to the water and stir. Pour the vinegar water mixture into the flour and stir with a wooden spoon until combined. The dough will be shaggy. Let rest for 4 hours in a warm area. JT usually puts a piece of clear plastic wrap over the top of the bowl.
Dough is ready when it is dotted with bubbles. Lightly flour work surface and place the dough on it, sprinkle a little more flour on top and fold the dough over itself a couple of times. Leave bread on the work surface and cover loosely with the recycled plastic wrap from the first rising and allow to rest for 15 more minutes.
Using just enough flour to keep the dough from sticking to your fingers, gently and quickly shape the dough into a ball (JR does this by simply pushing and folding, no kneading necessary). Generously dust a clean cotton towel (not terry cloth) with cornmeal and lay dough ball directly on it, seam-side down. Dust dough lightly with more cornmeal and cover with another clean cotton towel.
Dough should rest 2 hours or until it is more than double in size. At least 30 minutes before you wish to bake the bread, heat the oven to (232° C) 450° F. Put a 6 to 8 quart heavy cast iron pot with a lid into the oven and heat both oven and pot up as the oven warms. When the pot is heated through, add some cornmeal to the bottom and gently roll the dough into the hot pot, seam side up (JT does this by taking the cloth that the bread rested on and just roll it off the cloth into the pot). Be careful, the pot is extremely hot. It will look like a mess, but it will be OK. Cover with lid and bake for 35 minutes, then remove lid and bake for an additional 10 minutes.
Cool on wire rack.
The crust is incredible. Sadly, the photo is not.
The baguette is about 25-30cm (12 inches) long x 7-8 cm (3 inches) wide and the boule is about 15-20cm in diametre, perfect for 4 for a meal!
Notes:
We usually make one large boule out of this recipe but the last time we did 1 small boule ( in a 1.8L cast iron enamel pot with lid) and 1 baguette (in a similar pan as this)
If you use Le Creuset then make sure you change the lid knob out to a metal one because the black ones shouldn’t be heated at that high temperature.
You may recall that several months ago I did some food prep for the Global Morning Show showcasing a new cookbook Toronto Cooks; 50 Toronto Restauranteur chefs gave up their signature recipes for this beautifully photographed cookbook and they are the actual recipes that they serve in their restaurants without any intentional omissions! I had the privilege of making Chef Rocco Agostino’s Spicy Meatballs and although the meatballs were out of this world, they were slightly on the heavier side than I like to eat so when I saw Lorraine’s Vegetarian Bean and Quinoa Meatballs recipe, I was all over it! Because I wanted an Italian flavoured ball I used only her base ingredients and the flavourings from Chef Rocco’s incredible recipe. Thank you Lorraine, you’ve come up with another winner! The meatless balls are tender with great texture from the bulgur (a swap I made due to an over processing error on my first test).
One of the key, flavour-building ingredients is Chef Rocco’s Bomba. Sadly I was not able to find the recipe online, so I am not going to post it. Bomba is a combination of raw vegetables, brined artichokes, Italian chili peppers as well as a few other flavourful ingredients, ready-made can be purchased at specialty stores or better yet, buy the Toronto Cooks cookbook, it’s the best Toronto Restaurant cookbook you’ll find!
Spicy Vegetarian Meatballs with a Rich Tomato Sauce
680 mL puréed San Marzano tomatoes, with a little water to rinse out the jar
1/2 tsp baking soda
1/4 cup chopped fresh basil leaves
125 mL (1/4 cup) Bomba
salt to taste (be careful because the Bomba can be salty)
Directions, Tomato Sauce:
Heat a large dutch oven with 15 mL olive oil.
Add the onions and sauté until translucent. Add the garlic and cook for about 1 minute. Add the tomato purée, baking soda and simmer for five minutes.
Add the chopped basil, Bomba and simmer until dark and thick. You may cool and refrigerate at this point.
Ingredients, Meatless Balls:
15 mL olive oil
130 g onion, peeled and chopped
1 clove garlic, finely chopped
2 tsp dried oregano
10 g dried wild dehydrated mushroom powder
125 mL roasted red pepper, puréed
45 mL (3 tbsp) Bomba
1 cup grated Parmesan grams?
30 g (1/4 cup) ground almonds
2 eggs
124 g 1 cup breadcrumbs
136 g raw bulgur (yields 2 cups cooked) 170 g bulgur yields
65 g dry red kidney beans, cooked as per package directions and chopped roughly
Salt and pepper to taste
1/4 cup fresh parsley, chopped finely
1/4 cup fresh chives, chopped finely
1/4 cup fresh basil, chopped finely
Directions, meatless balls:
Add oil to a hot frying pan and cook the onions until translucent. Add the garlic and cook 1 minute. Cool completely.
In a large bowl, add the cooked bulgar, chopped cooked beans and onion mixture and mix with a fork. Add the roasted red pepper purée, Bomba, Parmesan, ground almond and bread crumbs and mix in well with the fork. Taste for seasoning (taste now because you won’t be able to when you add the eggs) and add salt and pepper as required.
Slightly whisk two eggs and incorporate into the mix.
Fold in the fresh parsley, chives and basil.
Refrigerate for 30 minutes.
Preheat oven to 400F. Bake meatless balls for 30 minutes, turning occasionally.
Cool completely and refrigerate until required.
Reheat sauce. Reheat meatless balls for 20 minutes at 300F..
These are the little guys baking.
Don’t let them fool you, these are very filling meatless balls.
I was so pleasantly surprised the other day at the grocery store when I saw my own work on the packaging! I worked a full week on these easy to assemble, ready made foods.
Notes:
Although I do love quinoa, I substituted bulgur here because I had over processed my first recipe test and it resulted in a pasty texture so instead of chucking the whole thing, I added bulgur. My husband loved the texture so when I made the second batch I simply substituted it altogether.
This recipe is about texture as much as it is about flavour, although it’s not meat, the texture has a great bite to it.
I found reheating the meatless balls in the sauce softened them up too much so I heated them in the oven 300F for 15-20 minutes.
As most dishes like this, it’s best the next day so I always make it one day before I needed it.
This time of year, those of us who live in the northern hemisphere are not quite as fortunate as those who live in the southern hemisphere; I’m referring to being able to source the best produce, of course. Personally, I think tomatoes are the greatest disappointment by far (next to strawberries). More often than not, I bite into a tomato and taste nothing. Nadda. Mealy. Pasty. Nothing. This time of year, I tend to gravitate toward the best canned tomatoes, knowing that they were picked and packed at their prime. But somehow, when it comes to using the humble tomato as the main ingredient, the STAR as it were, I feel that canned just wouldn’t cut it and alternative measures must be taken.
Some of you who have been on this journey with kitcheninspirations will recall that I posted a rant and a solution about unseasonal tomatoes a few years ago (4 to be exact) and todays post is about a great use for those oven-dried tomatoes. Oven drying is a long procedure but well worth it, particularly because there is little to no effort involved. Just a few clicks on the hydro metre and you’re almost all the way to a delicious tomato recipe.
Roasted Tomato Soup
Serves 4-5 150-175 mL servings
Ingredients:
1 kg (2.2 lbs) tomatoes ~ this doesn’t have to be precise (I used vine ripened)
500 mL to 1 L chicken stock (or vegetable stock)
6 cloves of garlic, roasted
2 tbsp olive oil (or chicken stock stock)
1/2 tsp salt
1/2 tsp baking soda
4 tbsp goats cheese, at room temperature
4 tsp unflavoured yogurt
Directions:
Pre-heat oven to 250° F (121° C).
Remove all loose skin from each garlic clove, leaving the tight skin on. Place the cloves into a small ramekin and add about 2 tbsp olive oil and some sea salt. Cover with foil wrap and tuck into the corner of the oven. If you prefer not to bake the garlic at the same time as the tomatoes, you may roast the garlic in a 350° F (177° C) oven for 40-45 minutes or until soft.
Wash and slice the tomatoes into thirds (believe me, the tomatoes lose a lot of water in the dehydration process so you must leave them THICK). Place cut side down on some paper towel for about a minute.
Rub a cooling rack with a lightly oiled paper towel and place directly over a baking sheet (to catch any drippings).
Arrange the tomatoes cut-side up on the prepared cooling rack and place in the centre of the pre heated oven. “Bake” for 4-5 hours until most of the moisture has been eliminated from the tomato.
Once dehydrated, add all of the tomatoes and the roasted garlic (skin removed), baking soda into a heat-proof bowl and slowly add the stock. Blitz with the immersion (stick) blender until smooth, adding more chicken stock until the desired consistency has been achieved. Season with salt as desired.
Push through a fine sieve and blitz once more for added creaminess.
Combine the goats cheese and the yogurt and whip until fluffy. Set aside for serving.
When ready to serve, heat the soup through and add a dollop of the goats cheese and yogurt into the centre. Serve piping hot.
This thick, creamy soup is perfect for cold, snowy days. It would also be delicious chilled on a hot summers day.
Notes:
The addition of baking soda came from JT, he uses this trick in his delicious Chicken Cacciatore to quell the acidity of the tomatoes. It really brings out the tomatoes’ sweetness — try it instead of adding sugar!
I whipped the goats cheese with yogurt to make it easier to melt into the soup, we swirled it in and it was delicious.
Last Friday night we went out for dinner but finding a spot was a much more arduous task than usual because it was Winterlicious. Winterlicious/Summerlicious theme was originally developed by the City of Toronto to encourage residents to go out for meals after the unfortunate SARS breakout in 2002; it’s a participation event where restaurants offer prix fixe meals for standardized rates (Lunch: $18 • $23 • $28; Dinner: $25 • $35 • $45). This year there are over 200 participating restaurants! What’s really cool is that some really high end restaurants participate where you get a three course meal for $45 Canadian (in some of these places $45 is usually just the main course!). It’s a great way to sample some expense account restaurants. But don’t think the restaurants aren’t making money because as one restaurateur once told me that because people perceive they are getting a deal on their meals, they will splurge on the bottle of wine, or two (in Ontario our restaurant liquor is usually marked up 3 times)! Getting a reservation this time of year is no easy task, even in non-participating places, but participating places it’s next to impossible. One year, I was on the phone for over an hour trying to get connected to a highly demanded Summerlicious restaurant, it was like calling a radio station for a prize, you just keep calling and calling and calling until you were connected. One year I gave up after 45 minutes of re-dial!
These days, I just couldn’t be bothered trying to get into the popular places plus we’re still trying to cut back consumption so three courses just isn’t what we want to eat, no matter how good the price. So Friday night we went to the newest addition of the Playa Cabana restaurants on Bloor, Playa Cabana Barrio. It’s part of a small Mexican group in Toronto and we have found (at their three other restaurants) the food to be exceptional and reasonably priced. This one was in Little Korea and the menu read more Korean than Mexican. I usually preview the menu but I was busy and didn’t this time. I was really in the mood for Mexican. The narrow restaurant was very crowded (imagine the width just wide enough for one table on either side, one parallel to the wall and one perpendicular). The tables are very close together so it’s difficult not to say ‘Hi’ and chat with the table next to yours (impossible for JT, that is). We were very fortunate as we had two young women from each end of the country (Victoria, BC and St. John, Newfoundland) reuniting for a girls weekend and we hit it off, weaving short conversations between courses about places they should go to in Toronto and their lives at the polar opposites of Canada.
One of the courses they ordered was BBQ’d Kalbi Ribs which came out “Fred Flintstone” style, piled up on a plate. When I say piled, it must have been 20 cm (8 inches) high! And I’m not exaggerating! It was difficult not to comment (for JT, that is)! But here’s the most unusual part: they insisted we take the last mammoth rib home as they were staying in a hotel (it was served family style, so it wasn’t handled). So we DID! Is that not the best story EVER? How many times have you wanted to give your uneaten food away while on holiday? It’s really a shame to throw away perfectly good left-overs (as long as they weren’t handled)
This inspiration is the result of that donated doggy bag of “Fred Flintstone” proportion Korean BBQ’d beef short rib!
Although the yolk doesn’t look as runny, it really was!
To be honest, I had not intended on posting this recipe but the accolades it received at a party we had late last year with our neighbours, well, I just couldn’t ignore it. If you like warm, melty brie, chopped cashews and almonds, some chopped dried cherries, apricots and raisins then this is for you. Oh, did I forget to mention the home-made caramel sauce? Yes, you did read that correctly.
Ingredients for the Brie:
Small round of Brie
About 50 g chopped nuts (I used cashews and almonds)
25 g chopped dried cherries
25 g chopped dried apricots
25 g golden raisins
1/2 tsp allspice
1/2 tsp cinnamon
Ingredients for the caramel sauce:
1/4 cup granulated sugar
3/4 tsp lyle’s Golden syrup
3/4 tsp water
Dash of lemon juice
1/4 cup heavy cream, heated
1/2 tbsp salted butter
Directions:
Pre heat oven to 275° F (135° C).
Combine the nuts and dried fruit with the spices and set aside.
In a microwave proof measuring cup, add the sugar, syrup, water and lemon juice, whisk to combine.
Microwave the sugar mixture on high until it JUST begins to darken (mine was a hair less than 1 minute 20 seconds, using a new microwave — watch it carefully). Remove it carefully from the microwave and set aside on a heat-proof surface and watch it turn dark amber.
Meanwhile, heat the heavy cream until almost boiling. When the melted sugar had reached a gorgeous amber colour, slowly add the hot cream while whisking. Add hot cream little by little as it will bubble up. Stir in butter until melted.
Pour hot caramel over spiced nut and dried fruit mix, toss until combined.
Place Brie round in the centre of a heat proof vessel (I used cast iron so it will keep warm for a while). Pour the nut caramel mixture over the Brie and bake until Brie is hot and melty 5-10 minutes. Serve with French stick and crackers.
I wish I had shot a pic of it right out of the oven but sadly it disappeared too quickly!
Do you have a cooking bucket list? I’ve had an informal (read: in my head) bucket list for quite some time; on it you’ll find duck, szalonczukor (a Hungarian fondant candy), spun sugar, puff pastry, phyllo pastry and last but not least, French Macarons! This post is about Macarons.
I was first introduced to these French Macarons a few years ago, a friend had brought a few back for me from Ladurée in Paris. My first bite experience was INCREDIBLE: crunchy, airy, lightly sweet, slightly chewy, fragrant, creamy, buttery. It was an awakening! It’s what you Aussie’s would call moreish and I would even go further to say needish, wantish, must-haveish!
The flavour combinations are limitless and I’ve even seen some savoury versions floating about the web-o-sphere (I must admit, a savoury version makes me cringe a bit). Today, I will share with you my second attempt recipe even though my first version turned out wonderfully, they were rather irregular in size and therefore not blog worthy. I used a Martha Stewart recipe for the meringue bit and a standard custard-based butter cream for the filling. The flavours I chose were: attempt 1 was lemon, attempt 2 were ice wine and pomegranate, chocolate and hazelnut. All were really delicious but my favourite was the lemon.
I will begin by saying that making Macarons are not as difficult as you might think; you need patience, a little know how and perseverance. The ingredients are simple and few. It makes me wonder why they charge so much for them, it must be the pomp and circumstance because it isn’t the cost of ingredients!
This blog post is an excellent reference; the professional baker did all the time-consuming comparisons and experimentation and documented it. My advice: Go with confidence and you WILL rock the recipe.
5 g flavour such as unsweetened cocoa powder (sifted) or espresso powder
1 large egg white, room temperature
25 g granulated sugar
Directions:
Preheat oven to 350° F (177° C). Place the rack in lower part of the oven.
Prepare your macaron template using your computer to draw 2.5 cm or 1″ circles about 2.5cm or 1″ apart. Print two sheets. Put the two sheets under your UNSTICK™ baking sheet liner to use as your circle templates.
This is the circle template under the UNSTICK liner.
In a coffee grinder, grind the almond flour in batches to a fine consistency (being careful not to make paste (marzipan) out of it). Omit if you can purchase extra finely ground almond flour.
Transfer ground almonds to a food processor and add the icing sugar; process until combined, about 1 minute.
Press the almond/sugar mixture through a fine-mesh sieve to remove the larger bits. You should have no more than 1 tbsp left, if you do, grind in coffee grinder again and press through fine sieve until you have no more than 1 tbsp left (save larger almond bits for something else).
Whisk egg whites and granulated sugar by hand to combine. Then beat on medium speed (#4 on a KitchenAid) for about 2 minutes, then increase speed to medium-high (#6) and beat 2 additional minutes. Then beat on high (#8) for 2 minutes more. The beaten egg whites will hold very stiff, glossy peaks when you lift the whisk out of the bowl. DO NOT OVER WHIP.
Add your choice of flavourings and food colourings and beat on the highest speed for about 1 minute. Just a drop if using flavouring or colour.
Then add dry ingredients ALL at ONCE (yes, I know many recipes say to fold in gingerly, but you really don’t have to), then fold with a spatula from bottom of bowl upward and end by pressing the flat side of the spatula firmly through centre of mixture. Repeat this process until all of the almond/sugar mixture has been incorporated and the ‘batter’ flows like lava (I counted about 35 complete strokes).
Prepare you pastry bag fitted with a 1 cm or 3/8″ round tip. Transfer the batter to the pastry bag.
Begin piping the batter onto the prepared UNSTICK™ baking sheet liner directly over the circles you’ve previously prepared. I found starting at the outer edge and piping into the centre to the easiest way to keep the Macarons uniform, repeat until you’ve used up your batter. Martha suggests you pipe about 1 cm or 1/2″ above the pan, whatever you do, you must be consistent to keep the batter even (so your circles are all the same size). Gently slide out the template paper from beneath the UNSTICK™ baking sheet liner.
Allow the pan to rest for 15 minutes, by doing this you give the peaks time to even out so your Macarons are beautiful and flat on top. Some suggest that you gently bang the pan a few time to remove air bubbles, I found I didn’t have many bubbles.
Bake each sheet separately for 13 minutes, rotating halfway through if your oven doesn’t bake evenly. Gently slide the liner off the baking sheet and allow to cool for a couple of minutes. The UNSTICK™ baking sheet liner allows you to pry off each macaron half easily onto a cooling rack and allow to cool completely. You may freeze the Macaron halves at this point in a well sealed, air-tight container.
Prepare your butter cream.
Great flavours to make macarons with.
Basic Butter Cream Recipe:
Ingredients:
3 egg yolks
35 g granulated sugar
3 1/2 tablespoons milk
105 g unsalted butter, softened
62 g icing sugar
Ingredients for Ice Wine and Pomegranate Butter Cream:
5 g ice wine syrup
1 g pomegranate molasses
2 drops generic red icing colour
Ingredients for Chocolate Hazelnut Butter Cream:
2 tbsp Nutella or hazelnut chocolate spread
Directions:
In a small saucepan, combine the egg yolks, milk and granulated sugar and whisk. Cook over medium heat until the egg thickens to coat the back of a spoon (like pudding). Remove from heat and allow to cool COMPLETELY.
When cool, beat the butter with the icing sugar until light and fluffy and add the cooked egg mixture and beat on high until very fluffy.
To make two flavours, divide the buttercream in half (roughly) and to each half add the flavourings.
Pair each Macaron half to a half that is more or less is the same size and shape, set aside.
Onto one-half of each Macaron pair, pipe the buttercream but not to the edge. Take the other half and gently squeeze the to side together so the buttercream squishes almost to the edge. Set aside. When you have filled all the halves, set on a clean baking sheet and refrigerate until buttercream is set. Store in an air-tight container on their sides until ready to serve. Allow to come to room temperature before serving.
A few notes:
I prefer weight measures over volume because it’s more accurate.
I ground my almonds in a coffee grinder because it results in a finer grind and apparently the grind is very important. Update May 2016: a fine grind almond meal is now available at my Bulk Barn so I no longer require to grind it in the coffee grinder.
I ruined a batch using the convection setting in my oven; they didn’t spread nor did they rise or develop feet.
Over the years, I have made quite a few batches of these treats (the latest May 2016 was 146 macarons for our anniversary party). Two observations: Do not over beat the egg whites or they will not form feat and they will crack. Also, I found that they will crack if you do not fold the almond meal into the egg whites enough, the batter really needs to behave like lava, a slow moving thick batter.
Update May 5, 2016: I have also used this recipe from the very lovely Lorraine over at Not Quite Nigella and it is excellent. Her recipe makes 461 g of buttercream and by my estimation, each macaron takes about 14 g of buttercream (or if you make small macarons, only about 7 g of buttercream).
Tender, delicious, delicate cookies
Betcha can’t eat just one!
Yes, I did get carried away with the photos!
For my first attempt, I didn’t grind the almonds quite fine enough and that’s why the macaron is not smooth.
The holidays are but a memory and we’re all back to our normal routines but we’re still seeing old and new friends whom we didn’t have time to see over the holidays. Wouldn’t it be nice to have a simple yet flavourful dip to offer? This garlic infused goat’s cheese was an hors d’œuvres I had about 12 years ago at an old friend’s place and it always makes the cut; when I realized I hadn’t posted a recipe for it on the blog, I thought 2015 is the time! It’s really so easy it’s not even a recipe but an inspiration, thinly sliced cloves of garlic with Extra Virgin Olive Oil, fresh aromatic basil leaves and tangy sun-dried tomatoes makes this absolutely irresistible. Mix it up and add some sun dried black olives instead of the sun dried tomatoes. The longer you allow the garlic slices to infuse the goat’s cheese the better and make sure you allow this dip to warm up to room temperature before you serve it. And for heaven’s sake, please don’t forget to count the garlic slices and make sure you remove every single one of them before serving because it could be a rude awakening for some poor soul.
Infused Goats Cheese
Makes about 1/2 cup of goats cheese dip
Ingredients:
4 cloves garlic sliced thinly (about 4-5 slices each, count the slices and take note)
1/4 tsp sea salt
5 basil leaves sliced thinly
~140 g goats cheese
2 tbsp EVOO
3 tbsp sun dried tomatoes in olive oil or chopped sun dried black olives
Directions:
Spread the goats cheese into a resealable container. Spike the thinly sliced garlic into the goat’s cheese so it’s covering most of the cheese.
Spread sliced basil over the cheese and poke them into the cheese. Sprinkle with salt and EVOO. Refrigerate at least 24 hours, longer is better.
Before serving, transfer to a pretty plate and remove the garlic slices (this is why you count them). Dot with the sun dried tomatoes or chopped black olives.
Allow the dip to come to room temperature to serve. Add more fresh basil, if you wish.
This is the infusing process, the sun dried tomatoes or black olives are added just before serving.
Quite some time ago I was approached by the creator of a new lineup of products called UNSTICK™. We spoke at length about the product and various applications and when I saw the product was launched last October at the Delicious food show I was ecstatic and impressed. I called the inventor immediately to congratulate them on the success of the launch and we talked about a product review. Kitcheninspirations was provided with products 1-5 for testing/reviewing with no other compensation. The following is my unbiased review.
The packaging is beautiful and clearly colour coded — believe it or not, a lot of brands get this wrong — you know the ones that you have to stand in front of for 10 minutes before you can figure out which one you usually buy?
“UNSTICK™ is made of a premium quality PTFE, which is a Teflon coated fiberglass material.”(1) It is FDA approved and is safe to use to 500° F (260° C). These products are made for everyday kitchen use and should be cared for like a reusable silicon sheet, never use sharp utensils, store rolled or flat, you know the drill. The beautiful thing about UNSTICK™ is that they are affordable (retails for $15.99-$19.99 Canadian) and are designed to fit many sizes of pots and pans. The bonus is if you can’t find one that fits, just cut it to size; presto, a custom-made reusable non-stick liner!
Why use a reusable non-stick liner? It’s not always about the ease of cleanup, that’s a no-brainer, for me it’s more about creating less waste (that means that you needn’t throw away a scratched teflon pan, just pop in an UNSTICK™ liner and you’re good to go) . It also creates a smooth surface over and above the normal texture of the pan — cakes have a beautiful, smooth crust to slather on icing, cookies spread uniformly and bake evenly. OK, clean up is a cinch and when you’re stuck in the kitchen baking or cooking for hours, a quick cleanup means 10 extra minutes you can sit before you start the next round! UNSTICK™ also cleans well, there is no greasy residue that some of the other name brand reusable silicon liners seem to get (no matter how hard you clean them). When you clean UNSTICK™, it actually feels clean and dries quickly. There is absolutely no smell or taste residue on baked goods (sometimes I find silicon pans have an odour). Another bonus is that you NEVER need to use any oil or nonstick spray and that’s better for you!
My first experiment with UNSTICK™ was the small loaf pan liner, it’s a pre-cut rectangle to fit snuggly in a 9-inch (23 cm) loaf pan. I baked a pumpkin loaf in it and it was so easy to remove (just pull up on the sides and lift the loaf out), the liner slides off perfectly.
The flat loaf pan reusable sheet.
The reusable sheet in the loaf pan.
The second go was Charles’ Swedish Chocolate Sticky Cake (Kladdkaka) in a 9-inch (23 cm) springform pan. Although the insert performed perfectly, I wasn’t so thrilled with the inevitable jagged edges the insert cuts left on the cake. Perhaps a few more cuts would smooth out the circle?
The flat spring-form reusable sheet
The round sheet in the spring-form pan
The jaggy cake. It’s
The frying pan liner was next, most of my frying pans are cast iron perfectly seasoned, but I did give this a go and made an omelet roll (rolled like the Japanese omelet, tamagoyaki) filled with a crab and goat cheese mix. The egg cooked perfectly and because I wanted to roll it, the liner made it incredibly easy; just lift up one side, tuck under the edge and roll.
The baking sheet liner was a god-send over the holidays, many melty messes were easily cleaned up and the reusable sheets cooled down so quickly that I was able to reuse them immediately on subsequent bakings of the same batch (a definite plus over the standard silicon sheets which seem to take a while to cool).
Roasting and baking sheet liner.
The oven liner is A M A Z I N G! It performs perfectly, it does NOT change the oven temperature one bit (like tin foil would) and because it has similar properties to the baking sheet (although the oven liner and the BBQ liners are much thicker) they are easy to handle and also cool down quickly so I was able to pull it out of my upper oven and test it in larger oven without having to wait for it to cool to handle it.
I have not tested the BBQ liner yet, there was a snowstorm the day I planned to give it a test and then later there was freezing rain, so we bunkered down, lit a fire, popped open the wine and chilled (I know you won’t mind). I can tell you what the BBQ liner would be amazing for is camping! OK, I’m not much of a camper but I do recall when my family when on a picnic to a public park and we used the communal hibachi BBQs, my Mom would spend at least an hour scrubbing the heck out of the communal hibachi so it wouldn’t be gross. The UNSTICK™ BBQ liner would allow you to spend a minimal amount of time to lightly clean the grill and put the liner on top, presto: covers up all the grossness and makes it safe to cook your own food. You could also fry an egg on it WITHOUT a pan! So if you’re camping and you have to portage, you need only take the UNSTICK™ lightweight BBQ liner and you’re good to go! No need for bulky heavy frying pans! It will also prevent flair ups and sauces will not drip all over your grill, gumming up the element or gas. And clean-up is a cinch, the gooey mess slides off and a dip in hot soapy water renders this clever product like new.
All in all, I am very happy with the performance of these products and I would definitely recommend them; I’m going to put an oven liner and a frying pan liner in my food styling kit which I know will save me precious minutes for clean up when I’m on set. Check out the UNSTICK™ shop here.
Christmas Eve is the more celebrated day in European families, even those residing in North America. Back when I was a child, my family would make the trip out to Northern Toronto on December 23 or 24 to buy our Christmas tree. It was tradition not to set up the tree until the day of Christmas Eve (although JT and I have been known to get our tree in late November!). Even though it was late by North American standards and the trees were pretty well picked over, we always managed to find a good one (not an easy task in a family of tree connoisseurs). One year the best tree (read fattest) was so short, we had to put it on a table. Mom said it was so more presents could fit under the tree. The only thing Dad did with the tree is put the lights on it. The lights would only be turned on to make sure they were evenly distributed and then they wouldn’t be turned on until later that night. Mom, my younger brother and I would always dress the tree. My favourite part was adding the tinsel after all the gorgeous hand blown glass balls (and various kid craft ornaments) were hung; my brother would throw the tinsel on by handful and I would carefully add them one tinsel strand at a time. The tree wouldn’t be complete without adding szalonczukor, a traditional Hungarian fondant candy that my Aunt and Uncle would send every year from Budapest. We also had candy canes but that was later as we became more Canadianized.
Christmas Eve was our big celebration and we would always have a huge dinner (Mom would make fish and turkey with all the fixings) and then after dinner (which seemed to take F O R E V E R) we’d be sent off to our rooms to see if we could see Santa in the skies because we’d follow him through NORAD! During that time Santa would arrive quite quietly and fill the floor beneath the tree with gifts. So many gifts. Then, Mom and Dad would turn off all the lights and illuminate the tree, Dad would put on on some Christmas music (a special mix he made on the Sony reel to reel) and they would signal my brother and I (and usually some stray my Mom invited for dinner) to come out of our room into the living room. That was our Christmas. I can still feel that nervous energy and the excitement of the anticipation as we walked down the hall into the living room, our eyes bugged open to take in the view of our beautifully lit Christmas tree and piles and piles of presents! We would always start out opening presents systematically but by the end it was always chaos. At some point Mom would serve dessert, a traditional Yule log (piskota), both walnut and poppy seed Baigli! She also made a Lindzer Szelet which was my Dad’s favourite (a tender pastry square with a layer of apricot jam and sometimes chocolate ganache). Cognacs would be poured (for the adults) and my brother and I would lose ourselves in the bounty of all our new toys and have an impromptu fashion show off all our new clothes (well, maybe that was just me). Family friends always popped in after dinner after the mess was cleaned up, more desserts were served and more cognac was poured. It truly was magical.
On Christmas Day, my brother and I would open our stockings and we would continue to play with our new things while Mom made a beautiful breakfast with kuglof and home made jam. Christmas Day was usually quiet at our house, we hung around in our jammies, played, watched a Christmas movie or two and just chilled. We were always invited to my parents’ best friends for Christmas Day dinner.
JT’s and my Christmas took on a similar landscape with the exception that on Christmas Eve we always go to my brother’s for dinner because they have kids. Lately, they been having a ham for dinner so we’re not eating turkey two days in a row (honestly, I don’t mind two turkey dinners). I usually bake a Yule log and a plate of Christmas cookies to share. This year I’ve baked a white chocolate and strawberry tart that I’m recipe testing. My brother’s family celebrate a more traditional North American Christmas (with her family) with the major festivities on the morning of the 25th and dinner with her family in the afternoon, which works out perfectly since JTs family does the same so we’ve never had a conflict. Today we’ll have JTs family over for our turkey dinner, complete with stuffing, roast potatoes, gravy and green beans with garlic and almonds. Dessert will be pie that my SIL brings as well as a cheesecake thing that I’m recipe testing. So tell me, how does your family celebrate Christmas and is it the 24th or the 25th?
It’s been a whirlwind year and I must admit that December snuck up on me and I feel like I’m behind. But the next few days will be all about family, relaxing and just enjoying the festivities. JT and I wish you all the best, a very merry Christmas and a safe and Happy New Year!
Do not be fooled that these are Vegan, they are surprisingly, incredibly truffle-like.
This is the last of the vegan recipe series that I’m doing for the time being. It was a great experience to cook this way and I’m very happy to have been able to document it. Cooking vegan is not nearly as difficult as I originally thought and like most everything, it’s not always healthy. If I were to be serious about this type of cooking, I would definitely research different types of fats to use because I really did not like the vegan margarine one bit. The blog resource I found is excellent and I would definitely recommend it to anyone cooking vegan.
I have definitely left the best for last, these vegan truffles are the pièce de résistance!
Incredibly creamy truffles, just as they should be.
Vegan Truffles
Makes about 3-5 dozen, depending on size
Ingredients:
12 oz bittersweet or semi-sweet chocolate chips (I used Belgian chocolate)
1/2 cup coconut milk (full fat)
1 tbsp margarine or coconut oil
1 tsp orange extract
1 tsp orange zest
1 tsp espresso powder + 1/4 tsp cinnamon
Espresso powder and icing sugar for rolling in
Directions:
Combine chocolate, coconut milk and margarine in a saucepan and heat until chocolate has melted and mixture is thick. Divide into two portions, about the same volume. Add your choice of flavourings to each portion.
Pour into a bowl , cover with plastic wrap and set in refrigerator overnight (I actually had mine sit a couple of days and it was fine).
Using a melon baller, sprayed with oil or vegan butter, shape into spheres. Roll into your favourite topping. Store in the refrigerator.
I was completely floored by how authentic these truffles tasted.The coconut flavour was quite subtle, if any and what it brought to the table was total creaminess. I would make these again, even for non-vegans. I think this recipe is totally a keeper and I hope you like it too. These truffles act much the same way as real, cream version truffles so you need not worry about them melting into a puddle.
If I hadn’t said these were Vagen, you wouldn’t have known.
These chewy lemon squares are a family favourite that I’ve been making for years. To be honest, I’ll probably make the vegan version from now own, these were THAT good. As per the non-vegan version, these are very lemony, so you must LOVE lemon.
Original recipe adapted from Company’s Coming, Squares by Jean Pare.
Makes 1 pan 9″ x 9″
Ingredients for Shortbread Crust:
1 1/2 cup all purpose flour
1/4 cup granulated sugar
1/4 cup vegan margarine
1/4 cup coconut oil
Directions for Shortbread Crust:
Preheat oven to 350° F (177°C). Line a 9″ x 9″ square pan with parchment (it makes it easier to lift out to cut).
Crumble the margarine and coconut oil into the flour, sugar until mealy (you can save time and pulse this in a food processor, metal; blades).
Press into a prepared 9×9 inch pan. Bake for 20 minutes.
Ingredients for Chewy Lemon Topping:
2 vegan eggs (I used this recipe: 2 tbsp ground flax seeds + 6 tbsp warm water (whisk together and allow to sit for 5 minutes))
1/4 cup + 2 tbsp lemon juice
1 cup granulated sugar
2 tbsp all purpose flour
1/2 tsp baking powder
1 cup unsweetened coconut
1/4 tsp salt
1 tsp lemon oil
6 drops yellow food colouring (optional)
Directions for Chewy Lemon Topping:
Stir together all of the ingredients. (I successfully left this on the counter while the shortbread pastry was baking and it seemed to thicken even more!)
Spread over shortbread base evenly. Bake at 350° F (177° C) for additional 30 minutes, until set in the centre and golden in colour.
Lift out of the pan using the handy parchment. Cool and cut into squares, or bars. Serve at room temperature.
Notes:
I was concerned that the flax would impart a flavour but the coconut and lemon flavourings were enough to mask it. To be honest, you can’t tell that these are Vegan.
You can use other Vegan egg alternatives, I just can’t predict how this recipe will behave with them. The blog I linked it to explains real egg behaviour in baking very well so you can make informed decisions on alternatives.
In converting a recipe to Vegan, I generally try to keep in mind all the flavours AND the textures in the non-vegan version. When I decided to make Vegan Spanakopita I became very excited until I remembered that there was crumbled feta in my recipe. Crumbled feta is not Vegan, so I began to think…what oh what can I use to replace the flavour and the unique texture this delicious cheese brings to the table. Yes, I could have omitted it altogether, but then it wouldn’t be as delicious! Some time ago, I’d made a note to marinate tofu in ‘feta’ flavours like lemon juice, apple cider vinegar, salt, oregano and olive oil…so I did a little experimentation and came up with this version. It’s actually pretty tasty on its own, but I needed it for this recipe so there won’t be marinated tofu on the buffet table, but this spanakopita more than makes up for it. I don’t think the non-vegans will mind this version. But there will be pulled pork and bacon wrapped dates just in case ;-)!
Vegan Spanakopita
A kitcheninspirations original recipe.
Makes about 50, 6 cm (about 3 inch) triangles
Ingredients:
1 tbsp canola oil
1 large sweet onion, sliced thinly
5 cloves garlic ~20 g, finely minced
500 g zucchini grated (about 2 medium-sized)
300 g spinach
3-4 tbsp finely chopped fresh dill
2 tbsp chopped fresh oregano
350 g marinated tofu, drained, roughly chopped (recipe below)
About 8-10 sheets phyllo
1/4 cup canola oil
Directions:
Heat canola oil in a large dutch oven. Add the sliced onion and sweat it out a bit, add the garlic and cook for about a minute. Add the grated zucchini (click here for some clear steps on making this dish) and cook for 3-4 minutes. Add the spinach and cook until it has totally wilted.
Remove from the heat and add the fresh dill, oregano and roughly chopped marinated tofu. Set into a fine sieve and allow to cool and drain.
Once completely cool, prepare the phyllo sheets by cutting them into 3 cm or 2.5 inch strips and lightly spraying each one with canola oil. Use two strips per triangle. Place one heaping teaspoon of the cooled filling onto one end and start folding into a triangle. Brush or spray lightly all over with the canola oil.
A heaping teaspoon of filling goes at the end.
Begin folding into a triangle and continue until the length is used up.
The nature of the folds covers in the filling very well.
A tidy little triangle.
Bake at 350°F for 12-14 minutes if saving for the freezer or 116-18 minutes to serve immediately.
To reheat, place a single layer of the triangles onto a baking sheet and reheat in 300°F for 10 minutes or until golden.
The oil makes the phyllo very crispy.
Marinated Tofu
Makes enough for one batch of Spanakopita (prepare 1-2 days ahead to allow tofu to absorb the marinade flavours)
Ingredients:
350 g extra firm tofu
1/4 cup apple cider vinegar
1/4 cup lemon juice
1/4 cup water
1/4 cup EVOO
1 tbsp fresh oregano
1 tbsp plus 1 tsp sea salt
1/2 tsp freshly ground mixed peppercorns
Directions:
Place the drained tofu on a cutting board over a sink so it’s tilting a bit into the sink. Place another cutting board on top and a heavy cast iron pan. Leave for 30 minutes to drain.
Meanwhile, combine the apple cider vinegar, lemon juice, water, EVOO, oregano, sea salt and peppercorns and mix well.
Once drained, dry off the tofu and cut into 1 cm cubes. Place into a glass container and cover with the marinating liquid. Marinate in the refrigerator, shaking the jar intermittently over 1 to 2 days. Drain to use.

 On some mornings the lake is so very still.
 Would you care for a slice?
 Our Paellas are always full of flavour.
 Red sky at night, sailors’ delight!
 Cocktails inside the screen-in porch, so peaceful.